继续对 Spring 的源码进行分析,上一篇文章介绍了 Spring Framework 启动阶段对快照恢复机制的支持,本篇介绍启动阶段侦听器(Listener)的实现。选择这个主题出于两方面考虑,一是启动阶段侦听器的接口设计比较好的揭示了 Spring Boot 启动过程中的状态规划,梳理并明确启动阶段的状态规划有助于理解整个启动过程并更好的阅读代码,二是侦听器作为一个相对独立的模块,能够帮助我们通过具体实现来学习 Spring Framework 这类通用架构类系统的设计思路。
此文真正进入到对 Spring Framework 一个相对独立模块的源码分析,一开始的想法是按照代码阅读的顺序,逐层剖析 Spring Framework 的启动阶段侦听器设计和实现,然而在实际编写过程中发现,由于 Spring Framework 侦听器的接口设计比较复杂,涉及多个层次的抽象,如果按照代码阅读顺序逐层剖析,会导致文章篇幅过长且难以理解,以至于写到一半的时候感觉这样实在不行,于是索性推倒重写。至于如何通过对源码的分析将设计思路清晰的表达出来,度在哪里,于我仍是一个需要摸索的事情,初步的想法还是准备站在“解构”的视角,尽量用清晰的简洁的表达,让读者能够看懂。
侦听器本质是架构层向应用层暴露的勾子(Hook),在程序的不同生命周期阶段通过事件或消息驱动的方式通知应用层可插入自定义逻辑(记录日志、对数据结构进行编解码或其他行为),从而实现在保持主线程序逻辑清晰,运行稳定前提下的功能增强。那这个勾子应该设置在什么地方最合适呢?我们知道计算机系统本质是一个状态机(State Machine),它的最小不可拆分单位就是状态,因此答案很明显:在进入状态或离开状态的时点,也就是状态发生迁移的时点。当然,状态本身是一个高层模型抽象的概念,比如对于 Spring Framework 启动过程来说,不同生命周期的阶段就可以被识别为一个独立状态,而对于一个缓存或数据结构来说,每一次实例数据的变化都可被视为一个状态迁移,正因如此,侦听器的设计并不完全是一个技术概念,而是与架构设计的视角高度相关的。一个清晰的侦听器设计本身就体现了架构是否被清晰规划,换句话说,我们有一个快速判断架构质量的方法,看它的侦听器接口规划是否条理清晰、层次分明,如果发现准备在项目中使用的架构,其侦听器设计和实现逻辑混乱,那就需要格外小心,因为这意味着很有可能该“架构”不是由资深架构师在严谨状态分析基础上规划的产物,而是小朋友们的“家庭作业”。
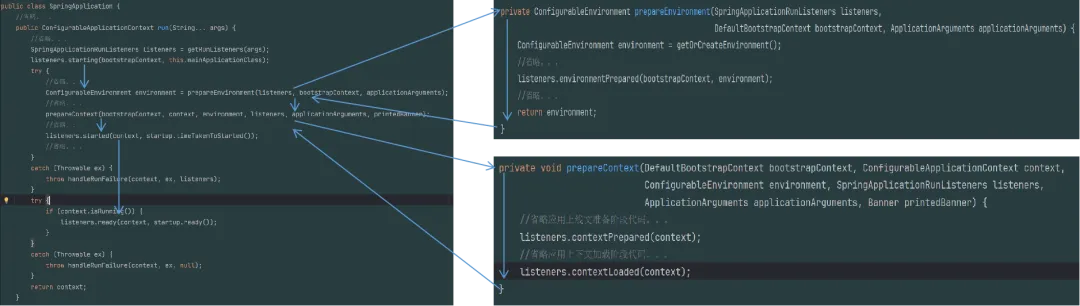
回到 `SpringApplication.run(String… args)` 方法,在该方法中,我们能够看到 `SpringApplicationRunListeners listeners = getRunListeners(args);` 这条语句,从语义上我们可知该语句完成了对 `SpringApplicationRunListeners` 的创建,该类名称是复数形式,实际是实现了 `SpringApplicationRunListener` 接口的所有侦听器实例的集合,我们看一下 `SpringApplicationRunListener` 这个接口的定义。
public interface SpringApplicationRunListener { /** * Called immediately when the run method has first started. Can be used for very * early initialization. * @param bootstrapContext the bootstrap context */ default void starting(ConfigurableBootstrapContext bootstrapContext) { } /** * Called once the environment has been prepared, but before the * {@link ApplicationContext} has been created. * @param bootstrapContext the bootstrap context * @param environment the environment */ default void environmentPrepared(ConfigurableBootstrapContext bootstrapContext,ConfigurableEnvironment environment) { } /** * Called once the {@link ApplicationContext} has been created and prepared, but * before sources have been loaded. * @param context the application context */ default void contextPrepared(ConfigurableApplicationContext context) { } /** * Called once the application context has been loaded but before it has been * refreshed. * @param context the application context */ default void contextLoaded(ConfigurableApplicationContext context) { } /** * The context has been refreshed and the application has started but * {@link CommandLineRunner CommandLineRunners} and {@link ApplicationRunner * ApplicationRunners} have not been called. * @param context the application context. * @param timeTaken the time taken to start the application or {@code null} if unknown * @since 2.6.0 */ default void started(ConfigurableApplicationContext context, Duration timeTaken) { } /** * Called immediately before the run method finishes, when the application context has * been refreshed and all {@link CommandLineRunner CommandLineRunners} and * {@link ApplicationRunner ApplicationRunners} have been called. * @param context the application context. * @param timeTaken the time taken for the application to be ready or {@code null} if * unknown * @since 2.6.0 */ default void ready(ConfigurableApplicationContext context, Duration timeTaken) { } /** * Called when a failure occurs when running the application. * @param context the application context or {@code null} if a failure occurred before * the context was created * @param exception the failure * @since 2.0.0 */ default void failed(ConfigurableApplicationContext context, Throwable exception) { }}
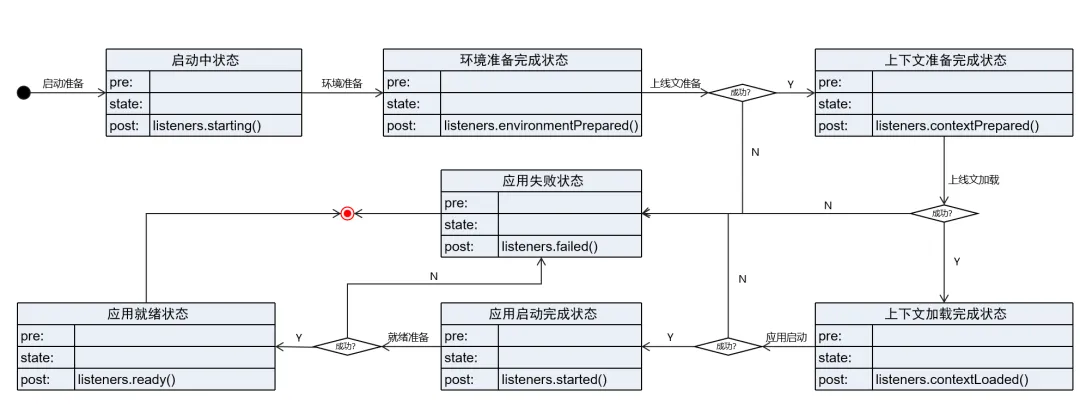
非常清晰,近乎直白的告诉了我们 Spring Framework 启动阶段的状态规划。笔者将上述侦听器接口在代码中的调用顺序抽取出来,并给出 Spring Framework 启动阶段状态机的第一个版本,如下图所示:
之所以说图 2 是启动阶段状态机的第一个版本,是因为目前仅仅根据侦听器接口识别出了启动阶段的状态划分,而真正标识状态的并不是侦听器,是各阶段代码中关键数据结构的信息,这部分工作还没有做,从图中也能看出所有的 state 都是空的。但进行状态的识别仍然有重要意义,首先,它能够帮助我们建立对启动过程的节奏感,代码再也不是铁板一块,有了分而治之的可能性,其次,良好的侦听器接口设计为我们提供了一个成熟(sophisticated)框架类应用最佳范式,优秀的代码应该结构清晰,有迹可循。
如果现在让你自己设计并实现一个侦听器模块的话,你觉得它应该具备哪些特性呢?我觉得有以下几点:
1. 事件驱动的机制设计:侦听器应由事件驱动,使得应用层能够通过事件的触发和响应实现业务逻辑的解耦,从而提高系统的灵活性和可维护性;
2. 简易的接口实现:应用层应该能快速和方便的实现一个侦听器,架构层应向应用层屏蔽其他具体的实现细节;
3. 灵活的匹配能力:事件和具体侦听器之间应该具备灵活匹配的能力,也就是说 1 个事件可知触发多个侦听器,而 1 个侦听器也应该支持多个事件,而匹配逻辑应该由应用层决定;
4. 自动化装配能力:侦听器模块应具备自动化的装配能力,应用层无需手动完成侦听器的加载和初始化工作;
5. 友好的调用接口:在应用程序中出发一个侦听器事件的接口应该友好易用,能够快速触发侦听器的执行。
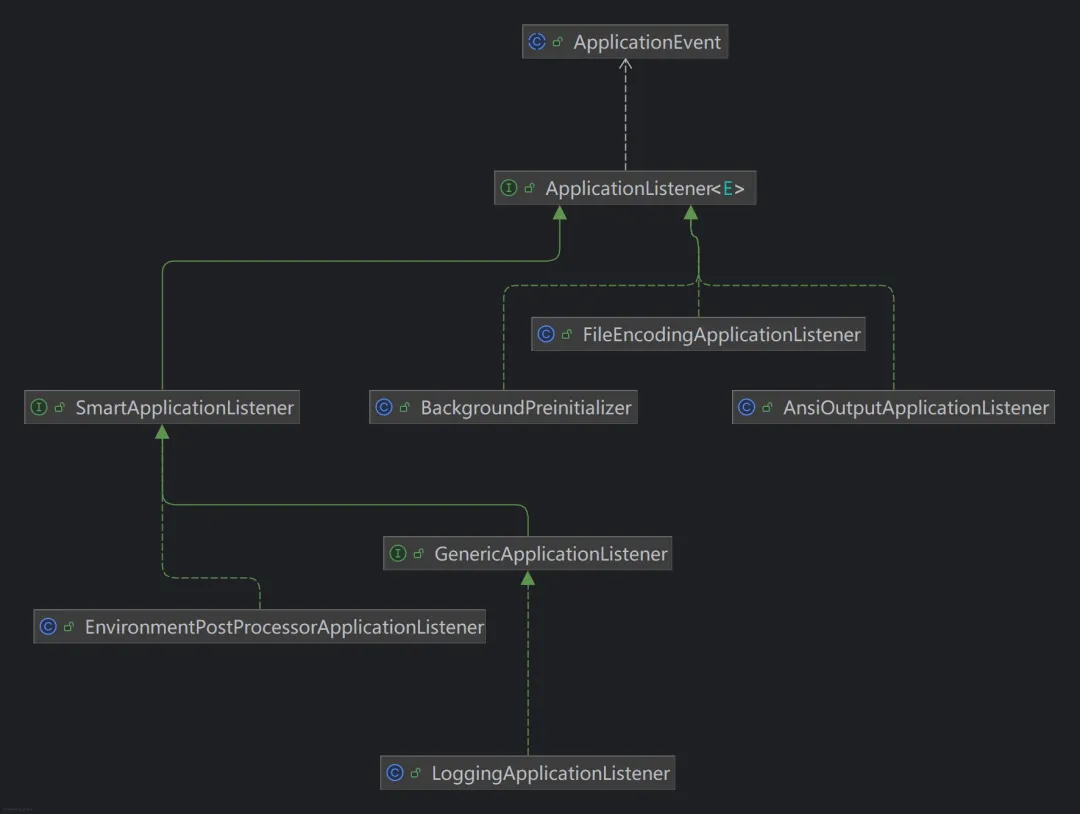
上一章节我们介绍了 `SpringApplicationRunListener` 这个接口的 7 个方法,分别是 `starting`、`environmentPrepared`、`contextPrepared`、`contextLoaded`、`started`、`ready`、`failed`,而每个方法调用背后都代表一个事件被触发,事件类图如下所示:
实际触发事件的是 `EventPublishingRunListener` 这个实现类,它在 Spring Boot 启动的不同阶段通过调用 `multicastInitialEvent` 方法(在`ConfigurableApplicationContext`被初始化之前)或 `publishEvent` 方法(在 `ConfigurableApplicationContext`被初始化之后)来发布事件。例如,在 `starting` 方法中,会创建并发布 `ApplicationStartingEvent` 事件,代码如下:
class EventPublishingRunListener implements SpringApplicationRunListener, Ordered { @Override public void starting(ConfigurableBootstrapContext bootstrapContext) { multicastInitialEvent(new ApplicationStartingEvent(bootstrapContext, this.application, this.args)); } @Override public void environmentPrepared(ConfigurableBootstrapContext bootstrapContext,ConfigurableEnvironment environment) { multicastInitialEvent(new ApplicationEnvironmentPreparedEvent(bootstrapContext, this.application, this.args, environment)); } @Override public void contextPrepared(ConfigurableApplicationContext context) { multicastInitialEvent(new ApplicationContextInitializedEvent(this.application, this.args, context)); } @Override public void contextLoaded(ConfigurableApplicationContext context) { //省略。。。 multicastInitialEvent(new ApplicationPreparedEvent(this.application, this.args, context)); } @Override public void started(ConfigurableApplicationContext context, Duration timeTaken) { context.publishEvent(new ApplicationStartedEvent(this.application, this.args, context, timeTaken)); AvailabilityChangeEvent.publish(context, LivenessState.CORRECT); } @Override public void ready(ConfigurableApplicationContext context, Duration timeTaken) { context.publishEvent(new ApplicationReadyEvent(this.application, this.args, context, timeTaken)); AvailabilityChangeEvent.publish(context, ReadinessState.ACCEPTING_TRAFFIC); } @Override public void failed(ConfigurableApplicationContext context, Throwable exception) { ApplicationFailedEvent event = new ApplicationFailedEvent(this.application, this.args, context, exception); if (context != null && context.isActive()) { // Listeners have been registered to the application context so we should // use it at this point if we can context.publishEvent(event); } else { // An inactive context may not have a multicaster so we use our multicaster to // call all the context's listeners instead if (context instanceof AbstractApplicationContext abstractApplicationContext) { for (ApplicationListener<?> listener : abstractApplicationContext.getApplicationListeners()) { this.initialMulticaster.addApplicationListener(listener); } } this.initialMulticaster.setErrorHandler(new LoggingErrorHandler()); this.initialMulticaster.multicastEvent(event); } }}
这里需要注意的是,Spring 事件模型规则是:监听器对某个父类事件的监听,会向下涵盖(cover)其所有的子类事件。也就是说,Spring 不仅会通知监听该具体事件类型的监听器,还会通知监听该事件所有父类(包括接口)类型的监听器,在图 3 中,如果我们创建的侦听器选择直接侦听 `SpringApplicationEvent` 事件,则这个侦听器不仅会收到来自 `SpringApplicationEvent` 事件的通知,还会收到继承自这个事件类的 7 个子类的事件通知。
这种设计使事件模型更加灵活,可以方便地对多个相关的事件进行统一处理。同时,这种设计也符合 Spring 框架中常见的“面向接口编程”的原则,使得事件的扩展和维护更加容易。要注意的是如果所有侦听器都监听父类事件,可能导致侦听器被频繁调用,这对系统性能可能会产生影响。
在 Spring Framework 中实现一个侦听器非常简单,只需实现 `ApplicationListener`、`SmartApplicationListener` 或 `GenericApplication` 这 3 个接口中的任何一个即可。
`ApplicationListener` 是 Spring Framework 事件监听机制中最基础的接口,采用泛型设计(如 `public interface ApplicationListener<E extends ApplicationEvent> extends EventListener`),其职责单一,通过 `onApplicationEvent` 方法处理指定类型的事件,结构也比较简单,适用于明确监听某一具体事件类型的场景,是事件监听最直接的实现方式。
public interface ApplicationListener<E extends ApplicationEvent> extends EventListener { /** * Handle an application event. * @param event the event to respond to */ voidonApplicationEvent(E event); //省略。。。}
`SmartApplicationListener` 接口继承自 `ApplicationListener` 接口,在基础监听功能上增加了“智能”决策能力。除了处理事件,它还提供了 `supportsEventType` 和 `supportsSourceType` 两个方法。这使得监听器能在运行时根据事件的类型和事件的来源(source) 动态判断是否应该处理当前事件,常用于需要复杂条件过滤的精细化监听场景。
SmartApplicationListener 接口定义
public interface SmartApplicationListener extends ApplicationListener<ApplicationEvent>, Ordered { /** * Determine whether this listener actually supports the given event type. * @param eventType the event type (never {@code null}) */ boolean supportsEventType(Class<? extends ApplicationEvent> eventType); /** * Determine whether this listener actually supports the given source type. * <p>The default implementation always returns {@code true}. * @param sourceType the source type, or {@code null} if no source */ default boolean supportsSourceType(@NullableClass<?> sourceType) { return true; } //省略。。。}
`GenericApplicationListener` 是更为底层的内部适配接口,核心优势在于对泛型事件的强大支持。它使用 `ResolvableType` 而非原始 `Class` 来定义支持的事件类型,因此能精确匹配如 `EntityCreatedEvent<User>` 这样的泛型事件。Spring 内部常用它来适配 @EventListener 注解方法,以实现高效、类型安全的事件派发。
GenericApplicationListener 接口定义
public interface GenericApplicationListener extends SmartApplicationListener { /** * Overrides {@link SmartApplicationListener#supportsEventType(Class)} with * delegation to {@link #supportsEventType(ResolvableType)}. */ @Override default boolean supportsEventType(Class<? extendsApplicationEvent> eventType) { return supportsEventType(ResolvableType.forClass(eventType)); } /** * Determine whether this listener actually supports the given event type. * @param eventType the event type (never {@code null}) */ boolean supportsEventType(ResolvableType eventType); //省略。。。}
Spring Framework 实现了事件与侦听器的解耦,事件和具体侦听器之间应该具备灵活匹配的能力,也就是说 1 个事件可知触发多个侦听器,而 1 个侦听器也应该支持多个事件,匹配逻辑完全交由应用层决定。我们通过启动阶段 Spring Framework 实际加载的侦听器实例来说明。笔者的测试工程是一个最轻量化的 Spring Boot 工程,下图是启动阶段加载的 Spring Boot 和 Spring Boot AutoConfigure 两个包中的侦听器实现。
类图中共有 5 个具体侦听器实现,分别是 `BackgroundPreinitializer`、`FileEncodingApplicationListener`、`AnsiOutputApplicationListener`、`EnvironmentPostProcessorApplicationListener` 以及 `LoggingApplicationListener`, 这些侦听器实现的具体功能不在这里讨论,我们要关心的是他们所实现的接口。
`BackgroundPreinitializer`、`FileEncodingApplicationListener` 和 `AnsiOutputApplicationListener` 均实现实现 `ApplicationListener` 接口。类声明语句如下:
public classBackgroundPreinitializerimplementsApplicationListener<SpringApplicationEvent>, Ordered{ //省略。。。}public classFileEncodingApplicationListenerimplementsApplicationListener<ApplicationEnvironmentPreparedEvent>, Ordered{ //省略。。。}public classAnsiOutputApplicationListenerimplementsApplicationListener<ApplicationEnvironmentPreparedEvent>, Ordered{ //省略。。。}
从接口中可以看到我们在图 3 中已经提到的事件类,语义非常清晰,`FileEncodingApplicationListener` 和 `AnsiOutputApplicationListener` 侦听 `ApplicationEnvironmentPreparedEvent` 事件,而 `BackgroundPreinitializer` 侦听 `SpringApplicationEvent` 事件。同时应该注意到,由于`SpringApplicationEvent`是其他事件的父类,意味着所有子类事件都会被 `BackgroundPreinitializer` 这个侦听器捕获。对于明确侦听单一事件类的侦听器来说,直接实现 `ApplicationListener` 接口并指定具体的事件类型即可。
`EnvironmentPostProcessorApplicationListener` 实现的是 `SmartApplicationListener` 接口,而 `LoggingApplicationListener` 则实现了 `GenericApplicationListener` 接口。通过实现这些不同的接口,侦听器可以提供不同程度的灵活性和智能决策能力。来看一下这两个侦听器的实现。
public class EnvironmentPostProcessorApplicationListener implements SmartApplicationListener, Ordered { //省略。。。 @Override public boolean supportsEventType(Class<? extendsApplicationEvent> eventType) { return ApplicationEnvironmentPreparedEvent.class.isAssignableFrom(eventType) || ApplicationPreparedEvent.class.isAssignableFrom(eventType) || ApplicationFailedEvent.class.isAssignableFrom(eventType); } @Override public void onApplicationEvent(ApplicationEvent event) { if (event instanceof ApplicationEnvironmentPreparedEvent environmentPreparedEvent) { onApplicationEnvironmentPreparedEvent(environmentPreparedEvent); } if (event instanceof ApplicationPreparedEvent) { onApplicationPreparedEvent(); } if (event instanceof ApplicationFailedEvent) { onApplicationFailedEvent(); } } //省略。。。}public class LoggingApplicationListener implements GenericApplicationListener { //省略。。。 private static final Class<?>[] EVENT_TYPES = { ApplicationStartingEvent.class, ApplicationEnvironmentPreparedEvent.class, ApplicationPreparedEvent.class, ContextClosedEvent.class, ApplicationFailedEvent.class }; private static final Class<?>[] SOURCE_TYPES = { SpringApplication.class, ApplicationContext.class }; @Override public boolean supportsEventType(ResolvableType resolvableType) { return isAssignableFrom(resolvableType.getRawClass(), EVENT_TYPES); } @Override public boolean supportsSourceType(Class<?> sourceType) { return isAssignableFrom(sourceType, SOURCE_TYPES); } @Override public void onApplicationEvent(ApplicationEvent event) { if (event instanceof ApplicationStartingEvent startingEvent) { onApplicationStartingEvent(startingEvent); } else if (event instanceof ApplicationEnvironmentPreparedEvent environmentPreparedEvent) { onApplicationEnvironmentPreparedEvent(environmentPreparedEvent); } else if (event instanceof ApplicationPreparedEvent preparedEvent) { onApplicationPreparedEvent(preparedEvent); } else if (event instanceof ContextClosedEvent contextClosedEvent) { onContextClosedEvent(contextClosedEvent); } else if (event instanceof ApplicationFailedEvent) { onApplicationFailedEvent(); } } //省略。。。}
在上面的代码中,`EnvironmentPostProcessorApplicationListener` 实现了 `SmartApplicationListener` 接口,通过 `supportsEventType` 方法判断传入的 `EventType`是否是 `ApplicationEnvironmentPreparedEvent`、`ApplicationPreparedEvent` 或 `ApplicationFailedEvent`,如果是则返回 `true`,否则返回 `false`,也就是说该侦听器支持对上述 3 个事件的侦听和处理。同理, `LoggingApplicationListener` 实现了 `GenericApplicationListener` 接口,通过 `supportsEventType` 和 `supportsSourceType` 方法进一步精确匹配事件类型和来源。仅对 `EventTypes` 数组中的事件进行侦听,同时要求来源类型(触发事件的类)为 `SpringApplication.class` 或 `ApplicationContext.class` 这两个类。在完成对事件的过滤后,就可通过 `onApplicationEvent` 方法进一步根据不同的事件进行针对性的处理了。
Spring Framework 支持对侦听器的自动化装配,自动化装配的含义是指框架支持通过以外部数据流、配置文件等形式自动完成侦听器类的加载、初始化以及注册到 Spring 上下文(Context)中的全过程。这部分内容是侦听器模块乃至 Spring Framework 框架的核心之一,因此对背景知识会有较多交代,读者可以在文章内容基础上自行查阅资料深入学习。
不同于 C 和 C++ 语言是直接将源码编译为本地机器码(Native Code)的执行方式,Java 语言在诞生之初就提出了一个非常响亮的口号:“一次编写,到处运行”(Write Once, Run Anywhere)。如果这个世界只存在一种操作系统和硬件体系结构,如 Wintel(Windows + Intel),那当然不是问题,但现实情况是多种不同的操作系统和硬件体系结构会长期存在并在竞争中共同形成一个更加健康的生态(对于健康生态一个形象的比喻是,应该是一张巨大的蛛网,且上面不应只有一只蜘蛛)。为此,“与平台无关”的理想只能在操作系统之上的应用层下功夫。虚拟机正是这种思想的产物,对于 Java 虚拟机来说,程序源码不再直接编译为本地机器码,而是编译为一种称为字节码(Bytecode)的中间语言(保存为.class文件),然后由虚拟机负责将字节码解释执行或编译成机器码执行。这种机制使得 Java 程序可以在不同的操作系统和硬件平台上运行,而无需重新编译源码。
一是虚拟机不仅实现了对下的“与平台无关”,同时也实现了对上的“与语言无关”。“与平台无关”前面已经说明了,“与语言无关”的含义是,由于虚拟机只认识字节码文件,且字节码是图灵完备(指一个模型可以实现任何算法,无论多么复杂)的,因此用 什么语言编译成字节码文件对于虚拟机来说没有任何差别。目前,包括 Kotlin、Groovy、JRuby 等一批语言都支持在 Java 虚拟机上运行。
二是虚拟机为 Java 语言提供了极高的扩展性和灵活性。不同言于 C 和 C++ 语,Java 语言在编译时并不进行连接,而是在运行时由虚拟机将类数据信息从 Class 文件加载到内存,并进行加载、连接和初始化,这个过程被称为虚拟机的类加载机制。这种机制会让类加载时增加额外的性能开销(虚拟机启动阶段将这个过程称为预热(Warm Up),Azul 公司的 CTO 在一次技术会议上曾经提到大型系统的预热过程可能需要 1-2 分钟),但 Java 天生可以动态扩展的语言特性就是依赖运行期动态加载和动态连接这个特点来实现的。Rod Johnson 在设计 Spring Framework 时所倡导的面向接口编程与松耦合,强调基于接口的编程,而不是基于具体实现的编程。鼓励开发者定义接口,然后提供多个实现。依赖注入容器负责在运行时将合适的实现注入到需要的地方,就是对 Java 虚拟机这种高扩展性的具体运用。
既然类加载机制是 Java 语言区别于传统静态语言,支持极高扩展性和灵活性的核心机制,我们有必要对 Java 的类装载机制的核心结构,类加载器(Class Loader)进行介绍。Java 虚拟机设计团队有意把类加载阶段中的“通过一个类的全限定名来获取描述该类的二进制字节流”这个动作放到 Java 虚拟机外部去实现,以便让应用程序自己决定如何去获取所需的类。实现这个动作的代码被称为“类加载器”。
类加载器加载的对象自然是 Class 文件,Java 中每个类都被编译为一个独立的 Class 文件,但整个程序不可能以单个 hive)、EAR(Enterprise ARchive)、WAR(Web Application Archive) 等以 ZIP 压缩格式为基础的库文件包。WAR 包是早期 WEB 类应用程序常用的发布包格式,EAR 包是 J2EE 应用程序发布包格式,这两个格式目前都Class 文件的形式去分发,一定需要某种形式将 Class 文件组织起来已方便管理和引用,这就形成了 JAR(Java\Jakarta Arc越来越不常用了。JAR 包作为 Java 语言体系中最早的包组织格式,尤其 Spring Boot 大行其道之后,几乎成为唯一真正大规模使用的 Java 包组织形式。在每个 JAR 包中,通常会包含一个或多个 Class 文件,以及一个 META-INF 文件夹,该文件夹用来存放与 JAR 文件相关的必要元数据信息,使得 JAR 包成为一个闭包的模块。JAR 包就是类加载器加载的主体。
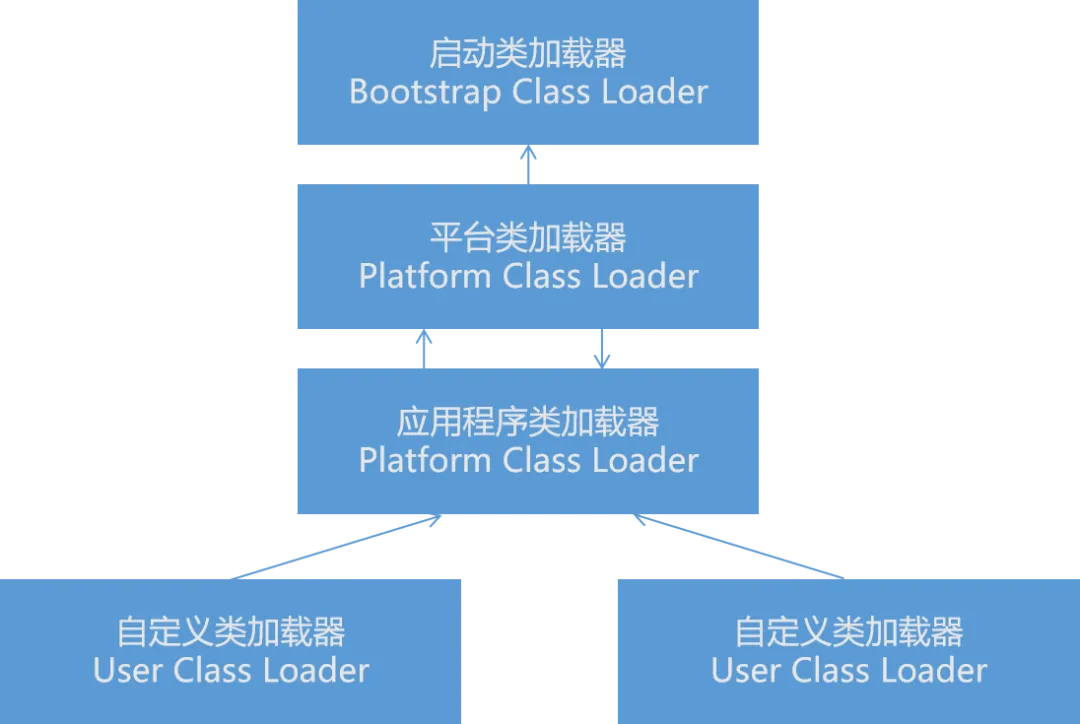
类加载器从 JDK 9 开始做了一些调整,但整体保持了 3 层结构。其中,Bootstrap Class Loader 和 Platform Class Loader 主要用于加载 JDK 固有模块,而 Application Class Loader 主要用于加载应用程序本身和依赖的第三方类库,也就说包括 Spring Framework 所含类库以及侦听器实现等类信息均由 Application Class Loader 加载。
重新回到代码,我们来看看 2.3 节图 4 中的 5 个侦听器是如何被装载的。
public class SpringApplication { //省略。。。 private List<ApplicationListener<?>> listeners; //省略。。。 /** * Create a new {@link SpringApplication} instance. The application context will load * beans from the specified primary sources (see {@link SpringApplication class-level} * documentation for details). The instance can be customized before calling * {@link #run(String...)}. * @param resourceLoader the resource loader to use * @param primarySources the primary bean sources * @see #run(Class, String[]) * @see #setSources(Set) */ @SuppressWarnings({ "unchecked", "rawtypes" }) public SpringApplication(ResourceLoader resourceLoader, Class<?>... primarySources) { //省略。。。 setListeners((Collection) getSpringFactoriesInstances(ApplicationListener.class)); //省略。。。 } /** * Sets the {@link ApplicationListener}s that will be applied to the SpringApplication * and registered with the {@link ApplicationContext}. * @param listeners the listeners to set */ public void setListeners(Collection<? extendsApplicationListener<?>> listeners) { this.listeners = new ArrayList<>(listeners); } private <T> List<T> getSpringFactoriesInstances(Class<T> type) { return getSpringFactoriesInstances(type, null); } private <T> List<T> getSpringFactoriesInstances(Class<T> type, ArgumentResolver argumentResolver) { return SpringFactoriesLoader.forDefaultResourceLocation(getClassLoader(null)).load(type, argumentResolver); } //省略。。。}
上述代码中 `SpringApplication` 类中有一个 `private List<ApplicationListener<?>> listeners` 实例变量,该变量是一个 `List` 类型,用于存储所有启动阶段需要加载的侦听器,所谓侦听器的装载过程,指的就是将 2.3 节图 4 标出的 5 个侦听器装载完成并存入 `SpringApplication.listeners` 变量的过程。
在 `SpringApplication` 的构造函数中,通过调用 `setListeners` 方法来设置这个 `listeners` 列表。而 `setListeners` 方法则会通过调用 `getSpringFactoriesInstances` 方法从 `SpringFactoriesLoader` 中加载所有实现 `ApplicationListener` 接口的类实例,并将其添加到 `listeners` 列表中。
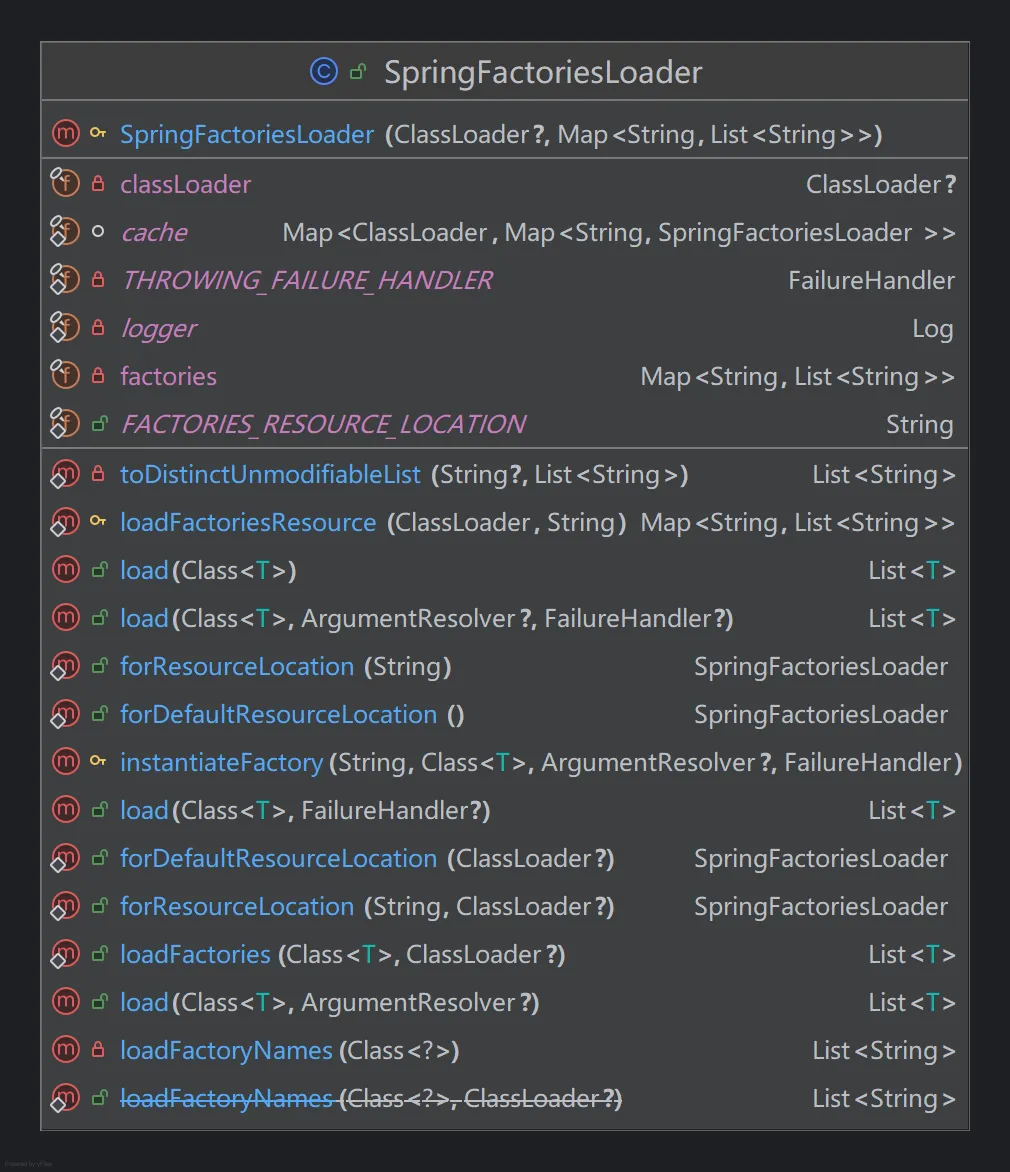
`SpringFactoriesLoader` 是启动阶段根据配置加载包括侦听器在内的一系列组件的核心数据结构,类图如下。
简述一下`SpringFactoriesLoader.forDefaultResourceLocation(getClassLoader(null)).load(type, argumentResolver)`这条语句的执行过程。
1. 获取 `ClassLoader`。我们在前面介绍过,Java 中所有的程序都已 JAR 包形式进行组织和分发,JAR 包中不仅包括编译后的 Class 文件,还包括 META-INF 目录下的元数据信息,因此,加载读取配置文件和加载程序的第一步骤就是获取类加载器。通过跟踪程序代码我们可以看到,最终使用的 Application Class Loader,并且从 `parent` 变量能清晰的看到 Application Class Loader -> Platform Class Loader -> Bootstrap Class Loader 三层类加载器结构,如下图所示。
2. 找到侦听器配置信息。我们前面说过装载过程是通过读取侦听器配置完成对侦听器的装载和初始化,那么就有两个问题需要解决,第一个是配置信息是以什么形式存放的,第二个事配置信息放在哪里。
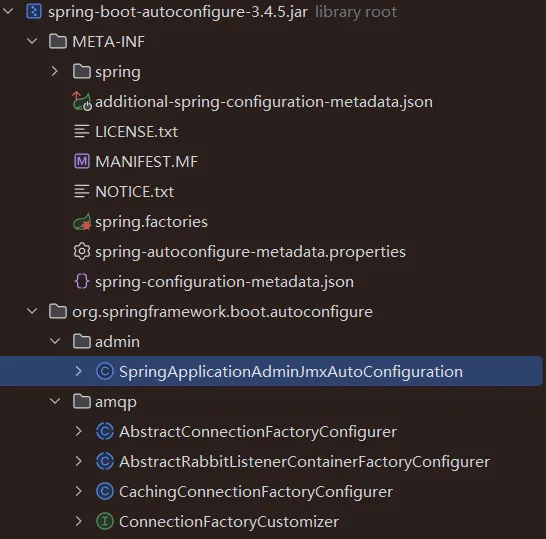
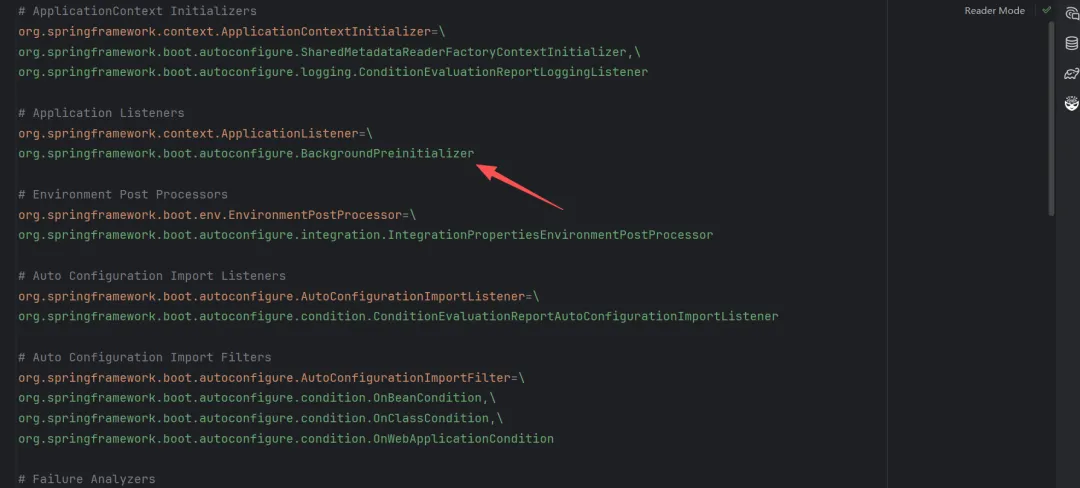
关于第一个问题,我们可以从图 5 中找到答案,在图 5 中的 spring-boot-autoconfigure-3.4.5.jar 包中,我们可以看到 META-INF/spring.factories 文件,该文件中包含了所有需要被 Spring Framework 加载的组件的全限定名,这里面就包括侦听器组件,如图所示。
图9 ApplicationListener 侦听器实现类配置
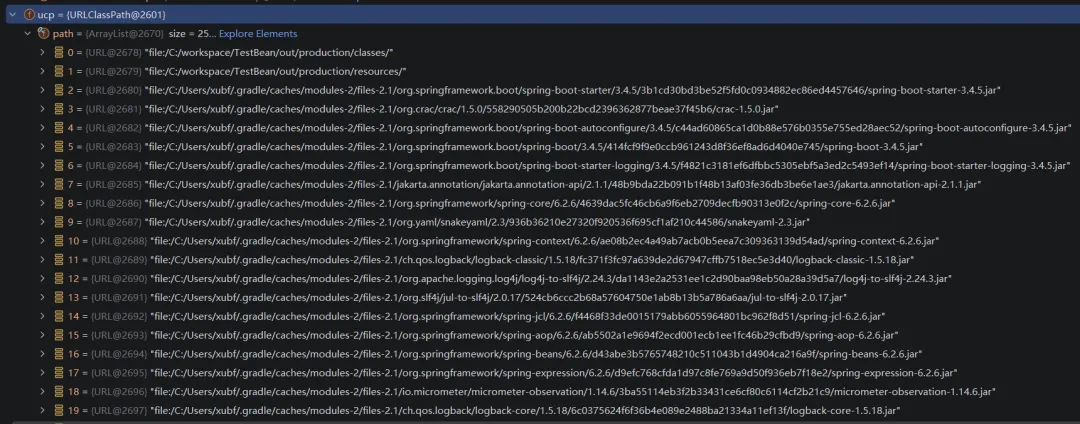
关于第二个问题,每一个程序运行所需的 JAR 包中都可能包含 `META-INF/spring.factories` 文件,也就是说,配置信息可以放在多个 JAR 包中,为了读取完整的配置信息,需要扫描所有在虚拟机环境变量 java.class.path 中的 JAR 文件和路径。Application Class Loader 对象中的 `ucp`(URLClassPath)变量下可以看到全部 Classpath 路径下的 JAR 包和目录。
值得注意的是,笔者自己的 TestBean 工程文件夹也在 Classpath 中,这就意味着开发中自己的工程 JAR 文件中也可以通过配置文件设置自定义的侦听器,框架会自动完成侦听器的加载和初始化,从而实现了自定义侦听器的插件化注入。
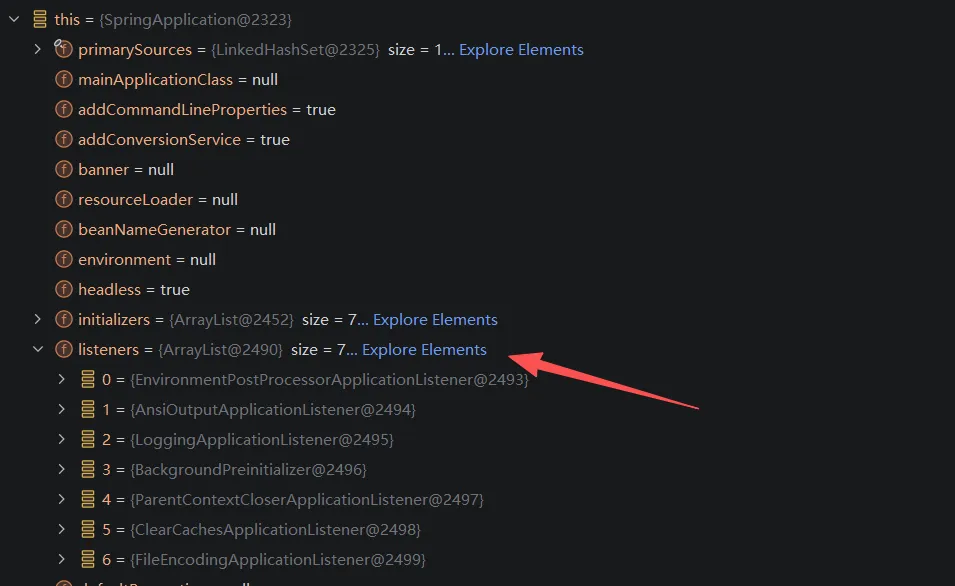
3. 解析配置文件并加载侦听器类,在获取了侦听器配置信息后,加载过程就变得顺理成章,这里不做详述了,读者可自行建立工程并跟踪代码去了解,最终的结果就是将创建的侦听器实例插入 `SpringApplicaiton.listeners` 对象列表中。
图11 SpringApplication.listeners
至此,我们介绍了 Spring Framework 的启动阶段自动装载机制,大家会发现在 `META-INF/spring.factories` 配置文件中,侦听器只是众多组件配置中的一项,也就是说这种基于配置的组件自动装配能力是贯穿整个 Spring Framework 设计和实现的通用机制,在主程序逻辑中,Spring Framework 尽可能的使用接口进行程序编写,而降具体实现通过配置和自动加载机制在运行时阶段注入到程序结构中,将面向接口编程的思想展现的玲离尽致。对于不熟悉这套机制的工程师来说,初读 Spring Framework 的源码会有较强的挫败感,以为静态阅读代码时看见的全是接口,而无法快速跟踪到具体实现,但是一旦对这套机制熟悉之后,就能深深的感受其设计的灵活和优雅之处,是学习框架类应用实现的很好范本。
最后一个部分内容是侦听器事件的触发。在前面完成对侦听器的装载之后,我们来看应用程序中如何触发侦听器事件。
public class SpringApplication { //省略。。。 public ConfigurableApplicationContext run(String... args) { //省略。。。 SpringApplicationRunListeners listeners = getRunListeners(args); listeners.starting(bootstrapContext, this.mainApplicationClass); //省略。。。 }}
上面是侦听器事件在 `SpringApplication.run` 方法中触发时的代码,很简单,就两句,第一句得到了一个 `SpringApplicationRunListeners` 对象,第二句则调用了 `starting` 方法来触发侦听器事件。这部分内容在本篇第一章节介绍启动阶段状态规划时已经提到过。
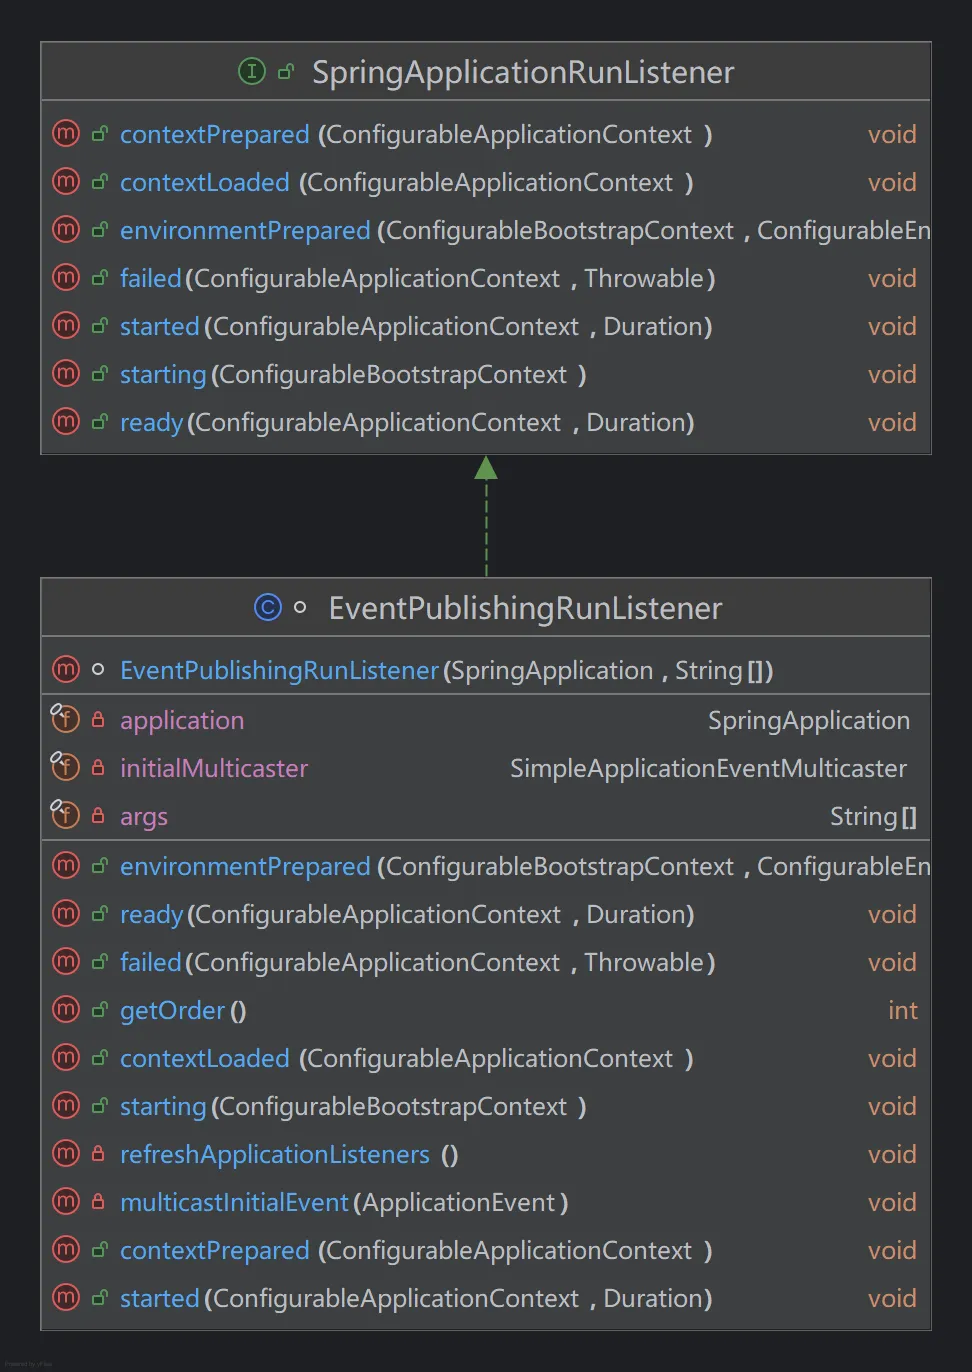
先看第一条语句,这里的`SpringApplicationRunListeners`是一个接口,并是不具体实现,而具体实现类是通过 `getRunListeners` 方法将引用赋值的。
private SpringApplicationRunListeners getRunListeners(String[] args) { ArgumentResolver argumentResolver = ArgumentResolver.of(SpringApplication.class, this); argumentResolver = argumentResolver.and(String[].class, args); List<SpringApplicationRunListener> listeners = getSpringFactoriesInstances(SpringApplicationRunListener.class, argumentResolver); SpringApplicationHook hook = applicationHook.get(); SpringApplicationRunListener hookListener = (hook != null) ? hook.getRunListener(this) : null; if (hookListener != null) { listeners = new ArrayList<>(listeners); listeners.add(hookListener); } return new SpringApplicationRunListeners(logger, listeners, this.applicationStartup);}
语句不长,内容读者自行学习,只提醒大家注意 `List<SpringApplicationRunListener> listeners = getSpringFactoriesInstances(SpringApplicationRunListener.class,argumentResolver);`这条语句,是不是似曾相识,看到了在 2.4.3 节侦听器装载过程我们介绍过的一个重要方法 `getSpringFactoriesInstances`,只不过在侦听器装载章节这条语句是 `getSpringFactoriesInstances(ApplicationListener.class)`,两条语句的区别在于传入的参数不同,一个用于加载 `ApplicationListener` 接口的实现类,另一个用于加载 `SpringApplicationRunListener` 接口的实现类。
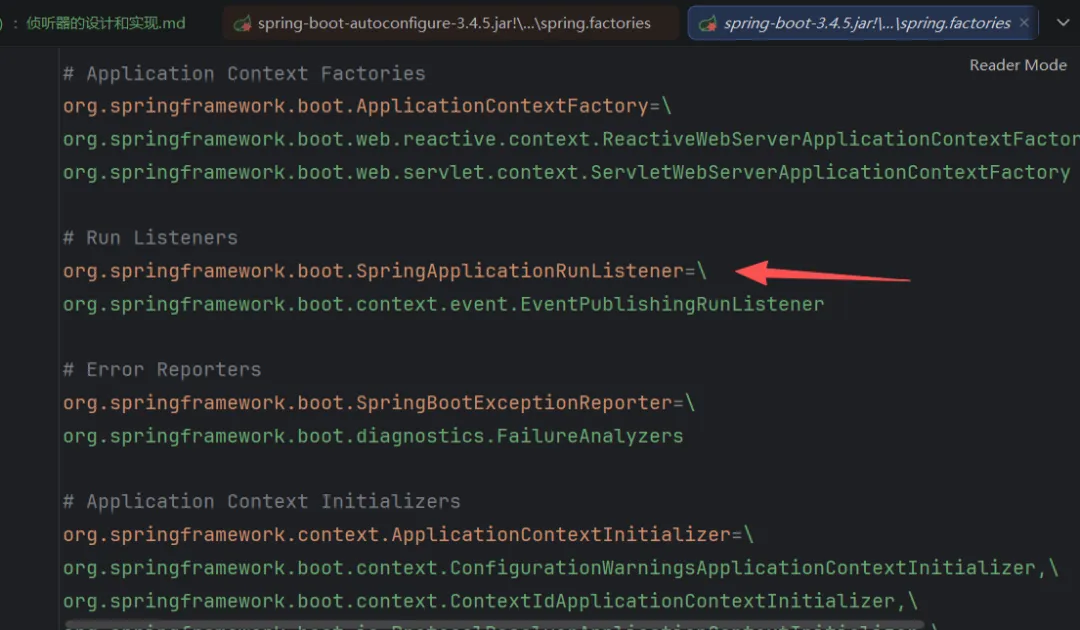
理解没错,`SpringApplicationRunListener`的具体实现也是通过 `META-INF/spring.factories` 文件配置并自动装载的,实际实现类是 `org.springframework.boot.context.event.EventPublishingRunListener`。
图12 SpringApplicationRunListener 侦听事件发布实现类配置
图13 EventPublishingRunListener 侦听事件发布实现类
这个类已经在本文 2.1 章节事件驱动的机制设计中介绍了,它完成了事件的触发、侦听器事件匹配和调用,我们完成了整个侦听器模块主要类结构的闭环。
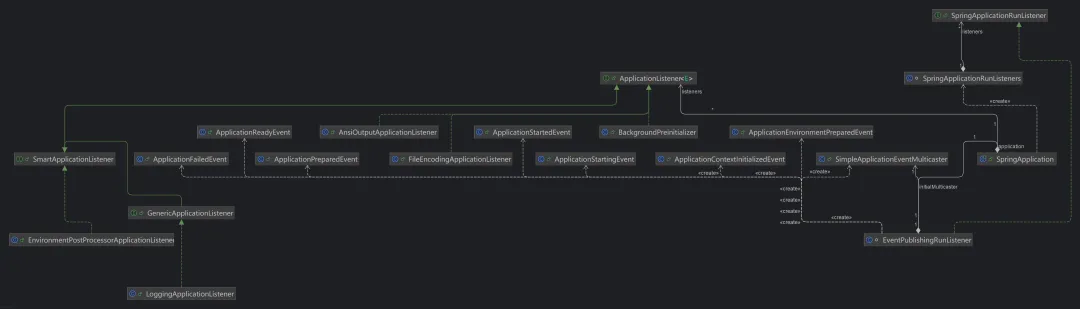
最后给住侦听器模块主要类结构全图,方便读者理解侦听器模块主要数据结构。
本文对侦听器模块的设计和实现进行了简单的介绍,个人觉得最有收获的有 3 点:
1. 良好的侦听器事件规划依赖于良好的架构状态分析,反过来说,如果侦听器事件规划不清晰,大概率架构的状态规划也是不清晰的;
2. 基于接口的编程思想和虚拟机动态加载机制的配合使通用的组件装载机制得以实现,Spring Framework 通过配置文件 `META-INF/spring.factories` 实现了对包括侦听器在内的各种组件的自动加载和初始化,主程序中主要基于接口进行代码编写,具体实现依赖运行时动态转载和注入,这种机制让框架具有极高的扩展性和灵活性;
3. 清晰识别出架构层和应用层之间的边界,并进行接口定义,有助于理清模块和组建之间的职责,更好的实现架构的抽象,使调用链跟踪更加清晰而符合逻辑。
本来应该再写一个例子程序演示一个自定义侦听器如何被框架调用的,但是元旦假期将尽,要留点时间休息一下,所以留给读者自行探索。写关于源码阅读的分享文章其实是副产品,真正的收获是阅读源码的过程,所以还是十分推荐大家要亲自动手去跟踪并了解框架运行时的状态,这样一定会有收获。大家元旦快乐。
 夜雨聆风
夜雨聆风