 夜雨聆风
夜雨聆风


使用Sphinx构建软件说明书(1):简单使用Sphinx
使用Sphinx构建软件说明书(1):简单使用Sphinx
微信公众号:生信小知识
关注可了解更多的生物信息学教程及知识。问题或建议,请公众号留言;
目录
前言1. 安装Sphinx2. 简单使用2.1 配置文档资源2.2 构建文档2.4 使用主题后记
前言
最近写了一个做差异染色质状态分析的软件包,为了方便大家使用,我决定对开发的软件包写一个说明书。
在我用过的软件中,deeptools这个软件的说明书令我印象深刻,因此我也试图去模仿deeptools工具的说明书来撰写我自己软件包的说明书。
我先看了看deeptools说明书的官网:https://deeptools.readthedocs.io/en/latest/content/list_of_tools.html
我发现几个事情:
-
说明书官网地址(https://deeptools.readthedocs.io)很好,很能突出软件的名称 -
说明书是用Sphinx构建
于是,我便简单搜索了下Sphinx以及ReadtheDocs,我发现原来大家一般会组合 “Sphinx+Github+ReadtheDocs” 使用:
-
Sphinx:文档生成工具,可以将纯文本格式的文档(如reStructuredText或Markdown)转换为多种输出格式,如HTML、PDF、EPUB等。我们可以用该工具帮助我们格式化生成说明文件。
-
GitHub:用于托管文档的源代码,并管理版本控制。
-
ReadtheDocs:开源的文档托管平台,主要用于托管和发布Sphinx生成的文档。可以从GitHub拉取文档源代码,自动构建并发布在线文档,供用户访问。
我之前只了解过Github,这里记录我学习Sphinx的记录。
所有知识来源:
-
https://www.osgeo.cn/sphinx-note/intro.html -
Sphinx 1.3.1 中文手册 (推荐查看)
1. 安装Sphinx
Sphinx是基于Python而来,故我们需要首先安装Python软件(这里不做过多说明)。
存在有Python后,我们可以直接使用 pip 完成Sphinx的安装:
$ pip install Sphinx
2. 简单使用
我们记录下最简单的Sphinx使用。
首先,我的使用环境是Windows电脑,使用Git软件实现命令行的撰写。
为了可以同步到GitHub上,我在电脑上首先创建了一个GitHub的目录(这里不做过多说明)。具体目录结构如下:
$ tree
.
`-- README.md
2.1 配置文档资源
我首先运行Sphinx:
$ sphinx-quickstart
Welcome to the Sphinx 8.2.3 quickstart utility.

Please enter values for the following settings (just press Enter to
accept a default value, if one is given in brackets).

Selected root path: .

You have two options for placing the build directory for Sphinx output.
Either, you use a directory "_build" within the root path, or you separate
"source" and "build" directories within the root path.
> Separate source and build directories (y/n) [n]: y

The project name will occur in several places in the built documentation.
> Project name: Try Sphinx
> Author name(s): fatyang
> Project release []: V1.0

If the documents are to be written in a language other than English,
you can select a language here by its language code. Sphinx will then
translate text that it generates into that language.

For a list of supported codes, see
https://www.sphinx-doc.org/en/master/usage/configuration.html#confval-language.
> Project language [en]: zh_CN

Creating file E:\OneDrive\Github\Sphinx_try\source\conf.py.
Creating file E:\OneDrive\Github\Sphinx_try\source\index.rst.
Creating file E:\OneDrive\Github\Sphinx_try\Makefile.
Creating file E:\OneDrive\Github\Sphinx_try\make.bat.

Finished: An initial directory structure has been created.

You should now populate your master file E:\OneDrive\Github\Sphinx_try\source\index.rst
and create other documentation
source files. Use the Makefile to build the docs, like so:
   make builder
where "builder" is one of the supported builders, e.g. html, latex or linkcheck.
而后会弹出一系列选项:
-
Separate source and build directories (y/n):你想把构建的最终文档目录放在哪,是放在当前目录下的 ” _build”,还是在当前目录下创建2个单独的目录 ”build+source”。我选择了 【y】即分开建立2个目录 -
Project name:工程名字,我输入 Try Sphinx -
Author name(s):作者名字,我输入 fatyang -
Project release:工程版本,我输入 V1.0 -
Project language:文档语言,我输入 zh_CN。我们可以打开提供的链接(https://www.sphinx-doc.org/en/master/usage/configuration.html#confval-language)查看找到zh_CN – Simplified Chinese
我们先看看 sphinx-quickstart 都干了什么。
$ tree
.
|-- Makefile
|-- README.md
|-- build
|-- make.bat
`-- source
    |-- _static
    |-- _templates
    |-- conf.py
    `-- index.rst
可以看到,除了已有的 README.md 文件外, sphinx-quickstart 帮我生成了下面几个文件:
Makefile
-
build目录:空白 make.batsource 目录-
_static:用于存放图片之类的多媒体文件 -
_templates: -
conf.py:配置文件
-
index.rst:主页文件
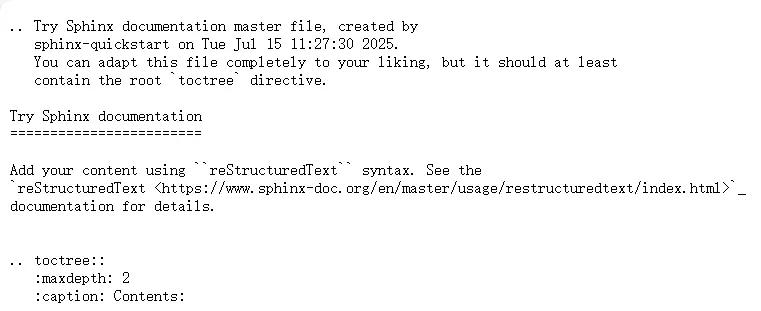
我们看看主页文件 index.rst 长什么样:
.. Try Sphinx documentation master file, created by
   sphinx-quickstart on Tue Jul 15 11:27:30 2025.
   You can adapt this file completely to your liking, but it should at least
   contain the root `toctree` directive.

Try Sphinx documentation
========================

Add your content using ``reStructuredText`` syntax. See the
`reStructuredText <https://www.sphinx-doc.org/en/master/usage/restructuredtext/index.html>`_
documentation for details.


.. toctree::
   :maxdepth: 2
   :caption: Contents:
后面我们会详细介绍每个文件及配置的含义。
2.2 构建文档
现在让我们先一起来构建文档吧。
在Windows系统中有2种方法来构建文档:
# 使用sphinx-build命令(在后面对该命令进行详解)
$ sphinx-build -b html source/ build/

# 使用sphinx-quickstart命令生成的make.bat文件(简单快捷,这里详细介绍)
$ ./make.bat html
考虑到我使用的是Windows系统,因此我主要 ./make.bat 工具,我们先来看看说明:
$ ./make.bat help
Sphinx v8.2.3
Please use `make target' where target is one of
  html        to make standalone HTML files
  dirhtml     to make HTML files named index.html in directories
  singlehtml  to make a single large HTML file
  pickle      to make pickle files
  json        to make JSON files
  htmlhelp    to make HTML files and an HTML help project
  qthelp      to make HTML files and a qthelp project
  devhelp     to make HTML files and a Devhelp project
  epub        to make an epub
  latex       to make LaTeX files, you can set PAPER=a4 or PAPER=letter
  text        to make text files
  man         to make manual pages
  texinfo     to make Texinfo files
  gettext     to make PO message catalogs
  changes     to make an overview of all changed/added/deprecated items
  xml         to make Docutils-native XML files
  pseudoxml   to make pseudoxml-XML files for display purposes
  linkcheck   to check all external links for integrity
  doctest     to run all doctests embedded in the documentation (if enabled)
  coverage    to run coverage check of the documentation (if enabled)
  clean       to remove everything in the build directory
这里我优先使用 make.bat 来生成文档:
$ ./make.bat html
Running Sphinx v8.2.3
loading translations [zh_CN]... done
making output directory... done
building [mo]: targets for 0 po files that are out of date
writing output...
building [html]: targets for 1 source files that are out of date
updating environment: [new config] 1 added, 0 changed, 0 removed
reading sources... [100%] index
looking for now-outdated files... none found
pickling environment... done
checking consistency... done
preparing documents... done
copying assets...
copying static files...
Writing evaluated template result to E:\OneDrive\Github\Sphinx_try\build\html\_static\basic.css
Writing evaluated template result to E:\OneDrive\Github\Sphinx_try\build\html\_static\documentation_options.js
Writing evaluated template result to E:\OneDrive\Github\Sphinx_try\build\html\_static\language_data.js
Writing evaluated template result to E:\OneDrive\Github\Sphinx_try\build\html\_static\alabaster.css
copying static files: done
copying extra files...
copying extra files: done
copying assets: done
writing output... [100%] index
generating indices... genindex done
writing additional pages... search done
dumping search index in Chinese (code: zh)... done
dumping object inventory... done
build succeeded.

The HTML pages are in build\html.
根据程序最后一句话,我们可以得知生成的文档地址在:build\html
我们进入这个目录:
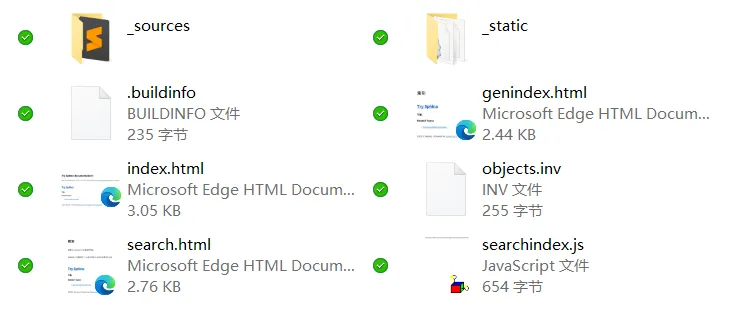
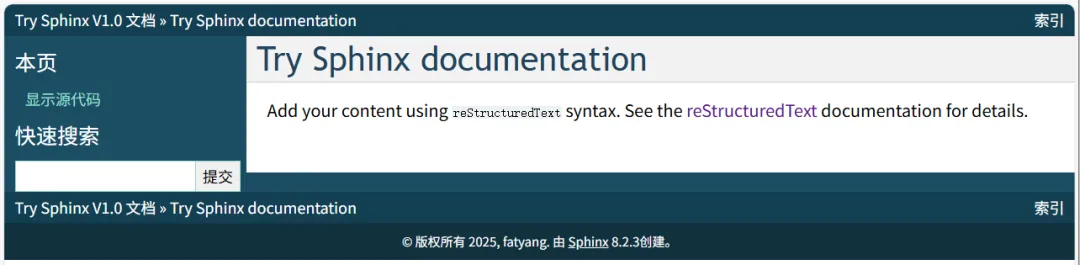
在这些文件中,我们打开 index.html 文件:
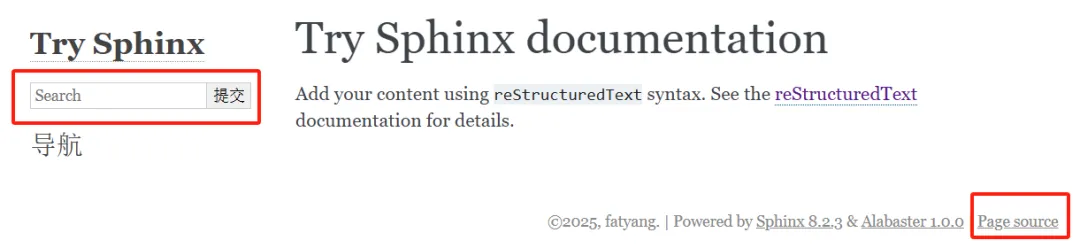
可以看到,还是比较高级的,还自带有搜索框,同时作者的名字也自动加入其中。当点击 Page source 后会出现原本 index.rst 文件内容:
2.4 使用主题
可以看到,虽然生成的文档看起来很高级,但是却没有那么美观。
如果生成的HTML不符合我们的审美观,我们可以选择使用不同的主题。 这里只简单介绍主题的更换。
Sphinx自带主题包括有:basic, alabaster, sphinx_rtd_theme, classic, sphinxdoc, scrolls, agogo, traditional, nature, haiku, pyramid, bizstyle, epub
具体可以在这里查看:https://www.sphinx-doc.org/en/master/usage/theming.html
这些主题不需要单独安装,直接在 conf.py 文件中进行修改即可。
例如,我在 conf.py 文件将主题修改为classic主题:
# Configuration file for the Sphinx documentation builder.
#
# For the full list of built-in configuration values, see the documentation:
# https://www.sphinx-doc.org/en/master/usage/configuration.html

# -- Project information -----------------------------------------------------
# https://www.sphinx-doc.org/en/master/usage/configuration.html#project-information

project = 'Try Sphinx'
copyright = '2025, fatyang'
author = 'fatyang'
release = 'V1.0'

# -- General configuration ---------------------------------------------------
# https://www.sphinx-doc.org/en/master/usage/configuration.html#general-configuration

extensions = []

templates_path = ['_templates']
exclude_patterns = []

language = 'zh_CN'

# -- Options for HTML output -------------------------------------------------
# https://www.sphinx-doc.org/en/master/usage/configuration.html#options-for-html-output

html_theme = 'classic'
html_static_path = ['_static']
我再次构建文档后,打开 index.html 文件:
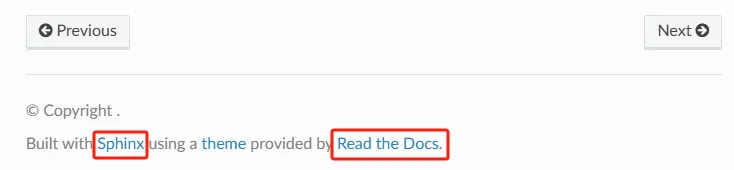
除了自带的主题外,我们也可以下载其他第三方主题,例如来自Read the Docs的主题。
我们首先需要安装这些主题:
$ pip install sphinx_rtd_theme
然后修改 conf.py 文件,在文件开头导入主题包:
#for using Read the Docs theme
import sphinx_rtd_theme
然后修改 html_theme 和 html_theme_path:
# html_theme = 'sphinxdoc'
html_theme = 'sphinx_rtd_theme'

#html_theme_path = []
html_theme_path = [sphinx_rtd_theme.get_html_theme_path()]
修改后的 conf.py 文件如下:
# Configuration file for the Sphinx documentation builder.
#
# For the full list of built-in configuration values, see the documentation:
# https://www.sphinx-doc.org/en/master/usage/configuration.html

import sphinx_rtd_theme

# -- Project information -----------------------------------------------------
# https://www.sphinx-doc.org/en/master/usage/configuration.html#project-information

project = 'Try Sphinx'
copyright = '2025, fatyang'
author = 'fatyang'
release = 'V1.0'

# -- General configuration ---------------------------------------------------
# https://www.sphinx-doc.org/en/master/usage/configuration.html#general-configuration

extensions = []

templates_path = ['_templates']
exclude_patterns = []

language = 'zh_CN'

# -- Options for HTML output -------------------------------------------------
# https://www.sphinx-doc.org/en/master/usage/configuration.html#options-for-html-output

html_theme = 'sphinx_rtd_theme'
html_theme_path = [sphinx_rtd_theme.get_html_theme_path()]
html_static_path = ['_static']
我再次构建文档后,打开 index.html 文件:
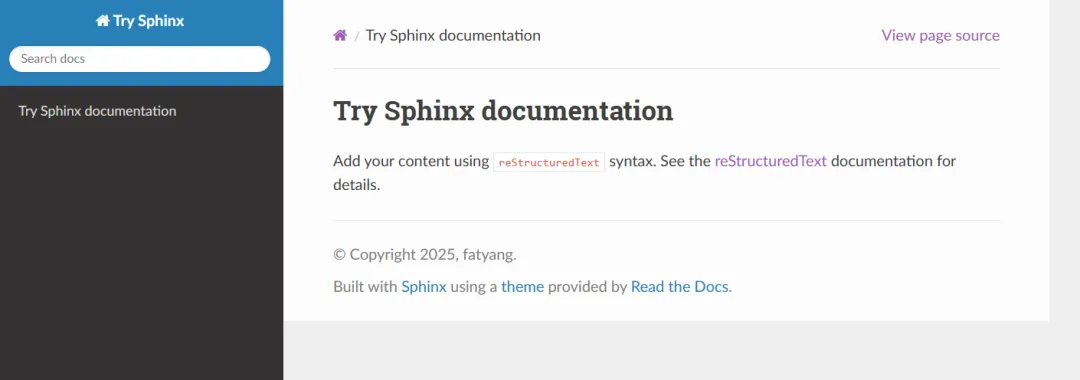
得到了和DeepTools类似的主题~
后记
这里我们简单体检了一下构建文档网页的方法,后面我们则对每个文件以及具体的配置文件进行一定的探索~
