夜雨聆风
夜雨聆风


OpenManus 源码分析(二)
OpenManus 源码分析第二篇文章主要聚焦于 OpenManus 所使用的 Tool。上一篇文章见OpenManaus 源码分析(一)
一. tool目录
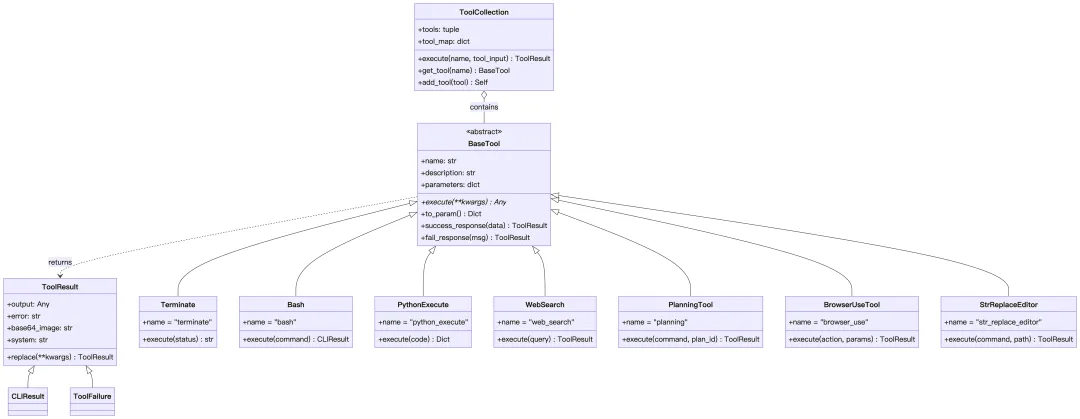
app/tool 目录实现了一个统一的工具系统架构,为 Agent 提供各种可调用的工具能力。所有工具都继承统一的 BaseTool,在 Pydantic 校验、Schema 暴露、异步执行和统一返回格式上保持一致。
1. 整体架构
1. 文件目录结构
app/tool/├── base.py # BaseTool, ToolResult 基类├── tool_collection.py # 工具集合管理│├── # 基础工具├── terminate.py # 终止工具├── bash.py # Bash 命令执行├── python_execute.py # Python 代码执行├── str_replace_editor.py # 文件编辑工具├── file_operators.py # 文件操作│├── # 浏览器/网络工具├── browser_use_tool.py # 浏览器操作├── web_search.py # 网络搜索├── crawl4ai.py # 网页爬取│├── # 其他├── planning.py # 规划工具├── mcp.py # MCP 协议工具├── ask_human.py # 人工确认│├── search/ # 搜索引擎实现│ ├── base.py # WebSearchEngine 基类│ ├── google_search.py│ ├── baidu_search.py│ ├── bing_search.py│ └── duckduckgo_search.py│├── sandbox/ # 沙箱环境工具│ ├── sb_browser_tool.py│ ├── sb_files_tool.py│ ├── sb_shell_tool.py│ └── sb_vision_tool.py│└── chart_visualization/ # 图表可视化工具 ├── data_visualization.py ├── chart_prepare.py └── python_execute.py2. 类图
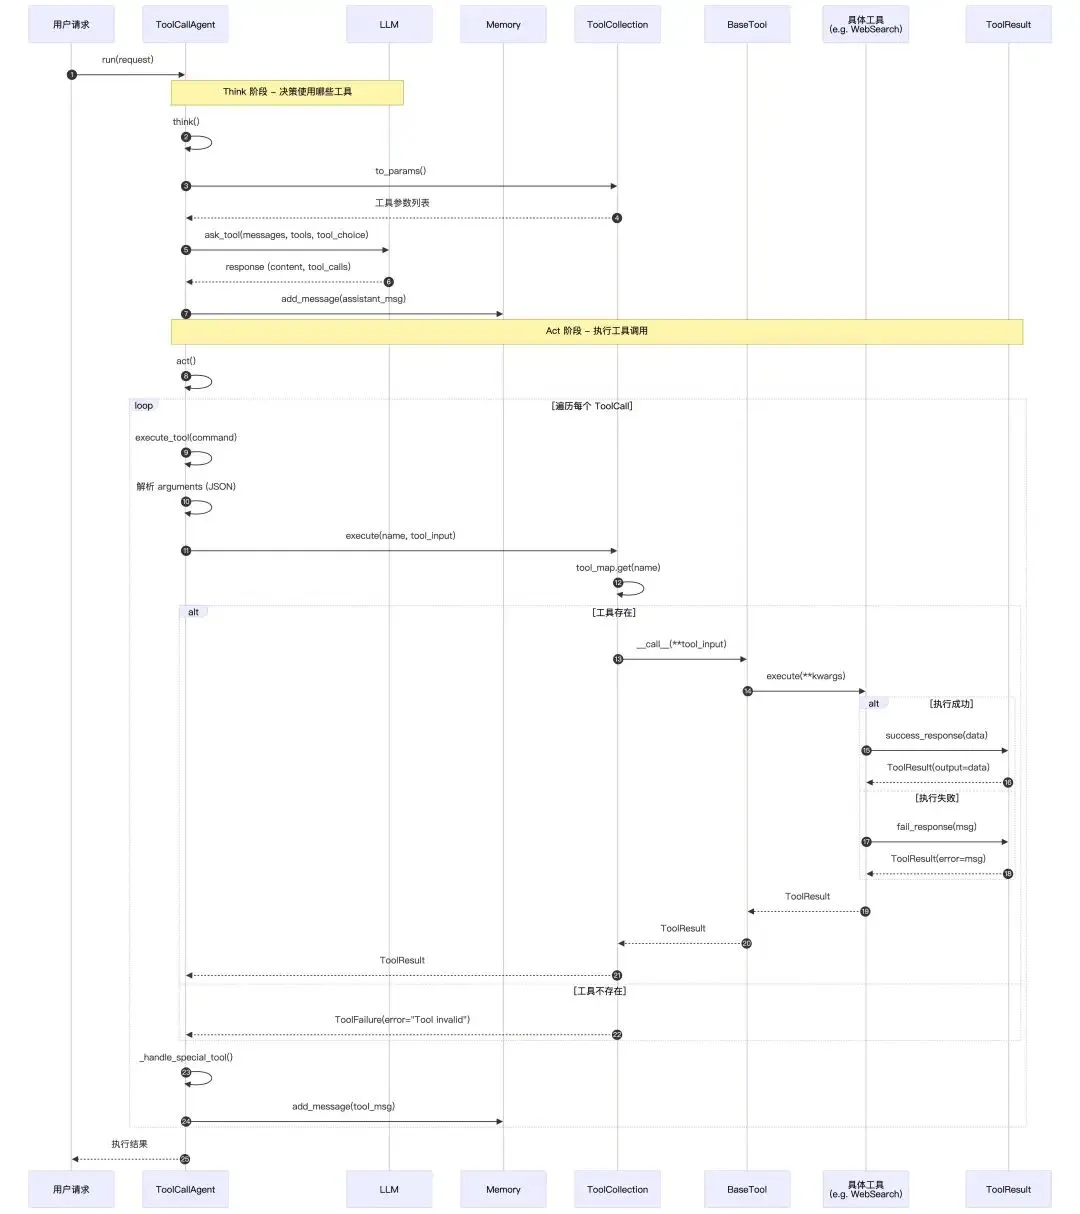
3. Agent使用Tool时序图
-
Think 阶段:Agent 通过 ToolCollection.to_params()获取所有工具的参数描述,发送给 LLM 进行决策,LLM 返回需要调用的tool_calls -
Act 阶段:遍历每个 ToolCall,调用ToolCollection.execute(),ToolCollection根据工具名从tool_map找到具体工具,通过BaseTool.__call__()→execute()执行具体逻辑,返回统一的ToolResult -
结果处理: success_response()或fail_response()都封装为ToolResult,然后通过Message.tool_message()将工具调用结果添加到 Memory
2. base.py
base.py提供所有工具共享的语言:用 Pydantic 描述输入输出,用抽象基类统一执行流程,用 ToolResul规范返回格式。
1. ToolResult
ToolResult是一个数据模型,用于封装工具执行后的所有可能返回状态。
classToolResult(BaseModel):"""Represents the result of a tool execution."""# 工具执行成功的文本输出(例如:搜索结果、计算结果)。 output: Any = Field(default=None) # 执行出错时的错误信息。 error: Optional[str] = Field(default=None) # 支持多模态(Vision),允许工具返回图片数据。 base64_image: Optional[str] = Field(default=None) system: Optional[str] = Field(default=None)classConfig: arbitrary_types_allowed = Truedef__bool__(self):return any(getattr(self, field) for field in self.__fields__)# 它实现了两个 ToolResult 的相加,将两个结果的文本内容(output, error, system)进行字符串拼接。def__add__(self, other: "ToolResult"):defcombine_fields( field: Optional[str], other_field: Optional[str], concatenate: bool = True ):if field and other_field:if concatenate:return field + other_fieldraise ValueError("Cannot combine tool results")return field or other_fieldreturn ToolResult( output=combine_fields(self.output, other.output), error=combine_fields(self.error, other.error), base64_image=combine_fields(self.base64_image, other.base64_image, False), system=combine_fields(self.system, other.system), )2. BaseTool
BaseTool是所有具体工具必须继承的父类,提供了Pydantic 检查数据是否符合预定义的类结构、Schema定义、结果标准化处理、以及抽象的执行接口能力。
如果你要添加新工具,只需要继承 BaseTool,定义 name 、 parameters以及description,并实现 execute 方法。
classBaseTool(ABC, BaseModel):"""Consolidated base class for all tools combining BaseModel and Tool functionality.""" name: str # 工具名称(LLM 识别工具的标识符) description: str # 工具描述 parameters: Optional[dict] = None# 参数定义的 JSON Schema(告诉 LLM 如何构造输入参数)classConfig: arbitrary_types_allowed = True underscore_attrs_are_private = Falseasyncdef__call__(self, **kwargs) -> Any:"""Execute the tool with given parameters."""returnawait self.execute(**kwargs)# 所有子类必须实现这个方法,编写具体的工具业务逻辑。 @abstractmethodasyncdefexecute(self, **kwargs) -> Any:"""Execute the tool with given parameters."""# 将工具的元数据转换为 OpenAI API 标准的 Function Calling 格式 ,OpenManus 可以直接把这个对象传给兼容这种function calling格式的模型,这样模型就能知道有哪些工具可用、长什么样、怎么调用。defto_param(self) -> Dict:"""Convert tool to function call format. Returns: Dictionary with tool metadata in OpenAI function calling format """return {"type": "function","function": {"name": self.name,"description": self.description,"parameters": self.parameters, }, }# 工具执行成功时,统一用 success_response 封装,如果是字符串,直接用,如果是字典,就变为 JSON 字符串defsuccess_response(self, data: Union[Dict[str, Any], str]) -> ToolResult:"""Create a successful tool result. Args: data: Result data (dictionary or string) Returns: ToolResult with success=True and formatted output """if isinstance(data, str): text = dataelse: text = json.dumps(data, indent=2) logger.debug(f"Created success response for {self.__class__.__name__}")return ToolResult(output=text)# 工具失败时,统一用 fail_response,只填 error 字段deffail_response(self, msg: str) -> ToolResult:"""Create a failed tool result. Args: msg: Error message describing the failure Returns: ToolResult with success=False and error message """ logger.debug(f"Tool {self.__class__.__name__} returned failed result: {msg}")return ToolResult(error=msg)3. ToolCollection.py
ToolCollection 是一个专门管理工具的工具箱。
-
对模型:给 LLM 一个整齐的工具清单,且通过 to_params把每个BaseTool的元信息汇总成工具 schema 列表,让模型知道我有哪些工具可以用,每个工具要什么参数。 -
对Agent: execute(name, tool_input)通过名字做动态派发,封装了“找工具 → 调用 → 异常处理 → 统一结果结构”的全过程。 -
对运行时扩展性: add_tool让工具箱可以在运行过程中添加新的工具。
和ToolCallAgent连起来看就是:
-
Agent 初始化时创建一个 ToolCollection,里面注册了一堆工具。 -
Agent 把 tool_collection.to_params()交给模型。 -
模型在对话时选择调用工具 name+ 参数arguments。 -
Agent 收到后调用: tool_collection.execute(name=name, tool_input=arguments)。 -
得到 ToolResult/ToolFailure,再把结果打包回模型作为新的上下文,让模型继续“思考下一步”。
classToolCollection:"""A collection of defined tools."""# tool_map是一个 dict(哈希表),key 是 tool.name,value 是 tool 实例,可以实现按名字 O(1) 查找工具def__init__(self, *tools: BaseTool): self.tools = tools self.tool_map = {tool.name: tool for tool in tools}def__iter__(self):return iter(self.tools)defto_params(self) -> List[Dict[str, Any]]:return [tool.to_param() for tool in self.tools]asyncdefexecute( self, *, name: str, tool_input: Dict[str, Any] = None ) -> ToolResult:# 用 tool_map 查找名字对应的工具实例 tool = self.tool_map.get(name)ifnot tool:return ToolFailure(error=f"Tool {name} is invalid")try:# 实际执行工具的地方 result = await tool(**tool_input)return resultexcept ToolError as e:return ToolFailure(error=e.message)# 批量串行执行工具(不是并行),更像是一个工具集合级别的辅助功能。# 比如Agent启动时做一轮环境自检:browser工具检查浏览器能否打开、文件工具检查工作目录是否存在等。asyncdefexecute_all(self) -> List[ToolResult]:"""Execute all tools in the collection sequentially.""" results = []for tool in self.tools:try: result = await tool() results.append(result)except ToolError as e: results.append(ToolFailure(error=e.message))return results# 通过名称获取工具的实例defget_tool(self, name: str) -> BaseTool:return self.tool_map.get(name)# 新增一个工具defadd_tool(self, tool: BaseTool):"""Add a single tool to the collection. If a tool with the same name already exists, it will be skipped and a warning will be logged. """if tool.name in self.tool_map: logger.warning(f"Tool {tool.name} already exists in collection, skipping")return self self.tools += (tool,) self.tool_map[tool.name] = toolreturn selfdefadd_tools(self, *tools: BaseTool):"""Add multiple tools to the collection. If any tool has a name conflict with an existing tool, it will be skipped and a warning will be logged. """for tool in tools: self.add_tool(tool)return self4. 简单工具
1. Terminate工具
只要 Agent 调用了这个工具,整个任务就会停止。
# 当任务完成或者任务实在做不下去的时候,可以选择使用这个工具_TERMINATE_DESCRIPTION = """Terminate the interaction when the request is met OR if the assistant cannot proceed further with the task.When you have finished all the tasks, call this tool to end the work."""classTerminate(BaseTool): name: str = "terminate" description: str = _TERMINATE_DESCRIPTION parameters: dict = {"type": "object","properties": {"status": { # 模型必须显式地给出一个结论:是成功,还是失败"type": "string","description": "The finish status of the interaction.","enum": ["success", "failure"], } },"required": ["status"], }# 这里没有真的终止程序,只是返回了一句字符串。关键是它的工具名称 "terminate" 被预先注册在 special_tool_names 列表中。当这个工具被调用时,Agent 会通过名称匹配识别出它是一个特殊工具,然后将自身状态设置为 FINISHED,从而终止主循环。asyncdefexecute(self, status: str) -> str:"""Finish the current execution"""returnf"The interaction has been completed with status: {status}"2. AskHuman工具
LLM 在信息不足、需要确认的场景时,可以向人类请求帮助时调用这个工具。
classAskHuman(BaseTool):"""Add a tool to ask human for help.""" name: str = "ask_human" description: str = "Use this tool to ask human for help." parameters: str = {"type": "object","properties": {"inquire": { # 表示LLM需要向用户询问的内容"type": "string","description": "The question you want to ask human.", } },"required": ["inquire"], }asyncdefexecute(self, inquire: str) -> str:# 显示 AI 的问题,并等待用户输入return input(f"""Bot: {inquire}\n\nYou: """).strip() 3. PythonExecute工具
PythonExecute 就是 OpenManus 给 Agent 配的一个一次性 Python 执行工具,LLM 输入一段代码,这个工具在一个独立子进程里跑,最多跑 5 秒,只把 print 和错误信息捞出来,打包成 {"observation": ..., "success": ...} 还给 Agent,用于下一轮推理。
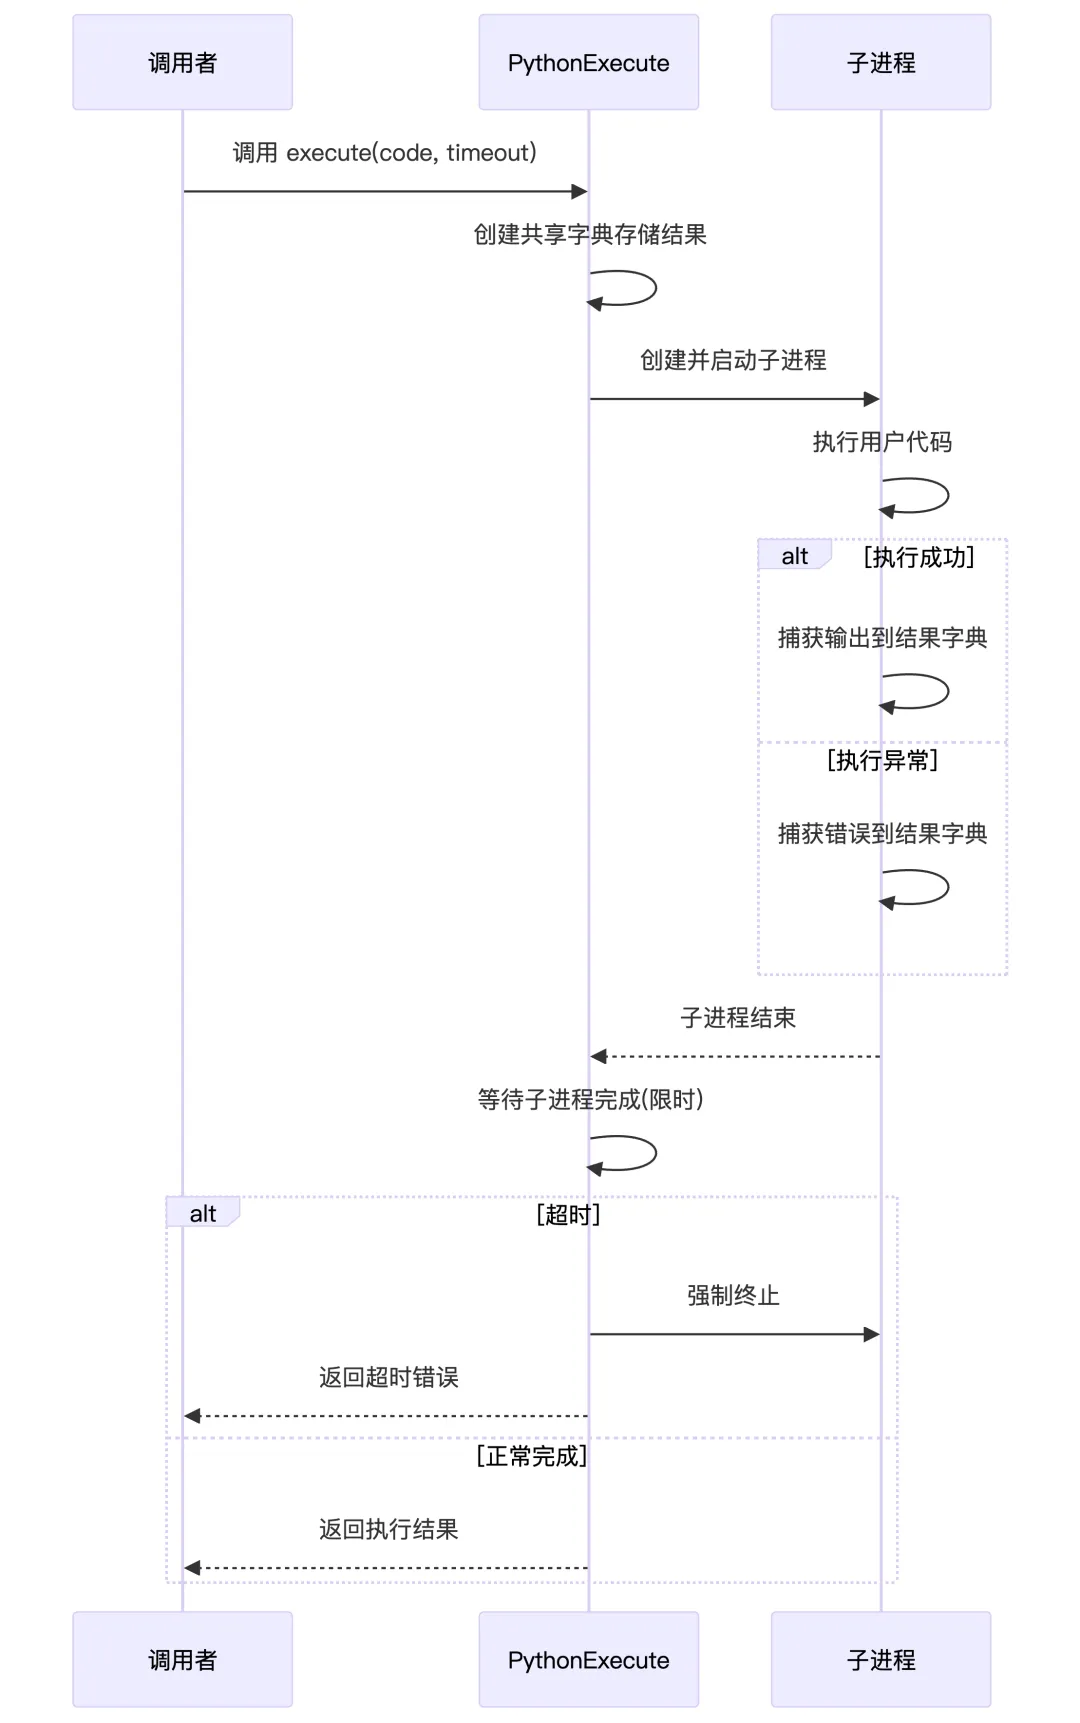
classPythonExecute(BaseTool):"""A tool for executing Python code with timeout and safety restrictions.""" name: str = "python_execute"# 提醒LLM,要想用这个工具执行代码,并看到代码执行结果,就要用print打印出来 description: str = "Executes Python code string. Note: Only print outputs are visible, function return values are not captured. Use print statements to see results." parameters: dict = {"type": "object","properties": {"code": {"type": "string","description": "The Python code to execute.", }, },"required": ["code"], }asyncdefexecute( self, code: str, timeout: int = 5, ) -> Dict:""" Executes the provided Python code with a timeout. Args: code (str): The Python code to execute. timeout (int): Execution timeout in seconds. Returns: Dict: Contains 'output' with execution output or error message and 'success' status. """with multiprocessing.Manager() as manager: result = manager.dict({"observation": "", "success": False})if isinstance(__builtins__, dict): safe_globals = {"__builtins__": __builtins__}else: safe_globals = {"__builtins__": __builtins__.__dict__.copy()} proc = multiprocessing.Process( target=self._run_code, args=(code, result, safe_globals) ) proc.start() proc.join(timeout)# timeout processif proc.is_alive(): proc.terminate() proc.join(1)return {"observation": f"Execution timeout after {timeout} seconds","success": False, }return dict(result)# 只记录标准输出(print的内容)和异常信息def_run_code(self, code: str, result_dict: dict, safe_globals: dict) -> None: original_stdout = sys.stdouttry: output_buffer = StringIO() sys.stdout = output_buffer# Python 提供的内置函数,用来执行任意一段字符串形式的 Python 代码 exec(code, safe_globals, safe_globals) result_dict["observation"] = output_buffer.getvalue() result_dict["success"] = Trueexcept Exception as e: result_dict["observation"] = str(e) result_dict["success"] = Falsefinally: sys.stdout = original_stdout 5. 命令执行类工具
1. bash工具
Bash 命令执行工具,用于在终端中异步执行 bash 命令,LLM 可以一条条往里发命令,看输出、看错误、遇到卡死还能超时重启。
完整流程:
-
Agent 想看当前目录,调用: {"tool": "bash","arguments": {"command": "ls -l"} -
Bash.execute():如果没有 session,就起一个/bin/bash,交给_BashSession.run("ls -l"),在子进程里输入:ls -l; echo '<<exit>>',等到 stdout 里出现<<exit>>,截取前面的输出,清空 buffer,返回CLIResult(output="ls 输出", error="...") -
Agent 把 output作为 observation,继续思考下一步要干嘛
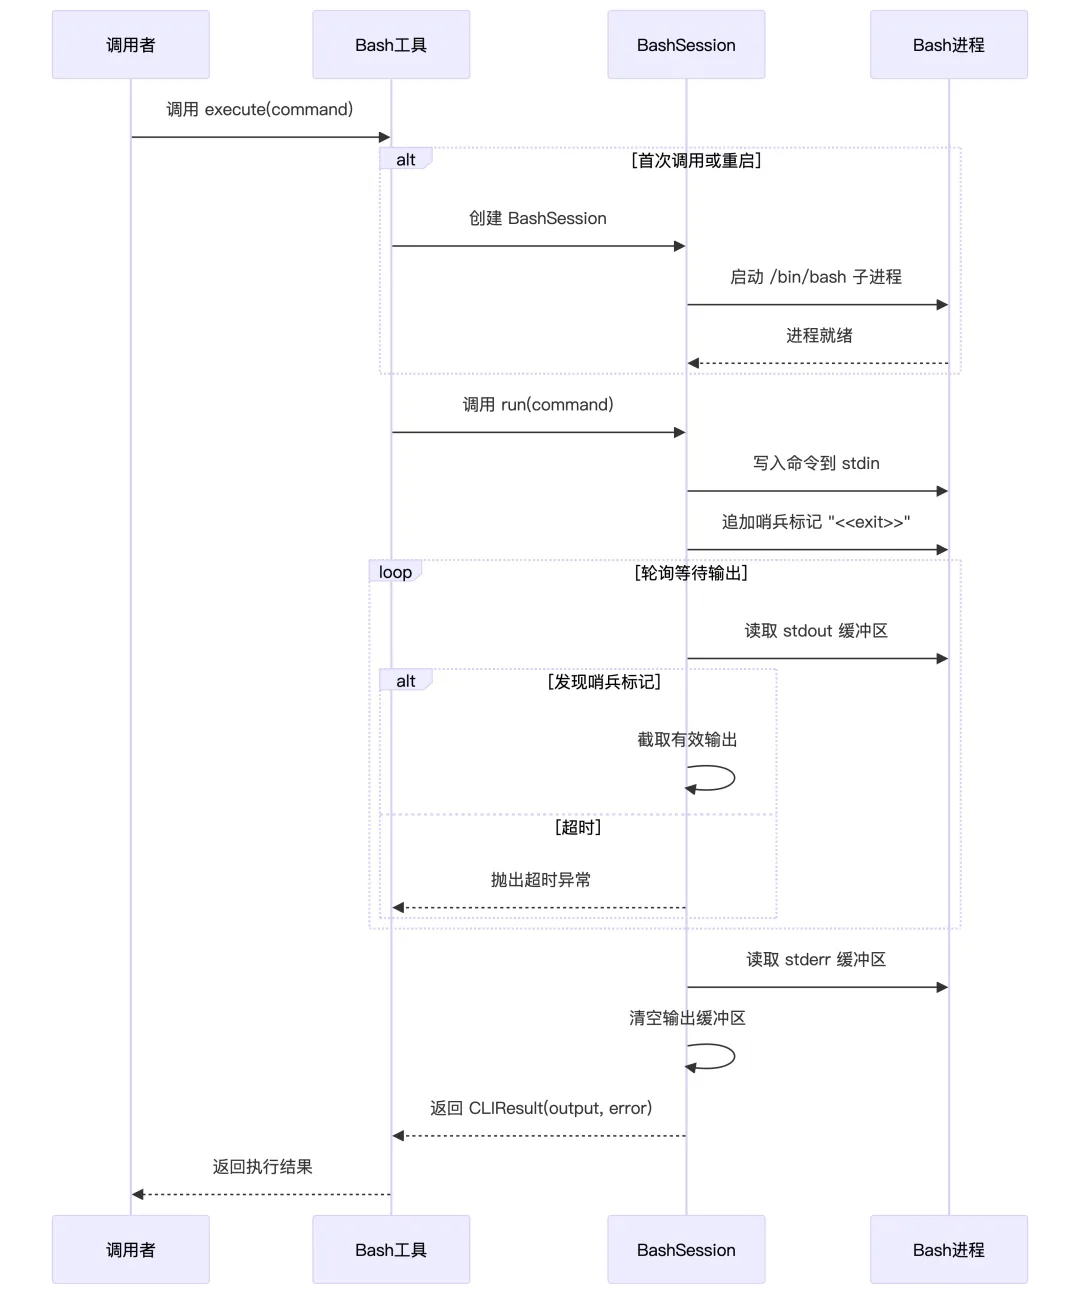
# 长时间运行的命令要用后台方式(结尾加 &,输出重定向到 log 文件),如果上次返回码是 -1,说明命令还在跑,可以再发一次空命令,拉更多日志,或者把要输入的内容直接作为 command,写到进程的 STDIN,或者发送 command="ctrl+c" 来打断进程(行为由工具实现)。如果提示 timeout,要改为后台方式重跑_BASH_DESCRIPTION = """Execute a bash command in the terminal.* Long running commands: For commands that may run indefinitely, it should be run in the background and the output should be redirected to a file, e.g. command = `python3 app.py > server.log 2>&1 &`.* Interactive: If a bash command returns exit code `-1`, this means the process is not yet finished. The assistant must then send a second call to terminal with an empty `command` (which will retrieve any additional logs), or it can send additional text (set `command` to the text) to STDIN of the running process, or it can send command=`ctrl+c` to interrupt the process.* Timeout: If a command execution result says "Command timed out. Sending SIGINT to the process", the assistant should retry running the command in the background."""classBash(BaseTool):"""A tool for executing bash commands""" name: str = "bash" description: str = _BASH_DESCRIPTION parameters: dict = {"type": "object","properties": {"command": {"type": "string","description": "The bash command to execute. Can be empty to view additional logs when previous exit code is `-1`. Can be `ctrl+c` to interrupt the currently running process.", }, },"required": ["command"], } _session: Optional[_BashSession] = Noneasyncdefexecute( self, command: str | None = None, restart: bool = False, **kwargs ) -> CLIResult:# 强制重启一个新的 bash 会话if restart:# 如果有旧 session,先 stop 掉if self._session: self._session.stop()# 开新 session self._session = _BashSession()await self._session.start()return CLIResult(system="tool has been restarted.")# 第一次用还没有会话,就创建一个if self._session isNone: self._session = _BashSession()await self._session.start()if command isnotNone:# 把 command 发进去,由 _BashSession.run() 真正执行returnawait self._session.run(command)raise ToolError("no command provided.")2. 文件操作工具
定义了一套统一的文件操作接口,给出了两个实现:
-
LocalFileOperator:直接操作宿主机的文件系统、shell,但是操作不可逆,可能影响用户本地数据。 -
SandboxFileOperator:通过SANDBOX_CLIENT把所有操作代理到一个隔离的沙盒环境,即使出错也不会影响用户真实环境。
并且还有一个点,任何一个工具,比如Python执行、数据分析等,只要拿到一个 FileOperator示例,就可以实现对文件的操作,且不用关心到底是在宿主机运行还是在沙箱内运行,在哪里执行取决于系統配置中是否开启了使用沙箱的选项。
LocalFileOperator和SandboxFileOperator分别实现了下面这5大核心能力:
classFileOperator(Protocol):"""Interface for file operations in different environments."""# 读文件,如Agent读取用户提供的代码文件进行分析asyncdefread_file(self, path: PathLike) -> str:"""Read content from a file.""" ...# 写文件,如Agent生成代码并保存到指定位置asyncdefwrite_file(self, path: PathLike, content: str) -> None:"""Write content to a file.""" ...# 判断目录,如Agent决定是遍历目录还是直接处理文件asyncdefis_directory(self, path: PathLike) -> bool:"""Check if path points to a directory.""" ...# 判断存在,如Agent在操作前检查文件是否存在,避免报错asyncdefexists(self, path: PathLike) -> bool:"""Check if path exists.""" ...#执行命令,如Agent运行 shell 命令,如 pip install、git clone 等asyncdefrun_command( self, cmd: str, timeout: Optional[float] = 120.0 ) -> Tuple[int, str, str]:"""Run a shell command and return (return_code, stdout, stderr).""" ...6. 高级工具
1. 文本编辑工具
StrReplaceEditor 其实是在给 Agent 做了一个安全的、可撤销的在线文本编辑器,并且可以在本地/沙箱两种环境下复用,主要负责:
-
浏览目录结构( viewdirectory) -
查看文件内指定行号范围的内容( viewfile withview_range) -
新建文件( create) -
基于字符串替换修改文件( str_replace) -
按行插入文本( insert) -
撤销上一次编辑( undo_edit)
枚举所有命令并定义参数schema:
# 工具描述,让模型知道这个工具是干嘛的、每个命令怎么用、有什么限制等。_STR_REPLACE_EDITOR_DESCRIPTION = """Custom editing tool for viewing, creating and editing files* State is persistent across command calls and discussions with the user* If `path` is a file, `view` displays the result of applying `cat -n`. If `path` is a directory, `view` lists non-hidden files and directories up to 2 levels deep* The `create` command cannot be used if the specified `path` already exists as a file* If a `command` generates a long output, it will be truncated and marked with `<response clipped>`* The `undo_edit` command will revert the last edit made to the file at `path`Notes for using the `str_replace` command:* The `old_str` parameter should match EXACTLY one or more consecutive lines from the original file. Be mindful of whitespaces!* If the `old_str` parameter is not unique in the file, the replacement will not be performed. Make sure to include enough context in `old_str` to make it unique* The `new_str` parameter should contain the edited lines that should replace the `old_str`"""# 5种能力:Command = Literal["view", "create", "str_replace", "insert", "undo_edit"]classStrReplaceEditor(BaseTool):"""A tool for viewing, creating, and editing files with sandbox support.""" name: str = "str_replace_editor" description: str = _STR_REPLACE_EDITOR_DESCRIPTION parameters = {"type": "object","properties": {"command": { "enum": [...], "type": "string" }, # 此次命令是什么"path": {...}, # 文件或目录的绝对路径 "file_text": {...}, "old_str": {...},"new_str": {...},"insert_line": {...},"view_range": {...}, },"required": ["command", "path"],}执行工具:
-
命令调度: execute会先依据config.sandbox.use_sandbox选择文件操作器(沙箱/本地),再调用validate_path做路径/命令合法性校验(绝对路径、存在性、目录/文件匹配),最后分支执行具体子方法,每次写操作后把旧内容推入_file_history,供undo_edit回滚。 -
查看: view根据路径类型选择_view_directory或_view_file。前者直接跑find ... -maxdepth 2返回目录树,后者支持view_range=[start,end]截取片段,并用make_output模拟cat -n输出。 -
字符串替换: str_replace会先把文件与目标串expandtabs(制表符统一变成空格),严格要求old_str唯一(利用 count,若多次匹配还会返回出现的行号),然后整文件替换,并生成上下文片段给用户确认,提示重复编辑。 -
插入与撤销: insert将插入行拆成列表拼接并同样记录历史,undo_edit从_file_history栈弹出上一次内容写回,缺乏历史时抛错,避免无状态撤销。 -
输出格式: _make_output负责统一截断、展开 tab、添加行号,因此所有命令的反馈都贴近cat -n风格,用户在聊天窗口即可预览修改部分。
asyncdefexecute( self, *, command: Command, path: str, file_text: str | None = None, view_range: list[int] | None = None, old_str: str | None = None, new_str: str | None = None, insert_line: int | None = None, **kwargs: Any, ) -> str:"""Execute a file operation command."""# 先依据 config.sandbox.use_sandbox 选择文件操作器 operator = self._get_operator()# 调用 validate_path 做路径/命令合法性校验(绝对路径、存在性、目录/文件匹配)await self.validate_path(command, Path(path), operator)# 执行具体命令if command == "view": result = await self.view(path, view_range, operator)elif command == "create":if file_text isNone:raise ToolError("Parameter `file_text` is required for command: create")await operator.write_file(path, file_text) self._file_history[path].append(file_text) result = ToolResult(output=f"File created successfully at: {path}")elif command == "str_replace":if old_str isNone:raise ToolError("Parameter `old_str` is required for command: str_replace" ) result = await self.str_replace(path, old_str, new_str, operator)elif command == "insert":if insert_line isNone:raise ToolError("Parameter `insert_line` is required for command: insert" )if new_str isNone:raise ToolError("Parameter `new_str` is required for command: insert") result = await self.insert(path, insert_line, new_str, operator)elif command == "undo_edit": result = await self.undo_edit(path, operator)else:# This should be caught by type checking, but we include it for safetyraise ToolError(f'Unrecognized command {command}. The allowed commands for the {self.name} tool are: {", ".join(get_args(Command))}' )return str(result)2. 网页搜索工具
对上:给 Agent 提供了上网查信息的函数调用的能力
对下:封装了多搜索引擎与网页内容抓取的复杂逻辑,屏蔽细节,只返回一个干净的结构化结果给 Agent。
1、搜索工具定义
classWebSearch(BaseTool):"""Search the web for information using various search engines.""" name: str = "web_search" description: str = """Search the web for real-time information about any topic. This tool returns comprehensive search results with relevant information, URLs, titles, and descriptions. If the primary search engine fails, it automatically falls back to alternative engines.""" parameters: dict = {"type": "object","properties": {"query": {"type": "string","description": "(required) The search query to submit to the search engine.", },"num_results": {"type": "integer","description": "(optional) The number of search results to return. Default is 5.","default": 5, },"lang": {"type": "string","description": "(optional) Language code for search results (default: en).","default": "en", },"country": {"type": "string","description": "(optional) Country code for search results (default: us).","default": "us", },"fetch_content": {"type": "boolean","description": "(optional) Whether to fetch full content from result pages. Default is false.","default": False, }, },"required": ["query"], }# 定义了可使用的搜索工具 _search_engine: dict[str, WebSearchEngine] = {"google": GoogleSearchEngine(),"baidu": BaiduSearchEngine(),"duckduckgo": DuckDuckGoSearchEngine(),"bing": BingSearchEngine(), }#网页内容抓取器 content_fetcher: WebContentFetcher = WebContentFetcher()2、数据模型层
(1)单条搜索结果
classSearchResult(BaseModel):"""Represents a single search result returned by a search engine.""" model_config = ConfigDict(arbitrary_types_allowed=True)# 结果在搜索列表中的位置 position: int = Field(description="Position in search results") # 搜索结果的 URL url: str = Field(description="URL of the search result") # 标题 title: str = Field(default="", description="Title of the search result") # 搜索结果内容摘要 description: str = Field( default="", description="Description or snippet of the search result" )# 来源搜索引擎名称 source: str = Field(description="The search engine that provided this result") # 页面原始内容(可选) raw_content: Optional[str] = Field( default=None, description="Raw content from the search result page if available" )def__str__(self) -> str:"""String representation of a search result."""returnf"{self.title} ({self.url})"(2)搜索元数据
classSearchMetadata(BaseModel):"""Metadata about the search operation.""" model_config = ConfigDict(arbitrary_types_allowed=True) total_results: int = Field(description="Total number of results found") language: str = Field(description="Language code used for the search") country: str = Field(description="Country code used for the search")(3)完整响应
这是搜索工具的统一响应格式,自动将结构化json数据转换为 LLM 可读的文本输出。
classSearchResponse(ToolResult):"""Structured response from the web search tool, inheriting ToolResult."""# 记录这次实际执行的搜索词 query: str = Field(description="The search query that was executed") # 所有搜索结果的集合 results: List[SearchResult] = Field( default_factory=list, description="List of search results" )# 搜索的元数据 metadata: Optional[SearchMetadata] = Field( default=None, description="Metadata about the search" )# 用 model_validator 自动生成 output @model_validator(mode="after")defpopulate_output(self) -> "SearchResponse":"""Populate output or error fields based on search results."""if self.error:return self# 开头加一行标题:告诉模型“下面这些是某个 query 的搜索结果” result_text = [f"Search results for '{self.query}':"]# 遍历每一条 SearchResultfor i, result in enumerate(self.results, 1):# 去掉标题首尾空格,如果是空字符串,就用 "No title" 占位,避免出现空行让模型搞不清哪里是标题。 title = result.title.strip() or"No title" result_text.append(f"\n{i}. {title}")# 增加URL result_text.append(f" URL: {result.url}")# 果有简短描述,就加一行;没有就跳过,避免噪音。if result.description.strip(): result_text.append(f" Description: {result.description}")# 如果要提取原始内容,最多取前 1000 个字符让模型大致知道内容方向,避免把整页网页内容塞进上下文,浪费 token。if result.raw_content: content_preview = result.raw_content[:1000].replace("\n", " ").strip()if len(result.raw_content) > 1000: content_preview += "..." result_text.append(f" Content: {content_preview}")# 在底部追加元数据if self.metadata: result_text.extend( [f"\nMetadata:",f"- Total results: {self.metadata.total_results}",f"- Language: {self.metadata.language}",f"- Country: {self.metadata.country}", ] )# 终把所有行 join 成 output self.output = "\n".join(result_text)return self3、整体搜索流程
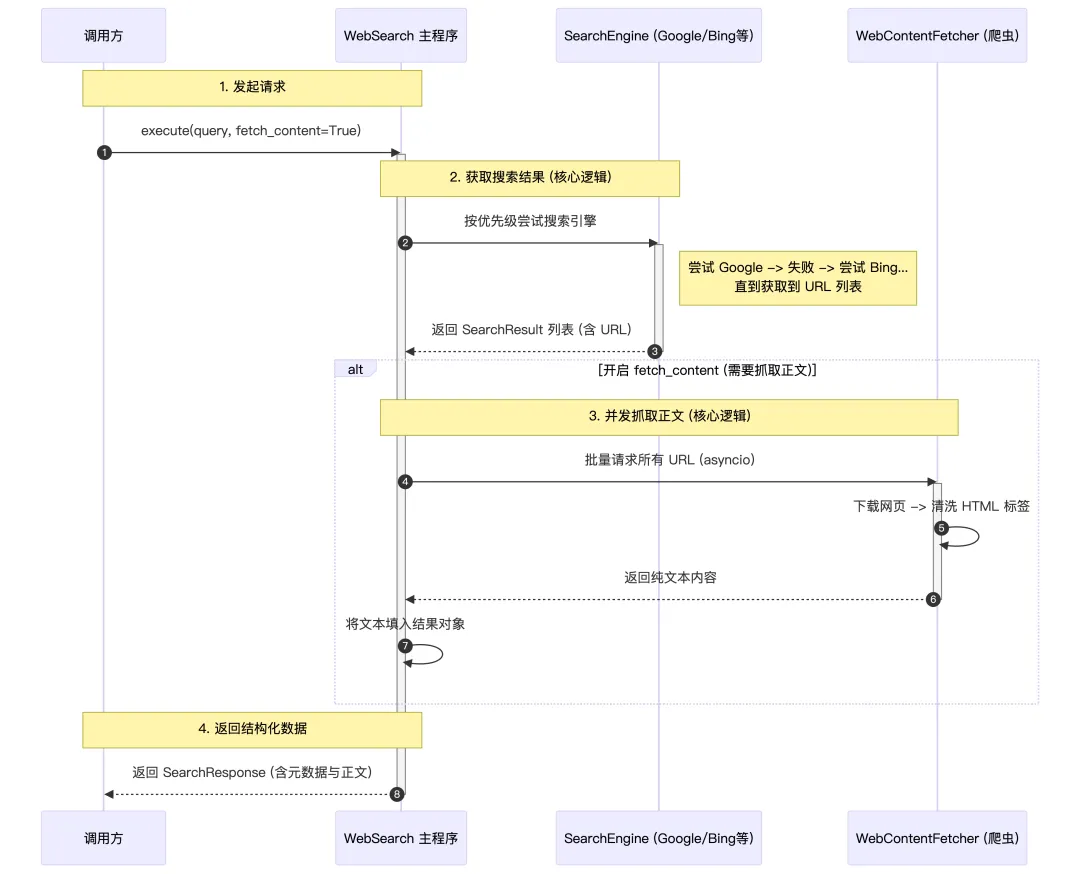
4、执行搜索
-
接收 AI Agent 传入的参数(query 必填,其他可选) -
从全局配置 config.search_config读取默认值: 1.retry_delay: 重试等待时间(默认60秒) 2.max_retries: 最大重试次数(默认3次) 3.lang:语言代码(默认 “en“) 4.country: 国家代码(默认 “us”) 5.fetch_content:是否要深入抓取搜索结果页面的完整内容 -
组装搜索参数 search_params
asyncdefexecute( self, query: str, num_results: int = 5, lang: Optional[str] = None, country: Optional[str] = None, fetch_content: bool = False, ) -> SearchResponse:# 1. 从配置读取重试延迟和最大重试次数,循环重试(默认最多3次)# 2. 按搜索引擎优先级顺序尝试所有搜索引擎for retry_count in range(max_retries + 1): results = await self._try_all_engines(query, num_results, search_params)if results:# 成功:可选抓取内容,返回结果if fetch_content: results = await self._fetch_content_for_results(results)return SearchResponse(status="success", ...)# 失败:等待后重试await asyncio.sleep(retry_delay)5、尝试所有搜索引擎
-
按顺序尝试每个搜索引擎 -
第一个成功的引擎返回结果后立即停止 -
将底层的 SearchItem转换为SearchResult
asyncdef_try_all_engines( self, query: str, num_results: int, search_params: Dict[str, Any] ) -> List[SearchResult]:"""Try all search engines in the configured order.""" engine_order = self._get_engine_order() # 获取引擎顺序for engine_name in engine_order:# 依次尝试每个搜索引擎 search_items = await self._perform_search_with_engine(...)if search_items:return [SearchResult(...) for item in search_items]return [] # 全部失败def_get_engine_order(self) -> List[str]:"""Determines the order in which to try search engines."""# 优先级:配置的首选引擎 > 配置的备用引擎 > 其他引擎 preferred = config.search_config.engine # 如 "google" fallbacks = config.search_config.fallback_engines # 如 ["bing", "duckduckgo"]6、各种搜索引擎
所有搜索引擎都继承自 WebSearchEngine 基类,返回统一的 SearchItem 结构:
classSearchItem(BaseModel):"""Represents a single search result item""" title: str = Field(description="The title of the search result") url: str = Field(description="The URL of the search result") description: Optional[str] = Field( default=None, description="A description or snippet of the search result" )def__str__(self) -> str:"""String representation of a search result item."""returnf"{self.title} - {self.url}"搜索引擎对比:
|
|
Bing | DuckDuckGo | Baidu | |
|---|---|---|---|---|
| 实现方式 |
|
|
|
|
| 国内可用 |
|
|
|
|
| 反爬能力 |
|
|
|
|
| 搜索质量 |
|
|
|
|
| 隐私保护 |
|
|
|
|
| 优点 |
|
|
|
|
| 缺点 |
|
|
|
|
| 推荐场景 |
|
|
|
|
3. 任务规划工具
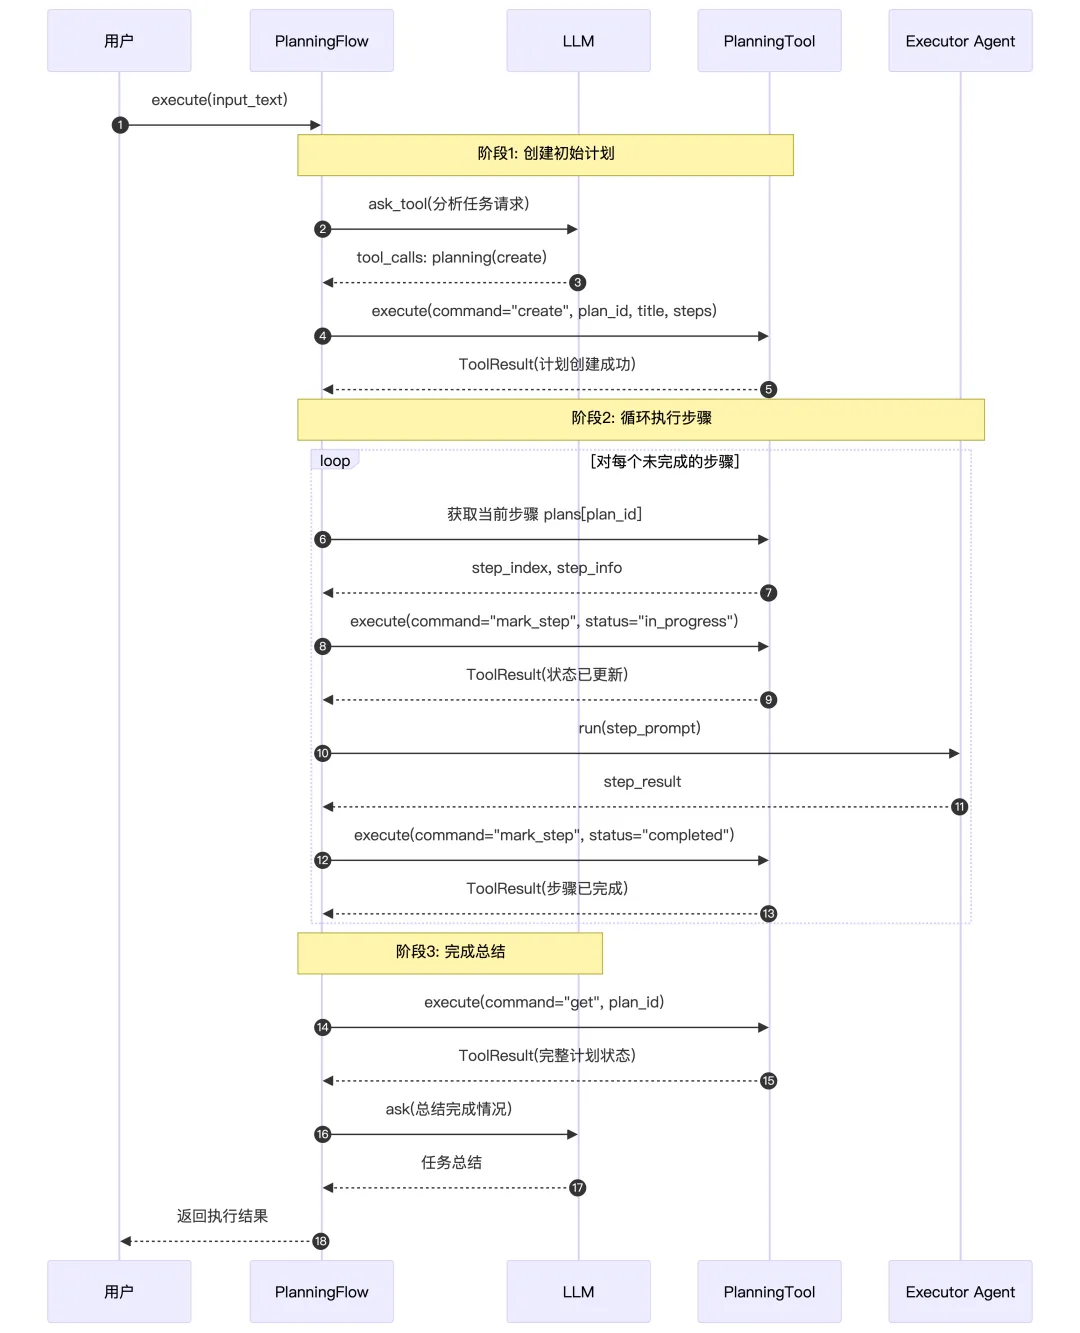
这是一个规划工具,用于帮助 Agent 创建和管理复杂任务的执行计划。这个工具主要干的事是:
把计划变成一个显式的数据结构(plan_id + title + steps + 每步状态和备注),提供一组类似小型“看板工具”的操作命令:create / update / list / get / set_active / mark_step / delete,让 Agent 可以在对话过程中不断查看、修改、打勾步骤,把长期任务做成“可视、可追踪”的流程,用显式结构化记忆,来替代一次性长CoT 的那种范式。
1、工具定义
_PLANNING_TOOL_DESCRIPTION = """A planning tool that allows the agent to create and manage plans for solving complex tasks.The tool provides functionality for creating plans, updating plan steps, and tracking progress."""classPlanningTool(BaseTool):""" A planning tool that allows the agent to create and manage plans for solving complex tasks. The tool provides functionality for creating plans, updating plan steps, and tracking progress. """ name: str = "planning" description: str = _PLANNING_TOOL_DESCRIPTION parameters: dict = {"type": "object","properties": {"command": {"description": "The command to execute. Available commands: create, update, list, get, set_active, mark_step, delete.","enum": ["create","update","list","get","set_active","mark_step","delete", ],"type": "string", },"plan_id": {"description": "Unique identifier for the plan. Required for create, update, set_active, and delete commands. Optional for get and mark_step (uses active plan if not specified).","type": "string", },"title": {"description": "Title for the plan. Required for create command, optional for update command.","type": "string", },"steps": {"description": "List of plan steps. Required for create command, optional for update command.","type": "array","items": {"type": "string"}, },"step_index": {"description": "Index of the step to update (0-based). Required for mark_step command.","type": "integer", },"step_status": {"description": "Status to set for a step. Used with mark_step command.","enum": ["not_started", "in_progress", "completed", "blocked"],"type": "string", },"step_notes": {"description": "Additional notes for a step. Optional for mark_step command.","type": "string", }, },"required": ["command"],"additionalProperties": False, }支持的操作:
|
|
|
|
|---|---|---|
|
|
|
|
|
|
|
|
|
|
|
|
|
|
|
|
|
|
|
|
|
|
|
|
|
|
|
|
2、时序图
4. LLM输出结构化工具
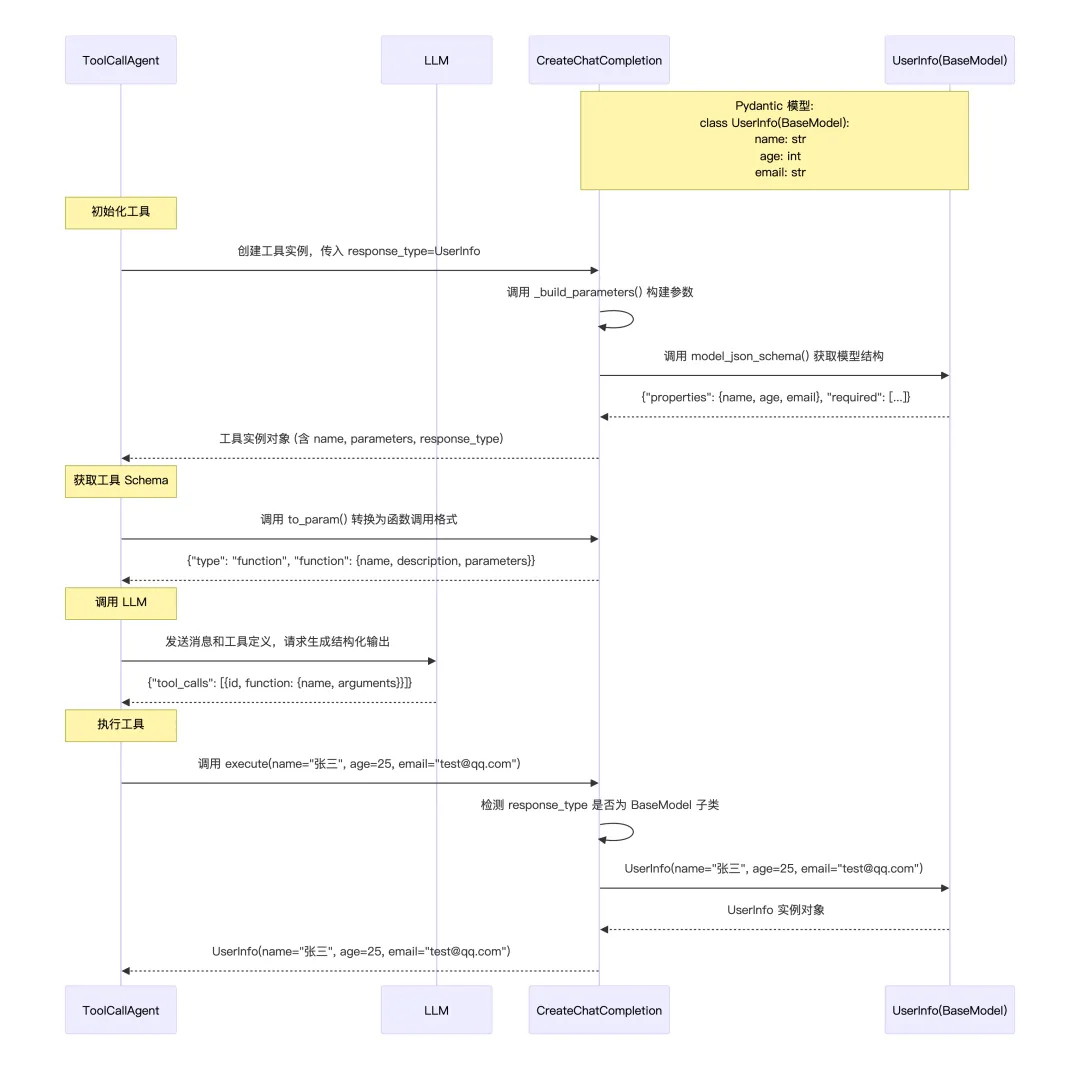
这个 CreateChatCompletion 是一个结构化输出生成器,专门用来告诉大模型必须按指定的格式输出结果,然后把模型输出再自动转成强类型的 Python 对象 / Pydantic 模型,方便后续代码使用。
1、工具定义
classCreateChatCompletion(BaseTool): name: str = "create_chat_completion" description: str = ("Creates a structured completion with specified output formatting." )# Python 原始类型 ➜ JSON Schema 类型的映射 type_mapping: dict = { str: "string", int: "integer", float: "number", bool: "boolean", dict: "object", list: "array", } response_type: Optional[Type] = None required: List[str] = Field(default_factory=lambda: ["response"])2、初始化与参数构建
def__init__(self, response_type: Optional[Type] = str): super().__init__()# 在创建工具实例时就告诉它想要什么类型 self.response_type = response_type# 生成一个针对这个类型的JSON Schema,作为LLM调用这个工具时的入参 self.parameters = self._build_parameters()def_build_parameters(self) -> dict:"""Build parameters schema based on response type."""# 要求模型返回类型是str时,当模型调用这个工具需要给出:{ "response": "xxxxxx" }if self.response_type == str:return {"type": "object","properties": {"response": {"type": "string","description": "The response text that should be delivered to the user.", }, },"required": self.required, }# 如果你传入的是一个 Pydantic 模型类,就可以让 LLM 按这个模型的字段来输出结构化结果。if isinstance(self.response_type, type) and issubclass( self.response_type, BaseModel ): schema = self.response_type.model_json_schema()return {"type": "object","properties": schema["properties"],"required": schema.get("required", self.required), }# List / Dict / Union 等复杂类型在这里处理return self._create_type_schema(self.response_type)3、执行与类型转换
把模型填好的参数转成你想要的 Python 对象
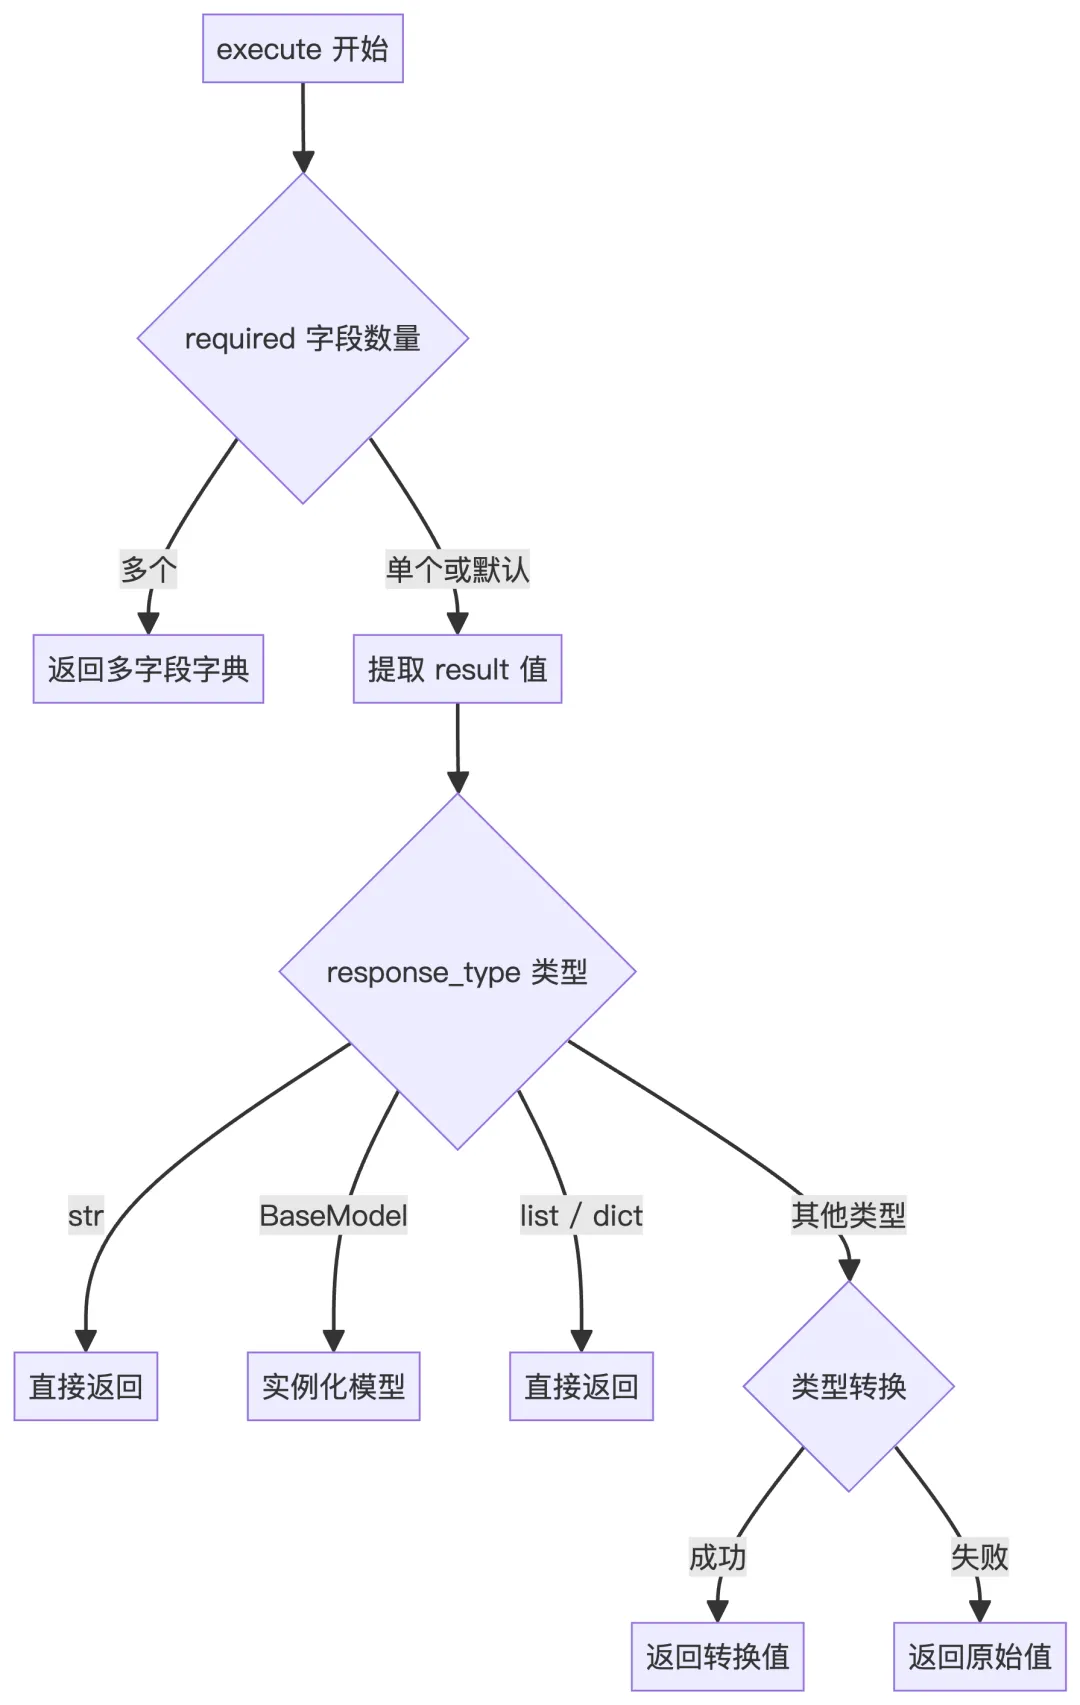
asyncdefexecute(self, required: list | None = None, **kwargs) -> Any:"""Execute the chat completion with type conversion. Args: required: List of required field names or None **kwargs: Response data Returns: Converted response based on response_type """ required = required or self.required# 解析 required 字段if isinstance(required, list) and len(required) > 0:# 单字段 → 提取该字段值if len(required) == 1: required_field = required[0] result = kwargs.get(required_field, "")else:# 多字段 → 返回包含所有字段的字典return {field: kwargs.get(field, "") for field in required}else: required_field = "response" result = kwargs.get(required_field, "")# Type conversion logicif self.response_type == str:return resultif isinstance(self.response_type, type) and issubclass( self.response_type, BaseModel ):return self.response_type(**kwargs)if get_origin(self.response_type) in (list, dict):return result # Assuming result is already in correct formattry:return self.response_type(result)except (ValueError, TypeError):return result4、时序图
这个工具的真正作用不是执行什么任务,而是用自己的输入 Schema 来约束 LLM 的输出格式,也就是我们在提供这个工具给 LLM 的时候,会告诉LLM要按照某种格式(提前定义的Schema)来输出调用请求,execute() 里面其实没做什么事情,就是把 LLM 生成的结构化数据取出来而已。
5. 浏览器工具
这个 BrowserUseTool 本质上是把一个可持续保持状态的浏览器,包装成一个统一的工具接口,给 Agent 调用,它既能像人一样点网页、填表、滚动页面,还能用 LLM 再读一遍网页来提炼信息。
1. 技术栈关系
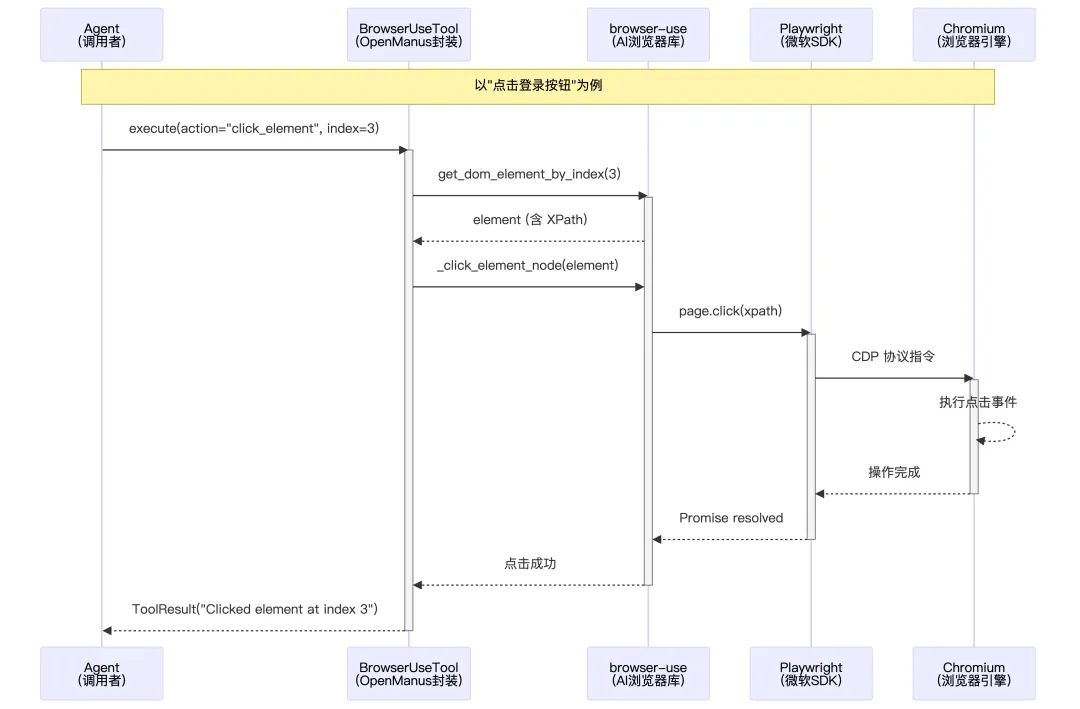
OpenManus 的浏览器操作采用三层 SDK 架构:
-
最底层是微软的 Playwright,它通过 CDP 协议直接控制 Chromium 浏览器,提供页面导航、元素点击、截图等原子操作。 -
中间层是 browser-use,它在 Playwright 之上封装了一套 AI 友好的抽象,将页面上所有可交互元素提取出来并分配索引(如 [0] 按钮、[1] 输入框),让 Agent 无需了解 CSS 选择器就能通过索引操作元素; -
最上层是 BrowserUseTool,它是 OpenManus 的业务封装,统一了 16 种浏览器动作的调用接口(导航、点击、输入、滚动、标签管理等),并集成了配置管理、异步锁、LLM 内容提取等功能。
总结:浏览器先把原始 DOM 交给 browser-use 的 DOM 扫描服务,扫描服务从中挑出关键可交互元素,为每个元素分配一个索引并记录 XPath,再把这些元素整理成一份简洁的“元素菜单”文本发给大模型(类似于{index:0,tag:button,text:登录,xpath:/html/body/div[1]/button[1]}),大模型只需要用这些索引来描述它想操作的元素,具体怎样在真实页面上找到并点击/输入,则由 browser-use和Playwright框架负责负责。
2. 工具定义
支持 16 种浏览器操作: 覆盖了导航、交互、滚动、内容提取、标签管理等完整场景,且定义了每个 action 需要的必要参数。
_BROWSER_DESCRIPTION = """\A powerful browser automation tool that allows interaction with web pages through various actions.* This tool provides commands for controlling a browser session, navigating web pages, and extracting information* It maintains state across calls, keeping the browser session alive until explicitly closed* Use this when you need to browse websites, fill forms, click buttons, extract content, or perform web searches* Each action requires specific parameters as defined in the tool's dependenciesKey capabilities include:* Navigation: Go to specific URLs, go back, search the web, or refresh pages* Interaction: Click elements, input text, select from dropdowns, send keyboard commands* Scrolling: Scroll up/down by pixel amount or scroll to specific text* Content extraction: Extract and analyze content from web pages based on specific goals* Tab management: Switch between tabs, open new tabs, or close tabsNote: When using element indices, refer to the numbered elements shown in the current browser state."""Context = TypeVar("Context")classBrowserUseTool(BaseTool, Generic[Context]): name: str = "browser_use" description: str = _BROWSER_DESCRIPTION parameters: dict = {"type": "object","properties": {"action": {"type": "string","enum": ["go_to_url","click_element","input_text","scroll_down","scroll_up","scroll_to_text","send_keys","get_dropdown_options","select_dropdown_option","go_back","web_search","wait","extract_content","switch_tab","open_tab","close_tab", ],"description": "The browser action to perform", },"url": {"type": "string","description": "URL for 'go_to_url' or 'open_tab' actions", },"index": {"type": "integer","description": "Element index for 'click_element', 'input_text', 'get_dropdown_options', or 'select_dropdown_option' actions", },"text": {"type": "string","description": "Text for 'input_text', 'scroll_to_text', or 'select_dropdown_option' actions", },"scroll_amount": {"type": "integer","description": "Pixels to scroll (positive for down, negative for up) for 'scroll_down' or 'scroll_up' actions", },"tab_id": {"type": "integer","description": "Tab ID for 'switch_tab' action", },"query": {"type": "string","description": "Search query for 'web_search' action", },"goal": {"type": "string","description": "Extraction goal for 'extract_content' action", },"keys": {"type": "string","description": "Keys to send for 'send_keys' action", },"seconds": {"type": "integer","description": "Seconds to wait for 'wait' action", }, },"required": ["action"],"dependencies": {"go_to_url": ["url"],"click_element": ["index"],"input_text": ["index", "text"],"switch_tab": ["tab_id"],"open_tab": ["url"],"scroll_down": ["scroll_amount"],"scroll_up": ["scroll_amount"],"scroll_to_text": ["text"],"send_keys": ["keys"],"get_dropdown_options": ["index"],"select_dropdown_option": ["index", "text"],"go_back": [],"web_search": ["query"],"wait": ["seconds"],"extract_content": ["goal"], }, }3. 工具使用时序图
|
|
|
|
|---|---|---|
|
|
|
|
|
|
|
|
|
|
|
|
|
|
|
|
|
|
|
|
|
|
|
|
|
|
|
|
|
|
|
|
|
|
|
|
|
|
|
|
|
|
|
|
|
|
|
|
|
|
|
|
|
|
|
|
|
|
|
|
|
|
|
|
|
|
|
|
4、浏览器初始化
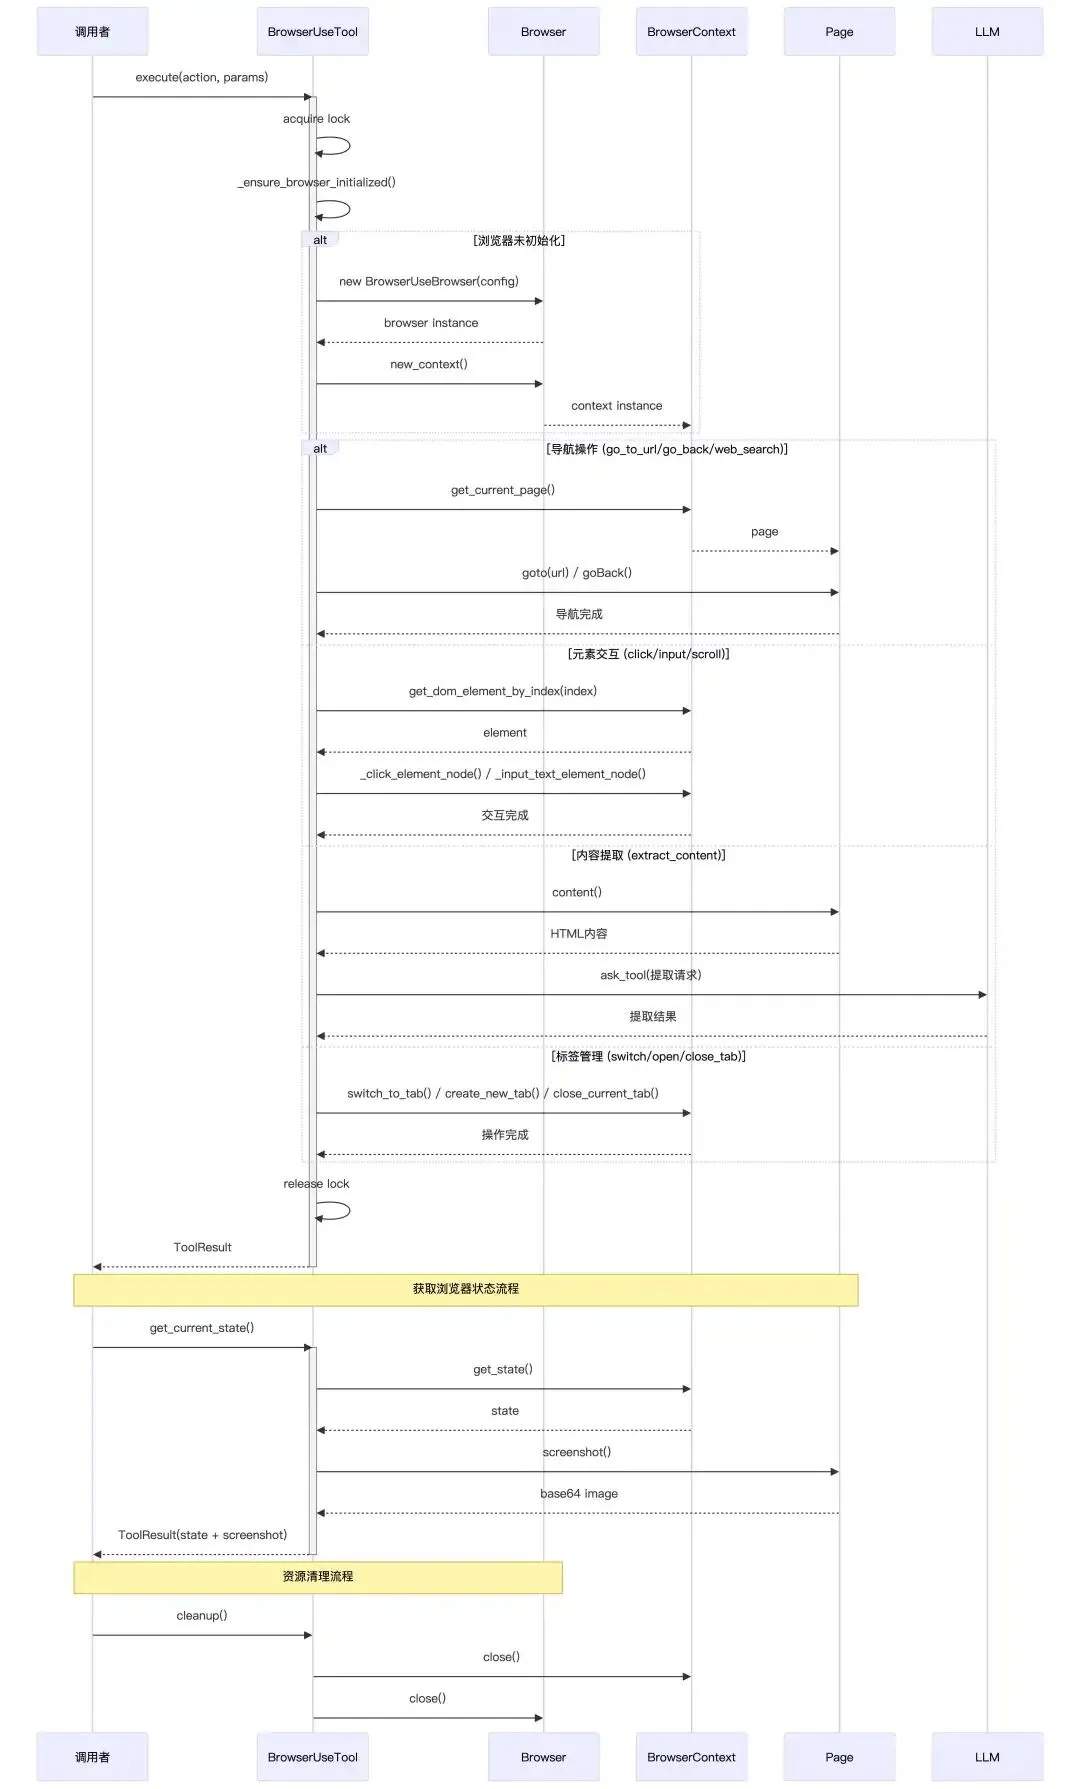
工具首次被调用时才真正启动浏览器且创建上下文,之后所有操作复用这一套对象,实现“有状态的浏览器 Session”。
asyncdef_ensure_browser_initialized(self) -> BrowserContext:"""Ensure browser and context are initialized."""# 确保浏览器只初始化一次,默认配置:有头模式,会显示浏览器窗口(便于调试)、禁用安全限制,允许跨域操作等if self.browser isNone: browser_config_kwargs = {"headless": False, "disable_security": True}# 封装了代理服务器的完整认证信息,支持 HTTP/HTTPS/SOCKS 代理if config.browser_config:from browser_use.browser.browser import ProxySettings# 代理相关配置if config.browser_config.proxy and config.browser_config.proxy.server: browser_config_kwargs["proxy"] = ProxySettings( server=config.browser_config.proxy.server, username=config.browser_config.proxy.username, password=config.browser_config.proxy.password, ) browser_attrs = ["headless", # 无头模式(无 UI 界面运行)"disable_security", # 禁用浏览器安全策略"extra_chromium_args",# 额外的 Chromium 启动参数"chrome_instance_path",# 指定本地 Chrome 可执行文件路径"wss_url",# WebSocket 远程浏览器连接 URL"cdp_url",# Chrome DevTools Protocol 连接 URL ]for attr in browser_attrs: value = getattr(config.browser_config, attr, None)if value isnotNone:ifnot isinstance(value, list) or value: browser_config_kwargs[attr] = value# 浏览器实例创建 self.browser = BrowserUseBrowser(BrowserConfig(**browser_config_kwargs))# 浏览器上下文创建if self.context isNone: context_config = BrowserContextConfig()# if there is context config in the config, use it.if ( config.browser_configand hasattr(config.browser_config, "new_context_config")and config.browser_config.new_context_config ): context_config = config.browser_config.new_context_config self.context = await self.browser.new_context(context_config) self.dom_service = DomService(await self.context.get_current_page())return self.context5、执行工具
大致流程:
-
拿锁,防止多个协程同时对浏览器做操作导致状态错乱。 -
根据 action分支,完成对应操作 -
用 ToolResult返回成功输出或错误信息
async function execute( action, url = null, index = null, text = null, scroll_amount = null, tab_id = null, query = null, goal = null, keys = null, seconds = null, ...extra_kwargs) -> ToolResult:# 1. 加锁,保证同一时间只有一个操作在控制浏览器withasync lock:try:# 2. 确保 browser/context 已初始化(懒加载) context = await ensure_browser_initialized()# 3. 从配置拿最大页面内容长度(用于抽取) max_content_length = config.browser_config.max_content_length or2000# 4. 根据 action 分支处理 switch action:# ===== 导航相关 ===== case "go_to_url":if url is empty:return ToolResult(error = "URL 必填") page = context.get_current_page() page.goto(url) page.wait_for_load()return ToolResult(output = "Navigated to url") case "go_back": context.go_back()return ToolResult(output = "Navigated back") case "refresh": context.refresh_page()return ToolResult(output = "Refreshed current page") case "web_search":if query is empty:return ToolResult(error = "query 必填")# 用内部 WebSearch 工具搜索 search_response = web_search_tool.execute( query = query, fetch_content = true, num_results = 1 )# 取第一条结果,浏览器跳过去 first_result = search_response.results[0] target_url = first_result.url page = context.get_current_page() page.goto(target_url) page.wait_for_load()# 直接把搜索工具的结构化结果返回return search_response# ===== 元素交互 ===== case "click_element":if index is null:return ToolResult(error = "index 必填") element = context.get_dom_element_by_index(index)if element 不存在:return ToolResult(error = "元素不存在") download_path = context.click_element(element) msg = "Clicked element at index index"if download_path 存在: msg += " 并下载文件到 download_path"return ToolResult(output = msg) case "input_text":if index 为 null 或 text 为空:return ToolResult(error = "index 和 text 必填") element = context.get_dom_element_by_index(index)if element 不存在:return ToolResult(error = "元素不存在") context.input_text(element, text)return ToolResult(output = "在 index 位置输入 text") case "scroll_down"or"scroll_up": direction = +1if action == "scroll_down"else-1 amount = scroll_amount 如果有 否则用 context.config.browser_window_size.height context.execute_js("window.scrollBy(0, direction * amount)")return ToolResult(output = "向下/上滚动 amount 像素") case "scroll_to_text":if text 为空:return ToolResult(error = "text 必填") page = context.get_current_page()try: locator = page.find_by_text(text) locator.scroll_into_view()return ToolResult(output = "滚动到包含该文本的位置") catch any_error:return ToolResult(error = "滚动失败,原因: error") case "send_keys":if keys 为空:return ToolResult(error = "keys 必填") page = context.get_current_page() page.keyboard.press(keys)return ToolResult(output = "发送按键 keys")# ===== 下拉框操作 ===== case "get_dropdown_options":if index 为 null:return ToolResult(error = "index 必填") element = context.get_dom_element_by_index(index)if element 不存在:return ToolResult(error = "元素不存在") page = context.get_current_page() options = page.evaluate_js("根据 element.xpath 找到 select,遍历 options,返回 text/value/index 列表" )return ToolResult(output = "Dropdown options: options") case "select_dropdown_option":if index 为 null 或 text 为空:return ToolResult(error = "index 和 text 必填") element = context.get_dom_element_by_index(index)if element 不存在:return ToolResult(error = "元素不存在") page = context.get_current_page() page.select_option_by_label(xpath = element.xpath, label = text)return ToolResult(output = "选择了指定文本的下拉选项")# ===== 内容抽取 ===== case "extract_content":if goal 为空:return ToolResult(error = "goal 必填") page = context.get_current_page()# 1)抓取整页 HTML → 转 Markdown html = page.content() markdown_content = html_to_markdown(html) truncated = markdown_content 截断到 max_content_length# 2)构造一个 extraction prompt(包含 goal + 页面内容) prompt = """ 你的任务是根据 goal 从页面里抽取相关信息, 如果 goal 很模糊,就总结页面。用 JSON 格式返回。 goal: ... content: truncated """ messages = [{ role: "system", content: prompt }]# 3)定义抽取函数的 JSON Schema(function calling) extraction_function_schema = { name: "extract_content", parameters: { extracted_content: { text: string, metadata: { source: string } } } }# 4)调用 LLM,强制使用这个函数 llm_response = llm.ask_tool( messages = messages, tools = [extraction_function_schema], tool_choice = "required" )if llm_response 有 tool_calls: args = parse_json(llm_response.tool_calls[0].arguments) extracted_content = args["extracted_content"]return ToolResult( output = "Extracted from page: extracted_content" )else:return ToolResult(output = "没有抽取到任何内容")# ===== Tab 管理 ===== case "switch_tab":if tab_id 为 null:return ToolResult(error = "tab_id 必填") context.switch_to_tab(tab_id) page = context.get_current_page() page.wait_for_load()return ToolResult(output = "切换到指定 tab") case "open_tab":if url 为空:return ToolResult(error = "url 必填") context.create_new_tab(url)return ToolResult(output = "新开标签并打开 url") case "close_tab": context.close_current_tab()return ToolResult(output = "关闭当前标签页")# ===== 等待 ===== case "wait": seconds_to_wait = seconds 如果有,否则 3 async_sleep(seconds_to_wait)return ToolResult(output = "等待了 seconds_to_wait 秒")# ===== 未知动作 ===== default:return ToolResult(error = "Unknown action")except any_error as e:# 统一异常兜底return ToolResult(error = f"Browser action failed: e")6. Browser和Context的区别
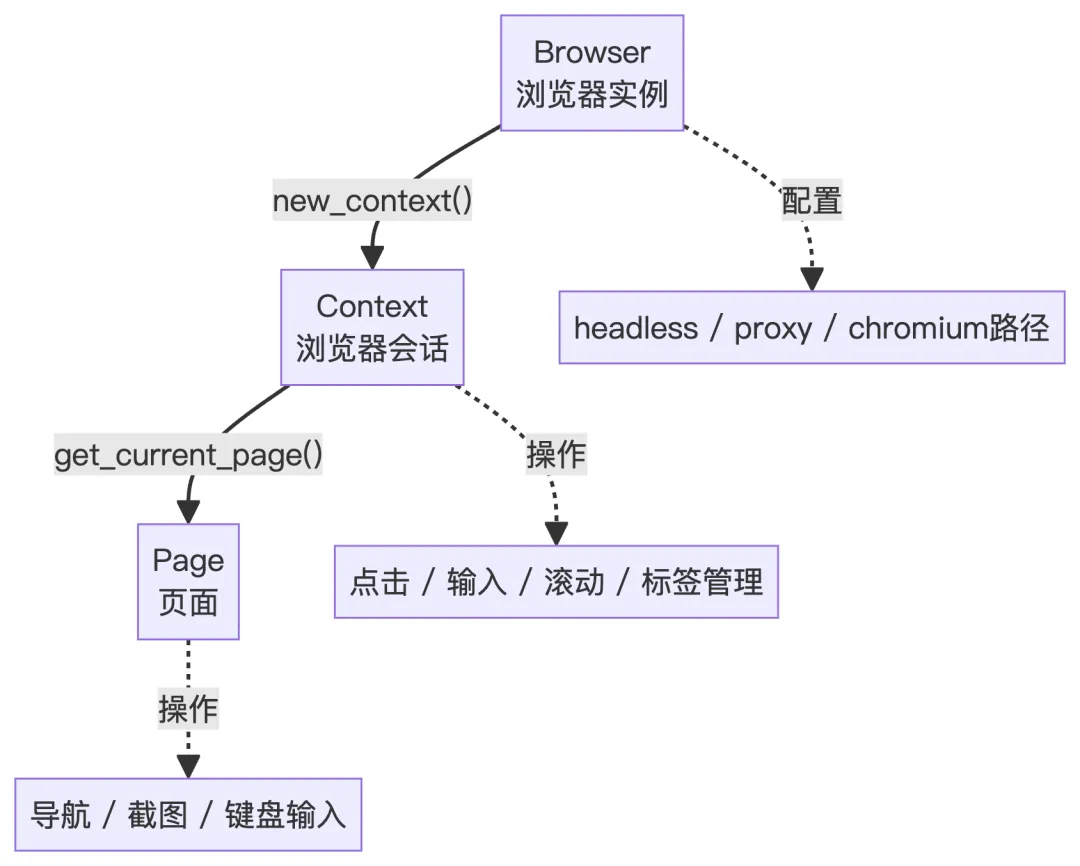
Browser Context是一个独立的浏览器会话环境,整个Chrome应用是一个浏览器实例,Chrome 里每个用户配置文件,或者每个无痕窗口就是一个Browser Context,每个Context里是可以开多个Tab的。
6. 网页爬虫工具
这个 Crawl4aiTool 就是给 Agent 用的“网页正文抽取 + 清洗器”,主要干的事:
接收一个或多个 URL,调用第三方库 Crawl4AI(一个专门为 LLM 设计的高性能爬虫库),在headless browser(没有界面、后台跑的浏览器进程)里打开页面,把网页内容抽成干净的 Markdown,返回一个带有:抽取内容预览、词数、链接数量、图片数量、每个 URL 的耗时以及成功 / 失败状态的文本总结,封装在 ToolResult 里给 Agent 用。
1、工具定义
classCrawl4aiTool(BaseTool):""" Web crawler tool powered by Crawl4AI. Provides clean markdown extraction optimized for AI processing. """ name: str = "crawl4ai" description: str = """Web crawler that extracts clean, AI-ready content from web pages. Features: - Extracts clean markdown content optimized for LLMs - Handles JavaScript-heavy sites and dynamic content - Supports multiple URLs in a single request - Fast and reliable with built-in error handling Perfect for content analysis, research, and feeding web content to AI models.""" parameters: dict = {"type": "object","properties": {"urls": { # 要爬的 URL 列表"type": "array","items": {"type": "string"},"description": "(required) List of URLs to crawl. Can be a single URL or multiple URLs.","minItems": 1, },"timeout": { # 每个 URL 的页面加载超时时间(秒)"type": "integer","description": "(optional) Timeout in seconds for each URL. Default is 30.","default": 30,"minimum": 5,"maximum": 120, },"bypass_cache": { # 是否绕过缓存"type": "boolean","description": "(optional) Whether to bypass cache and fetch fresh content. Default is false.","default": False, },"word_count_threshold": { # 内容块的最小词数阈值,太短就不当作有效内容(比如导航、按钮、页眉页脚)"type": "integer","description": "(optional) Minimum word count for content blocks. Default is 10.","default": 10,"minimum": 1, }, },"required": ["urls"], }2、工具执行
function crawl4ai(urls, timeout=30, bypass_cache=false, word_threshold=10):# 1. 统一成列表 url_list = (urls is str) ? [urls] : urls# 2. 过滤合法 URL valid_urls = [u for u in url_list if is_valid_http_url(u)]if valid_urls is empty:return ToolResult(error="No valid URLs provided")# 3. 配置 Crawl4AI browser_config = BrowserConfig(...) run_config = CrawlerRunConfig( cache_mode = BYPASS if bypass_cache else ENABLED, word_count_threshold = word_threshold, ... ) results = [] success_count = 0 fail_count = 0# 4. 复用一个 AsyncWebCrawlerwith AsyncWebCrawler(browser_config) as crawler:for each url in valid_urls:try: start = now() result = crawler.arun(url, run_config) cost = now() - startif result.success: stats = { word_count: count_words(result.markdown), links_count: count_internal_external_links(result.links), images_count: count_images(result.media), } save results[url] = { success=True, markdown, stats, cost } success_count++else: save results[url] = { success=False, error_message, cost } fail_count++except Exception as e: save results[url] = { success=False, error_message=str(e) } fail_count++# 5. 把结果格式化成 summary 文本 text = format_summary(results, success_count, fail_count)return ToolResult(output=text)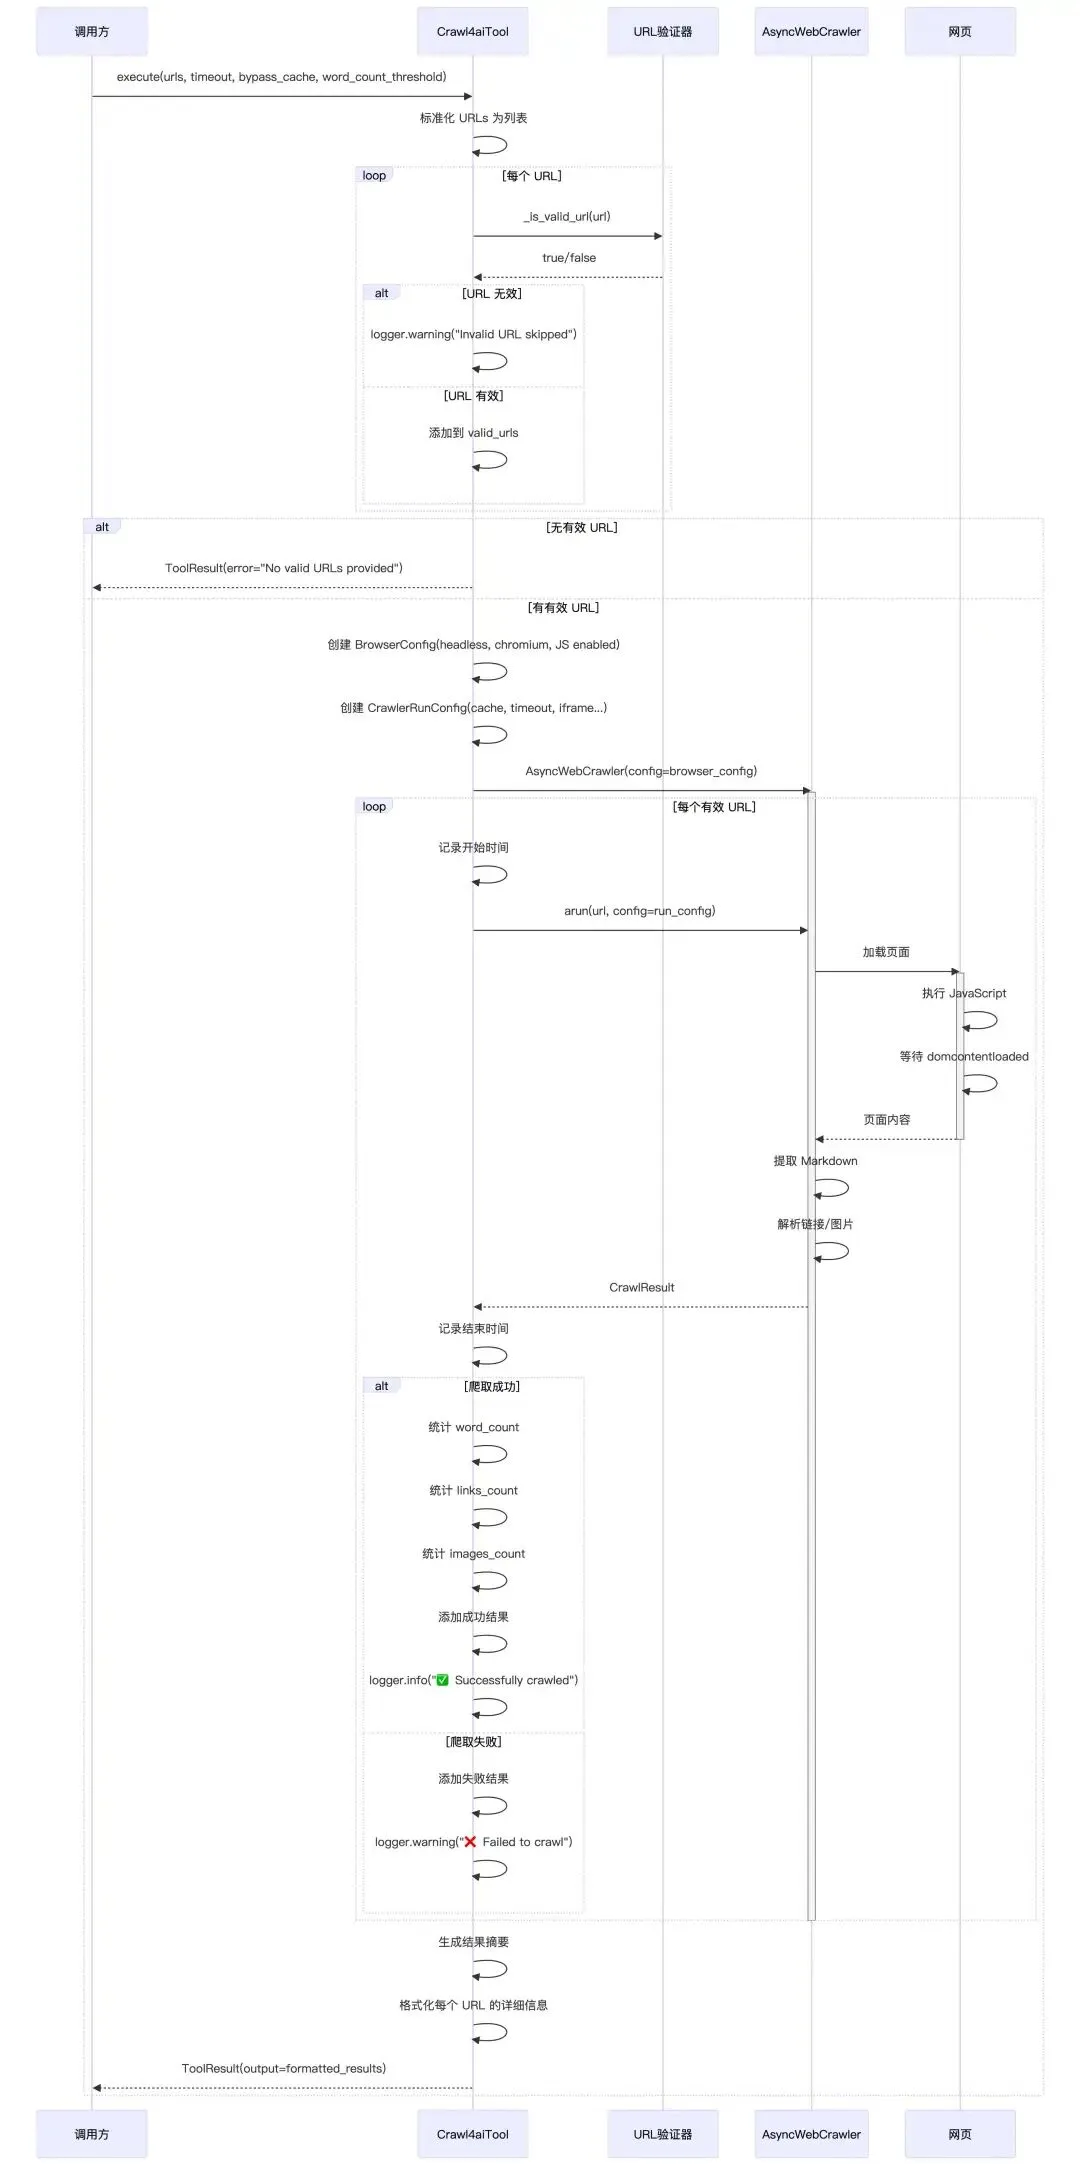
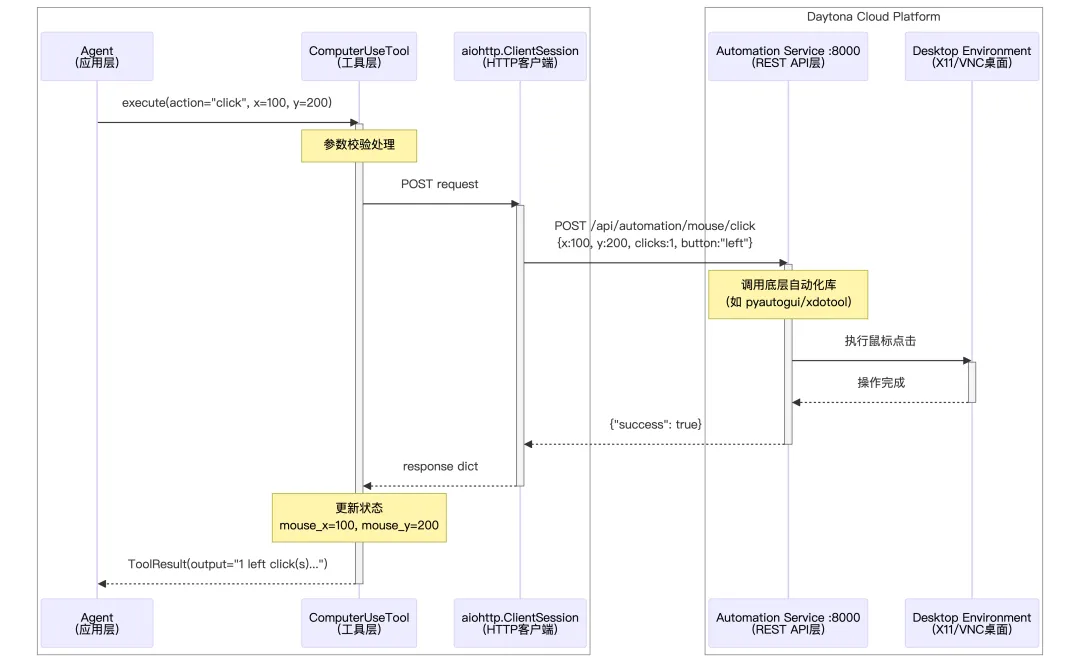
7. 计算机操作工具
这是一个计算机自动化工具,用于控制远程沙箱环境中的桌面界面。它通过 HTTP API 与自动化服务通信,实现鼠标、键盘和截图等操作。
1. 键盘和鼠标支持
-
KEYBOARD_KEYS:支持的键盘按键列表,包含字母、数字、功能键、组合键(如 ctrl+c、alt+tab) -
MOUSE_BUTTONS:支持的鼠标按键(左、右、中键)
KEYBOARD_KEYS = ["a","b","c","d","e","f","g","h","i","j","k","l","m","n","o","p","q","r","s","t","u","v","w","x","y","z","0","1","2","3","4","5","6","7","8","9","enter","esc","backspace","tab","space","delete","ctrl","alt","shift","win","up","down","left","right","f1","f2","f3","f4","f5","f6","f7","f8","f9","f10","f11","f12","ctrl+c","ctrl+v","ctrl+x","ctrl+z","ctrl+a","ctrl+s","alt+tab","alt+f4","ctrl+alt+delete",]MOUSE_BUTTONS = ["left", "right", "middle"]2. 工具定义
_COMPUTER_USE_DESCRIPTION = """\A comprehensive computer automation tool that allows interaction with the desktop environment.* This tool provides commands for controlling mouse, keyboard, and taking screenshots* It maintains state including current mouse position* Use this when you need to automate desktop applications, fill forms, or perform GUI interactionsKey capabilities include:* Mouse Control: Move, click, drag, scroll* Keyboard Input: Type text, press keys or key combinations* Screenshots: Capture and save screen images* Waiting: Pause execution for specified duration"""classComputerUseTool(SandboxToolsBase):"""Computer automation tool for controlling the desktop environment.""" name: str = "computer_use" description: str = _COMPUTER_USE_DESCRIPTION parameters: dict = {"type": "object","properties": {"action": {"type": "string","enum": ["move_to","click","scroll","typing","press","wait","mouse_down","mouse_up","drag_to","hotkey","screenshot", ],"description": "The computer action to perform", },"x": {"type": "number", "description": "X coordinate for mouse actions"},"y": {"type": "number", "description": "Y coordinate for mouse actions"},"button": {"type": "string","enum": MOUSE_BUTTONS,"description": "Mouse button for click/drag actions","default": "left", },"num_clicks": {"type": "integer","description": "Number of clicks","enum": [1, 2, 3],"default": 1, },"amount": {"type": "integer","description": "Scroll amount (positive for up, negative for down)","minimum": -10,"maximum": 10, },"text": {"type": "string", "description": "Text to type"},"key": {"type": "string","enum": KEYBOARD_KEYS,"description": "Key to press", },"keys": {"type": "string","enum": KEYBOARD_KEYS,"description": "Key combination to press", },"duration": {"type": "number","description": "Duration in seconds to wait","default": 0.5, }, },"required": ["action"],"dependencies": {"move_to": ["x", "y"],"click": [],"scroll": ["amount"],"typing": ["text"],"press": ["key"],"wait": [],"mouse_down": [],"mouse_up": [],"drag_to": ["x", "y"],"hotkey": ["keys"],"screenshot": [], }, }支持的 11 种操作:
|
|
|
|
|---|---|---|
|
|
|
|
|
|
|
|
|
|
|
|
|
|
|
|
|
|
|
|
|
|
|
|
|
|
|
|
|
|
|
|
|
|
|
|
|
|
|
|
|
|
|
|
3. 工具执行
所有API操作请求,都是通过HTTP发送到沙箱
async function execute(action, x, y, button, num_clicks, amount, text, key, keys, duration): TRY: SWITCH action: CASE "move_to": IF x 或 y 为空: RETURN 错误("需要 x 和 y 坐标") x_int, y_int = 四舍五入(x, y) result = API请求(POST, "/automation/mouse/move", {x, y}) IF 成功: 更新鼠标位置(x_int, y_int) RETURN 成功("移动到 (x, y)") ELSE: RETURN 错误(result.error) CASE "click": x_val = x ?? 当前鼠标x y_val = y ?? 当前鼠标y x_int, y_int = 四舍五入(x_val, y_val) result = API请求(POST, "/automation/mouse/click", {x, y, clicks, button}) IF 成功: 更新鼠标位置(x_int, y_int) RETURN 成功("在 (x, y) 点击了 n 次") ELSE: RETURN 错误(result.error) CASE "scroll": IF amount 为空: RETURN 错误("需要滚动量") amount = 限制范围(amount, -10, 10) result = API请求(POST, "/automation/mouse/scroll", {clicks, x, y}) IF 成功: direction = amount > 0 ? "向上" : "向下" RETURN 成功("在 (x, y) 滚动了 n 步") ELSE: RETURN 错误(result.error) CASE "typing": IF text 为空: RETURN 错误("需要输入文本") result = API请求(POST, "/automation/keyboard/write", {message, interval}) IF 成功: RETURN 成功("输入了: text") ELSE: RETURN 错误(result.error) CASE "press": IF key 为空: RETURN 错误("需要按键") result = API请求(POST, "/automation/keyboard/press", {keys, presses}) IF 成功: RETURN 成功("按下了: key") ELSE: RETURN 错误(result.error) CASE "wait": duration = 限制范围(duration, 0, 10) 等待(duration 秒) RETURN 成功("等待了 duration 秒") CASE "mouse_down": x_val = x ?? 当前鼠标x y_val = y ?? 当前鼠标y x_int, y_int = 四舍五入(x_val, y_val) result = API请求(POST, "/automation/mouse/down", {x, y, button}) IF 成功: 更新鼠标位置(x_int, y_int) RETURN 成功("在 (x, y) 按下鼠标") ELSE: RETURN 错误(result.error) CASE "mouse_up": x_val = x ?? 当前鼠标x y_val = y ?? 当前鼠标y x_int, y_int = 四舍五入(x_val, y_val) result = API请求(POST, "/automation/mouse/up", {x, y, button}) IF 成功: 更新鼠标位置(x_int, y_int) RETURN 成功("在 (x, y) 释放鼠标") ELSE: RETURN 错误(result.error) CASE "drag_to": IF x 或 y 为空: RETURN 错误("需要 x 和 y 坐标") target_x, target_y = 四舍五入(x, y) start_x, start_y = 当前鼠标位置 result = API请求(POST, "/automation/mouse/drag", {x, y, duration, button}) IF 成功: 更新鼠标位置(target_x, target_y) RETURN 成功("从 (start) 拖拽到 (target)") ELSE: RETURN 错误(result.error) CASE "hotkey": IF keys 为空: RETURN 错误("需要组合键") key_sequence = keys.split("+") // "ctrl+c" → ["ctrl", "c"] result = API请求(POST, "/automation/keyboard/hotkey", {keys, interval}) IF 成功: RETURN 成功("按下组合键: keys") ELSE: RETURN 错误(result.error) CASE "screenshot": result = API请求(POST, "/automation/screenshot") IF result 包含 image: base64_str = result.image timestamp = 获取时间戳() // 确保目录存在 IF screenshots 目录不存在: 创建目录("screenshots") // 保存文件 img_data = base64解码(base64_str) 保存文件("screenshots/screenshot_{timestamp}.png", img_data) 保存文件("latest_screenshot.png", img_data) RETURN 成功("截图已保存", base64_image=base64_str) ELSE: RETURN 错误("截图失败") DEFAULT: RETURN 错误("未知操作: action") CATCH Exception as e: RETURN 错误("操作失败: e")API端点映射:
|
|
|
|---|---|
|
|
|
|
|
|
|
|
|
|
|
|
|
|
|
|
|
|
|
|
|
|
|
|
|
|
|
|
|
|
4. 时序图