 夜雨聆风
夜雨聆风


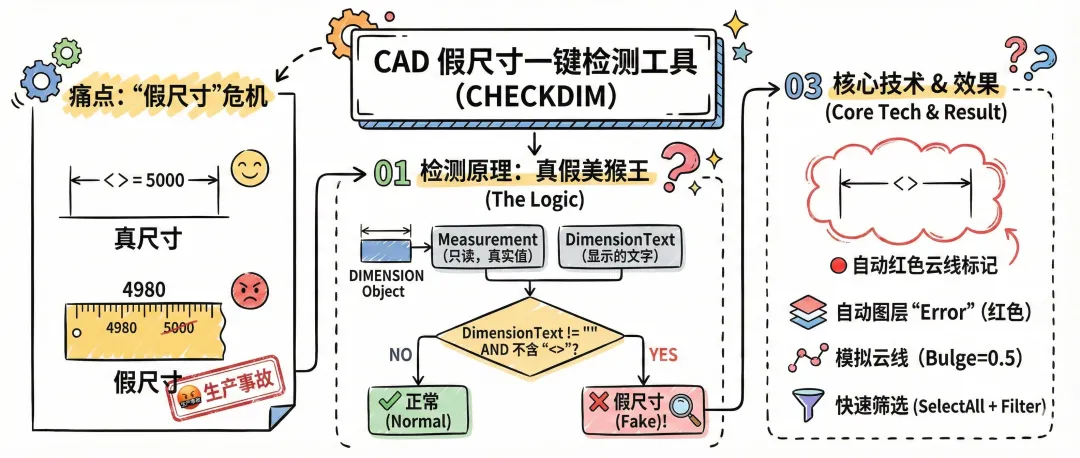
[免费]CAD二次开发插件源码分享:一键检测“假尺寸”并自动标记云线
作为设计师或审图员,最怕遇到这种图纸:
🤬 标注写着 5000,用 DI 命令一量只有 4980。
🤬 图纸看起来没问题,生产加工出来全是错的。
这就是传说中的“假尺寸”(手动修改了标注文字,而没有修改实际几何图形)。
今天分享一个 C# 源代码,一键自动检测全图所有的假尺寸,并自动画上红色云线圈出来!
在 AutoCAD 的数据库(Database)中,标注对象(Dimension)有两个关键属性:
|
|
|
|---|---|
|
|
真实测量值
|
|
|
显示的文字
|
判断逻辑非常简单:
if (dim.DimensionText != "" && !dim.DimensionText.Contains("<>")){// 这是一个假尺寸!}
注:<> 是 CAD 中代表“真实测量值”的占位符。如果包含它(例如 <>mm),通常认为是合法的。
新建一个类 DimChecker,复制以下代码。命令是 CHECKDIM。
using Autodesk.AutoCAD.ApplicationServices;using Autodesk.AutoCAD.Colors;using Autodesk.AutoCAD.DatabaseServices;using Autodesk.AutoCAD.EditorInput;using Autodesk.AutoCAD.Geometry;using Autodesk.AutoCAD.Runtime;namespace CadToolPlugin{public class DimChecker{[CommandMethod("CHECKDIM")]public void CheckFakeDimensions(){Document doc = Application.DocumentManager.MdiActiveDocument;Database db = doc.Database;Editor ed = doc.Editor;int fakeCount = 0;using (Transaction tr = db.TransactionManager.StartTransaction()){// 1. 确保 "Error" 图层存在,并设置为红色ObjectId errorLayerId = GetOrCreateLayer(db, tr, "Error", 1);// 2. 快速筛选所有标注 (Dimension)TypedValue[] tvs = new TypedValue[] {new TypedValue((int)DxfCode.Start, "DIMENSION")};SelectionFilter filter = new SelectionFilter(tvs);PromptSelectionResult psr = ed.SelectAll(filter);if (psr.Status != PromptStatus.OK){ed.WriteMessage("\n未发现任何标注。");return;}BlockTableRecord btr = (BlockTableRecord)tr.GetObject(db.CurrentSpaceId, OpenMode.ForWrite);// 3. 遍历标注进行检查foreach (ObjectId id in psr.Value.GetObjectIds()){Dimension dim = tr.GetObject(id, OpenMode.ForRead) as Dimension;if (dim == null) continue;// 核心判断:文字不为空 且 不包含自动测量值占位符 "<>"string text = dim.DimensionText;if (!string.IsNullOrEmpty(text) && !text.Contains("<>")){// 发现假尺寸!fakeCount++;// 4. 获取标注的包围盒 (Extents)if (dim.Bounds.HasValue){Extents3d bounds = dim.Bounds.Value;// 绘制云线CreateRevCloud(tr, btr, bounds, errorLayerId);}}}tr.Commit();}if (fakeCount > 0)ed.WriteMessage($"\n⚠️ 检测完成:发现了 {fakeCount} 个假尺寸,已用红色云线标记!");elseed.WriteMessage("\n✅ 完美!图中没有发现假尺寸。");}// 辅助方法:创建简易云线 (带凸度的多段线)private void CreateRevCloud(Transaction tr, BlockTableRecord btr, Extents3d ext, ObjectId layerId){// 向外偏移一点,避免压住文字double margin = (ext.MaxPoint.X - ext.MinPoint.X) * 0.1;Point2d p1 = new Point2d(ext.MinPoint.X - margin, ext.MinPoint.Y - margin);Point2d p2 = new Point2d(ext.MaxPoint.X + margin, ext.MinPoint.Y - margin);Point2d p3 = new Point2d(ext.MaxPoint.X + margin, ext.MaxPoint.Y + margin);Point2d p4 = new Point2d(ext.MinPoint.X - margin, ext.MaxPoint.Y + margin);Polyline cloud = new Polyline();cloud.SetDatabaseDefaults();cloud.LayerId = layerId;cloud.Closed = true;cloud.ColorIndex = 256; // ByLayer// 添加4个顶点cloud.AddVertexAt(0, p1, 0.5, 0, 0); // 凸度0.5形成圆弧cloud.AddVertexAt(1, p2, 0.5, 0, 0);cloud.AddVertexAt(2, p3, 0.5, 0, 0);cloud.AddVertexAt(3, p4, 0.5, 0, 0);btr.AppendEntity(cloud);tr.AddNewlyCreatedDBObject(cloud, true);}// 辅助方法:获取或创建图层private ObjectId GetOrCreateLayer(Database db, Transaction tr, string layerName, short colorIndex){LayerTable lt = (LayerTable)tr.GetObject(db.LayerTableId, OpenMode.ForRead);if (lt.Has(layerName)){return lt[layerName];}lt.UpgradeOpen();LayerTableRecord ltr = new LayerTableRecord();ltr.Name = layerName;ltr.Color = Color.FromColorIndex(ColorMethod.ByAci, colorIndex); // 1=RedObjectId id = lt.Add(ltr);tr.AddNewlyCreatedDBObject(ltr, true);return id;}}}
🔥 自动图层管理
代码会自动检查是否存在 “Error” 图层。如果没有,它会自动创建并将颜色设置为红色(ColorIndex = 1),确保醒目。
🔥 模拟云线 (Bulge)
真正的 RevCloud 命令算法很复杂。这里我们用了一个讨巧的方法:创建一个闭合的多段线矩形,并给每一段设置 凸度 (Bulge) = 0.5,这样直线段就会变成向外凸起的圆弧,看起来就像云线一样。
🔥 性能优化
使用了 ed.SelectAll(filter) 配合过滤器,只把内存中的标注对象抓取出来,而不是遍历整个数据库,即使图纸有 10 万个对象也能秒级完成。
📌 总结
这个小工具虽然简单,但能解决大问题。把它加入到你的公司内部工具集中,可以有效避免因“假尺寸”导致的生产事故。
📚 往期精选
