 夜雨聆风
夜雨聆风


OpenFeign源码深度解析:注解如何一步步转化为HTTP请求

作为Spring Cloud生态中最受欢迎的声明式HTTP客户端,OpenFeign让开发者只需通过注
解就能轻松调用远程服务。但你是否好奇,那些优雅的注解背后,究竟经历了怎样的魔
法,才最终转化为可执行的HTTP请求?本文将深入OpenFeign源码,一步步拆解从注解到
HTTP请求的完整流程,带你看透Feign的核心工作原理。
一、FeignClient的初始化:从注解到代理对象
当我们在Spring Boot项目中定义一个带有@FeignClient注解的接口时,Spring容器启动
时会通过FeignClientFactoryBean为这个接口创建动态代理对象。这个过程是Feign工作
的起点,也是理解后续流程的基础。
核心源码解析:FeignClientFactoryBean.getObject()
- 1
- 2
- 3
- 4
- 5
- 6
- 7
- 8
- 9
- 10
- 11
- 12
- 13
- 14
- 15
- 16
- 17
- 18
- 19
- 20
- 21
- 22
- 23
- 24
- 25
- 26
- 27
- 28
- 29
- 30
- 31
- 32
@OverridepublicObject getObject()throwsException{return getTarget();}<T> T getTarget() {FeignContext context = applicationContext.getBean(FeignContext.class);Feign.Builder builder = feign(context);if(!StringUtils.hasText(url)){if(name ==null){name ="";}String url = name.startsWith("http")? name :"http://"+ name;return(T) loadBalance(builder, context,newHardCodedTarget<>(type, name, url));}if(StringUtils.hasText(url)&&!url.startsWith("http")){url ="http://"+ url;}String url =this.url + cleanPath();Client client = getOptional(context,Client.class);if(client !=null){if(client instanceofLoadBalancerFeignClient){// not load balancing because we have a url,// but ribbon is on the classpath, so unwrapclient =((LoadBalancerFeignClient) client).getDelegate();}builder.client(client);}Targeter targeter =get(context,Targeter.class);return(T) targeter.target(this, builder, context,newHardCodedTarget<>(type, name, url));}
这段代码的核心逻辑是:
HardCodedTarget包含了接口类型、服务名和请求地址5.生成代理对象:通过Targeter.target()方法生成最终的动态代理实例关键机制:动态代理 Feign使用JDK动态代理为接口生成实现类,当我们调用接口方法
时,实际上是调用代理类的invoke()方法,这也是后续注解解析和请求构造的入口。
二、注解解析:将接口注解转化为元数据
代理对象创建完成后,Feign会通过Contract接口解析接口上的注解,
将@RequestMapping、@GetMapping等注解转化为可执行的请求元数据。Spring Cloud
Feign默认使用SpringMvcContract,它兼容Spring MVC的注解风格。
核心源码解析:SpringMvcContract.processAnnotationsOnMethod()
- 33
- 34
- 35
- 36
- 37
- 38
- 39
- 40
- 41
- 42
- 43
- 44
- 45
- 46
- 47
- 48
- 49
- 50
- 51
- 52
- 53
- 54
- 55
- 56
- 57
- 58
- 59
- 60
- 61
- 62
- 63
- 64
- 65
- 66
- 67
- 68
- 69
- 70
- 71
@OverridepublicList<MethodMetadata> processAnnotationsOnMethod(MethodMetadata data,Method method,Annotation[] annotations){super.processAnnotationsOnMethod(data, method, annotations);for(Annotation methodAnnotation : annotations){RequestMapping methodAnnotation = findMergedAnnotation(method,RequestMapping.class);if(methodAnnotation !=null){// HTTP MethodRequestMethod[] methods = methodAnnotation.method();if(methods.length ==0){methods =newRequestMethod[]{RequestMethod.GET };}checkOne(method, methods,"method");data.template().method(Request.HttpMethod.valueOf(methods[0].name()));// PathcheckAtMostOne(method, methodAnnotation.path(), "path");if (StringUtils.hasText(methodAnnotation.path()[0])) {String path = resolve(method, methodAnnotation.path()[0]);if (!path.startsWith("/")) {path = "/" + path;}data.template().uri(path);}// ProducesparseProduces(data, method, methodAnnotation.produces());// ConsumesparseConsumes(data, method, methodAnnotation.consumes());// HeadersparseHeaders(data, method, methodAnnotation.headers());data.indexToExpander(new LinkedHashMap<>());}}return Collections.singletonList(data);}
这段代码的核心作用是:
@RequestMapping或特定HTTP方法注解中获取请求方法(GET/POST等)2.解析请求路径:处理注解中的path属性,支持SpEL表达式解析3.处理请求头:解析produces、consumes和headers属性,构建请求头信息4.生成MethodMetadata:将解析后的元数据存储在
MethodMetadata对象中,供后续请求模板使用
关键设计:可扩展的Contract接口 Feign通过Contract接口实现了解耦,除
了SpringMvcContract,还可以自定义Contract来支持其他注解风格,比如JAX-RS注解。
三、RequestTemplate生成:构建请求的核心模板
注解解析完成后,Feign会通过RequestTemplate.Factory创建RequestTemplate对象,
这是Feign请求构造的核心数据结构,包含了请求的所有信息:URL、HTTP方法、请求头、请
求参数等。
核心源码解析:SynchronousMethodHandler.create()
- 72
- 73
- 74
- 75
- 76
- 77
- 78
- 79
- 80
- 81
- 82
- 83
- 84
- 85
- 86
- 87
- 88
- 89
- 90
- 91
- 92
- 93
- 94
- 95
- 96
- 97
- 98
- 99
- 100
- 101
- 102
- 103
- 104
- 105
- 106
public static MethodHandler create(Target<?> target, Method method, MethodMetadata metadata,RequestTemplate.Factory buildTemplateFromArgs,Options options, Decoder decoder, ErrorDecoder errorDecoder,Client client, Retryer retryer, List<RequestInterceptor> requestInterceptors,Logger logger, Level logLevel) {return new SynchronousMethodHandler(target, method, metadata, buildTemplateFromArgs, options,decoder, errorDecoder, client, retryer, requestInterceptors, logger, logLevel);}@Overridepublic Object invoke(Object[] argv) throws Throwable {RequestTemplate template = buildTemplateFromArgs.create(argv);Options options = findOptions(argv);Retryer retryer = this.retryer.clone();while (true) {try {return executeAndDecode(template, options);} catch (RetryableException e) {try {retryer.continueOrPropagate(e);} catch (RetryableException th) {Throwable cause = th.getCause();if (propagationPolicy == UNWRAP && cause != null) {throw cause;} else {throw th;}}if (logLevel != Level.NONE) {logger.logRetry(metadata.configKey(), logLevel);}continue;}}}
RequestTemplate的构建过程 当调用接口方法时,invoke()方法会首先调
用buildTemplateFromArgs.create(argv)生成RequestTemplate,这个过程主要做了以
下几件事:
持
@PathVariable、@RequestParam、@RequestBody等参数注解2.URL拼接:将解析后的路径与参数拼接成完整的请求URL3.请求头设置:将注解中指定的请求头信息添加到模板中4.请求体处理:如果是POST请求,将@RequestBody注解的参数序列化为请求体四、请求执行:从模板到实际HTTP请求
RequestTemplate生成后,Feign会通过Client接口将其转化为实际的HTTP请求并发送,
默认使用Client.Default,它基于Java的HttpURLConnection实现,也可以替换为
OkHttp或Apache HttpClient。
核心源码解析:SynchronousMethodHandler.executeAndDecode()
- 107
- 108
- 109
- 110
- 111
- 112
- 113
- 114
- 115
- 116
- 117
- 118
- 119
- 120
- 121
- 122
- 123
- 124
- 125
- 126
- 127
- 128
- 129
- 130
- 131
- 132
- 133
- 134
- 135
- 136
- 137
- 138
- 139
- 140
- 141
- 142
- 143
Object executeAndDecode(RequestTemplate template, Options options) throws Throwable {Request request = targetRequest(template);if (logLevel != Level.NONE) {logger.logRequest(metadata.configKey(), logLevel, request);}Response response;long start = System.nanoTime();try {response = client.execute(request, options);// ensure the request is set. TODO: remove in Feign 12response = response.toBuilder().request(request).requestTemplate(template).build();} catch (IOException e) {if (logLevel != Level.NONE) {logger.logIOException(metadata.configKey(), logLevel, e, elapsedTime(start));}throw errorDecoder.decode(metadata.configKey(), e);}long elapsedTime = TimeUnit.NANOSECONDS.toMillis(System.nanoTime() - start);if (decoder != null) {return decoder.decode(response, metadata.returnType());}return response;}Request targetRequest(RequestTemplate template) {for (RequestInterceptor interceptor : requestInterceptors) {interceptor.apply(template);}return target.apply(template);}
这段代码的核心流程是:
targetRequest()方法会先执行所有的
RequestInterceptor,然后通过target.apply()将RequestTemplate转化为
Request对象2.发送HTTP请求:通过client.execute()方法发送请求并获取响应3.处理响应:使用Decoder将响应结果反序列化为方法返回类型4.异常处理:通过ErrorDecoder处理请求异常,支持重试机制关键扩展点:RequestInterceptor RequestInterceptor允许我们在请求发送前统一
修改请求模板,比如添加统一的请求头、修改请求参数等,这是实现全局请求配置的重要方
式。
五、核心流程可视化:UML流程图
为了更清晰地展示整个流程,我们绘制了OpenFeign从注解到HTTP请求的完整流程图:
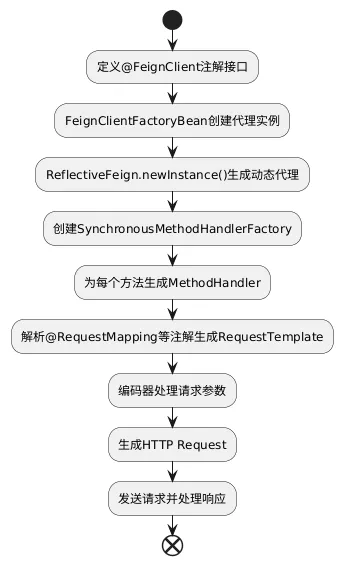
这个流程图完整展示了从注解定义到请求执行的每一个关键步骤:
@FeignClient的接口2.FeignClientFactoryBean创建动态代理实例3.ReflectiveFeign生成MethodHandler处理器4.Contract解析注解生成RequestTemplate5.编码器处理请求参数6.生成最终的HTTP Request并发送7.处理响应并返回结果结尾
好了,以上就是OpenFeign从注解到HTTP请求的完整流程。从动态代理创建到注解解析,再
到请求模板生成和最终执行,每一步都充满了设计巧思。希望本文能帮你彻底理解Feign的
工作原理,下次使用时不再只是”知其然”,更能”知其所以然”。欢迎在评论区分享你使用
Feign的经验和疑问,我们一起交流探讨!
