 夜雨聆风
夜雨聆风


完全免费,离线的验证码识别插件
完全免费,离线的验证码识别插件
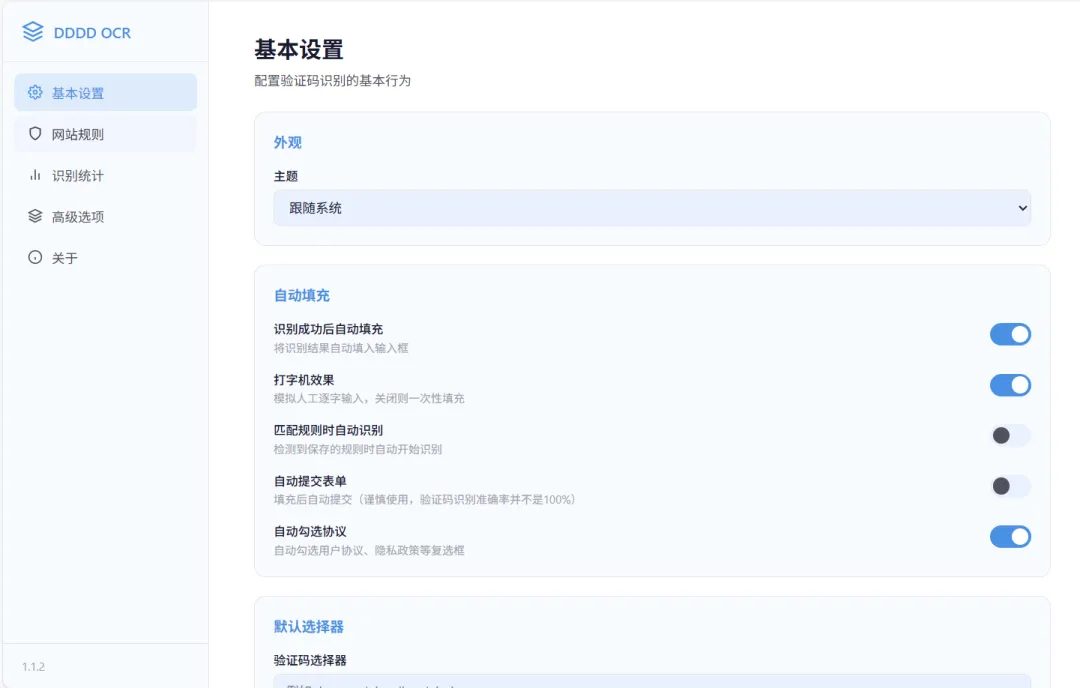
开发运维的时候由于要经常输入验证码,脚本猫或者油猴上有很多用脚本提供了验证码识别,虽然是免费,但是额度也有限,识别都要用到云服务,或者自己部署后端,先不说隐私什么的,光是注册或者部署就劝退很多人。找了很久类似的工具,也几乎都是使用云服务或者本地部署后端,不符合我的需求,怎么办呢?然后我直接让AI写了一个小玩具,使用ONNX runtime-web推理DDDDOCR的模型,速度也还算可以,一般在100ms-300ms之间
就在前两天,在Linux.do论坛上看到有大佬推验证码识别的插件,看了一眼也是需要云服务的。这么久了也没人发完全离线的验证码识别。那不如跟论坛有需要的大佬分享一下。
前身
一开始其实只是个油猴脚本,为了方便我到哪儿都可以用,我发到脚本猫去了,运行只加载ONNX runtime 我可以放心使用。当然是有一定限制的,油猴脚本第一次使用可能需要联网下载onnx runtime依赖,以及模型文件(也可以手动下载上传,模型有点大,就是比较慢),而且这些文件只能存在单个域名下,不能跨域,油猴或者脚本猫的存储上限是63M,这些模型啥的要是存进去,油猴或者脚本猫这些扩展就直接寄了。不过也能满足我的需求了,大佬们有需要可以从这儿取:DDDD OCR WEB – 验证码自动识别[1]
开发
我摸索了很久,我把 DDDDOCR 仓库为给AI,让AI来写,AI写的也是差强人意,JavaScript基本上还原不了,我自己也没写出来。咋办,心里生了个疙瘩,根本停不下来,我开始搜罗各种资料,看遍各种代码。找到一个node版本的项目,但是这个项目不是用的onnxruntime,先不说我能不能运行,光是装上它的依赖我都折腾了很久,终于折腾不下去了,继续找。
功夫不负有心人,还是让我翻到了合适的项目参考,代码也简单。最后使用下来效果也还不错(其实后面还是出现了一点点小问题),第一版,油猴脚本版就诞生了,很大程度上方便了我的运维工作。
后来在Linux.do论坛上看到有大佬推验证码识别的插件,看到纯内网需要验证码识别的评论,我感觉我可以试一试,但是脚本需要加载依赖才能使用,心血来潮,又折腾了几天(和AI斗智斗勇了几天)。最主要是浏览器扩展的API和油猴的API环境有一部分不太一样,明明在油猴正常的代码逻辑,放在浏览器扩展里面就不行了,也是又看了很多资料,又学了很多芝士。截止2026-01-19,浏览器扩展也是做出来了,在edge浏览器扩展商店发了第一版。
优化
最开始是在Linux论坛发的文章,收集到很多意见。也进行了很多改版。但是由于一开始看的资料是Chrome的,没看火狐的,然后,浏览器扩展在火狐上面就不能用。又看了一堆资料,最后不仅支持了火狐,也做了移动端适配。
以前的老版本的问题就是,如果验证码中又两个以上相同的字符,那么就只会输出一个字符,也就是上面提到的参考的项目代码。一开始确实是没问题的,但是后续使用中就出现问题了,经过几次的修改也算是改好了。
推理算法
OCR 引擎核心
1 2 3 4 5 6 7 8 9 10 11 12 13 14 15 16 17 18 19 20 21 22 23 24 25 26 27 28 29 30 31 32 33 34 35 36 37 38 39 40 41 42 43 44 45 46 47 48 49 50 51 52 53 54 55 56 57 58 59 60 61 62 63 64 65 66 67 68 69 70 71 72 73 74 75 76 77 78 79 80 81 82 83 84 85 86 87 88 89 90 91 92 93 94 95 96 97 98 99 100 101 102 103 104 105 106 107 108 109 110 111 112 113 114 115 116 117 118 119 120 121 122 123 124 125 126 127 128 129 130 131 132 133 134 135 136 137 138 139 140 141 142 143 144 145 146 147 148 149 150 import { ImageProcessor } from './image-processor';import type { OCRResult } from './types';// 声明全局 ONNX Runtime 对象declare const ort: any;export class OCREngine { private session: any = null; // ONNX 推理会话 private charsets: string[] = []; // 字符集映射表(索引 → 字符) private initialized = false; private ort: any = null; // ONNX Runtime 实例 private options: OCREngineOptions; /** * 核心识别方法 * 完整流程:图像加载 → 灰度化 → 缩放 → 归一化 → 构建张量 → 模型推理 → CTC 解码 */ async recognize(input: string | Blob | HTMLImageElement): Promise<OCRResult> { if (!this.initialized || !this.session) { await this.init(); } const startTime = Date.now(); // ① 加载图像并转为灰度数据(单通道 Uint8ClampedArray) const { data, width, height } = await ImageProcessor.loadImage(input); // ② 等比缩放:固定高度 64px,宽度按原始比例计算 // 这是 ddddocr 模型的输入要求:高度固定为 64,宽度自适应 const targetHeight = 64; const targetWidth = Math.floor(width * (targetHeight / height)); // 双线性插值缩放 const resized = ImageProcessor.resize(data, width, height, targetWidth, targetHeight); // ③ 归一化:像素值从 [0, 255] 映射到 [0.0, 1.0] const normalized = ImageProcessor.normalize(resized); // ④ 构建 ONNX 输入张量 // 形状为 [batch=1, channel=1, height=64, width=动态] // 单通道灰度图,batch_size 为 1 const tensor = new this.ort.Tensor( 'float32', normalized, [1, 1, targetHeight, targetWidth] // NCHW 格式 ); // ⑤ 执行模型推理 const feeds = { input1: tensor }; // 模型输入节点名为 "input1" const results = await this.session.run(feeds); // ⑥ CTC 解码:将模型输出的索引序列转为文字 const output = results.output; const text = this.decodeOutput(output); return { text }; } /** * CTC (Connectionist Temporal Classification) 解码 * * 模型输出是一个索引序列,需要进行以下处理: * 1. 跳过连续重复的索引(CTC 的"折叠"操作) * 2. 跳过空白标签(索引 0 为 CTC blank token) * 3. 通过字符集映射表将索引转为实际字符 * * 例如:模型输出 [0, 3, 3, 0, 5, 5, 5, 0, 2] * → 去重后 [0, 3, 0, 5, 0, 2] * → 去除 blank(0) 后 [3, 5, 2] * → 查表得到字符 "A7x" */ private decodeOutput(output: any): string { const indices = this.convertToNumberArray(output.data); const result: string[] = []; let prevIdx = -1; // 上一个索引,用于去重 for (const idx of indices) { // CTC 去重:跳过与前一个相同的索引 if (idx === prevIdx) { continue; } prevIdx = idx; // 跳过 blank token(索引 0)和无效索引 if (idx <= 0 || idx >= this.charsets.length) { continue; } const char = this.charsets[idx]; if (!char) continue; result.push(char); } return result.join(''); } /** * 处理模型输出数据类型 * ONNX 模型可能输出 BigInt64 或 Float32,需要统一转为 number */ private convertToNumberArray(data: any): number[] { const result: number[] = []; for (let i = 0; i < data.length; i++) { const value = data[i]; if (typeof value === 'bigint') { result.push(Number(value)); // BigInt → Number } else if (typeof value === 'number') { result.push(Math.round(value)); // Float → 四舍五入取整 } else { result.push(0); } } return result; } /** * 初始化推理引擎 * 加载 ONNX Runtime → 配置 WASM 后端 → 加载模型文件 → 创建推理会话 */ async init(): Promise<void> { if (this.initialized) return; // 获取 ONNX Runtime 实例(可能来自 CDN 全局变量或自定义加载) if (this.options.getOrt) { this.ort = await this.options.getOrt(); } else { this.ort = await this.waitForOrt(); } // 配置 WASM 后端参数 if (this.options.wasmPaths) { this.ort.env.wasm.wasmPaths = this.options.wasmPaths; } this.ort.env.wasm.numThreads = 4; // WASM 线程数 this.ort.env.wasm.simd = true; // 启用 SIMD 加速 // 加载模型文件(ArrayBuffer)和字符集(JSON 数组) const { model, charsets } = await this.options.getModel(); this.charsets = charsets; // 创建 ONNX 推理会话 this.session = await this.ort.InferenceSession.create(model, { executionProviders: ['wasm'], // 使用 WebAssembly 后端 graphOptimizationLevel: 'all', // 启用所有图优化 }); this.initialized = true; }}
图像预处理
图片是不能直接交给模型推理需要预处理的,JavaScript中使用的是canvas,浏览器扩展中使用的是OffscreenCanvas 处理
1 2 3 4 5 6 7 8 9 10 11 12 13 14 15 16 17 18 19 20 21 22 23 24 25 26 27 28 29 30 31 32 33 34 35 36 37 38 39 40 41 42 43 44 45 46 47 48 49 50 51 52 53 54 55 56 57 58 59 60 61 62 63 64 65 66 67 68 69 70 71 72 73 74 75 76 77 78 79 80 81 82 83 84 85 86 87 88 89 90 91 92 93 94 95 96 97 98 99 100 101 102 103 104 105 106 107 108 109 110 111 112 113 114 115 116 117 118 119 120 121 122 123 124 125 126 127 128 129 130 131 132 133 134 135 136 137 138 139 140 141 142 143 144 145 146 147 148 149 150 151 152 153 154 155 156 157 158 159 160 161 162 163 164 165 166 167 168 169 170 171 172 173 174 175 176 177 178 179 180 181 182 183 184 185 186 187 188 189 190 191 192 193 194 195 196 197 198 199 200 201 202 203 204 205 206 207 208 209 210 211 212 213 214 215 216 export class ImageProcessor { /** * 从 HTMLImageElement 提取灰度图像数据 * 流程:创建离屏 Canvas → 绘制图像 → 提取像素 → 灰度转换 */ static extractImageFromElement( img: HTMLImageElement ): { data: Uint8ClampedArray; width: number; height: number } { const canvas = document.createElement('canvas'); canvas.width = img.naturalWidth || img.width; canvas.height = img.naturalHeight || img.height; const ctx = canvas.getContext('2d')!; // 白色底色,防止透明背景的验证码产生黑色区域 ctx.fillStyle = '#FFFFFF'; ctx.fillRect(0, 0, canvas.width, canvas.height); ctx.drawImage(img, 0, 0); const imageData = ctx.getImageData(0, 0, canvas.width, canvas.height); // RGBA → 灰度 const grayData = this.toGrayscale(imageData.data); return { data: grayData, width: canvas.width, height: canvas.height }; } /** * 通用图像加载方法 * 支持 data URL / Blob / HTMLImageElement 三种输入 * 在 Service Worker 环境下使用 OffscreenCanvas 替代 DOM Canvas */ static async loadImage( input: string | Blob | HTMLImageElement ): Promise<{ data: Uint8ClampedArray; width: number; height: number }> { // Service Worker 中没有 document,走 OffscreenCanvas 分支 if (typeof document === 'undefined') { return this.loadImageInServiceWorker(input); } // HTMLImageElement 直接提取 if (input instanceof HTMLImageElement) { return this.extractImageFromElement(input); } // string (data URL / http URL) 或 Blob → 先加载为 Image const img = new Image(); img.crossOrigin = 'anonymous'; // 处理跨域图片 if (typeof input === 'string') { img.src = input; } else { img.src = URL.createObjectURL(input); } // 等待图片加载完成 await new Promise<void>((resolve, reject) => { img.onload = () => resolve(); img.onerror = () => reject(new Error('图片加载失败')); setTimeout(() => reject(new Error('图片加载超时')), 10000); }); // Canvas 绘制 → 提取像素 → 灰度化 const canvas = document.createElement('canvas'); canvas.width = img.width; canvas.height = img.height; const ctx = canvas.getContext('2d')!; ctx.fillStyle = '#FFFFFF'; ctx.fillRect(0, 0, img.width, img.height); ctx.drawImage(img, 0, 0); const imageData = ctx.getImageData(0, 0, img.width, img.height); const grayData = this.toGrayscale(imageData.data); if (typeof input !== 'string') { URL.revokeObjectURL(img.src); // 释放 Blob URL } return { data: grayData, width: img.width, height: img.height }; } /** * Service Worker 环境下的图像加载 * 使用 createImageBitmap + OffscreenCanvas 替代 DOM API */ private static async loadImageInServiceWorker( input: string | Blob | HTMLImageElement ): Promise<{ data: Uint8ClampedArray; width: number; height: number }> { let blob: Blob; if (typeof input === 'string') { const response = await fetch(input); blob = await response.blob(); } else if (input instanceof Blob) { blob = input; } else { throw new Error('Service Worker 环境不支持 HTMLImageElement'); } // Web API:createImageBitmap 可在 Worker 中使用 const imageBitmap = await createImageBitmap(blob); // OffscreenCanvas:Worker 中的离屏画布 const canvas = new OffscreenCanvas(imageBitmap.width, imageBitmap.height); const ctx = canvas.getContext('2d')!; ctx.fillStyle = '#FFFFFF'; ctx.fillRect(0, 0, canvas.width, canvas.height); ctx.drawImage(imageBitmap, 0, 0); const imageData = ctx.getImageData(0, 0, canvas.width, canvas.height); const grayData = this.toGrayscale(imageData.data); imageBitmap.close(); // 释放 ImageBitmap 资源 return { data: grayData, width: canvas.width, height: canvas.height }; } /** * RGBA → 灰度转换 * * 采用 ITU-R BT.709 标准加权公式: * Gray = 0.2126 × R + 0.7152 × G + 0.0722 × B * * 同时处理 Alpha 通道:将半透明像素与白色背景混合 * R' = R × α + 255 × (1 - α) * * 输入:RGBA 数组(每 4 个元素一个像素) * 输出:灰度数组(每个元素一个像素,值域 0-255) */ private static toGrayscale(data: Uint8ClampedArray): Uint8ClampedArray { const gray = new Uint8ClampedArray(data.length / 4); // 像素数 = RGBA长度/4 for (let i = 0; i < data.length; i += 4) { const r = data[i]; const g = data[i + 1]; const b = data[i + 2]; const a = data[i + 3]; // Alpha 预乘:与白色背景混合 const alpha = a / 255; const rr = r * alpha + 255 * (1 - alpha); const gg = g * alpha + 255 * (1 - alpha); const bb = b * alpha + 255 * (1 - alpha); // BT.709 加权灰度 gray[i / 4] = Math.round(0.2126 * rr + 0.7152 * gg + 0.0722 * bb); } return gray; } /** * 双线性插值缩放 * * 对每个目标像素,计算其在源图中的浮点坐标, * 取周围 4 个像素进行加权平均,实现平滑缩放。 * * 公式: * value = v1×(1-fx)×(1-fy) + v2×fx×(1-fy) + v3×(1-fx)×fy + v4×fx×fy * * 其中 (fx, fy) 是浮点坐标的小数部分 */ static resize( data: Uint8ClampedArray, width: number, height: number, newWidth: number, newHeight: number ): Uint8ClampedArray { const result = new Uint8ClampedArray(newWidth * newHeight); // 缩放比例 const xRatio = width / newWidth; const yRatio = height / newHeight; for (let y = 0; y < newHeight; y++) { for (let x = 0; x < newWidth; x++) { // 目标像素 → 源图中的浮点坐标 const px = x * xRatio; const py = y * yRatio; // 左上角整数坐标 const x1 = Math.floor(px); const x2 = Math.min(x1 + 1, width - 1); // 防越界 const y1 = Math.floor(py); const y2 = Math.min(y1 + 1, height - 1); // 小数部分(插值权重) const fx = px - x1; const fy = py - y1; // 四邻域像素值 const v1 = data[y1 * width + x1]; // 左上 const v2 = data[y1 * width + x2]; // 右上 const v3 = data[y2 * width + x1]; // 左下 const v4 = data[y2 * width + x2]; // 右下 // 双线性插值 const val = v1 * (1-fx) * (1-fy) + v2 * fx * (1-fy) + v3 * (1-fx) * fy + v4 * fx * fy; result[y * newWidth + x] = Math.round(val); } } return result; } /** * 归一化:[0, 255] → [0.0, 1.0] * 模型输入要求浮点数据 */ static normalize(data: Uint8ClampedArray): Float32Array { const normalized = new Float32Array(data.length); for (let i = 0; i < data.length; i++) { normalized[i] = data[i] / 255.0; } return normalized; }}
验证码处理
验证码元素检测
验证码都有一个带有验证码关键字的特征,那么就可以利用这个特性进行匹配,也要对web框架做适配。部分框架有可能拿不到数据
1 2 3 4 5 6 7 8 9 10 11 12 13 14 15 16 17 18 19 20 21 22 23 24 25 26 27 28 29 30 31 32 33 34 35 36 37 38 39 40 41 42 43 44 45 46 47 48 49 50 51 52 53 54 55 56 57 58 59 60 61 62 63 64 65 66 67 68 69 70 71 72 73 74 75 76 77 78 79 80 81 82 83 84 85 86 87 88 89 90 91 92 93 94 95 96 97 98 99 100 101 102 103 104 105 106 107 108 109 110 111 112 export class CaptchaDetector { private detectedCaptchas: DetectedCaptcha[] = []; /** * 全页面扫描入口 * 依次扫描四种类型的验证码载体 */ scan(): DetectedCaptcha[] { this.detectedCaptchas = []; this.scanImages(); // <img> 标签 this.scanCanvas(); // <canvas> 标签 this.scanSvg(); // <svg> 标签 this.scanBackgroundImages(); // CSS background-image return this.detectedCaptchas; } /** * 判断一个 <img> 是否可能是验证码 * * 多维度判断策略(按优先级): * 1. 尺寸过滤:宽高必须在合理范围内 * 2. 可见性检查:display:none / visibility:hidden 的排除 * 3. 排除列表:头像、logo、图标等非验证码图片 * 4. 关键词匹配:class / id / src 中包含验证码相关关键词 * 5. 邻近输入框检测:附近是否有可输入的 input * 6. data URL / blob URL:结合父级关键词和邻近输入框综合判断 */ private isLikelyCaptcha(img: HTMLImageElement): boolean { // ① 尺寸检查(同时处理未加载完的图片,读取 naturalWidth/attribute) const { width, height } = this.getEffectiveSize(img); if (!this.isCaptchaSize(width, height)) return false; // ② 可见性检查 if (!this.isVisibleOrHasSize(img, width, height)) return false; // ③ 排除已知非验证码图片(头像、logo 等) if (this.isExcludedImage(img)) return false; // ④ 关键词匹配(命中任一即判定为验证码) if (this.matchesKeywords(img)) return true; // class/id 包含关键词 if (this.srcContainsKeywords(img.src)) return true; // src URL 包含关键词 if (this.parentContainsKeywords(img)) return true; // 父级元素包含关键词 // ⑤ 附近存在可输入的 input if (this.hasNearbyInput(img)) return true; // ⑥ data URL 图片的特殊处理 if (this.isDataUrlImage(img) && this.isCaptchaSize(width, height)) { if (this.hasNearbyInput(img) || this.parentContainsKeywords(img)) return true; } return false; } /** * 排除非验证码图片 * 将 src / alt / class / id 合并后与排除模式列表进行匹配 * 对于 data URL 和 blob URL 不做 src 检查(它们没有语义化的路径) */ private isExcludedImage(img: HTMLImageElement): boolean { const src = this.getImageSrcForExclusionCheck(img); const alt = (img.alt || '').toLowerCase(); const className = (img.className?.toString?.() || '').toLowerCase(); const id = (img.id || '').toLowerCase(); const combined = `${src} ${alt} ${className} ${id}`.trim(); // EXCLUDE_PATTERNS = ['avatar', 'logo', 'icon', 'banner', ...] return CONSTANTS.EXCLUDE_PATTERNS.some(pattern => combined.includes(pattern)); } /** * 获取图片的有效尺寸 * 优先级:getBoundingClientRect > naturalWidth > HTML attribute * 处理图片尚未加载完成时 rect 为 0 的情况 */ private getEffectiveSize(element: Element): { width: number; height: number } { const rect = element.getBoundingClientRect(); let width = rect.width; let height = rect.height; if (element instanceof HTMLImageElement) { // 图片未渲染时 rect 可能为 0,回退到 naturalWidth if (width === 0 && element.naturalWidth > 0) { width = element.naturalWidth; } if (height === 0 && element.naturalHeight > 0) { height = element.naturalHeight; } // 再回退到 HTML width/height 属性 if (width === 0) { width = parseInt(element.getAttribute('width') || '0') || 0; } if (height === 0) { height = parseInt(element.getAttribute('height') || '0') || 0; } } return { width, height }; } /** * 关键词匹配:检查元素的 class 和 id 是否包含验证码关键词 */ private matchesKeywords(element: Element): boolean { const className = ((element as any).className?.toString?.() || '').toLowerCase(); const id = ((element as any).id || '').toLowerCase(); return CONSTANTS.CAPTCHA_KEYWORDS.some( keyword => className.includes(keyword) || id.includes(keyword) ); }}
除了验证码还有输入框,也可以根据关键字匹配,除此之外,一定在验证码元素附近,那么直接判断距离就可以
1 2 3 4 5 6 7 8 9 10 11 12 13 14 15 16 17 18 19 20 21 22 23 24 25 26 27 28 29 30 31 32 33 34 35 36 37 38 39 40 41 42 43 44 45 46 47 48 49 50 51 52 53 54 55 56 57 58 59 60 61 62 63 64 65 66 67 68 69 70 71 72 73 74 75 76 77 78 79 80 81 82 83 84 85 86 87 88 89 90 91 92 93 94 95 96 97 98 99 100 101 102 103 104 105 106 107 108 109 110 111 112 113 114 115 116 117 118 119 120 121 122 123 124 125 126 127 128 129 130 131 132 133 134 135 136 137 138 139 140 141 142 143 144 145 146 147 148 149 150 151 152 153 154 155 156 157 158 159 160 161 162 163 164 165 166 167 168 169 170 171 172 173 174 175 176 177 178 179 180 181 182 183 184 185 186 187 188 189 190 191 192 193 194 195 196 export class CaptchaDetector { /** * 查找验证码元素关联的输入框 * * 查找策略(按优先级): * 1. 框架组件内部查找(Element UI / Ant Design / iView / Vant) * 2. 直接父级容器内查找 * 3. 逐级向上遍历祖先元素查找 * 4. 全局搜索并评分排序 */ findRelatedInput(element: Element): HTMLInputElement | null { // ① 框架组件感知:验证码可能在 el-input-group__append 等结构中 const frameworkInput = this.findFrameworkRelatedInput(element); if (frameworkInput) return frameworkInput; const captchaRect = element.getBoundingClientRect(); // ② 直接父级容器内查找 const parent = element.parentElement; if (parent) { const input = this.findClosestInputInContainer(parent, captchaRect); if (input) return input; } // ③ 逐级向上查找(最多 4 层,限制距离 180px) let ancestor = parent?.parentElement; let depth = 0; while (ancestor && depth < 4) { const input = this.findClosestInputInContainer(ancestor, captchaRect, 180); if (input) return input; ancestor = ancestor.parentElement; depth++; } // ④ 全局搜索:遍历页面所有 input,按评分排序 const inputs = document.querySelectorAll('input'); let best: HTMLInputElement | null = null; let bestScore = Infinity; for (const input of inputs) { const htmlInput = input as HTMLInputElement; if (!this.isValidCaptchaInput(htmlInput)) continue; const inputRect = input.getBoundingClientRect(); // 粗筛:只考虑空间上大致相邻的输入框 const roughlyNear = ( // 在验证码右侧 220px 内,且垂直偏移 < 90px (inputRect.left > captchaRect.right && inputRect.left - captchaRect.right < 220 && Math.abs(inputRect.top - captchaRect.top) < 90) || // 在验证码下方 160px 内,且水平偏移 < 160px (inputRect.top > captchaRect.bottom && inputRect.top - captchaRect.bottom < 160 && Math.abs(inputRect.left - captchaRect.left) < 160) || // 中心距离 < 240px (this.calculateDistance(captchaRect, inputRect) < 240) ); if (!roughlyNear) continue; // 精细评分 const score = this.scoreInputCandidate(htmlInput, captchaRect, inputRect); if (score < bestScore) { bestScore = score; best = htmlInput; } } return best; } /** * 输入框候选评分算法 * * 基础分 = 几何距离(欧氏距离) * 加分项: * - name/placeholder 包含 "验证码" → +140 * - 包含 "verify/vcode/authcode" → +80 * - 包含 "yzm" → +60 * 减分项: * - 包含 "username/password/email" → -200(排除非验证码输入框) * * 分数越低越优先 */ private scoreInputCandidate( input: HTMLInputElement, captchaRect: DOMRect, inputRect: DOMRect ): number { const distance = this.calculateDistance(captchaRect, inputRect); let bonus = 0; const text = this.getInputSearchText(input); // 关键词加分(命中验证码相关词汇 → 优先选择) if (this.isCaptchaInputByName(input)) bonus += 120; if (text.includes('验证码')) bonus += 140; if (text.includes('verify')) bonus += 80; if (text.includes('vcode')) bonus += 80; if (text.includes('authcode')) bonus += 80; if (text.includes('checkcode')) bonus += 80; if (text.includes('yzm')) bonus += 60; // 排除项减分(命中用户名/密码等 → 降低优先级) if (this.isExcludedInputByText(input)) bonus -= 200; return distance - bonus; // bonus 越大 → 最终分越低 → 越优先 } /** * 综合获取输入框的语义文本(用于关键词匹配) * 收集来源:name / id / class / placeholder / aria-label / label 标签文本 */ private getInputSearchText(input: HTMLInputElement): string { const parts: string[] = []; parts.push(input.name || ''); parts.push(input.id || ''); parts.push(input.className || ''); parts.push(input.placeholder || ''); parts.push(input.getAttribute('aria-label') || ''); parts.push(input.getAttribute('data-label') || ''); parts.push(input.getAttribute('data-name') || ''); parts.push(this.getInputLabelText(input)); // <label for="..."> 的文本 return parts.join(' ').toLowerCase(); } /** * 框架组件感知的输入框查找 * * 支持主流 UI 框架的 DOM 结构: * - Element UI/Plus: .el-input / .el-input-group / .el-form-item * - Ant Design: .ant-input-group / .ant-form-item * - iView: .ivu-input-group / .ivu-form-item * - Vant: .van-field / .van-cell * * 验证码图片通常在 append/suffix 插槽中, * 而输入框在同一组件的 inner 区域 */ private findFrameworkRelatedInput(element: Element): HTMLInputElement | null { // Element UI/Plus const elInput = element.closest('.el-input') || element.closest('.el-input-group') || element.closest('.el-form-item'); if (elInput) { // 优先找 .el-input__inner(Element 的实际 input 元素) const elInner = elInput.querySelector('input.el-input__inner'); if (elInner && this.isValidCaptchaInput(elInner as HTMLInputElement)) { return elInner as HTMLInputElement; } // 降级:找任意 input const anyInput = elInput.querySelector('input'); if (anyInput && this.isValidCaptchaInput(anyInput as HTMLInputElement)) { return anyInput as HTMLInputElement; } } // Ant Design const antInput = element.closest('.ant-input-group') || element.closest('.ant-form-item') || element.closest('.ant-input-affix-wrapper'); if (antInput) { const anyInput = antInput.querySelector('input'); if (anyInput && this.isValidCaptchaInput(anyInput as HTMLInputElement)) { return anyInput as HTMLInputElement; } } // iView / Vant 同理... return null; } /** * 验证输入框是否合法(排除密码框、邮箱框、隐藏框等) */ private isValidCaptchaInput(input: HTMLInputElement): boolean { const type = (input.type || 'text').toLowerCase(); // 排除的 input 类型 // ['password', 'email', 'tel', 'hidden', 'submit', 'checkbox', 'radio', ...] if (CONSTANTS.EXCLUDED_INPUT_TYPES.includes(type)) return false; // 排除的 name/id // ['username', 'password', 'email', 'search', 'query', ...] const name = (input.name || '').toLowerCase(); const id = (input.id || '').toLowerCase(); for (const excluded of CONSTANTS.EXCLUDED_INPUT_NAMES) { if (name === excluded || id === excluded) return false; } // 必须可见 if (!this.isVisible(input)) return false; return true; }}
验证码图像捕获
众所周知,验证码一般是一个链接,请求这个链接会返回图像数据,然后前端渲染出来,问题是直接使用这个链接会导致得到的验证码和页面渲染的不是同一个验证码。怎么办呢?直接使用 canvas 渲染再进一步处理。当然了,验证码类型不可能只是img,也可能是canvas,svg等,也需要对应情况对应处理
1 2 3 4 5 6 7 8 9 10 11 12 13 14 15 16 17 18 19 20 21 22 23 24 25 26 27 28 29 30 31 32 33 34 35 36 37 38 39 40 41 42 43 44 45 46 47 48 49 50 51 52 53 54 55 56 57 58 59 60 61 62 63 64 65 66 67 68 69 70 71 72 73 74 75 76 77 78 79 80 81 82 83 84 85 86 87 88 89 90 91 92 93 94 95 96 97 98 99 100 101 102 103 104 105 106 107 108 109 110 111 112 113 114 115 116 117 118 119 120 121 122 123 124 125 126 127 128 129 130 131 132 133 134 135 136 137 138 139 140 141 142 143 144 145 146 147 148 149 150 151 152 153 154 155 156 157 158 159 160 161 162 163 164 165 166 167 168 169 170 171 172 173 174 175 176 177 178 179 180 181 182 183 184 185 186 187 188 189 190 191 192 193 194 195 196 197 198 export class CaptchaDetector { /** * 统一的图像捕获入口 * 根据验证码类型分发到对应的捕获方法 */ async captureImage(captcha: DetectedCaptcha): Promise<string> { switch (captcha.type) { case 'image': return this.captureImgElement(captcha.element as HTMLImageElement); case 'canvas': return this.captureCanvasElement(captcha.element as HTMLCanvasElement); case 'svg': return this.captureSvgElement(captcha.element as SVGElement); case 'background': return this.captureBackgroundElement(captcha.element as HTMLElement); } } /** * 捕获 <img> 元素 * 等待图片加载完成 → Canvas 绘制 → 导出 data URL * 对于跨域图片,如果 src 本身是 data URL 则直接返回 */ private async captureImgElement(img: HTMLImageElement): Promise<string> { await this.waitForImageLoad(img); const canvas = document.createElement('canvas'); const ctx = canvas.getContext('2d')!; const width = img.naturalWidth || img.width; const height = img.naturalHeight || img.height; canvas.width = width; canvas.height = height; ctx.drawImage(img, 0, 0, width, height); try { return canvas.toDataURL('image/png'); } catch { // 跨域图片会触发 SecurityError if (img.src.startsWith('data:')) return img.src; throw new Error('无法捕获跨域图片'); } } /** * 捕获 <img> 为 Blob(优先使用 fetch 获取原始二进制) * * 策略优先级: * 1. fetch 原始 URL → 获取未经浏览器解码的原始图片数据 * 2. Canvas 绘制 → toBlob 导出 * * fetch 优先的原因:Canvas 绘制后再导出可能损失画质 */ private async captureImgAsBlob(img: HTMLImageElement): Promise<Blob> { await this.waitForImageLoad(img); // 优先尝试 fetch 原始数据 if (img.src && !img.src.startsWith('data:') && !img.src.startsWith('blob:')) { try { const resp = await fetch(img.src, { credentials: 'include' }); if (resp.ok) { const ct = resp.headers.get('content-type') || ''; if (ct.includes('image/')) { return await resp.blob(); } } } catch { } } // 回退到 Canvas 方式 const canvas = document.createElement('canvas'); const ctx = canvas.getContext('2d')!; const width = img.naturalWidth || img.width; const height = img.naturalHeight || img.height; canvas.width = width; canvas.height = height; // 白色底色 ctx.fillStyle = '#FFFFFF'; ctx.fillRect(0, 0, width, height); ctx.drawImage(img, 0, 0, width, height); return await new Promise<Blob>((resolve, reject) => { canvas.toBlob((blob) => { if (blob) resolve(blob); else reject(new Error('图片转换失败')); }, 'image/png'); }); } /** * 捕获 <svg> 元素 * * 流程: * 1. 深克隆 SVG DOM 节点 * 2. 补充必要的 xmlns 属性 * 3. XMLSerializer 序列化为字符串 * 4. 创建 SVG Blob → Object URL * 5. 加载为 Image → Canvas 绘制 → 导出 Blob * * 为什么不直接用 SVG?因为 OCR 模型需要光栅化的像素数据 */ private async captureSvgAsBlob(svg: SVGElement): Promise<Blob> { // 深克隆,避免修改原始 DOM const clonedSvg = svg.cloneNode(true) as SVGElement; const rect = svg.getBoundingClientRect(); // 确保有明确的宽高 clonedSvg.setAttribute('width', String(rect.width)); clonedSvg.setAttribute('height', String(rect.height)); // 补充 xmlns(序列化后独立使用时必须有) if (!clonedSvg.getAttribute('xmlns')) { clonedSvg.setAttribute('xmlns', 'http://www.w3.org/2000/svg'); } // 序列化为 SVG 字符串 const serializer = new XMLSerializer(); const svgString = serializer.serializeToString(clonedSvg); // 创建 SVG Blob 和 Object URL const svgBlob = new Blob([svgString], { type: 'image/svg+xml' }); const url = URL.createObjectURL(svgBlob); try { // 加载为 Image 对象 const img = await new Promise<HTMLImageElement>((resolve, reject) => { const el = new Image(); el.onload = () => resolve(el); el.onerror = () => reject(new Error('SVG转换失败')); el.src = url; }); // Canvas 光栅化 const canvas = document.createElement('canvas'); canvas.width = Math.max(1, Math.round(rect.width)); canvas.height = Math.max(1, Math.round(rect.height)); const ctx = canvas.getContext('2d')!; ctx.fillStyle = '#FFFFFF'; ctx.fillRect(0, 0, canvas.width, canvas.height); ctx.drawImage(img, 0, 0); // 导出为 PNG Blob return await new Promise<Blob>((resolve, reject) => { canvas.toBlob((b) => { if (b) resolve(b); else reject(new Error('SVG转换失败')); }, 'image/png'); }); } finally { URL.revokeObjectURL(url); // 释放 Object URL } } /** * 捕获 CSS background-image 验证码 * 从 style 中提取 URL → 加载为 Image → Canvas 绘制 */ private async captureBackgroundAsBlob(el: HTMLElement): Promise<Blob> { const bgImage = el.style.backgroundImage || window.getComputedStyle(el).backgroundImage || ''; // 正则提取 url(...) const urlMatch = bgImage.match(/url\(['"]?(.+?)['"]?\)/); if (!urlMatch) throw new Error('无法提取背景图URL'); const imageUrl = urlMatch[1]; // data URL 直接 fetch 转 Blob if (imageUrl.startsWith('data:')) { const response = await fetch(imageUrl); return await response.blob(); } // HTTP URL:创建 Image 加载后 Canvas 绘制 const img = new Image(); img.crossOrigin = 'anonymous'; img.src = imageUrl; await new Promise<void>((resolve, reject) => { img.onload = () => resolve(); img.onerror = () => reject(new Error('背景图加载失败')); setTimeout(() => reject(new Error('背景图加载超时')), 5000); }); const canvas = document.createElement('canvas'); const rect = el.getBoundingClientRect(); canvas.width = Math.max(1, Math.round(rect.width)); canvas.height = Math.max(1, Math.round(rect.height)); const ctx = canvas.getContext('2d')!; ctx.fillStyle = '#FFFFFF'; ctx.fillRect(0, 0, canvas.width, canvas.height); ctx.drawImage(img, 0, 0, canvas.width, canvas.height); return new Promise<Blob>((resolve, reject) => { canvas.toBlob((b) => { if (b) resolve(b); else reject(new Error('背景图转换失败')); }, 'image/png'); }); }}
跨框架自动填充
值得注意的是,vue这些框架的输入框是加过料的,JavaScript直接改输入框的值是不生效的
1 2 3 4 5 6 7 8 9 10 11 12 13 14 15 16 17 18 19 20 21 22 23 24 25 26 27 28 29 30 31 32 33 34 35 36 37 38 39 40 41 42 43 44 45 46 47 48 49 50 51 52 53 54 55 56 57 58 59 60 61 62 63 64 65 66 67 68 69 70 71 72 73 74 75 76 77 78 79 80 81 82 83 84 85 86 87 88 89 90 91 92 93 94 95 96 97 98 99 100 101 102 103 104 105 106 107 108 109 110 111 112 113 114 115 116 117 118 119 120 121 122 123 124 125 126 127 128 129 130 131 132 133 export class AutoFill { /** * 设置输入框的值(兼容 React / Vue / Angular) * * 直接修改 input.value 在现代框架中不会触发状态更新, * 因为框架劫持了 value 的 setter。 * 需要通过原生 setter 绕过框架的拦截。 */ private setInputValue(input: HTMLInputElement, value: string): void { // 获取原生的 value setter(绕过框架的 defineProperty 劫持) const nativeInputValueSetter = Object.getOwnPropertyDescriptor( window.HTMLInputElement.prototype, 'value' )?.set; if (nativeInputValueSetter) { nativeInputValueSetter.call(input, value); } else { input.value = value; } // 触发各框架所需的事件 this.dispatchInputEvents(input); } /** * 分发输入事件(兼容 React / Vue / Angular) * * 不同框架监听不同的 DOM 事件: * - React: 依赖 _valueTracker,需要先重置 tracker * - Vue: 依赖 compositionstart/end 事件(处理中文输入法) * - Angular: 依赖 input + blur 事件 */ private dispatchInputEvents(input: HTMLInputElement): void { // 标准 InputEvent const inputEvent = new InputEvent('input', { bubbles: true, cancelable: true, inputType: 'insertText', data: input.value, }); input.dispatchEvent(inputEvent); // change 事件 this.dispatchEvent(input, 'change'); // === React 兼容 === // React 通过 _valueTracker 跟踪 input 值的变化, // 如果 tracker 中的旧值和新值相同,React 会忽略这次变化。 // 所以要先把 tracker 的值设为空字符串,制造"值已改变"的假象 const reactKey = Object.keys(input).find(key => key.startsWith('__reactProps$') || key.startsWith('__reactFiber$') || key.startsWith('__reactEventHandlers$') ); if (reactKey) { const tracker = (input as any)._valueTracker; if (tracker) { tracker.setValue(''); // 重置 tracker,使 React 认为值发生了变化 } } // === Angular 兼容 === // Angular 的 ngModel 通过 input + blur 事件同步视图和模型 const ngModel = (input as any).ngModel || input.getAttribute('ng-model') || input.getAttribute('[(ngModel)]'); if (ngModel) { this.dispatchEvent(input, 'input'); this.dispatchEvent(input, 'blur'); } // === Vue 兼容 === // Vue 的 v-model 在处理中文输入时依赖 compositionstart/end // 手动触发这对事件可以确保 v-model 正确更新 const vueKey = Object.keys(input).find(key => key.startsWith('__vue')); if (vueKey || input.hasAttribute('v-model')) { const compositionStart = new CompositionEvent('compositionstart', { bubbles: true }); const compositionEnd = new CompositionEvent('compositionend', { bubbles: true, data: input.value }); input.dispatchEvent(compositionStart); input.dispatchEvent(compositionEnd); } } /** * 模拟逐字打字输入 * * 依次触发 keydown → 设置值 → input 事件 → keyup * 每个字符之间有 50-150ms 的随机延迟,模拟人工输入节奏 * 这样可以更好地通过前端框架的输入验证和事件监听 */ private async simulateTyping(input: HTMLInputElement, text: string): Promise<void> { for (const char of text) { // keydown 事件 this.dispatchKeyEvent(input, 'keydown', char); // 通过原生 setter 追加字符 const nativeSetter = Object.getOwnPropertyDescriptor( window.HTMLInputElement.prototype, 'value' )?.set; if (nativeSetter) { nativeSetter.call(input, input.value + char); } else { input.value += char; } // input 事件(单字符) const inputEvent = new InputEvent('input', { bubbles: true, cancelable: true, inputType: 'insertText', data: char, }); input.dispatchEvent(inputEvent); // keyup 事件 this.dispatchKeyEvent(input, 'keyup', char); // 随机延迟 50-150ms await this.delay(50 + Math.random() * 100); } // 打字结束后触发 change 和 blur this.dispatchEvent(input, 'change'); this.dispatchEvent(input, 'blur'); }}
自动计算四则运算结果
有的验证码就需要用户计算得到的结果才可以,这一部分模型是不支持的,我们只能通过正则判断是不是四则运算,然后返回计算结果
1 2 3 4 5 6 7 8 9 10 11 12 13 14 15 16 17 18 19 20 21 22 23 24 25 26 27 28 29 30 31 32 33 34 35 36 37 38 39 40 41 42 43 44 45 46 47 48 49 50 51 52 53 54 55 56 57 58 59 60 61 62 63 64 65 66 67 68 69 70 71 72 73 74 75 76 77 78 79 80 81 82 83 84 85 86 87 88 89 90 91 92 93 94 95 export class Calculator { // 支持的运算符(包括中文全角和数学符号) private static readonly OPERATORS = ['+', '-', '×', '*', '÷', '/', 'x', 'X']; /** * 解析 OCR 识别出的数学表达式 * * 支持的格式: * "3+5=?" → 解析为 3 + 5 * "12×3" → 解析为 12 × 3 * "8÷2=?" → 解析为 8 ÷ 2 * "7-2=5" → 如果答案正确则不需要计算,答案错误则重新计算 * * 预处理:先去除噪声字符(?、?、空格等) */ static parseExpression(text: string): ParsedExpression | null { const trimmed = text.trim(); // 去除噪声字符 let cleanText = trimmed; for (const noise of this.NOISE_CHARS) { cleanText = cleanText.split(noise).join(''); } // 多个正则模式尝试匹配 const patterns = [ // "3+5=8" 或 "3+5=" /^(\d+(?:\.\d+)?)\s*([+\-×*÷/xX])\s*(\d+(?:\.\d+)?)\s*[==]?\s*\d*$/, // "3+5="(全角等号) /^(\d+(?:\.\d+)?)\s*([+\-×*÷/xX])\s*(\d+(?:\.\d+)?)\s*[==]$/, // "3+5"(无等号) /^(\d+(?:\.\d+)?)\s*([+\-×*÷/xX])\s*(\d+(?:\.\d+)?)$/, ]; for (const pattern of patterns) { const match = cleanText.match(pattern); if (match) { const num1 = parseFloat(match[1]); const operator = match[2]; const num2 = parseFloat(match[3]); if (!isNaN(num1) && !isNaN(num2)) { return { num1, operator, num2, originalText: trimmed, cleanExpression: `${num1}${this.normalizeOperator(operator)}${num2}`, }; } } } return null; } /** * 处理识别结果:判断是否为数学表达式,如果是则自动计算 * * 支持两种输出模式: * - 'result': 仅输出计算结果,如 "8" * - 'equation': 输出完整等式,如 "3+5=8" * * 还支持为不同站点配置不同的输出模式 */ static processResult( text: string, options: CalculateOptions, hostname: string ): string { if (!options.autoCalculate) return text; // 检查站点特定规则 if (options.rules && options.rules.length > 0) { if (!this.shouldCalculateForHostname(hostname, options.rules)) { return text; } } // 尝试解析表达式 const expression = this.parseExpression(text); if (!expression) return text; // 不是数学表达式,原样返回 // 计算结果 const result = this.calculate(expression); if (result === null) return text; // 根据站点规则或全局设置决定输出格式 const outputMode = this.getOutputModeForHostname( hostname, options.rules, options.outputMode ); if (outputMode === 'equation') { return this.formatEquation(expression, result); // "3+5=8" } return this.formatResult(result); // "8" }}
DOM 变化监听
方法有很多,监听DOM树变化,src变化等,但是如果要做通用的验证码识别,就全都要
1 2 3 4 5 6 7 8 9 10 11 12 13 14 15 16 17 18 19 20 21 22 23 24 25 26 27 28 29 30 31 32 33 34 35 36 37 38 39 40 41 42 43 44 45 46 47 48 49 50 51 52 53 54 55 56 57 58 59 60 61 62 63 64 65 66 67 68 69 70 71 72 73 74 75 76 77 78 79 80 81 82 83 84 85 86 87 88 89 90 91 92 93 94 95 96 97 98 /** * MutationObserver 配置 * * 监听 DOM 变化以自动发现新出现的验证码: * - childList: 新节点插入(页面动态加载验证码) * - attributes: 属性变化(验证码图片刷新时 src 变化) * - attributeFilter: 只关心图片相关的属性变化,避免过多回调 */observer = new MutationObserver((mutations) => { let shouldCheckAgreements = false; for (const mutation of mutations) { if (mutation.type === 'childList') { mutation.addedNodes.forEach((node) => { if (node instanceof HTMLElement) { // 新增的 img/canvas/svg → 可能是新验证码 if (node.matches('img, canvas, svg')) scheduleAutoSolve(); // 新增元素内部包含验证码载体 if (node.querySelector('img, canvas, svg')) scheduleAutoSolve(); // 新增带背景图的元素 if (node.style && node.style.backgroundImage) scheduleAutoSolve(); // 新增的 checkbox → 可能是协议复选框 if (node.matches('input[type="checkbox"]') || node.querySelector('input[type="checkbox"]')) { shouldCheckAgreements = true; } } }); } else if (mutation.type === 'attributes') { const target = mutation.target; if (target instanceof HTMLElement) { // img 的 src 变化 → 验证码刷新了 if (target instanceof HTMLImageElement && (mutation.attributeName === 'src' || mutation.attributeName === 'data-src')) { scheduleAutoSolve(); } // canvas 属性变化 → 内容可能更新 else if (target instanceof HTMLCanvasElement) { scheduleAutoSolve(); } // style 中 backgroundImage 变化 else if (mutation.attributeName === 'style' && target.style.backgroundImage) { scheduleAutoSolve(); } } } } if (shouldCheckAgreements) scheduleAgreementCheck();});observer.observe(document.body, { childList: true, subtree: true, // 监听整棵子树 attributes: true, // 只关心这些属性的变化,减少无关回调 attributeFilter: ['src', 'data-src', 'srcset', 'style', 'href'],});/** * 元素内容哈希 —— 判断验证码是否已经变化 * * 不同类型元素有不同的哈希策略: * - img: src + naturalWidth + naturalHeight * - canvas: toDataURL()(整个画布内容) * - svg: outerHTML(完整 SVG 标记) * - div: backgroundImage CSS 属性值 * * 比较前后两次哈希,相同则跳过,不同则触发重新识别 */private getElementHash(element: Element): string { if (element instanceof HTMLImageElement) { return element.src + '_' + element.naturalWidth + '_' + element.naturalHeight; } else if (element instanceof HTMLCanvasElement) { try { return element.toDataURL(); // 注意:跨域 canvas 会失败 } catch { return 'canvas_' + Date.now(); // 回退:每次都不同,强制重新识别 } } else if (element instanceof SVGElement) { return element.outerHTML; } else if (element instanceof HTMLElement && element.style.backgroundImage) { return element.style.backgroundImage; } return '';}/** * 防抖调度 * 短时间内多次 DOM 变化只触发一次识别,避免重复处理 */function scheduleAutoSolve(): void { if (!autoDetectEnabled) return; if (pendingTimer) clearTimeout(pendingTimer); pendingTimer = window.setTimeout(() => tryAutoSolveOnce(), 300);}
项目架构
1 2 3 4 5 6 7 8 9 10 11 12 13 14 15 16 17 18 19 20 21 22 23 24 25 26 27 28 29 30 31 32 33 34 35 36 37 38 39 40 ┌──────────────────────────────────────────────────────┐│ 用户页面 ││ ││ ┌──────────┐ ┌─────────┐ ┌────────┐ ┌─────────┐ ││ │ <img> │ │ <canvas>│ │ <svg> │ │ bg-image│ ││ └────┬─────┘ └────┬────┘ └───┬────┘ └────┬────┘ ││ │ │ │ │ ││ └─────────────┼───────────┼─────────────┘ ││ │ ││ ┌────────▼────────┐ ││ │ CaptchaDetector │ ← MutationObserver ││ │ 扫描/检测/评分 │ ││ └────────┬────────┘ ││ │ ││ ┌────────▼────────┐ ││ │ captureImage │ ││ │ Canvas截图/Blob │ ││ └────────┬────────┘ ││ │ ││ ┌─────────────────▼──────────────────┐ ││ │ ImageProcessor │ ││ │ 灰度化 → 缩放(64xN) → 归一化 │ ││ └─────────────────┬──────────────────┘ ││ │ ││ ┌─────────────────▼──────────────────┐ ││ │ OCREngine │ ││ │ ONNX Tensor → 推理 → CTC解码 │ ││ └─────────────────┬──────────────────┘ ││ │ ││ ┌──────────▼──────────┐ ││ │ Calculator │ ││ │ 数学表达式自动计算 │ ││ └──────────┬──────────┘ ││ │ ││ ┌──────────▼──────────┐ ││ │ AutoFill │ ││ │ 跨框架兼容填充 │ ││ │ React/Vue/Angular │ ││ └─────────────────────┘ │└──────────────────────────────────────────────────────┘
下载安装
edge浏览器用户可以在edge浏览器扩展应用商店安装,edge扩展审核周期比较长,更新比较慢,大概7天左右
https://microsoftedge.microsoft.com/addons/detail/lbdjhikpmfggijmddllmekoepdkhfanl
FireFox浏览器用户可以在FireFox扩展商店安装
https://addons.mozilla.org/addon/dddd-ocr-extension
如果只是单个网站测试使用,或者浏览器不支持扩展可以使用油猴的情况也可以考虑油猴脚本
https://scriptcat.org/zh-CN/script-show-page/4781
识别准确率取决于模型的训练数据集,我直接用的DDDDOCR的模型,如果大佬们有需要,可以使用DDDDOCR的模型训练项目本地训练专属模型。
写在最后
严肃喵喵两句:项目仅用于学习交流,开发,测试以及运维调试,禁止用于非法活动
引用链接
[1] DDDD OCR WEB – 验证码自动识别: https://scriptcat.org/zh-CN/script-show-page/4781
