 夜雨聆风
夜雨聆风


使用 QAI AppBuilder API 在高通平台上部署 AI 模型
1. 写在前面
在之前 QAI AppBuilder 的系列文章中,我们已经学习了:
-
QAI AppBuilder 是什么:高通官方开源|QAI AppBuilder:高通平台AI部署神器已就位
-
如何使用 QAI AppBuilder 在高通 9075 开发板上进行 AI 模型推理:高通 IQ9075 开发板实战:使用 QAI AppBuilder 实现 AI 模型推理
在本篇及后续的文章中,我将进一步介绍如何使用 QAI AppBuilder API 适配新模型以及解决方案。
2. QAI AppBuilder API 介绍
QAI AppBuilder 提供 python 和 C++ 两种 API 接口,开发者可以根据自己需要使用的编程语言来选择。其中,python 接口是通过 pybind 来调用 C++ 接口,两者在性能上基本上是等价的。
2.1 Python API 介绍
2.1.1 核心类概览
-
QNNConfig:全局配置管理
-
QNNContext:标准模型上下文(核心类)
-
GenieContext:大语言模型专用上下文
-
LogLevel:日志级别控制
-
PerfProfile:性能模式管理
2.1.2 QNNConfig
QNNConfig 用于配置 QNN 运行环境,必须在使用其他 API 之前调用。
API 签名:
class QNNConfig:@staticmethoddef Config(qnn_lib_path: str = "None", # QAIRT运行 库路径runtime: str = Runtime.HTP, # 运行时log_level: int = LogLevel.ERROR, # 日志级别profiling_level: int = ProfilingLevel.OFF, # 性能分析级别log_path: str = "None" # 日志文件路径) -> None
2.1.3 QNNContext
QNNContext 是最常用的类,用于加载模型、执行推理和管理模型生命周期。
构造函数:
class QNNContext:def __init__(self,model_name: str = "None", # 模型名称(唯一标识)model_path: str = "None", # 模型文件路径backend_lib_path: str = "None", # 后端库路径(可选)system_lib_path: str = "None", # 系统库路径(可选)is_async: bool = False, # 是否异步执行input_data_type: str = DataType.FLOAT, # 输入数据类型output_data_type: str = DataType.FLOAT # 输出数据类型) -> None
核心方法:
-
Inference – 执行推理
-
模型信息查询方法:
-
getInputShapes – 获取输入形状
-
getOutputShapes – 获取输出形状
-
getInputDataType – 获取输入数据类型
-
getOutputDataType – 获取输出数据类型
-
getGraphName – 获取图名称
-
getInputName – 获取输入张量名称
-
getOutputName – 获取输出张量名称
2.1.4 使用流程示例(不完整):
from qai_appbuilder import (QNNContext, QNNConfig, Runtime, LogLevel,ProfilingLevel, PerfProfile)# 配置 QNN 运行环境QNNConfig.Config(qnn_lib_path=str(qnn_dir), # 此参数从 v2.0.0 开始可以不进行设置,留空即可。runtime=Runtime.HTP,log_level=LogLevel.WARN,profiling_level=ProfilingLevel.BASIC)# 定义模型类class YourModel(QNNContext):"""Your Model"""def Inference(self, input_data):input_datas = [input_data]output_data = super().Inference(input_datas)[0]return output_data# 初始化模型your_model = YourModel()# 预处理# 执行推理output_data = your_model.Inference(input_data)# 后处理# 清理资源del your_model
2.2 C++ API 介绍
LibAppBuilder 是 C++ API 的核心类,定义(部分)如下:
classLIBAPPBUILDER_APILibAppBuilder{public:bool ModelInitialize(const std::string& model_name, const std::string& model_path,const std::string& backend_lib_path, const std::string& system_lib_path,bool async = false, const std::string& input_data_type="float", const std::string& output_data_type="float", uint32_t deviceID=0, std::string coreIdsStr="");bool ModelInference(std::string model_name, std::vector<uint8_t*>& inputBuffers,std::vector<uint8_t*>& outputBuffers, std::vector<size_t>& outputSize,std::string& perfProfile, size_t graphIndex = 0, size_t share_memory_size = 0);bool ModelApplyBinaryUpdate(const std::string model_name, std::vector<LoraAdapter>& lora_adapters);bool ModelDestroy(std::string model_name);bool CreateShareMemory(std::string share_memory_name, size_t share_memory_size);bool DeleteShareMemory(std::string share_memory_name);std::vector<std::vector<size_t>> getInputShapes(std::string model_name);std::vector<std::string> getInputDataType(std::string model_name);std::vector<std::string> getOutputDataType(std::string model_name);std::vector<std::vector<size_t>> getOutputShapes(std::string model_name);std::string getGraphName(std::string model_name);std::vector<std::string> getInputName(std::string model_name);std::vector<std::string> getOutputName(std::string model_name);std::vector<std::vector<size_t>> getInputShapes(std::string model_name, std::string proc_name);std::vector<std::string> getInputDataType(std::string model_name, std::string proc_name);std::vector<std::string> getOutputDataType(std::string model_name, std::string proc_name);std::vector<std::vector<size_t>> getOutputShapes(std::string model_name, std::string proc_name);std::string getGraphName(std::string model_name, std::string proc_name);std::vector<std::string> getInputName(std::string model_name, std::string proc_name);std::vector<std::string> getOutputName(std::string model_name, std::string proc_name);ModelInfo_t getModelInfo(std::string model_name, std::string input);ModelInfo_t getModelInfo(std::string model_name, std::string proc_name, std::string input);ModelInfo_t getModelInfoExt(std::string model_name, std::string input);};
2.2.1 主要方法:
-
ModelInitialize – 初始化模型:
具体实现在 ModelInitializeEx 函数:
https://github.com/Francis235/ai-engine-direct-helper/blob/main/src/LibAppBuilder.cpp#L359-L512
-
ModelInference – 执行推理:
具体实现在 ModelInferenceEx 函数:
https://github.com/Francis235/ai-engine-direct-helper/blob/main/src/LibAppBuilder.cpp#L512-L548)
-
ModelDestroy – 销毁模型:
具体实现在 ModelDestroyEx 函数:
https://github.com/Francis235/ai-engine-direct-helper/blob/main/src/LibAppBuilder.cpp#L551-L604
2.2.2 使用流程示例(不完整):
#include "LibAppBuilder.hpp"const std::string MODEL_NAME = "your model name"// 初始化日志和性能分析SetLogLevel(QNN_LOG_LEVEL_WARN);SetProfilingLevel(QNN_PROFILING_LEVEL_BASIC);// 创建 LibAppBuilder 实例并初始化模型LibAppBuilder libAppBuilder;int ret = libAppBuilder.ModelInitialize(MODEL_NAME,model_path.string(),backend_lib_path.string(),system_lib_path.string());// 预处理和推理前的准备操作// 如分配输入缓冲区,填充inputBuffers等// 执行推理ret = libAppBuilder.ModelInference(MODEL_NAME,inputBuffers,outputBuffers,outputSize,perfProfile);// 后处理和推理后的清理工作// 如释放输出缓冲区等// 销毁模型libAppBuilder.ModelDestroy(MODEL_NAME);
2.3 C++ API 到 Python API 的包装机制
在深度学习应用中,开发者通常使用相对简洁、易用的 Python 语言进行模型开发与推理;而在 Qualcomm HTP 等底层硬件上,高性能计算往往依赖复杂的 C/C++ 实现,并涉及大量指针操作。这种语言与抽象层级上的差异,为应用开发带来了较高的门槛。
为此,QAI AppBuilder 在 Python 环境中提供了高性能的 AI 模型推理能力,使开发者能够直接使用熟悉的 Python 接口和 NumPy 数组完成模型调用,而无需深入了解底层复杂的 QNN SDK 细节。同时,该能力在语义和性能上与底层 C++ 实现保持等价或近似一致。具体而言,QAI AppBuilder 的 C++ API 通过 pybind11 进行封装,对外暴露统一的 Python API。
在推理流程上,系统采用了三层委托架构: 首先,用户调用 Python 层的高阶接口,该接口负责自动完成输入张量的 reshape 等预处理操作;随后,Python 接口调用由 pybind11 封装的 C++ 对象,该对象进一步将请求委托给全局的 inference 函数;在这一过程中,pybind11 层能够将 NumPy 数组高效映射为 C++ 的 uint8_t* 指针,从而避免不必要的数据拷贝。最终,推理请求进入底层 C++ 核心推理引擎,并在 Qualcomm HTP/DSP 硬件上完成实际的模型计算。
在性能优化方面,输入数据在 float 模式下可能会触发一次必要的数据拷贝,而输出结果则通过 py::capsule 机制实现零拷贝返回。由于 Python API 与 C++ API 共用同一套核心推理代码路径,Python 层引入的额外开销主要集中在数据格式转换上。对于典型的深度学习推理场景而言,这部分开销可以忽略不计,从而在易用性与高性能之间实现了良好的平衡。
整个包装体系分为三层,层层委托:
-
Layer 1 – 核心 C++ 库(
src/LibAppBuilder):这是最底层的 C++ 实现。LibAppBuilder类声明了原生接口,直接操作uint8_t*裸指针缓冲区。真正的模型初始化、推理、销毁逻辑在src/LibAppBuilder.cpp中的ModelInitializeEx、ModelInferenceEx、ModelDestroyEx等内部函数实现。 -
Layer 2 – pybind11 绑定层:
-
绑定层在
pybind/AppBuilder.h中引入 pybind11 相关头文件,并声明一个全局LibAppBuilder实例g_LibAppBuilder -
关键数据转换:
py::array→uint8_t* -
PYBIND11_MODULE注册 -
Layer 3 – 高层封装:
qnncontext.py中的 Python 类(QNNContext,QNNContextProc,QNNLoraContext)是用户直接使用的 API,它们持有 pybind11 暴露的appbuilder.QNNContext对象。
关于这部分的详细解释可以参考 deepwiki 的介绍:https://deepwiki.com/search/qai-appbuilder-c-apipybindpyth_b4da9288-c302-4268-b0bf-8aae73e2ee42
3. yolo26n 部署
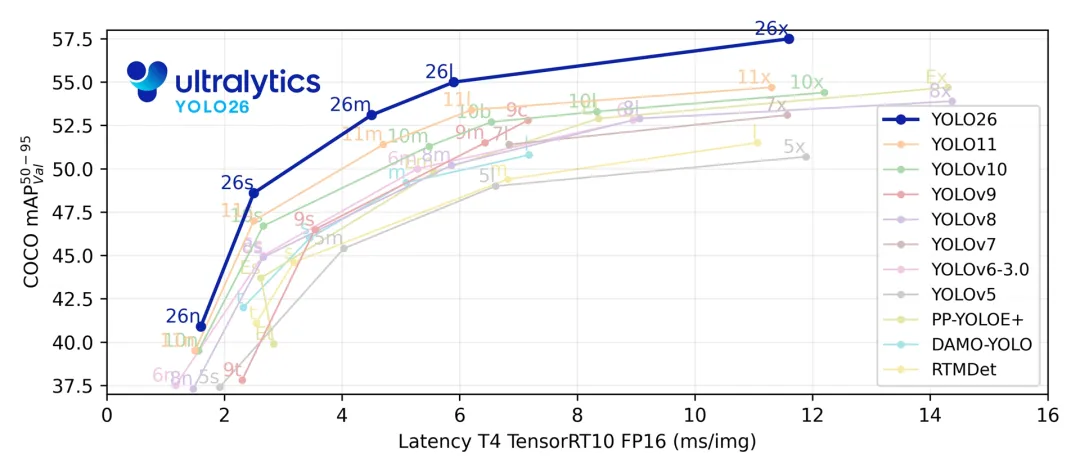
我们这里使用最新的 yolo 模型 – yolo26 来作为 demo,使用QAI AppBuilder Python API 在9075上部署。yolo26 简化了设计,是一个原生端到端模型 ,直接产生预测结果,而无需非最大抑制(NMS),专为边缘和低功耗设备设计。
从ultralytics yolo26的官方文档,我们还了解到,yolo26 采用双头架构,为不同部署场景提供了灵活性:
-
一对一头(默认): 无需 NMS 即可生成端到端预测,输出
(N, 300, 6),每张图像最多 300 次检测。该头为快速推理和简化部署进行了优化。 -
一对多头 :生成需要 NMS 后处理的传统 YOLO 输出,输出
(N, nc + 4, 8400),其中nc是类别数。该头通常能实现略高的精度,但代价是需要额外的后处理。可以在推理时通过指定end2end=False来启用该头。
官方测试结果:
模型来自:
https://github.com/ultralytics/assets/releases/download/v8.4.0/yolo26n.pt
我们首先导出 .onnx 模型,然后使用 QAIRT(QNN) SDK 中的工具转换成 .bin 模型:
$QNN_SDK_ROOT/bin/x86_64-linux-clang/qnn-onnx-converter -i ./sim_yolo26n.onnx --preserve_io layout --preserve_io datatype --output_path ./sim_yolo26n.cpp$QNN_SDK_ROOT/bin/x86_64-linux-clang/qnn-model-lib-generator -c ./sim_yolo26n.cpp -b ./sim_yolo26n.bin -t x86_64-linux-clang -o ./$QNN_SDK_ROOT/bin/x86_64-linux-clang/qnn-context-binary-generator --model ./x86_64-linux-clang/libsim_yolo26n.so --soc_model 77 --backend ${QNN_SDK_ROOT}/lib/x86_64-linux-clang/libQnnHtp.so --binary_file cntx_sim_yolo26n_9100_fp16
在转换模型这里需要注意模型的输入格式,这里我们使用 –preserve_io layout 参数来保证转换后模型的输入 layout 与原始模型相同,这里都是 NCHW,我们可以通过模型转换过程中产生的 *.json 文件查看模型结构。我在刚开始适配的时候,由于输入数据的结构与模型输入 layout 不匹配,导致最后画出来的目标检测框一直不对,花了很多时间在思考后处理部分,最后才意识到可能是输入的数据结构不对,调整了输入数据结构后,才得出正确的检测结果。

预处理部分相关代码如下:
def preprocess_PIL_image(image: Image) -> torch.Tensor:"""Convert a PIL image into a pyTorch tensor with range [0, 1] and shape NCHW."""transform = transforms.Compose([transforms.PILToTensor()]) # bgr imageimg: torch.Tensor = transform(image) # type: ignoreimg = img.float().unsqueeze(0) / 255.0 # int 0 - 255 to float 0.0 - 1.0return img# ...# Read and preprocess the image.image = Image.open(input_image_path)image = image.resize((IMAGE_SIZE, IMAGE_SIZE))outputImg = Image.open(input_image_path)image = preprocess_PIL_image(image) # transfer raw image to torch tensor format# image = image.permute(0, 2, 3, 1)image = image.numpy()
如果是从参考 yolov8 代码而来,image 这里是否需要 permute,要怎么 permute 都要根据自己模型的实际 layout 而来。
后处理部分,可以参考 yolov8 的部分代码,这里有几点点需要注意:
-
输出数据的 shape 为 [bs, 300, 6],每个检测目标有 6 个浮点数据表示,布局与 yolov8 类似,都是 xyxy,socre,class_idx
-
输出 score 已经按照降序排列,所以不需要再排序
-
如果在导出模型时设置了 end2end=True(default),则不需要进行 nms;否则仍需进行 nms。
# Run the inference.model_output = yolo26.Inference(image)pred_boxes = torch.tensor(model_output[0][:, :, :4])pred_scores = torch.tensor(model_output[0][:, :, 4])pred_class_idx = torch.tensor(model_output[0][:, :, 5])
至此,使用 QAI AppBuilder API 在高通 9075 上适配 yolo26n 就基本完成了,如果需要使用 yolo26 其他 size 的模型,只需要配置相应的模型即可。后续我会把 yolo26 适配的代码 pr 到官方 github 仓库,有问题欢迎评论区交流。
4. 总结
本文系统地介绍了 QAI AppBuilder API 的整体设计与使用方法。首先分别对 Python API 与 C++ API 的接口结构和使用方式进行了介绍,帮助读者建立对 AppBuilder API 的整体认知;随后从 C++ API 到 Python API 的封装机制入手,分析了 Python API 在保持高性能的同时兼顾易用性的设计思路。最后,以 yolo26n 模型为具体示例,详细说明了基于 Python API 的模型适配流程,并总结了实际适配过程中常见的问题及注意事项,为后续在真实项目中使用 QAI AppBuilder API 提供了参考和经验借鉴。
5. 参考
https://github.com/quic/ai-engine-direct-helper/tree/main
https://github.com/quic/ai-engine-direct-helper/blob/main/docs/guide_zh.md
https://docs.ultralytics.com/models/yolo26/#overview
