 夜雨聆风
夜雨聆风


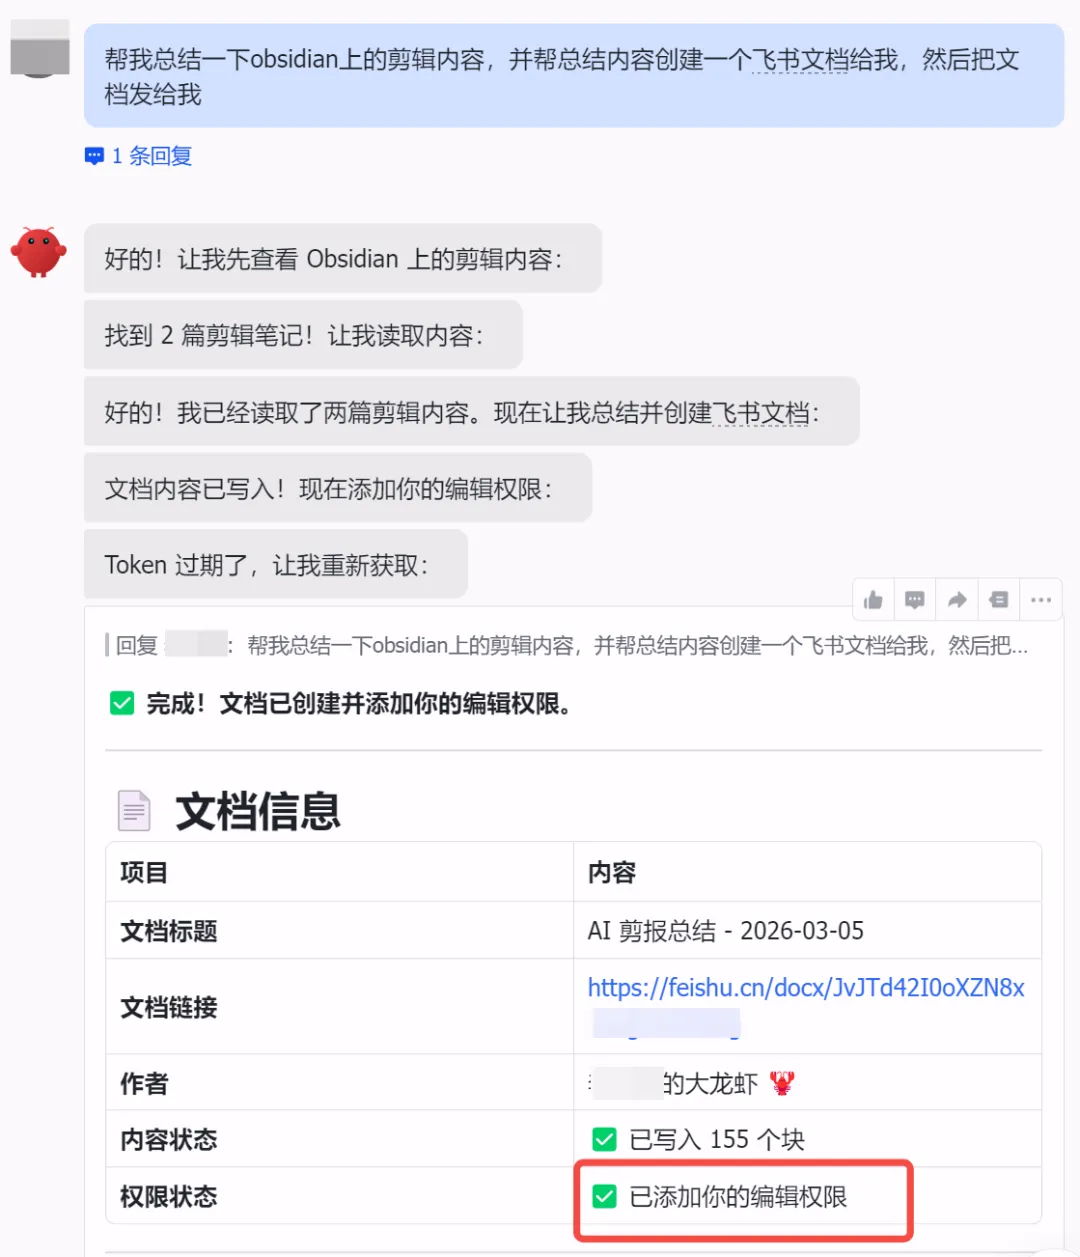
[养虾日记] 龙虾写的文档能自动授权编辑权限给你
一、问题起源
1.1 初始需求
二、问题排查过程
2.1 第一次尝试:使用 grant_to_requester 参数
{"requester_permission_added": false,"requester_permission_skipped_reason": "trusted requester identity unavailable"}
2.2 第二次尝试:配置 default_managers
{"channels": {"feishu": {"tools": {"feishu_doc": {"default_managers": ["你的飞书 open_id"]}}}}}
2.3 第三次尝试:修改飞书插件代码
const defaultManagers = ["你的飞书 open_id"];if (shouldGrantToRequester) {const membersToAdd = requesterOpenId ? [requesterOpenId] : defaultManagers;if (membersToAdd.length === 0) {requesterPermissionSkippedReason = "trusted requester identity unavailable";} else {for (const memberId of membersToAdd) {try {await client.drive.permissionMember.create({path: { token: docToken },params: { type: "docx", need_notification: false },data: {member_type: "openid",member_id: memberId,perm: requesterPermType,},});requesterPermissionAdded = true;} catch (err) {requesterPermissionError = err instanceof Error ? err.message : String(err);}}}}
2.4 第四次尝试:检查飞书应用权限
-
✅ docx:document:create – 创建文档 -
✅ docx:document – 文档操作 -
✅ docs:permission.member:create – 创建文档权限 -
✅ contact:user.base:readonly – 获取用户基本信息 -
✅ drive:drive – 云盘权限
2.5 第五次尝试:直接调用飞书 API
curl -X POST "https://open.feishu.cn/open-apis/drive/v1/permissions" \-H "Content-Type: application/json" \-H "Authorization: Bearer TOKEN" \-d '{"file_token": "xxx","entity_type": "user","entity_id": "ou_xxx","role": "editor"}'
curl -X POST "https://open.feishu.cn/open-apis/doc/v1/permissions/add" \-H "Content-Type: application/json" \-H "Authorization: Bearer TOKEN" \-d '{"document_id": "xxx","member_id": "ou_xxx","member_type": "user","role": "owner"}'
curl -X POST "https://open.feishu.cn/open-apis/drive/v1/permissions/{文档 ID}/members?type=docx" \-H "Content-Type: application/json" \-H "Authorization: Bearer TOKEN" \-d '{"member_type": "openid","member_id": "你的飞书 open_id","perm": "edit"}'
{"code": 99992402,"msg": "field validation failed","error": {"field_violations": [{"description": "type is required","field": "type"},{"field": "member_type","value": "user","description": "member_type is optional, options: [email,openid,unionid,openchat,opendepartmentid,userid,groupid,wikispaceid]"}]}}
-
member_type 应该是 “openid” 而不是 “user” -
URL 需要添加参数 ?type=docx
curl -X POST "https://open.feishu.cn/open-apis/drive/v1/permissions/{文档 ID}/members?type=docx" \-H "Content-Type: application/json" \-H "Authorization: Bearer TOKEN" \-d '{"member_type": "openid","member_id": "你的飞书 open_id","perm": "edit"}'
{"code": 0,"msg": "Success","data": {"member": {"member_id": "你的飞书 open_id","member_type": "openid","perm": "edit","perm_type": "container"}}}
三、最终解决方案
3.1 方案概述
3.2 实施步骤
步骤 1:创建文档
创建一个名为"测试文档"的飞书文档{"document_id": "文档 ID","url": "https://feishu.cn/docx/文档 ID"}
步骤 2:调用飞书 API 添加权限
#!/bin/bash# 配置变量DOC_TOKEN="文档 ID"USER_OPENID="你的飞书 open_id"APP_ID="你的飞书 APP ID"APP_SECRET="你的 APP Secret"# 获取 access tokenTOKEN=$(curl -s "https://open.feishu.cn/open-apis/auth/v3/app_access_token/internal" \-X POST \-H "Content-Type: application/json" \-d "{\"app_id\":\"${APP_ID}\",\"app_secret\":\"${APP_SECRET}\"}" \| grep -o '"app_access_token":"[^"]*"' | cut -d'"' -f4)# 添加编辑权限curl -X POST "https://open.feishu.cn/open-apis/drive/v1/permissions/${DOC_TOKEN}/members?type=docx" \-H "Content-Type: application/json" \-H "Authorization: Bearer ${TOKEN}" \-d "{\"member_type\": \"openid\",\"member_id\": \"${USER_OPENID}\",\"perm\": \"edit\"}"
步骤 3:验证权限
3.3 自动化集成
用户请求 → OpenClaw 创建文档 → 返回文档链接(无权限)用户请求 → OpenClaw 创建文档 → 自动调用飞书 API 添加权限 → 返回文档链接(有权限)四、关键发现
4.1 飞书 API 端点
POST https://open.feishu.cn/open-apis/drive/v1/permissions/{文档 ID}/members?type=docx-
❌ /drive/v1/permissions(缺少文档 ID) -
❌ /doc/v1/permissions/add(错误的 API 路径) -
❌ 缺少 ?type=docx 参数
4.2 API 参数格式
{"member_type": "openid","member_id": "你的飞书 open_id","perm": "edit"}
-
❌ “member_type”: “user”(应该是 “openid”) -
❌ “perm”: “editor”(应该是 “edit”) -
❌ 缺少 URL 参数 ?type=docx
4.3 权限级别
五、自动化脚本
5.1 完整脚本
#!/bin/bash# 配置APP_ID="你的飞书 APP ID"APP_SECRET="你的 APP Secret"USER_OPENID="你的飞书 open_id"# 获取文档 IDDOC_TOKEN="${1:-$DOC_TOKEN}"if [ -z "$DOC_TOKEN" ]; thenecho "用法:$0 <doc_token>"exit 1fi# 获取 access tokenecho "获取 access token..."TOKEN_RESPONSE=$(curl -s "https://open.feishu.cn/open-apis/auth/v3/app_access_token/internal" \-X POST \-H "Content-Type: application/json" \-d "{\"app_id\":\"${APP_ID}\",\"app_secret\":\"${APP_SECRET}\"}")TOKEN=$(echo "$TOKEN_RESPONSE" | grep -o '"app_access_token":"[^"]*"' | cut -d'"' -f4)if [ -z "$TOKEN" ]; thenecho "❌ 获取 access token 失败"exit 1fiecho "✅ Access token 获取成功"# 添加权限echo "添加编辑权限..."RESPONSE=$(curl -s -X POST "https://open.feishu.cn/open-apis/drive/v1/permissions/${DOC_TOKEN}/members?type=docx" \-H "Content-Type: application/json" \-H "Authorization: Bearer ${TOKEN}" \-d "{\"member_type\": \"openid\",\"member_id\": \"${USER_OPENID}\",\"perm\": \"edit\"}")# 检查响应if echo "$RESPONSE" | grep -q '"code":0'; thenecho "✅ 权限添加成功!"echo "📄 文档链接:https://feishu.cn/docx/${DOC_TOKEN}"elseecho "❌ 权限添加失败"echo "响应:$RESPONSE"exit 1fi
5.2 使用方法
# 添加执行权限chmod +x auto_add_permission.sh# 使用./auto_add_permission.sh 文档 ID
5.3 输出示例
获取 access token...✅ Access token 获取成功添加编辑权限...✅ 权限添加成功!📄 文档链接:https://feishu.cn/docx/{文档 ID}
六、实际验证
七、总结
-
自动化 – 创建文档后自动添加权限,无需手动操作 -
可靠 – 基于飞书官方 API,稳定性有保障 -
灵活 – 可以集成到任何工作流中 -
可复制 – 代码开源,可以直接使用
-
先手动测试 API,确认流程正确 -
再集成到自动化脚本中 -
最后考虑集成到 OpenClaw 工作流
