 夜雨聆风
夜雨聆风


OpenClaw 开发系列:第11篇-高级实战 — 从零构建一个完整插件
前置阅读:第 1-10 篇(全部)
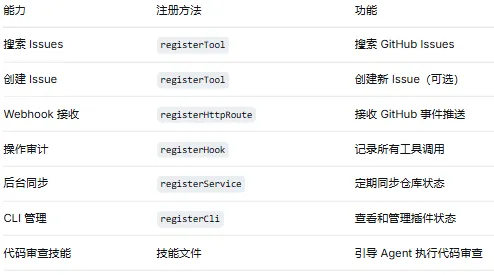
本篇是系列的收篇之作。我们将综合运用前面 10 篇的知识,从零构建一个生产级的 OpenClaw 插件——一个「GitHub 项目助手」,它同时注册工具、钩子、HTTP 路由、CLI 命令、后台服务和技能,展示插件开发的完整流程。【以下代码均为示例代码,重点是为了讲明白整个流程。真实的插件案例项目,将在后续篇章中推出】
01
—
项目目标
—
项目结构
github-assistant/├── openclaw.plugin.json # 插件清单├── package.json # npm 配置├── tsconfig.json # TypeScript 配置├── src/│ ├── index.ts # 插件入口(注册所有能力)│ ├── tools.ts # 工具定义│ ├── hooks.ts # 钩子注册│ ├── routes.ts # HTTP 路由│ ├── service.ts # 后台服务│ ├── cli.ts # CLI 子命令│ └── github-client.ts # GitHub API 客户端├── skills/│ └── code-review/│ └── SKILL.md # 代码审查技能└── README.md
03
—
步骤流程
步骤 1:清单文件
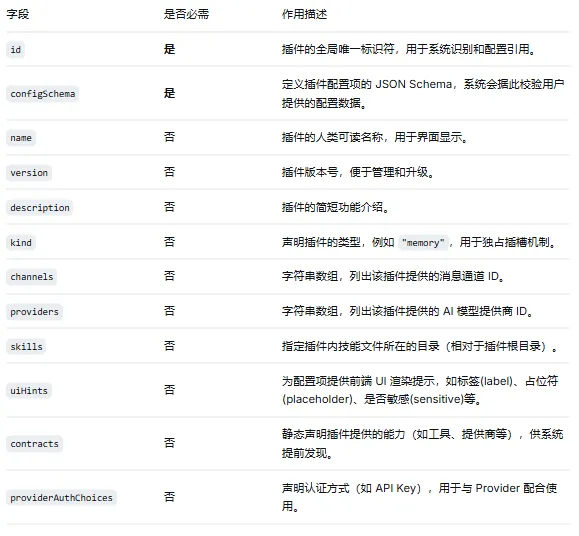
你可以把 openclaw.plugin.json 文件想象成插件的“身份证”和“说明书”。OpenClaw 在真正执行插件的功能代码之前,会先读取这份文件,了解这个插件的“身份”和“能力”,并确保它的“使用说明”是规范的。
{"id": "github-assistant","name": "GitHub Assistant","version": "1.0.0","description": "GitHub project management assistant for OpenClaw","configSchema": {"type": "object","additionalProperties": false,"properties": {"token": {"type": "string","description": "GitHub Personal Access Token"},"defaultOwner": {"type": "string","description": "Default repository owner"},"defaultRepo": {"type": "string","description": "Default repository name"},"syncInterval": {"type": "number","default": 300,"description": "Sync interval in seconds"},"webhookSecret": {"type": "string","description": "GitHub webhook secret for signature verification"}},"required": ["token"]},"providerAuthChoices": [{"provider": "github","method": "token","choiceId": "github-token","choiceLabel": "GitHub Personal Access Token","optionKey": "token","cliFlag": "--github-token"}],"uiHints": {"token": {"label": "GitHub Token","placeholder": "ghp_xxxxxxxxxxxx","sensitive": true},"webhookSecret": {"label": "Webhook Secret","placeholder": "whsec_...","sensitive": true}},"contracts": {"tools": ["github_search_issues", "github_create_issue"]},"skills": "skills"}
📋 openclaw.plugin.json 常用字段说明
步骤 2:package.json
package.json 是 Node.js 项目的标准配置文件。openclaw 字段告诉 OpenClaw 如何加载这个插件:
{"name": "github-assistant","version": "1.0.0","type": "module", // 使用 ES Module(OpenClaw 插件要求)"main": "./dist/index.js", // 编译后的入口文件路径"openclaw": {"extensions": ["./src/index.ts"] // OpenClaw 的插件入口(可以是 .ts)},"dependencies": {}, // 运行时依赖(本项目没有额外的依赖)"devDependencies": {"typescript": "^5.4.0" // 开发时需要 TypeScript}}
关于 "type": "module":OpenClaw 插件使用 ES Module 而非 CommonJS。如果你之前习惯用 require(),需要改为 import 语法。
步骤 3:GitHub API 客户端
在编写工具、钩子等代码之前,我们先封装一个 GitHub API 客户端类。它负责与 GitHub REST API 通信,处理认证、请求发送和错误处理。后续的工具和路由都会调用这个类:
// src/github-client.tsimport crypto from "crypto"; // Node.js 内置模块,用于 Webhook 签名验证export interface GitHubConfig {token: string;defaultOwner?: string;defaultRepo?: string;}export class GitHubClient {private config: GitHubConfig;constructor(config: GitHubConfig) {this.config = config;}private async request<T>(path: string,options: RequestInit = {}): Promise<T> {const url = `https://api.github.com${path}`;const response = await fetch(url, {...options,headers: {"Authorization": `Bearer ${this.config.token}`,"Accept": "application/vnd.github.v3+json","Content-Type": "application/json",...options.headers,},});if (!response.ok) {const body = await response.text();throw new Error(`GitHub API error ${response.status}: ${body}`);}return response.json() as Promise<T>;}async searchIssues(query: string, options: {owner?: string;repo?: string;state?: "open" | "closed" | "all";limit?: number;} = {}): Promise<SearchResult> {const owner = options.owner ?? this.config.defaultOwner;const repo = options.repo ?? this.config.defaultRepo;if (!owner || !repo) {throw new Error("Repository owner and name are required. " +"Set defaultOwner/defaultRepo in plugin config " +"or specify them in the query.");}const q = `${query} repo:${owner}/${repo}${options.state ? `is:${options.state}` : "is:open"}`;return this.request<SearchResult>(`/search/issues?q=${encodeURIComponent(q)}&per_page=${options.limit ?? 10}`);}async createIssue(params: {owner?: string;repo?: string;title: string;body: string;labels?: string[];}): Promise<Issue> {const owner = params.owner ?? this.config.defaultOwner;const repo = params.repo ?? this.config.defaultRepo;if (!owner || !repo) {throw new Error("Repository owner and name are required.");}return this.request<Issue>(`/repos/${owner}/${repo}/issues`, {method: "POST",body: JSON.stringify({title: params.title,body: params.body,labels: params.labels,}),});}async getRepo(owner: string, repo: string): Promise<Repo> {return this.request<Repo>(`/repos/${owner}/${repo}`);}verifyWebhookSignature(payload: string,signature: string,secret: string): boolean {const expected = "sha256=" + crypto.createHmac("sha256", secret).update(payload).digest("hex");return crypto.timingSafeEqual(Buffer.from(signature),Buffer.from(expected));}}// 类型定义interface SearchResult {total_count: number;items: Issue[];}interface Issue {id: number;number: number;title: string;body: string;state: string;labels: Array<{ name: string }>;created_at: string;updated_at: string;html_url: string;user: { login: string };}interface Repo {full_name: string;description: string;stargazers_count: number;open_issues_count: number;updated_at: string;}
步骤 4:工具定义
这一步实现插件的核心功能——注册两个工具。第一个是必需工具(搜索 Issues),第二个是可选工具(创建 Issue,因为有副作用)。具体来说,这里把工具注册的逻辑抽到了单独的 tools.ts 文件中,保持入口文件的简洁:
// src/tools.tsimport { Type } from "openclaw/plugin-sdk/typebox";import { GitHubClient } from "./github-client";import type { OpenClawPluginApi } from "openclaw/plugin-sdk/plugin-entry";export function registerTools(api: OpenClawPluginApi,client: GitHubClient): void {// 工具 1:搜索 Issues(必需工具)api.registerTool({name: "github_search_issues",description:"Search GitHub issues in a repository. Use this when the user " +"asks about bugs, feature requests, or any issues in a GitHub project. " +"Returns matching issues with title, state, labels, and description.",parameters: Type.Object({query: Type.String({description: "Search query (supports GitHub search syntax)",}),state: Type.Optional(Type.Union([Type.Literal("open"),Type.Literal("closed"),Type.Literal("all"),], {description: "Filter by issue state",})),limit: Type.Optional(Type.Number({description: "Maximum number of results",default: 10,minimum: 1,maximum: 30,})),}),async execute(_id, params) {try {const result = await client.searchIssues(params.query, {state: params.state as "open" | "closed" | "all" | undefined,limit: params.limit,});if (result.total_count === 0) {return {content: [{type: "text" as const,text: "No issues found matching the query.",},],};}const issues = result.items.map((issue) => ({number: issue.number,title: issue.title,state: issue.state,labels: issue.labels.map((l) => l.name),created: issue.created_at,url: issue.html_url,preview: issue.body?.substring(0, 200) ?? "",}));return {content: [{type: "text" as const,text: [`Found ${result.total_count} issues. Top ${issues.length}:`,"",...issues.map((i) =>`#${i.number} [${i.state}] ${i.title}\n` +` Labels: ${i.labels.join(", ") || "none"}\n` +` Created: ${i.created}\n` +` ${i.url}\n` +` ${i.preview}...`),].join("\n"),},],};} catch (error) {return {content: [{type: "text" as const,text: `GitHub search failed: ${error instanceofError ? error.message : String(error)}`,},],isError: true,};}},});// 工具 2:创建 Issue(可选工具,有副作用)api.registerTool({name: "github_create_issue",description:"Create a new GitHub issue. Use this when the user explicitly " +"asks to create, file, or report a new issue.",parameters: Type.Object({title: Type.String({description: "Issue title",}),body: Type.String({description: "Issue body / description",}),labels: Type.Optional(Type.Array(Type.String(), {description: "Labels to apply",})),}),async execute(_id, params) {try {const issue = await client.createIssue({title: params.title,body: params.body,labels: params.labels,});return {content: [{type: "text" as const,text: `Issue created successfully:\n#${issue.number}${issue.title}\n${issue.html_url}`,},],};} catch (error) {return {content: [{type: "text" as const,text: `Failed to create issue: ${error instanceofError ? error.message : String(error)}`,},],isError: true,};}},},{ optional: true });}
步骤 5:钩子注册
这里注册两个钩子:一个用于审计 GitHub 工具调用(纯观察,不干预),另一个为回复中的 Issue 编号自动添加链接。关于钩子的详细机制,参见第 5 篇:
// src/hooks.tsexport function registerHooks(api: OpenClawPluginApi): void {// 工具调用审计api.on("before_tool_call", async (context) => {if (context.toolName.startsWith("github_")) {api.logger.info("GitHub tool call", {tool: context.toolName,params: sanitizeParams(context.parameters),conversationId: context.conversationId,});}});// 消息后处理:为 GitHub 相关的回复添加仓库链接api.on("message_sending", async (context) => {const owner = (api.pluginConfig as { defaultOwner?: string })?.defaultOwner;const repo = (api.pluginConfig as { defaultRepo?: string })?.defaultRepo;if (owner && repo && context.message.text) {// 检测回复中是否提到了 issue 编号context.message.text = context.message.text.replace(/#(\d+)/g,`[#$1](https://github.com/${owner}/${repo}/issues/$1)`);}});}function sanitizeParams(params: Record<string, unknown>): Record<string, unknown> {const sanitized = { ...params };// 移除 token 等敏感字段if ("token" in sanitized) sanitized.token = "***";return sanitized;}import type { OpenClawPluginApi } from "openclaw/plugin-sdk/plugin-entry";
步骤 6:HTTP 路由
注册两个 HTTP 端点:一个接收 GitHub Webhook 推送(POST),一个提供健康检查(GET)。关于 HTTP 路由的详细机制,参见第 9 篇:
// src/routes.tsimport { GitHubClient } from "./github-client";export function registerRoutes(api: OpenClawPluginApi,client: GitHubClient): void {// Webhook 接收端点api.registerHttpRoute({method: "POST",path: "/github-assistant/webhook",handler: async (request, response) => {const signature = request.headers["x-hub-signature-256"];const secret = (api.pluginConfig as { webhookSecret?: string })?.webhookSecret;if(secret && signature) {if(!client.verifyWebhookSignature(request.rawBody,signature,secret)) {response.status(401).json({ error: "Invalid signature" });return;}}const event = request.headers["x-github-event"];const payload = request.body;api.logger.info("GitHub webhook received", { event });// 处理不同事件类型switch(event) {case "issues":await handleIssueEvent(payload);break;case "push":await handlePushEvent(payload);break;default:api.logger.info(`Unhandled GitHub event: ${event}`);}response.json({ received: true });},});// 健康检查端点api.registerHttpRoute({method: "GET",path: "/github-assistant/health",handler: async (_req, response) => {try {const owner = (api.pluginConfig as { defaultOwner?: string })?.defaultOwner;const repo = (api.pluginConfig as { defaultRepo?: string })?.defaultRepo;let repoInfo = null;if(owner && repo) {repoInfo = await client.getRepo(owner, repo);}response.json({status: "ok",plugin: api.id,repo: repoInfo? {name: repoInfo.full_name,openIssues: repoInfo.open_issues_count,stars: repoInfo.stargazers_count,}: "not configured",});} catch(error) {response.status(503).json({status: "error",error: error instanceof Error ? error.message : String(error),});}},});}async function handleIssueEvent(payload: Record<string, unknown>): Promise<void> {// 处理 issue 事件// 可以通知相关用户、更新内部状态等}async function handlePushEvent(payload: Record<string, unknown>): Promise<void> {// 处理 push 事件}import type { OpenClawPluginApi } from "openclaw/plugin-sdk/plugin-entry";
步骤 7:后台服务
注册一个定时同步服务,定期获取 GitHub 仓库的状态信息(如 Open Issues 数量)。关于后台服务的生命周期管理,参见第 9 篇:
// src/service.tsimport { GitHubClient } from "./github-client";export function registerService(api: OpenClawPluginApi,client: GitHubClient): void {api.registerService({name: "github-sync",description: "Periodically sync GitHub repository state",async start(context) {const intervalSec =((api.pluginConfig as { syncInterval?: number })?.syncInterval) ?? 300;context.logger.info(`Sync service started (interval: ${intervalSec}s)`);const interval = setInterval(async () => {try {const owner = (api.pluginConfig as { defaultOwner?: string })?.defaultOwner;const repo = (api.pluginConfig as { defaultRepo?: string })?.defaultRepo;if (owner && repo) {const repoInfo = await client.getRepo(owner, repo);context.logger.debug("Sync completed", {openIssues: repoInfo.open_issues_count,});}} catch (error) {context.logger.error("Sync failed", {error: error instanceof Error ? error.message : String(error),});}}, intervalSec * 1000);return { interval };},async stop(context, state) {if (state?.interval) {clearInterval(state.interval);}context.logger.info("Sync service stopped");},});}import type { OpenClawPluginApi } from "openclaw/plugin-sdk/plugin-entry";
步骤 8:CLI 子命令
注册两个 CLI 命令,让用户在终端中查看插件状态和搜索 Issues。关于 CLI 注册的详细用法,参见第 9 篇:
// src/cli.tsimport { GitHubClient } from "./github-client";export function registerCli(api: OpenClawPluginApi,client: GitHubClient): void {api.registerCli((cli) => {cli.command("gh-status").description("Show GitHub Assistant status").action(async () => {const config = api.pluginConfig as {defaultOwner?: string;defaultRepo?: string;token?: string;};console.log("GitHub Assistant Status");console.log("─".repeat(30));console.log(`Owner: ${config.defaultOwner ?? "not set"}`);console.log(`Repo: ${config.defaultRepo ?? "not set"}`);console.log(`Token: ${config.token ? "configured" : "not set"}`);if (config.defaultOwner && config.defaultRepo) {try {const repo = await client.getRepo(config.defaultOwner,config.defaultRepo);console.log(`Stars: ${repo.stargazers_count}`);console.log(`Open Issues: ${repo.open_issues_count}`);console.log(`Last Updated: ${repo.updated_at}`);} catch (error) {console.error(`Failed to fetch repo: ${error instanceofError ? error.message : String(error)}`);}}});cli.command("gh-search").description("Search GitHub issues from CLI").argument("<query>", "Search query").option("--state <state>", "Filter by state").action(async (query, options) => {const result = await client.searchIssues(query, {state: options.state as "open" | "closed" | "all" | undefined,});console.log(`Found ${result.total_count} issues:`);for (const issue of result.items) {console.log(` #${issue.number} [${issue.state}] ${issue.title}`);}});},{ name: "github-assistant" });}import type { OpenClawPluginApi } from "openclaw/plugin-sdk/plugin-entry";
步骤 9:代码审查技能
除了代码层面的能力,我们还可以为插件附赠一个技能文件(参见第 10 篇)。技能文件放在 skills/ 目录下,由清单文件的 "skills": "skills" 字段声明。这个技能文件会告诉 Agent 如何执行代码审查——包括审查步骤、检查项和输出格式:
<!-- skills/code-review/SKILL.md -->---name: code-reviewdescription: Perform structured code review on GitHub PRs and code snippetstrigger: when user asks to review code, check a PR, or analyze code qualitytools: [github_search_issues, github_create_issue]---# Code Review Skill## When to Activate- User asks to "review this code" or "check this PR"- User shares a pull request URL or code snippet- User asks about code quality, bugs, or security issues## Review Process### 1. Gather ContextFirst, search for related existing issues:github_search_issues: query="[topic of the code]"textThis helps identify known issues, related work, or recurring patterns.### 2. Analyze the CodeExamine the code for:**Correctness**- Logic errors and edge cases- Null/undefined handling- Error handling completeness**Security**- Input validation- Authentication/authorization- SQL injection, XSS, path traversal- Secrets or credentials in code**Performance**- Unnecessary loops or computations- Memory leaks- N+1 query patterns**Readability**- Naming conventions- Function complexity- Documentation and comments### 3. Report FindingsStructure the review as:**Summary**: What the code does and overall assessment**Critical Issues** (must fix):- Security vulnerabilities- Data loss risks- Crashes or unrecoverable errors**Suggestions** (should fix):- Performance improvements- Error handling gaps- Code simplification**Nitpicks** (nice to have):- Naming suggestions- Style consistency- Documentation improvements### 4. Follow-upIf the review identifies actionable items and the user confirms,create a tracking issue:github_create_issue: title="Code review follow-up: [summary]" body="[detailed findings]"text## Rules- Always read the full code before commenting- Prioritize correctness and security- Be specific — reference line numbers or code sections- Distinguish between must-fix and nice-to-have
步骤 10:插件入口
最后,在入口文件index.ts中把前面所有的模块串联起来。register(api) 回调是整个插件的启动点——它初始化 GitHub 客户端,然后调用各个模块的注册函数:
// src/index.tsimport { definePluginEntry } from "openclaw/plugin-sdk/plugin-entry";import { GitHubClient } from "./github-client";import { registerTools } from "./tools";import { registerHooks } from "./hooks";import { registerRoutes } from "./routes";import { registerService } from "./service";import { registerCli } from "./cli";interface GitHubAssistantConfig {token: string;defaultOwner?: string;defaultRepo?: string;syncInterval?: number;webhookSecret?: string;}export default definePluginEntry({id: "github-assistant",name: "GitHub Assistant",version: "1.0.0",description: "GitHub project management assistant",register(api) {const config = api.pluginConfig as GitHubAssistantConfig;if (!config.token) {api.logger.error("GitHub token not configured. " +"Set plugins.entries.github-assistant.config.token");return;}// 初始化 GitHub 客户端const client = new GitHubClient({token: config.token,defaultOwner: config.defaultOwner,defaultRepo: config.defaultRepo,});api.logger.info(`GitHub Assistant loaded` +(config.defaultOwner ? ` for ${config.defaultOwner}/${config.defaultRepo}` : ""));// 注册所有能力registerTools(api, client);registerHooks(api);registerRoutes(api, client);registerService(api, client);registerCli(api, client);},});
04
—
打包与发布
发布到 npm
# 编译 TypeScriptnpx tsc# 发布npm publish
发布到 ClawHub
# 安装并发布到 ClawHubopenclaw plugins publish ./github-assistant
用户安装
# 从 npm 安装openclaw plugins install github-assistant# 从 ClawHub 安装openclaw plugins install github-assistant@clawhub# 本地安装(开发时)openclaw plugins install ./github-assistant
用户启用可选工具
在第 2 篇中我们提到,可选工具(optional: true)默认不可用。用户需要在 OpenClaw 配置文件(~/.openclaw/config.json 或项目级 .openclaw/config.json)中显式允许:
{"tools": {"allow": ["github_create_issue"]}}
修改配置后需重启 Gateway:openclaw gateway restart。
用户配置
以下配置告诉 OpenClaw 如何连接到 GitHub,以及使用哪个仓库作为默认操作目标。配置文件位置同样是 ~/.openclaw/config.json 或项目级 .openclaw/config.json:
{"plugins": {"entries": {"github-assistant": {"config": {"token": "ghp_xxxxxxxxxxxx","defaultOwner": "my-org","defaultRepo": "my-project","syncInterval": 600,"webhookSecret": "whsec_xxx"}}}}}
05
—
测试
OpenClaw SDK 提供了测试工具,帮助验证插件行为:
import { createTestApi } from "openclaw/plugin-sdk/testing";describe("GitHub Assistant", () => {it("registers search tool", () => {const api = createTestApi();// 加载插件// 验证工具已注册});it("search tool returns results", async () => {// 模拟 GitHub API 响应// 调用工具执行函数// 验证返回值格式});});
06
—
最佳实践总结
1. 错误处理
始终在工具的 execute 函数中捕获异常,并返回 isError: true 的结果。不要让未捕获的异常传播到 OpenClaw 核心——那可能影响其他插件和整个系统的稳定性。
2. 配置安全
敏感信息(token、secret)在清单中标记为 sensitive: true,在日志中脱敏处理。
3. 命名规范
-
工具名称使用
snake_case,加功能域前缀:github_search_issues -
插件 ID 使用
kebab-case:github-assistant -
技能文件目录使用
kebab-case:code-review/
4. 信任边界
原生插件与 OpenClaw 核心运行在同一进程内,拥有相同的权限。插件 bug 可以导致 Gateway 崩溃。因此:
-
对外部输入做充分校验
-
对网络请求设置超时和重试
-
避免在工具中执行不可控的命令
-
在后台服务中捕获所有异常
5. 向后兼容
使用配置规范化函数处理旧版配置格式,避免用户升级时需要手动迁移。
07
—
系列总结
本系列用 12 篇文章系统讲解了 OpenClaw 开放系统的完整图景:
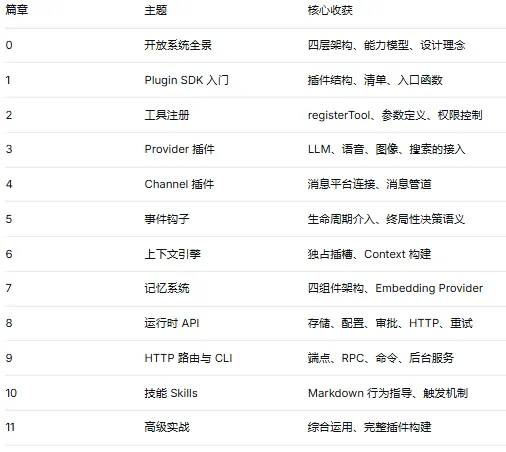
OpenClaw 的开放系统设计让 AI Agent 的能力边界变得可编程。无论你是想接入新的 AI 模型、连接新的消息平台,还是为 Agent 添加全新的工具和技能,插件系统都提供了标准化、类型安全的方式来实现。
这 12 篇只是一个起点。OpenClaw 的插件生态正在快速发展,100+ 的 SDK 子路径中还有更多能力等待探索。建议结合官方文档持续深入学习。