 夜雨聆风
夜雨聆风在日常工作中,我们经常遇到这样的场景:电商运营、档案管理或产品部门发来一个Excel表格,里面贴满了成百上千张产品图或照片。
🚀 它的功能有多强?
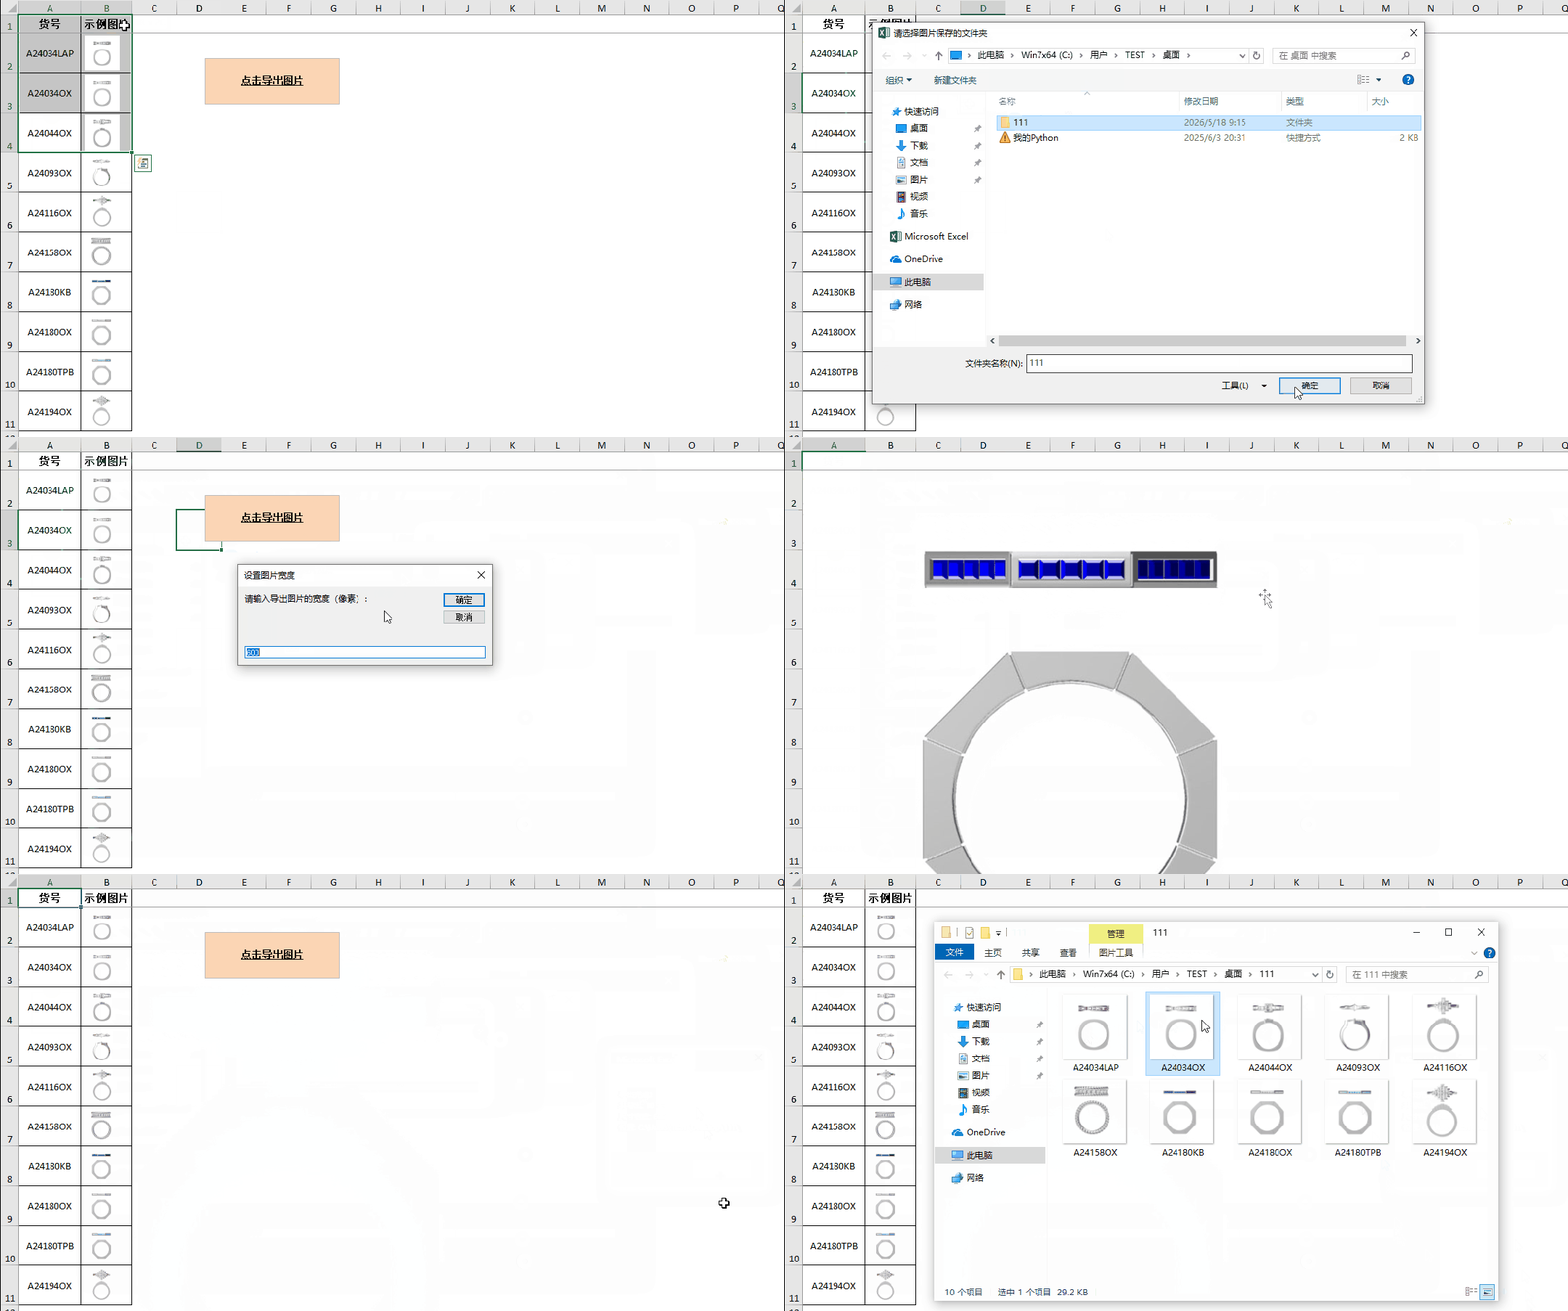
自动重命名 :自动抓取图片左侧单元格 的内容作为图片名,即使图片的宽度超出了单元格宽度,也能自动识别(如:A列是名字,B列是图片,导出的就是“名字.jpg”)。统一尺寸 :导出前自动把图片按比例拉伸/缩放到指定宽度 (如默认600px),不管原图是大是小。完全交互 :不用改代码!运行后会弹出窗口让你选择保存文件夹 ,再弹窗让你输入想要的宽度 。防空白BUG :采用了屏幕截图流(CopyPicture)技术,避免导出图片是空白的问题。无损排版 :导出完成后,Excel里的原图会自动恢复原样,不会破坏你的表格格式。
📖 使用教程(包教包会)
第一步:准备工作
第二步:进入VBA编辑器
第三步:粘贴代码
在菜单栏点击 【插入】 ->【模块】 。在空白的大框里,复制粘贴以下完整代码。
Option Explicit#If VBA7 ThenPublic Declare PtrSafe Sub Sleep Lib "kernel32" (ByVal dwMilliseconds As Long)#ElsePublic Declare Sub Sleep Lib "kernel32" (ByVal dwMilliseconds As Long)#End IfSub BatchExportImages_Custom()Dim ws As WorksheetDim shp As ShapeDim chrt As ChartObjectDim folderPath As StringDim fileName As StringDim validName As StringDim cellVal As StringDim originalWidth As DoubleDim originalHeight As DoubleDim targetWidth As DoubleDim newWidth As DoubleDim newHeight As DoubleDim count As IntegerDim colIndex As IntegerDim exportPath As StringDim userInput As StringSet ws = ActiveSheetWith Application.FileDialog(msoFileDialogFolderPicker).Title = "请选择图片保存的文件夹"If .Show = -1 ThenfolderPath = .SelectedItems(1) & "\"ElseMsgBox "未选择文件夹,操作已取消。"Exit SubEnd IfEnd WithuserInput = InputBox("请输入导出图片的宽度(像素):", "设置图片宽度", "600")' 校验输入是否为数字,如果不是则默认600If IsNumeric(userInput) And Val(userInput) > 0 ThentargetWidth = Val(userInput)ElseMsgBox "输入无效,将使用默认宽度 600"targetWidth = 600End Ifcount = 0For Each shp In ws.Shapes' 检查形状类型 (排除下拉框、OLE对象等,只处理图片)If shp.Type = msoPicture Or shp.Type = msoLinkedPicture Then' 获取图片左上角所在的列colIndex = shp.TopLeftCell.Column' 确保不是第一列 (A列没有左侧单元格)If colIndex > 1 Then' 获取命名 (左侧单元格)cellVal = shp.TopLeftCell.Offset(0, -1).ValuevalidName = CleanFileName(cellVal)If validName = "" Then validName = "Image_" & shp.IDoriginalWidth = shp.WidthoriginalHeight = shp.Heightshp.LockAspectRatio = msoTrueshp.Width = targetWidth ' 使用用户输入的宽度newWidth = shp.WidthnewHeight = shp.Heightshp.CopyPicture Appearance:=xlScreen, Format:=xlBitmap' 创建临时图表容器Set chrt = ws.ChartObjects.Add(0, 0, newWidth, newHeight)With chrt' 去除图表边框和背景.Border.LineStyle = 0.Chart.ChartArea.Format.Line.Visible = msoFalse.Chart.ChartArea.Format.Fill.Visible = msoFalse.Chart.PlotArea.Format.Line.Visible = msoFalse.Chart.PlotArea.Format.Fill.Visible = msoFalse.Activate.Chart.Pastews.Cells(1, 1).SelectEnd WithDoEventsexportPath = folderPath & validName & ".jpg"On Error Resume Next' 如果文件已存在,会直接覆盖chrt.Chart.Export fileName:=exportPath, FilterName:="JPG"On Error GoTo 0chrt.Deleteshp.Width = originalWidthcount = count + 1End IfEnd IfNext shpApplication.ScreenUpdating = TrueMsgBox "导出完成!" & vbCrLf & "共导出: " & count & " 张" & vbCrLf & "尺寸宽度: " & targetWidth & vbCrLf & "位置: " & folderPath' 打开目标文件夹Shell "explorer.exe " & folderPath, vbNormalFocusEnd Sub
第四步:运行代码
按键盘 F5 键运行代码(或者回到Excel界面,按 Alt + F8 选择 BatchExportImages_Custom 点击执行)。系统会弹窗让你 选择一个文件夹 来保存图片。系统会再次弹窗询问 图片宽度 (默认600,你可以填1000或者其他)。喝口水,等待几秒钟,文件夹自动打开,图片全都在里面了!
💡 注意事项
所以,图片 不要放在 A 列 。建议图片在 B 列,文件名在 A 列。如果左侧单元格是空的,代码会自动用 Image_ID 命名,不会报错。 如果要以图片右侧单元格值命名,请修改指定行代码
cellVal = shp.TopLeftCell.Offset(0, -1).ValuecellVal = shp.TopLeftCell.Offset(0, 1).Value
