 夜雨聆风
夜雨聆风官方文档晦涩不全|二进制+Docker两套方案,新手零翻车。四类高频报错、五坑修复命令、开机自启与离线部署全流程。
避开99%安装报错!Windows/Mac/Linux全平台OpenSandbox一键部署教程
1 开篇:四个高频报错与两条安装路线
看了官方文档三遍、报错五次、重装 Docker 两次,这才是 OpenSandbox 的真实上手体验。
为什么你的 docker compose up 总卡在 httpx.ReadTimeout?安装报错看着五花八门,根因其实集中在四类。本文按根因给修复命令,每一行都能直接粘贴。
Got permission denied while trying to connect to the Docker daemon sockethttpx.ReadTimeout: Read operation timed outOSError: [Errno 48] Address already in use配了OPENSANDBOX_SERVER_URL却不生效
前三条是环境问题,第四条是配置问题。这是 OpenSandbox 系列第二篇,第一篇讲为什么需要沙箱,本篇解决怎么装起来。装不起来,隔离再强也是零。
读完你会得到:
Windows(WSL2)/ macOS / Linux 三系统全覆盖 六项前置自检脚本,环境问题提前暴露 Docker Compose 与二进制 pip 两条安装路线 五个高频故障的修复命令 开机自启与离线部署配置
两条路线不冲突。先跑自检脚本,环境干净了再选路线。报错了回到第五节按坑修。四类报错对应章节:环境问题看第二节自检,镜像与权限看第五节。
2 前置准备:系统版本、Docker 与端口清单
部署前先对齐三件事:系统版本、依赖工具、端口。
| 平台 | 最低要求 | 推荐配置 |
|---|---|---|
| Windows | Win10 22H2 + WSL2 | Win11 + WSL2 + Docker Desktop |
| macOS | 12 Monterey + Docker Desktop | 14 Sonoma + Docker Desktop |
| Linux | Ubuntu 20.04 / CentOS 7.9 / Debian 11 | Ubuntu 24.04 LTS |
依赖:
Docker Engine 20.10+(Windows/Mac 用 Docker Desktop) Python 3.10+ pip 或 uv(推荐 uv,安装更快)
端口预留:
8080:二进制部署默认端口 8090:Docker Compose 默认端口
版本门槛保证两件事:Docker Compose v2 语法可用,Python 3.10+ 满足 server 与 SDK 的依赖。低于门槛会报一些奇怪的语法错误。两个端口是两条路线的约定,第三节展开。
Windows 建议走 WSL2:Docker Desktop 与 OpenSandbox 都基于 Linux 内核,虚拟化性能与兼容性最好。
3 两种部署形态:二进制进程与 Docker 容器
OpenSandbox Server 本质是一个 HTTP 服务,两种形态只是运行载体不同,对外 API 完全一致。
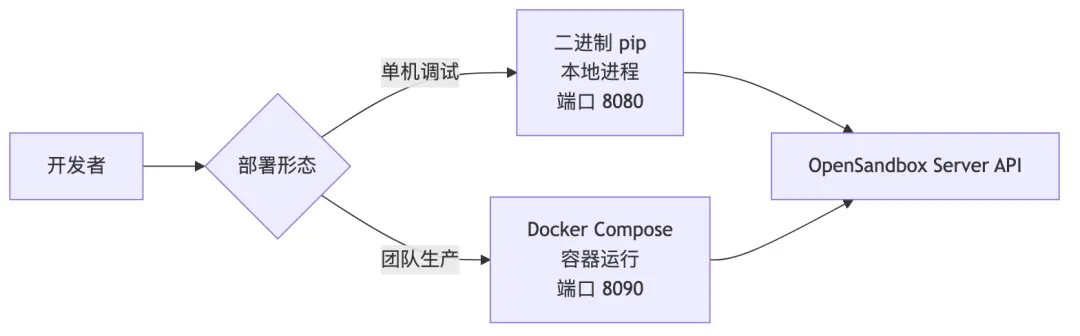
二进制:pip install opensandbox-server 装到本机,一个进程常驻。轻量,改配置重启即生效,适合单机开发调试。
Docker:docker compose up -d 拉到标准镜像,容器化运行。重启策略、环境变量、端口映射都写在 compose 文件里,团队复制即用。
| 维度 | 二进制进程 | Docker 容器 |
|---|---|---|
| 定位 | 单机开发调试 | 团队与生产 |
| 资源占用 | 轻量,一个进程 | 需容器运行时 |
| 适用场景 | 本地快速验证 | 团队协作、生产环境 |
| 运维复杂度 | 手动管进程 | 自带重启策略 |
| 默认端口 | 8080 | 8090 |
默认推荐 Docker:环境一致,换机器不重建。单机只想快速验证,再切二进制。
两种形态的对外 API 一致,SDK 与 CLI 代码不用改。切换成本只有一条:换端口与启动方式。
4 分步部署:环境自检、Docker Compose 与二进制安装
部署顺序有讲究:先把环境问题前置,再装服务,最后验证连通。五步走完就是一个最小闭环。
4.1 环境自检脚本:Docker、Python、端口与磁盘六项检查
环境问题前置,比装完再报错省一小时。脚本检查六项:Docker 是否就绪、socket 权限、Python 版本、8080/8090 端口、磁盘空间、WSL2 环境。Windows 用户在 WSL2 内运行。脚本不装任何东西,只做检查,可以反复跑。
#!/bin/bash
echo "=== OpenSandbox 环境自检 ==="

# 1. Docker
if command -v docker &>/dev/null && docker info &>/dev/null 2>&1; then
    echo "✅ Docker $(docker --version | awk '{print $3}' | tr -d ',')"
else
    echo "❌ Docker 未安装或未启动"
    echo "   修复:安装 Docker Desktop 或执行 systemctl start docker"
fi

# 2. Docker 权限(Linux)
if [[ "$(uname)" == "Linux" ]]; then
    if docker ps &>/dev/null 2>&1; then
        echo "✅ Docker 权限正常"
    else
        echo "⚠️  Docker 权限不足——非 root 用户无法访问 docker.sock"
        echo "   修复:sudo usermod -aG docker \$USER && newgrp docker"
    fi
fi

# 3. Python
if command -v python3 &>/dev/null; then
    PYVER=$(python3 --version | awk '{print $2}')
    echo "✅ Python $PYVER"
else
    echo "❌ Python 未安装"
    echo "   修复:brew install python@3.12 / apt install python3.12"
fi

# 4. 端口占用检查(默认 8080 / 8090)
for port in 8080 8090; do
    if lsof -i :$port &>/dev/null 2>&1; then
        echo "⚠️  端口 $port 被占用"
        echo "   修复:lsof -i :$port 查看占用进程"
    else
        echo "✅ 端口 $port 空闲"
    fi
done

# 5. 磁盘空间(建议 >2GB)
SPACE=$(df -h / | awk 'NR==2{print $4}' | tr -d 'Gi')
if awk -v s="$SPACE" 'BEGIN{exit !(s>2)}'; then
    echo "✅ 磁盘可用 ${SPACE}G"
else
    echo "⚠️  磁盘空间不足 2GB"
fi

# 6. WSL2 检查(Windows 专用)
if [[ "$(uname -r)" == *"microsoft"* ]] || [[ "$(uname -r)" == *"WSL2"* ]]; then
    echo "✅ WSL2 环境"
fi

echo "=== 自检完成 ==="
输出全绿再往下走。有报错先按脚本提示修复,再进下一步。
4.2 方案一:Docker Compose 一键部署与三步验证
Docker 提供标准化运行时,一次写好处处可跑。compose 配置以官方 example 为基线,补了自动重启与中文注释。execd 默认走阿里云源,国内拉取更快。
# OpenSandbox Server docker-compose.yml(官方基线核验版)
# 基线:官方 server/docker-compose.example.yaml
# 增量:+ restart: unless-stopped(BRIEF 要求)+ 中文注释
# 版本号已按官方 example 更新:execd v1.0.21(阿里云源)、egress v1.1.5
version: '3.8'
services:
  opensandbox-server:
    image: opensandbox/server:latest
    # 国内拉取慢时,改用阿里云源:
    # sandbox-registry.cn-zhangjiakou.cr.aliyuncs.com/opensandbox/server:latest
    container_name: opensandbox-server
    ports:
      - "8090:8090"
    volumes:
      - /var/run/docker.sock:/var/run/docker.sock
      # macOS Docker Desktop 的 socket 可能在 ~/.docker/run/docker.sock
    configs:
      - source: opensandbox-config
        target: /etc/opensandbox/config.toml
    environment:
      - SANDBOX_CONFIG_PATH=/etc/opensandbox/config.toml
    networks:
      - opensandbox-net
    restart: unless-stopped   # 开机/崩溃后自动拉起

configs:
  opensandbox-config:
    content: |
      [server]
      host = "0.0.0.0"
      port = 8090

      [log]
      level = "INFO"

      [runtime]
      type = "docker"
      # 国内环境用阿里云源 execd(官方 example 默认即阿里云源)
      execd_image = "sandbox-registry.cn-zhangjiakou.cr.aliyuncs.com/opensandbox/execd:v1.0.21"

      [egress]
      image = "opensandbox/egress:v1.1.5"

      [docker]
      network_mode = "bridge"
      # server 跑在容器内时,用宿主机可达地址(macOS/Linux 均可用 host.docker.internal)
      host_ip = "host.docker.internal"
      drop_capabilities = ["AUDIT_WRITE", "MKNOD", "NET_ADMIN", "NET_RAW", "SYS_ADMIN", "SYS_MODULE", "SYS_PTRACE", "SYS_TIME", "SYS_TTY_CONFIG"]
      no_new_privileges = true
      # 生产建议 4096+,避免多沙箱并发时 "can't start new thread"(官方 issue #447)
      pids_limit = 4096

networks:
  opensandbox-net:
    driver: bridge
启动后三步验证:看日志、查健康、验版本。
docker compose up -d
docker compose logs -f opensandbox-server
curl http://127.0.0.1:8090/health
# → {"status":"healthy"}
docker compose exec opensandbox-server opensandbox-server --version
# → OpenSandbox Server v0.2.x
宿主机 8090 映射容器 8090,配置里的 [server] port 必须一致。health 返回 healthy 说明 server 已就绪,版本号 v0.2.x 与 PyPI 当前 0.2.2 对应。不想用阿里云源时,把 execd_image 改回官方源 opensandbox/execd:v1.0.21、egress 改回 opensandbox/egress:v1.1.5 即可。
drop_capabilities 与 no_new_privileges 是官方默认的加固项,去掉等于削弱隔离,别手痒删掉。
4.3 方案二:pip 安装、初始化与后台启动
二进制是轻量进程,改配置重启即生效。三步:装包、生成配置、后台启动。
pip install opensandbox-server
opensandbox-server init-config ~/.sandbox.toml --example docker
nohup opensandbox-server > ~/.opensandbox.log 2>&1 &
curl http://127.0.0.1:8080/health
# → {"status":"healthy"}
平台对应:
macOS Apple Silicon:pip 自动选 arm64 wheel Linux x86_64:自动选 x86_64 wheel Windows:在 WSL2 内安装,与 Linux 相同 国内源码构建备选: git clone https://gitee.com/alibaba/OpenSandbox.git && cd OpenSandbox/server && pip install -e .
pip 会按平台自动挑 wheel,无需手动指定架构。Gitee 源码构建适合完全离线或需要改源码的场景。
4.4 环境变量与连通性验证:health、SDK 与 CLI
服务起来后,让 SDK 与 CLI 指向它。四个环境变量决定连接方式:
| 变量 | 作用 | 默认值 |
|---|---|---|
OPENSANDBOX_SERVER_URL |
SDK/CLI 连接地址 | http://localhost:8080[1] |
SANDBOX_CONFIG_PATH |
配置文件路径 | ~/.sandbox.toml |
OPENSANDBOX_INSECURE_SERVER |
本地测试免 API Key | NO |
OPENSANDBOX_API_KEY |
生产认证密钥 | 空(生产必填) |
本地测试用 OPENSANDBOX_INSECURE_SERVER=YES 免 API Key,生产必须配 OPENSANDBOX_API_KEY。这四行是 SDK/CLI 连上 server 的全部前提。INSECURE_SERVER 只用于本地测试,公网环境必须换 API Key 认证。
最小闭环:从空环境到服务健康、SDK/CLI 连通,只需三步验证。
第一步,健康检查:
curl http://127.0.0.1:8080/health
# → {"status":"healthy"}
第二步,Python SDK 建沙箱并执行命令:
# connectivity_check.py
import asyncio
from datetime import timedelta
from opensandbox import Sandbox

async def main():
    # 连接本地 server(默认 localhost:8080),创建沙箱
    sandbox = await Sandbox.create("ubuntu:latest", timeout=timedelta(minutes=1))
    async with sandbox:
        r = await sandbox.commands.run("echo OK")
        print(r.logs.stdout[0].text)

asyncio.run(main())
预期输出:OK
第三步,CLI 创建沙箱:
osb config init
osb config set connection.domain localhost:8080
osb sandbox create --image python:3.12 --timeout 5m -o json
# → 创建成功 JSON(含 sandbox_id)
三步输出符合预期,服务健康、SDK 与 CLI 都连通了。这就是部署的最小闭环,从空环境到可用服务只用了四条命令。输出示例与官方文档记录一致,端到端跑通需要本机 Docker daemon 就绪。
4.5 开机自启:systemd、launchd 与 WSL2 配置
开机自启保证断电恢复后服务自动回来。三平台各给一份配置,直接复制。
Linux systemd:
# /etc/systemd/system/opensandbox.service
[Unit]
Description=OpenSandbox Server
After=docker.service network.target
Requires=docker.service

[Service]
Type=simple
User=iefc
ExecStart=/home/iefc/.local/bin/opensandbox-server
Environment="SANDBOX_CONFIG_PATH=/home/iefc/.sandbox.toml"
Restart=on-failure
RestartSec=5

# 日志
StandardOutput=journal
StandardError=journal
SyslogIdentifier=opensandbox

[Install]
WantedBy=multi-user.target
sudo systemctl daemon-reload
sudo systemctl enable --now opensandbox.service
journalctl -u opensandbox.service -f
systemd 的日志自动进 journald,一条命令随时回看,不用再维护日志文件。launchd 的 RunAtLoad 开机加载、KeepAlive 崩溃自动拉起,与 systemd 的 Restart=on-failure 对应。
模板里的
iefc是示例用户名,复制后改成你自己的用户与路径。
macOS launchd:
<!-- ~/Library/LaunchAgents/ai.opensandbox.server.plist -->
<?xml version="1.0" encoding="UTF-8"?>
<!DOCTYPE plist PUBLIC "-//Apple//DTD PLIST 1.0//EN"
 "http://www.apple.com/DTDs/PropertyList-1.0.dtd">
<plist version="1.0">
<dict>
    <key>Label</key>
    <string>ai.opensandbox.server</string>
    <key>ProgramArguments</key>
    <array>
        <string>/opt/homebrew/bin/opensandbox-server</string>
    </array>
    <key>EnvironmentVariables</key>
    <dict>
        <key>SANDBOX_CONFIG_PATH</key>
        <string>/Users/iefc/.sandbox.toml</string>
    </dict>
    <key>RunAtLoad</key>
    <true/>
    <key>KeepAlive</key>
    <true/>
    <key>StandardOutPath</key>
    <string>/Users/iefc/Library/Logs/opensandbox.log</string>
    <key>StandardErrorPath</key>
    <string>/Users/iefc/Library/Logs/opensandbox.err</string>
</dict>
</plist>
launchctl load ~/Library/LaunchAgents/ai.opensandbox.server.plist
launchctl list | grep opensandbox
Windows 走 WSL2:
# /etc/wsl.conf(WSL2 内)
[boot]
command="nohup opensandbox-server > /var/log/opensandbox.log 2>&1 &"
[boot] command 在发行版启动时执行,配合 Windows 开机自启即可。
5 五个高频故障:症状、根因与修复命令
报错集中在五类。先看总览,再逐坑给可粘贴的修复命令。
| 坑 | 症状 | 根因 | 修复 |
|---|---|---|---|
| 镜像拉取失败 | httpx.ReadTimeout |
Docker Hub 国内不稳定 | 镜像加速器或预拉取国内源 |
| 端口被占用 | Address already in use |
8080/8090 被占 | lsof 查占用后改端口 |
| Linux 权限不足 | permission denied docker.sock |
用户不在 docker 组 | usermod 加组 + newgrp |
| Mac 虚拟化拦截 | Docker Desktop 无法启动 | Hypervisor 未授权 | 完全磁盘访问授权 + Rosetta |
| Windows WSL2 失败 | WSL 2 installation is incomplete |
WSL2 内核旧 | wsl --install + 默认版本 2 |
坑一,镜像拉取失败。Docker Hub 在国内不稳定,首次拉镜像经常超时。两套修复任选其一:
# 方案 A:配置镜像加速器
sudo tee /etc/docker/daemon.json <<'EOF'
{
  "registry-mirrors": [
    "https://docker.1ms.run",
    "https://docker.xuanyuan.me"
  ]
}
EOF
sudo systemctl restart docker

# 方案 B:预拉取国内源(推荐)
# code-interpreter 版本号以官方镜像仓库页为准
docker pull sandbox-registry.cn-zhangjiakou.cr.aliyuncs.com/opensandbox/code-interpreter:v1.0.2
预拉取常用沙箱镜像后,首次 Sandbox.create() 不再现场拉镜像,超时自然消失。
坑二,端口被占用。8080/8090 常被 nginx、本地服务占用,服务起来即闪退:
lsof -i :8080
# 改端口三法,任选其一:
# 配置文件:编辑 ~/.sandbox.toml 的 [server] port = 9090
# compose:ports 改为 "9090:8090"
# 环境变量:OPENSANDBOX_PORT=9090 opensandbox-server
改完端口要同步改 SDK 的 OPENSANDBOX_SERVER_URL,否则连不上。
坑三,Linux 非 root 无法启动。docker.sock 属主是 root:docker,不在组内就无权限:
sudo usermod -aG docker $USER
newgrp docker   # 关键:不刷新组权限等于没加
docker ps       # 无 sudo 能跑 = 修复成功
不要用
chmod 666 /var/run/docker.sock图省事。那会让所有用户获得与 root 等效的 Docker 权限,隔离边界等于拆了。
坑四,Mac 虚拟化拦截。macOS 虚拟化框架未授权给 Docker Desktop,启动被拦:
softwareupdate --install-rosetta
系统设置 → 隐私与安全性 → 完全磁盘访问权限 → 添加 Docker Desktop。首次启动弹出的网络过滤器授权,要点「允许」。Apple Silicon 上再装 Rosetta 2,兼容 Intel 镜像。
坑五,Windows WSL2 失败。WSL2 内核过旧或虚拟机平台未开启,Docker Desktop 起不来。PowerShell 管理员执行:
wsl --install
wsl --set-default-version 2
wsl -l -v        # VERSION 列须为 2
dism.exe /online /enable-feature /featurename:VirtualMachinePlatform /all /norestart
全部完成后重启 Windows,再打开 Docker Desktop 检查 WSL 集成。
五坑的共同规律:先跑自检脚本,多数问题在装之前就能暴露。修完命令直接粘贴,重启服务即可。
6 生产优化:离线部署、目录规范与日志持久化
生产环境三件事:内网离线部署、目录三分、日志持久化。
离线部署就是镜像与 Python 依赖双打包:
# 有网环境:拉取并打包镜像
docker pull sandbox-registry.cn-zhangjiakou.cr.aliyuncs.com/opensandbox/server:latest
docker save -o opensandbox-server.tar sandbox-registry.cn-zhangjiakou.cr.aliyuncs.com/opensandbox/server:latest
# 传输到内网机
scp opensandbox-server.tar user@airgap-server:/tmp/
# 内网环境:加载并改回标准 tag
docker load -i /tmp/opensandbox-server.tar
docker tag sandbox-registry.cn-zhangjiakou.cr.aliyuncs.com/opensandbox/server:latest opensandbox/server:latest
Python 依赖同样离线:有网机 pip download opensandbox-server -d ./offline-packages/,内网机 pip install --no-index --find-links=./offline-packages/ opensandbox-server。
镜像包与 pip 包走同一套路:有网环境打包,内网环境解包。
tag 必须改回标准名,否则 compose 里的 image 找不到 离线包建议连同校验和一起传输,防止传输损坏
目录三分,配置、日志、数据分开,备份与迁移只搬对应目录:
/opt/opensandbox/
├── config/   # 主配置 sandbox.toml
├── logs/     # 运行日志(挂载持久化)
├── data/     # 沙箱工作区(可选)
└── docker-compose.yml
目录三分后,备份只需打包整个 /opt/opensandbox,迁移不丢配置与日志。
日志两通道:容器挂载 vs journald,各有归属。
# Docker:compose 挂载 ./logs:/var/log/opensandbox
# systemd:journalctl -u opensandbox.service -f
journald 自带轮转与查询,比手写 nohup 重定向可靠。
7 资源:自检脚本、配置模板与官方入口
两条路线怎么选:单机开发调试选二进制,团队与生产选 Docker。版本号永远以官方 docker-compose.example.yaml 为准,旧教程里 execd v1.0.6、pids_limit 512 这类配置已过时,抄新不抄旧。本文所有命令与配置都在官方文档与 example 基线上核验过,直接复制即可。
可直接复用:
§4.1 环境自检脚本(六项检查) §4.2 docker-compose.yml(官方基线 + 自动重启) §4.5 systemd / launchd / wsl.conf 模板 官方安装文档[2]、GitHub 仓库[3]、Gitee 镜像[4]、CLI 文档[5]
引用链接
OpenSandbox 官方安装文档[6] — OpenSandbox — official — https://open-sandbox.ai/getting-started/installation[7] OpenSandbox 快速开始[8] — OpenSandbox — official — https://open-sandbox.ai/getting-started[9] OpenSandbox CLI 文档[10] — OpenSandbox — official — https://open-sandbox.ai/cli[11] OpenSandbox 配置文档[12] — OpenSandbox — official — https://open-sandbox.ai/getting-started/configuration[13] OpenSandbox 架构文档[14] — OpenSandbox — official — https://open-sandbox.ai/architecture[15] GitHub: alibaba/OpenSandbox[16] — 阿里巴巴 — official — https://github.com/alibaba/OpenSandbox[17] server/docker-compose.example.yaml[18] — OpenSandbox 官方仓库 — official — https://github.com/alibaba/OpenSandbox/blob/main/server/docker-compose.example.yaml[19] Gitee 镜像: alibaba/OpenSandbox[20] — 阿里巴巴 — official — https://gitee.com/alibaba/OpenSandbox[21] PyPI: opensandbox-server[22] — PyPI — official — https://pypi.org/project/opensandbox-server/(当前版本[23] 0.2.2) PyPI: opensandbox[24] — PyPI — official — https://pypi.org/project/opensandbox/[25]