 夜雨聆风
夜雨聆风


运维必备神器:Ansible从入门到精通实操详解
运维必备神器:Ansible从入门到精通实操详解
今天给大家分享一款「自动化运维神器」——Ansible,无需客户端、基于SSH,一键实现批量管理,让运维工作从“重复劳动”升级为“高效管控”,新手也能快速落地生产!
一、Ansible是什么?(极简入门,3分钟看懂)
Ansible是一款开源自动化运维工具,基于Python开发,核心优势就是「简单、高效、安全」,无需在被管理主机上安装任何客户端,只要能通过SSH连接、具备Python环境,就能实现批量主机管理、配置部署、任务执行等操作。
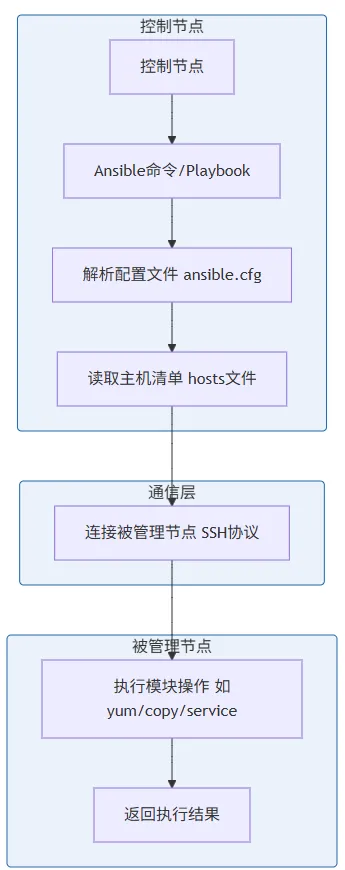
生产环境必看核心优势:
-
✅ 无客户端:减少主机资源占用,降低部署成本,避免客户端故障拖垮运维操作;
-
✅ 基于SSH:复用系统原生SSH协议,无需额外开放端口,安全性拉满;
-
✅ 声明式语法:不用写复杂脚本,只需定义“最终要达到的状态”,Ansible自动完成操作;
-
✅ 高可扩展:支持自定义模块、Playbook,适配物理机、虚拟机、容器等各类生产环境。
二、环境准备(生产环境标准配置,直接照做)
生产环境优先采用「1主多从」架构,1台控制节点(安装Ansible),多台被管理节点(目标主机),配置步骤简单,新手也能快速搞定。

2.1 控制节点安装
# 1. 安装EPEL源(Ansible不在默认yum源中)yum install -y epel-release# 2. 安装稳定版本yum install -y ansible# 3. 验证安装成功(出现版本号即正常)ansible --version2.2 复制公钥到被管理节点
也可以输入密码操作后面会有介绍
# 复制公钥到被管理节点ssh-copy-id root@192.168.1.100ssh-copy-id root@192.168.1.101注意:生产环境建议用普通用户(如ansible)执行操作,避免直接用root,提升安全性,后续实操会详细说明。
2.3 核心配置(生产环境推荐配置)
核心配置文件:/etc/ansible/ansible.cfg,以下是生产环境推荐的完整配置:
[defaults]# 基础配置inventory = /etc/ansible/hosts # 被管理节点清单路径remote_user = ansible # 默认执行用户(普通用户)private_key_file = ~/.ssh/id_rsa # 免密私钥路径# 性能优化forks = 20 # 并发数(根据控制节点性能调整)timeout = 60 # 连接超时时间(秒)pipelining = True # 启用管道传输,减少SSH连接次数accelerate = True # 启用加速模式# 安全配置host_key_checking = False # 关闭SSH密钥检查(首次连接不弹窗)become = False # 关闭sudobecome_method = sudo # sudo方法become_user = root # 默认切换到rootbecome_ask_pass = True # 不提示输入sudo密码(使用免密sudo)# 日志配置log_path = /var/log/ansible.log # 日志文件路径log_level = INFO # 日志级别(INFO/WARNING/ERROR)# 模块配置gathering = smart # 智能收集 factsfact_caching = jsonfile # 缓存 facts 到文件fact_caching_connection = /var/cache/ansible/facts # facts 缓存路径fact_caching_timeout = 86400 # facts 缓存超时时间(秒)# 错误处理retries = 3 # 失败重试次数# 其他配置display_skipped_hosts = False # 不显示跳过的主机stdout_callback = yaml # 输出格式为yaml[privilege_escalation]# 特权升级配置become = Falsebecome_method = sudobecome_user = rootbecome_ask_pass = True[ssh_connection]# SSH连接配置ssh_args = -o ControlMaster=auto -o ControlPersist=60s -o StrictHostKeyChecking=nocontrol_path = ~/.ssh/ansible-%%r@%%h:%%ppipelining = True配置说明:
-
性能优化:调整并发数、启用管道传输和加速模式,提高批量操作效率 -
安全配置:使用普通用户执行,通过sudo提升权限,避免直接使用root -
日志配置:记录详细日志,便于问题排查 -
模块配置:启用facts缓存,减少重复收集系统信息 -
错误处理:配置失败重试,提高操作可靠性 -
SSH配置:优化SSH连接,减少连接建立时间
2.4 主机清单配置(分组管理,批量操作更高效)
清单文件:/etc/ansible/hosts,按业务分组,后续操作直接指定分组即可,示例:
# 单主机配置(IP或主机名均可)192.168.1.100# 分组配置(推荐,按业务分类)[web] # web服务器组192.168.1.101192.168.1.102[db] # 数据库服务器组192.168.1.201192.168.1.202[all:vars] # 所有主机通用变量ansible_port = 22 # SSH端口(默认22,修改后需同步)验证清单:执行 ansible all -m ping,所有主机返回“pong”即配置成功。
三、生产环境操作命令
以下操作均在控制节点执行,所有命令可直接复制,替换IP/分组/路径即可,重点标红,新手也能零失误操作。
3.1 批量执行命令
语法:ansible 分组/IP -a "命令"(command模块默认,可省略)
# 1. 批量查看所有主机CPU信息ansible all -a "top -b -n 1 | grep Cpu"# 2. 批量重启web组Nginx服务ansible web -a "systemctl restart nginx"# 3. 批量查看db组MySQL状态ansible db -a "systemctl status mysqld"# 4. 批量创建普通用户(生产必做)ansible all -a "useradd -m ansible"ansible all -a "echo '123456' | passwd --stdin ansible"# 后续改为复杂密码3.2 批量部署软件
用yum模块,Ubuntu用apt模块,确保所有主机软件版本一致,示例:
# 1. 批量给web组安装Nginxansible web -m yum -a "name=nginx state=present"# present=安装,absent=卸载# 2. 批量给db组安装MySQL(指定8.0版本)ansible db -m yum -a "name=mysql-server-8.0 state=present"# 3. 批量更新系统软件(谨慎执行,先测后用)ansible all -m yum -a "name=* state=latest"3.3 批量同步配置文件
控制节点统一维护配置文件,批量同步到被管理节点,示例:
# 1. 同步Nginx配置文件到web组ansible web -m copy -a "src=./nginx.conf dest=/etc/nginx/nginx.conf mode=644 owner=root group=root"# 2. 同步后重启Nginxansible web -a "systemctl restart nginx"# 3. 批量同步自定义备份脚本ansible all -m copy -a "src=/root/scripts/backup.sh dest=/home/ansible/scripts/ mode=755"3.4 Playbook实战(生产核心,一键部署)
Playbook是Ansible的灵魂,用YAML语法,整合多个任务(安装、配置、重启),实现“一键部署”,适合复杂场景(如完整部署Web服务)。
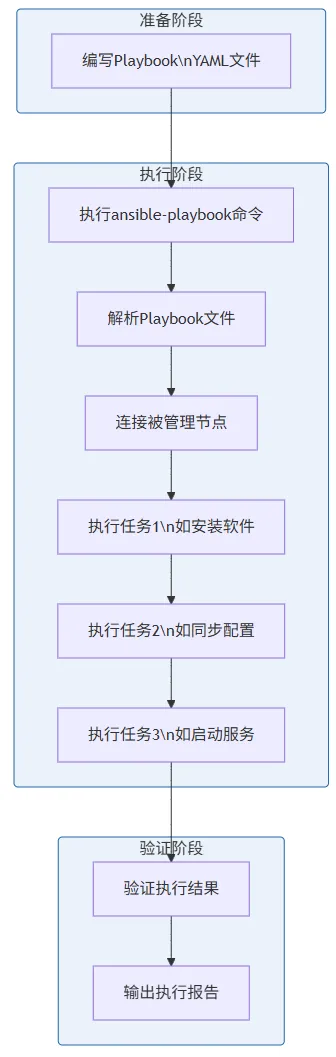
示例1:部署Nginx(Playbook文件:nginx-deploy.yml)
-name:批量部署Nginx服务hosts:webremote_user:roottasks:-name:1.安装Nginxyum:name:nginxstate:present-name:2.同步配置文件copy:src:./nginx.confdest:/etc/nginx/nginx.confmode:'0644'owner:rootgroup:root-name:3.启动Nginx并设置开机自启service:name:nginxstate:startedenabled:yes-name:4.验证启动状态command:systemctlis-activenginxregister:nginx_status-name:5.打印Nginx状态debug:msg:"Nginx 状态:{{ nginx_status.stdout }}"示例2:生产环境系统初始化(Playbook文件:system-init.yml,批量初始化100台主机)
-name:生产环境主机系统初始化hosts:allremote_user:ansible# 普通用户become:yes# sudo 提权gather_facts:true# 必须开,否则有些模块不生效tasks:-name:1.临时关闭防火墙service:name:firewalldstate:stoppedenabled:no-name:2.禁用SELinuxselinux:state:disabledregister:selinux_status-name:临时关闭SELinuxcommand:setenforce0failed_when:false# 已经关闭时不报错-name:3.安装基础工具yum:name:-wget-curl-vim-net-tools-lrzsz-chrony# 现代版时间同步(替代ntpdate)-ntpdatestate:present-name:4.设置时区为上海timezone:name:Asia/Shanghai-name:5.同步阿里云时间command:ntpdatentp.aliyun.comignore_errors:yes# 同步失败不报错-name:6.优化SSH配置——禁止root登录lineinfile:path:/etc/ssh/sshd_configregexp:'{{ item.regexp }}'line:'{{ item.line }}'backup:yeswith_items:-{regexp:'^#PermitRootLogin|^PermitRootLogin',line:'PermitRootLogin no'}# - { regexp: '^#Port|^Port', line: 'Port 2222' } ❌ 生产初始化先不要改端口!-name:7.重启SSH服务使配置生效service:name:sshdstate:restarted-name:8.给ansible用户配置免密sudolineinfile:path:/etc/sudoers.d/ansiblecreate:yesmode:'0440'line:'ansible ALL=(ALL) NOPASSWD: ALL'执行一下命令安装
ansible-playbook nginx-deploy.yml # 正常执行ansible-playbook nginx-deploy.yml -v # 详细输出(排错用)ansible-playbook nginx-deploy.yml --limit 192.168.1.101 # 仅指定主机执行四、进阶操作技巧
4.1 并发操作配置
Ansible默认并发数为5,可以根据控制节点性能和网络带宽调整,提高批量操作效率:
# 临时调整并发数(执行命令时指定)ansible all -a "命令" -f 20 # 20并发# 永久调整(修改ansible.cfg)# 在[defaults]部分添加:# forks = 204.2 自定义Host操作
除了使用/etc/ansible/hosts文件,还可以:
-
使用自定义清单文件:
# 执行时指定自定义清单文件ansible -i /path/to/my_hosts all -m ping -
动态清单:
# 使用脚本生成清单(适合云环境)ansible -i /path/to/dynamic_inventory.py all -m ping -
临时指定主机:
# 直接在命令中指定主机ansible "192.168.1.100,192.168.1.101" -m ping
4.3 密码输入操作
当没有配置免密SSH时,需要输入密码(多台主机需要将密码设置为一样的):
# 执行命令时提示输入密码ansible all -m ping -k# Playbook执行时提示输入密码ansible-playbook playbook.yml -k4.4 Sudo到Root操作
使用普通用户执行需要root权限的操作:
-
命令执行时使用sudo:
# 提示输入sudo密码ansible all -a "命令" -b -K# 或者在配置中设置# ansible.cfg中添加:# become_ask_pass = True -
Playbook中使用sudo:
-name:需要root权限的任务hosts:allremote_user:ansible# 普通用户become:yes# 启用sudobecome_method:sudo# sudo方法become_user:root# 切换到roottasks:-name:安装软件yum:name:nginxstate:present
五、生产避坑指南
-
🔒 权限控制:优先用普通用户执行操作,给普通用户配置sudo权限,避免root直接操作;
-
🧪 测试先行:批量修改、卸载软件等操作,先在测试机验证,再同步到生产;
-
📊 日志排错:执行日志默认在
/var/log/ansible.log,操作失败直接查日志; -
💾 配置备份:同步配置文件前,先备份被管理节点原有配置,避免误删;
-
🛡️ 安全加固:关闭无用SSH端口,限制控制节点IP访问。
六、常用命令汇总
6.1 基础操作命令
# 查看Ansible版本ansible --version# 验证主机连通性ansible web -m ping# 批量执行命令(默认使用command模块)ansible db -a "systemctl restart mysqld"# 执行Playbookansible-playbook nginx-deploy.yml# 查看模块用法ansible-doc copy# 并发执行命令(20并发)ansible all -a "ls" -f 20# 提示输入密码ansible all -m ping -k# sudo执行命令ansible all -a "yum update" --become -K6.2 执行命令模块
shell 与 command模块的区别:
-
command模块:默认模块,直接执行命令,不经过shell解释,因此不支持管道、重定向、环境变量等shell特性 -
shell模块:通过shell解释执行命令,支持管道、重定向、环境变量、shell内置命令等所有shell特性
使用场景:
-
简单命令(无需shell特性):使用command模块,更安全、执行速度更快 -
复杂命令(需要管道、重定向等):使用shell模块
# 使用command模块执行命令(默认模块,不支持管道和重定向)ansible all -m command -a "ls -la"# 使用shell模块执行命令(支持管道和重定向)ansible all -m shell -a "ps aux | grep nginx"# 使用shell模块执行多行命令ansible all -m shell -a "cd /tmp && mkdir test && echo 'test' > test.txt"# 执行本地脚本ansible all -m script -a "/path/to/local/script.sh"# 执行带参数的脚本ansible all -m script -a "/path/to/local/script.sh arg1 arg2"# 使用shell模块设置环境变量ansible all -m shell -a "export TEST_VAR=value && echo $TEST_VAR"# 执行复杂的shell命令ansible all -m shell -a "for i in {1..5}; do echo $i; done"# 检查命令执行结果ansible all -m shell -a "if [ -f /etc/nginx/nginx.conf ]; then echo 'Nginx配置文件存在'; else echo 'Nginx配置文件不存在'; fi"6.3 系统管理命令
# 收集主机信息ansible web -m setup# 查看磁盘使用情况(10并发)ansible all -a "df -h" -f 10# 查看内存使用情况(10并发)ansible all -a "free -m" -f 10# 查看系统负载(10并发)ansible all -a "uptime" -f 10# 查看系统信息ansible all -a "uname -a"# 同步系统时间(20并发)ansible all -a "ntpdate ntp.aliyun.com" --become -K -f 206.4 服务管理命令
# 查看服务状态ansible web -a "systemctl status nginx"# 启动服务(15并发)ansible web -a "systemctl start nginx" --become -K -f 15# 停止服务ansible web -a "systemctl stop nginx" --become -K# 重启服务(15并发)ansible web -a "systemctl restart nginx" --become -K -f 15# 设置开机自启ansible web -a "systemctl enable nginx" --become -K# 使用service模块管理服务ansible all -m service -a "name=nginx state=started enabled=yes"ansible all -m service -a "name=nginx state=stopped"6.5 文件管理命令
# 复制文件(10并发)ansible web -m copy -a "src=/etc/nginx/nginx.conf dest=/etc/nginx/nginx.conf" --become -K -f 10# 创建目录ansible all -m file -a "path=/data/logs state=directory mode=755" --become -K# 删除文件ansible all -m file -a "path=/tmp/test.txt state=absent"# 修改文件权限ansible all -m file -a "path=/etc/nginx/nginx.conf mode=644" --become -K# 查看文件内容ansible web -a "cat /etc/nginx/nginx.conf"# 修改文件行ansible all -m lineinfile -a "path=/etc/ssh/sshd_config regexp='^Port' line='Port 2222'" --become -K# 从远程主机获取文件ansible all -m fetch -a "src=/path/to/remote/file dest=/path/to/local/directory"# 基于Jinja2模板部署配置文件ansible all -m template -a "src=/path/to/template.j2 dest=/path/to/remote/file mode=644"# 基于rsync同步文件ansible all -m synchronize -a "src=/path/to/local/dir dest=/path/to/remote/dir delete=yes"# 解压文件ansible all -m unarchive -a "src=/path/to/archive.tar.gz dest=/path/to/destination remote_src=no"6.6 包管理命令
# 安装软件包(15并发)ansible web -m yum -a "name=nginx state=present" --become -K -f 15# 卸载软件包ansible web -m yum -a "name=nginx state=absent" --become -K# 更新软件包ansible web -m yum -a "name=nginx state=latest" --become -K# 更新所有软件包(20并发)ansible all -m yum -a "name=* state=latest" --become -K -f 20# Ubuntu安装软件包(15并发)ansible all -m apt -a "name=nginx state=present update_cache=yes" --become -K -f 156.7 用户管理命令
# 创建用户(10并发)ansible all -a "useradd ansible" --become -K -f 10# 删除用户ansible all -a "userdel -r test" --become -K# 设置用户密码ansible all -a "echo '123456' | passwd --stdin ansible" --become -K# 添加用户到组(10并发)ansible all -a "usermod -aG sudo ansible" --become -K -f 10# 使用user模块创建用户ansible all -m user -a "name=ansible comment='Ansible User' shell=/bin/bash createhome=yes"# 使用user模块删除用户ansible all -m user -a "name=test state=absent remove=yes"6.8 网络管理命令
# 查看网络接口ansible all -a "ifconfig"# 查看IP地址ansible all -a "ip addr"# 查看监听端口ansible all -a "netstat -tuln"# 测试网络连通性ansible all -a "ping -c 4 8.8.8.8"6.9 定时任务命令
# 添加定时任务ansible all -m cron -a "name='Backup task' minute=0 hour=0 job='tar -czf /backup/$(date +\%Y\%m\%d).tar.gz /data'"# 删除定时任务ansible all -m cron -a "name='Backup task' state=absent"6.10 Playbook相关命令
# 详细输出执行过程ansible-playbook nginx-deploy.yml -v# 限制执行主机ansible-playbook nginx-deploy.yml --limit 192.168.1.101# 执行指定标签任务ansible-playbook nginx-deploy.yml --tags install# 跳过指定标签任务ansible-playbook nginx-deploy.yml --skip-tags restart# 检查模式(不实际执行)ansible-playbook nginx-deploy.yml --check总结:Ansible的核心是“自动化、批量化、标准化”,不用写复杂脚本,不用逐个操作主机,新手也能快速上手。生产环境中,用清单分组、Playbook整合任务,既能提升运维效率,又能减少人为失误,堪称运维人的“效率神器”!
💬 留言互动:你在使用Ansible时遇到过哪些坑?欢迎在评论区留言,一起交流学习~
可以参考往期脚本测试:
Linux 服务器巡检不再难,包含Python和shell脚本可输出表格