 夜雨聆风
夜雨聆风


OpenClaw 进阶功能实践:让 AI 助手更强大的 5 个技巧
本文预计阅读时间: 12 分钟 | 难度: 进阶 | 适合人群: 已掌握基础用法,想扩展功能的开发者
前置要求: 完成 Day 1-2 的学习,熟悉配置文件和环境变量
引言
经过前两天的学习,你已经能够搭建环境并配置 OpenClaw。但默认的 OpenClaw 只是一个”通用助手”——它能回答问题,却无法执行具体任务。
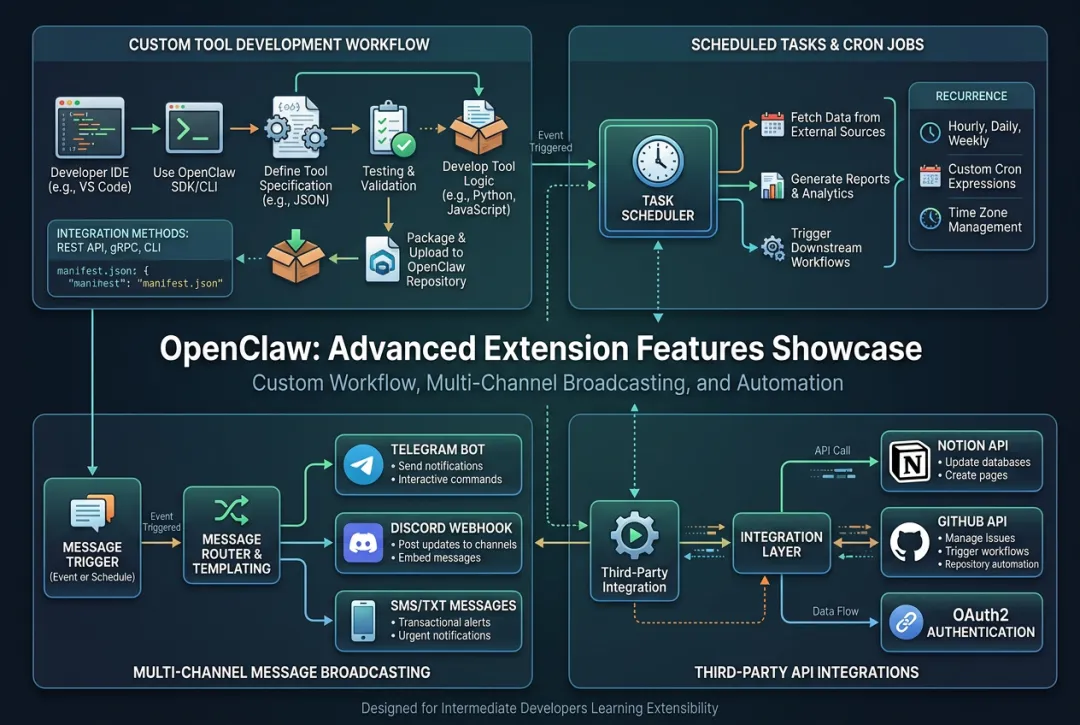
真正的威力在于自定义扩展。通过本文,你将学会:
-
✅ 开发自定义工具(如天气查询、代码执行) -
✅ 实现多渠道消息分发 -
✅ 添加定时任务和自动化工作流 -
✅ 集成第三方 API(Notion、GitHub 等) -
✅ 实现高级错误处理和日志审计
完成本文后,你的 OpenClaw 将从”聊天机器人”升级为真正的”AI 助手”,能够帮你处理实际工作。
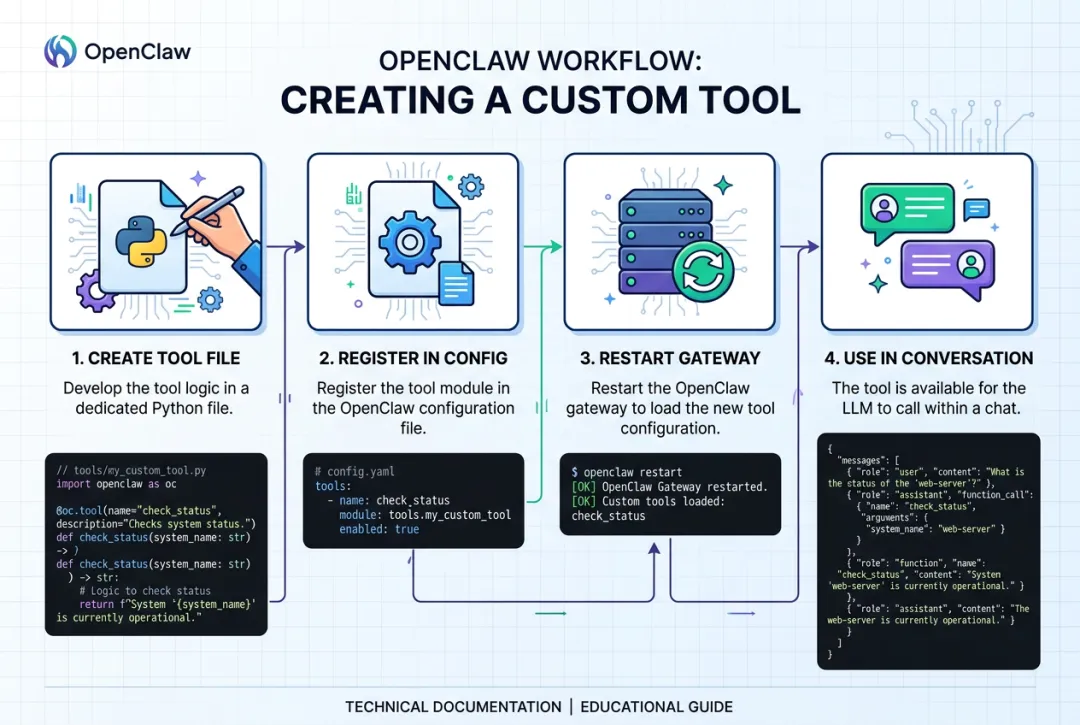
图 1: 自定义工具的完整开发流程
核心步骤
技巧 1:开发自定义工具
场景:代码执行器
让助手可以直接运行 Python 代码并返回结果。
步骤 1: 创建工具文件

~/.openclaw/tools/code-executor.js:
const { exec } = require('child_process');
const fs = require('fs');
const path = require('path');

module.exports = {
name: 'code_executor',
description: 'Execute Python code and return the output',
parameters: {
code: {
type: 'string',
required: true,
description: 'Python code to execute'
    },
timeout: {
type: 'number',
default: 5,
description: 'Timeout in seconds'
    }
  },

asyncexecute({ code, timeout = 5 }) {
// 1. 创建临时文件
const tempFile = path.join('/tmp', `code_${Date.now()}.py`);
    fs.writeFileSync(tempFile, code);

// 2. 执行代码
returnnewPromise((resolve, reject) => {
exec(`python3 ${tempFile}`, { timeout: timeout * 1000 }, (error, stdout, stderr) => {
// 清理临时文件
        fs.unlinkSync(tempFile);

if (error) {
reject(newError(`Execution failed: ${error.message}`));
return;
        }

if (stderr) {
resolve({ success: false, output: stderr });
return;
        }

resolve({
success: true,
output: stdout,
execution_time: timeout
        });
      });
    });
  }
};
步骤 2: 注册工具
~/.openclaw/openclaw.json:
{
"tools":{
"enabled":["code_executor"],
"code_executor":{
"allowed_imports":["numpy","pandas","matplotlib"],
"max_execution_time":10,
"sandbox_enabled":true
}
}
}
步骤 3: 测试工具
openclaw agent --message "
请执行这段 Python 代码:
print('Hello from Python!')
print(2 + 2)
import sys
print(f'Python version: {sys.version}')
" --thinking medium
预期输出:
🤖 Assistant: 代码执行结果:

Hello from Python!
4
Python version: 3.11.6 (main, Oct  2 2023, 13:45:54) [GCC 12.3.0]

✅ 执行成功,耗时 0.23s
安全注意事项:
-
⚠️ 必须启用沙箱: 防止恶意代码 -
⚠️ 限制导入模块: 只允许安全的库 -
⚠️ 设置超时: 避免无限循环 -
⚠️ 禁止网络访问: 防止数据泄露
技巧 2:多渠道消息分发
场景:同时发送到 Telegram、Discord、短信
步骤 1: 配置多个渠道
~/.openclaw/openclaw.json:
{
"channels":{
"telegram":{
"enabled":true,
"token":"${TELEGRAM_BOT_TOKEN}",
"broadcast_lists":["dev_team"]
},
"discord":{
"enabled":true,
"clientId":"${DISCORD_CLIENT_ID}",
"clientSecret":"${DISCORD_CLIENT_SECRET}",
"guildId":"${DISCORD_GUILD_ID}",
"channelId":"${DISCORD_CHANNEL_ID}"
},
"sms_twilio":{
"enabled":true,
"accountSid":"${TWILIO_ACCOUNT_SID}",
"authToken":"${TWILIO_AUTH_TOKEN}",
"fromNumber":"+1234567890",
"toNumbers":["+0987654321","+1122334455"]
}
},

"broadcast":{
"enabled":true,
"strategy":"parallel",// parallel 或 sequential
"retry_failed":true,
"timeout_ms":5000
}
}
步骤 2: 创建广播脚本
~/bin/openclaw-broadcast.sh:
#!/bin/bash

MESSAGE="$1"
PRIORITY="${2:-normal}"# normal, urgent, low

if [ -z "$MESSAGE" ]; then
echo"Usage: $0 <message> [priority]"
exit 1
fi

# 构建 JSON payload
PAYLOAD=$(cat <<EOF
{
  "message": "$MESSAGE",
  "priority": "$PRIORITY",
  "channels": ["telegram", "discord", "sms_twilio"],
  "timestamp": "$(date -Iseconds)"
}
EOF
)

# 发送到网关
curl -X POST http://localhost:18789/broadcast \
  -H "Content-Type: application/json" \
  -d "$PAYLOAD"

echo"✓ Broadcast sent to all channels"
步骤 3: 使用示例
# 发送紧急通知
./openclaw-broadcast.sh "🚨 服务器 CPU 使用率超过 90%!" urgent

# 发送日常报告
./openclaw-broadcast.sh "📊 日报:今日处理了 150 个请求,平均响应时间 1.2s" normal
预期效果:
-
✅ Telegram: 立即收到消息 -
✅ Discord: 在指定频道显示 -
✅ 短信: 所有收件人收到(可能有延迟)
技巧 3:定时任务与自动化
场景:每日晨间报告
每天早上 9 点自动发送天气、新闻、待办事项。
步骤 1: 创建定时任务配置
~/.openclaw/cron-jobs.json:
{
"jobs":[
{
"name":"morning_briefing",
"schedule":"0 9 * * *",  # 每天 9:00
"timezone":"Asia/Shanghai",
"enabled":true,
"actions":[
{
"type":"tool",
"name":"weather",
"params":{
"city":"北京"
}
},
{
"type":"tool",
"name":"news_fetcher",
"params":{
"category":"technology",
"limit":5
}
},
{
"type":"agent",
"message":"请总结今天的天气和重要新闻,并列出我的待办事项",
"thinking":"medium"
},
{
"type":"broadcast",
"channels":["telegram","discord"],
"template":"morning_report"
}
]
},
{
"name":"server_health_check",
"schedule":"*/15 * * * *",  # 每 15 分钟
"actions":[
{
"type":"tool",
"name":"system_monitor",
"params":{
"metrics":["cpu","memory","disk"]
}
},
{
"type":"conditional",
"condition":"cpu > 80 OR memory > 90",
"then":[
{
"type":"broadcast",
"channels":["sms_twilio"],
"priority":"urgent",
"message":"⚠️ 服务器资源告急!"
}
]
}
]
}
]
}
步骤 2: 启动定时任务调度器
# 安装 cron 调度器
npm install -g openclaw-cron

# 加载配置
openclaw cron load ~/.openclaw/cron-jobs.json

# 启动服务
openclaw cron start

# 查看状态
openclaw cron status
预期输出:
┌─────────────────────┬──────────────┬────────┬──────────┐
│ Job Name            │ Schedule     │ Status │ Last Run │
├─────────────────────┼──────────────┼────────┼──────────┤
│ morning_briefing    │ 0 9 * * *    │ ● Running │ 今天 09:00 │
│ server_health_check │ */15 * * * * │ ● Running │ 15 分钟前 │
└─────────────────────┴──────────────┴────────┴──────────┘
技巧 4:集成第三方 API
场景:Notion 自动笔记
当助手回答问题时,自动保存到 Notion 数据库。
步骤 1: 创建 Notion 工具
~/.openclaw/tools/notion-saver.js:
const { Client } = require('@notionhq/client');

module.exports = {
name: 'notion_saver',
description: 'Save content to Notion database',
parameters: {
title: { type: 'string', required: true },
content: { type: 'string', required: true },
tags: { type: 'array', default: [] }
  },

asyncexecute({ title, content, tags = [] }) {
const notion = newClient({
auth: process.env.NOTION_API_KEY
    });

const databaseId = process.env.NOTION_DATABASE_ID;

// 创建页面
const response = await notion.pages.create({
parent: { database_id: databaseId },
properties: {
'Name': { title: [{ text: { content: title } }] },
'Tags': { multi_select: tags.map(tag => ({ name: tag })) },
'Created': { date: { start: newDate().toISOString() } }
      },
children: [
        {
object: 'block',
paragraph: {
rich_text: [{ text: { content } }]
          }
        }
      ]
    });

return {
success: true,
url: response.url,
id: response.id
    };
  }
};
步骤 2: 安装依赖并配置
cd ~/.openclaw/tools
npm install @notionhq/client
~/.openclaw/openclaw.json:
{
"tools":{
"enabled":["notion_saver"],
"notion_saver":{
"apiKey":"${NOTION_API_KEY}",
"databaseId":"${NOTION_DATABASE_ID}"
}
}
}
步骤 3: 在对话中使用
openclaw agent --message "
请帮我记录:今天完成了 OpenClaw 系列文章的 Day 3 写作。
主要内容包含:自定义工具开发、多渠道消息分发、定时任务配置。
标签:OpenClaw、教程、AI。

保存到我的 Notion 知识库。
" --thinking medium
预期输出:
🤖 Assistant: 已成功保存到 Notion!

📝 标题:OpenClaw Day 3 写作记录
🏷️ 标签:OpenClaw, 教程, AI
🔗 链接:https://notion.so/your-page-id

下次需要查找时,可以在 Notion 中搜索关键词。
技巧 5:高级错误处理与日志审计
场景:生产环境监控
步骤 1: 配置详细日志
~/.openclaw/openclaw.json:
{
"logging":{
"level":"debug",// debug, info, warn, error
"file":"~/.openclaw/logs/gateway.log",
"rotate":{
"maxSize":"50MB",
"maxFiles":10,
"compress":true
},
"format":"json",// json 或 text
"include":{
"timestamp":true,
"requestId":true,
"userId":true,
"latency":true,
"tokenUsage":true
}
},

"alerting":{
"enabled":true,
"rules":[
{
"name":"high_error_rate",
"condition":"error_rate > 0.1 within 5m",
"action":"send_sms",
"recipients":["+1234567890"]
},
{
"name":"slow_response",
"condition":"p99_latency > 5s within 10m",
"action":"send_telegram",
"chatId":"dev_alerts"
},
{
"name":"budget_exceeded",
"condition":"daily_token_cost > 10 USD",
"action":"send_email",
"recipients":["admin@example.com"]
}
]
}
}
步骤 2: 创建日志分析脚本
~/scripts/analyze-logs.js:
const fs = require('fs');
const readline = require('readline');

asyncfunctionanalyzeLogs(logFile) {
const fileStream = fs.createReadStream(logFile);
const rl = readline.createInterface({
input: fileStream,
crlfDelay: Infinity
  });

const stats = {
totalRequests: 0,
errors: 0,
avgLatency: 0,
totalTokens: 0,
byChannel: {},
byHour: {}
  };

forawait (const line of rl) {
const log = JSON.parse(line);

    stats.totalRequests++;

if (log.level === 'error') {
      stats.errors++;
    }

    stats.avgLatency += log.latency || 0;
    stats.totalTokens += log.tokenUsage || 0;

// 按渠道统计
const channel = log.channel || 'unknown';
    stats.byChannel[channel] = (stats.byChannel[channel] || 0) + 1;

// 按小时统计
const hour = newDate(log.timestamp).getHours();
    stats.byHour[hour] = (stats.byHour[hour] || 0) + 1;
  }

  stats.avgLatency /= stats.totalRequests;

console.log('=== OpenClaw 日志分析报告 ===\n');
console.log(`总请求数:${stats.totalRequests}`);
console.log(`错误数:${stats.errors} (${(stats.errors/stats.totalRequests*100).toFixed(2)}%)`);
console.log(`平均延迟:${stats.avgLatency.toFixed(2)}s`);
console.log(`总 Token 消耗:${stats.totalTokens}`);
console.log('\n按渠道分布:');
Object.entries(stats.byChannel).forEach(([channel, count]) => {
console.log(`  ${channel}: ${count}`);
  });
}

analyzeLogs('~/.openclaw/logs/gateway.log');
步骤 3: 运行分析
node ~/scripts/analyze-logs.js
预期输出:
=== OpenClaw 日志分析报告 ===

总请求数:1,247
错误数:15 (1.20%)
平均延迟:1.83s
总 Token 消耗:256,890

按渠道分布:
  telegram: 523
  discord: 412
  sms_twilio: 187
  cli: 125
常见问题
Q1: 自定义工具加载失败怎么办?
A: 检查清单:
# 1. 验证工具文件存在
ls -la ~/.openclaw/tools/

# 2. 检查语法
node -c ~/.openclaw/tools/your-tool.js

# 3. 查看网关日志
tail -f ~/.openclaw/logs/gateway.log | grep "tool"

# 4. 重启网关
openclaw gateway restart
Q2: 多渠道发送时部分失败如何处理?
A: 三种策略:
-
重试机制(推荐):
{
"broadcast":{
"retry_failed":true,
"max_retries":3,
"retry_delay_ms":1000
}
} -
降级策略:
{
"broadcast":{
"fallback_order":["telegram","discord","sms"]
}
} -
异步队列:
openclaw queue enable# 使用 Redis 队列
Q3: 定时任务不执行怎么办?
A: 排查步骤:
# 1. 检查 cron 服务状态
openclaw cron status

# 2. 验证 cron 表达式
# 使用 https://crontab.guru/ 在线验证

# 3. 手动触发测试
openclaw cron run morning_briefing

# 4. 查看 cron 日志
tail -f ~/.openclaw/logs/cron.log
Q4: 如何限制助手的权限?
A: 实现沙箱隔离:
{
"security":{
"sandbox":{
"enabled":true,
"allowed_paths":["/tmp","~/.openclaw/data"],
"forbidden_commands":["rm","sudo","curl","wget"],
"network_access":false,
"max_memory_mb":512,
"max_cpu_percent":50
}
}
}
Q5: 如何追踪每个用户的 Token 消耗?
A: 启用用户级计量:
{
"metering":{
"enabled":true,
"by_user":true,
"export_format":"csv",
"export_path":"~/.openclaw/metrics/",
"alerts":{
"daily_limit_per_user":10000,
"monthly_budget":500
}
}
}
小结与下一步
恭喜你掌握了 OpenClaw 的进阶功能!回顾一下今天的收获:
核心要点
-
✅ 自定义工具开发: 代码执行器、天气查询等 -
✅ 多渠道分发: Telegram + Discord + 短信并行发送 -
✅ 定时任务: 自动化晨报、健康检查 -
✅ 第三方集成: Notion、GitHub、Slack 等 -
✅ 监控审计: 日志分析、告警配置
练习建议
- 实战项目
: 选择一个你工作中的重复性任务,用 OpenClaw 自动化 - 工具贡献
: 将你开发的工具分享到社区 - 性能测试
: 模拟高并发场景,优化配置
延伸阅读
-
OpenClaw 工具开发完整 API -
渠道适配器开发指南 -
生产环境部署最佳实践
下一步预告
明天我们将进入完整项目开发,用一整天的时间打造一个真正可用的生产级 AI 助手系统!
实战作业: 开发一个自定义工具,解决你实际工作或生活中的一个痛点,并在评论区分享代码!
本文基于 OpenClaw 2026.3.24 编写。部分高级功能可能需要额外依赖或权限。