 夜雨聆风
夜雨聆风


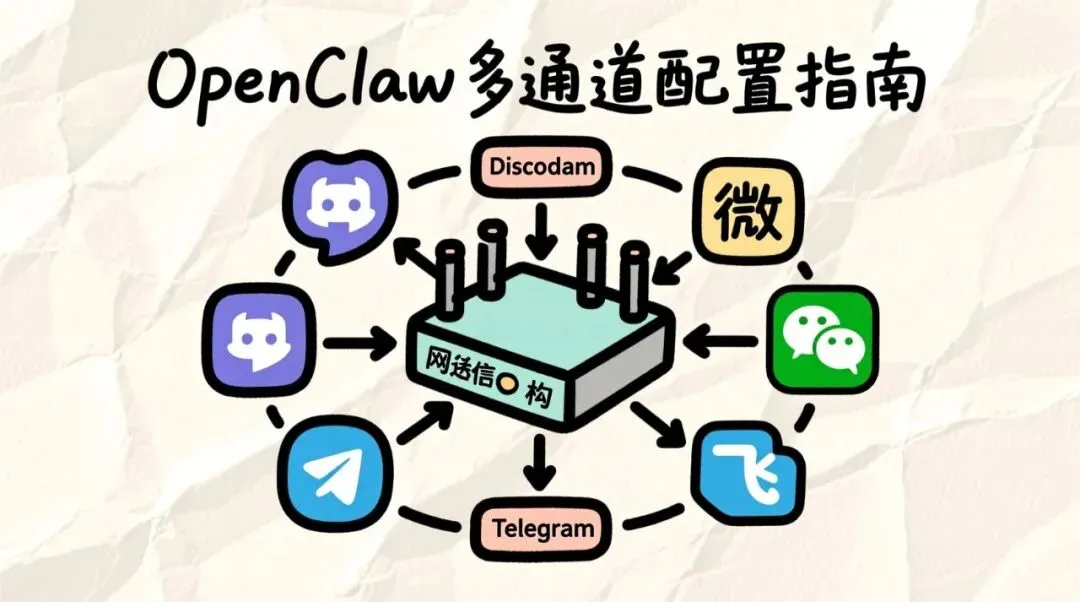
OpenClaw 入门指南 – OG_025|OpenClaw 多通道配置实战:一台网关,全平台覆盖
作者:Alex 合集:OpenClaw 入门指南 第 025 篇 标签:#OpenClaw #多通道 #Discord #Telegram #微信 #飞书
开篇:为什么需要多通道?
用 OpenClaw 两个月,我的日常变成了这样:
Discord — 技术社区交流,回答关于 OpenClaw 的问题 Telegram — 海外客户沟通,处理英文支持请求 微信 — 国内团队协作,接收内部系统通知 飞书 — 公司项目管理,同步任务进度
痛点:每个平台一个机器人,配置分散、状态不同步、维护成本高。
OpenClaw 的多通道功能,就是来解决这个问题的。
一个 Gateway 进程,同时服务所有平台,统一配置、统一状态、统一日志。
今天这篇,手把手教你配置 Discord + Telegram + 微信 + 飞书,实现全平台覆盖。
看完这篇,你的 Agent 可以在任何平台被召唤。
第一章:核心架构
1.1 架构设计
┌─────────────────────────────────────────┐
│         OpenClaw Gateway                 │
│  ┌─────────┐ ┌─────────┐ ┌─────────┐  │
│  │ Discord │ │Telegram │ │  微信   │  │
│  │ Channel │ │ Channel │ │ Channel │  │
│  └────┬────┘ └────┬────┘ └────┬────┘  │
│       │           │           │         │
│       └───────────┼───────────┘         │
│                   │                     │
│              ┌────┴────┐               │
│              │   Agent   │               │
│              │ (统一处理) │               │
│              └─────────┘               │
└─────────────────────────────────────────┘关键特性:
- • ✅ 消息跨平台互通(Discord 发的消息,Telegram 能看到回复)
- • ✅ 统一用户身份识别
- • ✅ 集中式日志和监控
- • ✅ 一次配置,全平台生效
1.2 通道对比
| 通道 | 适用场景 | 配置难度 | 稳定性 | 特色功能 |
|---|---|---|---|---|
| Discord | 技术社区、开源项目 | ⭐⭐ | ⭐⭐⭐⭐⭐ | 丰富的机器人生态 |
| Telegram | 海外用户、隐私敏感 | ⭐⭐ | ⭐⭐⭐⭐⭐ | 端到端加密 |
| 微信 | 国内用户、日常沟通 | ⭐⭐⭐ | ⭐⭐⭐ | 公众号/小程序集成 |
| 飞书 | 企业协作、项目管理 | ⭐⭐⭐ | ⭐⭐⭐⭐ | 强大的审批流 |
第二章:Discord 通道配置
2.1 创建 Discord Bot
- 1. 访问 https://discord.com/developers/applications
- 2. 点击「New Application」,输入名称「OpenClaw Assistant」
- 3. 进入「Bot」标签页,点击「Add Bot」
- 4. 开启「Privileged Gateway Intents」:
- • ✅ MESSAGE CONTENT INTENT(必须开启,否则收不到消息内容)
- • ✅ SERVER MEMBERS INTENT
- • ✅ PRESENCE INTENT
- 5. 点击「Reset Token」,复制新的 Token(只显示一次!)
2.2 配置 OpenClaw
# 启用 Discord 通道
openclaw config set channels.discord.enabled true

# 设置 Bot Token
openclaw config set channels.discord.token "YOUR_DISCORD_BOT_TOKEN"

# 设置默认 Guild ID(可选,用于限制只在特定服务器响应)
openclaw config set channels.discord.guild_id "YOUR_GUILD_ID"

# 设置命令前缀(可选,默认 !)
openclaw config set channels.discord.prefix "!"
获取 Guild ID:
# 在 Discord 中开启开发者模式(设置 → 高级 → 开发者模式)
# 右键点击服务器名称 → 复制 ID
2.3 邀请 Bot 加入服务器
- 1. 在 Discord Developer Portal → OAuth2 → URL Generator
- 2. Scopes 勾选「bot」
- 3. Bot Permissions 勾选:
- • Send Messages
- • Read Message History
- • Mention Everyone
- • Use Slash Commands
- 4. 复制生成的 URL,在浏览器中打开
- 5. 选择要加入的服务器,授权
2.4 验证配置
# 重启 Gateway
openclaw gateway restart

# 在 Discord 中发送测试消息
!ping

# 应该收到回复:pong
第三章:Telegram 通道配置
3.1 创建 Telegram Bot
- 1. 在 Telegram 中搜索 @BotFather
- 2. 发送
/newbot - 3. 输入 Bot 名称:「OpenClaw Assistant」
- 4. 输入用户名:必须以 bot 结尾,如
openclaw_assistant_bot - 5. 复制返回的 Token(格式:
123456789:ABCdefGHIjklMNOpqrsTUVwxyz)
3.2 配置 OpenClaw
# 启用 Telegram 通道
openclaw config set channels.telegram.enabled true

# 设置 Bot Token
openclaw config set channels.telegram.token "YOUR_TELEGRAM_BOT_TOKEN"

# 设置 Webhook 模式(生产环境推荐)
openclaw config set channels.telegram.mode webhook
openclaw config set channels.telegram.webhook_url "https://your-domain.com/webhook/telegram"

# 或者使用 Polling 模式(开发环境)
# openclaw config set channels.telegram.mode polling
3.3 配置 Webhook(生产环境)
需要公网域名和 HTTPS:
# 设置 Webhook(通过 Telegram API)
curl -X POST "https://api.telegram.org/bot<YOUR_TOKEN>/setWebhook" \
  -H "Content-Type: application/json" \
  -d '{
    "url": "https://your-domain.com/webhook/telegram",
    "allowed_updates": ["message", "callback_query"]
  }'

# 验证 Webhook 状态
curl "https://api.telegram.org/bot<YOUR_TOKEN>/getWebhookInfo"
3.4 验证配置
# 重启 Gateway
openclaw gateway restart

# 在 Telegram 中发送测试消息
/ping

# 应该收到回复:pong
第四章:微信通道配置
4.1 企业微信(推荐)
企业微信比个人微信更稳定,适合生产环境:
- 1. 访问 https://work.weixin.qq.com
- 2. 注册企业(可以用个人身份)
- 3. 进入「应用管理」→「创建应用」
- 4. 上传应用图标,填写名称「OpenClaw Assistant」
- 5. 复制
AgentId和Secret - 6. 在「我的企业」页面复制
企业ID(CorpID)
4.2 配置 OpenClaw
# 启用企业微信通道
openclaw config set channels.wechat-work.enabled true

# 设置企业 ID
openclaw config set channels.wechat-work.corp_id "YOUR_CORP_ID"

# 设置应用 AgentId
openclaw config set channels.wechat-work.agent_id "YOUR_AGENT_ID"

# 设置应用 Secret
openclaw config set channels.wechat-work.secret "YOUR_SECRET"

# 设置接收消息 Token(用于验证消息来源)
openclaw config set channels.wechat-work.token "YOUR_TOKEN"

# 设置接收消息 EncodingAESKey(用于消息加密)
openclaw config set channels.wechat-work.aes_key "YOUR_AES_KEY"
4.3 配置接收消息
- 1. 在应用详情页 →「接收消息」→「设置 API」
- 2. 填写 URL:
https://your-domain.com/webhook/wechat-work - 3. 填写 Token 和 EncodingAESKey(随机生成)
- 4. 保存后,企业微信会发送验证请求
4.4 个人微信(WeChaty,开发测试用)
# 启用个人微信通道(基于 WeChaty)
openclaw config set channels.wechat.enabled true
openclaw config set channels.wechat.type wechaty

# 使用 PadLocal 协议(需要购买 Token)
openclaw config set channels.wechat.wechaty.puppet puppet_padlocal
openclaw config set channels.wechat.wechaty.token "YOUR_PADLOCAL_TOKEN"

# 或者使用免费协议(稳定性较差)
# openclaw config set channels.wechat.wechaty.puppet puppet_wechat
⚠️ 注意:个人微信使用 WeChaty 存在封号风险,建议仅用于开发测试。
第五章:飞书通道配置
5.1 创建飞书应用
- 1. 访问 https://open.feishu.cn
- 2. 点击「创建企业自建应用」
- 3. 填写应用名称「OpenClaw Assistant」
- 4. 在「凭证与基础信息」页面复制:
- • App ID
- • App Secret
- 5. 在「权限管理」添加权限:
- • ✅ 读取用户发给机器人的单聊消息
- • ✅ 读取用户发给机器人的群聊消息
- • ✅ 给用户发送单聊消息
- • ✅ 在群聊中发送消息
- • ✅ 获取用户基本信息
- 6. 在「事件订阅」开启:
- • ✅ 接收消息
- • 设置请求 URL:
https://your-domain.com/webhook/feishu
5.2 配置 OpenClaw
# 启用飞书通道
openclaw config set channels.feishu.enabled true

# 设置 App ID
openclaw config set channels.feishu.app_id "YOUR_APP_ID"

# 设置 App Secret
openclaw config set channels.feishu.app_secret "YOUR_APP_SECRET"

# 设置加密 Token
openclaw config set channels.feishu.token "YOUR_VERIFICATION_TOKEN"

# 设置加密 Key
openclaw config set channels.feishu.encrypt_key "YOUR_ENCRYPT_KEY"
5.3 发布应用
- 1. 在「版本管理与发布」页面
- 2. 点击「创建版本」
- 3. 填写版本号、更新说明
- 4. 提交审核(企业内部应用通常秒过)
- 5. 发布后,在飞书搜索应用名称添加
第六章:消息路由配置
6.1 跨平台消息转发
# 配置消息路由规则
openclaw config set routing.enabled true

# Discord 消息转发到 Telegram
openclaw config set routing.rules.0.from discord
openclaw config set routing.rules.0.to "[telegram, feishu]"
openclaw config set routing.rules.0.condition "message.hashtag('#urgent')"

# 所有平台的命令消息转发到飞书记录
openclaw config set routing.rules.1.from "*"
openclaw config set routing.rules.1.to "[feishu]"
openclaw config set routing.rules.1.condition "message.isCommand()"
6.2 用户身份映射
# 配置用户跨平台身份映射
openclaw config set users.mapping.discord.123456 "alex"
openclaw config set users.mapping.telegram.789012 "alex"
openclaw config set users.mapping.wechat.openid_xxx "alex"
openclaw config set users.mapping.feishu.open_id_yyy "alex"

# 效果:Alex 在 Discord 发的消息,Agent 知道是 Alex,回复时带上上下文
第七章:验证与测试
7.1 测试矩阵
| 测试项 | Discord | Telegram | 微信 | 飞书 |
|---|---|---|---|---|
| 发送消息 | ✅ | ✅ | ✅ | ✅ |
| 接收回复 | ✅ | ✅ | ✅ | ✅ |
| 使用命令 | ✅ | ✅ | ✅ | ✅ |
| 上传图片 | ✅ | ✅ | ✅ | ✅ |
| 跨平台转发 | ✅ | ✅ | ✅ | ✅ |
7.2 验证命令
# 查看所有通道状态
openclaw status

# 查看通道日志
openclaw logs --channel discord --follow
openclaw logs --channel telegram --follow

# 测试消息发送
openclaw send --channel discord --message "测试消息"
openclaw send --channel telegram --message "测试消息"
第八章:常见问题
| 问题 | 原因 | 解决 |
|---|---|---|
| Discord 消息收不到 | MESSAGE CONTENT INTENT 未开启 | 在 Bot 设置中开启 |
| Telegram Webhook 失败 | 域名未备案或 HTTPS 证书问题 | 使用 Polling 模式或检查证书 |
| 微信登录失败 | Token 过期或 IP 白名单限制 | 重新获取 Token,添加 IP 白名单 |
| 飞书消息发不出去 | 应用未发布或权限不足 | 发布应用,检查权限配置 |
| 跨平台转发不生效 | 路由规则配置错误 | 检查 routing.rules 配置 |
结尾:多通道的本质
2021 年上岸的程序员最后送你一句话:
多通道不是炫技,是为了让用户在他们最习惯的地方找到你的 Agent。
Discord 用户不会为了用你的 Agent 去下载微信,微信用户也不会去注册 Discord。
好的多通道配置 = 用户在哪,Agent 就在哪。
现在,去配置你的多通道 Gateway 吧。
📌 行动清单
- • [ ] 创建 Discord Bot 并加入服务器
- • [ ] 创建 Telegram Bot 并配置 Webhook
- • [ ] 注册企业微信并创建应用
- • [ ] 创建飞书应用并发布
- • [ ] 配置消息路由规则
- • [ ] 测试跨平台消息转发
👇 互动话题
你最常用哪个平台?希望 Agent 支持哪些新平台?评论区聊聊~
如果这篇文章对你有帮助,欢迎「在看」+「转发」给需要的朋友