ARTICLE · 1325580
自建 KMS 激活Office、Windows
先叠个甲
本文仅限个人研究学习使用,企业用户请从官方渠道购买~
工具
服务器端
一台云服务器(本文以使用阿里云的云服务器为例,规格为2U2G。或者自己有一台NAS、可以不关机的主机、虚拟机都可以。) Ubuntu(操作系统,版本:24.04 LTS) Docker(版本:29.9.2) py-kms(下载最新的latest即可。) Tailscale(内网环境可以选择忽略,使用云主机的话强烈建议安装,不推荐直接暴露公网IP的端口。)
客户端
Windows PowerShell Office LTSC 2024 Tailscale Xshell Xftp
KMS激活关键概念
授权有效期 | 180天 | |
续期间隔 | 7 天 | 客户端每 7 天主动找 KMS服务器 续一次 |
重试间隔 | 2 小时 | 续期失败后,每 2 小时重试 |
一、总体架构
┌──────────────────────────┐│ Windows 客户端(动态 IP) ││ Office LTSC 2024 批量版 ││ cscript ospp.vbs │└────────────┬─────────────┘│ Tailscale 虚拟内网 *.*.*.*/*│ (无公网端口暴露)┌────────────▼─────────────┐│ Ubuntu ││ └─ Docker ││ └─ py-kms 容器 ││ 监听 0.0.0.0:1688 ││ 数据 → /opt/py-kms/db└──────────────────────────┘
二、服务端部署
2.1 准备
apt update && apt upgrade -ytimedatectl set-timezone Asia/Shanghaiip -4 addr show # 记录内网 IPcurl -s cip.cc | head -3 # 确认公网出口 IP
2.2 安装docker(已有忽略即可)
# 卸载系统自带的旧版本apt-get remove -y docker docker-engine docker.io containerd runc# 安装基础依赖apt-get updateapt-get install -y ca-certificates curl gnupg lsb-release# 添加阿里云 Docker CE 源的 GPG 密钥install -m 0755 -d /etc/apt/keyringscurl -fsSL https://mirrors.aliyun.com/docker-ce/linux/ubuntu/gpg \-o /etc/apt/keyrings/docker.ascchmod a+r /etc/apt/keyrings/docker.asc# 写入软件源echo "deb [arch=$(dpkg --print-architecture) signed-by=/etc/apt/keyrings/docker.asc] \https://mirrors.aliyun.com/docker-ce/linux/ubuntu $(. /etc/os-release && echo $VERSION_CODENAME) stable" \> /etc/apt/sources.list.d/docker.list# 安装dockerapt-get updateapt-get install -y docker-ce docker-ce-cli containerd.io docker-buildx-plugin docker-compose-plugin# 启动并设置开机自启systemctl enable --now dockersystemctl status docker --no-pager# 配置镜像加速器# 阿里云容器镜像加速地址需要在https://cr.console.aliyun.com/cn-hangzhou/instances/mirrors自行获取# 写入配置mkdir -p /etc/dockercat > /etc/docker/daemon.json <<'EOF'{"registry-mirrors": ["https://xxxxxx.mirror.aliyuncs.com"],"log-driver": "json-file","log-opts": { "max-size": "100m", "max-file": "3" }}EOFsystemctl daemon-reloadsystemctl restart docker# 查看docker版本docker version
2.3部署 py-kms
mkdir -p /opt/py-kms/dbdocker pull ghcr.io/py-kms-organization/py-kms:latestdocker run -d --name py-kms --restart always \-p 1688:1688 \-v /opt/py-kms/db:/home/py-kms/db \-e SQLITE_PATH=/home/py-kms/db/kms.db \ghcr.io/py-kms-organization/py-kms:latest
2.4 验证服务
docker psdocker logs --tail 20 py-kmsss -lntp | grep 1688
三、Office激活
3.1 ODT安装office(专业增强版)
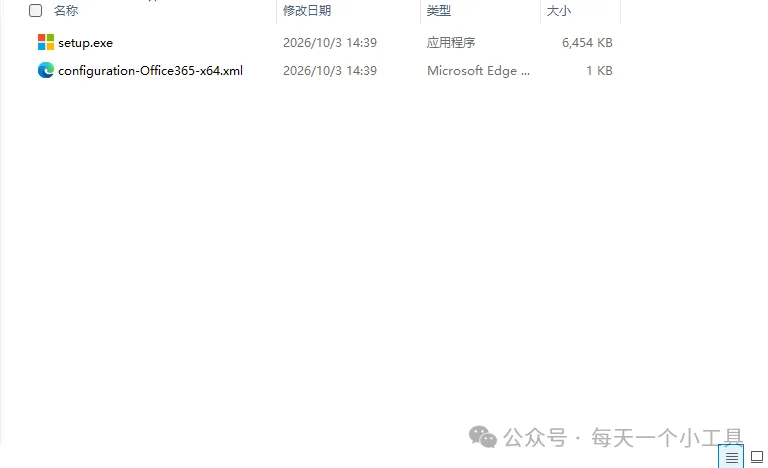
<Configuration><AddOfficeClientEdition="64"Channel="PerpetualVL2024"><ProductID="ProPlus2024Volume"><LanguageID="zh-cn" /></Product></Add><RemoveMSI /><DisplayLevel="Full"AcceptEULA="TRUE" /><PropertyName="AUTOACTIVATE"Value="1" /><UpdatesEnabled="TRUE"Channel="PerpetualVL2024" /></Configuration>
cd /d "当前目录"setup.exe /configure configuration-Office-LTSC-2024-x64-zh-cn.xml
3.2 开放云服务器安全组入方向1688端口
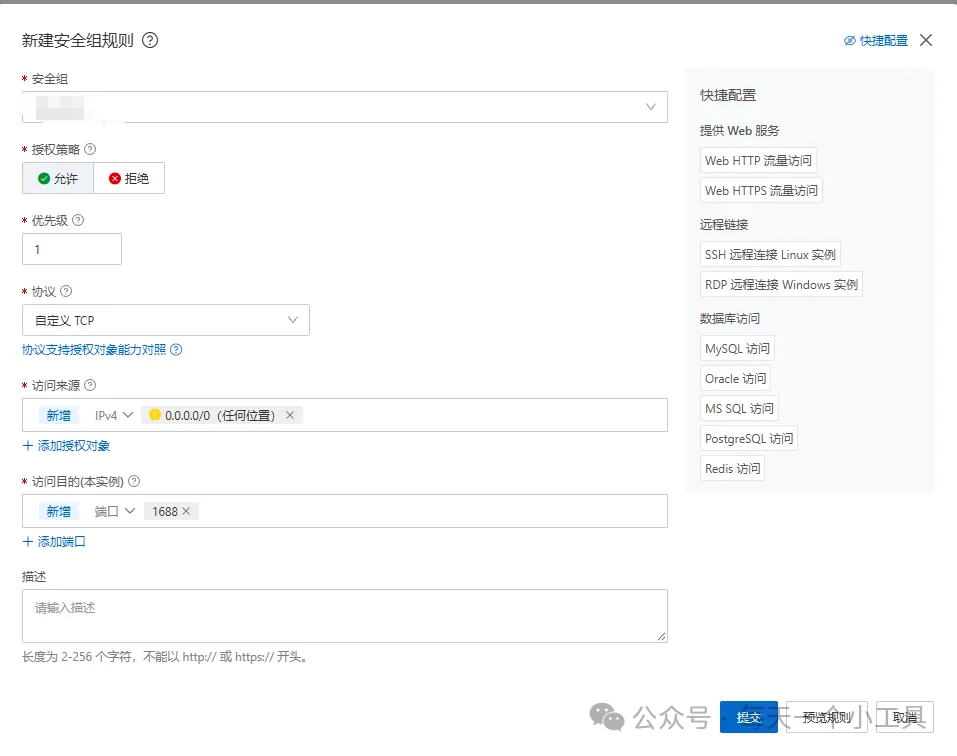
3.3 激活Office
Test-NetConnection -ComputerName '你的公网IP' -Port 1688TcpTestSucceeded : Truecd "C:\Program Files\Microsoft Office\root\Office16"#指向 KMS 服务器cscript ospp.vbs /sethst:'你的公网IP'cscript ospp.vbs /setprt:1688# 装 Office LTSC 专业增强版 2024 的 GVLK# (批量版通常已内置,若提示已存在/无效可跳过这步)cscript ospp.vbs /inpkey:XJ2XN-FW8RK-P4HMP-DKDBV-GCVGB# 激活cscript ospp.vbs /act
Office 2024 GVLK 对照表
版本 | GVLK |
Office LTSC 专业增强版 2024 | XJ2XN-FW8RK-P4HMP-DKDBV-GCVGB |
Office LTSC 标准版 2024 | V28N4-JG22K-W66P8-VTMGK-H6HGR |
Project Professional 2024 | FQQ23-N4YCY-73HQ3-FM9WC-76HF4 |
Project Standard 2024 | PD3TT-NTHQQ-VC7CY-MFXK3-G87F8 |
Visio LTSC Professional 2024 | B7TN8-FJ8V3-7QYCP-HQPMV-YY89G |
Visio LTSC Standard 2024 | JMMVY-XFNQC-KK4HK-9H7R3-WQQTV |
查看激活结果
cscript ospp.vbs /dstatusLICENSE STATUS: ---LICENSED---KMS machine registry override defined: 公网IP:1688
四、Windows激活
cd "C:\Windows\System32"# 1. 装对应版本的 GVLKslmgr /ipk W269N-WFGWX-YVC9B-4J6C9-T83GX# 2. 指向 KMS(注意格式:IP:端口,不要带 http://)slmgr /skms '你的公网IP':1688# 3. 激活slmgr /ato# 4. 查看结果slmgr /dlv # 回显携带许可证状态为已授权,且可以看到KMS服务器地址即为成功slmgr /xpr # 回显显示到期时间,180天后自动续期
WindowsGVLK 对照表
版本 | GVLK |
Windows 10/11 (SAC) - Pro(专业版) | W269N-WFGWX-YVC9B-4J6C9-T83GX |
Windows 10/11 (SAC) - Pro N | MH37W-N47XK-V7XM9-C7227-GCQG9 |
Windows 10/11 (SAC) - Pro for Workstations | NRG8B-VKK3Q-CXVCJ-9G2XF-6Q84J |
Windows 10/11 (SAC) - Enterprise(企业版) | NPPR9-FWDCX-D2C8J-H872K-2YT43 |
Windows 10/11 (SAC) - Enterprise N | DPH2V-TTNVB-4X9Q3-TJR4H-KHJW4 |
Windows 10/11 (SAC) - Education(教育版) | NW6C2-QMPVW-D7KKK-3GKT6-VCFB2 |
LTSC / LTSB - Win11 LTSC 2024 / Win10 LTSC 2021、2019 企业版 | M7XTQ-FN8P6-TTKYV-9D4CC-J462D |
LTSC / LTSB - 对应 N 版 | 92NFX-8DJQP-P6BBQ-THF9C-7CG2H |
Windows Server - Server 2025 Standard | TVRH6-WHNXV-R9WG3-9XRFY-MY832 |
Windows Server - Server 2025 Datacenter | D764K-2NDRG-47T6Q-P8T8W-YP6DF |
Windows Server - Server 2022 Standard | VDYBN-27WPP-V4HQT-9VMD4-VMK7H |
Windows Server - Server 2022 Datacenter | WX4NM-KYWYW-QJJR4-XV3QB-6VM33 |
Windows Server - Server 2019 Standard | N69G4-B89J2-4G8F4-WWYCC-J464C |
Windows Server - Server 2019 Datacenter | WMDGN-G9PQG-XVVXX-R3X43-63DFG |
Windows Server - Server 2016 Standard | WC2BQ-8NRM3-FDDYY-2BFGV-KHKQY |
Windows Server - Server 2016 Datacenter | CB7KF-BWN84-R7R2Y-793K2-8XDDG |
五、使用Tailscale组网,防止云服务器端口直接暴露在公网,且开放0.0.0.0
5.1 云服务器安装Tailscale
curl -fsSL https://tailscale.com/install.sh | shsudo tailscale up #会打印一个登录链接,浏览器打开登录,复制链接,到本地注册并登录tailscale ip -4 # 记下这个 IP,就是 KMS 的新地址
5.2 Windows本地安装Tailscale
tailscale ip -45.3 Windows本地测试与云服务器Tailscale地址连通性
Test-NetConnection -ComputerName '5.1 记录的IP' -Port 1688回显携带如下参数证明连通成功:
TcpTestSucceeded : True5.4 删除安全组规则
5.5 Windows客户端KMS地址改指向 Tailscale IP
cd "C:\Program Files\Microsoft Office\Office16"cscript ospp.vbs /sethst:x.x.y.zcscript ospp.vbs /setprt:1688cscript ospp.vbs /actcscript ospp.vbs /dstatus