 夜雨聆风
夜雨聆风一、安装前规划
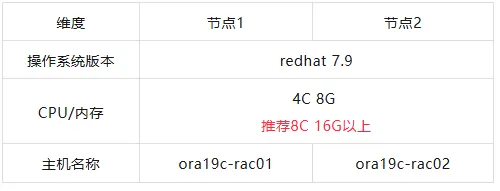
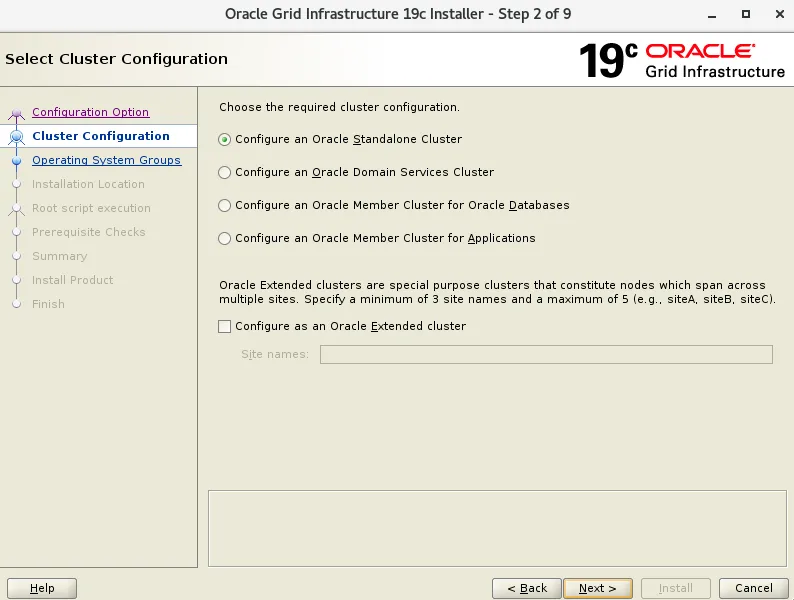
1.1 系统层面
1.2 网络层面
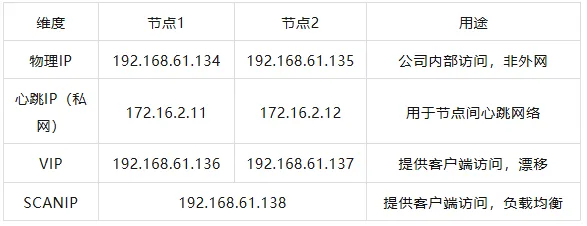
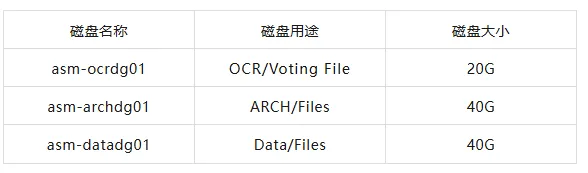
Oracle RAC 使用 ASM 存储来存放数据,包含心跳盘、数据盘、归档盘 三个磁盘组!
归档盘、数据盘大小根据实际数据量大小划分。
二、主机配置
2.1 通过 VMware 安装的系统点击下面,可查看详细步骤👇
通过 VMware 创建 Oracle 19c rac 主机
2.2 yum 源配置(如果有,则不需要)
网络yum源
[root@ora19c-rac01 ~]# cat /etc/yum.repos.d/redhat.repo[base]name= yum repobaseurl=http://mirrors.aliyun.com/centos/7/os/$basearch/enabled=1gpgcheck=0
本地 yum 源
手动挂载镜像源:mount /dev/cdrom /mntdf -Thcat <<EOF>>/etc/yum.repos.d/local.repo[local]name=localbaseurl=file:///mntgpgcheck=0enabled=1EOFyum repolist all
两种方式根据实际情况选择
2.3 配置心跳IP(私网IP)
节点1
[root@ora19c-rac01 ~]# cat /etc/sysconfig/network-scripts/ifcfg-ens33TYPE=EthernetPROXY_METHOD=noneBROWSER_ONLY=noBOOTPROTO=staticDEFROUTE=yesIPV4_FAILURE_FATAL=noIPV6INIT=yesIPV6_AUTOCONF=yesIPV6_DEFROUTE=yesIPV6_FAILURE_FATAL=noIPV6_ADDR_GEN_MODE=stable-privacyNAME=ens33UUID=fd9a356e-a199-4e52-b8fe-704d50fafcdeIPADDR=172.16.2.11NETMASK=255.255.255.0GATEWAY=192.168.61.2DEVICE=ens33ONBOOT=yes-- 重启后生效[root@ora19c-rac01 ~]# systemctl restart network
节点2
[root@ora19c-rac02 ~]# cat /etc/sysconfig/network-scripts/ifcfg-ens33TYPE=EthernetPROXY_METHOD=noneBROWSER_ONLY=noBOOTPROTO=staticDEFROUTE=yesIPV4_FAILURE_FATAL=noIPV6INIT=yesIPV6_AUTOCONF=yesIPV6_DEFROUTE=yesIPV6_FAILURE_FATAL=noIPV6_ADDR_GEN_MODE=stable-privacyNAME=ens33UUID=fd9a356e-a199-4e52-b8fe-704d50fafcdeDEVICE=ens33IPADDR=172.16.2.12NETMASK=255.255.255.0GATEWAY=192.168.61.2ONBOOT=yes-- 重启后生效[root@ora19c-rac02 ~]# systemctl restart network[root@ora19c-rac02 ~]# ping 172.16.2.11PING 172.16.2.11 (172.16.2.11) 56(84) bytes of data.64 bytes from 172.16.2.11: icmp_seq=1 ttl=64 time=0.448 ms64 bytes from 172.16.2.11: icmp_seq=2 ttl=64 time=0.306 ms64 bytes from 172.16.2.11: icmp_seq=3 ttl=64 time=0.282 ms[root@ora19c-rac01 ~]# ping 172.16.2.12PING 172.16.2.12 (172.16.2.12) 56(84) bytes of data.64 bytes from 172.16.2.12: icmp_seq=1 ttl=64 time=0.308 ms64 bytes from 172.16.2.12: icmp_seq=2 ttl=64 time=0.323 ms64 bytes from 172.16.2.12: icmp_seq=3 ttl=64 time=0.278 ms
三、存储配置
3.1 需要在 VMware 中配置共享存储,然后系统中再配置多路径。
在 VMware 中配置共享存储,详细步骤点击👉通过 VMware 创建共享存储
3.2 配置好共享存储后,主机查看uuid
--节点1[root@ora19c-rac01 ~]# lsblkNAME MAJ:MIN RM SIZE RO TYPE MOUNTPOINTsda 8:0 0 15G 0 disk├─sda1 8:1 0 1G 0 part /boot└─sda2 8:2 0 14G 0 part├─rhel-root 253:0 0 12.5G 0 lvm /└─rhel-swap 253:1 0 1.5G 0 lvm [SWAP]sdb 8:16 0 80G 0 disk└─sdb1 8:17 0 80G 0 partsdc 8:32 0 20G 0 disksdd 8:48 0 40G 0 disksde 8:64 0 40G 0 disksr0 11:0 1 4.2G 0 rom[root@ora19c-rac01 ~]# /usr/lib/udev/scsi_id -g -u -d /dev/sdc36000c29abee91b0f18a5032f6808d007[root@ora19c-rac01 ~]# /usr/lib/udev/scsi_id -g -u -d /dev/sdd36000c29066009d6eefabc7c18f5d489c[root@ora19c-rac01 ~]# /usr/lib/udev/scsi_id -g -u -d /dev/sde36000c29223d26b4fc93a5a37543f0c64--节点2[root@ora19c-rac02 ~]# lsblkNAME MAJ:MIN RM SIZE RO TYPE MOUNTPOINTsda 8:0 0 15G 0 disk├─sda1 8:1 0 1G 0 part /boot└─sda2 8:2 0 14G 0 part├─rhel-root 253:0 0 12.5G 0 lvm /└─rhel-swap 253:1 0 1.5G 0 lvm [SWAP]sdb 8:16 0 80G 0 disk└─sdb1 8:17 0 80G 0 partsdc 8:32 0 20G 0 disksdd 8:48 0 40G 0 disksde 8:64 0 40G 0 disksr0 11:0 1 4.2G 0 rom[root@ora19c-rac02 ~]# /usr/lib/udev/scsi_id -g -u -d /dev/sdc36000c29abee91b0f18a5032f6808d007[root@ora19c-rac02 ~]# /usr/lib/udev/scsi_id -g -u -d /dev/sdd36000c29066009d6eefabc7c18f5d489c[root@ora19c-rac02 ~]# /usr/lib/udev/scsi_id -g -u -d /dev/sde36000c29223d26b4fc93a5a37543f0c64
3.3 安装 multipath 绑定多路径(可以不做多路径,具体根据自己需要调整)
两个节点都需要安装
##安装multipathyum install -y device-mapper*mpathconf --enable --with_multipathd y#查看共享盘的scsi_id[root@ora19c-rac01 ~]# /usr/lib/udev/scsi_id -g -u /dev/sdc36000c29abee91b0f18a5032f6808d007[root@ora19c-rac01 ~]# /usr/lib/udev/scsi_id -g -u /dev/sdd36000c29066009d6eefabc7c18f5d489c[root@ora19c-rac01 ~]# /usr/lib/udev/scsi_id -g -u /dev/sde36000c29223d26b4fc93a5a37543f0c64
3.4 配置 multipath 文件
两个节点都需要配置
cp /etc/multipath.conf /etc/multipath.conf_$(date +%F)#vi /etc/multipath.confdefaults {user_friendly_names yes}blacklist {devnode "^sda"}multipaths {multipath {wwid "36000c29abee91b0f18a5032f6808d007"alias asm-ocrdg01}multipath {wwid "36000c29066009d6eefabc7c18f5d489c"alias asm-archdg01}multipath {wwid "36000c29223d26b4fc93a5a37543f0c64"alias asm-datadg01}}
3.5 激活multipath多路径
两个节点都需要执行
multipath -Fmultipath -v2multipath -ll
四、系统参数配置
4.1 hosts文件配置
两个节点都需要执行
#cat /etc/hosts################ Oracle RAC for pub ########################192.168.61.134 ora19c-rac01 ora19c-rac01-pub192.168.61.135 ora19c-rac02 ora19c-rac02-pub################ Oracle RAC for priv #######################172.16.2.11 ora19c-rac01-priv172.16.2.12 ora19c-rac02-priv################ Oracle RAC for vip ########################192.168.61.136 ora19c-rac01-vip192.168.61.137 ora19c-rac02-vip################ Oracle RAC for Scan IP ####################192.168.61.138 cj-scan--传过去节点2即可scp /etc/hosts root@192.168.61.135:/etc/hosts
4.2 防火墙配置和selinux配置
两个节点都需要执行
systemctl stop firewalldsystemctl disable firewalldsystemctl status firewalldsed -i 's/SELINUX=enforcing/SELINUX=disabled/g' /etc/selinux/configsetenforce 0getenforce
4.3 时间同步配置
两个节点都需要执行
如果有自己的NTP服务器,则在 /etc/chrony.conf 配置文件下改成自己的NTP服务域名。我这里选择默认的。
4.4 avahi-daemon 配置
两个节点都需要执行
图形化界面默认会安装这个服务,禁用即可
systemctl stop avahi-daemon.socketsystemctl stop avahi-daemon.servicesystemctl disable avahi-daemon.socketsystemctl disable avahi-daemon.service
4.5 NOZEROCONF 参数配置
两个节点都需要执行
网络设定信息,这是19C新增加的一个配置
-- 节点1cat /etc/sysconfig/network# Created by anacondaNETWORKING=yesHOSTNAME=ora19c-rac01NOZEROCONF=yes--节点2cat /etc/sysconfig/network# Created by anacondaNETWORKING=yesHOSTNAME=ora19c-rac02NOZEROCONF=yes
4.6 RemoveIPC配置
两个节点都需要执行
设置了RemoveIPC=yes 的会crash掉Oracle asm 实例和Oracle database实例
cat /etc/systemd/logind.confRemoveIPC=no
4.7 配置pam.d/login
两个节点都需要执行
cat /etc/pam.d/loginsession required pam_limits.sosession required /lib64/security/pam_limits.so
4.8 系统资源配置及大页配置Hugepage(16G内存以上建议配置)
两个节点都需要执行
4.8.1 limits.conf 用户文件进程限制配置
memlock=`awk '/MemTotal/{printf("%1.0f\n",$2/2.0)}' /proc/meminfo`
cat /etc/security/limits.conforacle soft nproc 16384oracle hard nproc 16384oracle soft nofile 65536oracle hard nofile 65536oracle soft memlock 3995032oracle hard memlock 3995032oracle soft stack 65536oracle hard stack 32768grid soft nproc 16384grid hard nproc 16384grid soft nofile 65536grid hard nofile 65536grid soft stack 65536grid hard stack 32768
4.8.2 sysctl.conf 配置
sga(物理内存的一半,[如物理内存为8 则sga为4]) HUGE=4*1024/2=2048
SHMALL=`awk '($1 == "MemTotal:"){print $2/4}' /proc/meminfo`
SHMMAX=`awk '/MemTotal/{printf("%1.0f\n",$2*0.8*1024)}' /proc/meminfo`
# cat /etc/sysctl.conffs.aio-max-nr = 1048576fs.file-max = 6815744kernel.shmall = 1997516kernel.shmmax = 6545460429kernel.shmmni = 4096kernel.sem = 250 32000 100 128net.ipv4.ip_local_port_range = 9000 65500net.core.rmem_default = 262144net.core.rmem_max = 4194304net.core.wmem_default = 262144net.core.wmem_max = 1048586net.ipv4.tcp_wmem = 262144 262144 262144net.ipv4.tcp_rmem = 4194304 4194304 4194304vm.min_free_kbytes=524288kernel.panic_on_oops = 1vm.nr_hugepages =2048--加载生效sysctl -p
4.9 关闭禁用透明大页配置和NUMA
两个节点都需要执行
在 GRUB_CMDLINE_LINUX 添加 numa=off transparent_hugepage=never
[root@ora19c-rac01 ~]# cat /etc/default/grubGRUB_TIMEOUT=5GRUB_DISTRIBUTOR="$(sed 's, release .*$,,g' /etc/system-release)"GRUB_DEFAULT=savedGRUB_DISABLE_SUBMENU=trueGRUB_TERMINAL_OUTPUT="console"GRUB_CMDLINE_LINUX="crashkernel=auto rd.lvm.lv=rhel/root rd.lvm.lv=rhel/swap numa=off transparent_hugepage=never rhgb quiet"GRUB_DISABLE_RECOVERY="true"-- 先备份之前的配置,然后再重新加载内核文件cp /boot/grub2/grub.cfg /boot/grub2/grub.cfg_$(date +%F)grub2-mkconfig -o /boot/grub2/grub.cfg-- 需要重启主机生效reboot--检查NUMA[root@ora19c-rac01 ~]# grep -i numa /var/log/dmesgNUMA turned off-- 检查透明大页[root@ora19c-rac01 ~]# grep HugePages /proc/meminfoAnonHugePages: 0 kB <<<0表示已禁用transparent hugepages
4.10 /dev/shm 大小设定
/dev/shm大小的设定为内存的一半
两个节点都需要配置
关于/dev/shm大小的设定简单介绍如下:
修改/etc/fstab文件中/dev/shm对应的这一行,在default后加上size=4G,保存退出。
若/etc/fstab无/dev/shm行,增加一行
tmpfs /dev/shm tmpfs defaults,rw,exec,size=4G 0 0
然后在root账号下执行如下命令:
mount -o rw,remount /dev/shm
五、Oracle 需求环境配置
5.1 用户及组、目录创建
两个节点都需要执行
groupadd -g 54421 oinstallgroupadd -g 54422 dbagroupadd -g 54423 opergroupadd -g 54424 backupdbagroupadd -g 54425 dgdbagroupadd -g 54426 kmdbagroupadd -g 54427 asmdbagroupadd -g 54428 asmopergroupadd -g 54429 asmadmingroupadd -g 54430 racdbauseradd -u 54321 -g oinstall -G dba,racdba,asmadmin,asmdba,asmoper -d /home/grid -s /bin/bash -c "grid Infrastructure Owner" gridecho "Ad#0783#DBA6" | passwd --stdin griduseradd -u 54322 -g oinstall -G dba,oper,backupdba,dgdba,kmdba,racdba,asmdba,asmadmin -d /home/oracle -s /bin/bash -c "Oracle Software Owner" oracleecho "Ad#0783#DBA6" | passwd --stdin oraclemkdir -p /oracle/app/gridmkdir -p /oracle/app/19.3.0/gridmkdir -p /oracle/app/dbmkdir -p /oracle/app/19.3.0/db_1chown -R root:oinstall /oraclechown -R grid:oinstall /oracle/app/gridchown -R oracle:oinstall /oracle/app/dbchown -R root:oinstall /oracle/app/19.3.0chown -R grid:oinstall /oracle/app/19.3.0/gridchown -R oracle:oinstall /oracle/app/19.3.0/db_1chmod -R 775 /oracle
5.2 环境变量配置
两个节点都需要执行
每个节点的 ORACLE_SID 不一样需要自行修改。
grid:(+ASM1、+ASM2)Oracle:(dbname1、dbname2)
--grid用户export TMP=/tmpexport TMPDIR=$TMPexport ORACLE_SID=+ASM1export ORACLE_BASE=/oracle/app/gridexport ORACLE_HOME=/oracle/app/19.3.0/gridexport ORACLE_TERM=xtermexport NLS_DATE_FORMAT='yyyy/mm/dd hh24:mi:ss'export TNS_ADMIN=$ORACLE_HOME/network/adminexport PATH=/usr/sbin:$PATHexport PATH=$ORACLE_HOME/bin:$PATHexport LD_LIBRARY_PATH=$ORACLE_HOME/lib:/lib:/usr/libexport CLASSPATH=$ORACLE_HOME/JRE:$ORACLE_HOME/jlib:$ORACLE_HOME/rdbms/jlibexport EDITOR=viexport LANG=en_USexport NLS_LANG=american_america.AL32UTF8umask 022--Oracle用户export TMP=/tmpexport TMPDIR=$TMPexport ORACLE_SID=export ORACLE_BASE=/oracle/app/dbexport ORACLE_HOME=/oracle/app/19.3.0/db_1export ORACLE_UNQNAME=export TNS_ADMIN=$ORACLE_HOME/network/adminexport ORACLE_TERM=xtermexport PATH=/usr/sbin:$PATHexport PATH=$ORACLE_HOME/bin:$PATHexport LD_LIBRARY_PATH=$ORACLE_HOME/lib:/lib:/usr/libexport CLASSPATH=$ORACLE_HOME/JRE:$ORACLE_HOME/jlib:$ORACLE_HOME/rdbms/jlibexport EDITOR=viexport LANG=en_USexport NLS_LANG=american_america.AL32UTF8export NLS_DATE_FORMAT='yyyy/mm/dd hh24:mi:ss'umask 022
5.3 用户登录shell限制配置(root用户下)
两个节点都需要执行
echo 'if [ $USER = "oracle" ]||[ $USER = "grid" ]; then' >> /etc/profileecho 'if [ $SHELL = "/bin/ksh" ]; then' >> /etc/profileecho 'ulimit -p 16384' >> /etc/profileecho 'ulimit -n 65536' >> /etc/profileecho 'else' >> /etc/profileecho 'ulimit -u 16384 -n 65536' >> /etc/profileecho 'fi' >> /etc/profileecho 'fi' >> /etc/profile
5.4 本地盘(不为共享磁盘),本地盘划分后挂载 /oracle
两个节点都需要执行
]# fdisk /dev/mapper/mpatha磁盘更新partprobe /dev/mapper/mpathaLVM操作创建PVpvcreate /dev/mapper/mpatha1创建VGvgcreate vg_ora /dev/mapper/mpatha1创建LVlvcreate -l +100%free -n lv_ora vg_ora格式化文件系统mkfs.xfs /dev/mapper/vg_ora-lv_ora挂载文件系统mount /dev/mapper/vg_ora-lv_ora /oracle设置开机自动启动vi /etc/fstab/dev/mapper/vg_ora-lv_ora /oracle xfs defaults 0 0
5.4 udev方式配置asm磁盘
两个节点都需要执行
-- 查看uuid[root@ora19c-rac01 ~]# /usr/lib/udev/scsi_id -g -u -d /dev/sdc36000c29abee91b0f18a5032f6808d007[root@ora19c-rac01 ~]# /usr/lib/udev/scsi_id -g -u -d /dev/sdd36000c29066009d6eefabc7c18f5d489c[root@ora19c-rac01 ~]# /usr/lib/udev/scsi_id -g -u -d /dev/sde36000c29223d26b4fc93a5a37543f0c64
5.4.1 修改udev
--节点1[root@ora19c-rac01 ~]# cat /etc/udev/rules.d/99-oracle-asmdevices.rulesKERNEL=="sd*", SUBSYSTEM=="block", PROGRAM=="/usr/lib/udev/scsi_id --whitelisted --replace-whitespace --device=/dev/$name", RESULT=="36000c29abee91b0f18a5032f6808d007", SYMLINK+="asm-ocrdg01", OWNER="grid", GROUP="asmadmin", MODE="0660"KERNEL=="sd*", SUBSYSTEM=="block", PROGRAM=="/usr/lib/udev/scsi_id --whitelisted --replace-whitespace --device=/dev/$name", RESULT=="36000c29066009d6eefabc7c18f5d489c", SYMLINK+="asm-archdg01", OWNER="grid", GROUP="asmadmin", MODE="0660"KERNEL=="sd*", SUBSYSTEM=="block", PROGRAM=="/usr/lib/udev/scsi_id --whitelisted --replace-whitespace --device=/dev/$name", RESULT=="36000c29223d26b4fc93a5a37543f0c64", SYMLINK+="asm-datadg01", OWNER="grid", GROUP="asmadmin", MODE="0660"--节点2[root@ora19c-rac02 ~]# cat /etc/udev/rules.d/99-oracle-asmdevices.rulesKERNEL=="sd*", SUBSYSTEM=="block", PROGRAM=="/usr/lib/udev/scsi_id --whitelisted --replace-whitespace --device=/dev/$name", RESULT=="36000c29abee91b0f18a5032f6808d007", SYMLINK+="asm-ocrdg01", OWNER="grid", GROUP="asmadmin", MODE="0660"KERNEL=="sd*", SUBSYSTEM=="block", PROGRAM=="/usr/lib/udev/scsi_id --whitelisted --replace-whitespace --device=/dev/$name", RESULT=="36000c29066009d6eefabc7c18f5d489c", SYMLINK+="asm-archdg01", OWNER="grid", GROUP="asmadmin", MODE="0660"KERNEL=="sd*", SUBSYSTEM=="block", PROGRAM=="/usr/lib/udev/scsi_id --whitelisted --replace-whitespace --device=/dev/$name", RESULT=="36000c29223d26b4fc93a5a37543f0c64", SYMLINK+="asm-datadg01", OWNER="grid", GROUP="asmadmin", MODE="0660"
[root@ora19c-rac01 ~]# udevadm control --reload-rules[root@ora19c-rac01 ~]# udevadm trigger --type=devices --action=change[root@ora19c-rac01 ~]# ll /dev/asm*lrwxrwxrwx 1 root root 3 3月 23 21:15 /dev/asm-archdg01 -> sddlrwxrwxrwx 1 root root 3 3月 23 21:15 /dev/asm-datadg01 -> sdelrwxrwxrwx 1 root root 3 3月 23 21:15 /dev/asm-ocrdg01 -> sdc[root@ora19c-rac02 ~]# udevadm control --reload-rules[root@ora19c-rac02 ~]# udevadm trigger --type=devices --action=change[root@ora19c-rac02 ~]# ll /dev/asm*lrwxrwxrwx 1 root root 3 3月 23 21:15 /dev/asm-archdg01 -> sddlrwxrwxrwx 1 root root 3 3月 23 21:15 /dev/asm-datadg01 -> sdelrwxrwxrwx 1 root root 3 3月 23 21:15 /dev/asm-ocrdg01 -> sdc
5.5 安装依赖(节点都执行)
yum install -y bc \gcc-c++ \binutils \compat-libcap1 \compat-libstdc++-33 \elfutils-libelf \elfutils-libelf-devel \fontconfig-devel \glibc \glibc-devel \libaio \libaio-devel \libX11 \libXau \libXi \libXtst \libXrender \libXrender-devel \libgcc \libstdc++ \libstdc++-devel \libxcb \make \net-tools \nfs-utils \smartmontools \sysstat \expect \psmisc \unzip \rsync
还有两个rpm依赖包,有需要点击下方获取👇
Oracle 19c compat-libstdc、pdksh 依赖包
rpm -ivh compat-libstdc++-33-3.2.3-47.3.x86_64.rpmrpm -ivh pdksh-5.2.14-37.el5.x86_64.rpm
5.6 上传19c软件包
有需要软件包点击下方获取👇
Oracle 19c grid、oracle 基础包(19.3.0)
六、安装Grid软件(节点1执行)
mkdir -p /oracle/softchown -R root:oinstall /oracle/softsu - gridcd /oracle/softunzip grid_home_193_V982068-01.zip -d $ORACLE_HOME-- 解压完后安装cvuqdisk-1.0.10-1.rpm[root@ora19c-rac01 soft]# cd /oracle/app/19.3.0/grid/cv/rpm[root@ora19c-rac01 rpm]# lscvuqdisk-1.0.10-1.rpm[root@ora19c-rac01 rpm]# rpm -ivh cvuqdisk-1.0.10-1.rpm准备中... ################################# [100%]Using default group oinstall to install package正在升级/安装...1:cvuqdisk-1.0.10-1 ################################# [100%][root@ora19c-rac01 rpm]# scp cvuqdisk-1.0.10-1.rpm root@192.168.61.135:/oracle/soft/cvuqdisk-1.0.10-1.rpm--节点2[root@ora19c-rac02 soft]# rpm -ivh cvuqdisk-1.0.10-1.rpm准备中... ################################# [100%]Using default group oinstall to install package正在升级/安装...1:cvuqdisk-1.0.10-1 ################################# [100%]
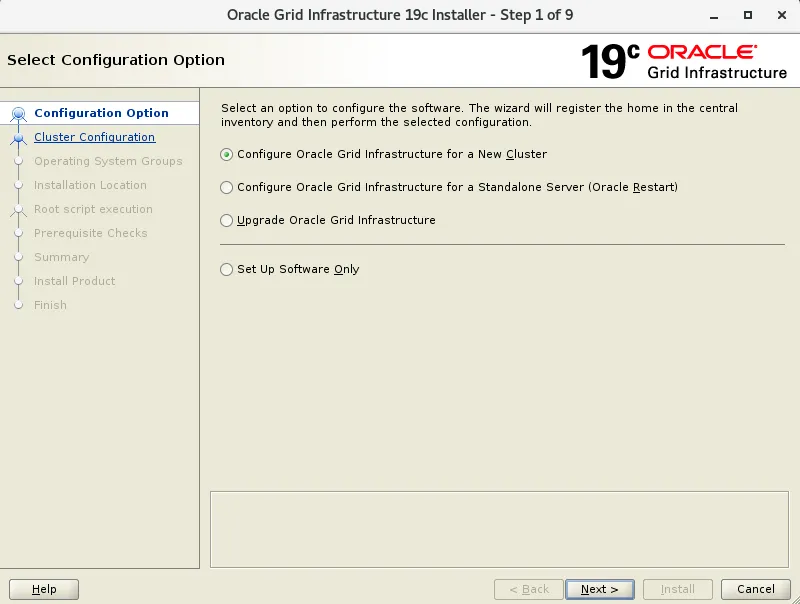
服务端安装图形界面 yum group install "Server with GUI"systemctl get-defaultsystemctl set-default graphical.targetsystemctl isolate graphical.targetsystemctl get-default注意事项:在yum group install "Server with GUI"时,会自动安装NetworkManager服务及firewalld服务,需要将这两个服务禁用systemctl stop firewalldsystemctl disable firewalldsystemctl status firewalldsystemctl stop NetworkManagersystemctl disable NetworkManagersystemctl status NetworkManager--调起图形化root# xhost +root# echo $DISPLAY:0su- girdgird$ export DISPLAY=:0cd /oracle/app/19.3.0/grid./gridSetup.sh -jreLoc /etc/alternatives/jre_1.8.0
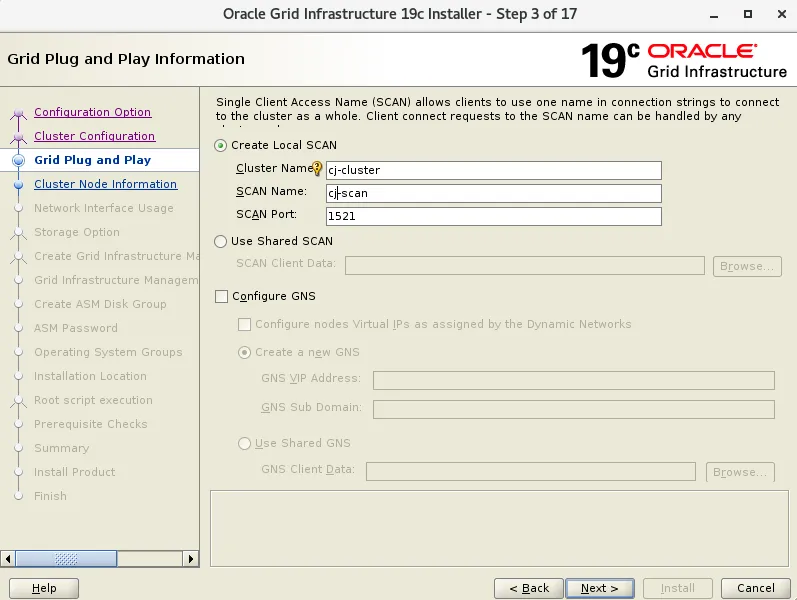
scan 名称与需要与 hosts 文件配置的scan名称保持一致
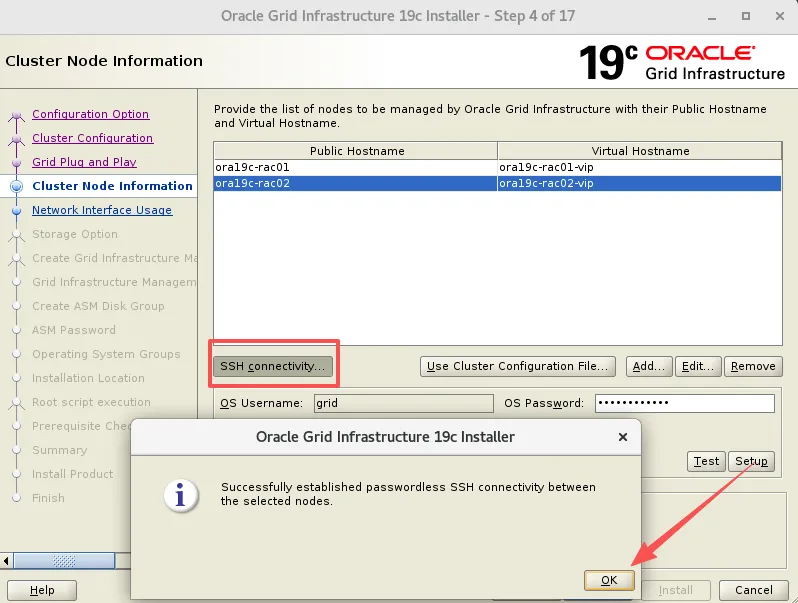
添加节点二信息,进行互信 输入 grid 用户密码,创建用户时两节点必须保持一致。
setup是配置互信,test是测试互信

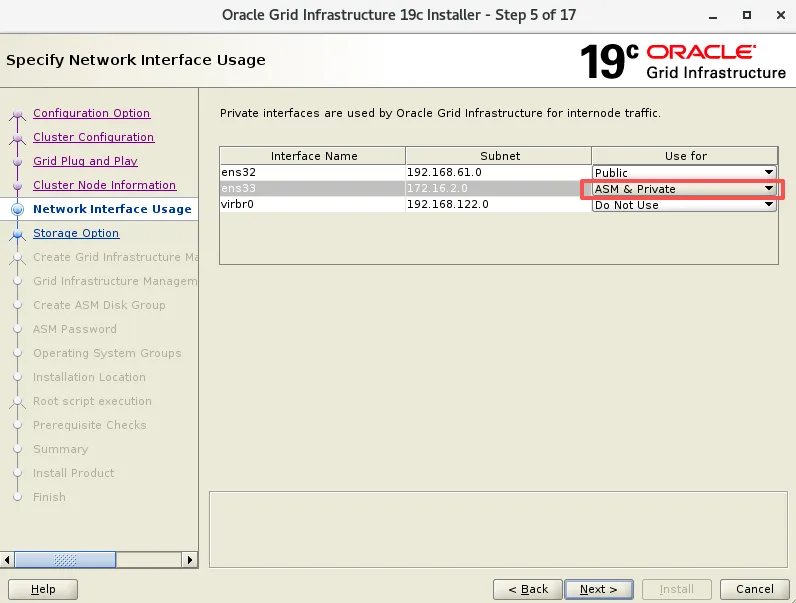
确认网卡和IP网段,19C 心跳网段需要选 ASM & Private,用于 ASM 实例的托管
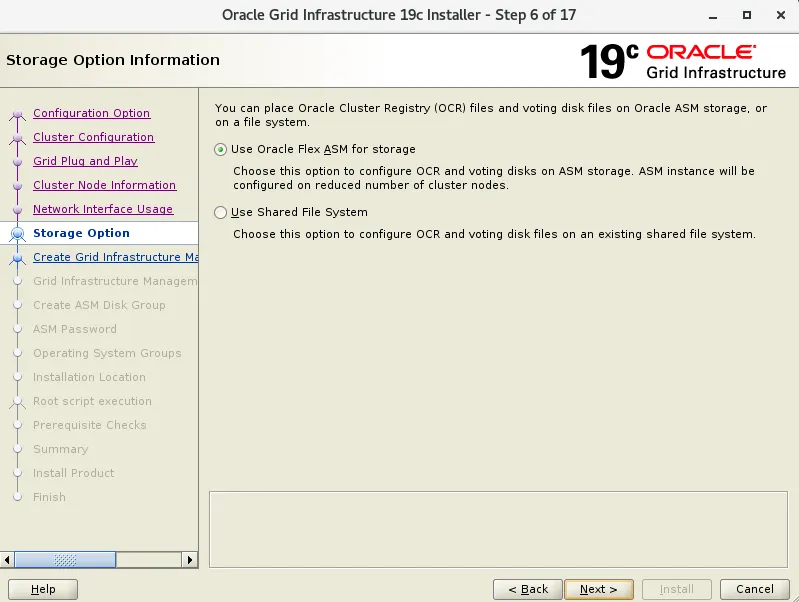
选择存储类型,19C 只有两个选项,ASM 只能选 Flex
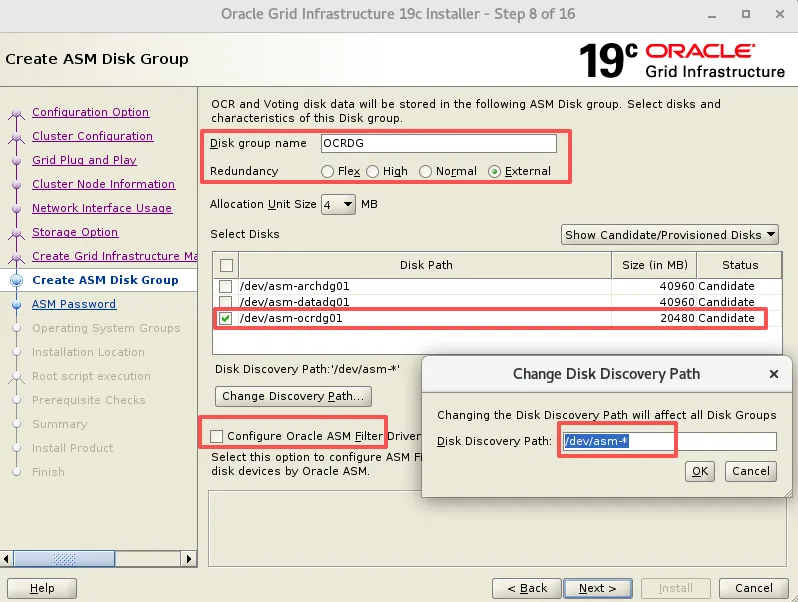
配置 OCR 磁盘组
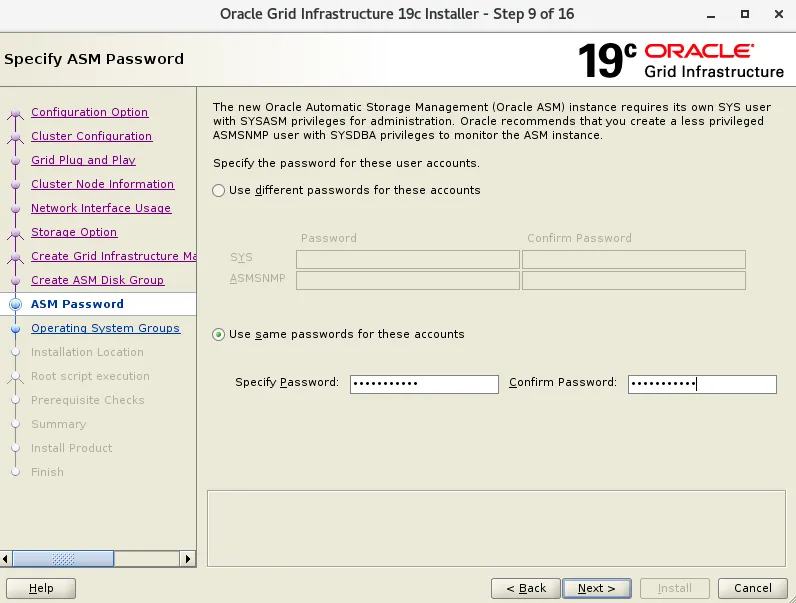
ASM 管理密码:Oracle_2026
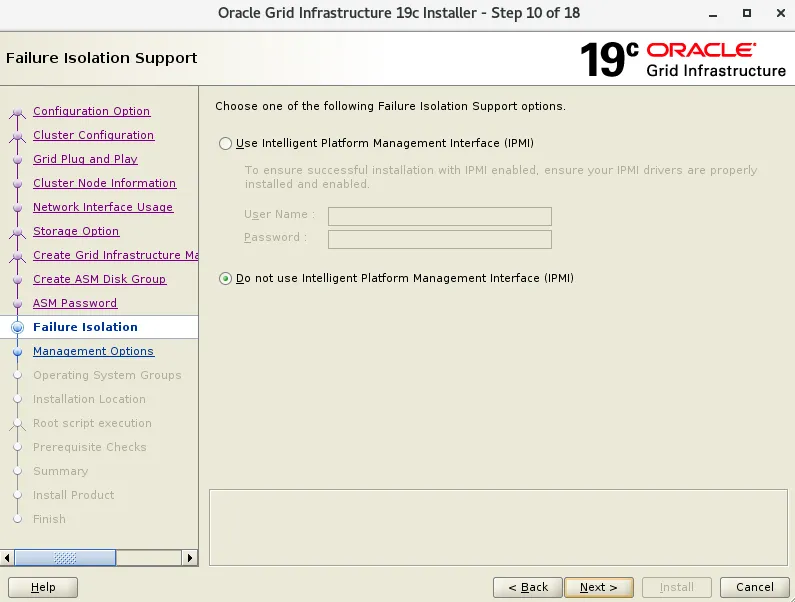
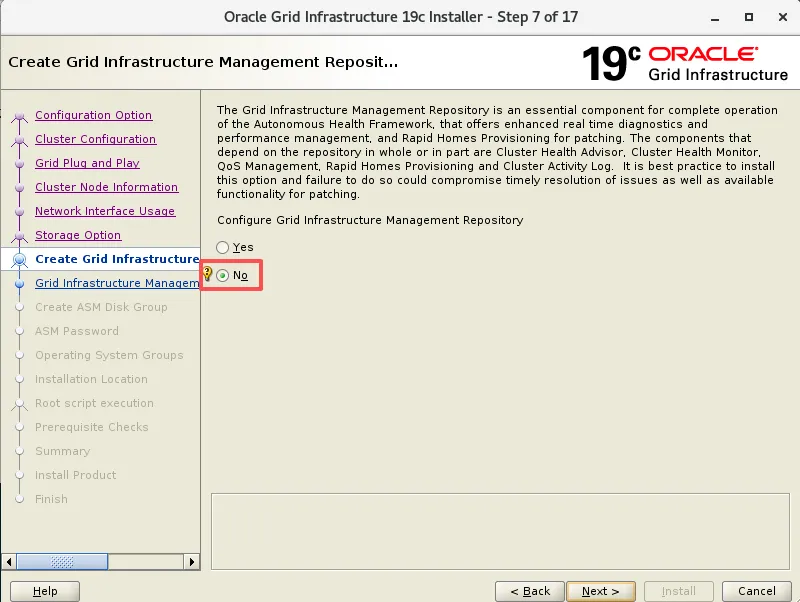
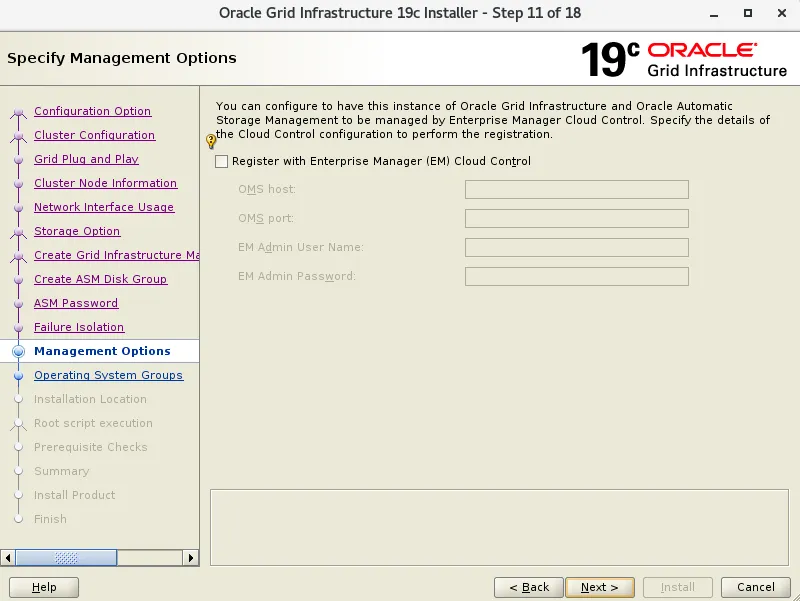
跳过EM管理注册
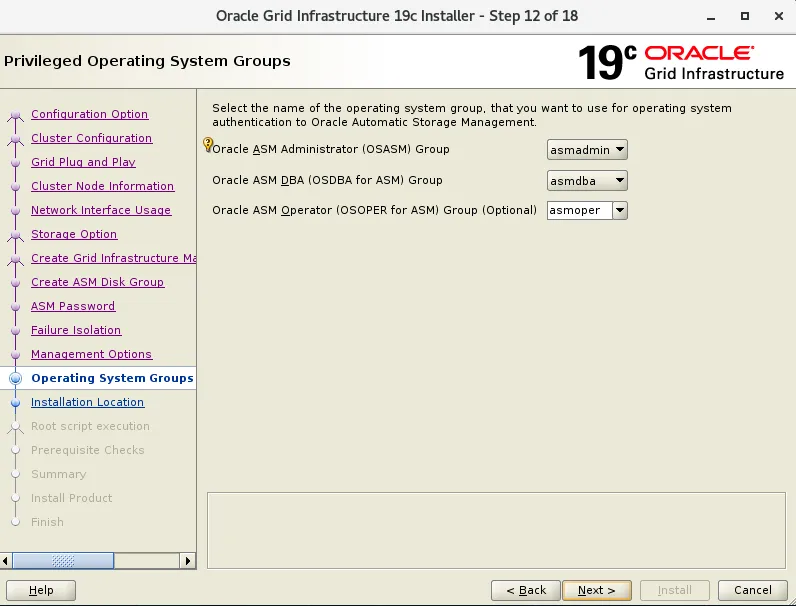
ASM 管理组的选择,默认即可
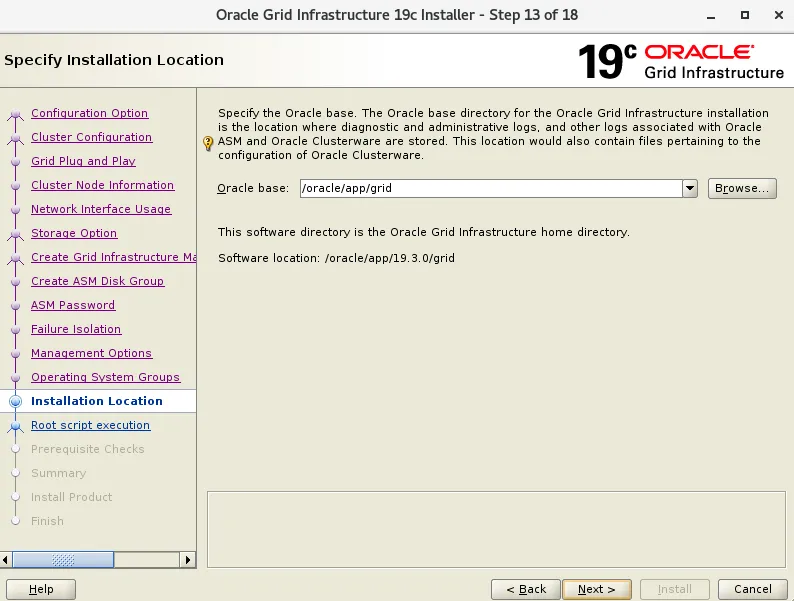
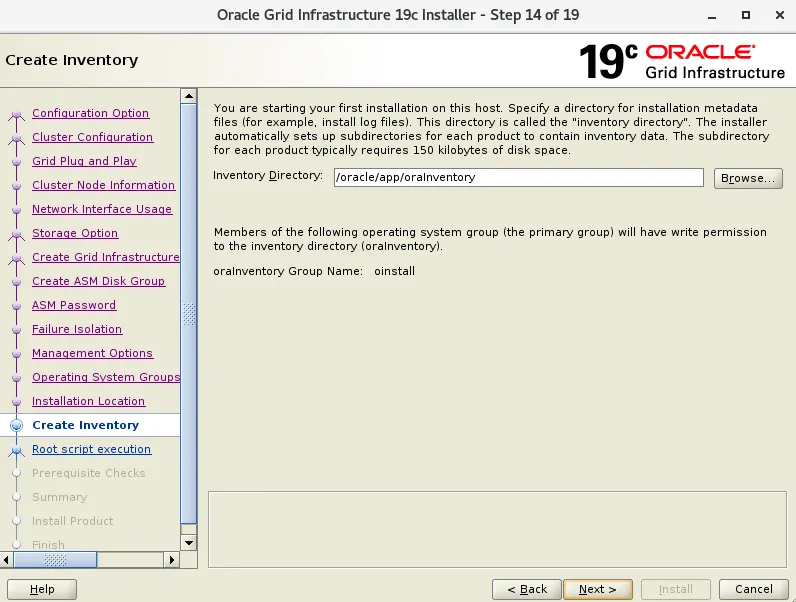
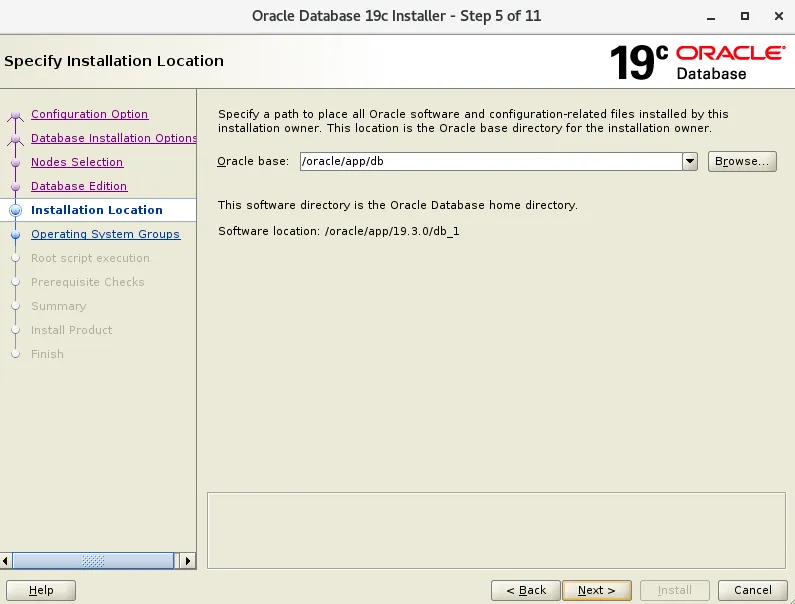
安装路径
不自动运行脚本

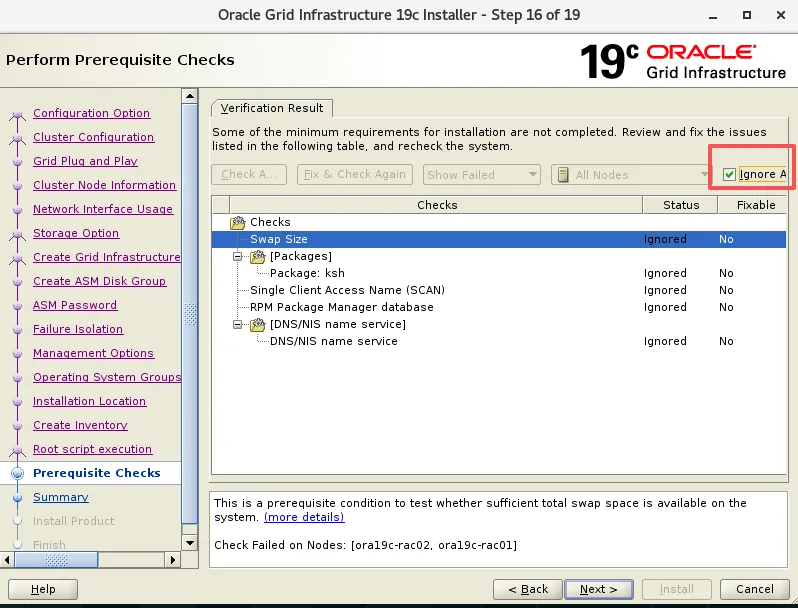
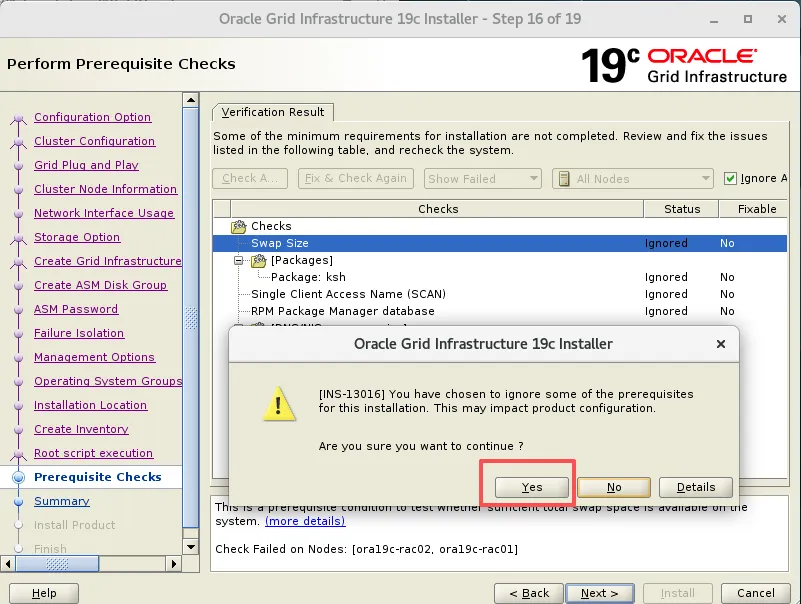
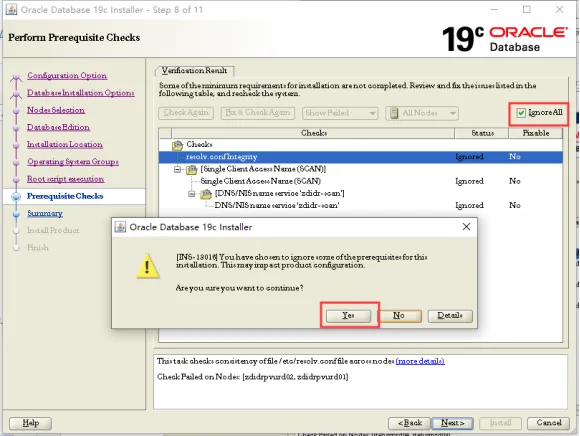
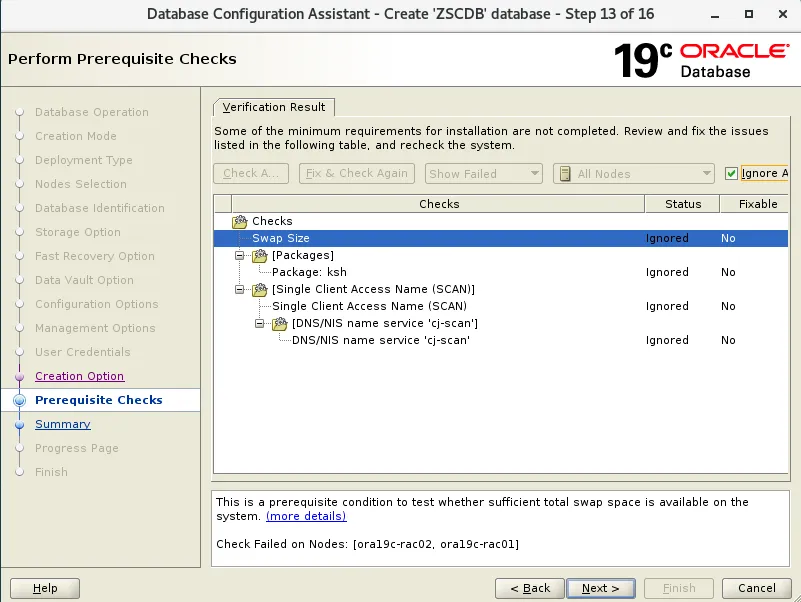
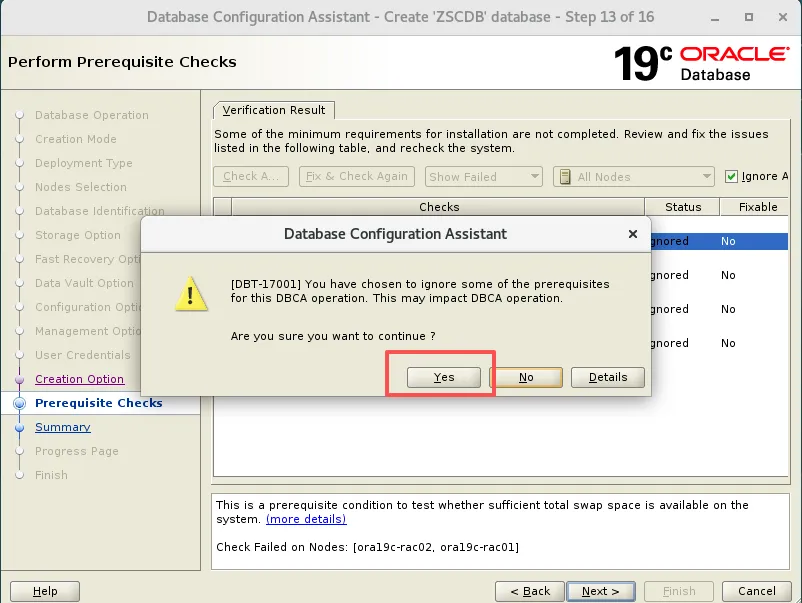
ksh已经安装,但是这里还是报错,直接先忽略即可
RPM Package Manager database,有些CVU检查需要root权限才能从系统检索所需信息,可忽略
MOS:Cluvfy Fail with PRVG-11250 The Check "RPM Package Manager Database"
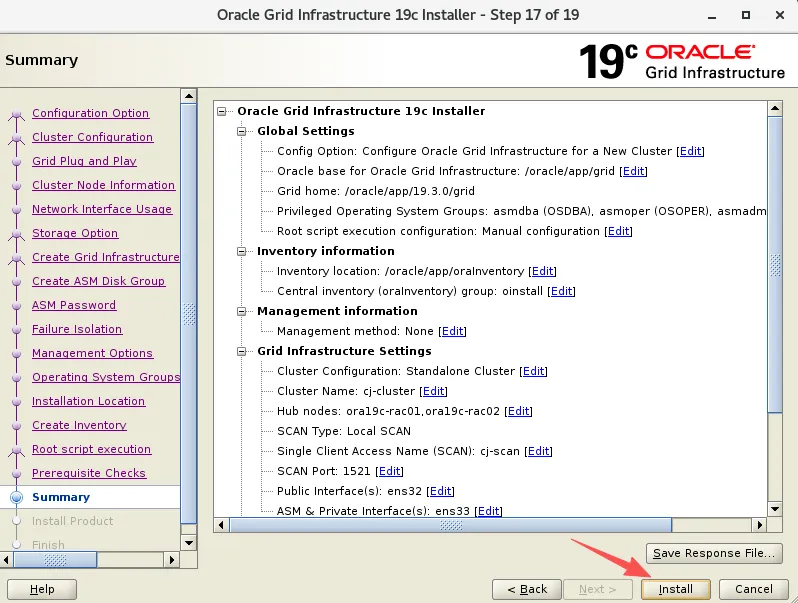
脚本输出信息
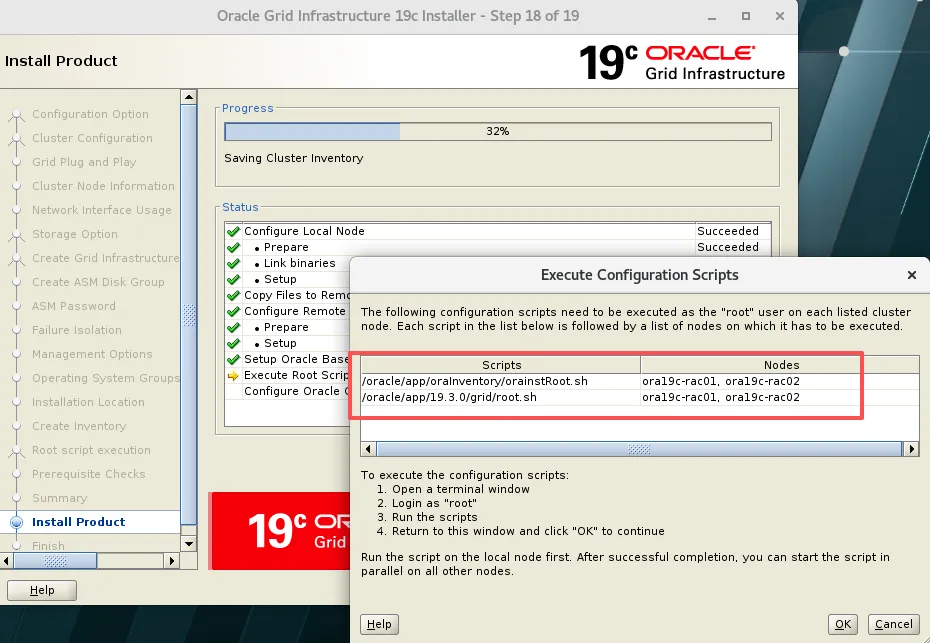
--节点1[root@ora19c-rac01 soft]# /oracle/app/oraInventory/orainstRoot.shChanging permissions of /oracle/app/oraInventory.Adding read,write permissions for group.Removing read,write,execute permissions for world.Changing groupname of /oracle/app/oraInventory to oinstall.The execution of the script is complete.--节点2[root@ora19c-rac02 ~]# /oracle/app/oraInventory/orainstRoot.shChanging permissions of /oracle/app/oraInventory.Adding read,write permissions for group.Removing read,write,execute permissions for world.Changing groupname of /oracle/app/oraInventory to oinstall.The execution of the script is complete.
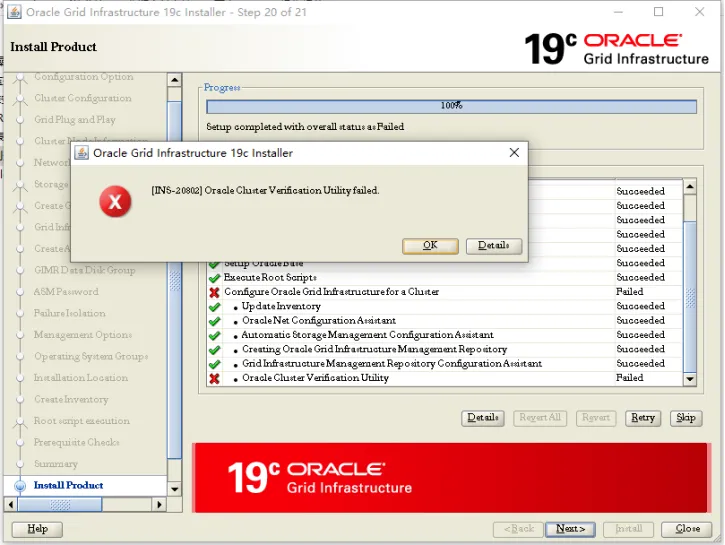
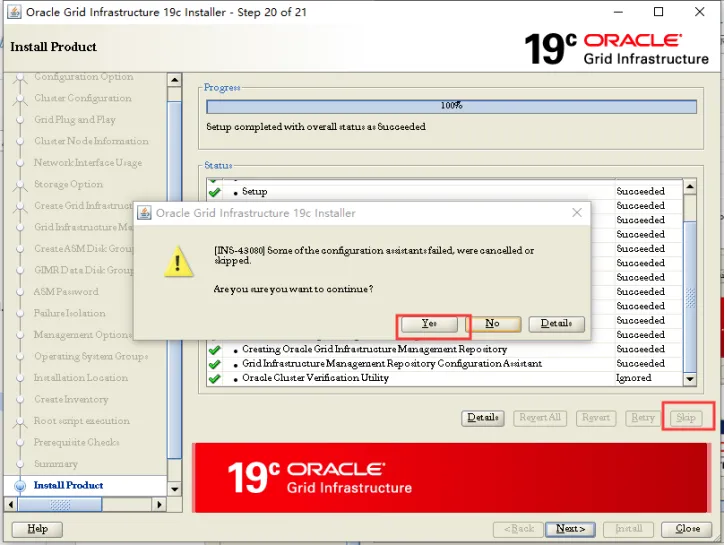
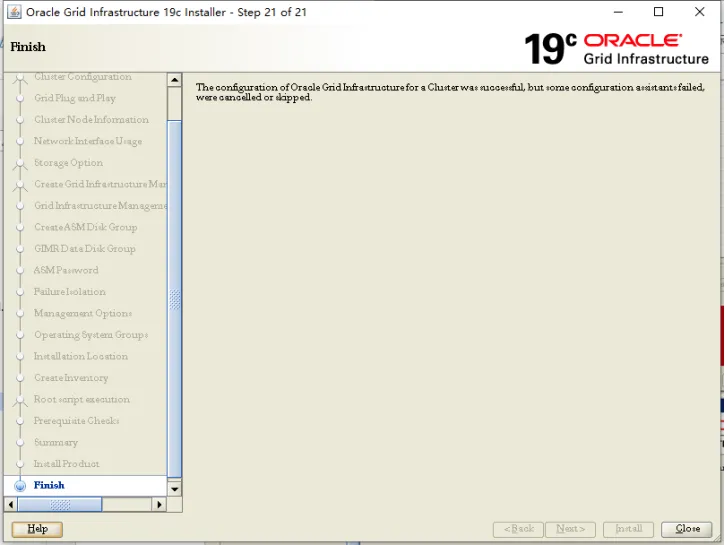
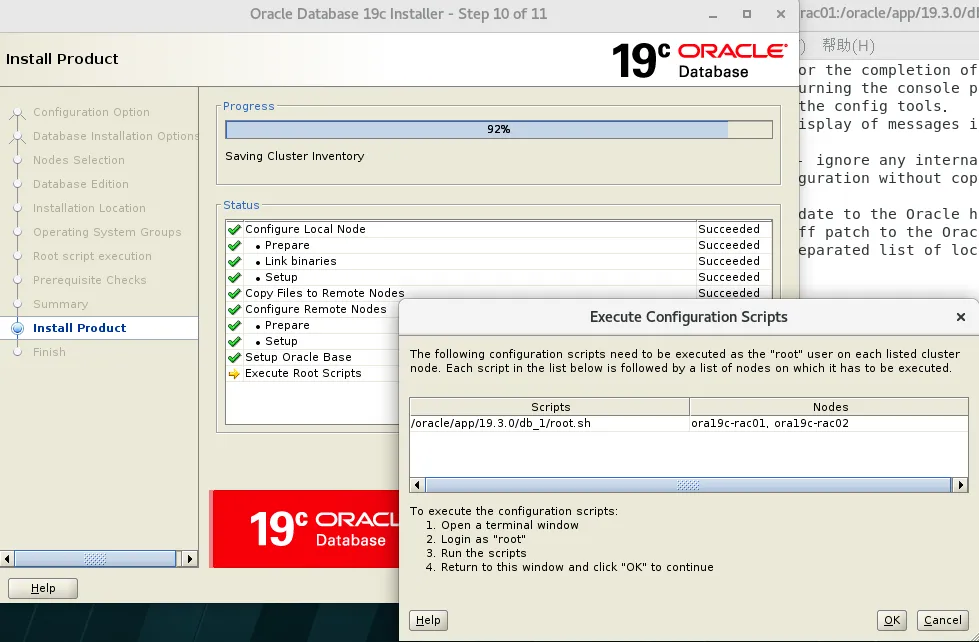
--节点1[root@ora19c-rac01 soft]# /oracle/app/19.3.0/grid/root.shPerforming root user operation.The following environment variables are set as:ORACLE_OWNER= gridORACLE_HOME= /oracle/app/19.3.0/gridEnter the full pathname of the local bin directory: [/usr/local/bin]:Copying dbhome to /usr/local/bin ...Copying oraenv to /usr/local/bin ...Copying coraenv to /usr/local/bin ...Creating /etc/oratab file...Entries will be added to the /etc/oratab file as needed byDatabase Configuration Assistant when a database is createdFinished running generic part of root script.Now product-specific root actions will be performed.Relinking oracle with rac_on optionUsing configuration parameter file: /oracle/app/19.3.0/grid/crs/install/crsconfig_paramsThe log of current session can be found at:/oracle/app/grid/crsdata/ora19c-rac01/crsconfig/rootcrs_ora19c-rac01_2026-03-23_11-46-10PM.log2026/03/23 23:46:15 CLSRSC-594: Executing installation step 1 of 19: 'SetupTFA'.2026/03/23 23:46:15 CLSRSC-594: Executing installation step 2 of 19: 'ValidateEnv'.2026/03/23 23:46:15 CLSRSC-363: User ignored prerequisites during installation2026/03/23 23:46:15 CLSRSC-594: Executing installation step 3 of 19: 'CheckFirstNode'.2026/03/23 23:46:17 CLSRSC-594: Executing installation step 4 of 19: 'GenSiteGUIDs'.2026/03/23 23:46:17 CLSRSC-594: Executing installation step 5 of 19: 'SetupOSD'.2026/03/23 23:46:17 CLSRSC-594: Executing installation step 6 of 19: 'CheckCRSConfig'.2026/03/23 23:46:18 CLSRSC-594: Executing installation step 7 of 19: 'SetupLocalGPNP'.2026/03/23 23:46:28 CLSRSC-594: Executing installation step 8 of 19: 'CreateRootCert'.2026/03/23 23:46:31 CLSRSC-594: Executing installation step 9 of 19: 'ConfigOLR'.2026/03/23 23:46:37 CLSRSC-594: Executing installation step 10 of 19: 'ConfigCHMOS'.2026/03/23 23:46:37 CLSRSC-594: Executing installation step 11 of 19: 'CreateOHASD'.2026/03/23 23:46:38 CLSRSC-4002: Successfully installed Oracle Trace File Analyzer (TFA) Collector.2026/03/23 23:46:41 CLSRSC-594: Executing installation step 12 of 19: 'ConfigOHASD'.2026/03/23 23:46:41 CLSRSC-330: Adding Clusterware entries to file 'oracle-ohasd.service'2026/03/23 23:47:12 CLSRSC-594: Executing installation step 13 of 19: 'InstallAFD'.2026/03/23 23:47:16 CLSRSC-594: Executing installation step 14 of 19: 'InstallACFS'.2026/03/23 23:47:48 CLSRSC-594: Executing installation step 15 of 19: 'InstallKA'.2026/03/23 23:47:51 CLSRSC-594: Executing installation step 16 of 19: 'InitConfig'.已成功创建并启动 ASM。[DBT-30001] 已成功创建磁盘组。有关详细信息, 请查看 /oracle/app/grid/cfgtoollogs/asmca/asmca-260323下午114820.log。2026/03/23 23:49:27 CLSRSC-482: Running command: '/oracle/app/19.3.0/grid/bin/ocrconfig -upgrade grid oinstall'CRS-4256: Updating the profileSuccessful addition of voting disk 577bc2cb37f04fc6bfd56173a448563b.Successfully replaced voting disk group with +OCRDG.CRS-4256: Updating the profileCRS-4266: Voting file(s) successfully replaced## STATE File Universal Id File Name Disk group-- ----- ----------------- --------- ---------1. ONLINE 577bc2cb37f04fc6bfd56173a448563b (/dev/asm-ocrdg01) [OCRDG]Located 1 voting disk(s).2026/03/23 23:50:31 CLSRSC-594: Executing installation step 17 of 19: 'StartCluster'.2026/03/23 23:51:31 CLSRSC-343: Successfully started Oracle Clusterware stack2026/03/23 23:51:31 CLSRSC-594: Executing installation step 18 of 19: 'ConfigNode'.2026/03/24 00:21:07 CLSRSC-594: Executing installation step 19 of 19: 'PostConfig'.2026/03/24 00:21:25 CLSRSC-325: Configure Oracle Grid Infrastructure for a Cluster ... succeeded--节点2[root@ora19c-rac02 ~]# /oracle/app/19.3.0/grid/root.shPerforming root user operation.The following environment variables are set as:ORACLE_OWNER= gridORACLE_HOME= /oracle/app/19.3.0/gridEnter the full pathname of the local bin directory: [/usr/local/bin]:Copying dbhome to /usr/local/bin ...Copying oraenv to /usr/local/bin ...Copying coraenv to /usr/local/bin ...Creating /etc/oratab file...Entries will be added to the /etc/oratab file as needed byDatabase Configuration Assistant when a database is createdFinished running generic part of root script.Now product-specific root actions will be performed.Relinking oracle with rac_on optionUsing configuration parameter file: /oracle/app/19.3.0/grid/crs/install/crsconfig_paramsThe log of current session can be found at:/oracle/app/grid/crsdata/ora19c-rac02/crsconfig/rootcrs_ora19c-rac02_2026-03-24_00-24-14AM.log2026/03/24 00:24:17 CLSRSC-594: Executing installation step 1 of 19: 'SetupTFA'.2026/03/24 00:24:17 CLSRSC-594: Executing installation step 2 of 19: 'ValidateEnv'.2026/03/24 00:24:17 CLSRSC-363: User ignored prerequisites during installation2026/03/24 00:24:17 CLSRSC-594: Executing installation step 3 of 19: 'CheckFirstNode'.2026/03/24 00:24:18 CLSRSC-594: Executing installation step 4 of 19: 'GenSiteGUIDs'.2026/03/24 00:24:18 CLSRSC-594: Executing installation step 5 of 19: 'SetupOSD'.2026/03/24 00:24:18 CLSRSC-594: Executing installation step 6 of 19: 'CheckCRSConfig'.2026/03/24 00:24:18 CLSRSC-594: Executing installation step 7 of 19: 'SetupLocalGPNP'.2026/03/24 00:24:19 CLSRSC-594: Executing installation step 8 of 19: 'CreateRootCert'.2026/03/24 00:24:19 CLSRSC-594: Executing installation step 9 of 19: 'ConfigOLR'.2026/03/24 00:24:26 CLSRSC-594: Executing installation step 10 of 19: 'ConfigCHMOS'.2026/03/24 00:24:27 CLSRSC-594: Executing installation step 11 of 19: 'CreateOHASD'.2026/03/24 00:24:27 CLSRSC-594: Executing installation step 12 of 19: 'ConfigOHASD'.2026/03/24 00:24:28 CLSRSC-330: Adding Clusterware entries to file 'oracle-ohasd.service'2026/03/24 00:24:40 CLSRSC-4002: Successfully installed Oracle Trace File Analyzer (TFA) Collector.2026/03/24 00:24:58 CLSRSC-594: Executing installation step 13 of 19: 'InstallAFD'.2026/03/24 00:24:59 CLSRSC-594: Executing installation step 14 of 19: 'InstallACFS'.2026/03/24 00:25:28 CLSRSC-594: Executing installation step 15 of 19: 'InstallKA'.2026/03/24 00:25:29 CLSRSC-594: Executing installation step 16 of 19: 'InitConfig'.2026/03/24 00:25:36 CLSRSC-594: Executing installation step 17 of 19: 'StartCluster'.2026/03/24 00:26:18 CLSRSC-343: Successfully started Oracle Clusterware stack2026/03/24 00:26:18 CLSRSC-594: Executing installation step 18 of 19: 'ConfigNode'.2026/03/24 00:26:28 CLSRSC-594: Executing installation step 19 of 19: 'PostConfig'.2026/03/24 00:26:34 CLSRSC-325: Configure Oracle Grid Infrastructure for a Cluster ... succeeded
查看集群状态
[root@ora19c-rac01 soft]# /oracle/app/19.3.0/grid/bin/crsctl stat res -t--------------------------------------------------------------------------------Name Target State Server State details--------------------------------------------------------------------------------Local Resources--------------------------------------------------------------------------------ora.LISTENER.lsnrONLINE ONLINE ora19c-rac01 STABLEONLINE ONLINE ora19c-rac02 STABLEora.chadONLINE ONLINE ora19c-rac01 STABLEONLINE ONLINE ora19c-rac02 STABLEora.net1.networkONLINE ONLINE ora19c-rac01 STABLEONLINE ONLINE ora19c-rac02 STABLEora.onsONLINE ONLINE ora19c-rac01 STABLEONLINE ONLINE ora19c-rac02 STABLEora.proxy_advmOFFLINE OFFLINE ora19c-rac01 STABLEOFFLINE OFFLINE ora19c-rac02 STABLE--------------------------------------------------------------------------------Cluster Resources--------------------------------------------------------------------------------ora.ASMNET1LSNR_ASM.lsnr(ora.asmgroup)1 ONLINE ONLINE ora19c-rac01 STABLE2 ONLINE ONLINE ora19c-rac02 STABLE3 OFFLINE OFFLINE STABLEora.LISTENER_SCAN1.lsnr1 ONLINE ONLINE ora19c-rac01 STABLEora.OCRDG.dg(ora.asmgroup)1 ONLINE ONLINE ora19c-rac01 STABLE2 ONLINE ONLINE ora19c-rac02 STABLE3 OFFLINE OFFLINE STABLEora.asm(ora.asmgroup)1 ONLINE ONLINE ora19c-rac01 Started,STABLE2 ONLINE ONLINE ora19c-rac02 Started,STABLE3 OFFLINE OFFLINE STABLEora.asmnet1.asmnetwork(ora.asmgroup)1 ONLINE ONLINE ora19c-rac01 STABLE2 ONLINE ONLINE ora19c-rac02 STABLE3 OFFLINE OFFLINE STABLEora.cvu1 ONLINE ONLINE ora19c-rac01 STABLEora.ora19c-rac01.vip1 ONLINE ONLINE ora19c-rac01 STABLEora.ora19c-rac02.vip1 ONLINE ONLINE ora19c-rac02 STABLEora.qosmserver1 ONLINE ONLINE ora19c-rac01 STABLEora.scan1.vip1 ONLINE ONLINE ora19c-rac01 STABLE--------------------------------------------------------------------------------
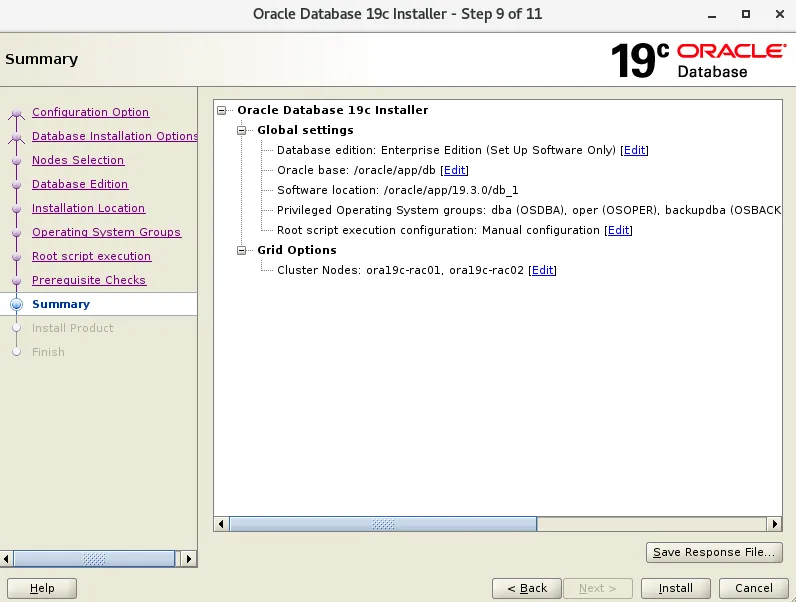
Grid软件到此就安装完成了。
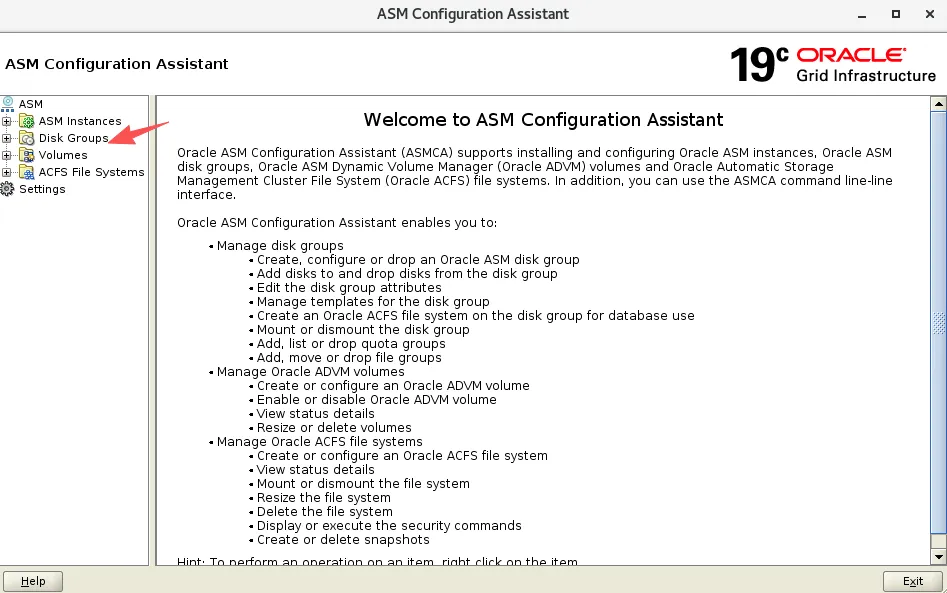
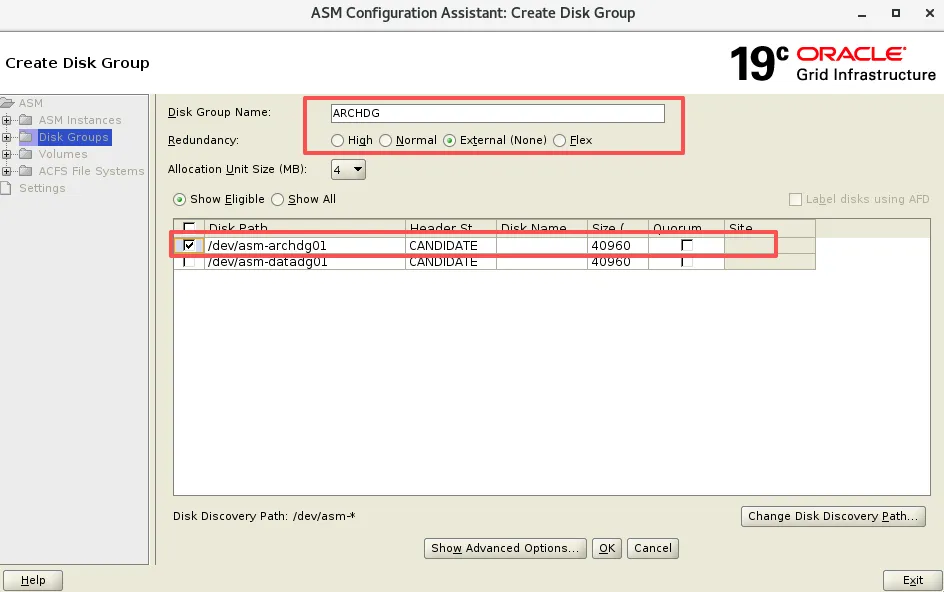
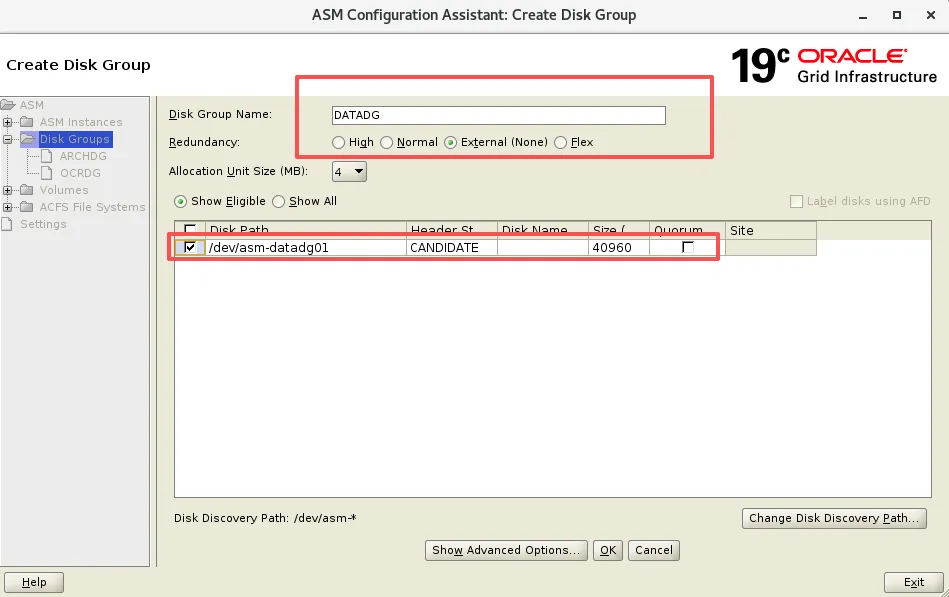
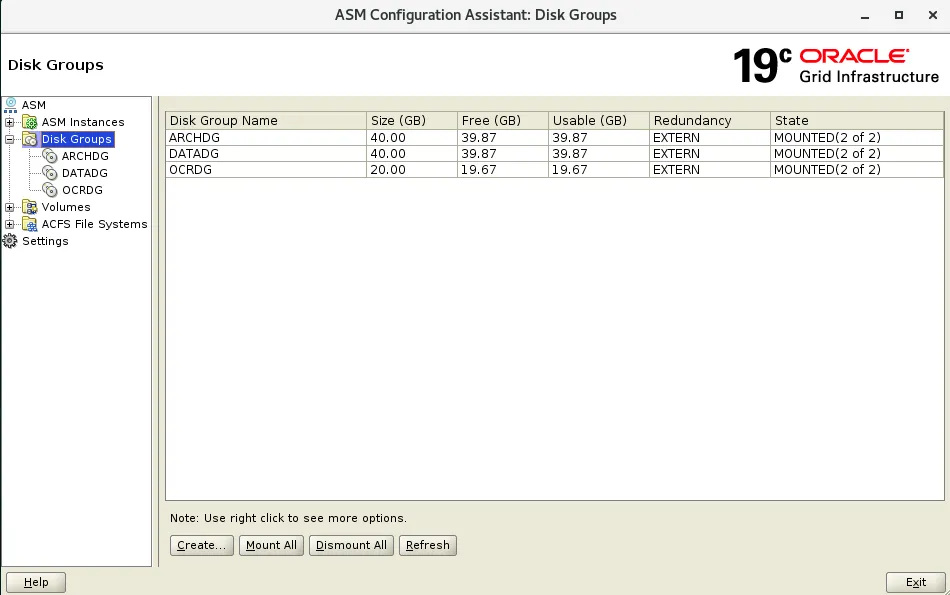
6.4 ASM 存储配置
创建 ARCHDG、DATADG 磁盘组。使用图形化方式添加。
su - gridasmca

七、安装 Oracle 软件 (节点1执行)
7.1 解压 Oracle 安装包
su - oraclecd /oracle/soft/unzip db_home_193_V982063-01.zip -d $ORACLE_HOME
7.2 安装过程
--调起图形化root# xhost +root# echo $DISPLAY:0su- oracleoracle$ export DISPLAY=:0cd $ORACLE_HOME./runInstaller -jreLoc /etc/alternatives/jre_1.8.0
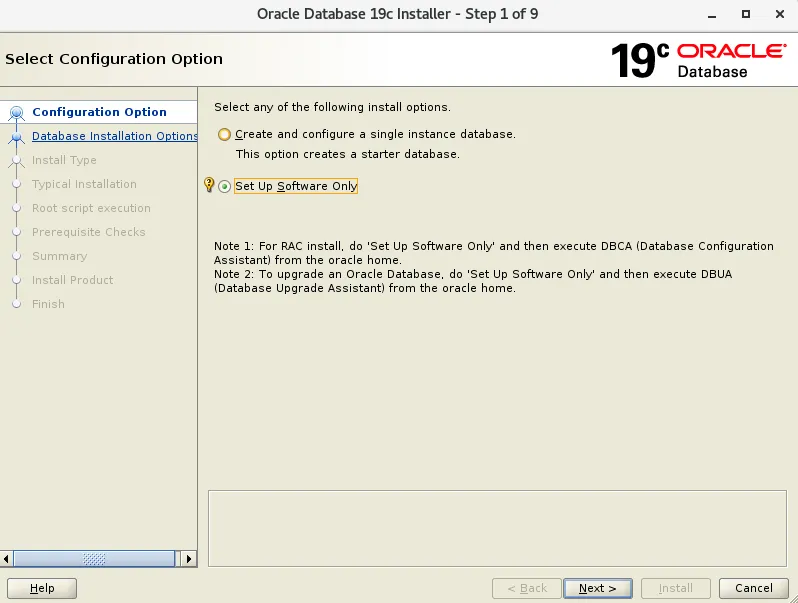
选择仅安装软件,数据库后续单独创建
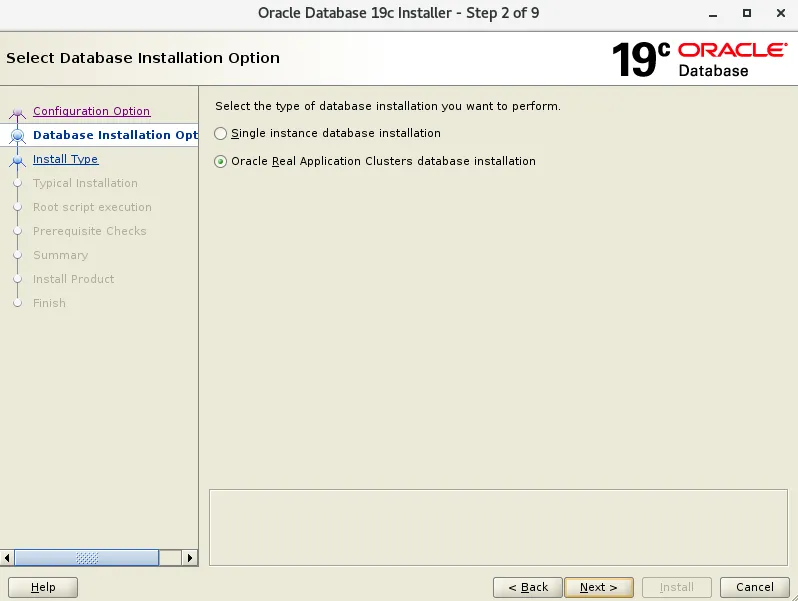
选择 RAC 集群安装
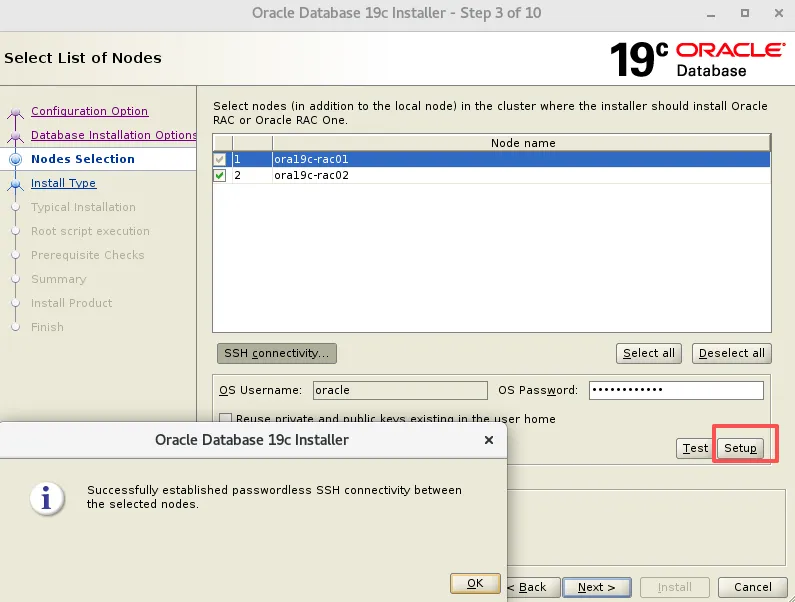
添加节点二信息,进行互信 输入 oracle 用户密码,创建用户时两节点必须保持一致。
setup是配置互信,test是测试互信
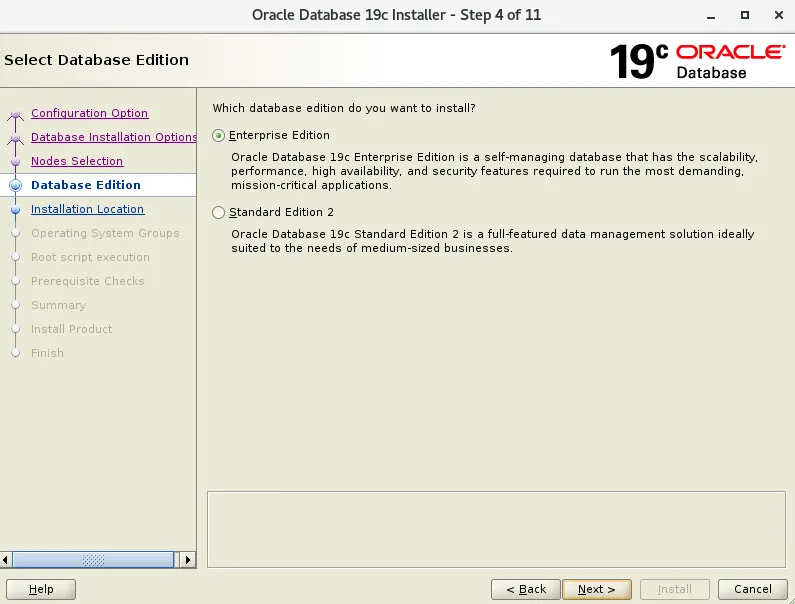
选择企业版
安装目录
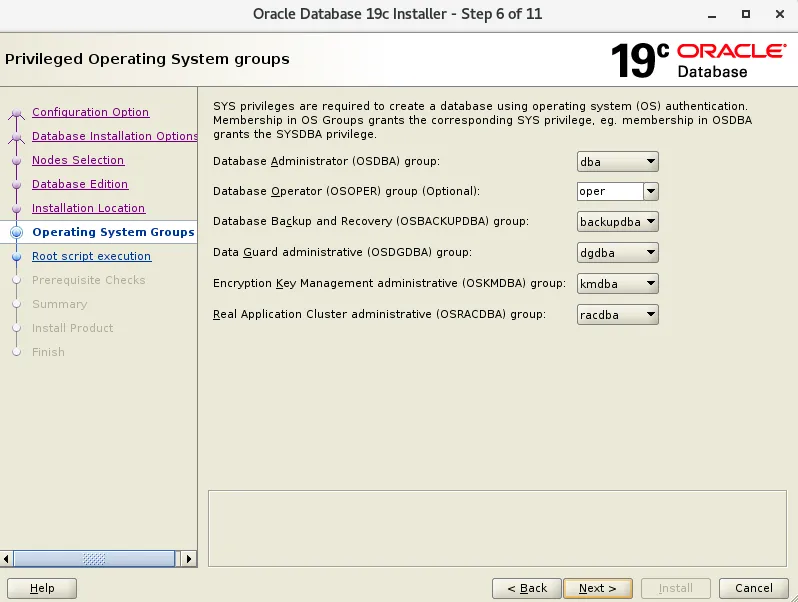
数据库管理组的选择,对比11g有些差异,多了dg、备份、加密权限组的设定。
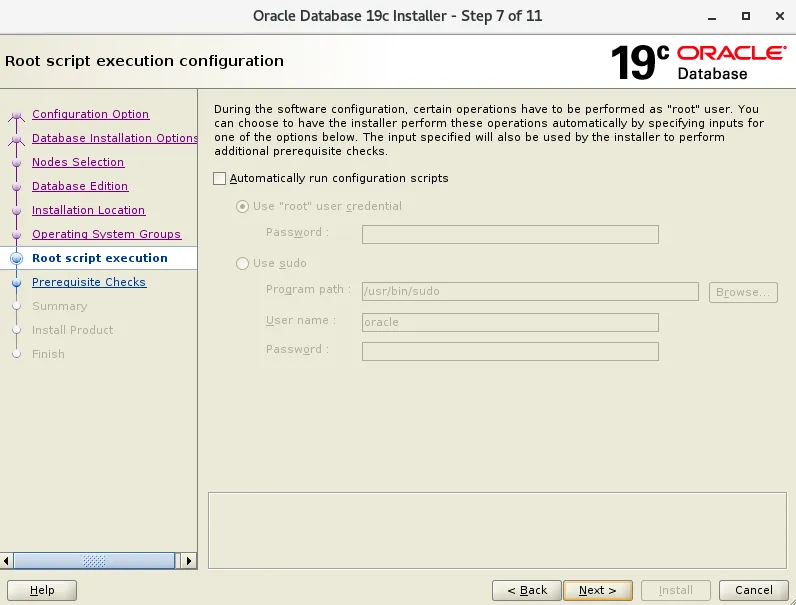
不自动运行配置脚本
root用户执行脚本,一个节点一个节点执行
脚本输出
--节点1[root@ora19c-rac01 soft]# /oracle/app/19.3.0/db_1/root.shPerforming root user operation.The following environment variables are set as:ORACLE_OWNER= oracleORACLE_HOME= /oracle/app/19.3.0/db_1Enter the full pathname of the local bin directory: [/usr/local/bin]:The contents of "dbhome" have not changed. No need to overwrite.The contents of "oraenv" have not changed. No need to overwrite.The contents of "coraenv" have not changed. No need to overwrite.Entries will be added to the /etc/oratab file as needed byDatabase Configuration Assistant when a database is createdFinished running generic part of root script.Now product-specific root actions will be performed.--节点2[root@ora19c-rac02 ~]# /oracle/app/19.3.0/db_1/root.shPerforming root user operation.The following environment variables are set as:ORACLE_OWNER= oracleORACLE_HOME= /oracle/app/19.3.0/db_1Enter the full pathname of the local bin directory: [/usr/local/bin]:The contents of "dbhome" have not changed. No need to overwrite.The contents of "oraenv" have not changed. No need to overwrite.The contents of "coraenv" have not changed. No need to overwrite.Entries will be added to the /etc/oratab file as needed byDatabase Configuration Assistant when a database is createdFinished running generic part of root script.Now product-specific root actions will be performed.
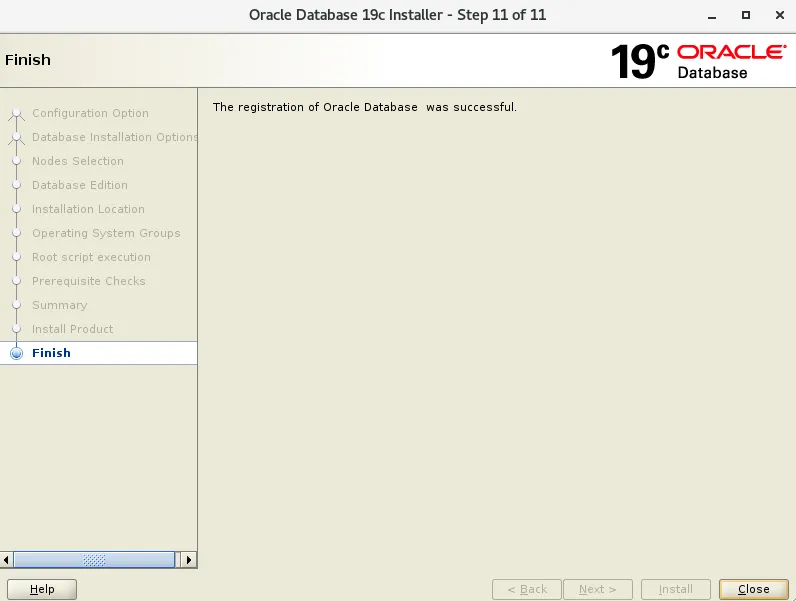
Oracle 软件的安装到此也安装完成。
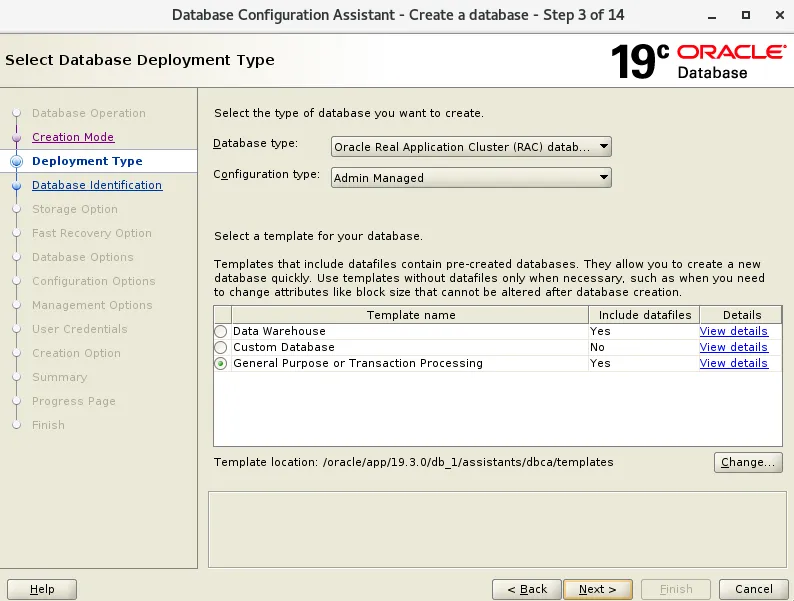
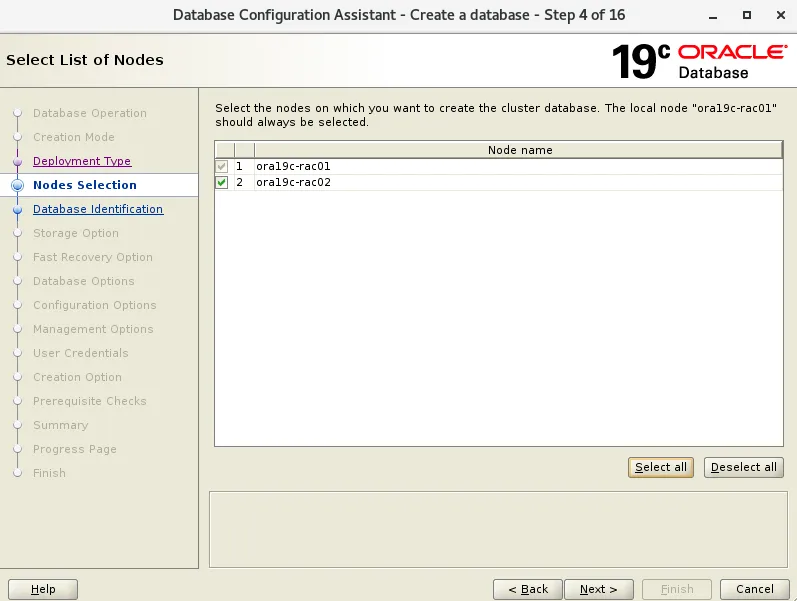
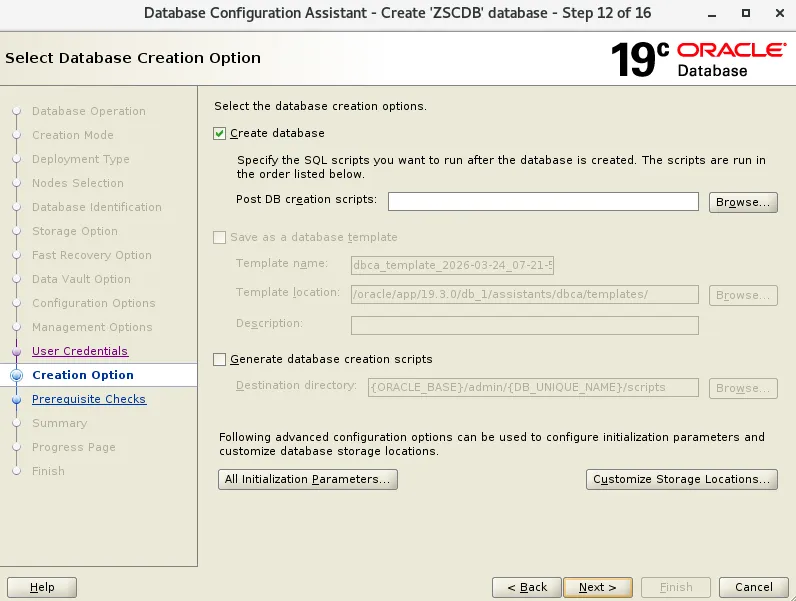
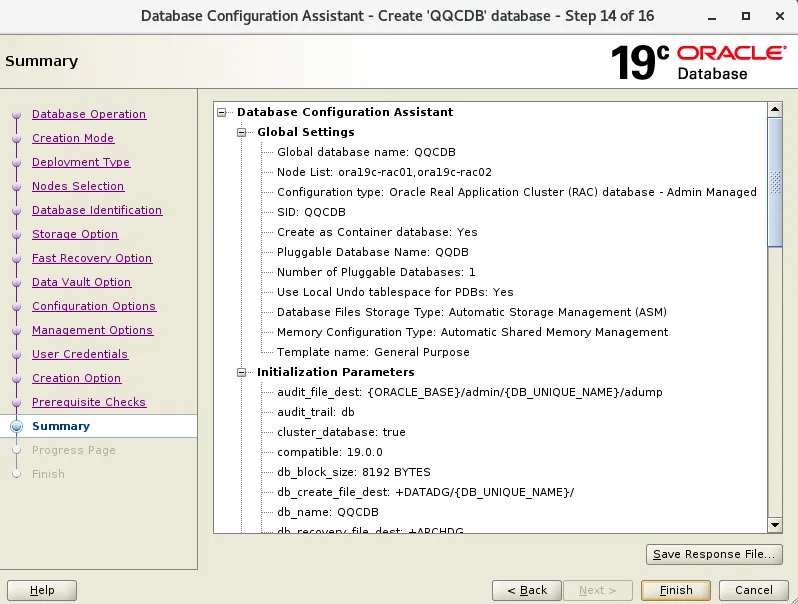
八、创建 CDB 和 PDB
8.1 创建CDB&PDB(在节点1创建即可)
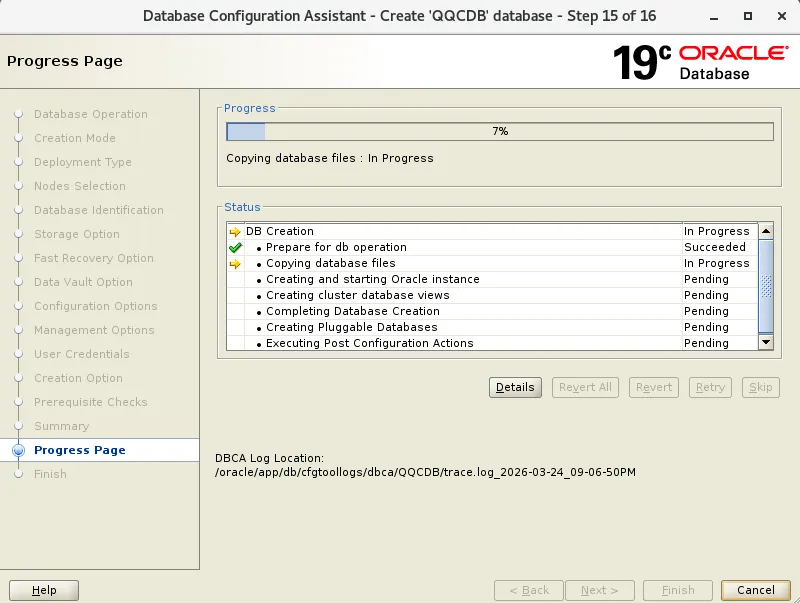
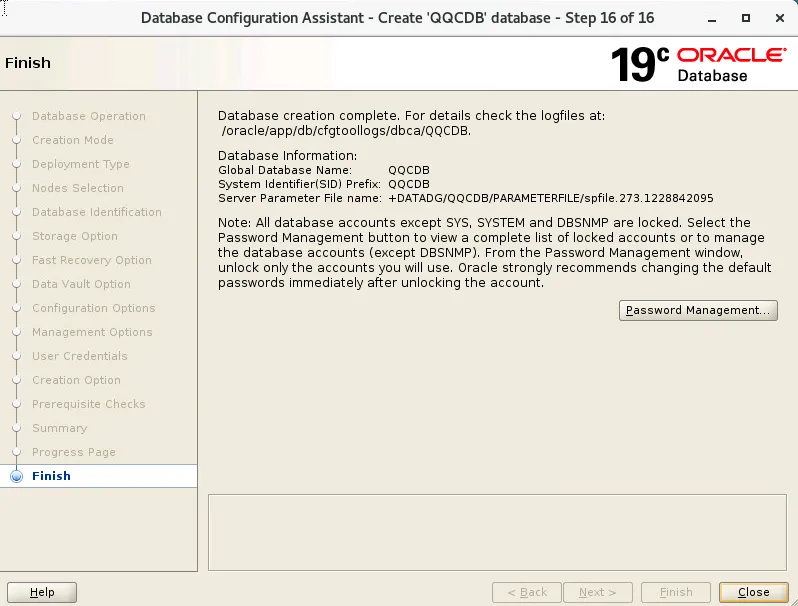
在oracle用户下执行dbca进行CDB和PDB的创建过程
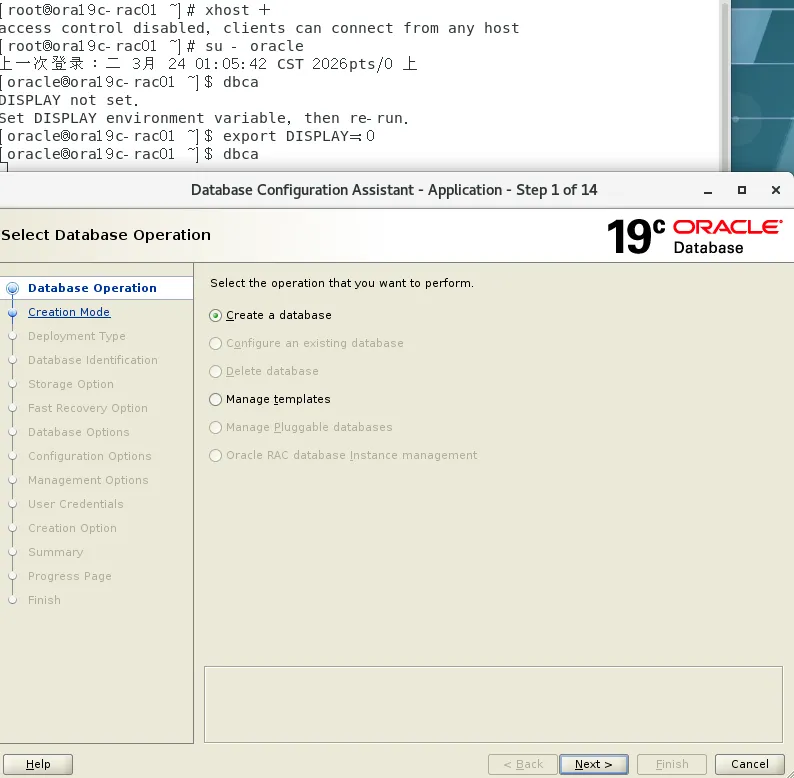
选择高级模式创建
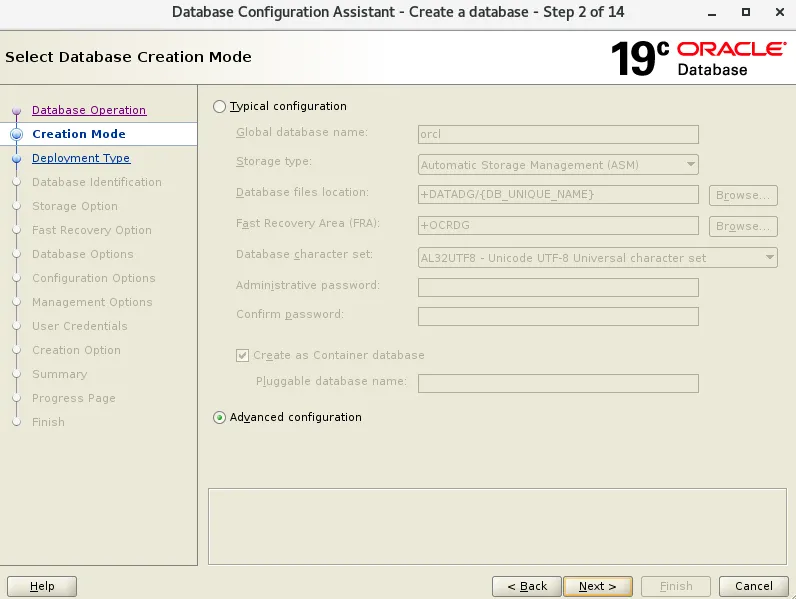
此处选择admin-Managed,如果选择策略管理,需要创建对应的池,为了方便此处选择admin-Managed即可,默认为策略管理。
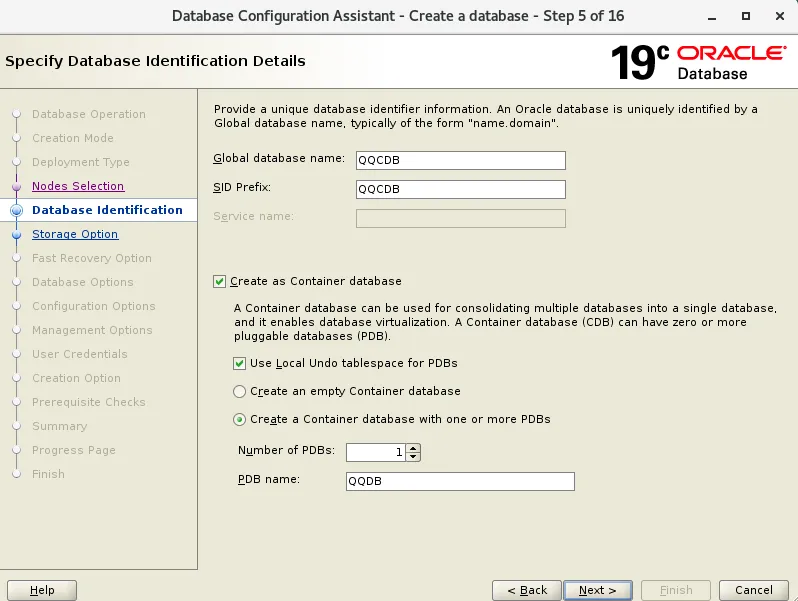
输入CDB的全局库名,SID名称,如果同时需要创建PDB,则需要填写PDB名,此处我们先创建一个PDB
CDB:QQCDB
PDB:QQDB
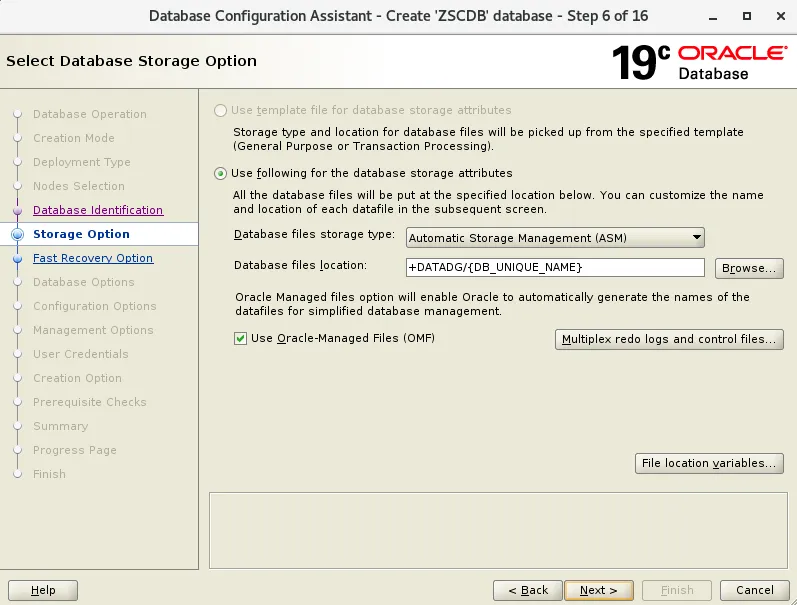
选择数据存储位置
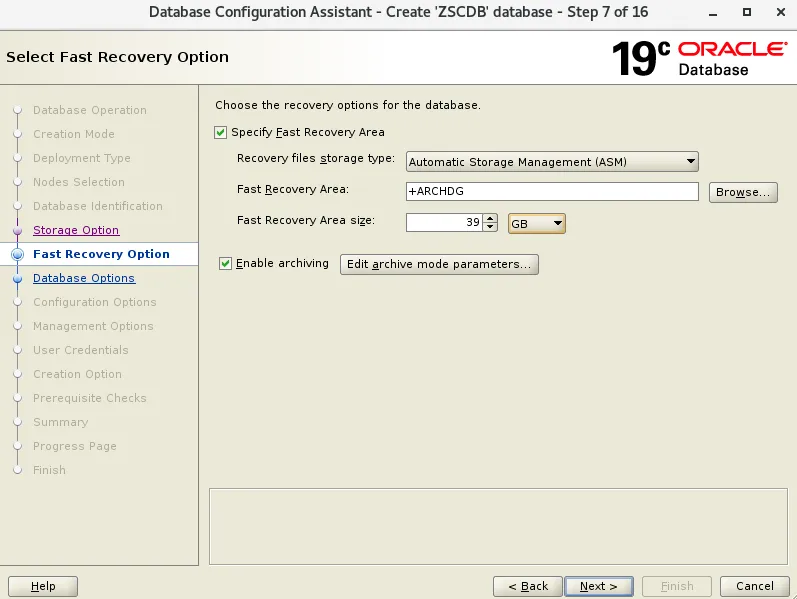
配置恢复目录和开启归档
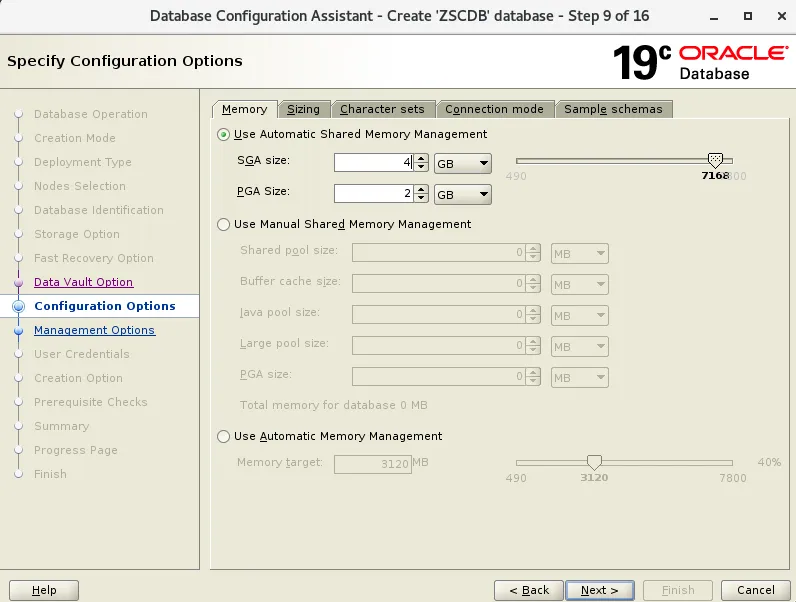
配置内存信息
这里不启动EM,跑CVU检查
密码设置 Oracle_2026
ksh和scan告警,忽略即可
[oracle@ora19c-rac01 ~]$ ps -ef | grep smonoracle 13305 1 0 17:04 ? 00:00:00 ora_smon_QQCDB1oracle 19705 19660 0 17:13 pts/0 00:00:00 grep --color=auto smonroot 44722 1 2 16:06 ? 00:01:29 /oracle/app/19.3.0/grid_1/bin/osysmond.bingrid 45438 1 0 16:06 ? 00:00:00 asm_smon_+ASM1[oracle@ora19c-rac01 ~]$ sqlplus / as sysdbaSQL*Plus: Release 19.0.0.0.0 - Production on Wed Mar 25 17:13:47 2026Version 19.3.0.0.0Copyright (c) 1982, 2019, Oracle. All rights reserved.Connected to:Oracle Database 19c Enterprise Edition Release 19.0.0.0.0 - ProductionVersion 19.3.0.0.0SQL> show pdbsCON_ID CON_NAME OPEN MODE RESTRICTED---------- ------------------------------ ---------- ----------2 PDB$SEED READ ONLY NO3 QQDB READ WRITE NO
8.2.1 设置重启自动启动PDB,两个节点都执行
alter pluggable database all save state;SELECT * FROM DBA_PDB_SAVED_STATES;
8.2.2 修改监听端口
[oracle@ora19c-rac01 ~]$ srvctl modify listener -l LISTENER -p "TCP:1521"[oracle@ora19c-rac01 ~]$ srvctl stop listener[oracle@ora19c-rac01 ~]$ srvctl start listener
8.2.3 配置低版本客户端连接高版本客户端(两节点都要配置)
[oracle@zdidrpvurd01 admin]$ cd $ORACLE_HOME/network/admin[oracle@zdidrpvurd01 admin]$ vi sqlnet.oraSQLNET.ALLOWED_LOGON_VERSION_SERVER=8SQLNET.ALLOWED_LOGON_VERSION_CLIENT=8
8.2.4 配置tnsnames连接信息
具体点击如下链接👇
8.2.5 修改密码复杂度和设置密码不过期(CDB和各PDB都要执行)
SQL> alter session set container=QQDB;SQL> @?/rdbms/admin/utlpwdmg.sqlSQL> alter profile default limit password_verify_function verify_function;SQL> alter profile default limit password_life_time unlimited;
8.2.6 关闭自动定时任务(CDB和PDB都运行)
exec DBMS_AUTO_TASK_ADMIN.DISABLE( client_name => 'auto space advisor', operation => NULL,window_name => NULL);exec DBMS_AUTO_TASK_ADMIN.DISABLE( client_name => 'sql tuning advisor', operation => NULL,window_name => NULL);
8.2.7 关闭调度任务
CDB 执行
exec dbms_scheduler.disable('ORACLE_OCM.MGMT_CONFIG_JOB');exec dbms_scheduler.disable('ORACLE_OCM.MGMT_STATS_CONFIG_JOB');exec DBMS_STATS.SET_PARAM( 'method_opt','FOR ALL COLUMNS SIZE 1' );
PDB 执行
exec DBMS_STATS.SET_PARAM( 'method_opt','FOR ALL COLUMNS SIZE 1' );8.2.8 关闭自动索引特性
// disable 19c automatic indexing featurealter system set "_optimizer_use_auto_indexes"=OFF scope=spfile;alter system set filesystemio_options=setall scope=spfile;
九、日常运维脚本
9.1 配置历史日志清理
两个节点都配置
grid用户清理文件
vi /home/grid/scripts/clean_grid_log.sh#!/bin/bash. /home/grid/.bash_profileLISTENER_LOG=`$ORACLE_HOME/bin/lsnrctl status|grep log|awk '{print $4}'|sed 's!/alert/log.xml!/trace/listener.log!'`LISTENER_LOG_BAK=`$ORACLE_HOME/bin/lsnrctl status|grep log|awk '{print $4}'|sed 's!/alert/log.xml!/trace/listener.log.bak!'`LISTENER_XML=`$ORACLE_HOME/bin/lsnrctl status|grep log|awk '{print $4}'|sed 's!/alert/log.xml!/alert/log_*.xml!'`########## grid user clean listener log ##########echo $LISTENER_LOGecho $LISTENER_LOG_BAKecho $LISTENER_XMLtail -n 10000 $LISTENER_LOG > $LISTENER_LOG_BAKcp $LISTENER_LOG_BAK $LISTENER_LOGrm -rf $LISTENER_XML########## grid user clean ASM audit log ##########echo $ORACLE_HOME/rdbms/auditnohup find $ORACLE_HOME/rdbms/audit -type f -name "*.aud" -mtime +1 -exec rm {} \; &
oracle用户清理文件
vi /home/oracle/scripts/clean_oracle_log.sh#!/bin/bash. /home/oracle/.bash_profile########## oracle user clean audit log ##########audit_log=`sqlplus -s / as sysdba <<ENDset feedback offset head offselect value from v\\$parameter where name='audit_file_dest';END`dateecho $audit_lognohup find $audit_log -type f -name "*.aud" -mtime +1 -exec rm {} \; &
root用户清理文件
vi /root/clean_rac_log.shsu - oracle -c "/bin/sh /home/oracle/scripts/clean_oracle_log.sh >> /tmp/clean_rac.log"su - grid -c "/bin/sh /home/grid/scripts/clean_grid_log.sh >> /tmp/clean_rac.log"
root用户 配置定时任务
crontab -e0 0 * * 0 sh /root/clean_rac_log.sh## 先创建 .logtouch /tmp/clean_rac.logchmod 777 /tmp/clean_rac.log
mkdir -p /home/oracle/arch_delcd /home/oracle/arch_delmkdir {log,scripts}vi /home/oracle/arch_del/scripts/delarc.rsvrun{show all;crosscheck archivelog all;delete noprompt archivelog all completed before 'sysdate -7';}vi /home/oracle/arch_del/scripts/del_root_arch.sh#!/bin/bashexport ORACLE_SID=QQCDB1export ORACLE_BASE=/oracle/app/dbexport ORACLE_HOME=/oracle/app/19.3.0/db_1LOG_DIR=/home/oradba/arch_del/logLOG_FILE=${LOG_DIR}/arch_del_$(date +%Y%m%d).logsu - oracle -c "echo Script started at $(date) >> ${LOG_FILE}"su - oracle -c "rman target / cmdfile=/home/oradba/arch_del/scripts/delarc.rsv >> ${LOG_FILE}"su - oracle -c "echo Script ended at $(date) >> ${LOG_FILE}"su - oracle -c "find /home/oradba/arch_del/log/* -mtime +9 | xargs rm -rf"
root用户 配置定时任务
crontab -e30 6 * * 5 sh /home/oracle/arch_del/scripts/del_root_arch.sh &
