 夜雨聆风
夜雨聆风


�� 多模态脑磁共振影像全流程处理工具 Multimodal Brain MRI Full-Processing Pipeline
项目链接🔗:https://github.com/Karcen/rs-fMRI-Pipeline-Tutorial/tree/main
🧠 多模态脑磁共振影像全流程处理工具
Multimodal Brain MRI Full-Processing Pipeline
📑 目录 | Table of Contents
-
项目简介 | Project Overview -
环境搭建 | Environment Setup -
数据准备与规范 | Data Preparation & Specification -
DICOM 转 NIfTI 工具使用指南 | DICOM to NIfTI Tool Guide -
多模态脑连接分析流水线使用指南 | Multimodal Brain Connectivity Pipeline Guide -
脑区激活分析工具使用指南 | Brain Region Activation Analysis Guide -
3D 脑网络可视化工具使用指南 | 3D Brain Network Visualization Guide -
FreeSurfer 模型导出与合并工具 | FreeSurfer Model Export & Merge Tools -
扫描参数与质控规范 | Scan Parameters & Quality Control Standards -
常见问题 | FAQ -
输出图片结果 | Figure outputs -
参考文献 | References
📖 项目简介 | Project Overview
🇨🇳 中文
本项目严格遵循《T/CHIA 48-2024 精神影像脑结构功能成像技术与信息处理规范》,实现了脑磁共振影像从原始DICOM数据格式转换到多模态定量分析、脑连接组构建、图论分析与可视化的全流程自动化处理。
支持的模态包括: T1WI结构像、BOLD静息态功能像、DTI弥散张量像、FLAIR、SWI、QSM、ASL、TOF-MRA等,适配1.5T/3.0T临床与科研型磁共振设备,可满足精神影像临床科研的标准化分析需求。
核心功能模块:
-
🔄 DICOM → NIfTI 批量转换 -
🧠 多模态脑连接分析(功能+结构) -
📊 zALFF脑区激活定量分析 -
🎨 3D脑网络可视化(AAL166图谱) -
📐 FreeSurfer彩色模型导出与合并
🇬🇧 English
This project strictly follows the T/CHIA 48-2024 Specification for structural and functional imaging technology and information processing in psychoradiology, and implements a fully automated full workflow for brain MRI processing, from raw DICOM data format conversion to multimodal quantitative analysis, brain connectome construction, graph theory analysis and visualization.
Supported modalities include: T1WI structural image, BOLD resting-state functional image, DTI diffusion tensor image, FLAIR, SWI, QSM, ASL, TOF-MRA, etc. It is compatible with 1.5T/3.0T clinical and research MRI scanners, and can meet the standardized analysis requirements of clinical research on psychiatric imaging.
Core Functional Modules:
-
🔄 DICOM → NIfTI Batch Conversion -
🧠 Multimodal Brain Connectivity Analysis (FC + SC) -
📊 zALFF Brain Region Activation Quantitative Analysis -
🎨 3D Brain Network Visualization (AAL166 Atlas) -
📐 FreeSurfer Colored Model Export & Merge
🛠️ 环境搭建 | Environment Setup
🇨🇳 中文
本项目运行依赖系统级工具与Python第三方库,以下为分系统的分步安装指南。
1. 基础环境要求
|
|
|
|---|---|
|
|
|
|
|
|
|
|
|
|
|
|
2. 系统级工具安装(dcm2niix)
dcm2niix 是DICOM转NIfTI格式的核心工具,必须提前安装:
macOS
# 安装Homebrew(如未安装)/bin/bash -c "$(curl -fsSL https://raw.githubusercontent.com/Homebrew/install/HEAD/install.sh)"# 安装dcm2niixbrew install dcm2niix# 验证安装dcm2niix --versionWindows
# 方式一:通过conda安装(推荐)conda install -c conda-forge dcm2niix# 验证安装dcm2niix --version# 方式二:下载预编译二进制文件# 前往 https://github.com/rordenlab/dcm2niix/releases 下载Windows版本# 解压后将exe所在路径添加到系统环境变量PATH中Linux (Ubuntu/Debian)
sudo apt updatesudo apt install dcm2niixdcm2niix --version3. Python虚拟环境配置(推荐)
# 方式一:conda(推荐)conda create -n mri_pipeline python=3.10conda activate mri_pipeline# 方式二:venvpython -m venv mri_pipeline# Windowsmri_pipeline\Scripts\activate# macOS/Linuxsource mri_pipeline/bin/activate4. Python依赖库安装
# 必选核心依赖pip install numpy scipy nibabel nilearn dipy matplotlib seaborn networkx pandas# 可选依赖(交互式可视化功能)pip install plotly|
|
|
|---|---|
|
|
|
|
|
|
|
|
|
|
|
|
|
|
|
|
|
|
|
|
|
|
|
|
🇬🇧 English
The operation of this project depends on system-level tools and Python third-party libraries.
1. Basic Environment Requirements
|
|
|
|---|---|
|
|
|
|
|
|
|
|
|
|
|
|
2. System-level Tool Installation (dcm2niix)
dcm2niix is the core tool for DICOM to NIfTI format conversion.
macOS
/bin/bash -c "$(curl -fsSL https://raw.githubusercontent.com/Homebrew/install/HEAD/install.sh)"brew install dcm2niixdcm2niix --versionWindows
conda install -c conda-forge dcm2niixdcm2niix --versionLinux (Ubuntu/Debian)
sudo apt updatesudo apt install dcm2niixdcm2niix --version3. Python Virtual Environment Configuration
# Method 1: conda (Recommended)conda create -n mri_pipeline python=3.10conda activate mri_pipeline# Method 2: venvpython -m venv mri_pipeline# Windowsmri_pipeline\Scripts\activate# macOS/Linuxsource mri_pipeline/bin/activate4. Python Dependency Installation
# Mandatory core dependenciespip install numpy scipy nibabel nilearn dipy matplotlib seaborn networkx pandas# Optional dependency (for interactive visualization)pip install plotly|
|
|
|---|---|
|
|
|
|
|
|
|
|
|
|
|
|
|
|
|
|
|
|
|
|
|
|
|
|
📁 数据准备与规范 | Data Preparation & Specification
🇨🇳 中文
1. 原始DICOM数据目录结构
原始DICOM数据需按序列分文件夹存放,每个序列一个独立文件夹:
├── sort/ # 原始DICOM根目录│ ├── 001_T1_MPRAGE/ # T1结构像序列│ ├── 002_BOLD_REST/ # BOLD静息态功能像序列│ ├── 003_DTI_64DIR/ # DTI弥散张量像序列│ ├── 004_FLAIR_3D/ # 3D FLAIR序列│ ├── 005_SWI/ # SWI磁敏感加权序列│ └── 006_TOF_MRA/ # TOF血管成像序列2. 模态命名关键词规则
|
|
|
|---|---|
|
|
|
|
|
|
|
|
|
|
|
|
|
|
|
|
|
|
|
|
|
3. DTI数据特殊要求
DTI数据需配套.bval和.bvec梯度文件,需与DICOM文件放在同一文件夹下。
4. 配套数据文件
本项目需配合以下标准模板和图谱文件使用(已上传至仓库):
|
|
|
|---|---|
|
|
|
|
|
|
|
|
|
|
|
|
🇬🇧 English
1. Raw DICOM Data Directory Structure
├── sort/ # Root directory of raw DICOM│ ├── 001_T1_MPRAGE/ # T1 structural image sequence│ ├── 002_BOLD_REST/ # BOLD resting-state functional image sequence│ ├── 003_DTI_64DIR/ # DTI diffusion tensor image sequence│ ├── 004_FLAIR_3D/ # 3D FLAIR sequence│ ├── 005_SWI/ # SWI susceptibility weighted sequence│ └── 006_TOF_MRA/ # TOF angiography sequence2. Modality Naming Keyword Rules
|
|
|
|---|---|
|
|
|
|
|
|
|
|
|
|
|
|
|
|
|
|
|
|
|
|
|
3. Special Requirements for DTI Data
DTI data must be accompanied by .bval and .bvec gradient files.
4. Supporting Data Files
The following standard templates and atlas files are required (uploaded to repository):
|
|
|
|---|---|
|
|
|
|
|
|
|
|
|
|
|
|
🔄 DICOM转NIfTI工具使用指南 | DICOM to NIfTI Tool Guide
🇨🇳 中文
脚本文件:DICOM2NIfTI.py
本工具用于批量将原始DICOM序列转换为NIfTI格式(.nii.gz压缩格式),并自动按模态分类存放。
1. 脚本配置修改
# ======================# 路径配置 | Path Configuration# ======================# 原始DICOM数据根目录BASE_DIR = "/Users/xxx/Downloads/brain_data/sort"# 转换后NIfTI文件输出根目录OUTPUT_DIR = "/Users/xxx/Downloads/brain_data/nifti"2. 运行脚本
python DICOM2NIfTI.py3. 输出结果说明
├── nifti/ # 输出根目录│ ├── T1/ # T1结构像转换结果│ ├── BOLD/ # BOLD功能像转换结果│ ├── DTI/ # DTI弥散像转换结果(含.bval/.bvec)│ ├── FLAIR/ # FLAIR序列转换结果│ ├── SWI/ # SWI序列转换结果│ └── OTHER/ # 未识别模态的转换结果4. 核心功能
-
✅ 自动递归扫描原始目录下的所有序列文件夹 -
✅ 基于关键词自动识别模态并分类存放 -
✅ 自动生成规范的文件名,避免重名 -
✅ 输出 .nii.gz压缩格式,节省存储空间 -
✅ 终端实时打印转换进度与成功/失败状态
🇬🇧 English
Script File:DICOM2NIfTI.py
This tool is used to batch convert raw DICOM sequences to NIfTI format (.nii.gz compressed format).
1. Script Configuration
# Path ConfigurationBASE_DIR = "/Users/xxx/Downloads/brain_data/sort"OUTPUT_DIR = "/Users/xxx/Downloads/brain_data/nifti"2. Run the Script
python DICOM2NIfTI.py3. Output Structure
├── nifti/│ ├── T1/ # T1 structural images│ ├── BOLD/ # BOLD functional images│ ├── DTI/ # DTI diffusion images (with .bval/.bvec)│ ├── FLAIR/ # FLAIR sequences│ ├── SWI/ # SWI sequences│ └── OTHER/ # Unrecognized modalities4. Core Features
-
✅ Auto recursive scan of all sequence folders -
✅ Auto modality recognition and classification -
✅ Standardized file naming to avoid duplication -
✅ .nii.gzcompressed output format -
✅ Real-time progress and status printing
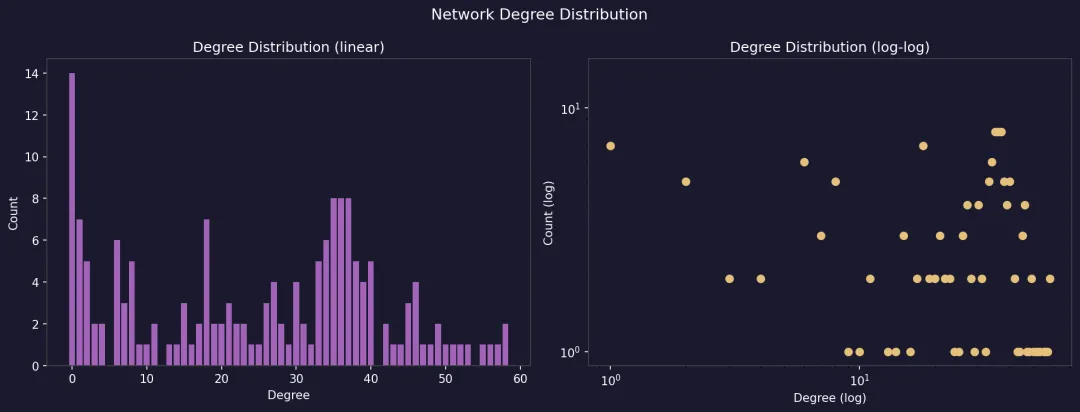
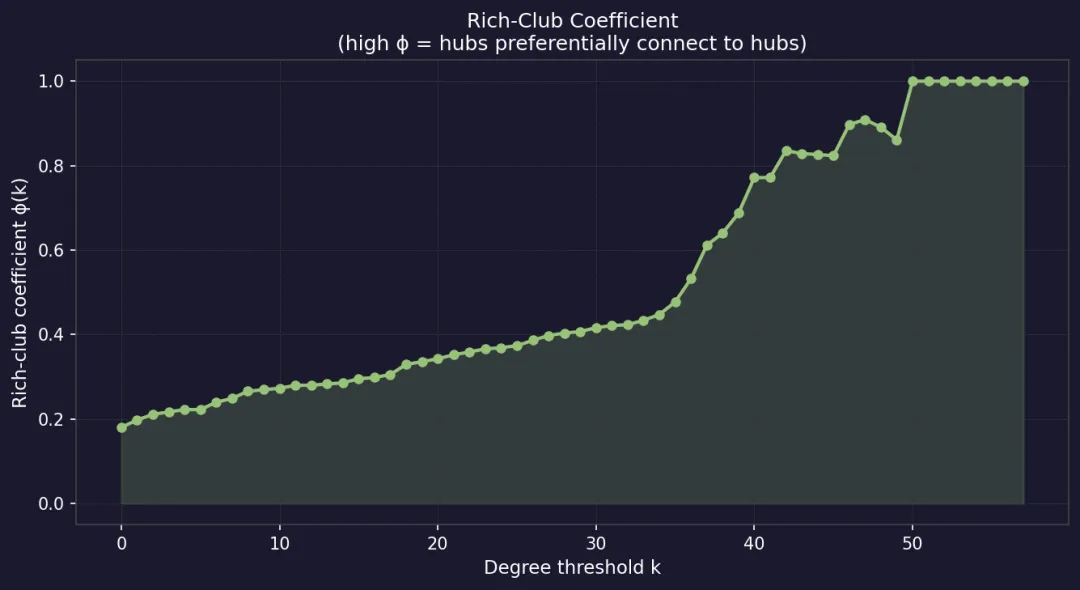
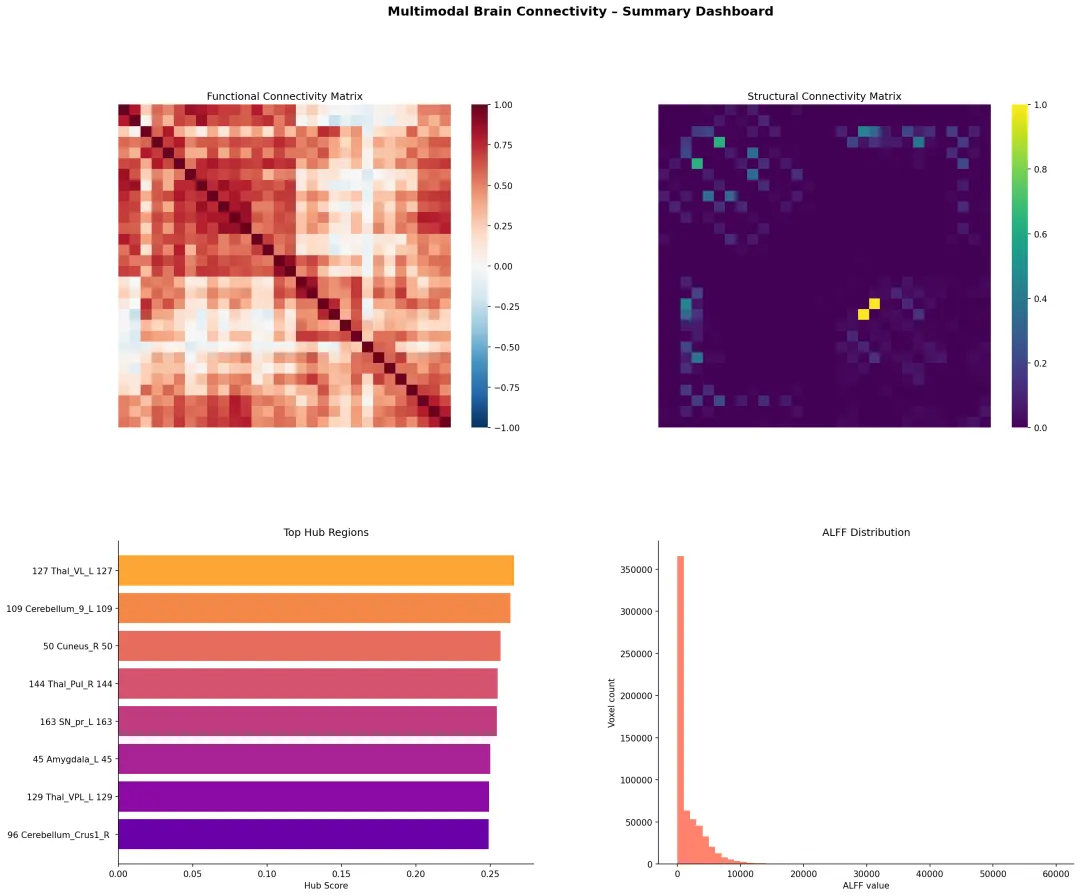
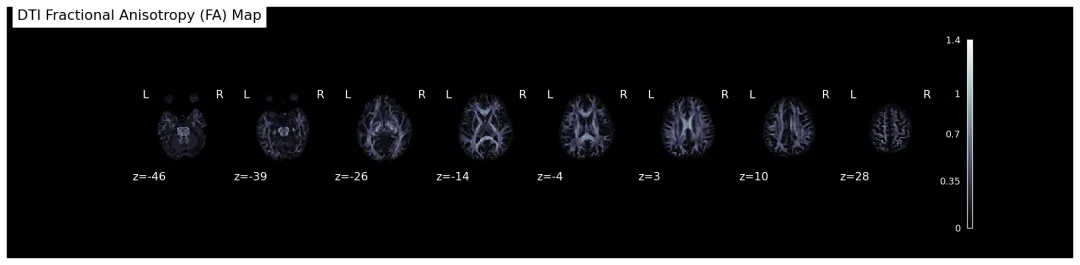
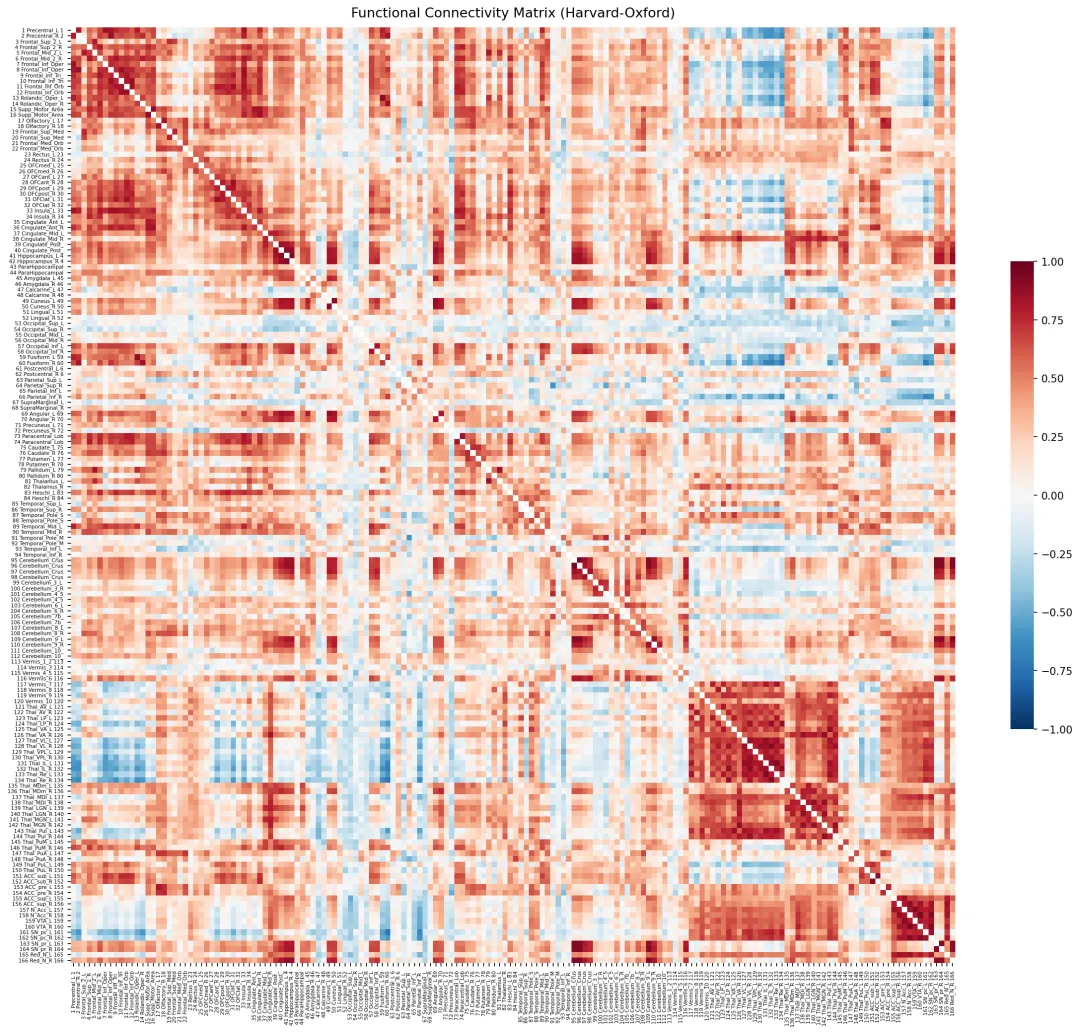
🧠 多模态脑连接分析流水线使用指南 | Multimodal Brain Connectivity Pipeline Guide
🇨🇳 中文
脚本文件:multimodal_brain_connectivity_pipeline.py
本流水线是核心分析工具,实现了多模态脑MRI数据的全流程标准化分析,严格遵循T/CHIA 48-2024规范。
1. 核心功能模块
|
|
|
|---|---|
|
|
|
|
|
|
|
|
|
|
|
|
|
|
|
|
|
|
|
|
|
|
|
|
2. 脚本配置修改
# ======================# 路径配置 | Path Configuration# ======================PATHS = {"t1": "/Users/xxx/Downloads/brain_data/nifti/T1","bold": "/Users/xxx/Downloads/brain_data/nifti/BOLD","dti": "/Users/xxx/Downloads/brain_data/nifti/DTI","atlas_nii": "/path/to/AAL3v1.nii.gz","atlas_labels": "/path/to/AAL3v1.nii.txt"}# 分析结果输出目录OUT_DIR = Path("./brain_pipeline_outputs")# ======================# 预处理参数 | Preprocessing Parameters# ======================TR = 1.0# BOLD序列重复时间(ms)FWHM = 6.0# 空间平滑核大小(mm)HP_FREQ = 0.01# 带通滤波低频截止(Hz)LP_FREQ = 0.10# 带通滤波高频截止(Hz)N_DUMMIES = 5# 丢弃的初始dummy扫描帧数FA_THRESH = 0.20# DTI纤维束追踪FA阈值3. 运行流水线
python multimodal_brain_connectivity_pipeline.py4. 输出结果
|
|
|
|
|---|---|---|
|
|
bold_preprocessed_mni.nii.gz
alff.nii.gz、fa_map.nii.gz |
|
|
|
fc_matrix.npy/csv
sc_matrix.npy/csv |
|
|
|
pipeline_results_summary.csv
alff_by_roi.csv |
|
|
|
activation_maps.png
fc_heatmap.png、brain_network_graph.png |
|
|
|
interactive_network.html |
|
|
|
pipeline_terminal_output.txt |
|
🇬🇧 English
Script File:multimodal_brain_connectivity_pipeline.py
This pipeline is the core analysis tool for multimodal brain MRI data.
1. Core Functional Modules
|
|
|
|---|---|
|
|
|
|
|
|
|
|
|
|
|
|
|
|
|
|
|
|
|
|
|
|
|
|
2. Script Configuration
# Path ConfigurationPATHS = {"t1": "/Users/xxx/Downloads/brain_data/nifti/T1","bold": "/Users/xxx/Downloads/brain_data/nifti/BOLD","dti": "/Users/xxx/Downloads/brain_data/nifti/DTI","atlas_nii": "/path/to/AAL3v1.nii.gz","atlas_labels": "/path/to/AAL3v1.nii.txt"}OUT_DIR = Path("./brain_pipeline_outputs")# Preprocessing ParametersTR = 1.0# BOLD TR (ms)FWHM = 6.0# Smoothing kernel (mm)HP_FREQ = 0.01# Bandpass low cutoff (Hz)LP_FREQ = 0.10# Bandpass high cutoff (Hz)N_DUMMIES = 5# Dummy scans to dropFA_THRESH = 0.20# DTI FA threshold3. Run the Pipeline
python multimodal_brain_connectivity_pipeline.py4. Output Files
|
|
|
|
|---|---|---|
|
|
bold_preprocessed_mni.nii.gz
alff.nii.gz, fa_map.nii.gz |
|
|
|
fc_matrix.npy/csv
sc_matrix.npy/csv |
|
|
|
pipeline_results_summary.csv
alff_by_roi.csv |
|
|
|
activation_maps.png
fc_heatmap.png, brain_network_graph.png |
|
|
|
interactive_network.html |
|
|
|
pipeline_terminal_output.txt |
|
📊 脑区激活分析工具使用指南 | Brain Region Activation Analysis Guide
🇨🇳 中文
脚本文件:MNI152_zALFF_Brain_Region_Activation_Analysis.py
本工具专注于静息态zALFF脑区激活的定量分析,输出最活跃脑区的排名与MNI坐标。
1. 核心功能
|
|
|
|---|---|
|
|
|
|
|
|
|
|
|
|
|
|
2. 运行脚本
python MNI152_zALFF_Brain_Region_Activation_Analysis.py3. 输出结果
|
|
|
|---|---|
TOP10_active_regions.csv |
|
top10_coordinates.csv |
|
all_brain_regions_activity.csv |
|
🇬🇧 English
Script File:MNI152_zALFF_Brain_Region_Activation_Analysis.py
This tool focuses on quantitative analysis of resting-state zALFF brain region activation.
1. Core Features
|
|
|
|---|---|
|
|
|
|
|
|
|
|
|
|
|
|
2. Run the Script
python MNI152_zALFF_Brain_Region_Activation_Analysis.py3. Output Files
|
|
|
|---|---|
TOP10_active_regions.csv |
|
top10_coordinates.csv |
|
all_brain_regions_activity.csv |
|
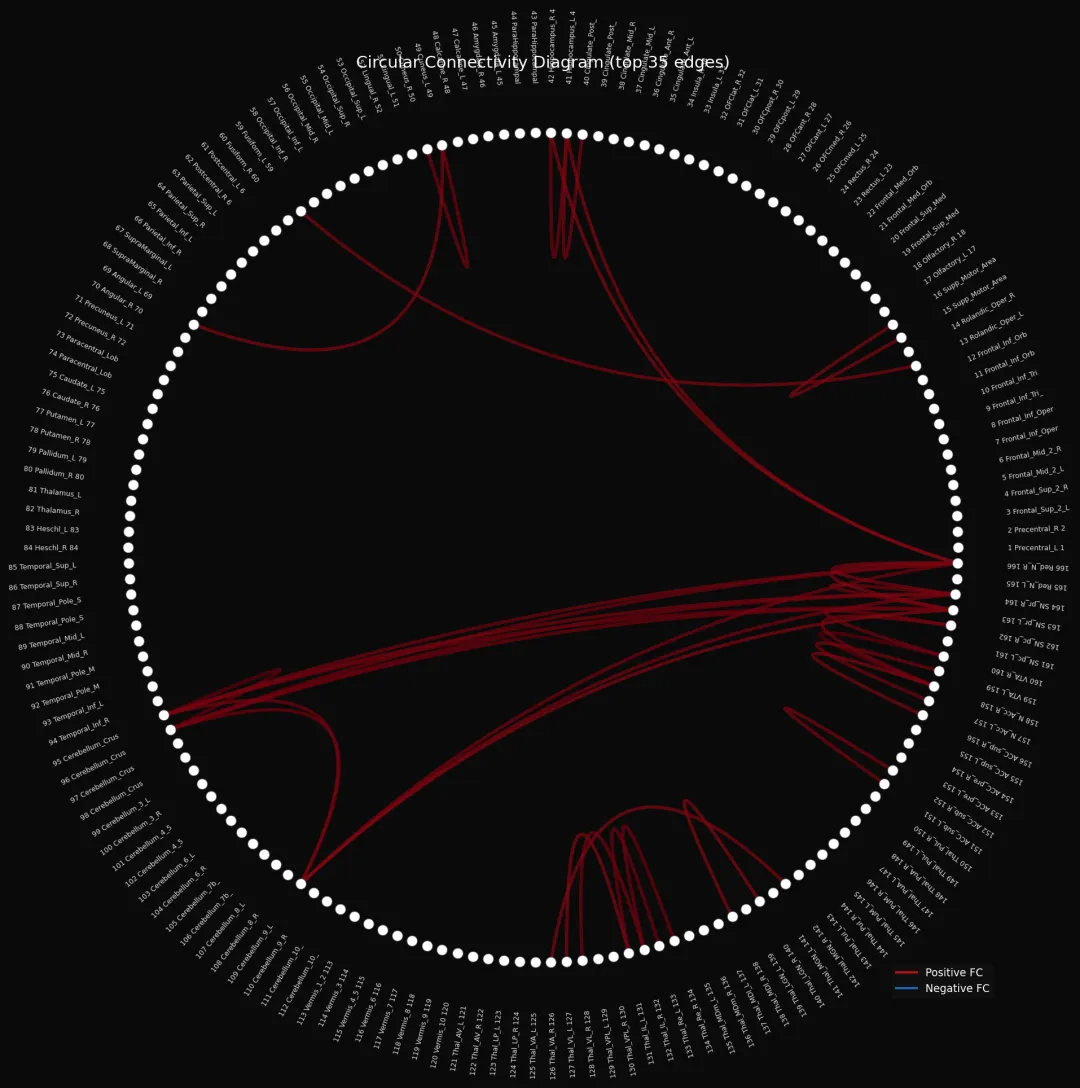
🎨 3D脑网络可视化工具使用指南 | 3D Brain Network Visualization Guide
🇨🇳 中文
脚本文件:plot_3D_brain_network_AAL166.py
本工具基于AAL166图谱生成3D脑网络可视化图,展示脑区间的功能连接通路。
1. 核心功能
|
|
|
|---|---|
|
|
|
|
|
|
|
|
|
|
|
|
2. 运行脚本
python plot_3D_brain_network_AAL166.py3. 输出结果
|
|
|
|---|---|
3D_brain_network_AAL166.png |
|
network_edges.csv |
|
🇬🇧 English
Script File:plot_3D_brain_network_AAL166.py
This tool generates 3D brain network visualization based on AAL166 atlas.
1. Core Features
|
|
|
|---|---|
|
|
|
|
|
|
|
|
|
|
|
|
2. Run the Script
python plot_3D_brain_network_AAL166.py3. Output Files
|
|
|
|---|---|
3D_brain_network_AAL166.png |
|
network_edges.csv |
|
📐 FreeSurfer模型导出与合并工具 | FreeSurfer Model Export & Merge Tools
本项目地址:https://github.com/Karcen/freesurfer-recon-freeview-3dstats
🇨🇳 中文
本模块包含两个脚本,用于从FreeSurfer处理结果导出彩色3D脑模型并合并为完整大脑。
1. export_colored_ply_from_freesurfer.py
功能: 从FreeSurfer导出彩色PLY格式脑模型
|
|
|
|---|---|
|
|
|
|
|
|
|
|
|
python export_colored_ply_from_freesurfer.py2. merge_colored_brain_ply.py
功能: 合并左右脑PLY模型为完整大脑
|
|
|
|---|---|
|
|
|
|
|
|
|
|
|
python merge_colored_brain_ply.py3. 输出结果
|
|
|
|---|---|
left_hemisphere.ply |
|
right_hemisphere.ply |
|
merged_brain.ply |
|
🇬🇧 English
This module contains two scripts for exporting colored 3D brain models from FreeSurfer and merging them into a complete brain.
The project can be found at: https://github.com/Karcen/freesurfer-recon-freeview-3dstats
1. export_colored_ply_from_freesurfer.py
Function: Export colored PLY format brain models from FreeSurfer
|
|
|
|---|---|
|
|
|
|
|
|
|
|
|
python export_colored_ply_from_freesurfer.py2. merge_colored_brain_ply.py
Function: Merge left and right hemisphere PLY models
|
|
|
|---|---|
|
|
|
|
|
|
|
|
|
python merge_colored_brain_ply.py3. Output Files
|
|
|
|---|---|
left_hemisphere.ply |
|
right_hemisphere.ply |
|
merged_brain.ply |
|
📋 扫描参数与质控规范 | Scan Parameters & Quality Control Standards
🇨🇳 中文
本章节内容严格遵循《T/CHIA 48-2024 精神影像脑结构功能成像技术与信息处理规范》。
1. 设备基础参数要求
|
|
|
|
|
|
|---|---|---|---|---|
|
|
|
|
|
|
|
|
|
|
|
|
|
|
|
|
|
|
|
|
|
|
|
|
2. 核心序列推荐参数(3.0T科研场景)
|
|
|
|---|---|
|
|
|
|
|
|
|
|
|
|
|
|
|
|
|
|
|
|
3. 核心序列质控要求
|
|
|
|
|---|---|---|
|
|
|
|
|
|
|
|
|
|
|
|
|
|
|
|
|
|
|
|
|
|
|
|
|
|
|
|
|
|
|
|
|
|
|
🇬🇧 English
This section strictly follows the T/CHIA 48-2024 Specification for Psychoradiology.
1. Basic Equipment Parameter Requirements
|
|
|
|
|
|
|---|---|---|---|---|
|
|
|
|
|
|
|
|
|
|
|
|
|
|
|
|
|
|
|
|
|
|
|
|
2. Recommended Core Sequence Parameters (3.0T Research)
|
|
|
|---|---|
|
|
|
|
|
|
|
|
|
|
|
|
|
|
|
|
|
|
3. Core Sequence QC Requirements
|
|
|
|
|---|---|---|
|
|
|
|
|
|
|
|
|
|
|
|
|
|
|
|
|
|
|
|
|
|
|
|
|
|
|
|
|
|
|
|
|
|
|
❓ 常见问题 | FAQ
🇨🇳 中文
Q1: 运行DICOM2NIfTI.py时提示”dcm2niix: command not found”
A: dcm2niix未正确安装或未加入系统环境变量。请重新安装dcm2niix,或在脚本中直接指定dcm2niix的绝对路径。
Q2: 运行流水线时提示”ImportError: No module named ‘xxx'”
A: 对应的Python依赖库未安装。请激活虚拟环境后,重新执行依赖安装命令。
Q3: BOLD数据预处理失败,提示”维度不匹配”
A: 检查BOLD数据是否为4维(x, y, z, 时间点)。确认TR参数与扫描参数一致,N_DUMMIES小于总时间点数。
Q4: DTI模块运行失败,提示”找不到bval/bvec文件”
A: 确保.bval和.bvec文件与DTI的NIfTI文件同目录,且文件名前缀完全一致(如DTI_001.nii.gz对应DTI_001.bval和DTI_001.bvec)。
Q5: 可视化图片显示不全、文字重叠
A: 检查matplotlib版本(推荐3.5+)。可修改脚本中绘图的figsize参数调整画布大小。
Q6: FreeSurfer模型导出失败
A: 确保已完成FreeSurfer的recon-all处理,且SUBJECTS_DIR环境变量已正确设置。
🇬🇧 English
Q1: “dcm2niix: command not found” when running DICOM2NIfTI.py
A: dcm2niix is not installed correctly or not in system PATH. Reinstall dcm2niix or specify absolute path in script.
Q2: “ImportError: No module named ‘xxx'” when running pipeline
A: Python dependency not installed. Activate virtual environment and reinstall dependencies.
Q3: BOLD preprocessing failed, “dimension mismatch”
A: Check BOLD data is 4D (x, y, z, time). Verify TR matches scan parameters, N_DUMMIES < total time points.
Q4: DTI module failed, “cannot find bval/bvec files”
A: Ensure .bval and .bvec files are in same directory as DTI NIfTI file with matching filename prefix.
Q5: Visualization images incomplete, text overlapping
A: Check matplotlib version (3.5+ recommended). Modify figsize parameter in script to adjust canvas size.
Q6: FreeSurfer model export failed
A: Ensure FreeSurfer recon-all is completed and SUBJECTS_DIR environment variable is set correctly.
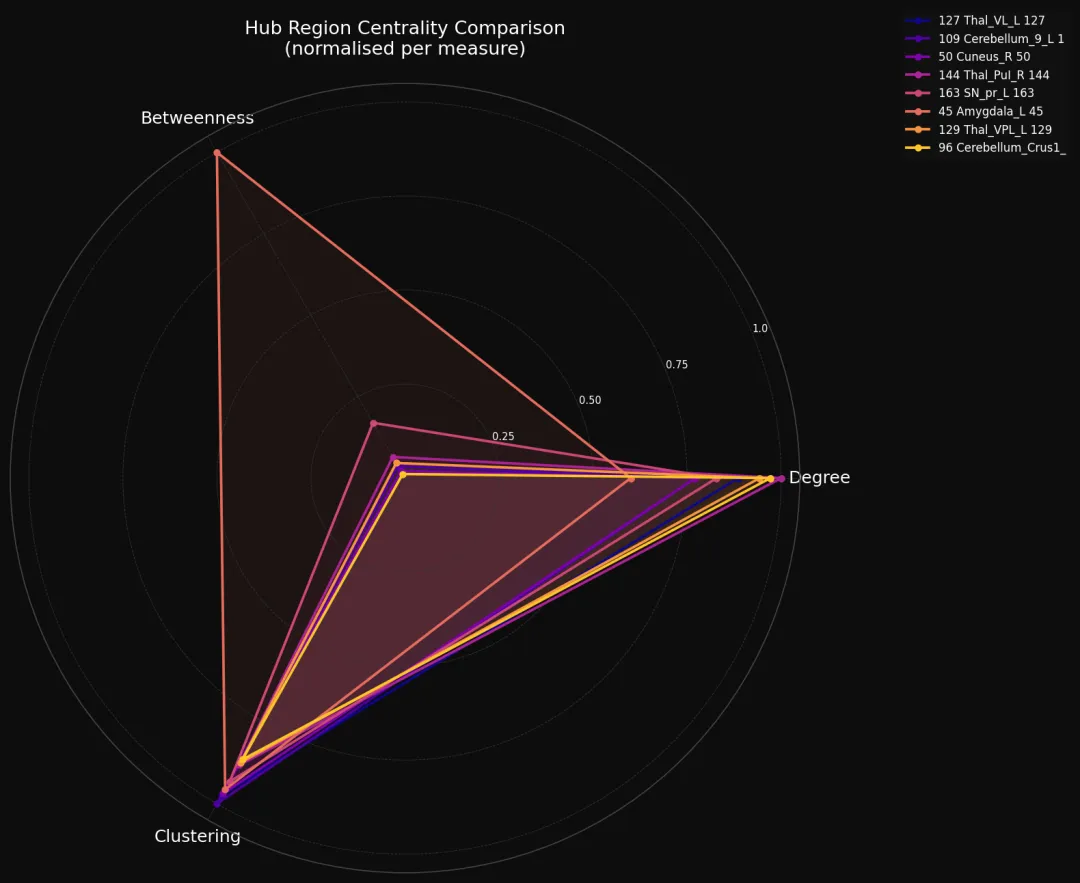
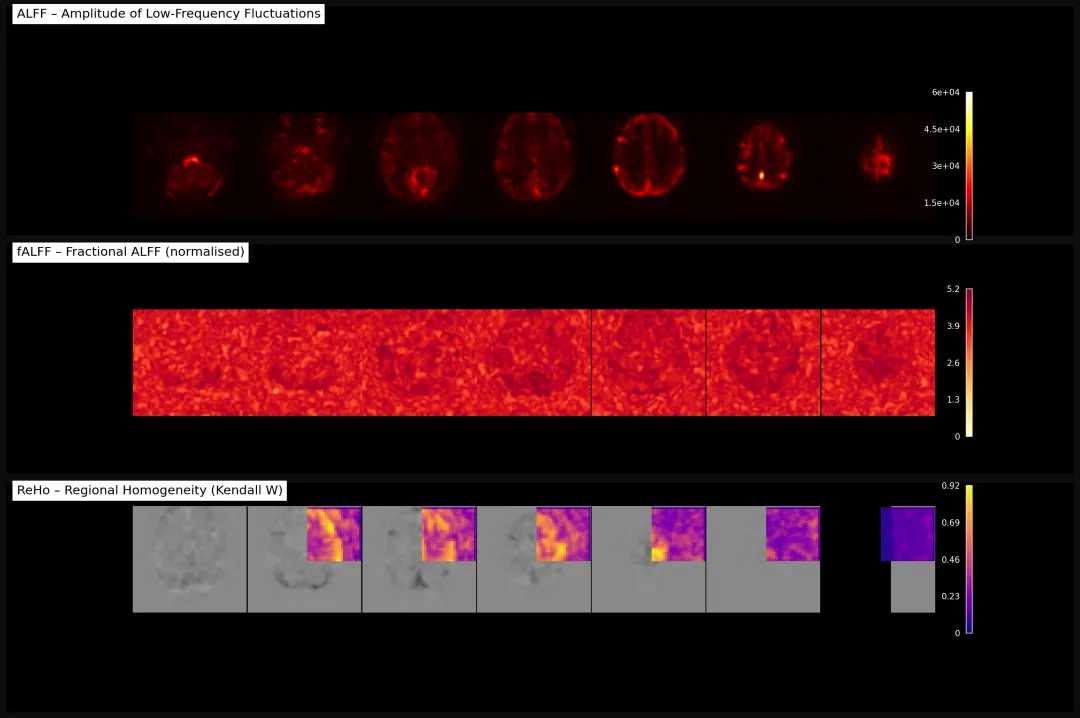
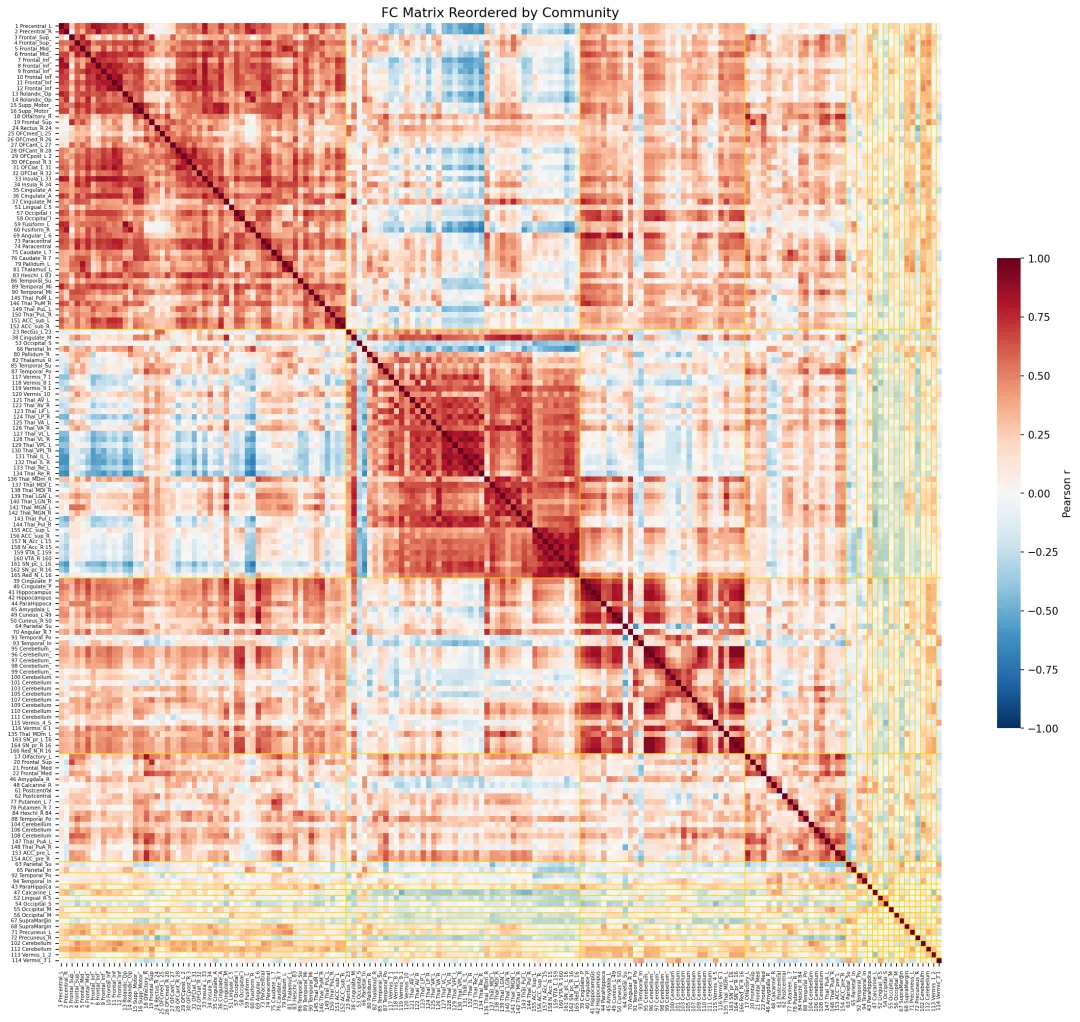
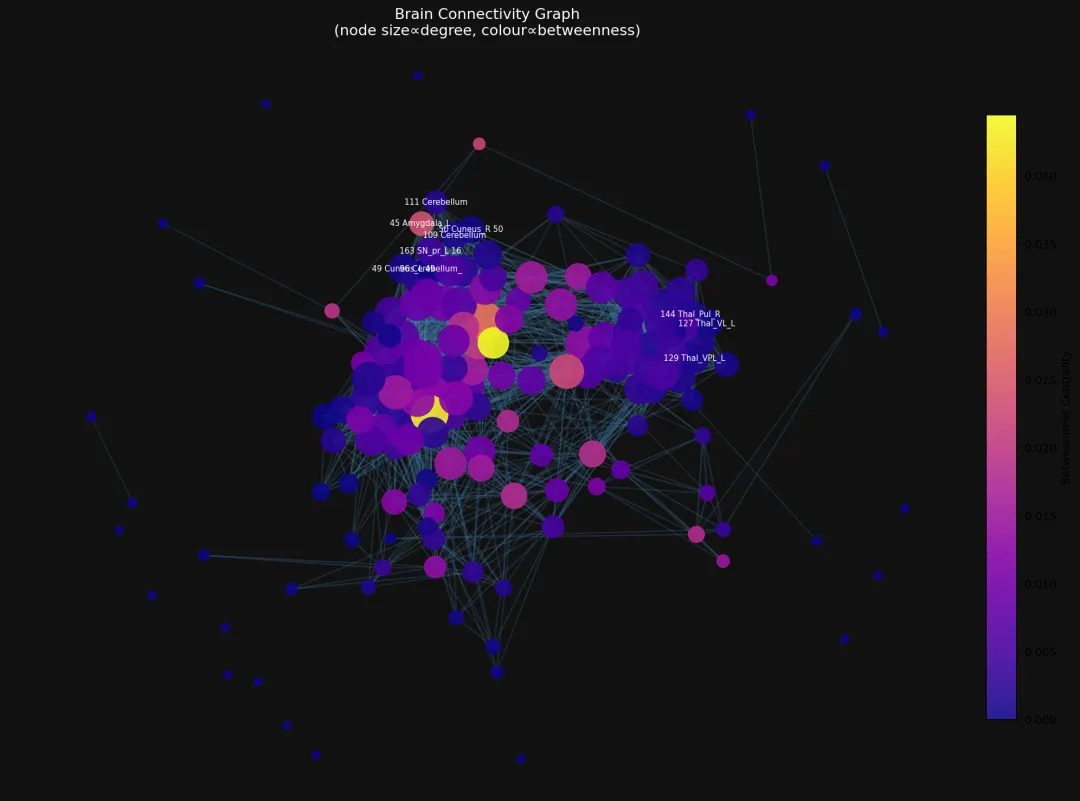
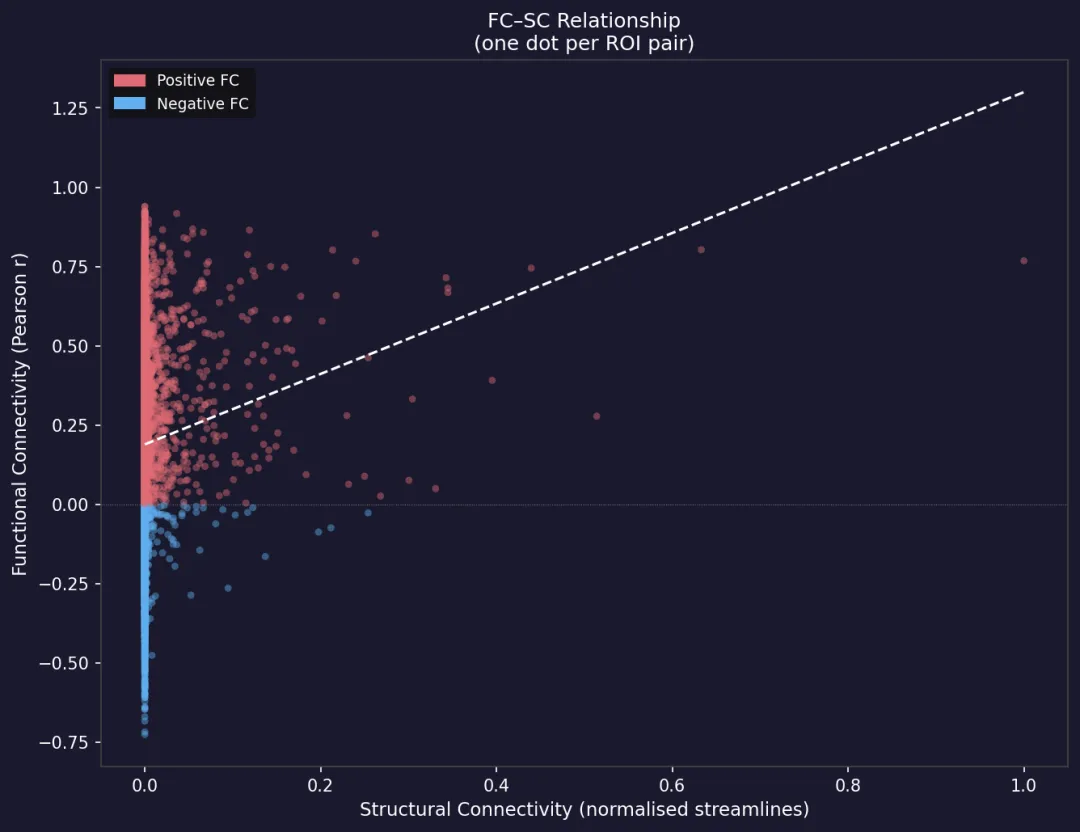
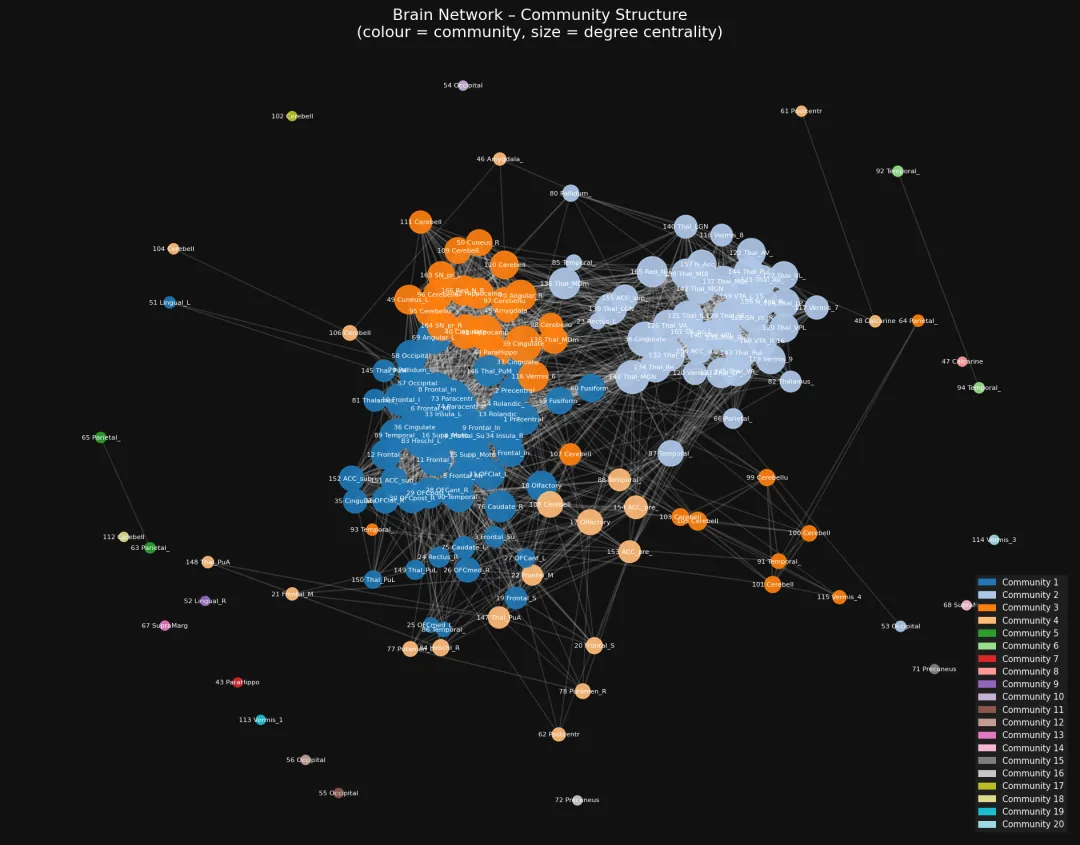
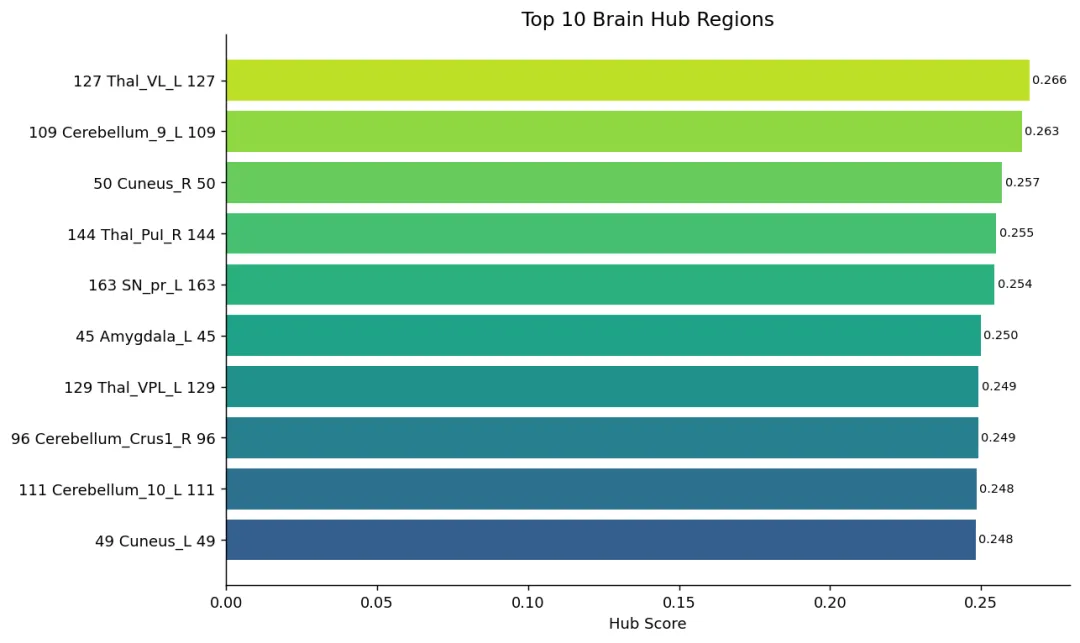
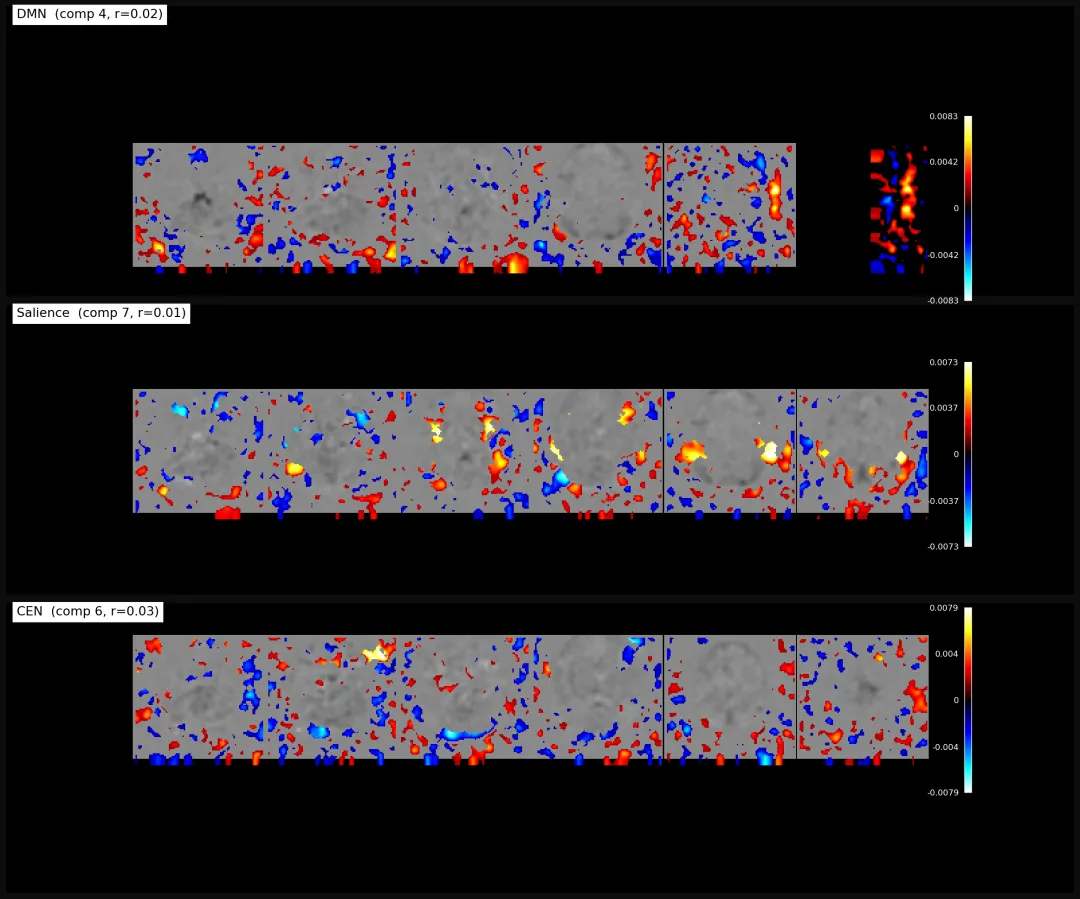
输出图片结果 Figure outputs


📚 参考文献 | References
-
T/CHIA 48-2024, 精神影像脑结构功能成像技术与信息处理规范[S]. 中国卫生信息与健康医疗大数据学会, 2024.