理解 CSI 不等于能实现 CSI。本文从规范深读到代码实现,带你手写一个完整的存储驱动——覆盖三层 gRPC 服务设计、Go 语言驱动实现、以及 Unix Socket 通信机制。
核心要点
- CSI 规范三层拆解
:Identity / Controller / Node 服务的职责边界与协议设计
- 完整驱动实现
:Go 语言实现的本地存储驱动,覆盖卷生命周期全流程
- gRPC 服务启动
:Unix Socket 绑定、驱动注册与健康检查机制
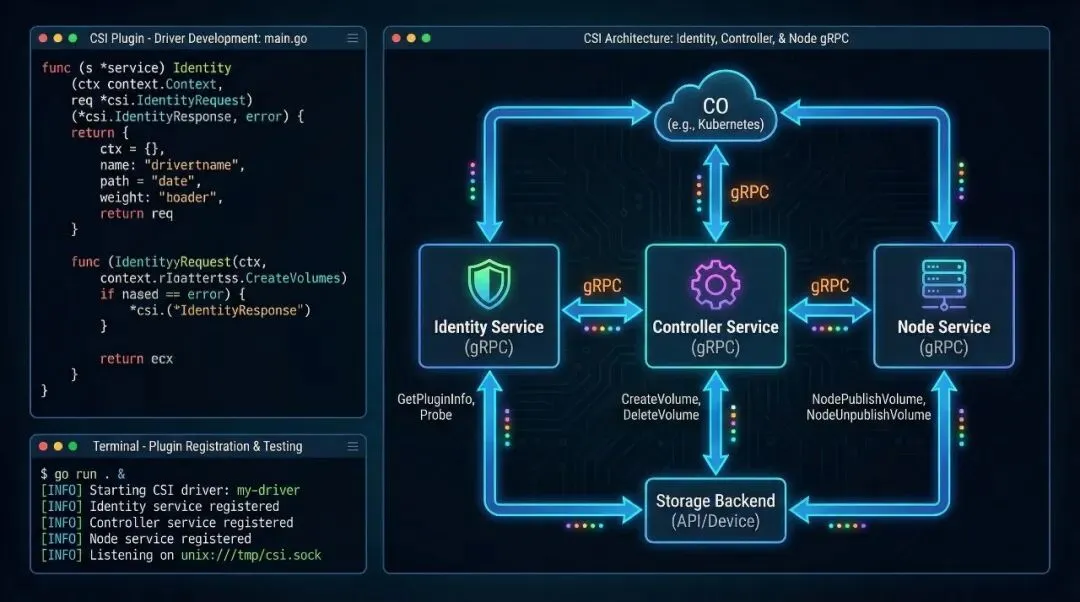
CSI 规范深读:三个 gRPC 服务的职责边界
CSI 规范定义的不是一个单一的 gRPC 服务,而是三个独立的服务接口,分别运行在不同的 Pod 容器中,通过 Unix Socket 通信。这种分层设计的妙处在于:允许你选择性地实现某些接口(例如,只实现 Node 服务来支持连接已有的云存储),同时保持架构的内聚性。
Identity 服务:驱动的身份证
serviceIdentity {rpcGetPluginInfo(GetPluginInfoRequest) returns (GetPluginInfoResponse) {}rpcGetPluginCapabilities(GetPluginCapabilitiesRequest) returns (GetPluginCapabilitiesResponse) {}rpcProbe(ProbeRequest) returns (ProbeResponse) {}}
GetPluginInfo 返回驱动的名称、版本等元数据。Kubernetes 通过这个接口验证驱动是否与集群兼容。关键字段是 name(必须是 FQDN 格式,如 localstorage.k8s.io),kubelet 用它来标识你的驱动。
GetPluginCapabilities 声明驱动支持的能力——比如是否支持卷扩展(EXPAND_VOLUME)、卷统计(GET_VOLUME_STATS)。Kubernetes 根据这个列表决定是否向驱动发送相关请求。换句话说,你不在 Capabilities 里声明的能力,K8s 压根不会来问你,驱动可以只做自己擅长的事。
Probe 是健康检查接口。kubelet 周期性调用它,确保驱动仍然活着。返回值很简单——ready: true 表示准备好接收请求,否则 kubelet 会隔离这个驱动。
Controller 服务:卷的生命周期管理
serviceController {rpcCreateVolume(CreateVolumeRequest) returns (CreateVolumeResponse) {}rpcDeleteVolume(DeleteVolumeRequest) returns (DeleteVolumeResponse) {}rpcControllerPublishVolume(ControllerPublishVolumeRequest) returns (ControllerPublishVolumeResponse) {}rpcControllerUnpublishVolume(ControllerUnpublishVolumeRequest) returns (ControllerUnpublishVolumeResponse) {}rpcListVolumes(ListVolumesRequest) returns (ListVolumesResponse) {}rpcGetCapacity(GetCapacityRequest) returns (GetCapacityResponse) {}rpcControllerGetCapabilities(ControllerGetCapabilitiesRequest) returns (ControllerGetCapabilitiesResponse) {}}
这个服务运行在控制平面(通常是 Controller Manager Pod),负责卷的全生命周期。CreateVolume 是我在自己的存储后端(比如文件系统、块设备、云存储)中创建实际的卷。这个调用可能很耗时(秒级),所以 CSI spec 特别强调:实现必须是幂等的。如果网络中断,Kubernetes 重试请求时,你必须返回相同结果而不是创建两个卷。
ControllerPublishVolume 负责将卷关联到特定的节点。对于云存储(如 AWS EBS),这步通常是将磁盘 attach 到 EC2 实例。对于本地存储,这步可能是空操作。返回的 publish_context 是一个 key-value 对,kubelet 会在 NodePublishVolume 时接收到它,用来区分同一个卷在不同节点的挂载方式。
Node 服务:Pod 挂载的关键操作
serviceNode {rpcNodeStageVolume(NodeStageVolumeRequest) returns (NodeStageVolumeResponse) {}rpcNodeUnstageVolume(NodeUnstageVolumeRequest) returns (NodeUnstageVolumeResponse) {}rpcNodePublishVolume(NodePublishVolumeRequest) returns (NodePublishVolumeResponse) {}rpcNodeUnpublishVolume(NodeUnpublishVolumeRequest) returns (NodeUnpublishVolumeResponse) {}rpcNodeGetCapabilities(NodeGetCapabilitiesRequest) returns (NodeGetCapabilitiesResponse) {}rpcNodeGetInfo(NodeGetInfoRequest) returns (NodeGetInfoResponse) {}}
这个服务运行在每个节点(kubelet 通过 gRPC 调用),负责将卷实际挂载到 Pod。NodeStageVolume 是预处理阶段——如果是块设备,这里格式化磁盘、创建文件系统。NodePublishVolume 才是真正的挂载,将卷绑定到 Pod 的挂载点(比如 /var/lib/kubelet/pods/{pod-id}/volumes/kubernetes.io~csi/{volume-id}/mount)。
两阶段设计(Stage + Publish)的好处是:一个块设备可能被多个 Pod 以只读方式使用,Stage 阶段只做一次(格式化、创建 FS),多个 Pod 各自执行 Publish 阶段(只读挂载)。
自定义本地存储驱动的完整实现
现在我们用 Go 实现一个简单但完整的本地存储驱动。这个驱动的后端存储是 Linux 本地文件系统上的目录——每个”卷”就是一个目录。
驱动的基础结构
packagemainimport (“context”“fmt”“net”“os”“path/filepath”“sync”“google.golang.org/grpc”csi“github.com/container-storage-interface/spec/lib/go/csi”)typeLocalStorageDriverstruct {nodeIDstringdriverNamestringvolumeDirstring// 所有卷的存储路径,如 /var/lib/local-volumesvolumesMutexsync.Mutexvolumesmap[string]*Volume// volumeID -> Volume metadata}typeVolumestruct {IDstringPathstringCapacityint64}funcNewLocalStorageDriver(nodeID, driverName, volumeDirstring) *LocalStorageDriver {return&LocalStorageDriver{nodeID: nodeID,driverName: driverName,volumeDir: volumeDir,volumes: make(map[string]*Volume), }}
驱动持有一个内存中的卷注册表(volumes map),记录已创建的卷。实际生产系统会用数据库替代这个 map,但这里用 map 演示核心逻辑。
Identity 服务实现
func (d*LocalStorageDriver) GetPluginInfo(ctxcontext.Context, req*csi.GetPluginInfoRequest) (*csi.GetPluginInfoResponse, error) {return&csi.GetPluginInfoResponse{Name: d.driverName, // “local-storage.k8s.io”VendorVersion: “0.1.0”, }, nil}func (d*LocalStorageDriver) GetPluginCapabilities(ctxcontext.Context, req*csi.GetPluginCapabilitiesRequest) (*csi.GetPluginCapabilitiesResponse, error) {return&csi.GetPluginCapabilitiesResponse{Capabilities: []*csi.PluginCapability{ {Type: &csi.PluginCapability_Service_{Service: &csi.PluginCapability_Service{Type: csi.PluginCapability_Service_CONTROLLER_SERVICE, }, }, }, }, }, nil}func (d*LocalStorageDriver) Probe(ctxcontext.Context, req*csi.ProbeRequest) (*csi.ProbeResponse, error) {return&csi.ProbeResponse{Ready: &wrapperspb.BoolValue{Value: true}}, nil}
这三个方法很直接。注意 GetPluginCapabilities 声明驱动支持 CONTROLLER_SERVICE,这告诉 Kubernetes:”我实现了完整的生命周期管理(CreateVolume / DeleteVolume),不是只读驱动”。
下面这张表格汇总了三个服务的核心差异,开发时可以快速查阅:
Controller 服务:创建和删除卷
func (d*LocalStorageDriver) CreateVolume(ctxcontext.Context, req*csi.CreateVolumeRequest) (*csi.CreateVolumeResponse, error) {d.volumesMutex.Lock()deferd.volumesMutex.Unlock()volumeID:=req.Nameif_, exists:=d.volumes[volumeID]; exists {// 幂等性:已存在则返回成功vol:=d.volumes[volumeID]return&csi.CreateVolumeResponse{Volume: &csi.Volume{VolumeId: volumeID,CapacityBytes: vol.Capacity, }, }, nil }// 创建卷的物理存储(这里就是一个目录)volPath:=filepath.Join(d.volumeDir, volumeID)iferr:=os.MkdirAll(volPath, 0755); err!=nil {returnnil, fmt.Errorf(“failed to create volume directory: %v”, err) }capacity:=req.CapacityRange.RequiredBytesifcapacity==0 {capacity = 1024*1024*1024// 默认 1GiB }d.volumes[volumeID] = &Volume{ID: volumeID,Path: volPath,Capacity: capacity, }return&csi.CreateVolumeResponse{Volume: &csi.Volume{VolumeId: volumeID,CapacityBytes: capacity, }, }, nil}func (d*LocalStorageDriver) DeleteVolume(ctxcontext.Context, req*csi.DeleteVolumeRequest) (*csi.DeleteVolumeResponse, error) {d.volumesMutex.Lock()deferd.volumesMutex.Unlock()volumeID:=req.VolumeIdvol, exists:=d.volumes[volumeID]if !exists {// 幂等性:已删除则返回成功return&csi.DeleteVolumeResponse{}, nil }iferr:=os.RemoveAll(vol.Path); err!=nil {returnnil, fmt.Errorf(“failed to delete volume: %v”, err) } delete(d.volumes, volumeID)return&csi.DeleteVolumeResponse{}, nil}func (d*LocalStorageDriver) ControllerPublishVolume(ctxcontext.Context, req*csi.ControllerPublishVolumeRequest) (*csi.ControllerPublishVolumeResponse, error) {// 本地存储驱动不需要 attach 操作,返回 publish_context 为空return&csi.ControllerPublishVolumeResponse{PublishContext: map[string]string{}, }, nil}func (d*LocalStorageDriver) ControllerUnpublishVolume(ctxcontext.Context, req*csi.ControllerUnpublishVolumeRequest) (*csi.ControllerUnpublishVolumeResponse, error) {return&csi.ControllerUnpublishVolumeResponse{}, nil}
注意 CreateVolume 的幂等性设计:如果卷已存在,不是报错而是返回现有卷的信息。这样即使网络超时导致 Kubernetes 重试,也能安全处理。ControllerPublishVolume 对本地存储来说是空操作,但你必须实现这个方法——我第一次写 CSI 驱动时漏掉了它,结果 external-attacher 反复报 Unimplemented 错误,排查了快两小时才意识到问题出在这里。
Node 服务:挂载到 Pod
func (d*LocalStorageDriver) NodeStageVolume(ctxcontext.Context, req*csi.NodeStageVolumeRequest) (*csi.NodeStageVolumeResponse, error) {// 本地存储不需要 stage 操作(格式化),直接返回return&csi.NodeStageVolumeResponse{}, nil}func (d*LocalStorageDriver) NodeUnstageVolume(ctxcontext.Context, req*csi.NodeUnstageVolumeRequest) (*csi.NodeUnstageVolumeResponse, error) {return&csi.NodeUnstageVolumeResponse{}, nil}func (d*LocalStorageDriver) NodePublishVolume(ctxcontext.Context, req*csi.NodePublishVolumeRequest) (*csi.NodePublishVolumeResponse, error) {targetPath:=req.TargetPath// 例如 /var/lib/kubelet/pods/xxx/volumes/kubernetes.io~csi/vol-1/mountvolumeID:=req.VolumeIdd.volumesMutex.Lock()vol, exists:=d.volumes[volumeID]d.volumesMutex.Unlock()if !exists {returnnil, fmt.Errorf(“volume %s not found”, volumeID) }// 创建目标挂载点iferr:=os.MkdirAll(targetPath, 0755); err!=nil {returnnil, fmt.Errorf(“failed to create mount point: %v”, err) }// 执行 bind mount:将卷目录挂载到 Pod 的挂载点// 实际实现需要调用 syscall.Mount()iferr:=syscall.Mount(vol.Path, targetPath, “”, syscall.MS_BIND, “”); err!=nil {returnnil, fmt.Errorf(“mount failed: %v”, err) }return&csi.NodePublishVolumeResponse{}, nil}func (d*LocalStorageDriver) NodeUnpublishVolume(ctxcontext.Context, req*csi.NodeUnpublishVolumeRequest) (*csi.NodeUnpublishVolumeResponse, error) {targetPath:=req.TargetPathiferr:=syscall.Unmount(targetPath, 0); err!=nil {returnnil, fmt.Errorf(“unmount failed: %v”, err) }return&csi.NodeUnpublishVolumeResponse{}, nil}func (d*LocalStorageDriver) NodeGetInfo(ctxcontext.Context, req*csi.NodeGetInfoRequest) (*csi.NodeGetInfoResponse, error) {return&csi.NodeGetInfoResponse{NodeId: d.nodeID,MaxVolumesPerNode: 100, // 单个节点最多挂载 100 个卷 }, nil}
NodePublishVolume 是 Pod 能否使用卷的关键。通过 syscall.Mount() 执行 bind mount,将卷目录(/var/lib/local-volumes/vol-1)挂载到 Pod 的挂载点(/var/lib/kubelet/pods/xxx/volumes/...)。kubelet 看到挂载点出现后,才会启动 Pod。有一个容易忽略的细节:NodeUnpublishVolume 里的 Unmount 失败时,如果你直接返回错误,kubelet 会不断重试,但 Pod 也无法被删除。生产中更稳妥的做法是先检查挂载点是否还存在(os.Stat(targetPath)),不存在就直接返回成功。
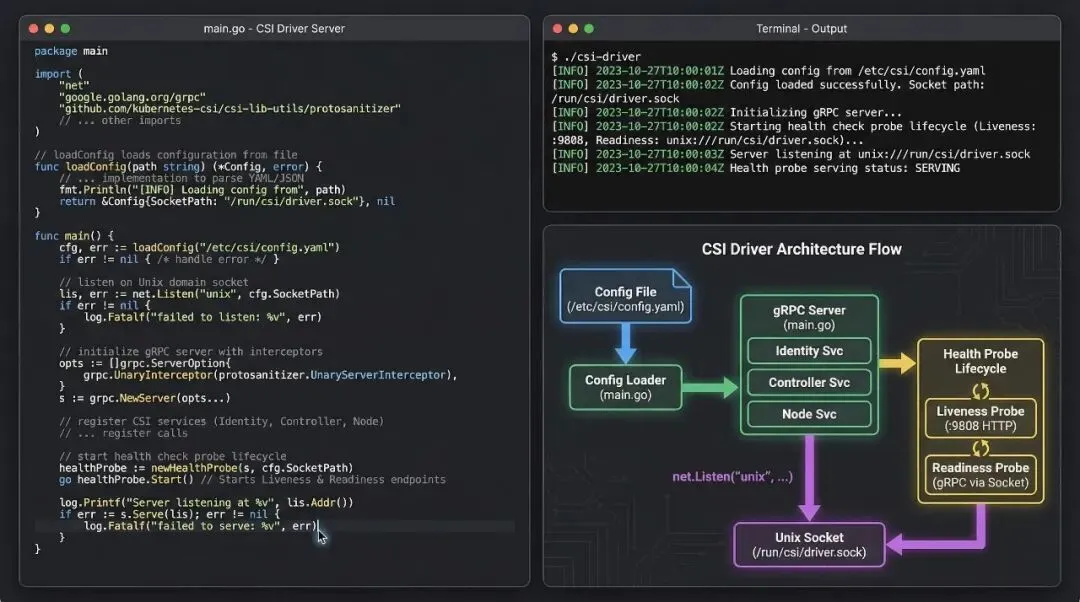
gRPC 服务启动与 Unix Socket 通信
func main() { driverName:=“local-storage.k8s.io” nodeID:=os.Getenv(“NODE_ID”) ifnodeID==“” { nodeID = “local-node-1” }volumeDir:=“/var/lib/local-volumes”os.MkdirAll(volumeDir, 0755)driver:=NewLocalStorageDriver(nodeID, driverName, volumeDir)// 创建 gRPC 服务器并注册驱动grpcServer:=grpc.NewServer()csi.RegisterIdentityServer(grpcServer, driver)csi.RegisterControllerServer(grpcServer, driver)csi.RegisterNodeServer(grpcServer, driver)// 绑定到 Unix SocketsocketPath:=“/var/lib/kubelet/plugins/local-storage.k8s.io/csi.sock”os.MkdirAll(filepath.Dir(socketPath), 0755)os.Remove(socketPath) // 防止旧的 socket 文件冲突listener, err:=net.Listen(“unix”, socketPath)iferr!=nil {log.Fatalf(“Failed to listen on socket: %v”, err) }log.Printf(“CSI driver starting on %s”, socketPath)iferr:=grpcServer.Serve(listener); err!=nil {log.Fatalf(“Server failed: %v”, err) }}
驱动启动时,创建一个 Unix Socket(通常在 /var/lib/kubelet/plugins/{driver-name}/csi.sock)并绑定 gRPC 服务。kubelet 和 external-provisioner 通过这个 Socket 与驱动通信。Socket 文件本身就是驱动存活的证明——kubelet 检测 Socket 文件存在就认为驱动已就绪。我曾在一次故障排查中发现,驱动重启后旧的 Socket 文件没被清理,导致 kubelet 一直连不上新进程,所以上面代码里 os.Remove(socketPath) 这一行不能省。
验证 Socket 是否正常工作,可以用 csi-sanity 或直接用 grpcurl 测试:
# 检查 Socket 文件是否存在ls -la /var/lib/kubelet/plugins/local-storage.k8s.io/csi.sock# 用 grpcurl 测试 Identity 服务grpcurl -plaintext -unix /var/lib/kubelet/plugins/local-storage.k8s.io/csi.sock csi.v1.Identity/GetPluginInfo
到这里,我们已经完成了 CSI 驱动的核心实现——从规范理解到三层 gRPC 服务的 Go 代码,再到 Unix Socket 启动机制。但代码写完只是开始,要让驱动真正在 Kubernetes 集群中跑起来,还需要配套的 Sidecar 容器编排、部署 YAML、测试验证和生产环境配置。
现在就动手:把上面的代码跑起来,用 csi-sanity 对你的驱动做一次合规测试。它会自动调用所有 CSI RPC 并验证返回值是否符合规范——我每次改完驱动都先跑一遍,能拦住 80% 的低级错误:
# 安装 csi-sanitygo install github.com/kubernetes-csi/csi-test/cmd/csi-sanity@latest# 对你的驱动跑合规测试(驱动需先启动)csi-sanity –csi.endpoint /var/lib/kubelet/plugins/local-storage.k8s.io/csi.sock \ –csi.testvolumesize 1073741824
下一篇预告
《CSI 插件开发实战(下):部署、测试与生产上线》 — 我们将完成 Sidecar 容器编排(provisioner / attacher / registrar)、Controller StatefulSet 和 Node DaemonSet 部署、单元测试与集成测试、本地集群调试技巧,以及生产环境的 RBAC / StorageClass / 监控告警配置。
 夜雨聆风
夜雨聆风