一个AI工具,如果没有工具系统,就只是”纸上谈兵”。Claude Code的40+工具,让它从”代码生成器”进化为”AI工程师”。
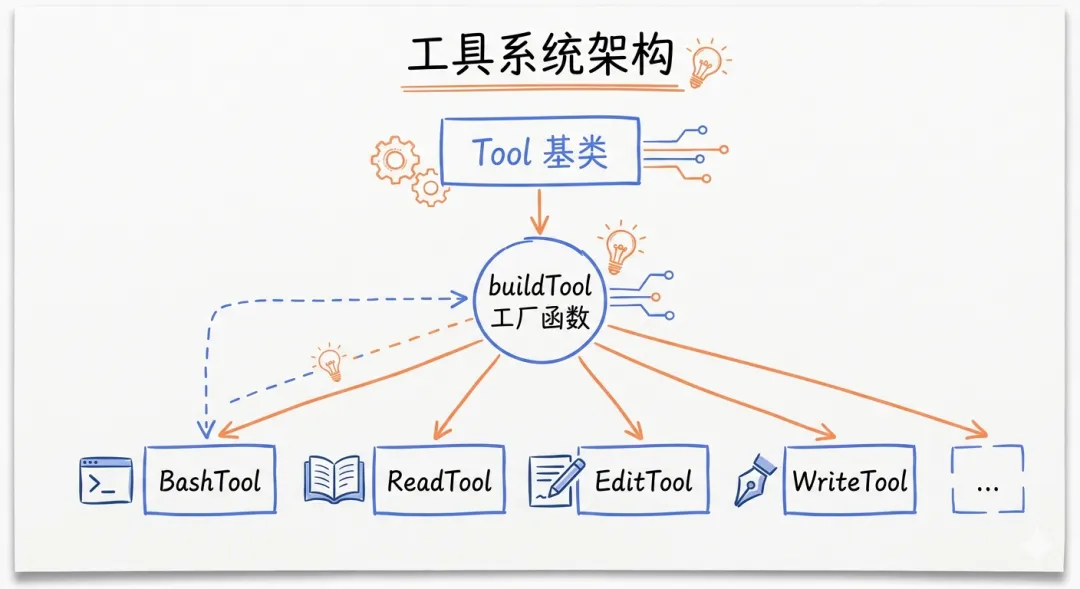
工具系统架构图
开篇:为什么工具系统是AI Agent的核心
很多人问:Claude Code和ChatGPT有什么区别?
表面上看,都是”对话+代码生成”。但本质上,ChatGPT只能”说”,Claude Code能”做”。
这个”做”的能力,就来自工具系统。
工具系统的本质
传统AI工具:
● 输入:文本
● 输出:文本(代码、回答、建议)
● 能力:生成内容
Claude Code:
● 输入:任务
● 输出:行动(读文件、改代码、执行命令)
● 能力:执行任务
关键差异:
● ChatGPT:”这是一个修复方案…”
● Claude Code:”我已经修复了,运行测试通过。”
这个差异,就是工具系统带来的。
工具系统对比图
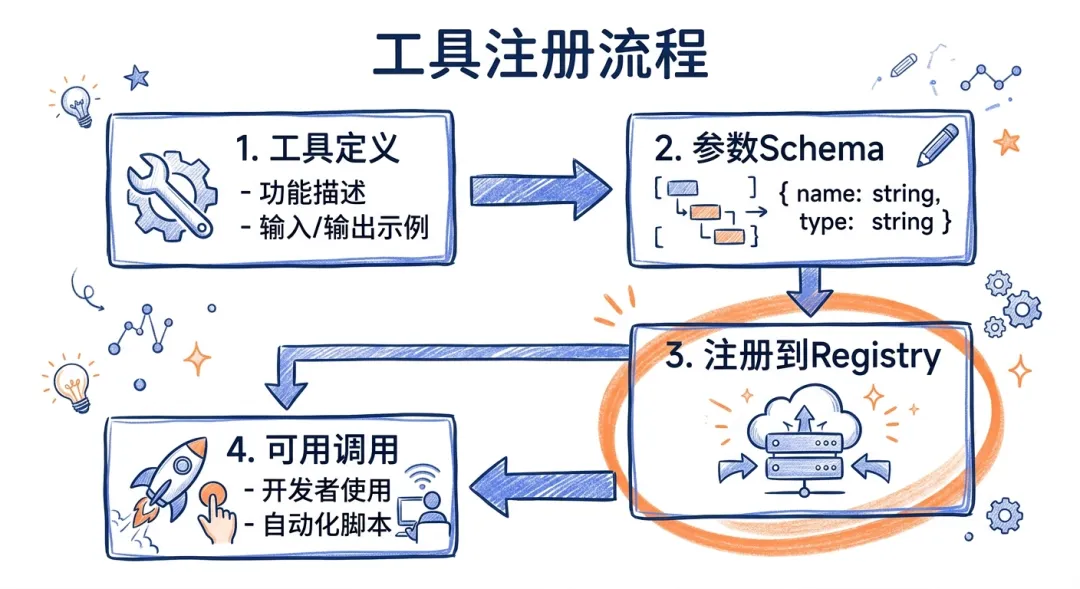
一、工具注册机制:从buildTool()到动态过滤
Tool基类设计
泄露的源码揭示了Tool的核心设计:
// 伪代码,基于泄露源码重构interface Tool { // 元数据 name: string description: string // 输入验证 inputSchema: z.ZodType<any> // 权限控制 checkPermissions(input: any): Promise<PermissionDecision> // 执行逻辑 execute(input: any, context: ExecutionContext): Promise<ToolResult> // 结果渲染 render(result: ToolResult): React.ReactNode // 并发安全 isConcurrentSafe(): boolean isInterruptible(): boolean isReadOnly(): boolean // 结果限制 getMaxResultSize(): number}
设计亮点:
1. Schema验证:使用Zod确保输入正确
const BashToolInputSchema = z.object({ command: z.string(), workingDirectory: z.string().optional(), timeout: z.number().optional(),})// 自动验证const input = BashToolInputSchema.parse(rawInput)
2. 权限控制:细粒度的权限检查
enum PermissionDecision { Allow, // 允许执行 Deny, // 拒绝执行 Ask, // 询问用户 Defer, // 延迟决策}async checkPermissions(input: { command: string }): Promise<PermissionDecision> { // 检查危险命令 if (input.command.includes(‘rm -rf’)) { return PermissionDecision.Ask } // 检查权限规则 if (this.settings.allowedCommands.includes(input.command)) { return PermissionDecision.Allow } return PermissionDecision.Ask}
3. 并发安全:防止资源竞争
class FileEditTool implements Tool { isConcurrentSafe(): boolean { return false // 文件编辑不能并发 }}class GrepTool implements Tool { isConcurrentSafe(): boolean { return true // 搜索可以并发 }}
buildTool()工厂模式
所有工具都通过buildTool()工厂函数创建:
function buildTool(config: ToolConfig): Tool { return { name: config.name, description: config.description, inputSchema: config.inputSchema, // 默认实现 checkPermissions: config.checkPermissions || (() => PermissionDecision.Allow), isEnabled: config.isEnabled || (() => true), isConcurrentSafe: config.isConcurrentSafe || (() => false), isInterruptible: config.isInterruptible || (() => true), isReadOnly: config.isReadOnly || (() => false), // 必须实现 execute: config.execute, render: config.render, }}
设计哲学:
“Default permissive, override for security”
默认宽松:checkPermissions默认返回Allow,isEnabled默认返回true。
按需收紧:每个工具根据自己的安全需求,覆盖默认行为。
这不是”安全漏洞”,而是开发便利性与安全性的平衡。
Schema缓存:toolSchemaCache.ts的实现
问题:每次调用工具都需要序列化Schema,影响性能。
解决方案:缓存Schema定义
class ToolSchemaCache { private cache: Map<string, string> = new Map() getSchema(tool: Tool): string { const cached = this.cache.get(tool.name) if (cached) return cached // 首次生成并缓存 const schema = zodToJsonSchema(tool.inputSchema) this.cache.set(tool.name, JSON.stringify(schema)) return this.cache.get(tool.name)! }}
收益:
● 工具选择速度:提升~30%
● 内存占用:增加~2MB(可接受)
动态过滤:基于Feature Gates
编译时过滤:
// 构建前const allTools = [ FileReadTool, FileEditTool, BashTool, // …更多工具]// 如果FEATURE_ADVANCED_TOOLS未启用const tools = allTools.filter(tool => { if (tool.requiresFeature) { return feature(tool.requiresFeature) } return true})
运行时过滤:
// 根据用户权限动态过滤function getAvailableTools(user: User): Tool[] { return allTools.filter(tool => { // 检查用户是否有权限使用该工具 if (!user.permissions.includes(tool.name)) { return false } // 检查工具是否在当前环境可用 if (!tool.isAvailable()) { return false } return true })}
工具注册流程图
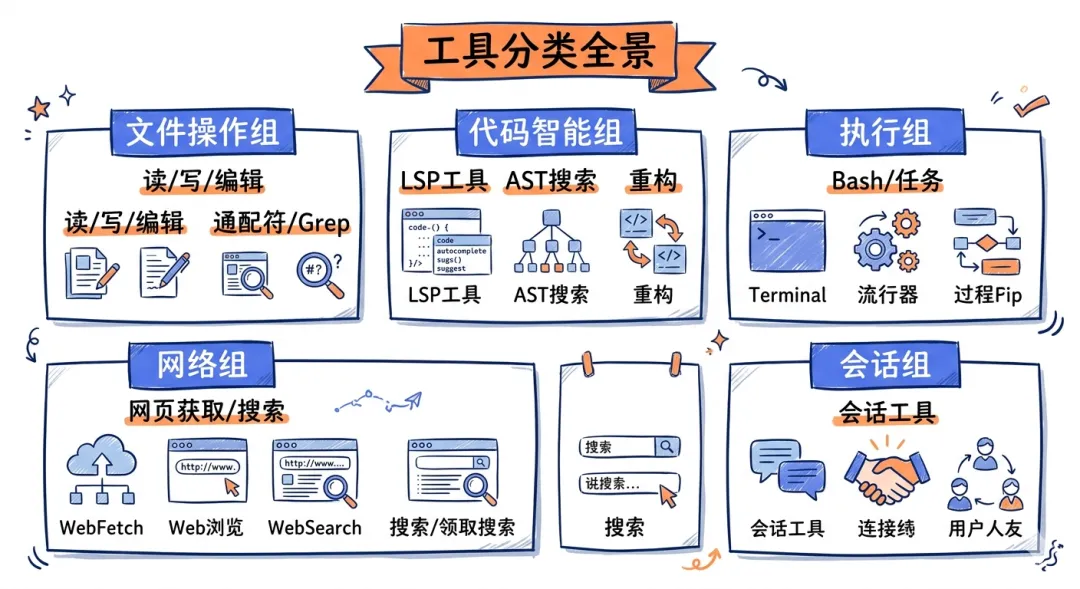
二、核心工具详解:从BashTool到MCPTool
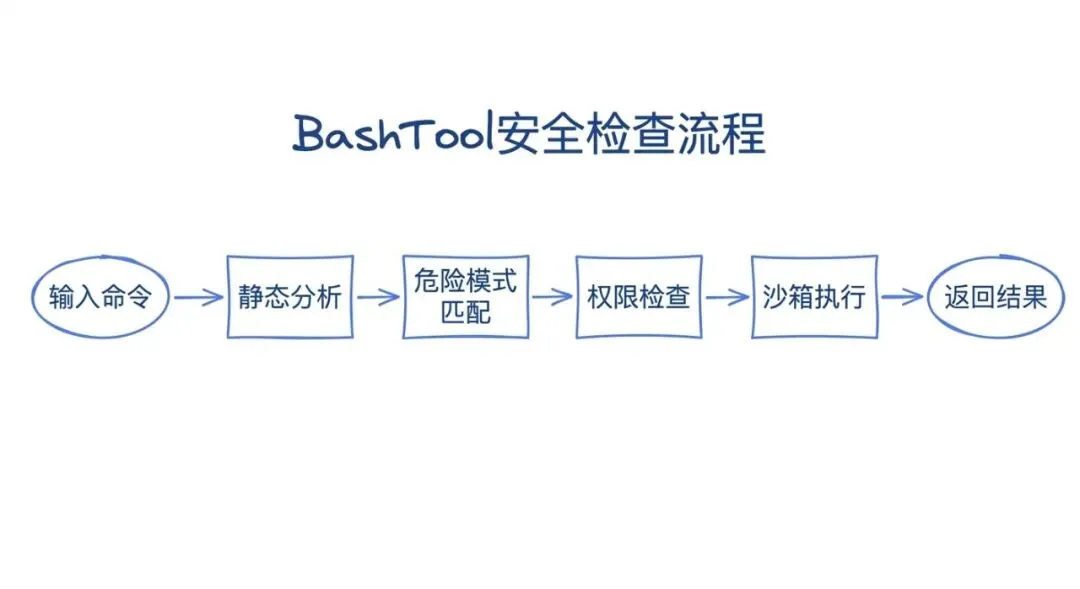
BashTool:静态分析防止危险命令
最危险也最强大的工具。
泄露的源码揭示了它的安全机制:
class BashTool implements Tool { name = ‘bash’ async execute(input: { command: string }) { // 静态分析 const analysis = this.analyzeCommand(input.command) if (analysis.isDestructive) { throw new Error(`Destructive command blocked: ${analysis.reason}`) } // 沙箱执行(如果启用) if (this.settings.sandbox.enabled) { return this.executeInSandbox(input.command) } // 正常执行 return this.executeDirectly(input.command) } analyzeCommand(command: string): CommandAnalysis { const dangerousPatterns = [ /rm\s+-rf\s+\//, // 删除根目录 />\s*\/dev\/sda/, // 覆盖磁盘 /mkfs/, // 格式化 /dd\s+if=.*of=\/dev/, // 磁盘操作 /:(){ :|:& };:/, // Fork bomb ] for (const pattern of dangerousPatterns) { if (pattern.test(command)) { return { isDestructive: true, reason: `Matches dangerous pattern: ${pattern}`, } } } return { isDestructive: false } }}
安全层级:
1. 静态分析:检查危险模式
2. 权限检查:是否在allowlist中
3. 沙箱隔离:bubblewrap/Seatbelt
4. 用户确认:高风险操作需批准
实测案例:
# 被阻止claude> 删除所有node_modulesAI: 我需要执行 `find . -name node_modules -exec rm -rf {} +`⚠️ 这将删除多个目录,确认执行?[y/N]# 自动通过claude> 运行测试AI: 执行 `npm test`✓ 自动执行(在allowlist中)
FileEditTool:验证settings文件
为什么settings文件需要特殊处理?
因为它们可能包含敏感信息或危险配置。
class FileEditTool implements Tool { async execute(input: { path: string, oldString: string, newString: string }) { // 检查是否是settings文件 if (this.isSettingsFile(input.path)) { return this.editSettingsFile(input) } // 普通文件编辑 return this.editNormalFile(input) } isSettingsFile(path: string): boolean { const settingsPatterns = [ /\.claude\/settings\.json$/, /claude\.json$/, /\.clauderc$/, ] return settingsPatterns.some(pattern => pattern.test(path)) } async editSettingsFile(input: EditInput): Promise<ToolResult> { // 解析当前settings const currentSettings = JSON.parse(await fs.readFile(input.path, ‘utf-8’)) // 解析新的settings const newSettings = JSON.parse(input.newString) // 验证新配置 const validation = this.validateSettings(newSettings) if (!validation.valid) { return { success: false, error: `Invalid settings: ${validation.errors.join(‘, ‘)}`, } } // 检查危险配置 if (this.hasDangerousConfig(newSettings)) { return { success: false, error: ‘Dangerous configuration detected. Manual review required.’, } } // 应用编辑 await fs.writeFile(input.path, JSON.stringify(newSettings, null, 2)) return { success: true } } validateSettings(settings: any): ValidationResult { // 检查必需字段 if (settings.permissionMode && ![‘default’, ‘auto’, ‘plan’].includes(settings.permissionMode)) { return { valid: false, errors: [‘Invalid permissionMode’], } } // 检查类型 if (settings.tools && !Array.isArray(settings.tools)) { return { valid: false, errors: [‘tools must be an array’], } } return { valid: true, errors: [] } }}
保护机制:
1. 格式验证:确保JSON有效
2. 字段验证:确保字段类型正确
3. 安全检查:阻止危险配置
4. 审计日志:记录所有修改
WebFetchTool:域名预审批列表
问题:AI可能访问恶意网站或泄露敏感信息。
解决方案:域名白名单+预审批机制
class WebFetchTool implements Tool { private allowedDomains = [ ‘github.com’, ‘npmjs.com’, ‘stackoverflow.com’, ‘docs.anthropic.com’, // …更多可信域名 ] async execute(input: { url: string }) { const urlObj = new URL(input.url) // 检查域名是否在白名单 if (!this.allowedDomains.includes(urlObj.hostname)) { // 需要用户审批 const approved = await this.requestApproval(input.url) if (!approved) { return { success: false, error: ‘Domain not in allowlist and user denied access.’, } } // 添加到临时白名单 this.allowedDomains.push(urlObj.hostname) } // 执行fetch return fetch(input.url) }}
安全策略:
● 预审批域名:GitHub、npm等可信站点
● 动态审批:其他域名需要用户确认
● 会话缓存:批准过的域名在当前会话有效
● 审计日志:记录所有访问
AgentTool:子代理的创建与管理
最复杂的工具:它创建了一个新的Claude实例。
class AgentTool implements Tool { name = ‘agent’ async execute(input: { task: string tools?: string[] // 允许的工具列表 model?: ‘opus’ | ‘sonnet’ timeout?: number }) { // 创建子代理 const subAgent = await this.createSubAgent({ tools: input.tools || [‘read’, ‘grep’, ‘glob’], model: input.model || ‘sonnet’, }) // 在隔离环境中执行 const result = await subAgent.execute(input.task, { timeout: input.timeout || 300000, // 5分钟 }) // 返回摘要 return { success: result.success, summary: result.summary, // 不返回完整上下文 artifacts: result.artifacts, // 只返回产物 } } async createSubAgent(config: SubAgentConfig): Promise<SubAgent> { // 创建新的上下文窗口 const context = new ContextWindow() // 加载指定的工具 const tools = config.tools.map(name => this.toolRegistry.get(name)) // 选择模型 const model = config.model === ‘opus’ ? ‘claude-opus-4-6’ : ‘claude-sonnet-4-6’ return new SubAgent({ context, tools, model, // 子代理没有AgentTool(防止递归) excludedTools: [‘agent’, ‘team-create’], }) }}
使用场景:
用户: 分析整个代码库的依赖关系AI: 我需要扫描所有package.json文件,这会产生大量上下文。让我创建一个子代理来处理这个任务…[子代理启动]→ 读取所有package.json→ 分析依赖关系→ 生成依赖图谱[子代理完成]AI: 依赖分析完成。发现了15个循环依赖,详见dependency-graph.json。
关键优势:
● 上下文隔离:子代理的工作不污染主上下文
● 工具隔离:可以限制子代理的能力
● 超时控制:防止长时间运行
● 结果摘要:只返回关键信息
MCPTool:外部工具的统一接口
MCP(Model Context Protocol):开放的工具协议。
class MCPTool implements Tool { name = ‘mcp’ async execute(input: { server: string tool: string arguments: any }) { // 获取MCP服务器连接 const connection = await this.mcpManager.getConnection(input.server) if (!connection) { return { success: false, error: `MCP server “${input.server}” not connected.`, } } // 调用工具 try { const result = await connection.callTool({ name: input.tool, arguments: input.arguments, }) return { success: true, content: result.content, } } catch (error) { return { success: false, error: error.message, } } }}
MCP服务器的生命周期:
[启动]→ 加载MCP配置→ 连接服务器→ 发现工具列表→ 注册到ToolRegistry[运行]→ 接收工具调用请求→ 通过MCP协议转发→ 返回结果[关闭]→ 断开连接→ 清理资源
LSPTool:语言服务器协议集成
让AI理解代码结构,而不仅仅是文本。
class LSPTool implements Tool { name = ‘lsp’ private clients: Map<string, LanguageClient> = new Map() async execute(input: { action: ‘definition’ | ‘references’ | ‘hover’ | ‘symbols’ file: string line: number character: number }) { // 获取或创建LSP客户端 const client = await this.getOrCreateClient(input.file) switch (input.action) { case ‘definition’: return this.gotoDefinition(client, input) case ‘references’: return this.findReferences(client, input) case ‘hover’: return this.getHover(client, input) case ‘symbols’: return this.listSymbols(client, input.file) } } async gotoDefinition(client: LanguageClient, input: any) { const result = await client.sendRequest(‘textDocument/definition’, { textDocument: { uri: `file://${input.file}` }, position: { line: input.line, character: input.character }, }) return { success: true, location: result, } }}
支持的LSP功能:
|
|
|
|
| gotoDefinition |
|
|
| findReferences |
|
|
| hover |
|
|
| symbols |
|
|
| rename |
|
|
核心工具关系图
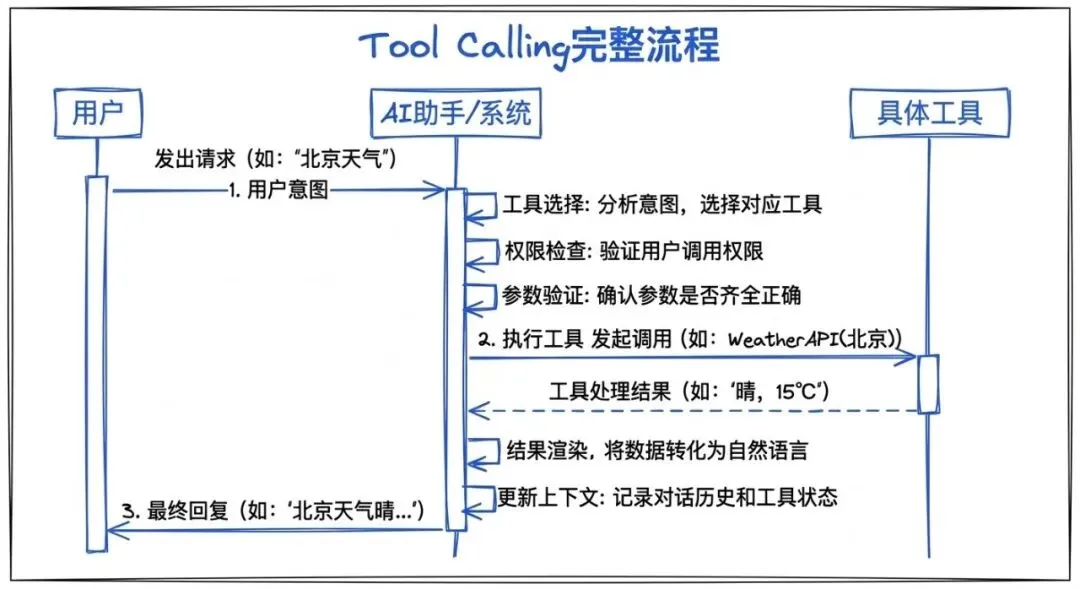
三、Tool Calling流程:从意图到执行
完整的调用链
当用户说”修复这个bug”时,发生了什么?
步骤1:意图理解
// Claude分析用户意图const intent = analyzeIntent(“修复这个bug”)// → { action: “fix”, target: “bug”, context: “当前文件” }
步骤2:工具选择
// 选择合适的工具const tools = selectTools(intent, availableTools)// → [FileReadTool, GrepTool, BashTool, FileEditTool]
步骤3:工具调用规划
// 生成工具调用序列const plan = [ { tool: ‘grep’, input: { pattern: ‘error’, path: ‘./src’ } }, { tool: ‘read’, input: { path: ‘./src/error.ts’ } }, { tool: ‘edit’, input: { path: ‘./src/error.ts’, oldString: ‘…’, newString: ‘…’ } }, { tool: ‘bash’, input: { command: ‘npm test’ } },]
步骤4:逐步执行
for (const step of plan) { // 检查权限 const permission = await checkPermission(step) if (permission === PermissionDecision.Ask) { const userDecision = await askUser(step) if (userDecision === ‘deny’) { // 中断执行或寻找替代方案 break } } // 执行工具 const result = await executeTool(step) // 处理结果 if (!result.success) { // 错误处理 await handleError(result.error) break } // 更新上下文 context.addToolResult(result)}
权限检查的四个层级
层级1:配置规则(最高优先级)
{ “permissions”: { “allow”: [“Bash(npm *)”, “Read(*)”], “deny”: [“Bash(rm -rf *)”], “ask”: [“Bash(git push *)”] }}
层级2:ML分类器
// 在auto模式下,使用ML模型评估风险const risk = await classifier.evaluate({ tool: ‘bash’, input: { command: ‘npm install lodash’ }, context: currentContext,})// risk: { level: ‘LOW’, confidence: 0.95 }
层级3:交互式提示
// 如果前两层都没有决策,询问用户const decision = await showPermissionDialog({ tool: ‘bash’, input: { command: ‘git push origin main’ }, reason: ‘This will push changes to the remote repository.’,})
层级4:Coordinator处理(多Agent场景)
// 如果是子代理的请求,传递给coordinatorif (isSubAgentRequest()) { const decision = await coordinator.evaluatePermission(request) return decision}
错误处理与重试机制
错误分类:
enum ToolError { InputValidationError, // 输入验证失败 PermissionDenied, // 权限拒绝 ExecutionError, // 执行错误 TimeoutError, // 超时 ResourceLimitExceeded, // 资源限制}
重试策略:
async function executeWithRetry(tool: Tool, input: any, maxRetries = 3) { for (let attempt = 0; attempt < maxRetries; attempt++) { try { const result = await tool.execute(input) if (result.success) { return result } // 可恢复错误,重试 if (result.error === ToolError.TimeoutError) { await sleep(1000 * (attempt + 1)) // 指数退避 continue } // 不可恢复错误,直接返回 return result } catch (error) { if (attempt === maxRetries – 1) { throw error } await sleep(1000 * (attempt + 1)) } }}
Tool Calling时序图
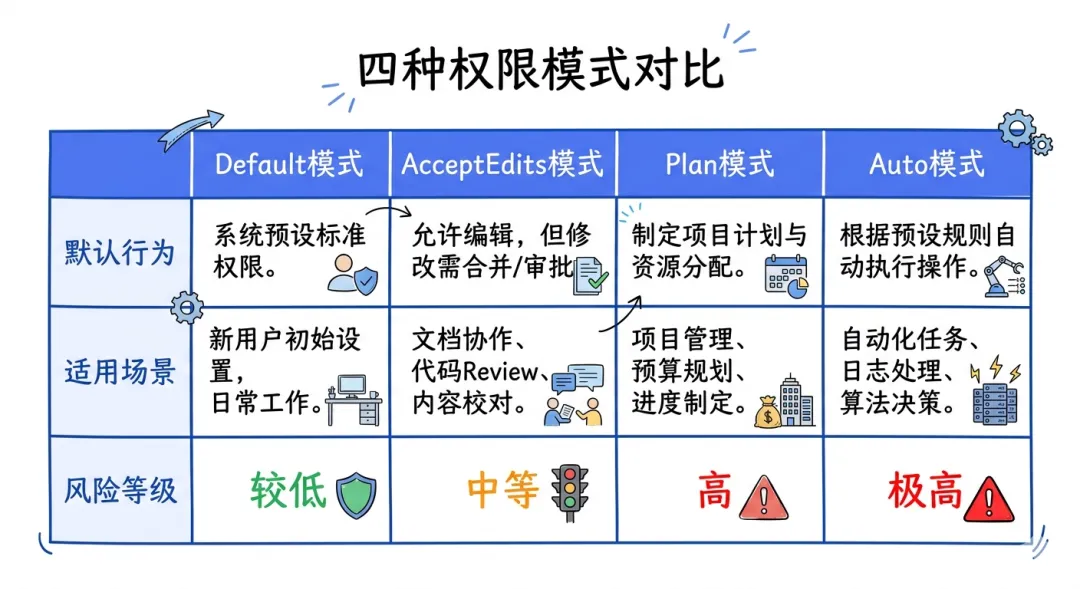
四、权限系统深度解析:从default到bypass
四种权限模式对比
|
|
|
|
|
| default |
|
|
|
| acceptEdits |
|
|
|
| plan |
|
|
|
| auto |
|
|
|
| bypassPermissions |
|
|
|
Protected Files机制
某些文件永远需要手动确认:
const protectedFiles = [ /\.env/, // 环境变量 /credentials\.json/, // 凭证文件 /\.ssh\//, // SSH密钥 /\.aws\//, // AWS凭证 /\.github\/workflows\//, // CI/CD配置]
即使设置为bypass模式,这些文件仍然会触发警告:
async checkProtectedFiles(path: string): Promise<boolean> { for (const pattern of protectedFiles) { if (pattern.test(path)) { // 显示警告 await showWarning(`Attempting to modify protected file: ${path}`) // 需要额外确认 const confirmed = await askForConfirmation( `Are you sure you want to modify ${path}?` ) return confirmed } } return true}
ML分类器:自动决策权限提示
在auto模式下,Claude Code使用ML模型评估风险。
泄露的源码揭示了它的实现:
class PermissionClassifier { private model: MLModel async evaluate(request: PermissionRequest): Promise<ClassificationResult> { // 提取特征 const features = this.extractFeatures(request) // 调用ML模型 const prediction = await this.model.predict(features) return { level: prediction.level, // LOW | MEDIUM | HIGH confidence: prediction.confidence, reason: prediction.reason, } } extractFeatures(request: PermissionRequest): Features { return { // 工具特征 toolType: request.tool, toolCategory: getToolCategory(request.tool), // 输入特征 inputComplexity: measureComplexity(request.input), hasSensitiveKeywords: checkSensitiveKeywords(request.input), // 上下文特征 projectType: detectProjectType(), recentActions: getRecentActions(), userBehaviorPattern: getUserPattern(), // 文件特征(如果是文件操作) fileType: getFileType(request.input.path), isProtectedFile: isProtected(request.input.path), } }}
决策逻辑:
function makeDecision(classification: ClassificationResult): PermissionDecision { // LOW风险:自动允许 if (classification.level === ‘LOW’ && classification.confidence > 0.9) { return PermissionDecision.Allow } // HIGH风险:询问用户 if (classification.level === ‘HIGH’) { return PermissionDecision.Ask } // MEDIUM风险:根据置信度决定 if (classification.confidence > 0.95) { return PermissionDecision.Allow } return PermissionDecision.Ask}
Permission Explainer:透明的风险解释
为什么需要解释?
因为用户需要理解为什么某个操作被认为是高风险的。
class PermissionExplainer { async explain(request: PermissionRequest, classification: ClassificationResult): Promise<string> { // 使用单独的LLM调用生成解释 const prompt = `A permission request was classified as ${classification.level} risk.Request details:– Tool: ${request.tool}– Input: ${JSON.stringify(request.input)}– Context: ${request.context}Classification reason: ${classification.reason}Explain to the user why this operation is considered ${classification.level} risk, in simple and clear language. Focus on:1. What the operation will do2. Why it might be risky3. What could go wrong` const explanation = await callClaude(prompt, { model: ‘haiku’ }) return explanation }}
示例输出:
⚠️ Risk Level: HIGHThis operation will execute `git push –force origin main`, which:– Overwrites remote history (cannot be undone)– May delete other developers’ commits– Breaks team collaboration workflowAlternative: Use `git push` without `–force` flag, or create a new branch.
权限模式对比图
五、实战案例:工具系统的典型使用模式
案例1:修复测试失败
用户: 测试失败了,帮我修复AI: 让我分析测试失败的原因…[Tool: Bash] 运行 npm test→ 3 tests failed[Tool: Grep] 搜索错误信息→ 找到错误在 src/utils.test.ts[Tool: Read] 读取测试文件→ 发现断言错误[Tool: Read] 读取实现文件→ 发现实现逻辑错误[Tool: Edit] 修复实现→ 已修复 src/utils.ts[Tool: Bash] 重新运行测试→ 所有测试通过 ✅AI: 问题已修复!是utils.ts中的计算逻辑错误,详见提交。
工具序列:Bash → Grep → Read → Read → Edit → Bash
案例2:重构代码结构
用户: 把这个文件拆分成多个模块AI: 让我分析文件结构…[Tool: LSP] 分析文件符号→ 发现5个主要函数[Tool: Read] 读取文件内容→ 1200行代码[Tool: Agent] 创建子代理分析依赖→ 生成依赖关系图[Tool: Write] 创建新文件 module1.ts[Tool: Write] 创建新文件 module2.ts[Tool: Write] 创建新文件 module3.ts[Tool: Edit] 更新原文件→ 只保留入口和导入[Tool: Bash] 运行测试→ 测试通过 ✅AI: 已拆分为3个模块,每个模块约400行,依赖关系清晰。
工具序列:LSP → Read → Agent → Write × 3 → Edit → Bash
案例3:研究新代码库
用户: 帮我理解这个项目的架构AI: 让我探索项目结构…[Tool: Bash] 查看项目根目录→ 发现 package.json, src/, tests/[Tool: Read] 读取 package.json→ 识别技术栈: React, TypeScript, Jest[Tool: Glob] 查找所有入口文件→ 找到 src/index.ts, src/App.tsx[Tool: LSP] 分析入口符号→ 识别主要组件[Tool: Grep] 搜索路由配置→ 找到路由结构[Tool: Agent] 深度分析目录结构→ 生成架构图AI: 这是一个React+TypeScript项目,采用组件化架构…
工具序列:Bash → Read → Glob → LSP → Grep → Agent
六、工具系统的启示:如何设计自己的AI Agent工具
核心设计原则
原则1:工具是能力的延伸,不是能力的替代
// 错误做法class MagicTool implements Tool { name = ‘magic’ async execute(input: any) { // 自动完成所有事情 return await doEverything(input) }}// 正确做法class FileReadTool implements Tool { name = ‘read’ async execute(input: { path: string }) { // 只做一件事:读取文件 return fs.readFile(input.path, ‘utf-8’) }}
原则2:每个工具都应该有明确的安全边界
class BashTool implements Tool { checkPermissions(input: { command: string }) { // 定义安全边界 if (isDangerous(input.command)) { return PermissionDecision.Ask } return PermissionDecision.Allow }}
原则3:工具组合比单一工具更强大
// 不要创建”超级工具”class SuperTool implements Tool { name = ‘fix-everything’ // ❌ 包含太多职责}// 而是创建可组合的工具class FileReadTool implements Tool { /* … */ }class FileEditTool implements Tool { /* … */ }class BashTool implements Tool { /* … */ }// ✅ 可以灵活组合
实战:实现一个简化的工具系统
步骤1:定义Tool接口
interface Tool<I = any, O = any> { name: string description: string inputSchema: z.ZodType<I> execute(input: I): Promise<O>}
步骤2:实现核心工具
const fileReadTool: Tool<{ path: string }, string> = { name: ‘read’, description: ‘Read file contents’, inputSchema: z.object({ path: z.string() }), async execute({ path }) { return fs.readFile(path, ‘utf-8’) },}const bashTool: Tool<{ command: string }, { stdout: string, stderr: string }> = { name: ‘bash’, description: ‘Execute shell command’, inputSchema: z.object({ command: z.string() }), async execute({ command }) { return new Promise((resolve, reject) => { exec(command, (error, stdout, stderr) => { if (error) reject(error) else resolve({ stdout, stderr }) }) }) },}
步骤3:构建ToolRegistry
class ToolRegistry { private tools: Map<string, Tool> = new Map() register(tool: Tool) { this.tools.set(tool.name, tool) } get(name: string): Tool | undefined { return this.tools.get(name) } list(): Tool[] { return Array.from(this.tools.values()) }}
步骤4:集成LLM
async function runWithTools(userMessage: string) { const tools = registry.list() // 调用LLM const response = await anthropic.messages.create({ model: ‘claude-sonnet-4-6’, max_tokens: 4096, tools: tools.map(t => ({ name: t.name, description: t.description, input_schema: zodToJsonSchema(t.inputSchema), })), messages: [{ role: ‘user’, content: userMessage }], }) // 处理工具调用 for (const block of response.content) { if (block.type === ‘tool_use’) { const tool = registry.get(block.name) const input = block.input const result = await tool!.execute(input) console.log(`Tool ${block.name}:`, result) } }}
写在最后:工具系统是AI Agent的灵魂
Claude Code的40+工具,不是”功能列表”,而是能力边界的工程化体现。
核心洞察:
● 工具数量:决定了AI能做什么
● 工具设计:决定了AI能做多好
● 权限系统:决定了AI能走多远
Claude Code的成功,证明了:
“AI Agent的价值,不在于模型有多聪明,而在于我们如何设计工具系统让模型发挥最大能力。”
系列预告:下一篇文章,我们将深入Claude Code的多Agent编排系统,解析Coordinator模式如何实现团队协作。
互动问题:你在设计AI Agent工具时,最大的挑战是什么?权限控制、错误处理、还是工具组合?欢迎在评论区分享你的经验。
相关文章:
Claude Code源码深度解析(一):从现象级产品到源码泄露
Claude Code源码深度解析(二):785KB main.tsx的奥秘
参考资源
协议规范
● LSP规范 | MCP协议
● Zod文档 | Anthropic Tool Use
源码分析
● 泄露源码镜像 | WaveSpeedAI工具分析
● Engineer’s Codex深度解析
作者:另一个AI世界
本文首发于微信公众号,未经授权禁止转载
 夜雨聆风
夜雨聆风