 夜雨聆风
夜雨聆风


Claude Code 源码精读 | 07 如何设计属于自己的 skill?
这是「Claude Code 源码精读」系列的第 7 篇。上一篇,我们搞清楚了 Skill 到底是什么,以及它在工作流上的价值。这一篇我们讨论「怎么设计自己的 Skill」。
读完这篇,你会搞清楚以下2件事:
-
• 如何写 Skill.md 文件?
-
• 深入源码,看看 CC 如何设计 frontend-design 这个 skill ?
目录
|
|
|
|---|---|
|
|
|
|
|
|
|
|
上一期内容我们讲了 skill 是什么?它是以 skill.md 文件为索引的一个可执行的策略单元。
说人话,Skill 就是 Agent 的一个 SOP,它类似于公司发布的工作规范,Agent 看到这些规范之后,就会根据他们来实现相应的工作流。
你可以直接使用别人封装好的现成的SOP,比如使用superpowers 来做开发,使用frontend-design 来做设计。
但使用别人 skill 的坏处就是它不够个性化,不够灵活。不能很好地兼容你的数据,你的习惯。
你要想这个 SOP 完全符合你的需求,还是需要进行一些编辑操作。这样才能形成属于自己的 SKill。
所以,是有必要去理解一下 skill 的设计架构的。这样不管是你去基于别人的 skill 去修改编辑,还是从 0~1 的创建一个属于自己的 skill。都会更加方便。
如何写 Skill.md
Skill.md 文件是一个 MD 格式的文本文件,不了解的人不用太害怕。它其实就是另外一种形式的 word 文本而已。
Skill.md 文件中包含了元数据和执行指令。元数据是指一些抽象出来的字段,方便代码直接操作的,比如可以直接指定模型名称、推理强度。执行指令层就是具体的 SOP 的提示词。
元数据:16 个字段
|
|
|
|
|
|---|---|---|---|
|
|
name |
|
|
|
|
description |
|
|
|
|
when_to_use |
|
|
|
|
version |
|
|
|
|
arguments |
|
|
|
|
argument-hint |
|
|
|
|
allowed-tools |
|
|
|
|
model |
|
|
|
|
effort |
|
|
|
|
context |
|
|
|
|
agent |
|
|
|
|
paths |
|
|
|
|
hooks |
|
|
|
|
shell |
|
|
|
|
disable-model-invocation |
|
|
|
|
user-invocable |
|
|
|
|
|
|
|
|
|
|
|
|
|
|
|
|
|
|
|
|
|
|
|
|
|
|
|
|
|
|
|
|
|
|
|
|
|
|
|
|
|
|
|
|
|
|
|
我们来过一下元数据包括哪些内容。按照用途,可以把这 16 个字段分成 6 组来看。
第一组:身份标识 —— name、description、when_to_use、version
这组字段是 skill 的「身份证」。name 是唯一标识,模型通过它引用 skill,也是你斜杠命令调用的名字。最好简洁易懂。description 是关于 skill 的总体描述。这是 skill 设计里最关键的字段,决定了模型在什么时候会调用你的 skill。description 写得不好,就会影响到调用效果。when_to_use 是 description 的补充,触发场景一句话说不完,就在这里去做补充。version 用来打版本号,迭代时方便对照。
第二组:参数定义 —— arguments、argument-hint
这组用来给 skill 传参。arguments 是用来声明可替换的参数名,在你调用 skill 的时候,输入一些补充信息。比如我有一个公司分析的 skill,我调用这 skill 的时候,同时也会输入这个公司的名称。这个公司的名称就是一个 skill 的参数。虽然你不在这设置参数,很多时候 Agent 也能够识别,但显示声明更稳定一些。argument-hint 是显示给用户看的提示文案,在输入斜杠命令的时候会出现。
第三组:执行配置 —— allowed-tools、model、effort
这组控制 skill 跑起来的「运行时配置」。allowed-tools 限定 skill 只能调用哪些 Tool 工具,比如你只允许读文件、不允许写文件等。model 指定执行模型,可以让某个重要 skill 强制走更强的 Opus,而不受当前模型设置影响。effort 控制推理强度,复杂任务给高,简单任务给低,省 token。
第四组:执行环境 —— context、agent
这组决定 skill 在哪里跑的环境。context 默认是 inline,就是用当前的 Agent 在主对话里执行。改成 fork 就会开一个隔离的子 agent 跑,这种设置适合需要大量探索、不想污染主上下文的场景。agent 字段可以进一步指定用哪个 agent 类型来执行(CC 内部有定义不同类型的子 Agent。这个后面有我们再展开)。
第五组:触发控制 —— paths、disable-model-invocation、user-invocable
这组决定 skill 什么时候、被谁触发。paths 是条件激活路径,只有命中匹配的文件时,skill 才会被激活,避免无关场景下被误触发。disable-model-invocation 设为 true 后,模型不能主动调用这个 skill,只能由用户显式触发,适合那些副作用大的 skill。user-invocable 正好反过来,用来控制用户是否能用 /xxx 命令直接调用。
第六组:扩展能力 —— hooks、shell
hooks 让 skill 自带钩子,在执行 Skill 前/后触发某些动作(这个也在后面再说)。shell 配置 shell 执行相关的行为。这两个字段绝大多数场景用不到,前期都可以直接忽略。
总结一下,其实写自己的 skill 时,绝大部分情况只需要填 name、description这两个字段就够了。其他的,有个了解,看别人 skill 的时候能看懂就行。
讲完元数据,我们再看指令层。
指令层:9 个关键信息
指令层就是一段 markdown 提示词,是写给模型看的「工作 SOP 指南」。元数据是硬约束,指令层是软约束,但它写得好不好直接决定 skill 的效果。一个完整的 skill 会包含以下 9 个关键信息。
执行目标说明:告诉模型这个 skill 要解决的问题是什么,就是你可以尽可能地详细具体。
触发后总流程:动作分解,列清楚执行步骤。这两项是核心骨架。
输入约定:说明这个 skill 期望接收什么样的输入,比如参数格式、前置条件。
输出约定:明确模型需要输出的东西。如果你有模板的话,可以给模型一个明确的输出模板。这个在一些流程性的东西上非常好用。比如你的周报、汇报 PPT、调研报告、需求文档。
关键规则与边界:写”不要做什么”和”失败怎么办”的地方。这里越具体,模型越不会犯低级错误。比如”不要直接修改原文,所有改动 append 到末尾”这种规则。这种一般都是在 skill 不断迭代中,根据反馈添加优化的。
工具使用指南:告诉模型在什么场景下可以用哪个工具。尤其当多个工具都能干同一件事时,明确指引能避免模型选错。
外部资源引用说明:这个相当于扩展包了。skill.md 无法把所有内容塞进一个文件。额外的参考材料可以放在 references/ 目录下,把可执行脚本放在 scripts/ 目录下,然后在 skill.md 里写清楚「什么时候去读 references/x.md」「什么时候执行 scripts/y.sh」。这样能控制主文件长度,模型也能按需加载,省 token。
示例(输入/输出):一个好的 example 胜过一千字描述,模型对样式的对齐能力,远高于对纯文字描述的对齐能力。
验证与完成标准:一份 checklist,定义清楚验收标准,告诉模型什么算”做完”,防止他偷懒。
跟做产品一样。做 skill 也是一个不断迭代的过程。一般简单的 Skill,一开始包含:执行目标说明 + 触发后总流程 + 输出约定就够了。其他字段,根据效果反馈,看 skill 在什么场景下容易出问题,再针对性的补充。
讲完了 skill 的文件结构,下面我们看一个真实的 skill 案例。
CC 案例拆解:frontend-design
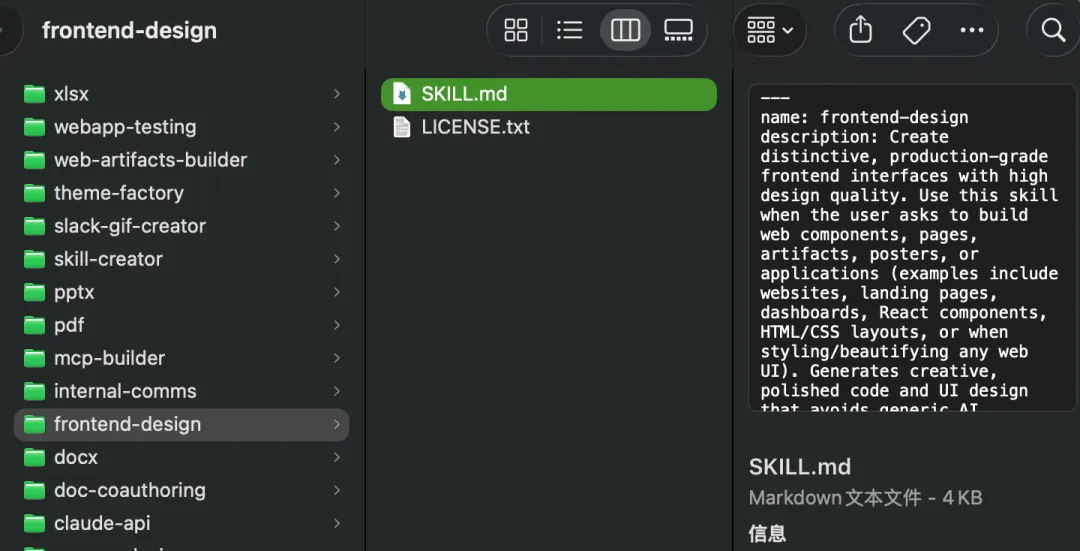
CC 内置了一个 frontend-design skill,我们看到 Claude 的很多不落俗套的网页设计,都是这个 skill 在支撑。
我们拆开它的元数据和指令层来看。
元数据
---name: frontend-designdescription: Create distinctive, production-grade frontend interfaces with high design quality. Use this skill when the user asks to build web components, pages, artifacts, posters, or applications (examples include websites, landing pages, dashboards, React components, HTML/CSS layouts, or when styling/beautifying any web UI). Generates creative, polished code and UI design that avoids generic AI aesthetics.license: Complete terms in LICENSE.txt---它的元数据,也只写了 name 和 description。description 这一段写得清晰明确,没有废话:
-
1. 做什么:创造有辨识度、可达生产水准的高品质前端界面。 -
2. 什么时候用:当用户要求构建 Web 组件、页面、产物、海报或应用时使用本 Skill。 -
3. 差异化点:避免千篇一律的「AI 味」。
指令层
This skill guides creation of distinctive, production-grade frontend interfaces that avoid generic "AI slop" aesthetics. Implement real working code with exceptional attention to aesthetic details and creative choices.The user provides frontend requirements: a component, page, application, or interface to build. They may include context about the purpose, audience, or technical constraints.## Design ThinkingBefore coding, understand the context and commit to a BOLD aesthetic direction:- **Purpose**: What problem does this interface solve? Who uses it?- **Tone**: Pick an extreme: brutally minimal, maximalist chaos, retro-futuristic, organic/natural, luxury/refined, playful/toy-like, editorial/magazine, brutalist/raw, art deco/geometric, soft/pastel, industrial/utilitarian, etc. There are so many flavors to choose from. Use these for inspiration but design one that is true to the aesthetic direction.- **Constraints**: Technical requirements (framework, performance, accessibility).- **Differentiation**: What makes this UNFORGETTABLE? What's the one thing someone will remember?**CRITICAL**: Choose a clear conceptual direction and execute it with precision. Bold maximalism and refined minimalism both work - the key is intentionality, not intensity.Then implement working code (HTML/CSS/JS, React, Vue, etc.) that is:- Production-grade and functional- Visually striking and memorable- Cohesive with a clear aesthetic point-of-view- Meticulously refined in every detail## Frontend Aesthetics GuidelinesFocus on:- **Typography**: Choose fonts that are beautiful, unique, and interesting. Avoid generic fonts like Arial and Inter; opt instead for distinctive choices that elevate the frontend's aesthetics; unexpected, characterful font choices. Pair a distinctive display font with a refined body font.- **Color & Theme**: Commit to a cohesive aesthetic. Use CSS variables for consistency. Dominant colors with sharp accents outperform timid, evenly-distributed palettes.- **Motion**: Use animations for effects and micro-interactions. Prioritize CSS-only solutions for HTML. Use Motion library for React when available. Focus on high-impact moments: one well-orchestrated page load with staggered reveals (animation-delay) creates more delight than scattered micro-interactions. Use scroll-triggering and hover states that surprise.- **Spatial Composition**: Unexpected layouts. Asymmetry. Overlap. Diagonal flow. Grid-breaking elements. Generous negative space OR controlled density.- **Backgrounds & Visual Details**: Create atmosphere and depth rather than defaulting to solid colors. Add contextual effects and textures that match the overall aesthetic. Apply creative forms like gradient meshes, noise textures, geometric patterns, layered transparencies, dramatic shadows, decorative borders, custom cursors, and grain overlays.NEVER use generic AI-generated aesthetics like overused font families (Inter, Roboto, Arial, system fonts), cliched color schemes (particularly purple gradients on white backgrounds), predictable layouts and component patterns, and cookie-cutter design that lacks context-specific character.Interpret creatively and make unexpected choices that feel genuinely designed for the context. No design should be the same. Vary between light and dark themes, different fonts, different aesthetics. NEVER converge on common choices (Space Grotesk, for example) across generations.**IMPORTANT**: Match implementation complexity to the aesthetic vision. Maximalist designs need elaborate code with extensive animations and effects. Minimalist or refined designs need restraint, precision, and careful attention to spacing, typography, and subtle details. Elegance comes from executing the vision well.Remember: Claude is capable of extraordinary creative work. Don't hold back, show what can truly be created when thinking outside the box and committing fully to a distinctive vision.frontend-design 的指令层拆解包括:
-
• 执行目标说明:开篇就说,要做出有辨识度、可达生产水准的前端界面,避开「AI 味」。 -
• 输入约定:用户会提供需求(组件、页面、应用),可能附带用途、受众、技术约束。 -
• 触发后总流程: -
1. 先想:「Design Thinking」从目的、气质、约束、差异化 4 个维度选定一条美学方向。 -
2. 再做(输出要求):实现可运行的代码,满足 4 条标准(生产级、有冲击力、风格统一、细节打磨)。 -
• 关键规则与边界(正向):「Frontend Aesthetics Guidelines」从字体、色彩、动效、空间、背景 5 个维度给出具体规则。 -
• 关键规则与边界(反向):他还专门写了一整段,不要白底紫渐变这种配色,也绝对不要用滥俗字体。
最后最有意思的是,他还不忘 PUA 一下 Claude 😂。
“请记住:Claude 完全能做出非常出色、有创造力的东西。别自我设限,在跳出套路、全力押注一种鲜明愿景时,把真正能做出来的东西呈现出来。”
所以,创造一个属于自己的 skill 并不复杂,只要描述清楚你的目标、流程和预期输出结果,写入一个 Skill.md 文件即可。
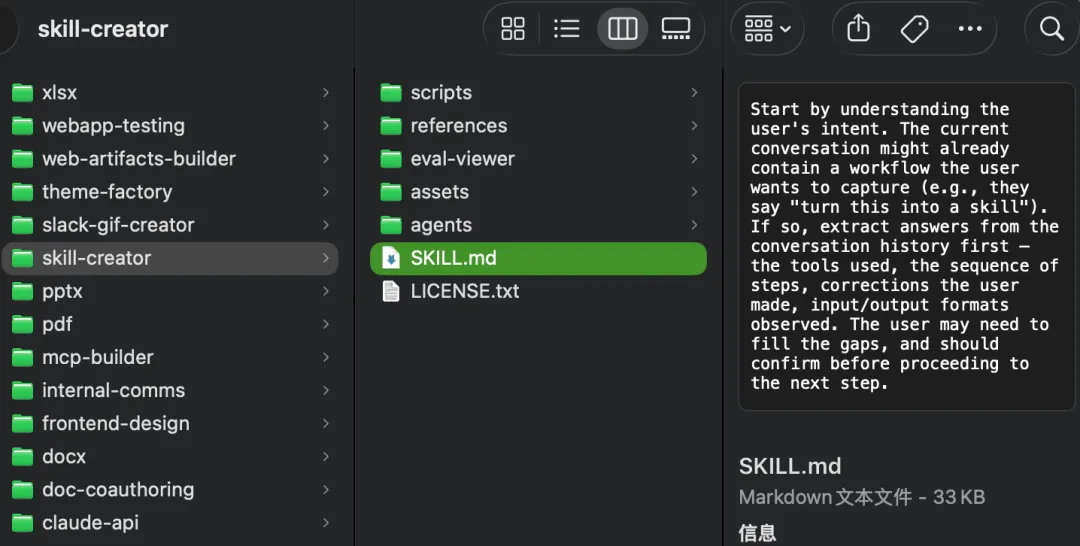
本来还准备展开讲一下Skill-Creator这个官方设计skill的skill 的。一看这篇已经这么长了,就不展开了。大家有兴趣的话,可以直接去CC 的 skill 文件夹去查看,是一个更加复杂的 skill,包括脚本、素材、子 Agent。
写在最后
这期我们搞清楚了 Skill.md 文件到底可以怎么写?通过frontend-design这个案例,有了一个真实的 skill 体感。
下一期,我们讲 MCP,看模型如何通过 MCP 与外部应用连接?
我们下期见。
「Claude Code 源码精读」系列持续更新,关注我,带你理解最顶尖的 Agent 设计。