 夜雨聆风
夜雨聆风新手指南:如何为 OpenClaw 配置你的专属大模型,零基础配置 OpenClaw
欢迎来到 OpenClaw 的世界!作为一个初次接触 AI 应用的新手,面对满屏的代码和配置文件难免会感到无从下手。别担心,这篇文章将为你拨开迷雾,用最通俗易懂的语言,带你一步步完成 OpenClaw 的大模型接入配置。
1、三大核心概念入门简介(baseUrl、apiKey 和 model id)
在配置大模型时,你一定会反复遇到三个关键词:baseUrl、apiKey 和 model id。你可以把调用大模型想象成“向一位博学多才的专家写信请教问题”。
(1)baseUrl(基础地址)
是什么:这是大模型服务商提供的 API 接口地址,各大模型平台(如通义千问、豆包等)均会提供。
打个比方:这相当于专家的“收件地址”。没有这个地址,你的问题就无法送达。例如通义千问:https://dashscope.aliyuncs.com/compatible-mode/v1
(2)apiKey(密钥)
是什么:服务商分配给你的一串唯一字符,用于验证身份和计费。
打个比方:这是你的“专属通行证”。专家凭此确认是你发来的请求,并从你的账户扣除相应费用。请务必妥善保管,切勿泄露给他人。例如:sk-a1b2c3d4e5f6g7h8...
(3)model id(模型名称 / ID)
是什么:同一家服务商旗下通常提供多个不同版本的大模型(有的能力强但价格高,有的响应快但相对经济),你需要明确指定使用哪一个。各服务商平台的模型列表中均会详细列出。
打个比方:这是你要请教的“具体哪一位专家”的名字。例如:qwen3.5-flash、qwen3.5-plus
(4)如何获取
上面 3 个参数不仅支持各大服务商接口,也支持中转 API。鉴于龙虾的强大 Token 消耗能力,本地部署一些大模型也是不错的选择。部署好之后,同样支持这 3 个参数的配置。 下面以阿里云通义千问和字节跳动豆包为例,介绍如何获取以上三项配置信息。
以阿里云·通义千问(Qwen)为例:
•获取 apiKey:登录阿里云百炼控制台,在右上角头像旁找到“API-KEY”,点击创建一个新的 API Key。
•baseUrl:千问兼容 OpenAI 格式的接口地址通常固定为 https://dashscope.aliyuncs.com/compatible-mode/v1。
•model id:常用的有qwen3.5-flash(经济快捷)、qwen3.5-plus(性能均衡,推荐)、qwen3-max(能力最强)。

以字节跳动·火山引擎·豆包(Doubao)为例:
•获取 apiKey:登录火山引擎控制台,在“API Key 管理”中创建;也可以在选择具体模型后,通过“API 接入”相关入口找到对应的 API Key。
•baseUrl:通常固定为https://ark.cn-beijing.volces.com/api/v3。
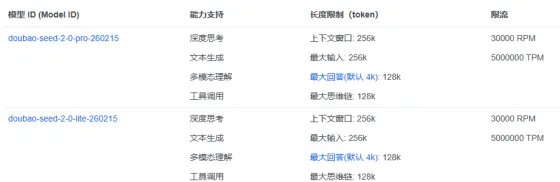
•model id:目前常用的通用模型有doubao-seed-2-0-lite-260215、doubao-seed-2-0-pro-260215等。
2、OpenClaw 配置文件
配置文件在哪里?
OpenClaw 的核心设置保存在本地的一个 JSON 文件中。根据你的系统环境,它通常位于用户目录下的隐藏文件夹内。
•Windows 系统:配置文件路径通常为C:\Users\你的用户名\.openclaw\openclaw.json(例如:C:\Users\Administrator\.openclaw\openclaw.json)。
•Ubuntu 系统:配置文件路径通常为~/.openclaw/openclaw.json。
找到该文件后,用文本编辑器(如记事本、VS Code)打开即可编辑。
如果目录下不存在openclaw.json,可在命令窗口输入openclaw setup进行初始化。
3、保姆级配置步骤
步骤 1:备份原文件
在修改任何配置文件之前,请先将原来的openclaw.json复制一份作为备份,以便改错后随时恢复。
步骤 2:替换配置文件
打开配置文件,将其内容完全替换为以下模板:
{"models": {"mode": "merge","providers": {"custom-001": {"baseUrl": "xxxxx","apiKey": "xxxxxx","api": "openai-completions","models": [{"id": "qwen-plus","name": "qwen-plus (Custom Provider)","reasoning": false,"input": ["text"],"cost": {"input": 0,"output": 0,"cacheRead": 0,"cacheWrite": 0},"contextWindow": 16000,"maxTokens": 4096}]}}},"agents": {"defaults": {"model": {"primary": "custom-001/qwen-plus"},"models": {"custom-001/qwen-plus": {}},"workspace": "C:\\Users\\Administrator\\.openclaw\\workspace","contextPruning": {"mode": "cache-ttl","ttl": "1h"},"compaction": {"mode": "safeguard"},"heartbeat": {"every": "30m"}}},"tools": {"profile": "coding","web": {"search": {"enabled": true,"provider": "gemini","gemini": {"apiKey": "sk-xxxxxxxxxx"}}}},"commands": {"native": "auto","nativeSkills": "auto","restart": true,"ownerDisplay": "raw"},"session": {"dmScope": "per-channel-peer"},"hooks": {"internal": {"enabled": true,"entries": {"boot-md": {"enabled": true},"bootstrap-extra-files": {"enabled": true},"command-logger": {"enabled": true},"session-memory": {"enabled": true}}}},"gateway": {"port": 18789,"mode": "local","bind": "loopback","controlUi": {"allowedOrigins": ["http://localhost:18789"]},"auth": {"mode": "token","token": "f2f4f617fe7a38cde2449495204c053d18168dcbc6d8ab61"},"tailscale": {"mode": "off","resetOnExit": false},"nodes": {"denyCommands": ["camera.snap","camera.clip","screen.record","contacts.add","calendar.add","reminders.add","sms.send"]}},"skills": {"install": {"nodeManager": "npm"},"entries": {"goplaces": {"apiKey": "sk-xxxxxxxxxxxxxx"},"nano-banana-pro": {"apiKey": "sk-xxxxxxxxxxxxxxxxxxxxx"},"notion": {"apiKey": "sk-xxxxxxxxxxxxxxxxxxxx"},"openai-image-gen": {"apiKey": "sk-xxxxxxxxxxxxxxxxxxxxx"},"openai-whisper-api": {"apiKey": "sk-xxxxxxxxxxxxxxxxxxxx"},"sag": {"apiKey": "sk-xxxxxxxxxxxxxxxxxxxxx"}}}}
步骤 3:替换核心参数
通常为了保护 apiKey,可以将其配置在系统环境变量中,但不同服务商的变量名称各有差异,反而不够直观。直接在配置文件中填写更为简洁清晰。
需要修改以下 4 个参数:
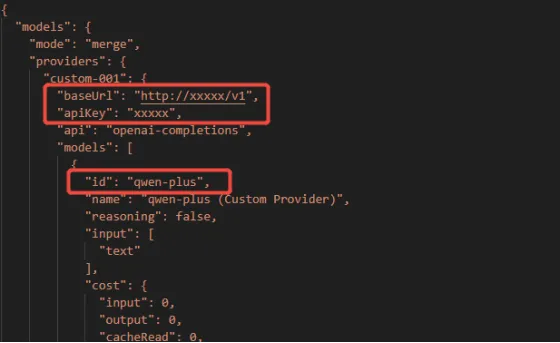
•大模型地址:"baseUrl": "http://xxxxx/v1"
•大模型密钥:"apiKey": "xxxxx"
•大模型名称:"id": "qwen-plus"
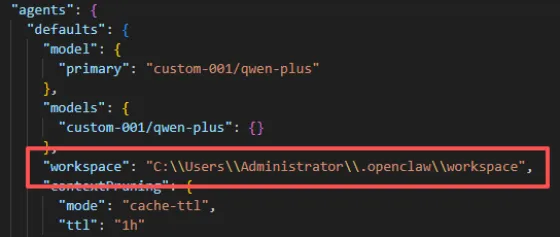
•工作空间路径: Windows 填 "C:\Users\用户名\.openclaw\workspace",Linux/macOS 填 "~/.openclaw/workspace"
配置示意如下:
步骤 4:确认默认模型
在配置文件中找到"agents"→ "defaults"→ "model"→ "primary",确保其值为你刚才配置的模型路径,格式为"custom-001/模型ID",例如"custom-001/qwen-plus"。这表示 OpenClaw 启动后将默认调用该模型为你服务。
步骤 5:处理其他服务的 API Key(可选)
如果你目前只需要使用基础对话功能,可以暂时忽略tools和skills中的"sk-xxxxx"占位符。待日后需要启用图片生成、Web 搜索等高级功能时,再前往对应服务商申请密钥并填入即可。
步骤 6:保存并重启
保存修改后的openclaw.json文件,然后关闭并重新启动 OpenClaw 程序。重启命令通常为:
openclaw gateway restart完成以上步骤后,你的 OpenClaw 便已成功接入强大的云端大模型,可以愉快地开始对话了!