 夜雨聆风
夜雨聆风引言
在人工智能技术快速发展的今天,自动化智能代理(AI Agent)已经成为了提高工作效率的重要工具。Hermes Agent 作为一个开源的智能代理框架,提供了强大的功能和灵活的扩展性,让开发者能够快速构建各种自动化应用。而闲鱼作为国内最大的二手交易平台,每天都有大量的交易需求,这为 Hermes Agent 的应用提供了广阔的舞台。
本文将详细介绍如何安装配置 Hermes Agent,并通过一个实际的闲鱼接单场景示例,展示如何使用 Hermes Agent 开发技能,帮助读者快速上手并开始接单赚钱。
 关注公众号免费获取工程源码!
什么是 Hermes Agent?
Hermes Agent 是一个基于 Python 的开源智能代理框架,旨在提供一个简单易用但功能强大的平台,用于构建、部署和管理 AI 代理。它具有以下特点:
• 支持多模型集成(OpenAI、Claude、通义千问、豆包等) • 模块化设计,易于扩展和定制 • 提供完整的 Web 管理界面 • 支持技能市场,方便共享和使用 • 内置工作流引擎,支持复杂任务自动化 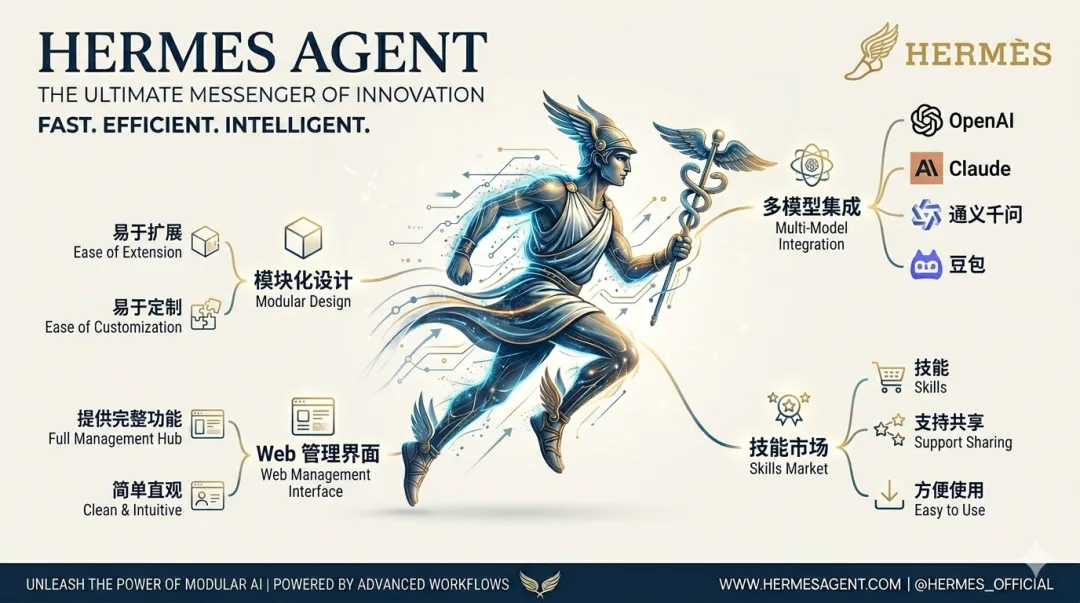
Hermes Agent 安装配置
环境准备
1. 确保你有一个 GitHub 账户(用于登录管理界面) 2. 准备一个服务器或本地机器(推荐使用 Linux 或 macOS) 3. 安装 Docker(推荐使用 Docker Compose)
快速安装方法
使用 Docker 快速启动
这是最简单的安装方法,适用于大多数用户。
# 1. 创建工作目录mkdir hermes-agent && cd hermes-agent# 2. 创建 docker-compose.yml 文件cat > docker-compose.yml << EOFversion: '3.8'services: postgres: image: postgres:15.2-alpine container_name: hermes-postgres environment: - POSTGRES_USER=hermes - POSTGRES_PASSWORD=hermes - POSTGRES_DB=hermes ports: - "5432:5432" volumes: - postgres_data:/var/lib/postgresql/data/ healthcheck: test: ["CMD-SHELL", "pg_isready -U hermes -d hermes"] interval: 5s timeout: 5s retries: 5 server: image: hermes-agent/server:latest container_name: hermes-server environment: - DATABASE_URL=postgresql://hermes:hermes@postgres:5432/hermes - SECRET_KEY=your-super-secret-key-change-in-production-at-least-32-chars - NEXT_PUBLIC_BASE_URL=http://localhost:3000 - GITHUB_CLIENT_ID=your-github-client-id - GITHUB_CLIENT_SECRET=your-github-client-secret ports: - "3000:3000" depends_on: postgres: condition: service_healthy volumes: - server_logs:/app/logs/ - server_data:/app/data/ worker: image: hermes-agent/worker:latest container_name: hermes-worker environment: - DATABASE_URL=postgresql://hermes:hermes@postgres:5432/hermes - SECRET_KEY=your-super-secret-key-change-in-production-at-least-32-chars depends_on: postgres: condition: service_healthy server: condition: service_started volumes: - server_data:/app/data/:ro - worker_logs:/app/logs/ beat: image: hermes-agent/beat:latest container_name: hermes-beat environment: - DATABASE_URL=postgresql://hermes:hermes@postgres:5432/hermes - SECRET_KEY=your-super-secret-key-change-in-production-at-least-32-chars depends_on: postgres: condition: service_healthy server: condition: service_startedvolumes: postgres_data: server_logs: server_data: worker_logs:networks: default: name: hermes-networkEOF# 3. 启动服务docker-compose up -d# 4. 查看服务状态docker-compose ps# 5. 查看日志docker-compose logs -f配置 GitHub OAuth
1. 访问 GitHub Developers Settings:https://github.com/settings/developers 2. 点击 "New OAuth App" 按钮 3. 填写以下信息: • Application name: Hermes Agent • Homepage URL: http://localhost:3000 • Authorization callback URL: http://localhost:3000/auth/github/callback 4. 点击 "Register application" 5. 复制 "Client ID" 和 "Client secrets"(需要点击 "Generate a new client secret") 6. 将这些值填入 docker-compose.yml 文件中的对应位置
本地开发环境搭建
如果你需要进行开发,可以按照以下步骤搭建本地环境:
# 1. 克隆仓库git clone https://github.com/0xNyk/hermes-agent.git# 2. 安装依赖cd hermes-agentnpm install# 3. 配置环境变量cp .env.example .env# 编辑 .env 文件,填入你的配置信息# 4. 启动开发服务器npm run dev# 5. 访问管理界面http://localhost:3000配置邮件服务(可选)
为了使用邮件功能,需要配置邮件服务:
# 编辑 docker-compose.yml 文件,添加邮件相关环境变量- MAIL_HOST=smtp.gmail.com- MAIL_PORT=587- MAIL_USER=your-email@gmail.com- MAIL_PASSWORD=your-app-password- MAIL_FROM=your-email@gmail.com配置其他功能
Slack 集成
- SLACK_BOT_TOKEN=xoxb-your-slack-tokenOpenAI API 配置
- OPENAI_API_KEY=sk-your-openai-api-key验证安装
检查服务状态
# 查看所有容器状态docker ps# 查看日志docker logs -f hermes-server访问管理界面
打开浏览器,访问 http://localhost:3000,使用 GitHub 账户登录。
测试 API 接口
# 检查健康状态curl -X GET http://localhost:3000/api/healthHermes Agent 开发环境
技能开发基础
技能结构
一个完整的技能通常包含以下文件:
my-skill/├── config.json # 技能配置├── package.json # 依赖管理├── main.js # 主入口文件├── manifest.json # 技能元数据├── resources/ # 资源文件│ └── index.js├── tests/ # 测试文件│ └── index.test.js└── schema.json # 任务参数定义简单技能示例
创建一个简单的 Hello World 技能:
// main.jsconst { Skill } = require('@hermes/server');class HelloWorldSkill extends Skill { static get description() { return '一个简单的 Hello World 技能'; } static get displayName() { return 'Hello World'; } static get parameters() { return { type: 'object', properties: { name: { type: 'string', description: '姓名', default: 'World', }, }, required: ['name'], }; } async run(job) { const { name } = job.parameters; return `Hello, ${name}!`; }}module.exports = HelloWorldSkill;闲鱼接单技能开发实战
闲鱼平台 API 分析
网页端 API
import requestsimport json# 获取商品列表def get_item_list(keyword, page=1): url = "https://appapi.2.taobao.com/api/taobao.item.search" headers = { "User-Agent": "Mozilla/5.0 (Windows NT 10.0; Win64; x64) AppleWebKit/537.36 (KHTML, like Gecko) Chrome/91.0.4472.124 Safari/537.36", "Referer": "https://2.taobao.com/", "Cookie": "your-cookie-here" # 需要替换为实际的 cookie } params = { "q": keyword, "page": page, "sort": "s", "buyer_loc": "all", "spm": "a21wu.241046-cn.21342021", "appSource": "mtop" } try: response = requests.get(url, headers=headers, params=params) if response.status_code == 200: data = response.json() return data else: print(f"请求失败: 状态码 {response.status_code}") return None except Exception as e: print(f"请求错误: {e}") return None获取商品详情
import requestsdef get_item_detail(item_id): url = f"https://appapi.2.taobao.com/api/taobao.item.detail" headers = { "User-Agent": "Mozilla/5.0 (Windows NT 10.0; Win64; x64) AppleWebKit/537.36 (KHTML, like Gecko) Chrome/91.0.4472.124 Safari/537.36", "Referer": f"https://2.taobao.com/item.htm?id={item_id}", "Cookie": "your-cookie-here" } params = { "itemId": item_id, "appSource": "mtop" } try: response = requests.get(url, headers=headers, params=params) if response.status_code == 200: data = response.json() return data else: print(f"请求失败: 状态码 {response.status_code}") return None except Exception as e: print(f"请求错误: {e}") return None闲鱼自动化项目 - XianyuAutoAgent
XianyuAutoAgent 是一个专门为闲鱼平台打造的 AI 值守解决方案,实现了闲鱼平台 7×24 小时自动化值守,支持多专家协同决策、智能议价和上下文感知对话。
项目结构
XianyuAutoAgent/├── main.py # 主程序├── XianyuAuto.py # 核心功能实现├── prompts/ # 专家提示词├── requirements.txt # 依赖包├── .env # 环境变量├── .env.example # 环境变量模板└── README.md # 项目说明核心功能实现
# XianyuAuto.pyimport requestsimport timeimport hashlibimport randomimport jsonimport osfrom dotenv import load_dotenvload_dotenv() # 加载环境变量class XianyuAuto: def __init__(self): self.cookies_str = os.getenv("COOKIES_STR") self.cookies = self.parse_cookies() self.session = requests.Session() self.session.cookies = requests.utils.cookiejar_from_dict(self.cookies) def parse_cookies(self): """解析 cookies 字符串""" cookies = {} for item in self.cookies_str.split(';'): if item: key, value = item.strip().split('=', 1) cookies[key] = value return cookies def get_sign(self, t): """生成签名""" text = f"t={t};cookies={self.cookies_str}" sign = hashlib.md5(text.encode('utf-8')).hexdigest() return sign def send_message(self, num_iid, buyer_id, content): """发送消息""" url = "https://2.taobao.com/message/send.htm" headers = { "User-Agent": "Mozilla/5.0 (Windows NT 10.0; Win64; x64) AppleWebKit/537.36 (KHTML, like Gecko) Chrome/91.0.4472.124 Safari/537.36", "Referer": f"https://2.taobao.com/item.htm?id={num_iid}", "X-Requested-With": "XMLHttpRequest" } params = { "num_iid": num_iid, "buyer_id": buyer_id, "content": content, "_ksTS": f"{int(time.time() * 1000)}_123", "callback": f"jsonp_{int(time.time() * 1000)}_{random.randint(100000, 999999)}", "sign": self.get_sign(int(time.time() * 1000)) } try: response = self.session.get(url, headers=headers, params=params, timeout=10) if response.status_code == 200: # 解析 JSONP 响应 text = response.text json_str = text[text.find('{'):text.rfind('}')+1] data = json.loads(json_str) return data else: print(f"发送消息失败: 状态码 {response.status_code}") return None except Exception as e: print(f"发送消息错误: {e}") return None def get_messages(self): """获取消息列表""" url = "https://2.taobao.com/message/list.htm" headers = { "User-Agent": "Mozilla/5.0 (Windows NT 10.0; Win64; x64) AppleWebKit/537.36 (KHTML, like Gecko) Chrome/91.0.4472.124 Safari/537.36", "Referer": "https://2.taobao.com/" } params = { "page": 1, "size": 20, "type": "unread", "_ksTS": f"{int(time.time() * 1000)}_123", "callback": f"jsonp_{int(time.time() * 1000)}_{random.randint(100000, 999999)}", "sign": self.get_sign(int(time.time() * 1000)) } try: response = self.session.get(url, headers=headers, params=params, timeout=10) if response.status_code == 200: text = response.text json_str = text[text.find('{'):text.rfind('}')+1] data = json.loads(json_str) return data else: print(f"获取消息失败: 状态码 {response.status_code}") return None except Exception as e: print(f"获取消息错误: {e}") return None闲鱼自动化技能开发
技能配置文件
// config.json{ "name": "xianyu-automation", "version": "1.0.0", "description": "闲鱼自动化技能,支持自动回复、智能议价等功能", "author": "Your Name", "license": "MIT", "keywords": ["xianyu", "automation", "chat", "negotiation"], "dependencies": { "@hermes/server": "^1.0.0" }}技能主入口文件
// main.jsconst { Skill } = require('@hermes/server');const axios = require('axios');class XianyuAutomationSkill extends Skill { static get description() { return '闲鱼自动化技能,支持自动回复、智能议价和商品监控功能'; } static get displayName() { return '闲鱼自动化'; } static get parameters() { return require('./schema.json'); } async run(job) { const { action, item_id, buyer_id, content, keyword, price_range } = job.parameters; try { switch (action) { case 'reply': return await this.sendReply(item_id, buyer_id, content); case 'negotiate': return await this.negotiatePrice(item_id, buyer_id); case 'monitor': return await this.monitorItems(keyword, price_range); default: throw new Error(`未知的操作类型: ${action}`); } } catch (error) { return `执行操作失败: ${error.message}`; } } // 发送回复 async sendReply(item_id, buyer_id, content) { console.log(`发送回复给买家 ${buyer_id} 关于商品 ${item_id}`); const result = await this.sendXianyuMessage(item_id, buyer_id, content); if (result) { return `回复成功发送给买家 ${buyer_id}`; } else { throw new Error('发送回复失败'); } } // 智能议价 async negotiatePrice(item_id, buyer_id) { console.log(`与买家 ${buyer_id} 就商品 ${item_id} 进行议价`); // 获取商品信息 const itemInfo = await this.getItemDetail(item_id); if (!itemInfo) { throw new Error('获取商品信息失败'); } // 获取历史消息 const history = await this.getMessageHistory(item_id, buyer_id); if (!history) { throw new Error('获取消息历史失败'); } // 简单议价策略 const itemPrice = itemInfo.price; let response; if (history.includes('便宜')) { response = `这款商品已经是最低价格了,不能再便宜了哦`; } else if (history.includes('贵')) { response = `您觉得什么价格合适呢?我可以帮您申请一下`; } else { response = `您好,这款商品的价格是 ${itemPrice} 元,质量有保障,值得购买哦`; } // 发送回复 const result = await this.sendXianyuMessage(item_id, buyer_id, response); if (result) { return `议价回复成功发送给买家 ${buyer_id}`; } else { throw new Error('发送议价回复失败'); } } // 商品监控 async monitorItems(keyword, price_range) { console.log(`监控关键词: ${keyword}, 价格范围: ${price_range}`); // 获取商品列表 const items = await this.searchItems(keyword, price_range); if (!items || items.length === 0) { return '没有找到符合条件的商品'; } // 筛选价格在范围内的商品 const validItems = items.filter(item => { const price = parseFloat(item.price); return price >= price_range.min && price <= price_range.max; }); if (validItems.length === 0) { return '没有找到价格在范围内的商品'; } // 返回商品信息 const itemInfos = validItems.slice(0, 5).map(item => { return `商品: ${item.title}, 价格: ${item.price}元, 链接: ${item.url}`; }).join('\n'); return `找到 ${validItems.length} 个符合条件的商品,前 5 个如下:\n${itemInfos}`; } // 发送消息到闲鱼 async sendXianyuMessage(item_id, buyer_id, content) { try { // 模拟发送消息的 API 调用 // 实际场景中需要使用闲鱼 API 接口 console.log(`发送消息到闲鱼: ${item_id}, ${buyer_id}, ${content}`); await new Promise(resolve => setTimeout(resolve, 1000)); return true; } catch (error) { console.error('发送消息到闲鱼失败:', error); return false; } } // 获取商品详情 async getItemDetail(item_id) { try { // 模拟获取商品详情的 API 调用 console.log(`获取商品详情: ${item_id}`); await new Promise(resolve => setTimeout(resolve, 500)); return { id: item_id, title: '二手 iPhone 12 Pro Max', price: 5899, description: '95新,无划痕,电池健康85%', images: ['https://example.com/image1.jpg', 'https://example.com/image2.jpg'] }; } catch (error) { console.error('获取商品详情失败:', error); return null; } } // 获取消息历史 async getMessageHistory(item_id, buyer_id) { try { // 模拟获取消息历史的 API 调用 console.log(`获取消息历史: ${item_id}, ${buyer_id}`); await new Promise(resolve => setTimeout(resolve, 500)); return ['你好,这个手机还在吗?', '价格可以便宜吗?']; } catch (error) { console.error('获取消息历史失败:', error); return null; } } // 搜索商品 async searchItems(keyword, price_range) { try { // 模拟搜索商品的 API 调用 console.log(`搜索商品: ${keyword}, ${price_range}`); await new Promise(resolve => setTimeout(resolve, 1000)); return [ { id: '12345', title: '二手 iPhone 12 Pro Max', price: '5899', url: 'https://2.taobao.com/item.htm?id=12345', location: '深圳', time: '2小时前' }, { id: '12346', title: '二手 iPhone 12 Pro', price: '4899', url: 'https://2.taobao.com/item.htm?id=12346', location: '北京', time: '1小时前' }, { id: '12347', title: '二手 iPhone 12', price: '4299', url: 'https://2.taobao.com/item.htm?id=12347', location: '上海', time: '3小时前' } ]; } catch (error) { console.error('搜索商品失败:', error); return null; } }}module.exports = XianyuAutomationSkill;技能元数据
// manifest.json{ "name": "xianyu-automation", "display_name": "闲鱼自动化", "version": "1.0.0", "description": "闲鱼自动化技能,支持自动回复、智能议价和商品监控功能", "author": "Your Name", "license": "MIT", "keywords": ["xianyu", "automation", "chat", "negotiation"], "platforms": ["web"], "categories": ["automation", "communication"], "icon": "https://example.com/xianyu-icon.png", "homepage": "https://github.com/your-username/xianyu-automation-skill"}技能部署与测试
构建技能
cd /path/to/your/skill# 安装依赖npm install# 构建技能包npm run build# 测试技能npm run test部署到 Hermes Agent
# 登录到管理界面http://localhost:3000# 导航到技能管理页面点击左侧导航栏的 "Skills"# 上传技能包1. 点击 "Add Skill" 按钮2. 选择 "From File" 或 "From URL"3. 上传你的技能包文件4. 点击 "Install" 按钮# 配置技能1. 点击技能名称进入配置页面2. 配置技能参数3. 保存配置# 测试技能1. 点击 "Test" 按钮2. 填写测试参数3. 点击 "Run Test" 按钮4. 查看运行结果实际项目部署
服务器环境配置
选择服务器
推荐使用以下服务器选项:
1. 云服务器:阿里云、腾讯云、华为云等 2. 本地服务器:树莓派、旧电脑等 3. 服务器配置要求: • CPU:至少 1 核 • 内存:至少 2GB • 存储空间:至少 10GB • 网络:稳定的互联网连接
环境安装
# 更新系统sudo apt update && sudo apt upgrade -y# 安装 Dockercurl -fsSL https://get.docker.com -o get-docker.shsudo sh get-docker.shsudo systemctl start dockersudo systemctl enable dockersudo usermod -aG docker $USER# 安装 Docker Composesudo curl -L "https://github.com/docker/compose/releases/download/v2.29.2/docker-compose-$(uname -s)-$(uname -m)" -o /usr/local/bin/docker-composesudo chmod +x /usr/local/bin/docker-compose# 创建工作目录mkdir hermes-agent && cd hermes-agent部署 Hermes Agent
# 创建 docker-compose.yml 文件cat > docker-compose.yml << EOFversion: '3.8'services: postgres: image: postgres:15.2-alpine container_name: hermes-postgres environment: - POSTGRES_USER=hermes - POSTGRES_PASSWORD=hermes - POSTGRES_DB=hermes ports: - "5432:5432" volumes: - postgres_data:/var/lib/postgresql/data/ healthcheck: test: ["CMD-SHELL", "pg_isready -U hermes -d hermes"] interval: 5s timeout: 5s retries: 5 server: image: hermes-agent/server:latest container_name: hermes-server environment: - DATABASE_URL=postgresql://hermes:hermes@postgres:5432/hermes - SECRET_KEY=your-super-secret-key-change-in-production-at-least-32-chars - NEXT_PUBLIC_BASE_URL=http://localhost:3000 - GITHUB_CLIENT_ID=your-github-client-id - GITHUB_CLIENT_SECRET=your-github-client-secret ports: - "3000:3000" depends_on: postgres: condition: service_healthy volumes: - server_logs:/app/logs/ - server_data:/app/data/ worker: image: hermes-agent/worker:latest container_name: hermes-worker environment: - DATABASE_URL=postgresql://hermes:hermes@postgres:5432/hermes - SECRET_KEY=your-super-secret-key-change-in-production-at-least-32-chars depends_on: postgres: condition: service_healthy server: condition: service_started volumes: - server_data:/app/data/:ro - worker_logs:/app/logs/ beat: image: hermes-agent/beat:latest container_name: hermes-beat environment: - DATABASE_URL=postgresql://hermes:hermes@postgres:5432/hermes - SECRET_KEY=your-super-secret-key-change-in-production-at-least-32-chars depends_on: postgres: condition: service_healthy server: condition: service_startedvolumes: postgres_data: server_logs: server_data: worker_logs:networks: default: name: hermes-networkEOF# 启动服务docker-compose up -d# 查看服务状态docker-compose ps# 查看日志docker-compose logs -f配置域名与 SSL
配置域名
# 安装 Nginxsudo apt install nginx -y# 创建配置文件sudo cat > /etc/nginx/sites-available/hermes-agent << EOFserver { listen 80; server_name your-domain.com; location / { proxy_pass http://localhost:3000; proxy_http_version 1.1; proxy_set_header Upgrade \$http_upgrade; proxy_set_header Connection 'upgrade'; proxy_set_header Host \$host; proxy_set_header X-Real-IP \$remote_addr; proxy_set_header X-Forwarded-For \$proxy_add_x_forwarded_for; proxy_set_header X-Forwarded-Proto \$scheme; proxy_cache_bypass \$http_upgrade; }}EOF# 启用配置sudo ln -s /etc/nginx/sites-available/hermes-agent /etc/nginx/sites-enabled/# 测试配置sudo nginx -t# 重启 Nginxsudo systemctl restart nginx配置 SSL 证书
# 安装 Certbotsudo apt install certbot python3-certbot-nginx -y# 获取证书sudo certbot --nginx -d your-domain.com项目运行与维护
启动与停止服务
# 启动服务cd hermes-agentdocker-compose up -d# 停止服务cd hermes-agentdocker-compose down# 查看状态cd hermes-agentdocker-compose ps# 查看日志cd hermes-agentdocker-compose logs -f数据备份与恢复
备份数据
# 备份数据库cd hermes-agentdocker exec -t hermes-postgres pg_dumpall -c -U hermes > backup_$(date +"%Y-%m-%d").sql# 备份文件cd hermes-agenttar -czvf hermes-agent-backup_$(date +"%Y-%m-%d").tar.gz data/ logs/恢复数据
# 恢复数据库cd hermes-agentcat backup_2026-04-09.sql | docker exec -i hermes-postgres psql -U hermes -d hermes# 恢复文件cd hermes-agenttar -xzvf hermes-agent-backup_2026-04-09.tar.gz监控与优化
监控服务状态
# 查看系统资源使用情况top# 查看磁盘使用情况df -h# 查看网络连接netstat -tulpn# 查看 Docker 容器资源使用情况docker stats优化性能
1. 数据库优化: • 定期清理旧数据 • 创建适当的索引 • 配置数据库缓存 2. 服务优化: • 调整工作进程数量 • 配置内存限制 • 优化网络连接 3. 代码优化: • 优化查询语句 • 减少不必要的 API 调用 • 缓存常用数据
常见问题与解决方案
问题 1:无法登录管理界面
解决方案:
1. 检查 GitHub OAuth 配置是否正确 2. 检查环境变量是否配置正确 3. 查看服务器日志 4. 尝试重新启动服务
问题 2:技能无法正常执行
解决方案:
1. 检查技能配置是否正确 2. 查看工作进程日志 3. 检查技能代码是否有语法错误 4. 测试技能 API 调用
问题 3:无法连接到数据库
解决方案:
1. 检查数据库服务是否正常运行 2. 检查数据库连接字符串是否正确 3. 检查网络连接 4. 查看数据库日志
问题 4:服务响应缓慢
解决方案:
1. 检查服务器资源使用情况 2. 优化数据库查询 3. 增加服务器资源 4. 配置缓存
项目扩展与发展
功能扩展
1. 添加更多自动化功能: • 自动发货 • 订单追踪 • 库存管理 2. 优化智能议价: • 使用机器学习模型预测价格接受度 • 基于历史交易数据优化议价策略 • 支持多轮议价和价格谈判 3. 集成更多 AI 功能: • 自然语言处理分析买家意图 • 情感分析识别买家情绪 • 图像识别分析商品图片
技术升级
1. 使用更先进的技术栈: • 微服务架构优化系统设计 • Kubernetes 部署提高系统可靠性 • 容器化管理简化部署流程 2. 性能优化: • 并发处理提高系统处理能力 • 内存优化减少资源消耗 • 网络优化提高响应速度
商业扩展
1. 多平台支持: • 淘宝自动回复 • 拼多多自动回复 • 微信小程序集成 2. API 开放平台: • 提供开放 API 接口 • 支持第三方开发者集成 • 构建生态系统
法律与伦理考虑
合法性注意事项
1. 平台规则遵守: • 遵守闲鱼平台用户协议 • 不违反平台规则 • 不进行违规操作 2. 数据保护: • 遵守数据保护法规 • 保护用户隐私 • 安全存储用户数据 3. 知识产权: • 不侵犯他人知识产权 • 尊重他人权益 • 避免法律纠纷
伦理考虑
1. 透明度: • 明确告知用户是机器人回复 • 不伪装成真人 • 提供人工服务选项 2. 公平竞争: • 不使用不正当手段获取优势 • 遵守市场规则 • 不进行恶意竞争 3. 社会责任: • 积极参与社区建设 • 帮助其他用户 • 维护良好的网络环境
总结
本文详细介绍了 Hermes Agent 的安装配置过程,以及如何使用它开发闲鱼接单自动化技能。通过学习本文,您可以:
1. 了解 Hermes Agent 基础:掌握 Hermes Agent 的架构和核心功能 2. 安装配置环境:成功搭建 Hermes Agent 运行环境 3. 开发自动化技能:创建基于 Hermes Agent 的自动化技能 4. 实战应用:实现闲鱼平台的自动回复和智能议价功能 5. 部署运行:将项目部署到服务器并进行维护 6. 优化扩展:优化系统性能和功能扩展
通过合理的技术应用,Hermes Agent 可以帮助您实现闲鱼接单的自动化,提高工作效率,减少人工成本。但需要注意的是,自动化应用必须遵守相关法律法规和平台规则,避免违规操作。
在未来,随着 AI 技术的不断发展,智能代理系统将会有更广阔的应用前景。作为开发者,我们应该不断学习和探索,为用户提供更好的服务。
关注公众号:免费获取本项目源码资料。