 夜雨聆风
夜雨聆风nano-vllm 用千行代码拆解 vLLM 核心,是读懂大模型推理最快的捷径。
1. 介绍
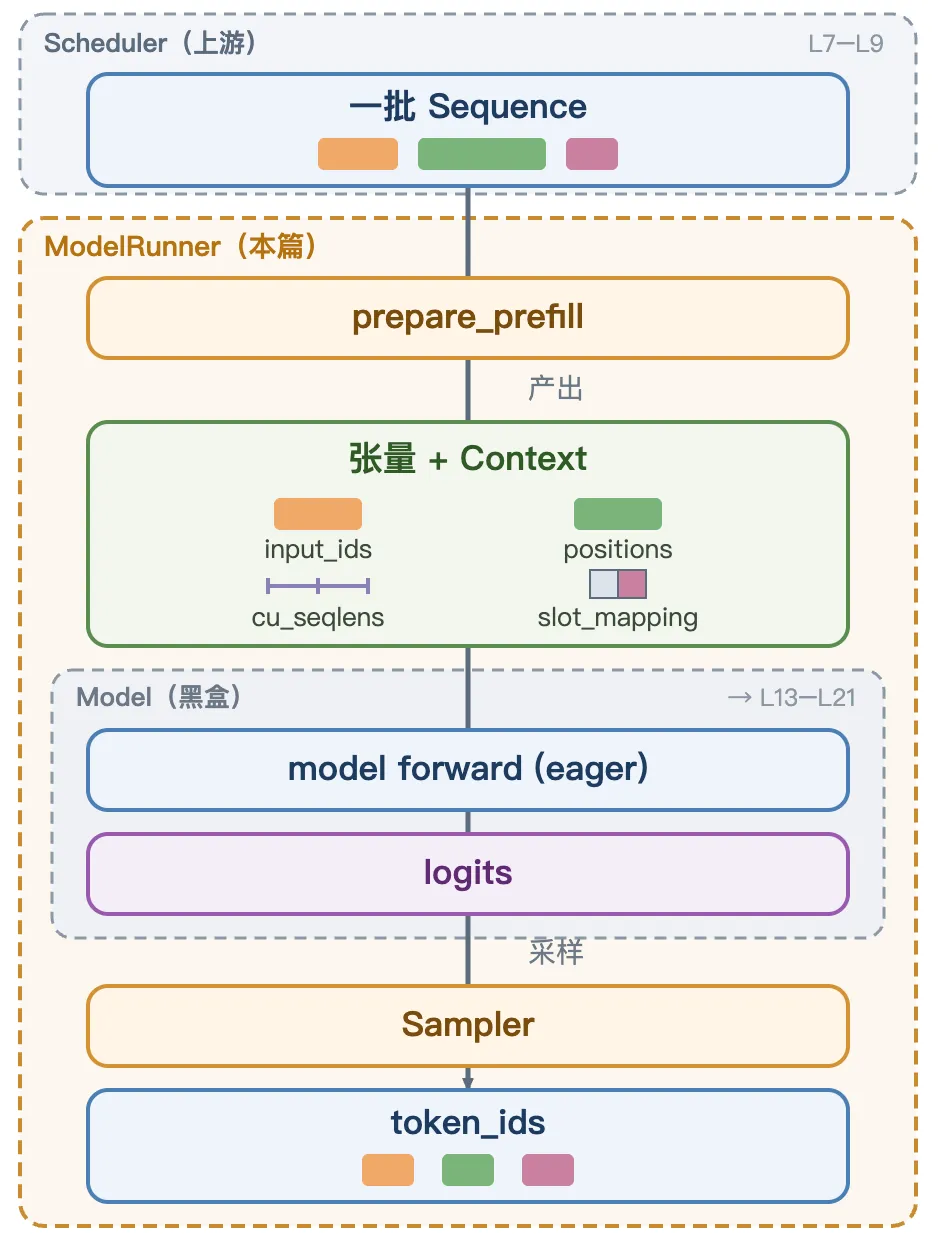
调度器决定“这一步跑哪些 Sequence”,Context 负责把元数据透传到模型每一层。但还有一层缺口:模型的 forward 只认张量(input_ids、positions),不认 Sequence 对象,也不认 block 表。需要一个把请求翻译成张量、再把结果翻译回 token 的中间层。
这个中间层就是本篇要介绍的 ModelRunner。
2. 本节总览
ModelRunner 接收一批来自调度器的 Sequence,调用模型的 forward 方法,产出 token。
run | ||
prepare_prefill | ||
prepare_decode | ||
allocate_kv_cache | ||
set_context | ||
run_model | ||
loopread_shm/write_shm |
3. 实现简版 ModelRunner
__init__:初始化
• 加载模型权重到 GPU • 创建采样器 • 申请 KV Cache
import torchfrom nanovllm.config import Configfrom nanovllm.engine.sequence importSequencefrom nanovllm.models.qwen3 import Qwen3ForCausalLMfrom nanovllm.layers.sampler import Samplerfrom nanovllm.utils.context import set_context, get_context, reset_contextfrom nanovllm.utils.loader import load_modelclassModelRunner:def__init__(self, config: Config):self.config = configself.block_size = config.kvcache_block_sizeSequence.block_size = self.block_size# 确保模型、KV Cache 都加载到 GPU 里,并使用正确的精度 default_dtype = torch.get_default_dtype() torch.set_default_dtype(config.hf_config.dtype) torch.set_default_device("cuda")# Qwen3 模型架构,后续章节详细介绍self.model = Qwen3ForCausalLM(config.hf_config) load_model(self.model, config.model)self.sampler = Sampler()# 下文介绍self.allocate_kv_cache(num_blocks=8)# 还原默认 device/dtype,否则 prepare_* 里# torch.tensor(..., pin_memory=True) 会因默认 cuda 而报错 torch.set_default_device("cpu") torch.set_default_dtype(default_dtype)allocate_kv_cache:创建 KV cache
申请一个 6 维张量存储 KV,形状为 (2, num_layers, num_blocks, block_size, num_kv_heads, head_dim)。
张量维度的顺序并不是简单拍板,而是针对 KV 读写的特点精心编排的。
以 num_kv_heads 和 head_dim 维度顺序为例:
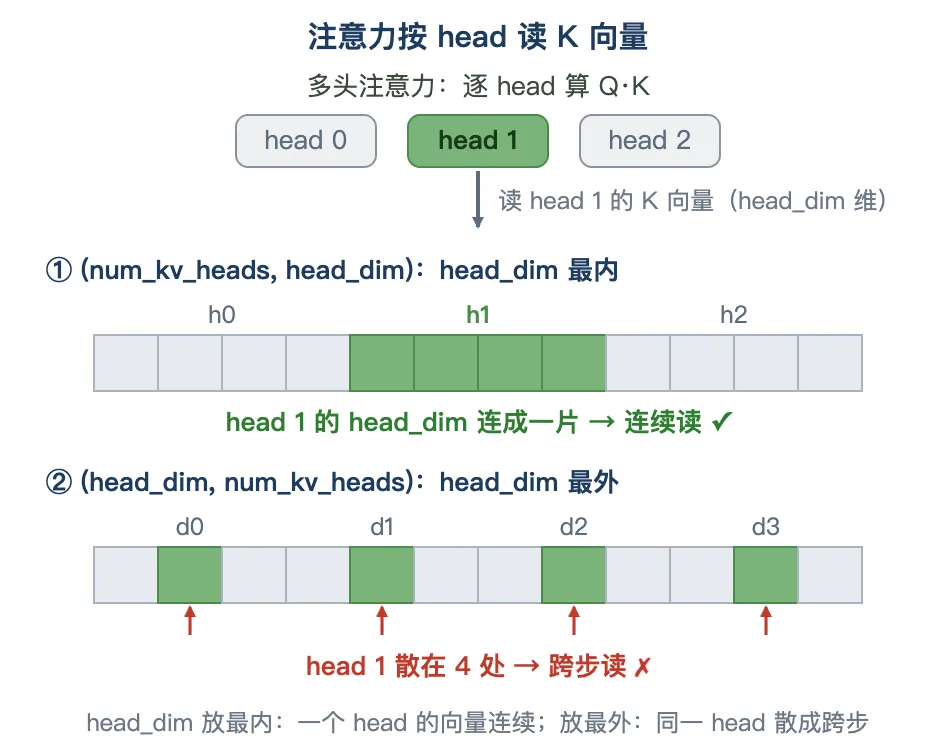
张量底层是一维连续内存,维度越靠内越相邻,一起读写的数据就越连续,越能避免跨步访问带来的 cache miss 与带宽浪费。
defallocate_kv_cache(self, num_blocks: int): hf = self.config.hf_config nkv = hf.num_key_value_heads head_dim = getattr( hf, "head_dim", hf.hidden_size // hf.num_attention_heads, )# 形状 (2, num_layers, num_blocks, block_size, num_kv_heads, head_dim)self.kv_cache = torch.empty(2, hf.num_hidden_layers, num_blocks,self.block_size, nkv, head_dim, )# 把每层 attention 的 k_cache / v_cache 指到这块大张量的对应切片 layer_id = 0for module inself.model.modules():ifhasattr(module, "k_cache") andhasattr(module, "v_cache"): module.k_cache = self.kv_cache[0, layer_id] module.v_cache = self.kv_cache[1, layer_id] layer_id += 1ModelRunner.allocate_kv_cache = allocate_kv_cacherun:驱动整个流程
• 把调度产物Sequence拼装为 model.forward 需要的 张量 • 调用 model.forward 计算 logits • 采样出 token • 清理本步 Context
defrun(self, seqs: list[Sequence], is_prefill: bool) -> list[int]:# Sequence → 张量 input_ids, positions = (self.prepare_prefill(seqs) if is_prefill # 下文介绍elseself.prepare_decode(seqs) # 下一篇介绍 )# 在 GPU 上进行采样,所以 sampler 参数也需要存到 GPU 显存里 temperatures = torch.tensor( [seq.temperature for seq in seqs], dtype=torch.float32, device="cuda", )# forward → logits → 采样出 token logits = self.run_model(input_ids, positions) # 后续详细介绍 token_ids = self.sampler(logits, temperatures).tolist() # 后续详细介绍# 清理本步的 Context reset_context()return token_idsModelRunner.run = runrun_model:计算 logits
• 张量经过 model.forward 得到 hidden • hidden 经过 lm_head 得到 logits • 推理不涉及反向传播,使用 @torch.inference_mode关闭 PyTorch 梯度计算
@torch.inference_mode()defrun_model(self, input_ids, positions): hidden = self.model(input_ids, positions)returnself.model.compute_logits(hidden)ModelRunner.run_model = run_modelprepare_prefill:把变长 prompt 铺成张量
prefill 把多个 prompt 铺成一个张量,方便后续进行并行计算。
该方法产出五个对象:
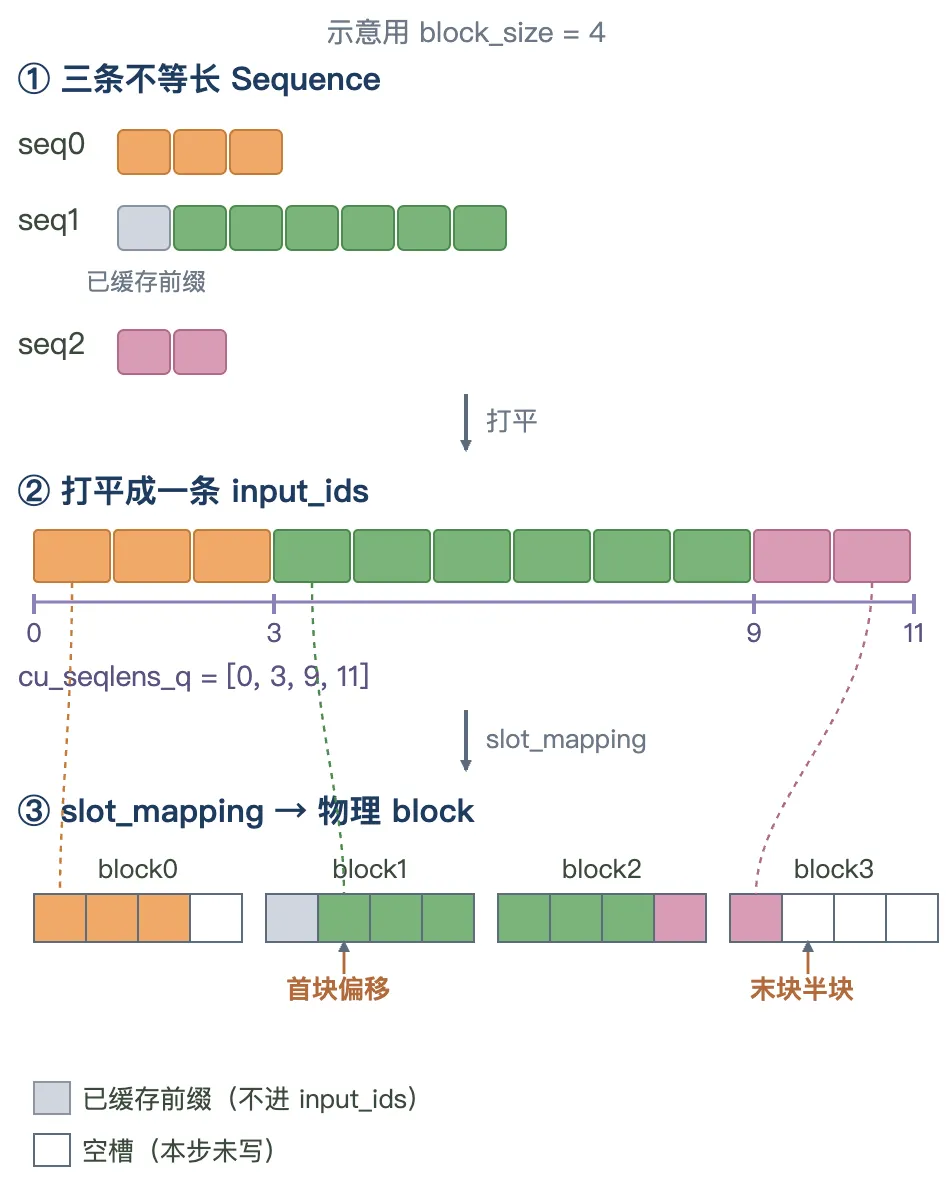
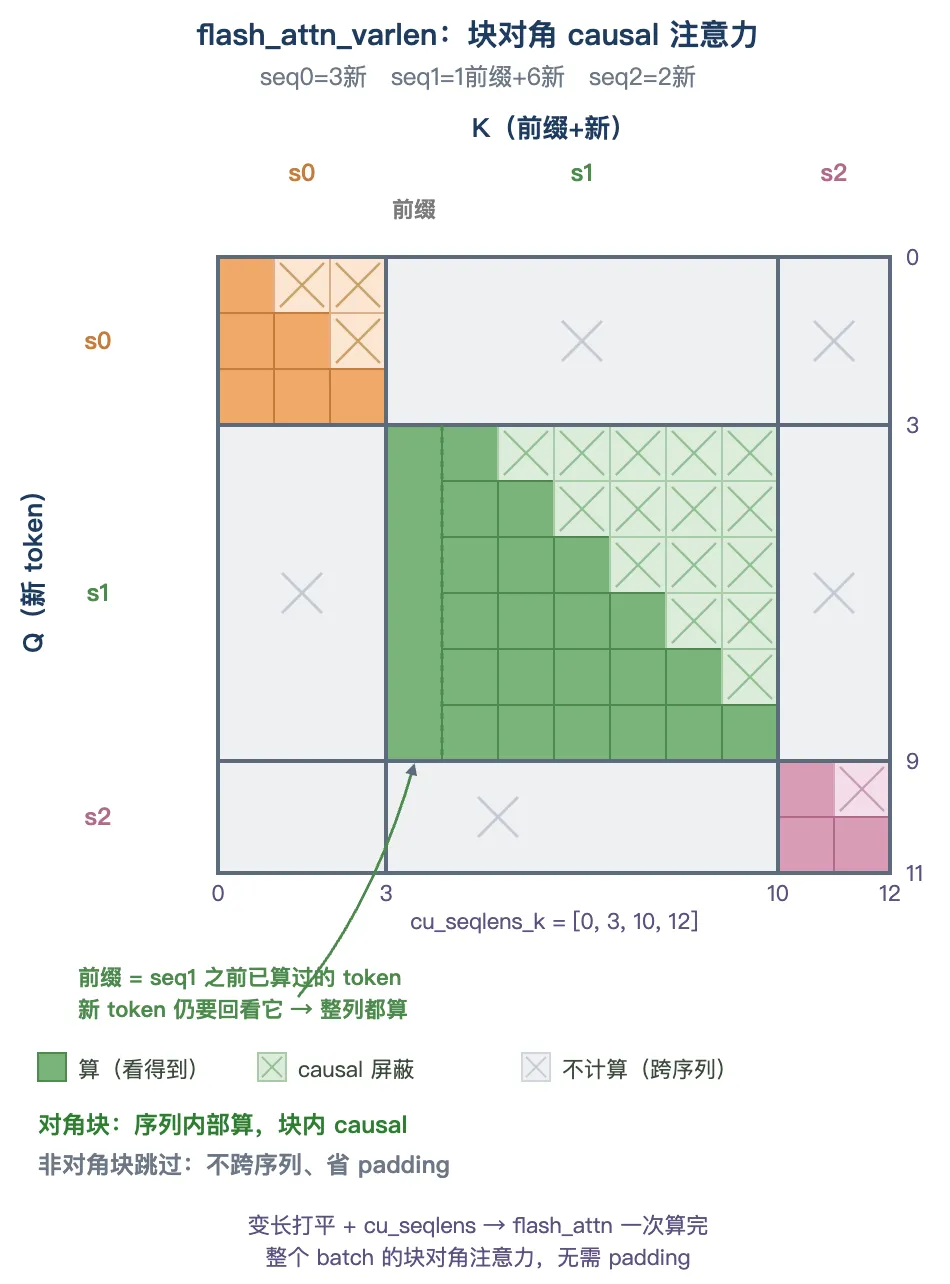
• input_ids:把各序列要计算的新 token 首尾相接打平成一个一维数组。• positions:每个新 token 的位置编号,接着前缀往后排(有前缀时从start开始,不从 0 开始)。• cu_seqlens_q:各序列在打平数组里的 query 边界,形如[0, 3, 9, 11],FlashAttention 据此切开变长 batch。• cu_seqlens_k:key 的边界,长度等于前缀加新 token(有 prefix cache 时k > q)。• slot_mapping:每个新 token 要写入的物理 slot 下标。
铺好这些张量后,prefill 走 flash_attn_varlen_func:它用 cu_seqlens 把打平的 q/k 切回序列,做块对角 causal 注意力——每条序列只在自己内部算(块内 causal:第 i 个 query 只看自己和前面的 key),序列之间不算,省掉给短序列 padding 的显存。
defprepare_prefill(self, seqs: list[Sequence]): input_ids = [] positions = [] cu_seqlens_q = [0] # query(新 token)在打平数组里的边界 cu_seqlens_k = [0] # key(前缀 + 新)的长度边界 max_seqlen_q = 0 max_seqlen_k = 0 slot_mapping = [] # 每个新 token 写到哪个物理 slot block_tables = Nonefor seq in seqs: start = seq.num_cached_tokens # 已缓存前缀长度 seqlen_q = seq.num_scheduled_tokens # 本步要算的新 token 数 end = start + seqlen_q seqlen_k = end # key 总长 = 前缀 + 新 input_ids.extend(seq[start:end]) # 只取要算的那一段 positions.extend(range(start, end)) # 位置接着前缀往后排 cu_seqlens_q.append(cu_seqlens_q[-1] + seqlen_q) cu_seqlens_k.append(cu_seqlens_k[-1] + seqlen_k) max_seqlen_q = max(seqlen_q, max_seqlen_q) max_seqlen_k = max(seqlen_k, max_seqlen_k)# —— slot_mapping:算出每个新 token 写到哪个物理 slot ——# slot = KV cache 里的一个物理槽位,一个 token 的 K/V 占一个。# 逻辑连续的 token,物理 block 可能不连续(paged),故逐 block 算。# start_block / end_block:[start, end) 覆盖的逻辑 block 范围,# end 向上取整,取成开区间(左闭右开)。 start_block = start // self.block_size end_block = (end + self.block_size - 1) // self.block_sizefor i inrange(start_block, end_block):# block_table[i]:第 i 个逻辑 block → 物理 block 号# base:该物理 block 在大张量里的起始 slot 下标 base = seq.block_table[i] * self.block_size slot_start = baseif i == start_block: # 首块:前缀已写过,从偏移处起 slot_start += start % self.block_sizeif i != end_block - 1: # 中间块:整块写满到 block_size slot_end = base + self.block_sizeelse: # 末块:只写到 end,通常是半块 slot_end = base + end - i * self.block_size# [slot_start, slot_end) 这段槽位依次发给本块内的新 token slot_mapping.extend(range(slot_start, slot_end))# 有前缀复用时才需要 block_tables(→ L5)if cu_seqlens_k[-1] > cu_seqlens_q[-1]: block_tables = self.prepare_block_tables(seqs)# CPU list → pinned 张量 → 异步拷 GPU# pin_memory:页锁定内存,物理地址固定,DMA 可直读,省一次中转拷贝# 普通的 CPU 内存是可分页内存(pageable)# 操作系统的虚拟内存机制可能随时把它换出到磁盘# 或在物理内存里挪位置,物理地址不固定# non_blocking:把拷贝排进 CUDA stream 就返回,让 CPU 不干等;# 拷贝与 forward 同在默认 stream,按入队顺序执行,# forward 一定等拷贝完才读,不会读到没拷完的数据。defto_cuda(x, dtype): t = torch.tensor(x, dtype=dtype, pin_memory=True)return t.cuda(non_blocking=True) input_ids = to_cuda(input_ids, torch.int64) positions = to_cuda(positions, torch.int64) cu_seqlens_q = to_cuda(cu_seqlens_q, torch.int32) cu_seqlens_k = to_cuda(cu_seqlens_k, torch.int32) slot_mapping = to_cuda(slot_mapping, torch.int32)# 写进 Context,透传给每一层 attention(→ L10) set_context(True, cu_seqlens_q, cu_seqlens_k, max_seqlen_q, max_seqlen_k, slot_mapping, None, block_tables, )return input_ids, positionsModelRunner.prepare_prefill = prepare_prefillprepare_block_tables:记录历史 K/V 的地址
block_table:一条序列「逻辑块 → 物理块号」的清单,如 [3, 7, 1] 表示它的第 0、1、2 个逻辑块分别落在物理块 3、7、1。
何时用:无前缀复用时,K/V 当场算出、就在批里,不需要它;命中前缀缓存时,前缀 K/V 已在 KV cache 里,此时 key 比 query 长,即 cu_seqlens_k[-1] > cu_seqlens_q[-1],attention 只能凭 block_table 回 cache 读(→ L5)。
padding:各序列长短不一,用 -1 补齐成 (batch, 最长块数) 张量,-1 表空块,kernel 跳过。
defprepare_block_tables(self, seqs: list[Sequence]):# 最长的 block_table,决定矩形张量的列数 max_len = max(len(seq.block_table) for seq in seqs)# 每行一条序列,短的用 -1 补到 max_len,凑成规整矩形 bt = [ seq.block_table + [-1] * (max_len - len(seq.block_table))for seq in seqs ]# CPU → pinned → 异步拷 GPU(同 prepare_prefill 的 to_cuda) table = torch.tensor(bt, dtype=torch.int32, pin_memory=True)return table.cuda(non_blocking=True)ModelRunner.prepare_block_tables = prepare_block_tables4. 集成验证
加载真实 Qwen3-0.6B,造一条 Sequence,跑一次 prefill,验证 ModelRunner 能否把它拼接成张量、输出第一个 token。
import torch.distributed as distfrom modelscope import snapshot_downloadfrom transformers import AutoTokenizerfrom nanovllm.sampling_params import SamplingParams# 单卡环境准备:nano-vllm 的网络层在构造时要查 world_size,# 这里先初始化一个单进程组(多卡版后续介绍)torch.cuda.set_device(0)ifnot dist.is_initialized(): dist.init_process_group("nccl", "tcp://localhost:2333", world_size=1, rank=0)# 本地路径(Config 要求 model 是已存在的目录)model_path = snapshot_download("Qwen/Qwen3-0.6B")config = Config(model_path, enforce_eager=True, max_model_len=4096)runner = ModelRunner(config)tokenizer = AutoTokenizer.from_pretrained(model_path)# prompt → token ids(chat template)msgs = [{"role": "user", "content": "你是谁"}]text = tokenizer.apply_chat_template( msgs, tokenize=False, add_generation_prompt=True, enable_thinking=False,)prompt_ids = tokenizer(text).input_ids# 造一条 Sequence,整段 prompt 一次 prefillseq = Sequence(prompt_ids, SamplingParams(temperature=0.6))seq.num_scheduled_tokens = len(seq) # 整段都要算seq.block_table = list(range(seq.num_blocks)) # 看一眼 prepare_prefill 铺出来的张量input_ids, positions = runner.prepare_prefill([seq])ctx = get_context()print("prompt tokens :", len(prompt_ids))print("input_ids[:8] :", input_ids[:8].tolist())print("positions[:8] :", positions[:8].tolist())print("cu_seqlens_q :", ctx.cu_seqlens_q.tolist())print("slot_mapping[:8]:", ctx.slot_mapping[:8].tolist())reset_context()Downloading Model from https://www.modelscope.cn to directory: /DATA/disk5/cache/modelscope/models/Qwen/Qwen3-0.6B2026-05-28 18:10:33,327 - modelscope - INFO - Target directory already exists, skipping creation.prompt tokens : 14input_ids[:8] : [151644, 872, 198, 105043, 100165, 151645, 198, 151644]positions[:8] : [0, 1, 2, 3, 4, 5, 6, 7]cu_seqlens_q : [0, 14]slot_mapping[:8]: [0, 1, 2, 3, 4, 5, 6, 7]# 端到端:一批 Sequence → 第一个 next tokentoken_ids = runner.run([seq], is_prefill=True)print("first next token id :", token_ids[0])print("decoded :", tokenizer.decode(token_ids))first next token id : 104198decoded : 我是5. 小结
ModelRunner 是调度器与模型之间的中间层:向上接收 Sequence 对象,拼接张量,forward 完再把 logits 转为 token。
__init__ 备好模型与 cache,run 串起 prepare → forward → sample,prepare_prefill 把变长 prompt 打平、用 cu_seqlens 标边界、slot_mapping 逐 block 算出每个新 token 的物理写入位置。
下一篇讲解 prepare_decode——decode 怎么在 prefill 留下的状态上,继续生成 token。
