夜雨聆风
夜雨聆风


WooCommerce 支付插件开发 – 可扩展支付网关基类设计
做 WooCommerce 支付插件开发,最头疼的就是重复代码。每接一个新渠道,都要从头写一遍支付流程、通知处理、配置管理。代码越写越多,维护成本越来越高。
今天分享一个实战方案:设计一个可扩展的支付网关基类,让新增支付方式只需要几行代码。
为什么需要基类设计
先说说问题。传统的支付插件开发是这样的:
// 支付宝网关
class WC_Gateway_Alipay extends WC_Payment_Gateway{
    publicfunction process_payment($order_id) { /* 300行代码 */ }
    publicfunction payment_notify_handler() { /* 200行代码 */ }
    // ... 各种重复逻辑
}

// 微信支付网关
class WC_Gateway_Wechat extends WC_Payment_Gateway{
    publicfunction process_payment($order_id) { /* 又是300行,几乎一样 */ }
    publicfunction payment_notify_handler() { /* 又是200行,几乎一样 */ }
}
看起来是两个不同的支付方式,实际上 80% 的代码是一样的:
-
• 订单金额转换和校验 -
• 支付请求构造和发送 -
• 异步通知接收和验签 -
• 订单状态更新逻辑 -
• 错误处理和日志记录
基类设计的核心思想就是:把共性抽出来,差异点留给子类。
基类架构设计
我们的基类 WC_Gateway_Antom_Common 继承自 WooCommerce 的 WC_Payment_Gateway,这是标准做法。
abstractclass WC_Gateway_Antom_Common extends WC_Payment_Gateway{
    protected $currency;

    publicfunction __construct() {
        $this->init_settings();
        $this->setup_props();
        $this->init_form_fields();

        // 注册必要的事件钩子
        add_action('woocommerce_update_options_payment_gateways_' . $this->id,
                   [$this, 'process_admin_options']);
        add_action('woocommerce_api_antom_payment_notify',
                   [$this, 'payment_notify_handler']);
    }
}
注意这里用了 abstract,强制子类必须实现某些方法,同时基类里可以包含完整的通用逻辑。
属性初始化:setup_props()
每个支付方式都有图标、支持的币种、显示名称等属性。基类里统一处理:
protectedfunction setup_props() {
    // 从配置中读取图标
    $this->icon = $this->get_pay_setting('icon');
    $this->has_fields = true;
    $this->supports = ['products'];

    // 支持的币种列表
    $this->currency = $this->get_pay_setting('support_currencies');

    // 显示名称,支持后台自定义
    $this->title = $this->get_option('title') ?:
                   $this->get_pay_setting('default_display_name');

    // 后台显示支持的币种
    $show_currency = array_slice($this->currency, 0, 4);
    if (count($this->currency) > 4) {
        $show_currency[] = ' and others';
    }
    $this->method_description = '支持币种: ' . implode(' ', $show_currency);
}
这里的关键设计是 get_pay_setting() 方法,它从统一的配置数组中读取当前支付方式的属性。新增支付方式时,只需要在配置数组里加一条记录,不用改基类代码。
核心支付流程:process_payment()
这是整个插件最复杂的部分,包含了完整的支付链路:
publicfunction process_payment($order_id) {
$order = wc_get_order($order_id);
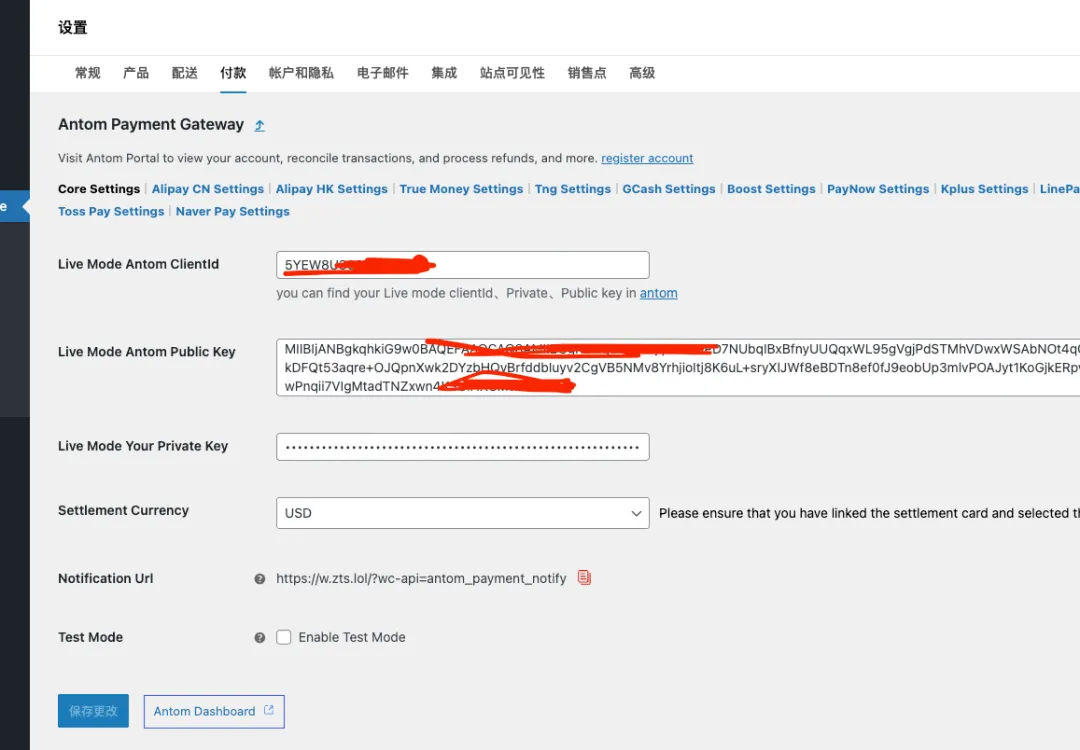
// 1. 加载核心配置
$core_settings = antom_get_core_settings();
$client_id = $core_settings['clientid'];
$private_key = $core_settings['private_key'];
// 2. 检查支付环境
if (!$this->is_valid_for_use()) {
return $this->return_failure('支付方式配置错误');
}
// 3. 构造支付请求
$request = $this->build_payment_request($order, $core_settings);
// 4. 发送请求并处理响应
$response = $this->send_payment_request($request);
// 5. 返回结果给 WooCommerce
return $this->handle_payment_response($order, $response);
}基类里封装了完整的支付流程,子类只需要关心自己的特殊逻辑。比如信用卡支付需要额外的 3D 验证处理,可以在子类里重写特定方法。
异步通知处理
支付完成后,第三方平台会异步通知商户。基类里提供完整的验签和状态更新逻辑:
publicfunction payment_notify_handler() {
    // 1. 获取请求数据
    $headers = getallheaders();
    $body = file_get_contents('php://input');

    // 2. 提取关键字段
    $client_id = $headers['Client-Id'] ?? '';
    $signature = $headers['Signature'] ?? '';

    // 3. 验签(安全第一)
    $verify_result = Antom_Signature_Tool::verify(
        'POST', '/wc-api/antom_payment_notify',
        $client_id, $headers['Request-Time'],
        $body, $signature, $public_key
    );

    if (!$verify_result) {
        wp_die('签名验证失败');
    }

    // 4. 解析通知内容
    $notify_data = json_decode($body, true);
    $order = $this->get_order_by_payment_request_id(
        $notify_data['paymentRequestId']
    );

    // 5. 更新订单状态(幂等处理)
    $this->update_order_status($order, $notify_data);
}
这里有几个关键点:
-
• 验签必须做:防止伪造通知 -
• 幂等处理:同一笔支付可能多次通知,要根据当前状态判断是否处理 -
• 快速响应:异步通知要求尽快返回,不要在这里做耗时操作
子类实现:极简模式
有了基类,子类的实现就简单多了。以 DANA 钱包为例:
class WC_Gateway_Antom_DANA extends WC_Gateway_Antom_Common{
    public $id = 'antom_dana';
}
就这几行,一个完整的支付方式就实现了。所有支付流程、通知处理、配置管理都复用基类。
再看信用卡支付,需要一些特殊处理:
class WC_Gateway_Antom_Card extends WC_Gateway_Antom_Common{
    public $id = 'antom_card';

    // 信用卡需要额外收集卡号信息
    publicfunction payment_fields() {
        // 渲染卡号输入表单
        echo $this->get_card_form_html();
    }

    // 处理信用卡特有的 3D 验证
    protectedfunction handle_3d_secure($order, $response) {
        if (isset($response['normalUrl'])) {
            // 跳转到 3D 验证页面
            return ['result' => 'success', 'redirect' => $response['normalUrl']];
        }
        return parent::handle_payment_response($order, $response);
    }
}
子类只需要关注自己的差异点,通用逻辑全部下沉到基类。
配置管理设计
支付方式的各种属性(图标、币种、显示名称等)集中管理:
function antom_get_payment_methods() {
    return [
        'antom_alipay_cn' => [
            'slug' => 'antom_alipay_cn',
            'payment_method_type' => 'ALIPAY_CN',
            'support_currencies' => ['CNY', 'USD', 'HKD', 'SGD'],
            'icon' => ['alipay-icon.svg'],
            'gateway_file' => 'includes/gateways/class-wc-gateway-antom-alipay-cn.php',
            'gateway_class' => 'WC_Gateway_Antom_Alipay_CN',
        ],
        'antom_dana' => [
            'slug' => 'antom_dana',
            'payment_method_type' => 'DANA',
            'support_currencies' => ['IDR', 'USD'],
            'icon' => ['dana-icon.svg'],
            'gateway_file' => 'includes/gateways/class-wc-gateway-antom-dana.php',
            'gateway_class' => 'WC_Gateway_Antom_DANA',
        ],
        // ... 更多支付方式
    ];
}
主插件文件里统一加载:
// 加载基类
require_once 'includes/gateways/class-wc-gateway-antom-common.php';

// 自动加载所有支付方式
$payment_methods = antom_get_payment_methods();
foreach ($payment_methods as $method) {
    if (is_file($method['gateway_file'])) {
        require_once $method['gateway_file'];
    }
}

// 注册到 WooCommerce
add_filter('woocommerce_payment_gateways', function($gateways) {
    $methods = antom_get_payment_methods();
    foreach ($methods as $method) {
        if (class_exists($method['gateway_class'])) {
            $gateways[] = $method['gateway_class'];
        }
    }
    return $gateways;
});
新增支付方式只需要:
-
1. 在配置数组里加一条记录 -
2. 创建一个继承基类的子类(通常就几行代码)
安全设计
支付插件安全是重中之重,基类里必须包含:
1. 请求签名
所有发往支付平台的请求都要签名:
class Antom_Signature_Tool{
    public staticfunction sign($httpMethod, $path, $clientId,
                               $reqTime, $content, $privateKey) {
        // 构造签名内容
        $signContent = $httpMethod . ' ' . $path . "\n"
                     . $clientId . '.' . $reqTime . '.' . $content;

        // RSA-SHA256 签名
        openssl_sign($signContent, $signature, $privateKey, 'sha256');
        return urlencode(base64_encode($signature));
    }
}
2. 响应验签
支付平台的回调通知必须验签:
public staticfunction verify($httpMethod, $path, $clientId,
                              $rspTime, $rspBody, $signature, $publicKey) {
    $rspContent = $httpMethod . ' ' . $path . "\n"
                . $clientId . '.' . $rspTime . '.' . $rspBody;

    $signature = urldecode($signature);
    return openssl_verify($rspContent, base64_decode($signature),
                         $publicKey, 'sha256') === 1;
}
3. 并发控制
防止用户重复点击支付按钮导致重复扣款:
class Antom_Payment_Request_Checker{
    publicfunction check_payment_limit($order) {
        // 检查是否已有成功支付
        if ($this->has_successful_payment()) {
            return ['result' => 'success', 'redirect' => $order->get_view_order_url()];
        }

        // 检查并发请求数量
        if ($this->payment_request_count >= 20) {
            return ['error' => '支付尝试次数已达上限'];
        }

        // 生成或复用 payment_request_id
        return $this->get_or_create_payment_request_id();
    }
}
总结
这套基类设计支撑了 15+ 支付方式的接入,核心思路就几点:
1. 抽象共性,隔离差异
-
• 支付流程、通知处理、配置管理全部下沉到基类 -
• 子类只关注自己的特殊逻辑
2. 配置驱动
-
• 支付方式属性集中管理 -
• 新增渠道只需改配置,不用改代码
3. 安全第一
-
• 请求签名 + 响应验签 -
• 并发控制和幂等处理 -
• 敏感信息不硬编码
4. 可扩展性
-
• 抽象基类 + 具体实现 -
• 钩子机制支持自定义 -
• 自动加载减少重复代码
实际项目中,这套架构让新增一个支付方式的时间从几天缩短到几小时。对于需要接入多渠道支付的项目,这种设计思路很有参考价值。