夜雨聆风
夜雨聆风
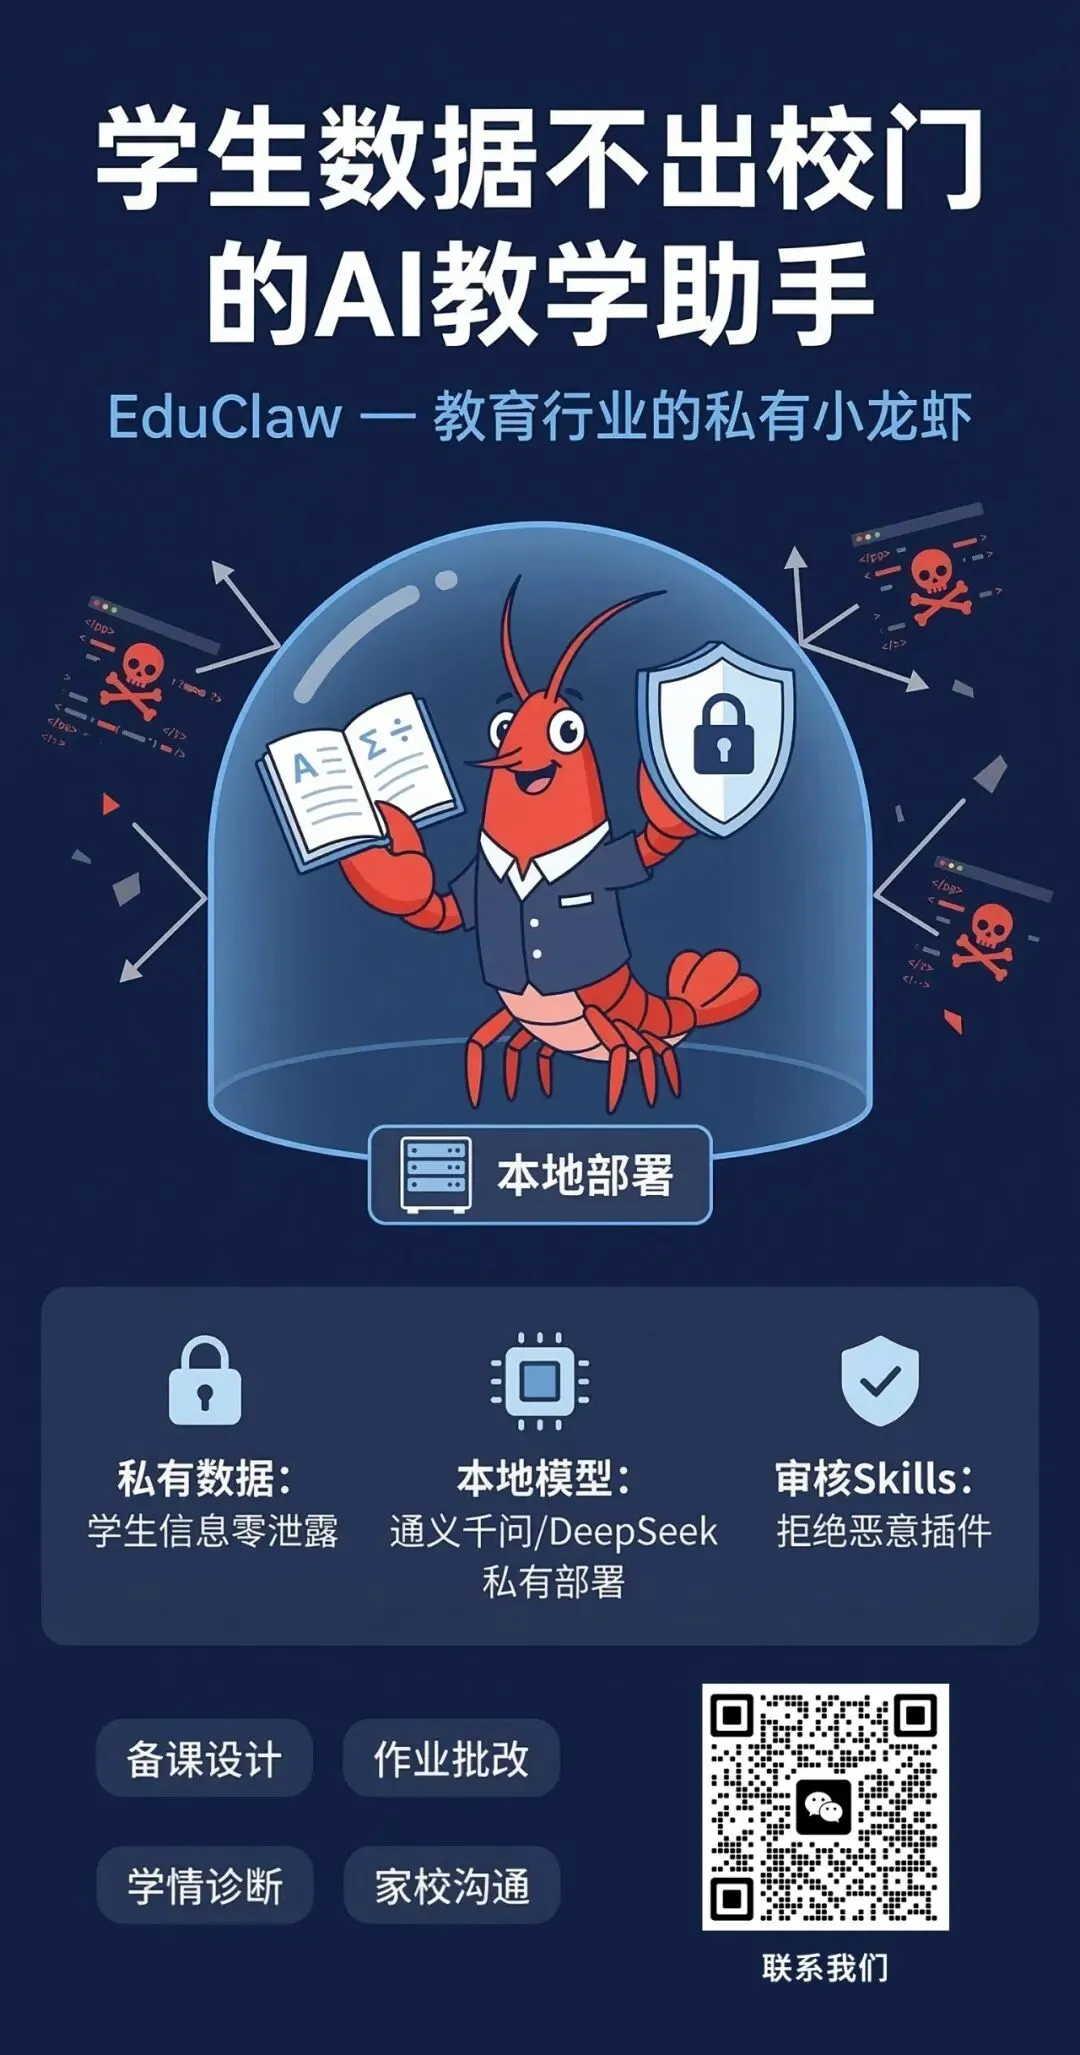
摘要: OpenClaw 的吉祥物是一只红色小龙虾,它近百万行代码、50+ 集成,六个月成为 GitHub 最热 AI 开源项目之一。但剥掉所有外围功能后,真正撑起整个系统的只有五个组件——我花了一周时间复刻这副骨架,在上面长出了一只面向教育场景的"小龙虾"。本文用真实代码把五个核心组件讲透,从 Config 到 Tool Loop,从 ReAct 论文到课堂可演示的本地 Agent,最后展示这副骨架如何直接映射到教育 AI 产品的架构设计。

一、先问对问题:一个最小可用的 AI Agent,到底由什么组成?
这两年 AI Agent 的讨论越来越热。OpenClaw、Claude Code、Cursor Agent、AutoGen、LangGraph、MCP Runner——名词太多,很多开发者的第一反应是劝退。
他们的直觉通常是:Agent 是不是必须有复杂的规划器?必须接入浏览器、终端、数据库?必须用某个编排框架才能做?
这些问题本身没有错,但都太靠后了。真正应该先问的是:一个最小可用的 AI Agent,到底最少由什么组成?
OpenClaw 是一个很好的观察样本——名字里的 Claw(钳子)来自它那只标志性的红色小龙虾吉祥物。它足够"像一个完整世界"——多通道、工具系统、长会话、插件扩展、子代理编排。但如果把外围能力全部剥掉,骨架其实不大。contextbento 在今天发布的架构拆解文章中给出了一个极有启发性的判断:
剥掉插件、Web UI、调度器、子代理、MCP 桥接、TTS、PDF、浏览器工具之后,真正决定一个 Agent 是否成立的,只剩五个组件。

这五个组件不仅能解释 OpenClaw,也几乎能解释今天所有主流 AI Agent 系统的共同结构。一旦理解了它们,你再看任何 Agent 框架,都会感觉像同一台机器穿了不同外套。
二、Agent 和聊天机器人的本质区别:不是更聪明,而是会循环
普通聊天机器人:请求进来,响应出去,一个来回,结束。
Agent 不是这样。它接收指令后,判断是否需要调用工具,执行工具获取真实世界的信息,读取结果,再决定下一步——直到它认为任务完成,才输出最终答案。
这就是 Yao et al. 2022 年在 ReAct 论文中形式化的模式:
Thought → Action(工具调用)→ Observation(工具结果)→ Repeat
翻译成工程语言:模型先推理,决定是否调工具,工具返回外部世界的真实数据,模型再基于真实数据继续推理。这个循环就是 Agent 的心跳。
Agent 的核心不是 prompt 写得多花,而是看它周围的基础设施搭得稳不稳。 OpenClaw 架构拆解的真正价值,恰恰在于把这些基础设施剥离出来了。
三、本地教学项目:从 OpenClaw 身上拆下骨架,长出一只教育小龙虾
为了让五个组件不只是概念,我基于同样的架构花一周时间构建了一个本地可运行的教学版 Agent。相比 OpenClaw 原版的 Telegram + Claude 云端方案,这只教育小龙虾做了几个关键收敛:
exec | ||
项目目录结构:
ounter(lineounter(lineounter(lineounter(lineounter(lineounter(lineounter(lineounter(lineounter(lineounter(lineounter(lineounter(lineounter(lineounter(lineounter(lineounter(lineounter(lineounter(lineounter(lineounter(lineopenclaw_local/├── config.py # 组件1: Config Loader├── channels/│ ├── base.py # Channel 抽象基类│ ├── web_ui.py # 组件2: Web UI Channel Adapter│ └── console.py # 备用: 终端 Channel Adapter├── session_store.py # 组件3: Session Store├── tool_loop.py # 组件4: Tool Loop Engine├── tools/│ ├── base.py # Tool 抽象基类│ └── exec_tool.py # exec 工具实现├── llm/│ ├── base.py # LLM Provider 抽象基类│ ├── ollama_native.py # Ollama 原生 API 适配│ ├── openai_compatible.py # OpenAI 兼容接口│ ├── anthropic.py # Anthropic API 适配│ └── mock.py # 离线演示用 Mock Provider├── reply.py # 组件5: Reply Delivery├── app.py # 主应用:串联五个组件└── worker.py # 子进程入口
下面逐个拆解。
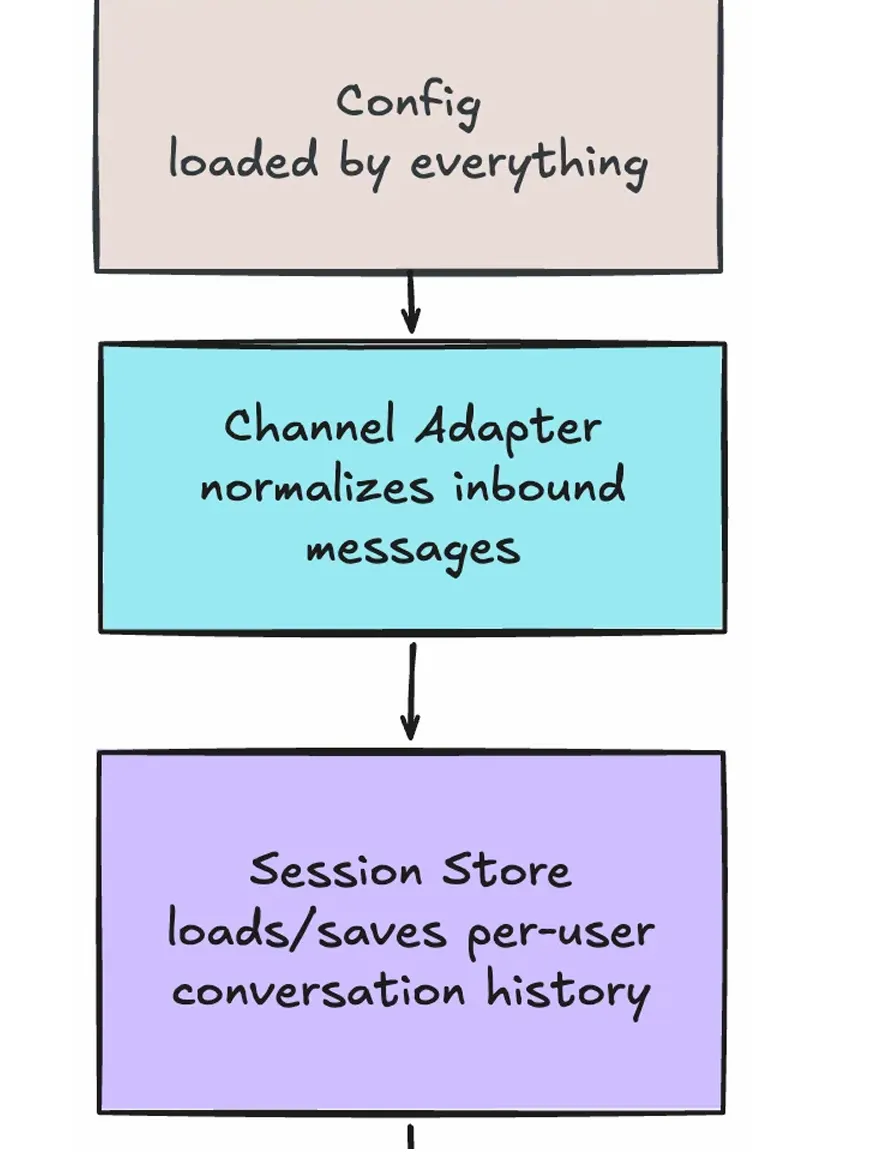
四、组件1:Config Loader —— 定义 Agent 的运行边界
很多人会低估配置层。不就是读个 YAML 文件吗?
但 Config Loader 做的是一件非常重要的事:它定义了整个 Agent 运行时的边界条件——用哪个模型、连什么地址、允许哪些工具、工具超时多久、会话历史存哪里、最大循环几次。
核心实现(精简):
ounter(lineounter(lineounter(lineounter(lineounter(lineounter(lineounter(lineounter(lineounter(lineounter(line@dataclass(frozen=True)class AppConfig:agent_name: strsystem_prompt: strsessions_dir: strallowed_users: list[str]max_tool_iterations: intmodel: ModelConfig # provider / model / api_key / base_urlchannel: ChannelConfig # kind / host / porttool_policy: ToolPolicyConfig # allowed_commands / blocked_substrings / timeout_s
两个设计决策值得注意:
第一,frozen=True。 配置对象在创建后不可变。所有组件读取它,但没有任何组件修改它。这是一个看似微小但极其重要的约束——配置是全局只读状态。
第二,环境变量展开。 通过正则替换 ${VAR_NAME},让同一份 YAML 在不同环境下无需修改即可运行:
ounter(lineounter(lineounter(lineounter(lineounter(lineounter(lineounter(lineounter(line_ENV_PATTERN = re.compile(r"\$\{([A-Z0-9_]+)\}", re.IGNORECASE)def _expand_env_values(value):if isinstance(value, str):return _ENV_PATTERN.sub(lambda m: os.environ.get(m.group(1), ""), value)# 递归处理 list 和 dict...
对应的配置文件(config.example.yaml,精简):
ounter(lineounter(lineounter(lineounter(lineounter(lineounter(lineounter(lineounter(lineounter(lineounter(lineounter(lineounter(lineounter(lineounter(lineounter(lineounter(lineounter(lineounter(lineounter(lineounter(lineounter(lineounter(lineounter(lineounter(lineounter(lineounter(lineounter(lineagent_name: openclaw-lecturesystem_prompt: |You are the assistant inside a local teaching demo...Use the exec tool only when it helps answer the user's request.Use Windows PowerShell commands only.sessions_dir: ./sessionsmax_tool_iterations: 8model:provider: ollamamodel: qwen3.5:4bbase_url: http://127.0.0.1:11434/v1tool_policy:allowed_commands:- Get-PSDrive- Get-ChildItem- Get-Process- Get-Location- whoami- hostnameblocked_substrings:- rm- del- shutdown- curl- wget
注意 tool_policy 同时定义了白名单(allowed_commands)和黑名单(blocked_substrings)——这不是冗余设计,而是防御纵深:白名单控制"只能做什么",黑名单拦截"绝对不能做什么"。
五、组件2:Channel Adapter —— 把消息入口的混乱挡在系统边界之外
如果问这五个组件里哪个最容易被忽略但最该重视,答案是 Channel Adapter。
现实世界的消息入口极其"脏":Telegram 的 webhook payload、飞书的事件回调、钉钉的机器人消息体、Discord 的 Gateway 事件——格式完全不同。如果让核心逻辑直接面对这些平台原始格式,系统会迅速变成一团糟。
Channel Adapter 的职责只有一个:把平台特有的数据,翻译成系统内部的标准消息格式。
标准消息的类型定义:
ounter(lineounter(lineounter(lineounter(lineounter(lineounter(lineounter(line@dataclass(frozen=True)class NormalizedMessage:channel: str # "web_ui" / "telegram" / "feishu"peer_id: str # 用户在该通道的唯一标识user_id: str # 用户身份(可能跨通道一致)text: str # 用户输入的文本metadata: dict[str, Any] = field(default_factory=dict)
Web UI 的 Adapter 实现中,关键的标准化逻辑发生在 HTTP POST 处理里:
ounter(lineounter(lineounter(lineounter(lineounter(lineounter(lineounter(lineounter(lineounter(lineounter(line# channels/web_ui.py 中的核心逻辑if parsed.path == '/api/chat':peer_id = str(payload.get('peer_id', 'browser-demo'))text = str(payload.get('text', '')).strip()result = self.server.call_agent({'channel': 'web_ui','peer_id': peer_id,'user_id': peer_id,'text': text,})
关键设计决策:系统内部永远不看到平台特有数据。 Router 和 Tool Loop 只认 NormalizedMessage,不关心消息来自浏览器、飞书还是终端。
这意味着什么?意味着加一个新通道(比如从 Web UI 扩展到飞书)不需要改动核心逻辑,只需要写一个新的 Adapter。项目中已经预置了两个通道实现——WebUIChannel 和 ConsoleChannel——共享同一个 Channel 抽象基类:
ounter(lineounter(lineounter(lineounter(lineclass Channel(ABC):@abstractmethodasync def run(self, app:OpenClawLocalApp) -> None:raise NotImplementedError
对于教育场景下的 EduClaw 项目,这一层需要适配飞书 webhook 和钉钉机器人 API。协议不同,但架构位置完全一致。
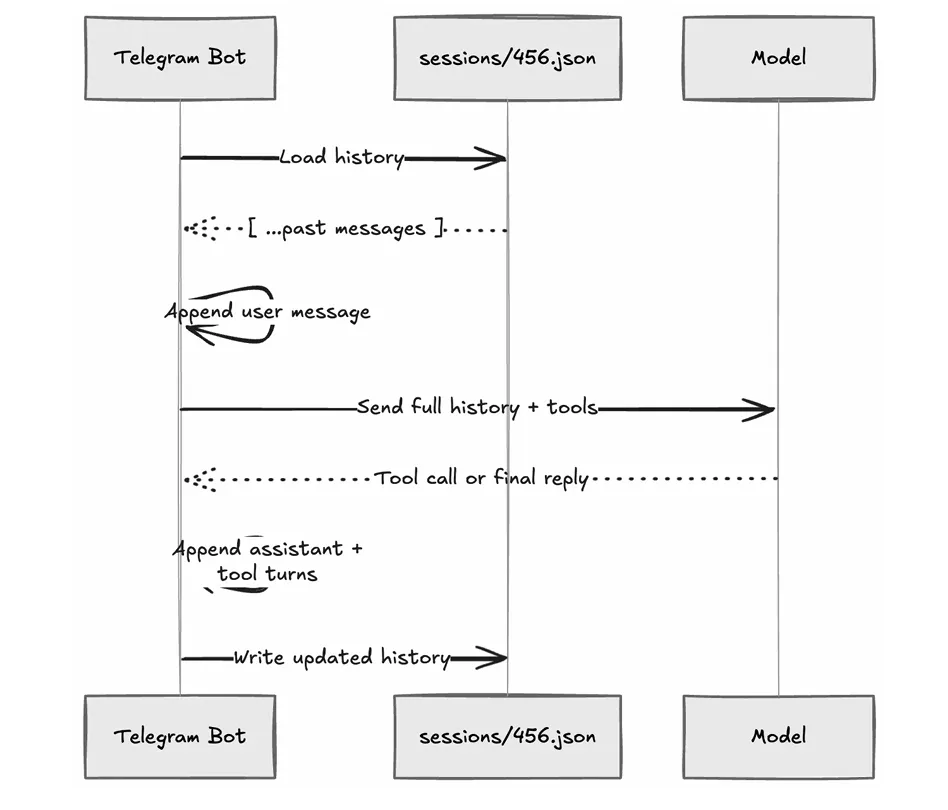
六、组件3:Session Store —— Agent "记得住上下文"的真正原因
很多人第一次用 Agent 觉得它"更聪明",其实很大一部分原因不是模型变强了,而是它有更稳定的会话状态。
用户说"看看当前目录文件",然后追问"把刚才那个最大的文件指出来"——如果系统没有保留历史,第二句话无法被理解。
Session Store 的职责:把每个用户的上下文历史稳定地存下来,在下一轮继续带回给模型。
核心实现:
ounter(lineounter(lineounter(lineounter(lineounter(lineounter(lineounter(lineounter(lineounter(lineounter(lineounter(lineounter(lineounter(lineounter(lineounter(lineounter(lineounter(lineounter(lineounter(lineounter(lineounter(lineounter(lineclass SessionStore:def __init__(self, base_dir, max_messages=60):self.base_dir = Path(base_dir)self._locks: dict[str, threading.Lock] = {} # 每会话一把写锁def build_session_key(self, agent_name, channel, peer_id):return f"agent:{agent_name}:{channel}:direct:{peer_id}"def load_messages(self, session_key):path = self.session_path(session_key)if not path.exists():return []return json.loads(path.read_text(encoding="utf-8"))def save_messages(self, session_key, messages):trimmed = messages[-self.max_messages:] # 防止历史无限膨胀path = self.session_path(session_key)path.write_text(json.dumps(trimmed, ensure_ascii=False, indent=2))def session_path(self, session_key):safe_name = re.sub(r"[^a-zA-Z0-9._-]+", "_", session_key)return self.base_dir / f"{safe_name}.json"
三个设计决策值得展开:
第一,确定性的复合键。 会话标识不是简单的 userId,而是 agent:{agent_name}:{channel}:direct:{peer_id} 的复合结构。真实的会话文件名长这样:
ounter(lineagent_openclaw-lecture_web_ui_direct_browser-0ea9f4ae-f0d0-469c-9c15-40fa2fe3f495.json
为什么不直接用 userId?因为同一个用户可能从不同通道发消息,同一个系统里可能有多个 Agent。一旦键设计过于简单,将来一定会发生会话冲突。OpenClaw 原文特别强调了这一点:即使 MVP 只支持一个通道,也应该从 Day 1 就按复合键设计。
第二,每会话一把写锁。self._locks 按 session_key 分配独立的 threading.Lock,防止同一用户的快速连发消息破坏历史文件的一致性。在 app.py 中的使用方式:
ounter(lineounter(lineounter(lineounter(lineounter(lineounter(linelock = self.session_store.get_lock(session_key)with lock:history_before = self.session_store.load_messages(session_key)history = [*history_before, {"role": "user", "content": message.text}]updated_history, final_text, trace = await self.tool_loop.run(history)self.session_store.save_messages(session_key, updated_history)
第三,历史裁剪。max_messages=60 做滑动窗口,防止上下文无限膨胀撑爆模型的 token 限制。这是最朴素的上下文管理策略,生产系统通常会升级为摘要压缩或关键事实保留。
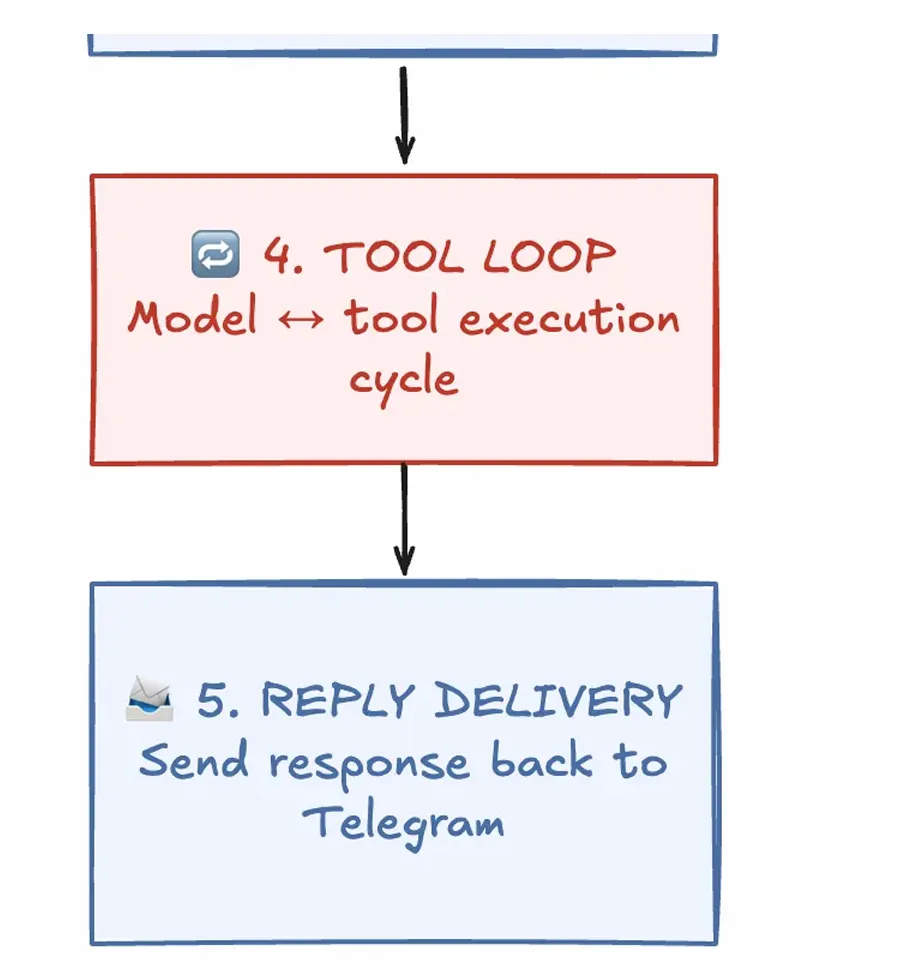
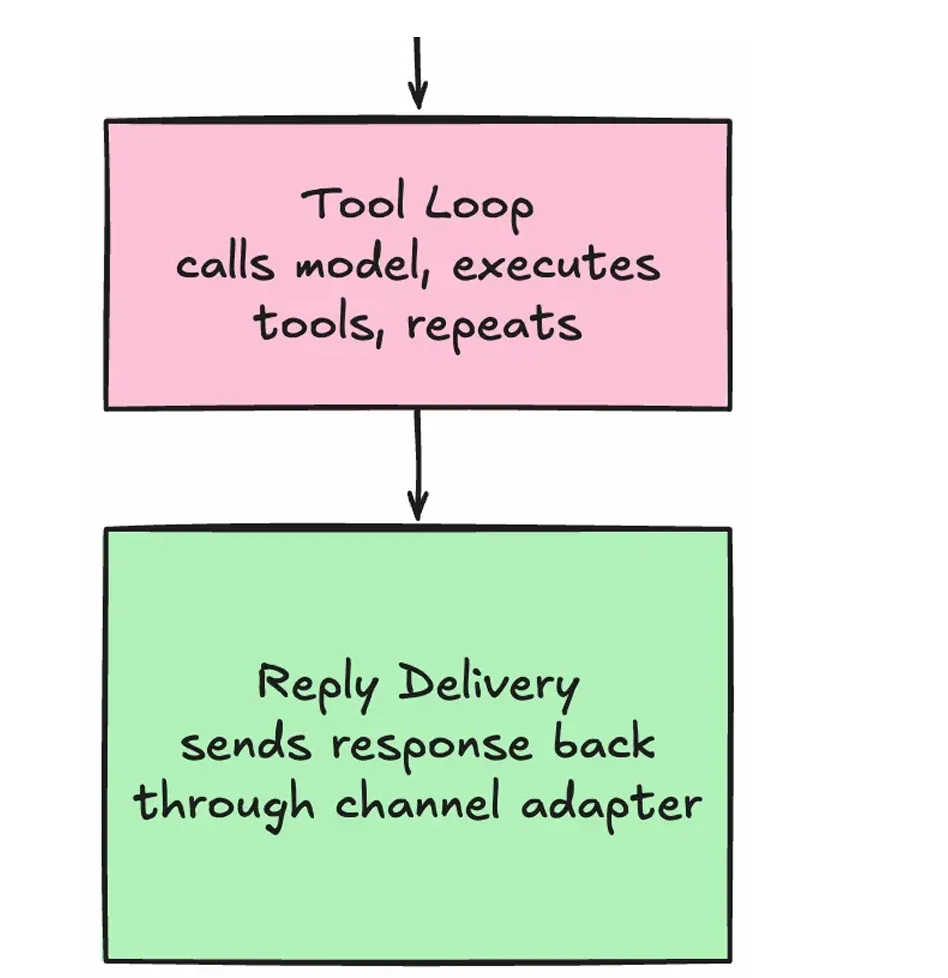
七、组件4:Tool Loop —— Agent 真正的心脏
如果前三层是在搭舞台,Tool Loop 就是演员开始表演的地方。
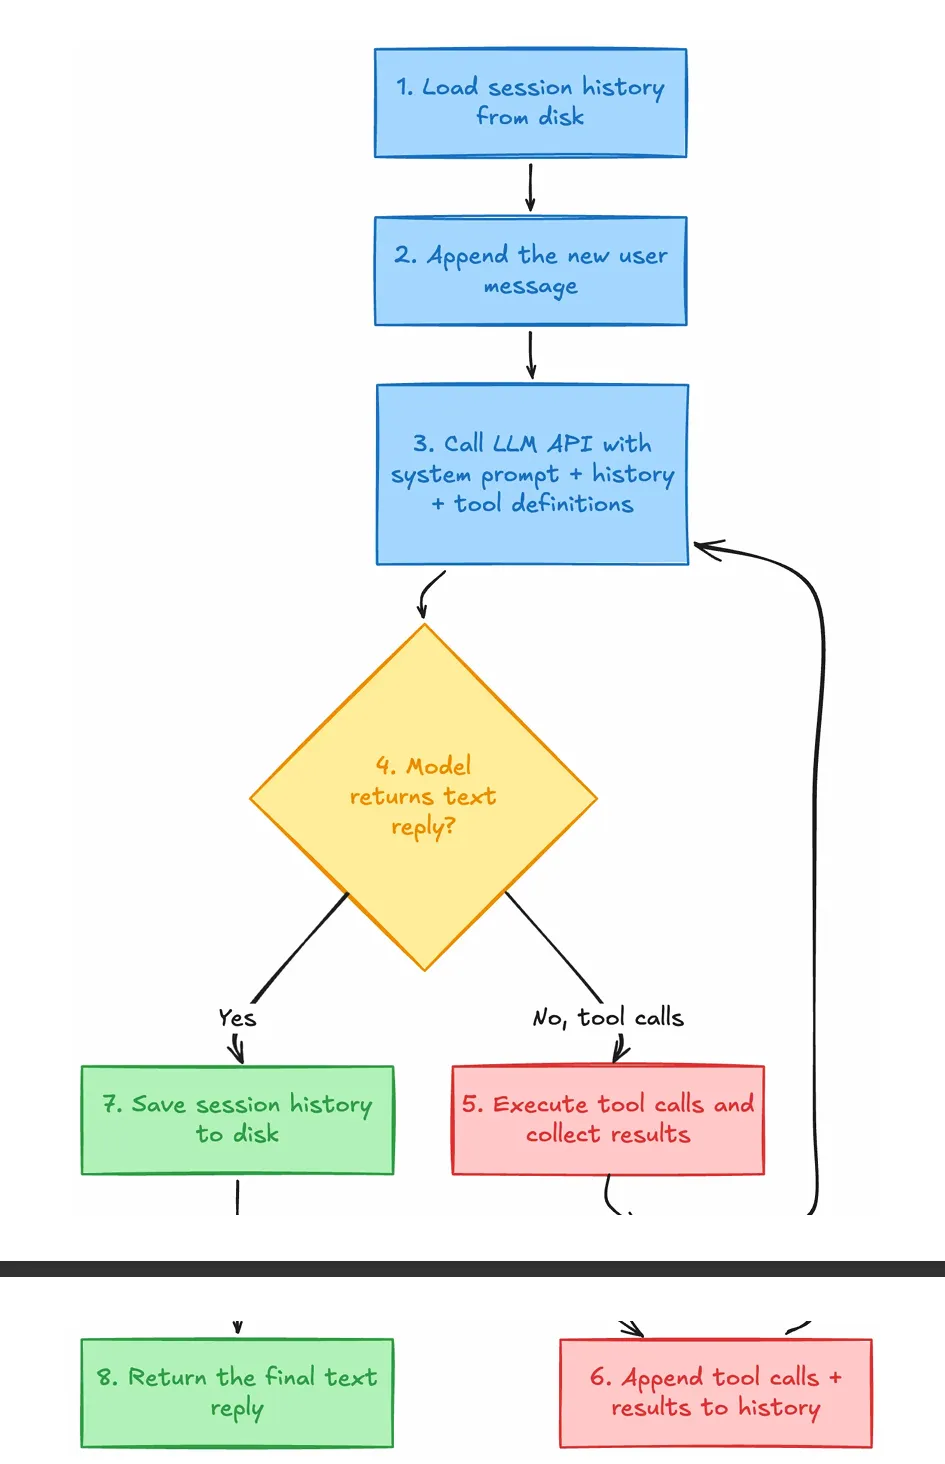
核心循环(精简至关键逻辑):
ounter(lineounter(lineounter(lineounter(lineounter(lineounter(lineounter(lineounter(lineounter(lineounter(lineounter(lineounter(lineounter(lineounter(lineounter(lineounter(lineounter(lineounter(lineounter(lineounter(lineounter(lineounter(lineounter(lineounter(lineounter(lineounter(lineounter(lineounter(lineounter(lineounter(lineounter(lineounter(lineounter(lineounter(lineounter(lineounter(lineounter(lineclass ToolLoopEngine:async def run(self, history):working_history = [dict(m) for m in history]trace = []for iteration in range(1, self.max_iterations + 1):# 1. 调用模型result = await self.provider.complete(system_prompt=self.system_prompt,messages=working_history,tools=[t.definition for t in self.tools.values()],)working_history.append({"role": "assistant","content": result.text or "","tool_calls": [...] # 如果有工具调用})# 2. 如果模型直接给出文本回复,循环结束if not result.tool_calls:return working_history, result.text.strip(), trace# 3. 如果模型请求工具调用,逐个执行for tool_call in result.tool_calls:tool = self.tools.get(tool_call.name)tool_output = await tool.execute(tool_call.arguments)working_history.append({"role": "tool","tool_call_id": tool_call.id,"name": tool_call.name,"content": tool_output,})# 4. 教学版:一轮工具后强制总结forced_text = await self._force_final_answer(working_history)working_history.append({"role": "assistant", "content": forced_text})return working_history, forced_text, trace
这段代码展示了 ReAct 模式在工程中的完整落地。几个关键点:
工具定义遵循 function calling 标准。 以 exec 工具为例:
ounter(lineounter(lineounter(lineounter(lineounter(lineounter(lineounter(lineounter(lineounter(lineounter(lineounter(lineounter(lineounter(lineclass ExecTool(Tool):@propertydef definition(self):return ToolDefinition(name="exec",description="Run a shell command on the local machine.",input_schema={"command": {"type": "string","description": "A shell command to run.",}},)
工具执行有完整的安全防线:
ounter(lineounter(lineounter(lineounter(lineounter(lineounter(lineounter(lineounter(lineounter(lineounter(lineounter(lineounter(lineounter(lineounter(lineounter(lineounter(lineounter(lineounter(lineounter(lineounter(linedef _validate_command(self, command):# 1. 危险 token 拦截(rm, del, shutdown...)dangerous_tokens = {"rm", "del", "remove-item", "shutdown", "reboot"}for token in dangerous_tokens:if token in tokens:return False, f"blocked token '{token}'"# 2. 危险短语拦截(git reset, invoke-webrequest...)for phrase in dangerous_phrases:if phrase in normalized:return False, f"blocked phrase '{phrase}'"# 3. 白名单前缀检查if self.allowed_commands:for prefix in self.allowed_commands:if normalized.startswith(prefix.lower()):return True, ""return False, "command prefix is not on the allow list"return True, ""
三层防线——危险 token → 危险短语 → 白名单前缀——是典型的防御纵深设计。即使模型被 prompt injection 诱导,也无法执行 rm -rf / 或 curl 外传数据。
为什么教学版要在一轮工具后强制总结?
真实的 OpenClaw 允许模型多轮循环调用工具,但在本地小模型 + 课堂演示场景下,无限自由迭代最容易出现重复调用、跑偏、上下文漂移。所以项目做了一个务实的工程取舍:保留完整的循环结构,但在第一轮工具执行后,用 _force_final_answer() 强制模型产出总结:
ounter(lineounter(lineounter(lineounter(lineounter(lineounter(lineounter(lineounter(lineounter(lineounter(lineounter(lineounter(lineasync def _force_final_answer(self, history):forced_prompt = (self.system_prompt+ "\n\nYou already have the required tool results. ""Do not call any tools now. Write the final answer directly.")result = await self.provider.complete(system_prompt=forced_prompt,messages=history,tools=[], # 关键:传空工具列表,断掉模型的工具调用能力)return result.text.strip()
tools=[] 是这里最精妙的一行——通过在 API 调用中移除工具定义,从协议层面杜绝模型继续调用工具的可能性。
还有一个隐藏的亮点:Fallback 机制。 当模型提供方出错(Ollama 冷启动、网络超时)时,tool_loop.py 不是直接报错,而是通过关键词匹配走本地确定性路由:
ounter(lineounter(lineounter(lineounter(lineounter(lineounter(lineounter(lineounter(linedef _classify_fallback_route(self, text):lowered = text.lower()if any(t in lowered for t in ["process", "进程"]):return "processes"if any(t in lowered for t in ["disk", "磁盘"]):return "disk"# ... 更多路由return None
匹配成功后,直接执行预定义的 PowerShell 命令,跳过模型推理。这确保了课堂演示的稳定性——即使 Ollama 临时不响应,系统依然能完成工具调用链路的展示。
八、组件5:Reply Delivery —— 系统闭环的最后一环
Tool Loop 产出答案后,Reply Delivery 负责把它安全送回用户。看似最简单的一层,但它承担的是"闭环"的职责。
核心问题是平台字符限制。Telegram 单条上限 4096 字符,Discord 是 2000。模型生成 5000 字回复时,需要智能分割。
ounter(lineounter(lineounter(lineounter(lineounter(lineounter(lineounter(lineounter(lineounter(lineounter(lineounter(lineounter(lineounter(lineounter(lineounter(lineounter(linedef split_reply(text, limit=4096):if len(text) <= limit:return [text]chunks = []current = ""for paragraph in text.split("\n\n"):candidate = f"{current}\n\n{paragraph}" if current else paragraphif len(candidate) <= limit:current = candidatecontinueif current:chunks.append(current)# 段落级 → 行级 → 字符级逐层降级切割...return chunks
分割策略是三级降级:先按段落(\n\n)切,段落超长则按行(\n)切,行还超长则按字符硬切。这保证了代码块和 Markdown 格式在大多数情况下不被破坏。
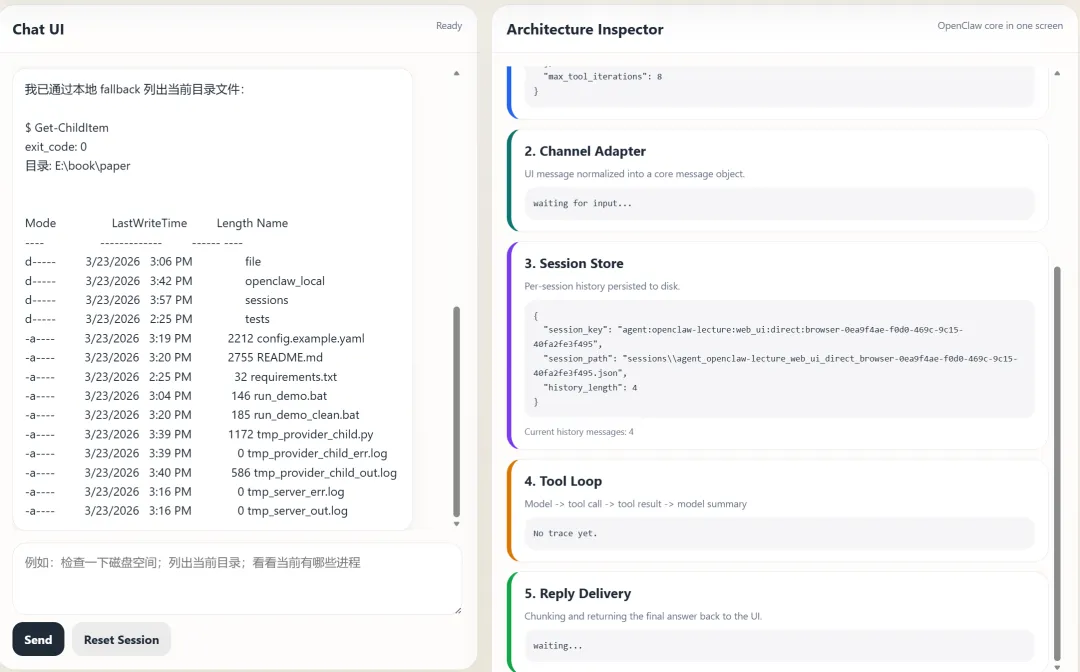
九、五个组件如何串联:一条消息的完整生命周期
把整个系统用一句话描述:
浏览器发来消息 → Web UI Adapter 标准化 → Session Store 读取历史 → Tool Loop 决定是否调工具 → 工具执行 → 结果写回历史 → 模型总结 → Reply Delivery 切块返回前端。
串联逻辑在 app.py 的 _process_message 方法中一目了然:
ounter(lineounter(lineounter(lineounter(lineounter(lineounter(lineounter(lineounter(lineounter(lineounter(lineounter(lineounter(lineounter(lineounter(lineounter(lineounter(lineounter(lineasync def _process_message(self, message: NormalizedMessage):# 组件1: Config 已在 __init__ 中加载# 组件2: message 已由 Channel Adapter 标准化session_key = self.session_store.build_session_key( # 组件3agent_name=self.config.agent_name,channel=message.channel,peer_id=message.peer_id,)lock = self.session_store.get_lock(session_key)with lock:history = self.session_store.load_messages(session_key) # 组件3: 读history.append({"role": "user", "content": message.text})updated, final_text, trace = await self.tool_loop.run(history) # 组件4self.session_store.save_messages(session_key, updated) # 组件3: 写chunks = split_reply(final_text) # 组件5return {"reply_chunks": chunks, "trace": trace, ...}
这条链路看起来不花哨,但一旦它稳定了,所有高级能力——多通道、更多工具、上下文压缩、权限控制、子代理、MCP 桥接——本质上都只是在这五层中的某一层做增强。
复杂能力不是从零生成的,它们只是附着在稳定骨架上的增量复杂度。
十、LLM Provider 层:一个值得注意的架构附加物
虽然不在"五大组件"之列,但项目中的 LLM Provider 抽象值得单独说明,因为它决定了系统的模型切换能力。
ounter(lineounter(lineounter(lineounter(lineclass LLMProvider(ABC):@abstractmethodasync def complete(self, system_prompt, messages, tools) -> LLMResult:raise NotImplementedError
项目提供了四个实现:
OllamaNativeProvider | /api/chat 接口,5 次重试 | |
OpenAICompatibleProvider | /v1/chat/completions,自动识别 Ollama 增加重试 | |
AnthropicProvider | ||
MockProvider |
MockProvider 是一个巧妙的教学工具——它用确定性的关键词匹配模拟模型行为,让你在完全离线的环境下也能演示完整的工具循环链路。
十一、从教学项目到生产系统:演进路径
演进过程中有一个原则需要反复强调:安全加固和故障模式不是"以后再加的功能",而是从 Day 1 就需要意识到的失败模式。 项目中已经内建的防线——命令白名单/黑名单、执行超时、输出截断、写锁——都是这个原则的体现。
十二、这副骨架上的教育小龙虾:从通用 Agent 到教育产品
这个教学项目不是为了复刻 OpenClaw,而是为了验证一个判断:AI Agent 的核心架构已经趋于稳定,可以作为教育科技产品的可靠基底。
把 Config 中的 system_prompt 换成苏格拉底式教学引导词,把 exec 工具换成代码沙箱执行器和知识点查询工具,把 Session Store 扩展为学生知识状态追踪,把 Channel Adapter 接入飞书或钉钉——同一副骨架上,长出来的就是一只教育小龙虾。
五个组件的映射关系:
Config → Agent Profile 配置(含学科绑定、难度策略、安全边界) Channel Adapter → 飞书/钉钉消息适配层 Session Store → 学生会话状态 + 知识点掌握度追踪 Tool Loop → 教学引擎(代码执行 + 知识检索 + 苏格拉底式引导) Reply Delivery → 飞书卡片消息的富文本格式适配
架构是同构的。差异在于每一层的领域特化程度。
结语:先有骨架,再长肌肉,最后才是那身红壳
OpenClaw 那只红色小龙虾之所以能跑起来,不是因为它的壳有多花哨,而是因为它的五段骨架足够稳。
这个本地教学项目做的事情,就是把这副骨架从小龙虾身上拆下来,摊在桌面上让你看清楚每一段关节:输入如何进入系统、会话如何落盘、工具如何被调用、结果如何回流、答案如何回到前端。然后在这副骨架上,长出了一只面向教育场景的小龙虾——不大,但五脏俱全。
如果你能把这 5 个组件讲清楚、跑通、扩展,你就已经迈过了理解 AI Agent 的第一道真正门槛。
剩下的,无非是在这条骨架上继续长出更强的钳子和更厚的壳。
附:核心代码文件与五组件对照表
config.py | ||
channels/web_ui.py | ||
session_store.py | ||
tool_loop.py | ||
reply.py | ||
| 辅助 | tools/exec_tool.py | |
| 辅助 | llm/*.py | |
| 串联 | app.py | _process_message 是主链路 |