 夜雨聆风
夜雨聆风一、本篇你能学到
Git官方下载 + 安装 + 全局配置(零基础第一步)
Git 高频命令场景化速查(不用背,随用随查)
完整实战流程:克隆→修改→提交→推送→拉取→冲突解决
IDEA 集成 Git可视化操作(告别敲命令)
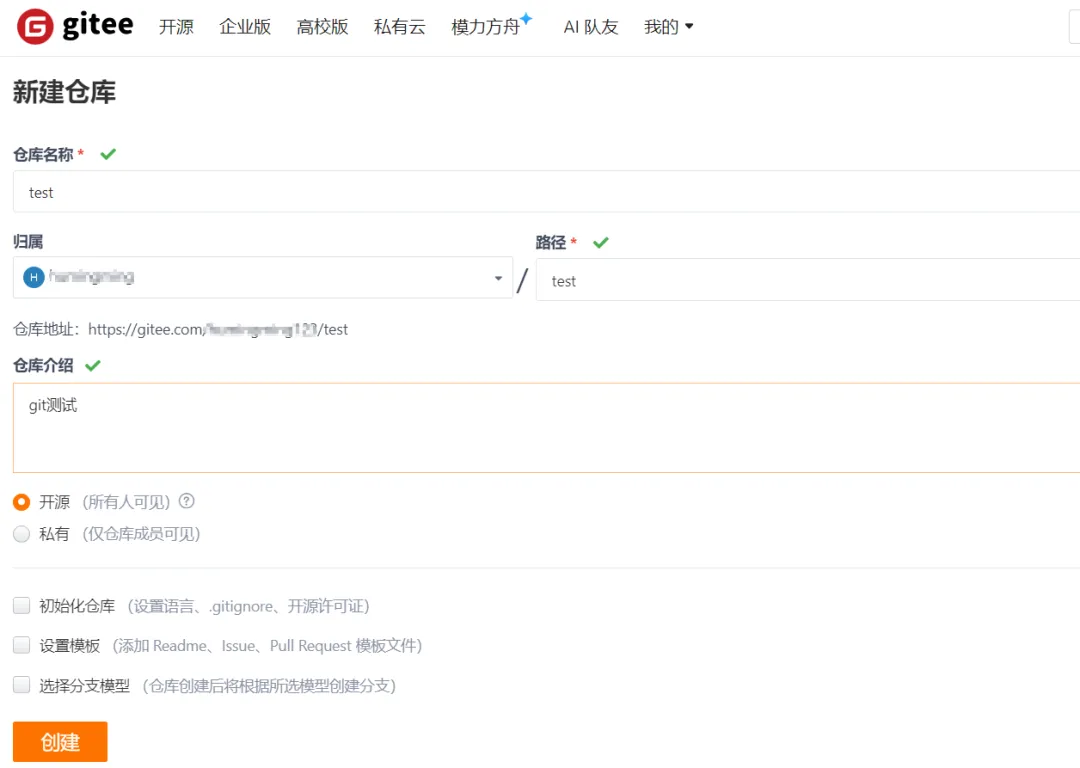
二、Git 一站式下载、安装与配置(新手必看)
1. Git 官方下载地址:https://git-scm.com/
2. 安装步骤(全程默认,无脑下一步)
打开下载好的安装包,一路点击 Next(无需修改任何配置)
安装完成后,右键桌面 / 文件夹,出现Git Bash Here说明安装成功!
打开 Git Bash,输入git --version,显示版本号即安装完成

3. Git 全局配置(首次使用必做!)
# 1. 配置全局用户名(建议用GitHub/Gitee昵称)git config --global user.name "你的名字"# 2. 配置全局邮箱(建议用GitHub/Gitee绑定邮箱)git config --global user.email "你的邮箱地址"# 3. 查看配置是否成功(显示配置信息即生效)git config --list
4. 可选:SSH 免密配置(进阶,不用每次输密码)
Git Bash 输入:ssh-keygen -t rsa(一路回车)
找到生成的密钥:C:\Users\你的用户名\.ssh\id_rsa.pub
复制密钥内容,粘贴到 GitHub/Gitee 的 SSH Keys 中即可
三、Git 常用命令场景化速查(随用随查)
| 仓库操作 | git init | |
git init [project-name] | ||
git clone [url] | ||
| 文件操作 | git add [file1] [file2] ... | |
git add [dir] | ||
git add . | ||
git rm [file1] [file2] ... | ||
| 代码提交 | git commit -m [message] | |
git commit [file1] [file2] ... -m [message] | ||
git commit -a | git add) | |
git commit -v | ||
| 分支管理 | git branch | |
git branch -r | ||
git branch -a | ||
git branch [branch-name] | ||
git checkout -b [branch] | ||
git branch [branch] [commit] | ||
git checkout [branch-name] | ||
git branch --set-upstream [branch] [remote-branch] | ||
git merge [branch] | ||
git branch -d [branch-name] | ||
git push origin --delete [branch-name] | ||
| 标签管理 | git tag | |
git tag [tag] | ||
git tag -d [tag] | ||
git show [tag] | ||
git push [remote] [tag] | ||
git push [remote] --tags | ||
git checkout -b [branch] [tag] | ||
| 查看信息 | git status | |
git log | ||
git log --stat | ||
git log -5 --pretty --oneline | ||
git diff | ||
| 远程同步 | git fetch [remote] | |
git pull [remote] [branch] | ||
git push [remote] [branch] | ||
git push [remote] --force | ||
| 撤销操作 | git checkout [file] | |
git checkout . | ||
git reset --hard | ||
| 暂存操作 | git stash | |
git stash pop |
四、Git 完整实战演练(命令行版,一步一复刻)
前置准备
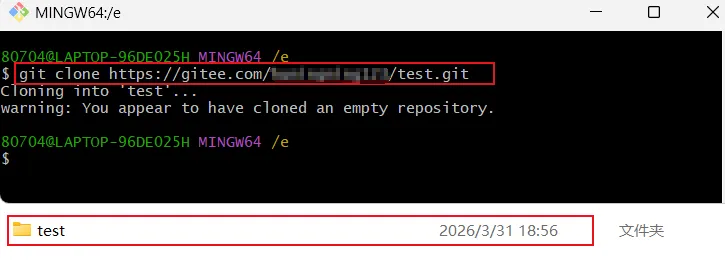
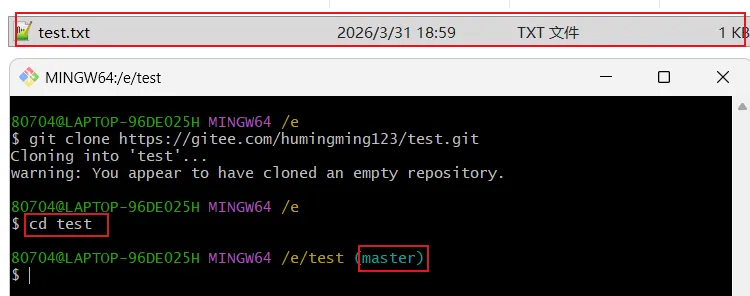
1:克隆远程仓库到本地
#1. 克隆项目(替换为你的仓库地址)git clone https://gitee.com/xxx/test.git#2. 进入项目文件夹cd test
2:修改文件并提交代码
在项目里新建test.txt,写入:测试git
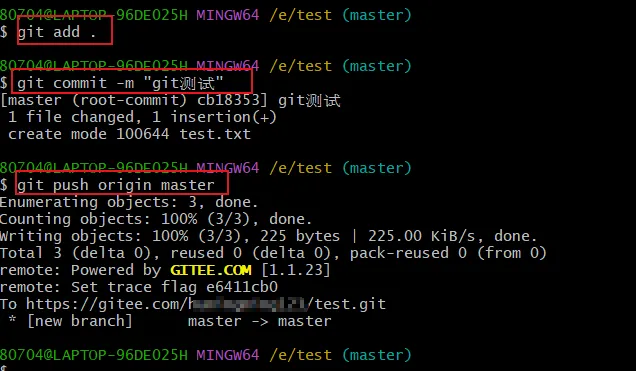
执行命令:
# 查看文件状态git status# 添加所有修改到暂存区git add .# 提交到本地仓库git commit -m "git测试"# 推送到远程仓库git push origin master

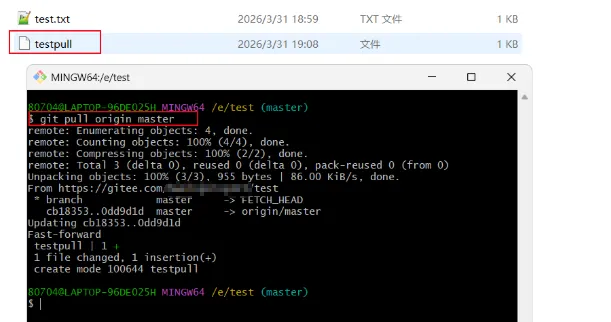
3:拉取远程最新代码
git pull origin master
4:模拟冲突 + 解决冲突(核心难点)
步骤 1:制造冲突
修改本地test.txt文件,修改第一行,添加一行:我来测试

在gitee上修改test.txt,模拟团队成员修改,添加git merge

步骤 2:拉取代码,提示冲突
git pull origin master提示:error: Your local changes to the following files would be overwritten by merge:test.txtPlease commit your changes or stash them before you merge.Abortinggit stashgit pull origin mastergit stash pop提示:Auto-merging test.txtCONFLICT (content): Merge conflict in test.txtOn branch masterYour branch is up to date with 'origin/master'.Unmerged paths:(use "git restore --staged <file>..." to unstage)(use "git add <file>..." to mark resolution)both modified: test.txt

步骤 3:手动解决冲突
<<<<<<< Updated upstreamgit测试git merge=======git测试,123我来测试>>>>>>> Stashed changes
解决规则:删除 Git 标记(<<<<<、=====、>>>>>),保留需要的代码即可修改后文件:
git测试,123我来测试git merge
步骤 4:提交解决后的代码
git add test.txtgit commit -m "解决冲突、"git push origin master


冲突解决完成!
五、IDEA 集成 Git 可视化操作(不用敲命令)
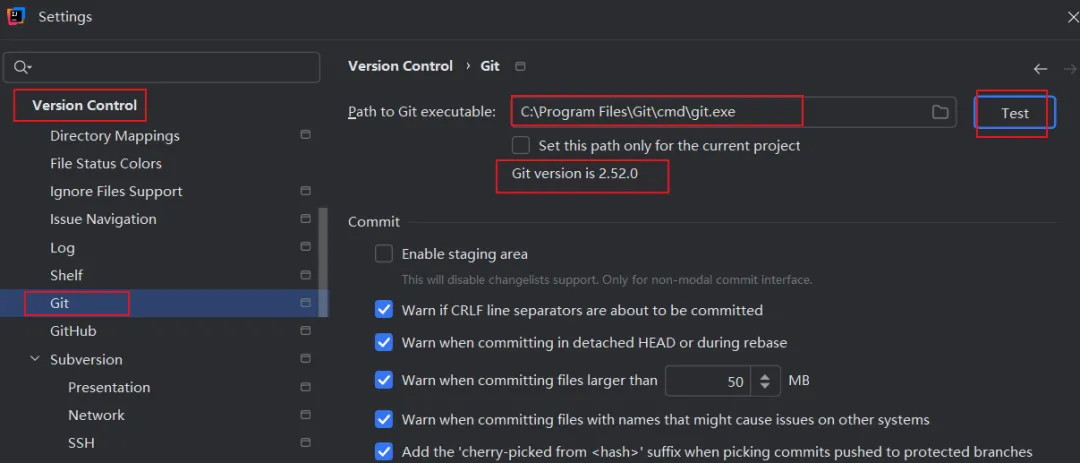
1. IDEA 配置 Git
File → Settings → Version Control → Git
选择本地git.exe路径 → 点击 Test,提示成功即可
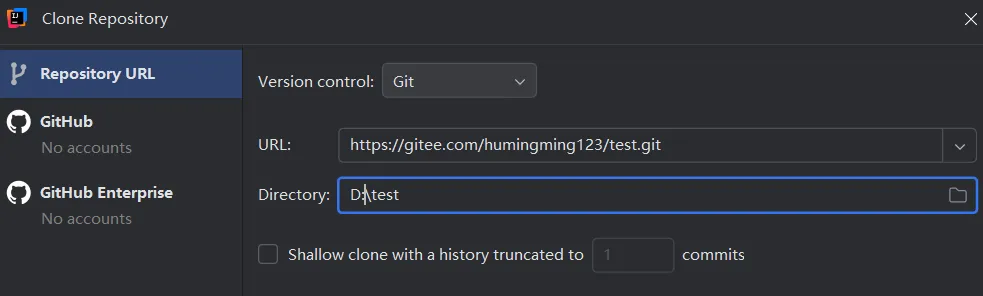
2. 克隆项目
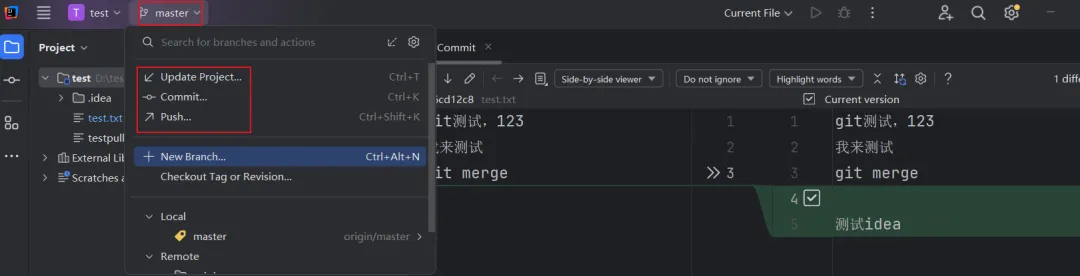
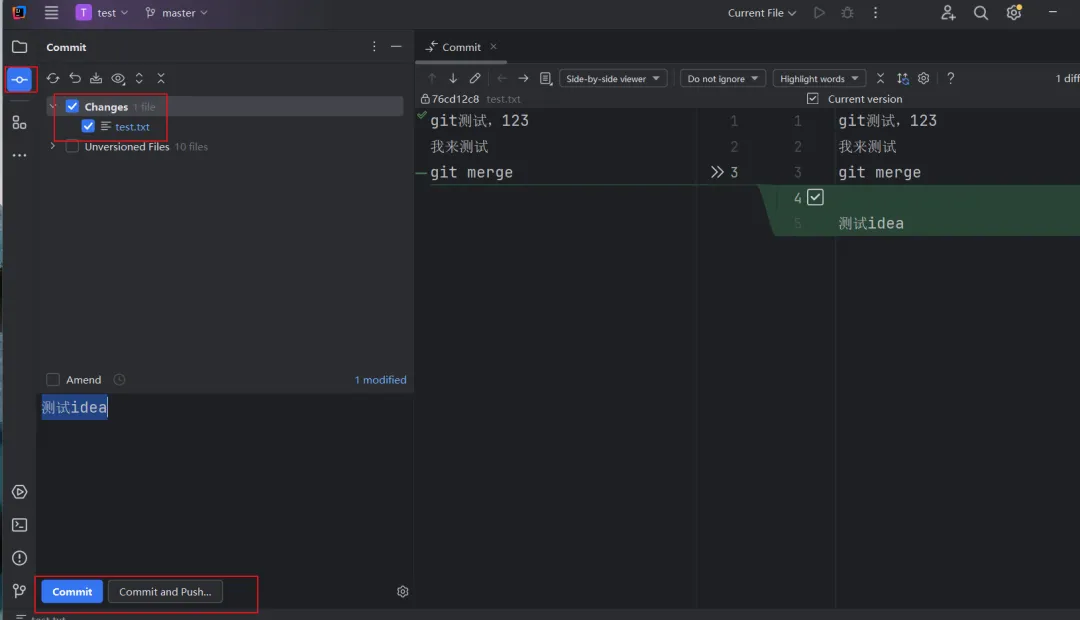
3. 提交 + 推送代码
修改文件后,右键 → Git → Add
顶部 Git → Commit → 填写说明 → Commit
顶部 Git → Push → 推送远程

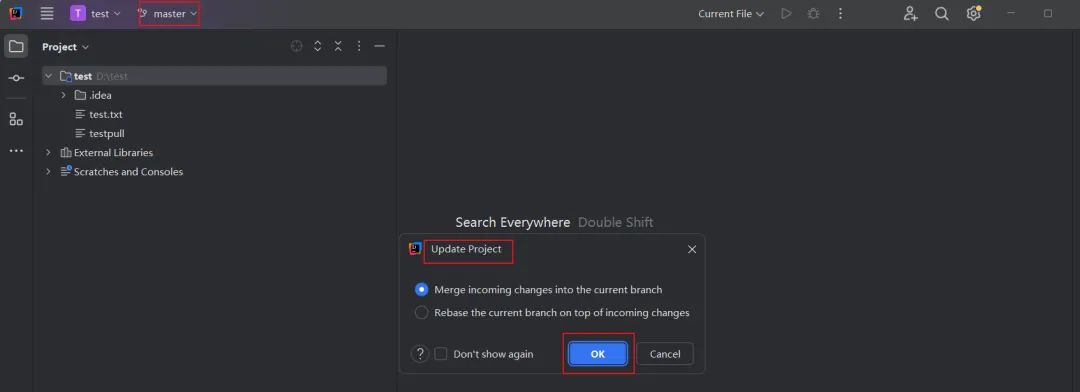
4. 拉取代码
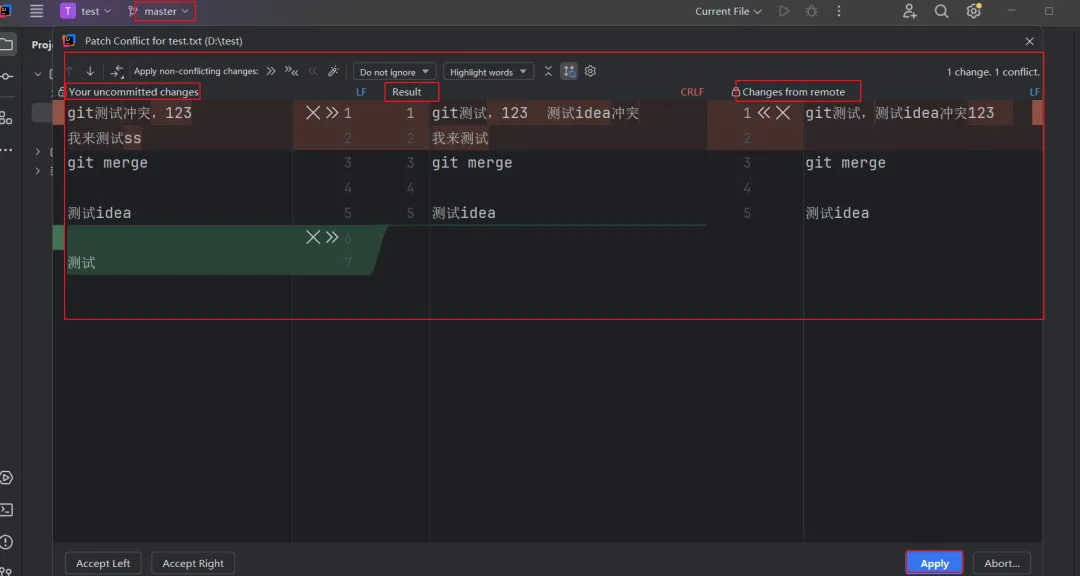
5. IDEA 一键解决冲突
触发冲突后,点击Resolve Conflicts
可视化界面选择保留代码 → Apply
直接提交推送即可
总结:
第一步:下载 Git→安装→配置用户名邮箱
核心流程:clone(克隆)→ add(添加)→ commit(提交)→ push(推送)→ pull(拉取)
冲突解决:删除 Git 标记→保留正确代码→重新提交
日常开发:优先用 IDEA 可视化操作,命令行应急使用
最后:

本文完整代码,后台回复【代码】即可领取。
我还整理了 Java、SpringBoot 学习视频,
后台回复【学习资料】免费获取。
后续会持续更新后端实战干货、bug 解决方案、面试技巧。
关注我,每天进步一点点,写稳代码,少踩坑、少掉头发~
