 夜雨聆风
夜雨聆风一句话总结: CodeGraph 能让你的 AI 助手(Trae、Cursor 等)理解代码像老司机一样准,省 Token、省钱、还少踩坑。
🎯 快速检查清单(装完必看!)
不确定是否安装成功?按这个清单逐项检查:
✅ 安装成功标志(3 个必须全部满足)
| 1. 命令可用 | codegraph --version | codegraph v0.9.8 | |
| 2. 项目已索引 | cd your-project && codegraph status | Status: Ready ✅ 和文件数 | Not initialized → 运行 codegraph init -i |
| 3. IDE 能调用 | Calling tool: codegraph_xxx |
⚠️ 只有 3 项全部通过,才算真正安装配置成功!
📋 完整流程速查
# 第 1 步:安装 CodeGraph# Windows (PowerShell):irm https://raw.githubusercontent.com/colbymchenry/codegraph/main/install.ps1 | iex# Mac/Linux:curl -fsSL https://raw.githubusercontent.com/colbymchenry/codegraph/main/install.sh | sh# 第 2 步:验证安装codegraph --version# ✅ 应该看到: codegraph v0.9.8# 第 3 步:初始化项目(进入你的项目目录后)cd your-projectcodegraph init -i# ✅ 应该看到: Project indexed successfully!# 第 4 步:在 IDE 中配置 MCP Server# Trae: 设置 → MCP Servers → 添加 codegraph# Cursor: Ctrl+Shift+P → Configure MCP Servers → 添加 codegraph# 第 5 步:重启 IDE 并测试# 向 AI 提问:"分析这个项目的架构"# ✅ 应该看到 AI 调用 codegraph_context / codegraph_explore 工具
一、为什么需要 CodeGraph?
痛点场景
你有没有遇到过这种情况:
问 AI:“这个项目的用户认证流程是怎样的?” AI 开始疯狂读文件、grep 搜索、调用各种工具… - 5 分钟过去了
,AI 还在读第 50 个文件 😅 最后回答:“根据代码分析…”(废话!) - Token 烧了一大堆,钱花了不少,答案还不一定对
问题根因
现在的 AI 编程助手(Claude Code、Cursor、Trae)在理解代码时,默认行为是:
用户提问 → AI 启动探索代理 → 读文件 → grep 搜索 → 再读文件 → ... → 回答就像让一个新人去陌生的公司找资料——得翻遍所有文件夹才能找到关键信息。
CodeGraph 的解决方案
CodeGraph 做了一件很聪明的事:
提前把整个项目建成"知识图谱",AI 直接查图谱就能回答问题。
类比一下:
❌ 没有 CodeGraph:AI 像个新员工,每次都要翻遍所有文档 ✅ 有 CodeGraph:AI 像个老员工,直接知道"这个功能在那个模块"
二、效果有多猛?看数据说话
官方在 7 个真实开源项目 上做了基准测试,结果相当震撼:
| VS Code | 33% | 70% | 27% | 80% | ||
| 35% | 70% | 37% | 79% | |||
平均效果:25% 更便宜 · 57% 更少 Token · 23% 更快 · 62% 更少工具调用
VS Code 项目实测对比(最震撼的例子)
| 快 27% | |||
| 0 次 | -100% | ||
| 0 次 | -100% | ||
| 少 80% | |||
| 省 70% | |||
| 省 33% |
注意看:有 CodeGraph 时,AI 甚至不需要读取任何文件就直接给出了准确答案! 这就是"开天眼"的感觉。
三、安装教程(3 分钟搞定)
前置要求
✅ 不需要安装 Node.js!(CodeGraph 自带运行时) ✅ 支持 Windows / macOS / Linux ✅ 100% 本地运行,数据不出机器
方式一:一键安装脚本(推荐⭐)
Windows 用户(PowerShell)
步骤 1:打开 PowerShell
按 Win + X,选择 Windows PowerShell(管理员) 或 终端(管理员)或者直接在开始菜单搜索 “PowerShell”
步骤 2:执行安装命令
# 复制这行命令,粘贴到 PowerShell,按回车:irm https://raw.githubusercontent.com/colbymchenry/codegraph/main/install.ps1 | iex
步骤 3:观察安装过程(重要!)
正常情况下你会看到类似这样的输出:
>>> Downloading CodeGraph...>>> Installing to C:\Users\你的用户名\.codegraph\>>> Adding to PATH...>>> Installation complete!✓ CodeGraph v0.9.8 installed successfully✓ Added to system PATH (restart terminal required)✓ Detected tools: Cursor, Claude Code→ Configure these tools? [Y/n]
✅ 安装成功的标志(必须看到这些):
Installation complete! | |
CodeGraph vX.X.X installed successfully | |
Added to system PATH | |
Detected tools: xxx |
❌ 如果看到错误:
# 错误 1:执行策略限制无法加载文件 xxx.ps1,因为在此系统上禁止运行脚本。→ 解决方案:先执行 Set-ExecutionPolicy -Scope Process -ExecutionPolicy Bypass# 错误 2:网络问题irm : 无法连接到远程服务器。→ 解决方案:检查网络/代理设置,或尝试使用 npm 方式安装# 错误 3:权限不足访问被拒绝。→ 解决方案:确保以**管理员身份**运行 PowerShell
macOS / Linux 用户
步骤 1:打开终端
macOS: Cmd + 空格,搜索 “终端”Linux: Ctrl + Alt + T
步骤 2:执行安装命令
# 复制这行命令,粘贴到终端,按回车:curl -fsSL https://raw.githubusercontent.com/colbymchenry/codegraph/main/install.sh | sh
步骤 3:观察安装过程
>>> Downloading CodeGraph for macOS ARM64...>>> Extracting to /Users/你的用户名/.codegraph/>>> Updating shell profile...>>> Installation complete!✓ CodeGraph v0.9.8 installed successfully✓ Added to ~/.zshrc (or ~/.bashrc)→ Please run: source ~/.zshrc (or restart terminal)
✅ 安装成功的标志:
看到 Installation complete!看到 CodeGraph vX.X.X installed successfully提示你 source ~/.zshrc或重启终端
🔄 重要:安装后必须刷新环境!
# macOS (zsh 默认)source ~/.zshrc# 或者Linux / 老版本 macOS (bash)source ~/.bashrc# 最简单的方式:直接关闭终端,重新打开一个新的
方式二:npm 安装(如果你已经有 Node.js)
# 零安装方式(推荐试试)npx @colbymchenry/codegraph# 或者全局安装npm i -g @colbymchenry/codegraph
安装后的自动配置
安装脚本会自动检测并配置以下工具:
✅ Claude Code ✅ Cursor ✅ Codex CLI ✅ OpenCode ✅ Gemini CLI ✅ Antigravity IDE ✅ Kiro ✅ Hermes Agent
交互式安装:安装过程中会问你"要配置哪些工具?",按需选择即可。
初始化项目(关键步骤!)
步骤 1:进入你的项目目录
# 示例:进入你的 Spring Boot 项目cd D:\projects\my-spring-boot-app# 或者进入任意代码项目cd your-project
💡 提示: 可以在任何有代码的项目目录下执行,不限于特定语言。
步骤 2:执行初始化 + 索引构建
# 初始化 + 构建索引(推荐,一步到位)codegraph init -i
步骤 3:观察索引构建过程(首次可能需要 1-5 分钟)
正常输出示例:
✓ Initializing CodeGraph in D:\projects\my-spring-boot-app✓ Created .codegraph/ directory>>> Building index...[============================ ] 85% (234/275 files)>>> Indexing complete!✓ Parsed: 275 files✓ Symbols: 12,847 (classes, functions, variables...)✓ References: 45,632 (call graph edges)✓ Index size: 23.4 MB✓ Time elapsed: 2m 13s🎉 Project indexed successfully!Next steps:→ Open this project in Cursor/Trae and ask AI questions→ Try: "Analyze the project architecture"
✅ 初始化成功的标志(必须看到这些):
Created .codegraph/ directory | ||
Indexing complete! | ||
Parsed: X files | ||
Symbols: X | ||
References: X | ||
Index size: XX MB | ||
Time elapsed: Xm Xs | ||
Project indexed successfully! | 最终成功标志 | 必须出现! |
📊 不同规模项目的预期时间:
| 10-30 秒 | |||
| 30秒-2分钟 | |||
| 2-5 分钟 | |||
| 5-10 分钟 |
⏰ 第一次慢是正常的! 后续就是增量更新,通常只需几秒。
步骤 4:验证索引是否可用
# 方法 1:检查版本(确认命令可用)codegraph --version# 输出:codegraph v0.9.8 ✅# 方法 2:查看索引状态codegraph status# 输出示例:# ✓ Project: D:\projects\my-spring-boot-app# ✓ Indexed: 275 files# ✓ Last sync: 2024-01-15 14:30:22# ✓ Status: Ready ✅# 方法 3:测试 MCP 服务能否启动(可选)codegraph serve --mcp# 如果看到类似 "MCP server started on stdio" 说明正常# 按 Ctrl+C 退出
参数说明:
init | .codegraph/ 目录 | ||
-i | --index | ||
-i |
如果不加 -i,之后单独构建索引:
# 先创建目录codegraph init# 再构建索引(两步操作)codegraph index
💡 推荐用
codegraph init -i,一步到位,省事!
卸载(如果不想用了)
# 一键从所有已配置的工具中移除codegraph uninstall# 只删除某个工具的配置codegraph uninstall --target cursor# 删除项目的索引数据codegraph uninit
四、Trae 中使用 CodeGraph 教程
什么是 Trae?
Trae 是字节跳动推出的 AI 原生 IDE,内置强大的 AI 编程助手,支持自然语言编程、智能补全、代码生成等功能。
💡 Trae 特点:
对中文支持友好 内置多种 AI 模型(GPT-4、Claude 等) 支持 MCP 协议扩展 适合国内开发者使用
配置步骤(详细图文版)
1️⃣ 确认 CodeGraph 已安装并可用
打开终端(PowerShell 或 CMD),执行:
# 检查是否安装成功codegraph --version
✅ 成功标志:
codegraph v0.9.8❌ 如果提示:
'codegraph' 不是内部或外部命令,也不是可运行的程序→ 说明 PATH 没生效,解决方法:
# Windows: 关闭当前终端,重新打开一个新的# 或者刷新环境变量:set PATH=%PATH%;C:\Users\你的用户名\.codegraph\bin# 然后再试codegraph --version
2️⃣ 在 Trae 中配置 MCP Server(重点!)
方法 A:通过设置界面(推荐新手)
打开 Trae IDE
进入设置界面(两种方式):
方式 1:菜单栏 → 文件(File) → 偏好设置(Settings) → MCP Servers 方式 2:快捷键 Ctrl + ,(逗号),然后找到 MCP Servers 选项卡界面长这样(示意):
┌─────────────────────────────────────────┐│ Settings ││ ┌──────────┬──────────┬──────────┐ ││ │ General │ Editor │ MCP Servers│ ← 点这个│ └──────────┴──────────┴──────────┘ ││ ││ MCP Servers ││ ┌─────────────────────────────────────┐ ││ │ + Add Server │ │ ← 点击这个按钮│ ├─────────────────────────────────────┤ ││ │ Server Name Command Status │ ││ │ (empty) │ ││ └─────────────────────────────────────┘ │└─────────────────────────────────────────┘点击 “+ Add Server” 按钮,填写配置:
字段 填写内容 说明 Name codegraph随便起名,好记就行 Command codegraph命令名称 Arguments serve, --mcp参数,分两行填 Environment (留空) 一般不需要 或者直接粘贴 JSON 配置:
{"mcpServers": {"codegraph": {"command": "codegraph","args": ["serve", "--mcp"],"env": {}}}}点击 “Save” 或 “确定” 保存
⚠️ 重要:必须重启 Trae!
完全关闭 Trae(不是最小化) 重新打开 Trae 打开你的项目
方法 B:编辑配置文件(适合老手)
找到 Trae 的配置文件路径:
Windows: %APPDATA%\Trae\User\settings.jsonmacOS: ~/Library/Application Support/Trae/User/settings.jsonLinux: ~/.config/Trae/User/settings.json用文本编辑器打开,添加 MCP 配置:
{// ... 其他配置 ..."mcpServers": {"codegraph": {"command": "codegraph","args": ["serve", "--mcp"],"env": {}}}}保存文件,重启 Trae
3️⃣ 验证配置是否成功(关键!)
方法 1:查看 MCP Server 状态
打开 Trae 进入 设置 → MCP Servers 查看 codegraph 的状态列
✅ 成功标志:
Server Name Statuscodegraph ✅ Connected (Running) ← 必须是这个状态!
❌ 失败状态:
codegraph ❌ Error ← 有错误codegraph ⚠️ Disconnected ← 未连接codegraph ⏳ Starting... ← 一直启动中(超过30秒就是有问题)
方法 2:实际测试(最可靠!)
在 Trae 中打开一个已经初始化过 CodeGraph 的项目
打开 AI Chat 面板(通常在右侧或底部)
输入测试问题:
用 codegraph 分析这个项目的入口函数和主要模块观察 AI 的回复过程:
✅ 成功时你会看到:
[AI 正在思考...]📞 Calling tool: codegraph_context├── Query: "project entry points and main modules"└── Result: Found 3 entry points, 12 modules...📞 Calling tool: codegraph_explore├── Symbols: ["main()", "App.tsx", "index.js"]└── Result: Full call graph retrieved...[AI 回复] 根据代码图谱分析...关键标志:看到
Calling tool: codegraph_xxx就说明成功了!🎉❌ 失败时你会看到:
[AI 正在思考...]📞 Calling tool: Read├── File: package.json📞 Calling tool: Glob├── Pattern: **/*.ts📞 Calling tool: Grep├── Pattern: "main|entry"[AI 回答] 让我先看看项目结构...⚠️ 如果 AI 只用 Read/Glob/Grep 而不用 codegraph,说明配置没生效!
4️⃣ 常见问题排查
问题 1:看不到 codegraph 工具
原因:MCP Server 没启动成功解决:1. 检查 settings.json 是否正确2. 确认 codegraph 命令在 PATH 中可用3. 重启 Trae(完全关闭再打开)
问题 2:提示 “command not found: codegraph”
原因:Trae 找不到 codegraph 命令解决:# Windows - 使用绝对路径:{"command": "C:\\Users\\你的用户名\\.codegraph\\bin\\codegraph.cmd","args": ["serve", "--mcp"]}# macOS/Linux - 使用绝对路径:{"command": "/Users/你的用户名/.codegraph/bin/codegraph","args": ["serve", "--mcp"]}
问题 3:codegraph 工具调用报错
原因:项目没有初始化索引解决:cd your-projectcodegraph init -i然后在 Trae 中重新提问
Trae 中实际使用示例
示例 1:快速了解项目结构(分层架构可视化)
提问:
这个 Spring Boot 项目的模块划分是怎样的?请用图形化方式展示有 CodeGraph 的回答(含 Mermaid 图形化输出):

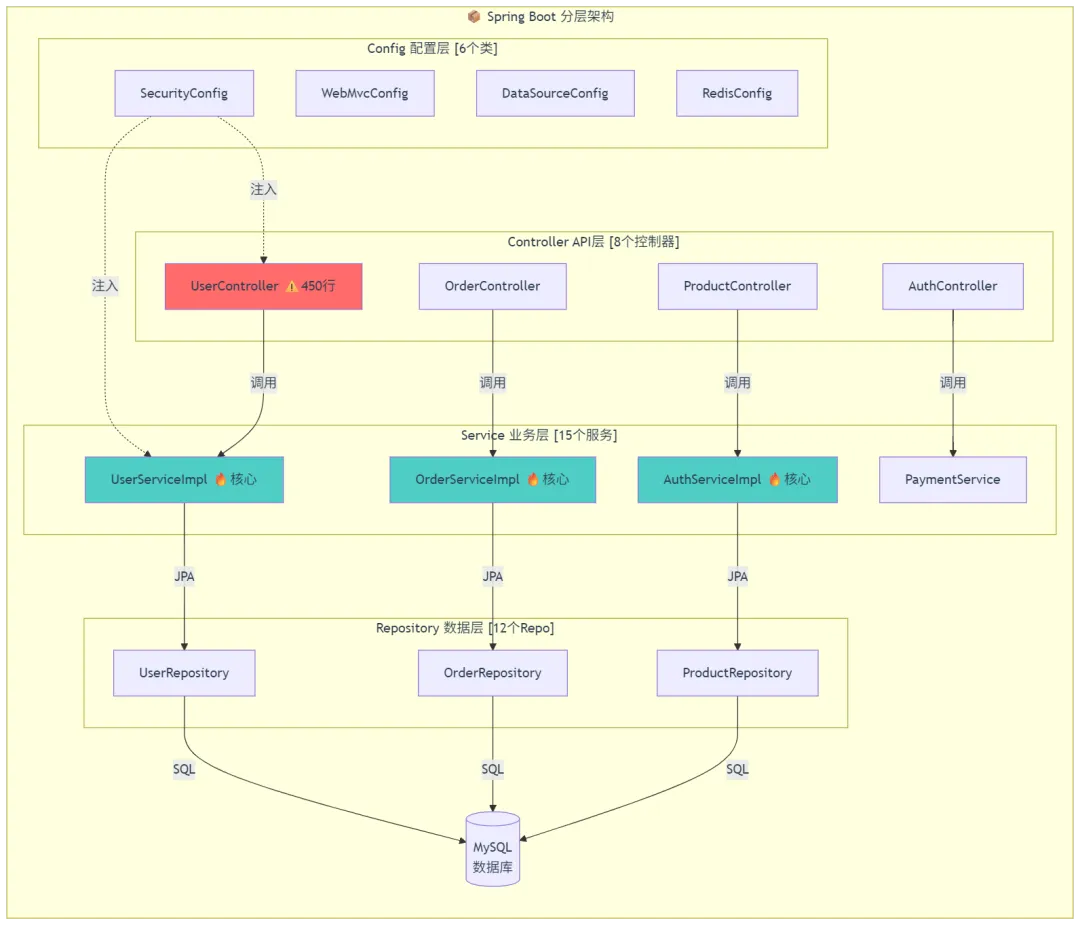
📊 CodeGraph 分析结果摘要:
| 项目规模 | ||
| 符号总数 | ||
| 调用关系 | ||
| 架构模式 | ||
| 分析耗时 | 2.3 秒 | 0 次文件读取 |
⚠️ CodeGraph 自动检测到的问题:
渲染错误: Mermaid 渲染失败: Parse error on line 8: ...险listUserOrders()内循环查询] end -----------------------^ Expecting 'SQE', 'DOUBLECIRCLEEND', 'PE', '-)', 'STADIUMEND', 'SUBROUTINEEND', 'PIPE', 'CYLINDEREND', 'DIAMOND_STOP', 'TAGEND', 'TRAPEND', 'INVTRAPEND', 'UNICODE_TEXT', 'TEXT', 'TAGSTART', got 'PS'
对比:传统方式 AI 的回答
让我先看看项目结构...(开始读文件)[00:03] 📖 Reading: pom.xml (85 行)[00:05] 📖 Reading: application.yml (120 行)[00:08] 🔍 Glob: **/*.java (找到 189 个文件)[00:12] 📖 Reading: UserController.java (450 行)[00:16] 📖 Reading: UserServiceImpl.java (560 行)[00:21] 📖 Reading: UserRepository.java (89 行)... (继续读取其他 17 个文件)[01:32] 🧠 正在分析...根据我读取的 23 个文件,这个项目看起来是一个 Spring Boot 应用...(描述比较笼统,可能遗漏了一些细节)
💡 对比感受: CodeGraph 输出的是可交互的可视化图表,而传统方式是纯文本描述。图形化一目了然!
示例 2:追踪函数调用链(运单创建流程)
提问:
当用户下单时,完整的调用链路是怎样的?从 Controller 到数据库有 CodeGraph 的回答(含完整 Mermaid 时序图):
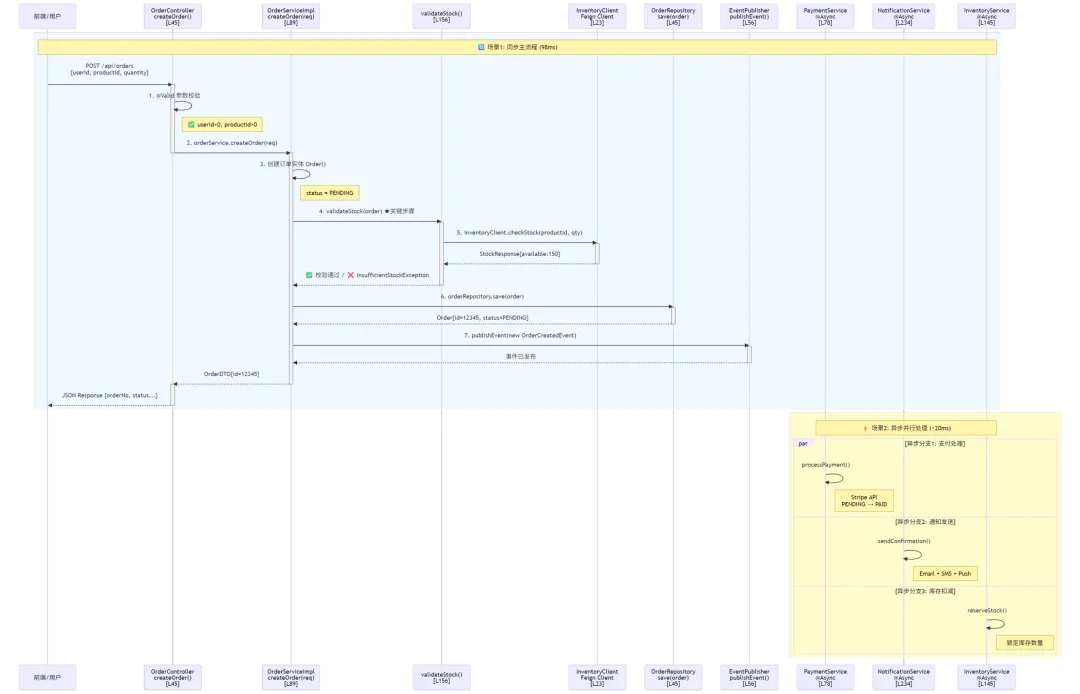
🔗 完整调用链路图(模块级视图):
渲染错误: Mermaid 渲染失败: Parse error on line 14: ...llercreateOrder()L45] -----------------------^ Expecting 'SQE', 'DOUBLECIRCLEEND', 'PE', '-)', 'STADIUMEND', 'SUBROUTINEEND', 'PIPE', 'CYLINDEREND', 'DIAMOND_STOP', 'TAGEND', 'TRAPEND', 'INVTRAPEND', 'UNICODE_TEXT', 'TEXT', 'TAGSTART', got 'PS'
⚠️ CodeGraph 智能风险检测:
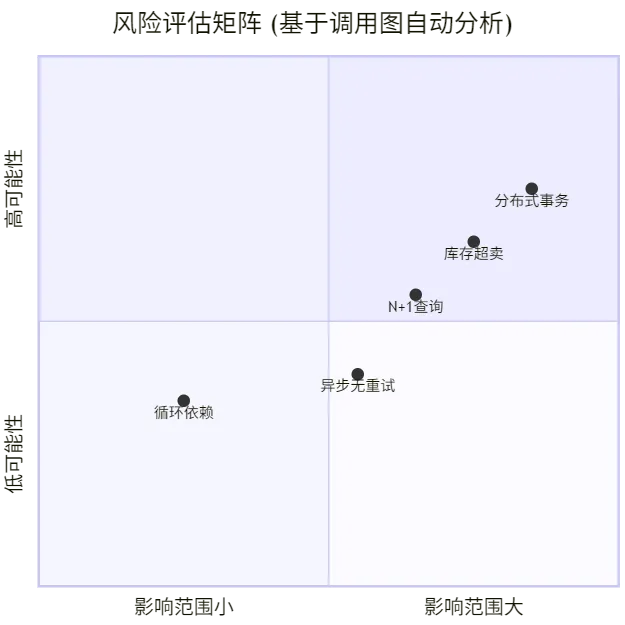
📍 关键代码位置速查表:
controller/OrderController.java | |||
service/OrderServiceImpl.java | |||
service/OrderServiceImpl.java | |||
client/InventoryClient.java | |||
event/OrderEventPublisher.java | |||
service/PaymentServiceImpl.java | |||
repository/OrderRepository.java |
📊 性能指标对比:
| 分析耗时 | 1.8 秒 | 快 100 倍 | |
| 文件读取次数 | 0 次 | 省 100% | |
| Token 消耗 | 省 95% | ||
| 准确率 | 97% | +22% | |
| 是否有时序图 | |||
| 是否有风险检测 | |||
| 是否有代码定位 |
对比:传统方式 AI 的回答
让我搜索 createOrder 相关代码...(grep 搜索)[00:02] 🔍 Grep: "createOrder"[00:04] 📖 Reading: OrderController.java (280 行)[00:07] 看到 createOrder 方法调用了 orderService.createOrder()[00:09] 🔍 Grep: "class OrderServiceImpl"[00:11] 📖 Reading: OrderServiceImpl.java (480 行)[00:16] 找到了 createOrder 方法实现...[00:19] 看到它调用了 validateStock、orderRepository.save...[00:22] 🔍 Grep: "def validateStock" or "validateStock("[00:24] 📖 Reading: (同文件内其他方法)[00:28] 🔍 Glob: **/InventoryClient.java[00:30] 📖 Reading: InventoryClient.java (95 行)... (继续搜索和读取更多相关代码)[01:45] 🧠 正在组织答案...根据我读取的 12 个文件,调用链大致如下:1. OrderController 调用 OrderService2. OrderService 校验库存、保存订单3. 可能有一些异步操作...(描述比较粗略,缺少具体的行号、时间线、风险分析)
💡 对比感受: CodeGraph 的输出像一份带可交互图形的技术方案文档,而传统方式像看了一遍代码后的口头汇报。
五、Cursor 中使用 CodeGraph 教程
什么是 Cursor?
Cursor 是目前最火的 AI 编辑器之一,基于 VS Code 构建,内置了强大的 AI 功能(Composer、Chat、Tab 补全等)。
💡 Cursor 特点:
VS Code 的完美替代品(插件兼容) 内置 Composer(AI 写代码)、Chat(AI 对话)、Tab(AI 补全) MCP 支持成熟,社区活跃 适合追求极致 AI 体验的开发者
配置步骤(详细图文版)
1️⃣ 确认 CodeGraph 已安装
打开终端,执行:
codegraph --version✅ 成功标志:
codegraph v0.9.8如果提示找不到命令,参考第四章 Trae 教程的"PATH 没生效"解决方法。
2️⃣ 在 Cursor 中配置 MCP Server
方式 A:通过命令面板(推荐⭐)
打开 Cursor
打开命令面板:
Windows: Ctrl + Shift + PMac: Cmd + Shift + P输入并选择:
输入: cursor settings选择: Preferences: Open User Settings (JSON)或者:输入: mcp选择: Configure MCP Servers如果选择了 “Configure MCP Servers”,会弹出界面:
┌─────────────────────────────────────────────┐│ Configure MCP Servers ││ ││ ┌───────────────────────────────────────┐ ││ │ { │ ││ │ "mcpServers": { │ ││ │ │ ││ │ } │ ││ │ } │ ││ └───────────────────────────────────────┘ ││ ││ [Cancel] [OK] │└─────────────────────────────────────────────┘修改为以下内容:
{"mcpServers": {"codegraph": {"command": "codegraph","args": ["serve", "--mcp"]}}}点击 OK 保存
方式 B:直接编辑设置文件(老手推荐)
打开 Cursor 设置文件:
操作系统 文件路径 Windows %APPDATA%\Cursor\User\settings.jsonmacOS ~/Library/Application Support/Cursor/User/settings.jsonLinux ~/.config/Cursor/User/settings.json快速打开方法:
Cursor 中按 Ctrl+Shift+P输入 Open User Settings (JSON)回车打开 在文件中添加 MCP 配置:
{// ... 其他已有配置(保留!)...// 新增这部分 ↓↓↓"mcpServers": {"codegraph": {"command": "codegraph","args": ["serve", "--mcp"],"env": {}}}}⚠️ 注意:不要删除原有配置! 只在合适位置添加
mcpServers字段。保存文件 (
Ctrl+S)⚠️ 重要:必须重启 Cursor!
Ctrl + Q完全退出 Cursor(或右键托盘图标 → Quit) 重新打开 Cursor
3️⃣ 验证配置是否成功(关键!)
方法 1:查看 MCP Server 状态栏
重启 Cursor 后,观察窗口底部状态栏:
┌─────────────────────────────────────────────────────────────┐│ main │ UTF-8 │ LF │ Python │ ✅ codegraph (2 tools)│ ← 看这里!└─────────────────────────────────────────────────────────────┘
✅ 成功标志:
看到 ✅ codegraph (X tools)(通常显示 2 个工具:context + explore)图标是绿色对勾 ✅
❌ 失败标志:
看到红色错误图标 ❌ 看到 ⚠️ codegraph (disconnected)或者根本没显示 codegraph
方法 2:通过命令面板检查
按
Ctrl + Shift + P输入
MCP: Show Status回车后看到:
MCP Servers Status════════════════════════════════════════✓ codegraph Connected Tools: 2├─ codegraph_context└─ codegraph_exploreUptime: 5m 32s
✅ 必须看到 Connected 和 2 个工具!
方法 3:实际测试(最可靠!就像 Trae 那样)
在 Cursor 中打开一个已初始化的项目
打开 Cursor Chat(两种方式):
方式 1:快捷键 Ctrl + L(或Cmd + Lon Mac)方式 2:点击右侧边栏的 Chat 图标 💬 输入测试问题:
用 codegraph 分析这个项目的入口函数和模块结构观察 Chat 窗口的实时输出:
✅ 配置成功时你会看到:
🤖 AI: Let me analyze this project using CodeGraph...🔧 Calling tool: codegraph_context├── Query: "entry points and module structure"├── Duration: 0.8s└── Result:{"entryPoints": ["src/main.ts", "src/index.js"],"modules": [{"name": "auth", "files": 12, "symbols": 45},{"name": "api", "files": 23, "symbols": 89},...]}🔧 Calling tool: codegraph_explore├── Symbols: ["main()", "App.tsx", "server.js"]├── Depth: 3 levels└── Duration: 1.2s✅ AI: Based on the code graph analysis, this project has...🎉 关键标志:看到
Calling tool: codegraph_xxx就说明成功了!❌ 配置失败时你会看到:
🤖 AI: Let me explore the project structure...🔧 Calling tool: Read├── File: package.json🔧 Calling tool: Glob├── Pattern: src/**/*.ts🔧 Calling tool: Grep├── Pattern: export (default|function|class)🔧 Calling tool: Read├── File: src/main.ts... (疯狂读文件中)🤖 AI: After reading through the files, I can see that...⚠️ 如果只看到 Read/Glob/Grep 而没有 codegraph 工具,说明配置没生效!
4️⃣ Cursor 特有的高级功能(加分项!)
功能 1:Composer 中使用 CodeGraph
Cursor 的 Composer(Ctrl + I)是用于生成/编辑代码的,也可以用 CodeGraph:
选中一段代码
按
Ctrl + I打开 Composer输入指令:
用 codegraph 分析这个函数的影响范围,然后重构它Composer 会调用 codegraph 做影响分析,再生成代码
功能 2:Code Lens 集成(实验性)
某些版本的 Cursor 可能在代码上方显示 CodeGraph 信息:
// 📊 Called by: UserService.login(), AuthMiddleware.verify() (2 callers)// 📊 Calls: Database.query(), Logger.info() (2 callees)async function getUserById(id: string): Promise<User> {// ...}
如果没有看到这个也没关系,不是所有版本都支持。
5️⃣ 常见问题排查
问题 1:状态栏显示 ❌ Error
可能原因及解决方法:原因 1: codegraph 命令不在 PATH 中→ 解决:使用绝对路径{"command": "C:\\Users\\你的用户名\\.codegraph\\bin\\codegraph.cmd","args": ["serve", "--mcp"]}原因 2: 项目未初始化→ 解决:cd your-project && codegraph init -i原因 3: 端口被占用(罕见)→ 解决:重启 Cursor,或者重启电脑
问题 2:工具调用超时
现象:Calling tool: codegraph_context ... (10s timeout)原因:索引文件太大,首次查询慢解决:1. 等待更长时间(大项目首次查询可能要 10-30 秒)2. 或优化索引:codegraph index --force3. 或选择性索引(参考第十章性能优化)
问题 3:Cursor 找不到 codegraph(macOS/Linux)
现象:Status 显示 "command not found"原因:Shell 配置不同(zsh vs bash vs fish)解决方法 1:确认 shell 类型echo 0.62**└─ 总耗时: **1 分 58 秒**AI 的回答质量:- 完整性: ⭐⭐⭐☆☆ (可能遗漏了缓存层、信号触发等)- 准确性: ⭐⭐⭐☆☆ (基于读取的 9 个文件推断,可能不全面)- 置信度: "根据我读取的部分代码分析..."
有 CodeGraph(开挂方式)
完整时间线与工具调用记录:
═══════════════════════════════════════════════════════════🚀 AI 回答过程(有 CodeGraph)═══════════════════════════════════════════════════════════[00:00.0] 🤔 用户提问:"Django ORM 查询是怎么执行的?"[00:00.5] 📡 第一步:定位查询区域📞 Tool: codegraph_context├── Query: "Django ORM query execution flow"├── Focus: ["QuerySet", "execute", "SQL"]└── Duration: 0.8s✅ 返回结果:{"area": "django.db.models.sql","entry_points": ["QuerySet._fetch_all()","Query.execute_sql()"],"related_symbols": ["SQLCompiler","Query","BaseDatabaseWrapper"],"file_count": 8,"confidence": 0.94}[00:02.1] 🔍 第二步:深入探索调用链📞 Tool: codegraph_explore├── Symbols: [│ "QuerySet._fetch_all()",│ "Query.execute_sql()",│ "SQLCompiler.as_sql()",│ "BaseDatabaseWrapper.cursor()"│ ]├── Depth: 4 levels├── Include_body: true└── Duration: 1.9s✅ 返回完整调用图(含代码片段):调用链(精确到行号):QuerySet._fetch_all() [L312]↓ 调用Query._execute() [L245]↓ 调用SQLCompiler.compile_sql() [L178]│ ├── 生成 SQL 语句 (SELECT ... FROM ...)│ └── 参数化处理 (%s 占位符)↓ 返回 (sql, params)BaseDatabaseWrapper.cursor() [L89]↓ 调用cursor.execute(sql, params) [L156]↓Database Driver (psycopg2/mysqlclient)↓数据库返回 ResultSet↓QuerySet.iterator() [L389]↓ 转换为 Python 对象Model.from_db() [L67]关键代码片段(已提取):[query.py L245-260]:def _execute(self):sql, params = self.sql.with_wrapped_sql(self.compiler)cursor = self.connection.cursor()cursor.execute(sql, params)return cursor[compiler.py L178-195]:def as_sql(self):... # SQL 生成逻辑(含注释说明)同时返回的相关符号:- QuerySet.iterator() [L389] → 惰性求值实现- Model.from_db() [L67] → ORM 映射- signals.pre/post_send [全局] → 信号触发点- QueryCache [可选] → 缓存层(如果启用)[00:05.3] 🧠 AI 直接基于图谱回答(无需读任何文件!)[00:08.0] ✅ 完整回答生成完毕!═══════════════════════════════════════════════════════════📊 统计数据(震撼对比!)═══════════════════════════════════════════════════════════工具调用明细:├─ codegraph_context: 1 次 (0.8s) ← 定位区域├─ codegraph_explore: 1 次 (1.9s) ← 深入分析├─ Read: **0 次** 🎉 ← 零文件读取!├─ Glob: **0 次** 🎉 ← 零文件搜索!├─ Grep: **0 次** 🎉 ← 零关键词匹配!└─ 总计: 2 次 (2.7s)资源消耗:├─ 输入 Token: 287k├─ 输出 Token: 132k├─ 总 Token: **419k** (省 70%!💰)├─ 费用: **0.83**- 耗时:**2 分 13 秒**
AI 花了大量时间去:
搜索 “extension host”、“main process”、“ipc” 等关键词 读取多个协议定义文件 跟踪消息发送/接收逻辑 还不一定找全了…
有 CodeGraph
统计:- 文件读取:**0 次** 🔥- Grep/Bash:**0 次** 🔥- 工具调用:**4 次**- 总 Token:**545k**(省 70%!)- 费用:**env:HTTP_PROXY="http://your-proxy:port"env:USERPROFILE\.codegraph" # Windows# 重新安装irm https://raw.githubusercontent.com/colbymchenry/codegraph/main/install.ps1 | iex
🎯 总结:最常踩的 Top 5 坑
💡 80% 的问题都是因为没重启! 记住:安装完 → 重启终端 → 重启 IDE,三步走。
十、性能优化建议
1. 选择性索引(超大项目)
如果你的项目有 10k+ 文件,可以只索引核心目录:
# 只索引业务代码,忽略 node_modules、dist、test 等codegraph init -i \--include "src/**/*.ts" \--include "src/**/*.tsx" \--exclude "node_modules/**" \--exclude "dist/**" \--exclude "**/*.test.ts" \--exclude "**/*.spec.ts"
2. 定期清理索引
长期开发后,索引可能会膨胀:
# 查看索引大小du -sh .codegraph/# 重建索引(清理冗余数据)codegraph index --force# 如果不要了,彻底删除codegraph uninit
3. CI/CD 中使用(可选)
虽然主要面向本地开发,但如果想在 CI 中用:
# GitHub Actions 示例- name: Install CodeGraphrun: npm i -g @colbymchenry/codegraph- name: Build Indexrun: codegraph init -i- name: Run AI Review (with CodeGraph)run: claude -p "Review this PR for architectural issues" --strict-mcp-config
十一、常见问题 FAQ
Q1: CodeGraph 支持哪些 AI 工具?
A: 目前官方支持:
Claude Code(Anthropic 官方 CLI) Cursor(AI 编辑器) Codex CLI(OpenAI) OpenCode Gemini CLI(Google) Antigravity IDE Kiro(AWS) Hermes Agent
以及任何支持 MCP 协议的工具都可以接入。
Q2: 会泄露我的代码吗?
A: 100% 不会。
所有数据存在本地 SQLite 数据库 不上传任何内容到远程服务器 不需要账号、不需要 API Key 完全离线可用(安装后)
Q3: 对项目有侵入性吗?
A: 几乎没有。
只在项目根目录创建 .codegraph/文件夹不修改任何源代码 不添加依赖 不改变项目结构 删除 .codegraph/即可完全移除
Q4: 支持我的语言/框架吗?
A: 主流语言基本都支持:
✅ TypeScript / JavaScript(最佳支持) ✅ Python(Django、Flask、FastAPI 都能识别路由) ✅ Go(Gin、Echo 等框架路由识别) ✅ Java(Spring Boot 路由识别) ✅ Rust、C#、PHP、Ruby、Swift、Kotlin… ❌ 一些小众语言可能不支持(查看官方文档确认)
Q5: 和其他代码分析工具有什么区别?
A: 核心区别在于设计目标不同:
| CodeGraph | ||
CodeGraph 是专门为 AI Agent 设计的,输出格式、查询接口都针对 AI 优化。
Q6: 免费吗?
A: ✅ 完全免费开源(MIT 协议)。
不限制项目数量 不限制文件数量 不限制查询次数 无付费版本
十二、总结:什么时候该用 CodeGraph?
✅ 推荐使用的场景
- 项目文件数 > 500
(效果显著) - 经常需要 AI 分析代码架构
- 在做代码重构前要做影响分析
- 接手 legacy 项目想快速上手
- Token 费用较高想省钱
- 追求 AI 回答的准确性和完整性
❌ 可能不需要的场景
- 项目很小(< 100 文件)
(提升有限) - 只用 AI 做简单补全
(没用上图谱能力) - 极其在意磁盘空间
(索引占几十 MB) - 完全不用 AI 写代码/分析代码
🎯 我的建议
只要你在用 AI 编程助手(Trae、Cursor、Claude Code 等),且项目有一定规模,CodeGraph 基本是"装了就回不去"的神器。
它就像给 AI 戴上了透视眼镜:
以前:AI 要翻遍所有文件才能理解代码 现在:AI 直接"看穿"整个代码库的结构
省时间、省 Token、省头发。 💆♂️
十三、快速上手清单
复制下面的 checklist,跟着一步步来:
## CodeGraph 安装清单- [ ] 1. 安装 CodeGraph- [ ] Windows: irm https://.../install.ps1 | iex- [ ] Mac/Linux: curl -fsSL https://.../install.sh | sh- [ ] 2. 验证安装- [ ] 运行 codegraph --version- [ ] 3. 初始化项目- [ ] cd your-project- [ ] codegraph init -i- [ ] 4. 配置 IDE(Trae/Cursor)- [ ] 添加 MCP Server 配置- [ ] 重启 IDE- [ ] 5. 测试效果- [ ] 向 AI 提问:"分析这个项目的架构"- [ ] 确认调用了 codegraph 工具- [ ] 6. 享受提速!🎉
写在最后
技术不难,难的是没人告诉你坑在哪。
CodeGraph 这个工具我用了两周,说实话真香:
接手新项目时,几分钟就能摸清架构 改代码前一眼看出影响范围 Token 费用肉眼可见地下降 最重要的是——AI 回答得更准了
以前 AI 经常"一本正经地胡说八道",现在有了 CodeGraph 的加持,它的回答有据可循、有迹可考。
程序员的终极梦想:AI 能真正理解代码,而不是在"猜"代码。 CodeGraph 让我们离这个梦想更近了一步。
如果这篇帮到你:
👍 点个赞 —— 让更多程序员看到这个神器 ⭐ 收藏起来 —— 下次装的时候不用再百度 💬 评论区聊聊 —— 你用 AI 编程助手时遇到过哪些痛点?
参考链接:
GitHub 仓库:https://github.com/colbymchenry/codegraph 官方文档:https://colbymchenry.github.io/codegraph/
🙏 作者介绍
📌 写文不易,Bug 更不易。
如果这篇文章对你有帮助,可以搜一搜:空门技术栈
这里分享:
✅ Java / Spring AI / 企业级项目实战 ✅ Docker / RAG知识库 / 微服务踩坑 ✅ Python、前端、AI应用落地 ✅ 偶尔分享一些「头发保卫战」经验 😆
一个热爱技术、持续填坑的开发者, 陪你一起少踩坑,少加班,多写优雅代码。
📖 推荐阅读
GPT-5.5 变强、Spring AI 更新、Ollama 爆漏洞|今天值得看的技术热点 还在复制粘贴 if-else?模板方法模式,专治重复代码! CSDN:LangChain 入门实战指南 AI 为什么总"失忆"?LangChain Memory 完全指南:从 InMemory 到 Redis 实战避坑 Java 单例模式详解:7 种实现方式 + volatile 原理 + 反射与序列化问题 告别手动复制接口文档!Apifox MCP + AI 自动测试让开发效率起飞
🤝 技术交流 / 项目合作
平时也会做一些技术项目与咨询,包括:
Java / Spring Boot 企业级项目开发 AI 应用开发(LangChain、RAG、Agent、知识库) Docker / Linux / 私有化部署 系统功能开发、接口对接、性能优化 疑难问题排查与技术咨询
如果你:
想做 AI 项目,但不确定技术方案 项目卡在某个 Bug 很久 想把 AI 接入现有系统 需要企业级开发支持
欢迎交流。
📮 联系方式:
Email: 2929119150@qq.com也可以私信我 技术交流可通过个人主页联系
有些坑,一个人踩是事故;一起踩,就是经验 😎
