 夜雨聆风
夜雨聆风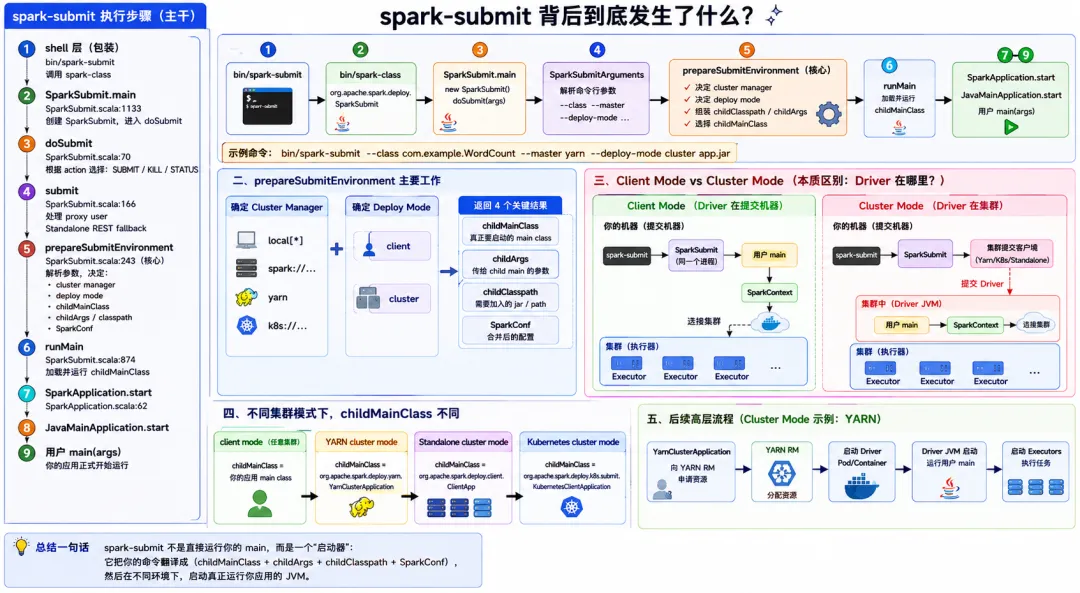
基于 Spark 4.2,分支 branch-4.2
阅读时长约 6 分钟 · 入门到中级
背景
我们每天都会敲:
bin/spark-submit \--verbose \--class org.apache.spark.examples.SparkPi \--master local[2] \examples/jars/spark-examples_2.13-4.2.0.jar \10
但这条命令背后发生了什么?
它是直接启动你的 main 方法吗?它什么时候决定是 client mode 还是 cluster mode?它为什么同一套命令能跑 local、Standalone、YARN、Kubernetes?
改文章走一遍 spark-submit 的源码路径。
一、流程图:从 shell 到用户 main
下面是简化后的主路径。严格来说,spark-submit 会先进入 spark-class,再由 launcher 生成最终 JVM 命令,最后才进入 SparkSubmit.main。
bin/spark-submit ↓bin/spark-class org.apache.spark.deploy.SparkSubmit ↓SparkSubmit.main ↓new SparkSubmit().doSubmit(args) ↓SparkSubmitArguments 解析参数 ↓prepareSubmitEnvironment ├─ 判断 cluster manager: local / standalone / yarn / k8s ├─ 判断 deploy mode: client / cluster ├─ 组装 childClasspath ├─ 组装 childArgs └─ 选择 childMainClass ↓runMain ↓加载 childMainClass ↓SparkApplication.start ↓JavaMainApplication.start ↓用户 main(args)
一句话:
spark-submit 自己不是你的应用。它是一个“启动器”,负责把参数翻译成一个真正要运行的 main class。
二、shell 层:spark-submit 只是一层包装
打开 bin/spark-submit:27:
exec "${SPARK_HOME}"/bin/spark-class org.apache.spark.deploy.SparkSubmit "$@"spark-submit 本身很薄。它只做了两件事:
找到
SPARK_HOME调用
spark-class启动org.apache.spark.deploy.SparkSubmit
真正复杂的逻辑在 Scala 代码里。
三、入口:SparkSubmit.main
SparkSubmit.scala:1103 是 companion object:
object SparkSubmit extends CommandLineUtils with Logging 真正入口在 SparkSubmit.scala:1133:
override def main(args: Array[String]): Unit = {Option(System.getenv("SPARK_PREFER_IPV6")).foreach(System.setProperty("java.net.preferIPv6Addresses", _))val submit = new SparkSubmit() {self =>overrideprotected def parseArguments(args: Array[String]): SparkSubmitArguments = {new SparkSubmitArguments(args) { ... }}}submit.doSubmit(args)}
注意这里不是直接运行用户程序,而是:
创建
SparkSubmit解析命令行参数
进入
doSubmit
四、doSubmit:决定“提交动作”
SparkSubmit.scala:70。下面是简化后的代码:、
def doSubmit(args: Array[String]): Unit = {val appArgs = parseArguments(args)appArgs.action match {case SparkSubmitAction.SUBMIT => submit(appArgs, true, appArgs.toSparkConf())case SparkSubmitAction.KILL => kill(appArgs)case SparkSubmitAction.REQUEST_STATUS => requestStatus(appArgs)case SparkSubmitAction.PRINT_VERSION => printVersion()}}
spark-submit 其实不只会提交任务,还能:
--kill杀掉应用--status查询状态--version打印版本
日常最常见的是 SUBMIT,也就是进入 submit(...)。
五、submit:处理 proxy user 和 Standalone REST fallback
SparkSubmit.scala:166。下面是简化后的代码:
private def submit(args: SparkSubmitArguments, uninitLog: Boolean, sparkConf: SparkConf): Unit = {def doRunMain(): Unit = {if (args.proxyUser != null) {// 用 Hadoop UGI 代理用户运行proxyUser.doAs(new PrivilegedExceptionAction[Unit]() {override def run(): Unit = {runMain(args, uninitLog)}})} else {runMain(args, uninitLog)}}if (args.isStandaloneCluster && args.useRest) {try {doRunMain()} catch {case e: SubmitRestConnectionException =>args.useRest = falsesubmit(args, false, sparkConf)}} else {doRunMain()}}
这一步的重点不是启动用户程序,而是做两类“提交前保护”:
如果指定了
--proxy-user,用对应用户身份执行Standalone cluster 模式下优先用 REST 提交,失败后 fallback 到老的 RPC 提交
真正准备环境在下一步。
六、prepareSubmitEnvironment:spark-submit 的核心
SparkSubmit.scala:243 是最重要的入口。下面是简化后的代码:
private[deploy] def prepareSubmitEnvironment(args: SparkSubmitArguments,conf: Option[HadoopConfiguration] = None): (Seq[String], Seq[String], SparkConf, String) = {val childArgs = new ArrayBuffer[String]()val childClasspath = new ArrayBuffer[String]()val sparkConf = args.toSparkConf()var childMainClass = ""val clusterManager: Int = args.maybeMaster match {caseSome("yarn") => YARNcase Some(m) if m.startsWith("spark") => STANDALONEcase Some(m) if SparkMasterRegex.isK8s(m) => KUBERNETEScase Some(m) if m.startsWith("local") => LOCALcase None => LOCAL}val deployMode: Int = args.deployMode match {case "client" | null => CLIENTcase "cluster" => CLUSTER}// 后面根据 clusterManager + deployMode 选择 childMainClass / childArgs / classpath}
它返回四个东西:
| 返回值 | 含义 |
|---|---|
childArgs | 真正传给 child main class 的参数 |
childClasspath | 需要额外加入 classloader 的 jar / path |
sparkConf | 最终合并后的 SparkConf |
childMainClass | 真正要启动的 main class |
这就是 spark-submit 的核心:把用户命令翻译成 childMainClass + childArgs + childClasspath + SparkConf。
七、client mode vs cluster mode,到底差在哪
很多人以为 deploy mode 是“调度器不同”。不是。
deploy mode 只回答一个问题:
Driver 运行在哪里?
| deploy mode | Driver 位置 | spark-submit 进程做什么 |
|---|---|---|
| client | 就在提交机器上 | 直接启动用户 main |
| cluster | 在集群里, 随机一个机器启动driver | 启动一个集群客户端,把 Driver 交给集群管理器 |
所以在 client mode 下, 你可以使用`jps`查看到SparkSubmit进程的存在:
spark-submit JVM → SparkSubmit → 用户 main → new SparkContext → 连接集群
在 cluster mode 下:
spark-submit JVM → SparkSubmit → 集群提交客户端 main → 向 YARN/K8s/Standalone 提交 Driver集群中的 Driver JVM → 用户 main → new SparkContext
prepareSubmitEnvironment 根据 clusterManager + deployMode 选择不同 childMainClass。例如 SparkSubmit.scala:1126-1131 定义了几类 cluster 提交入:
private[deploy] val YARN_CLUSTER_SUBMIT_CLASS ="org.apache.spark.deploy.yarn.YarnClusterApplication"private[deploy] val STANDALONE_CLUSTER_SUBMIT_CLASS = classOf[ClientApp].getName()private[deploy] val KUBERNETES_CLUSTER_SUBMIT_CLASS ="org.apache.spark.deploy.k8s.submit.KubernetesClientApplication"
也就是说:
YARN cluster:先跑
YarnClusterApplicationStandalone cluster:先跑
ClientAppKubernetes cluster:先跑
KubernetesClientApplication
它们负责把真正的 Driver 交给对应的集群管理器。
八、runMain:加载 childMainClass
SparkSubmit.scala:964。下面是简化后的代码:
private def runMain(args: SparkSubmitArguments, uninitLog: Boolean): Unit = {val (childArgs, childClasspath, sparkConf, childMainClass) = prepareSubmitEnvironment(args)val loader = getSubmitClassLoader(sparkConf)for (jar <- childClasspath) {addJarToClasspath(jar, loader)}var mainClass: Class[_] = nullmainClass = Utils.classForName(childMainClass)val app: SparkApplication = if (classOf[SparkApplication].isAssignableFrom(mainClass)) {mainClass.getConstructor().newInstance().asInstanceOf[SparkApplication]} else {new JavaMainApplication(mainClass)}app.start(childArgs.toArray, sparkConf)}
这里有两个关键点。
第一,Spark 不是直接反射调用用户 main,而是先包装成 SparkApplication。
第二,如果 childMainClass 本身实现了 SparkApplication,直接用它;否则用 JavaMainApplication 包一层。
九、SparkApplication:统一入口协议
SparkApplication.scala:27:
private[spark] traitSparkApplication{def start(args: Array[String], conf: SparkConf): Unit}
标准 Java/Scala 应用会被包装成 JavaMainApplication。看 SparkApplication.scala:39:
private[deploy] class JavaMainApplication(klass: Class[_]) extends SparkApplication {override def start(args: Array[String], conf: SparkConf): Unit = {val mainMethod = klass.getMethod("main", new Array[String](0).getClass)val sysProps = conf.getAll.toMapsysProps.foreach { case (k, v) =>sys.props(k) = v}mainMethod.invoke(null, args)}}
也就是:
找到用户类的
main(Array[String])把 SparkConf 写入 JVM system properties
反射调用用户 main
这时,你的代码终于开始执行。
十、用户 main 之后:SparkContext 才真正创建
spark-submit 本身不会创建 SparkContext。
真正创建 SparkContext 的通常是你的应用代码:
val spark = SparkSession.builder().getOrCreate()或者:
val sc = new SparkContext(conf)这件事发生在你的 main 方法内部。
这也是很多初学者混淆的一点:
spark-submit负责启动 DriverDriver 里面的用户代码负责创建
SparkContextSparkContext再创建DAGScheduler/TaskScheduler/SparkEnv
换句话说:spark-submit 不等于 SparkContext。spark-submit 只是把你的程序跑起来。
十一、样例测试:看 verbose 输出
最简单的观察方式是加 --verbose:
bin/spark-submit \--verbose \--class org.apache.spark.examples.SparkPi \--master local[2] \ examples/jars/spark-examples_2.13-4.2.0.jar \10
看到相关得信息:
Main class:org.apache.spark.examples.SparkPiArguments:10Spark config:...Classpath elements:...
这些信息正是 runMain 中 args.verbose 分支打印的,源码在 SparkSubmit.scala:971-979。
十二、总结
完整路径回顾:
bin/spark-submit:27→ bin/spark-class org.apache.spark.deploy.SparkSubmit→ SparkSubmit.main:1133→ new SparkSubmit().doSubmit→ SparkSubmit.doSubmit:70→ SparkSubmit.submit:166→ SparkSubmit.runMain:964→ prepareSubmitEnvironment:243→ 解析 master / deploy-mode / classpath / child main→ Utils.classForName(childMainClass)→ SparkApplication.start→ JavaMainApplication.start:41→ 用户 main(args)→ SparkSession.builder.getOrCreate / new SparkContext
最值得关注的三个经验:
spark-submit 是启动器,不是应用本身。 它负责解析参数、拼 classpath、决定 child main class,然后把控制权交出去。
client / cluster mode 的本质差异是 Driver 位置。 client mode 下 Driver 就在 spark-submit 进程里;cluster mode 下 spark-submit 先启动一个提交客户端,由集群管理器再拉起 Driver。
SparkContext 通常不是 spark-submit 创建的,而是用户 main 创建的。
spark-submit到SparkContext中间隔着JavaMainApplication.start → 用户 main。
每天花费10分钟学习spark,让你技术之路走得更稳、更快。
喜欢的点个关注。