 夜雨聆风
夜雨聆风


OpenClaw 中 Skill(技能)与 Tool(工具)有啥区别?
一、核心区别对比
一句话总结
- Tool(工具)
:是程序化的能力,由代码实现,AI 通过函数调用直接执行 - Skill(技能)
:是知识性的指导,由 Markdown 文档编写,AI 阅读后按说明操作
详细对比表
|
|
|
|
|---|---|---|
| 本质 |
|
|
| 实现方式 |
|
|
| 调用机制 |
|
|
| 定义位置 | src/agents/tools/*.ts |
skills/
~/.clawdbot/skills/ |
| 典型示例 | web_search()
read()、exec() |
summarize
github、weather |
| 灵活性 |
|
|
| 扩展方式 |
|
|
二、Skill(技能)系统详解
1. Skill 的存储结构
plaintext
skills/├── summarize/│ └── SKILL.md # 每个技能都有一个 SKILL.md 文件├── github/│ └── SKILL.md├── weather/│ └── SKILL.md└── 1password/ └── SKILL.md2. SKILL.md 文件结构
让我用
summarize技能举例:markdown
---name: summarize # 技能名称description: Summarize or extract text from URLs... # 技能描述(AI 用于判断是否使用)homepage: https://summarize.sh # 主页metadata: { "clawdbot": { "emoji": "🧾", "requires": { "bins": ["summarize"] # 依赖的命令行工具 }, "install": [ # 安装指引 { "id": "brew", "kind": "brew", "formula": "steipete/tap/summarize", "bins": ["summarize"], "label": "Install summarize (brew)" } ] }}---# SummarizeFast CLI to summarize URLs, local files, and YouTube links.## When to use (trigger phrases)Use this skill immediately when the user asks any of:- "use summarize.sh"- "what's this link about?"- "summarize this URL/article"- "transcribe this YouTube/video"## Quick start```bashsummarize "https://example.com" --model google/gemini-3-flash-previewsummarize "/path/to/file.pdf" --model google/gemini-3-flash-previewsummarize "https://youtu.be/dQw4w9WgXcQ" --youtube autoModel + keys
Set the API key for your chosen provider:
-
OpenAI: OPENAI_API_KEY -
Anthropic: ANTHROPIC_API_KEY…
plaintext
### 3. Skill 加载机制```mermaidgraph TB A[Gateway 启动] --> B[扫描技能目录] B --> C[按优先级加载] C --> D[extraDirs<br/>额外目录<br/>最低优先级] C --> E[bundledSkills<br/>内置技能] C --> F[managedSkills<br/>管理技能<br/>~/.clawdbot/skills] C --> G[workspaceSkills<br/>工作区技能<br/>最高优先级] G --> H[解析 SKILL.md] H --> I[提取 Frontmatter 元数据] I --> J[检查依赖条件] J --> K{符合条件?} K -->|是| L[加入技能列表] K -->|否| M[跳过] L --> N[格式化后注入系统提示] style G fill:#ff6b6b style N fill:#4ecdc44. Skill 如何被 AI 发现和使用?
步骤 1:Skill 注入系统提示
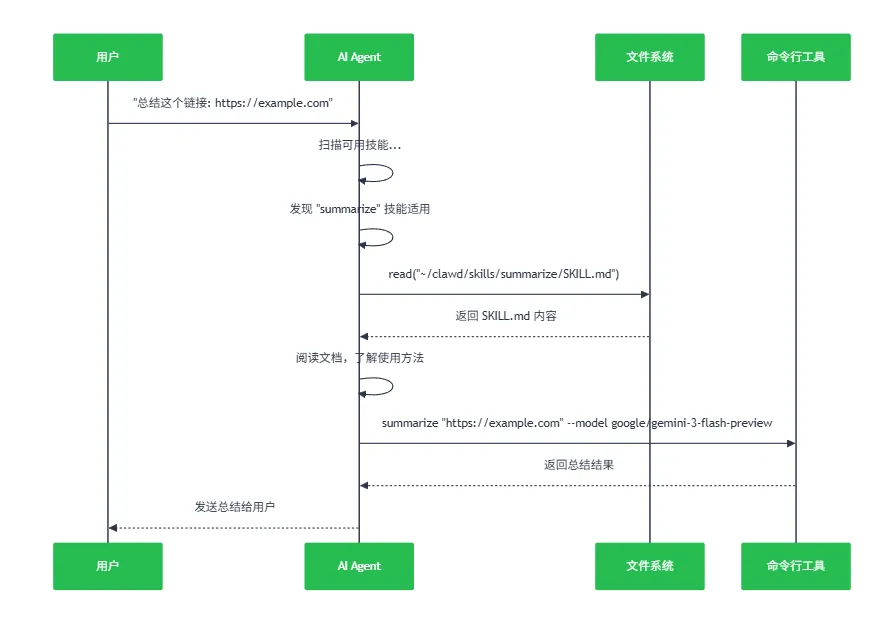
当用户发送消息时,Gateway 会将可用技能注入到系统提示中:
typescript
// src/agents/system-prompt.ts 第 15-33 行function buildSkillsSection(params) { if (params.skillsPrompt?.trim()) { return [ "## Skills (mandatory)", "Before replying: scan <available_skills> <description> entries.", `- If exactly one skill clearly applies: read its SKILL.md at <location> with \`${params.readToolName}\`, then follow it.`, "- If multiple could apply: choose the most specific one, then read/follow it.", "- If none clearly apply: do not read any SKILL.md.", trimmed, // 这里包含了所有可用技能的名称和描述 ]; }}步骤 2:AI 判断是否需要使用 Skill
AI 收到系统提示后,会按以下逻辑判断:
plaintext
用户消息: "帮我总结一下这个链接 https://example.com/article"AI 思考过程:1. 扫描 <available_skills> 列表2. 发现 "summarize" 技能的描述: "Summarize or extract text from URLs..."3. 判断: 这个技能完全适用!4. 决定: 使用 read 工具读取 SKILL.md 文件5. 执行: 按照 SKILL.md 中的指引操作步骤 3:AI 读取并遵循 Skill 指引
5. Skill 的优先级机制
为什么这样设计?

-
工作区技能优先级最高:用户可以自定义覆盖任何技能 -
内置技能保底:确保基本功能始终可用 -
插件技能可扩展:插件可以带来新技能
三、Tool(工具)系统详解
1. Tool 的定义方式
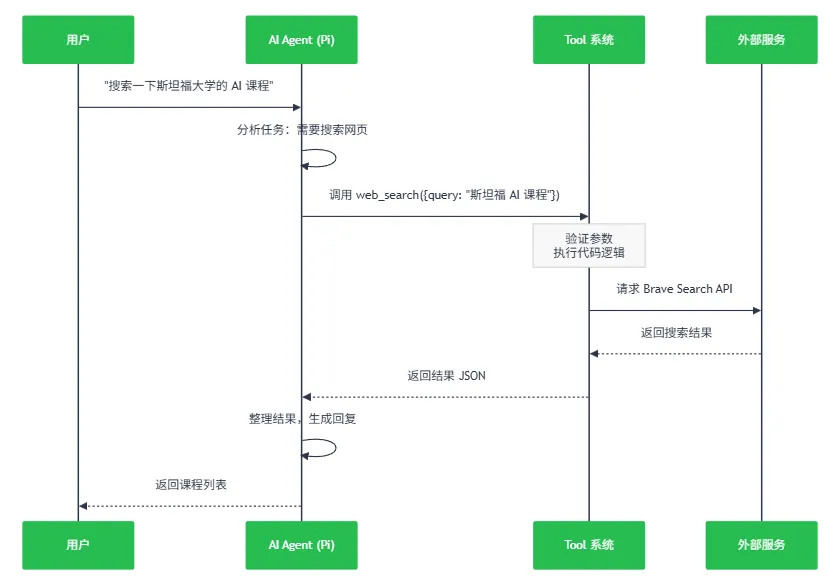
Tool 是用 TypeScript 代码实现的函数,遵循 AgentTool 接口:
typescript
// src/agents/tools/web-search.ts 第 35-66 行const WebSearchSchema = Type.Object({ query: Type.String({ description: "Search query string." }), count: Type.Optional( Type.Number({ description: "Number of results to return (1-10).", minimum: 1, maximum: MAX_SEARCH_COUNT, }), ), country: Type.Optional(Type.String({ ... })), // ... 更多参数});export function createWebSearchTool(options) { return { name: "web_search", description: "Search the web (Brave API)", schema: WebSearchSchema, // TypeBox Schema 定义输入参数 execute: async (params, context) => { // 具体实现逻辑 const results = await braveSearch(params.query, params.count); return jsonResult(results); } };}2. Tool 的调用机制
3. 核心工具示例
示例 1:文件读取工具
typescript
// 这是一个内置工具,AI 可以直接读取文件{ name: "read", description: "Read file contents", schema: { path: string }, execute: async ({ path }) => { return await fs.readFile(path, "utf-8"); }}示例 2:浏览器控制工具
typescript
// src/agents/tools/browser-tool.ts{ name: "browser", description: "Control web browser", // 支持的操作: // - snapshot: 获取页面快照 // - click: 点击元素 // - type: 输入文本 // - navigate: 导航到 URL // - ...}示例 3:会话通信工具
typescript
// src/agents/tools/sessions-send-tool.ts{ name: "sessions_send", description: "Send a message to another session/sub-agent", schema: { sessionKey: string, // 目标会话 message: string, // 消息内容 }, execute: async ({ sessionKey, message }) => { // 跨会话通信逻辑 }}
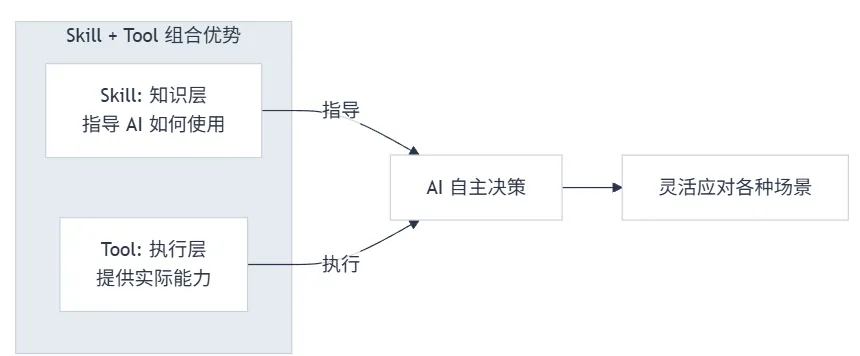
四、Skill 与 Tool 的协同工作
典型案例:GitHub 技能的使用
mermaid
graph TB A[用户: 查看 PR #55 的 CI 状态] --> B{AI 分析} B --> C[扫描技能列表] C --> D[发现 "github" 技能] D --> E[读取 SKILL.md] E --> F[文档说: 使用 gh CLI 工具] F --> G[AI 决定使用 exec 工具] G --> H[调用 exec<br/>"gh pr checks 55 --repo owner/repo"] H --> I[执行命令] I --> J[返回 CI 状态] J --> K[AI 整理结果] K --> L[回复用户] style E fill:#ffe66d style G fill:#ff6b6b style H fill:#4ecdc4完整流程:
- 用户请求
:”查看 PR #55 的检查状态” - AI 发现技能
:扫描可用技能,发现 github技能- 读取文档
:使用 read工具读取SKILL.md- 学习用法
:文档中写道: bash
gh pr checks 55 --repo owner/repo
- 调用工具
:使用 exec工具执行上述命令- 返回结果
:将命令执行结果整理后回复用户 为什么这样设计?
优势:
- 灵活性
:Skill 可以随时修改,AI 会立即适应新用法 - 可扩展性
:添加新功能只需写个 Markdown 文件 - 解耦
:Tool 提供基础能力,Skill 提供使用策略 - AI 自主性
:AI 不是简单调用 API,而是理解文档后自主决策
五、核心代码实现解析
1. Skill 加载与格式化
typescript
// src/agents/skills/workspace.tsfunction loadSkillEntries(workspaceDir, opts) { // 加载各来源的技能 const bundledSkills = loadSkills({ dir: bundledSkillsDir, source: "clawdbot-bundled" }); const managedSkills = loadSkills({ dir: managedSkillsDir, source: "clawdbot-managed" }); const workspaceSkills = loadSkills({ dir: workspaceSkillsDir, source: "clawdbot-workspace" }); // 合并(workspace 优先级最高) const merged = new Map(); for (const skill of bundledSkills) merged.set(skill.name, skill); for (const skill of managedSkills) merged.set(skill.name, skill); for (const skill of workspaceSkills) merged.set(skill.name, skill); // 解析每个技能的元数据 return Array.from(merged.values()).map(skill => { const frontmatter = parseFrontmatter(fs.readFileSync(skill.filePath)); return { skill, frontmatter, clawdbot: resolveClawdbotMetadata(frontmatter), invocation: resolveSkillInvocationPolicy(frontmatter), }; });}2. 将 Skill 注入系统提示
typescript
// src/agents/skills/workspace.tsfunction buildWorkspaceSkillSnapshot(workspaceDir, opts) { const entries = loadSkillEntries(workspaceDir, opts); const eligible = filterSkillEntries(entries, opts?.config); // 格式化为 AI 可理解的提示文本 const prompt = formatSkillsForPrompt(eligible.map(e => e.skill)); return { prompt, // 这个会被注入到系统提示中 skills: eligible.map(e => ({ name: e.skill.name })), };}3. AI 如何调用 Tool
AI 的 Tool 调用是由 Pi Agent 运行时处理的:
typescript
// 工具定义const tools = [ createWebSearchTool({ apiKey: "..." }), createWebFetchTool(), createReadTool(), createExecTool(), // ... 更多工具];// AI 运行时会根据工具列表决定调用哪个// 这是由 @mariozechner/pi-agent-core 库处理的
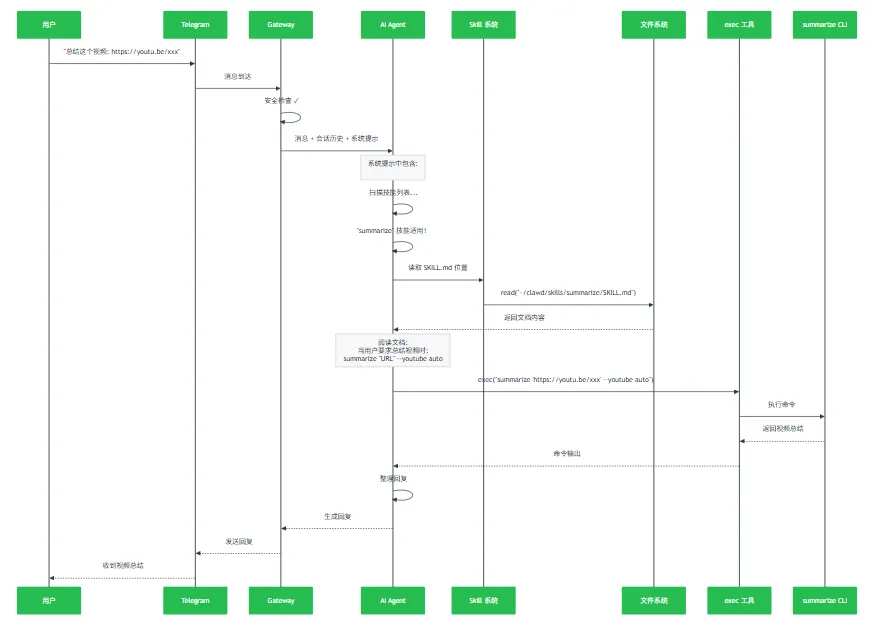
六、完整示例:从用户请求到回复
场景:用户要求总结一篇 YouTube 视频
七、设计哲学与启示
1. 关注点分离(Separation of Concerns)
- Tool
负责”能做什么”(Capability) - Skill
负责”怎么做”(Strategy)
plaintext
Tool: 我可以执行命令(exec)Skill: 你应该用这个命令来解决这个问题2. 开放封闭原则(Open-Closed Principle)
-
对扩展开放:添加新 Skill 只需写 Markdown -
对修改封闭:不需要改动核心代码
3. 声明式 vs 命令式
- Skill(声明式)
:描述”做什么”和”何时做” - Tool(命令式)
:实现”怎么做”
4. AI 原生设计
这是与传统编程最大的不同:
plaintext
传统编程:程序员写死逻辑 → 程序执行AI 编程:程序员写文档指导 → AI 阅读后自主决策 → 执行优势:- AI 可以灵活应对边缘情况- 可以组合多个 Skill- 可以根据上下文调整策略
八、总结
|
|
|
|
|---|---|---|
| 本质 |
|
|
| 提供 |
|
|
| 调用方式 |
|
|
| 扩展难度 |
|
|
| 灵活性 |
|
|
| 示例 | exec()
read() |
summarize
github |
| 位置 | src/agents/tools/ |
skills/
|
核心思想:
Tool 是肌肉,Skill 是大脑。
Tool 提供执行能力,Skill 提供决策指导。两者结合,AI 不仅能”做事”,还能”知道怎么做”和”何时做”。
这种设计让 OpenClaw 成为一个真正智能的个人助手,而不是简单的命令执行器。🦞