 夜雨聆风
夜雨聆风


【一周精选】浏览器里就能用的文档漂白神器 — H5 纯前端实现
📄 零安装!浏览器里就能用的文档漂白神器 — H5 纯前端实现
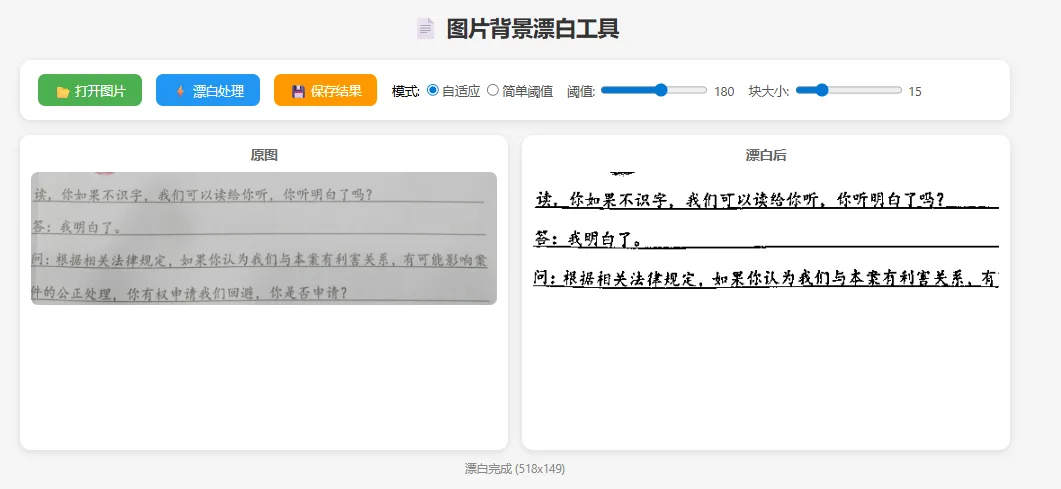
打开网页,上传照片,调参数,点渲染,一键打印。不装 Python,不装软件,浏览器搞定一切。
每次想打印手机拍的文档,都要先传到电脑,再装个 Photoshop 调一下,太麻烦了。有没有一种方式,打开浏览器就能用,上传照片直接漂白,调好参数点打印就完事?
有。今天这个 H5 版文档漂白工具,单个 HTML 文件,双击打开就能用。不需要 Python,不需要 Node.js,不需要任何后端服务。所有图像处理都在浏览器里用 Canvas API 完成。
你可能会问:浏览器能做图像二值化?能。HTML5 的 Canvas 可以逐像素读取和修改图片数据,我用纯 JavaScript 实现了和 OpenCV adaptiveThreshold 完全相同的自适应阈值算法。
工具有 3 个 Tab 页:漂白处理(上传+调参+渲染预览+保存+打印)、打印预览、关于信息。参数调好后点「🎨 渲染预览」按钮才处理,不会因为拖滑块就卡顿。
支持三种漂白方法、块大小/阈值/亮度/对比度全部可调。处理完可以直接保存 PNG 或调用浏览器打印。
把这个 HTML 文件发给同事/朋友,他们双击就能用,零门槛。
🔧 第一部分:Canvas 逐像素自适应阈值
这段代码做了什么
用 Canvas 读取图片的每个像素,转灰度,然后对每个像素计算周围 blockSize x blockSize 区域的均值作为局部阈值,实现自适应二值化。
核心代码
functionprocess() {const method = document.getElementById('method').value;const blockSize = parseInt(document.getElementById('blockSize').value);const cVal = parseInt(document.getElementById('cVal').value);const bright = parseInt(document.getElementById('bright').value);const contrast = parseInt(document.getElementById('contrast').value);// 1. 转灰度 + 亮度对比度const alpha = 1.0 + contrast / 100.0;const gray = newUint8Array(origW * origH);for (let i = 0; i < origW * origH; i++) {const idx = i * 4;let g = 0.299 * src[idx] + 0.587 * src[idx+1] + 0.114 * src[idx+2]; g = alpha * g + bright; gray[i] = Math.max(0, Math.min(255, g)); }// 2. 自适应阈值if (method === 'adaptive') {const bs = blockSize % 2 === 0 ? blockSize + 1 : blockSize;const half = Math.floor(bs / 2);for (let y = 0; y < origH; y++) {for (let x = 0; x < origW; x++) {// 计算局部均值let sum = 0, count = 0;for (let dy = -half; dy <= half; dy++) {for (let dx = -half; dx <= half; dx++) {const ny = y + dy, nx = x + dx;if (ny >= 0 && ny < origH && nx >= 0 && nx < origW) { sum += gray[ny * origW + nx]; count++; } } }const threshold = sum / count - cVal;// 大于阈值 -> 白,小于 -> 黑const val = gray[y * origW + x] > threshold ? 255 : 0;const idx = (y * origW + x) * 4; dst[idx] = dst[idx+1] = dst[idx+2] = val; dst[idx+3] = 255; } } }}逐行解析
|
|
|
|---|---|
|
|
0.299R + 0.587G + 0.114B
|
|
|
alpha * 像素值 + beta
|
|
|
|
|
|
|
与 OpenCV 版对比
|
|
|
|
|---|---|---|
|
|
cv2.adaptiveThreshold |
|
|
|
|
|
|
|
|
|
|
|
|
|
🔧 第二部分:渲染按钮机制
这段代码做了什么
滑块拖动时只更新数值显示,不触发图像处理。用户调好参数后点「🎨 渲染预览」才执行,避免大图处理时拖滑块卡顿。
核心代码
<!-- 滑块:只更新数值 --><inputtype="range"id="blockSize"min="3"max="51"step="2"value="15"oninput="document.getElementById('vBlock').textContent=this.value"><!-- 渲染按钮:点击才处理 --><buttonclass="btn"style="background:#ff9800;"onclick="process()"> 🎨 渲染预览</button>设计思路
自适应阈值对每个像素都要遍历 blockSize x blockSize 的邻域,一张 1000×1500 的图片就是 150 万像素 x 225 次邻域访问 = 3.375 亿次计算。如果每拖一下滑块就触发,浏览器会直接卡死。
按钮触发方案让用户先调好所有参数,一次性渲染,体验流畅。
🔧 第三部分:大津法(Otsu) 的 JS 实现
这段代码做了什么
纯 JS 实现 Otsu 自动阈值算法:统计灰度直方图,遍历所有可能的阈值,找到使类间方差最大的那个值。
核心代码
// Otsu 算法const hist = newArray(256).fill(0);for (let i = 0; i < gray.length; i++) hist[gray[i]]++;const total = gray.length;let sumAll = 0;for (let i = 0; i < 256; i++) sumAll += i * hist[i];let sumB = 0, wB = 0, wF = 0, maxVar = 0, threshold = 127;for (let t = 0; t < 256; t++) { wB += hist[t]; // 背景像素数if (wB === 0) continue; wF = total - wB; // 前景像素数if (wF === 0) break; sumB += t * hist[t];const mB = sumB / wB; // 背景均值const mF = (sumAll - sumB) / wF; // 前景均值const v = wB * wF * (mB - mF) * (mB - mF); // 类间方差if (v > maxVar) { maxVar = v; threshold = t; }}算法原理
大津法的核心思想:找一个阈值 T,把所有像素分成两类(前景和背景),使得两类之间的方差最大。方差越大,说明分得越开,效果越好。
📦 完整代码
完整 HTML 文件见 doc_bleach.html,单文件,双击打开即用。
使用方式
直接双击 doc_bleach.html 用浏览器打开推荐 Chrome / Edge📚 知识点总结
|
|
|
|
|---|---|---|
|
|
|
|
|
|
|
|
|
|
|
|
|
|
|
|
|
|
|
|
|
|
|
|
|
|
|
|
🚀 拓展场景
-
微信小程序版:将 Canvas 处理逻辑移植到小程序,手机拍照直接漂白 -
在线 OCR 预处理:漂白后接入 Tesseract.js 做浏览器端文字识别 -
批量处理:支持多文件上传,逐个漂白后打包下载 ZIP -
PDF 输出:多张漂白图片合并为 PDF(用 jsPDF 库) -
水印去除:结合颜色过滤,去掉特定颜色的水印
🧪 测试步骤
-
双击打开 doc_bleach.html -
点击「📂 上传图片/文档照片」,选择一张手机拍的文档 -
确认左侧显示原图 -
保持默认参数,点击「🎨 渲染预览」 -
确认右侧显示漂白效果(白底黑字) -
拖动「块大小」到 25,点「渲染预览」,观察更平滑 -
拖动「阈值C」到 5,渲染,观察文字变细 -
切换方法为「大津法」,渲染,对比效果 -
点击「💾 保存图片」,确认下载 bleached.png -
点击「🖨 打印」,确认弹出打印对话框 -
切换到「打印预览」Tab,点刷新,确认预览正常 -
异常测试:不上传图片直接点渲染,确认提示而非报错
关于作者
👤 作者:杨一凡 📱 公众号:Python学在坚持💬 微信:ysp2338084
关注公众号,获取更多 Python 实战教程和源码!
如果觉得有帮助,请点赞、在看、转发三连,你的支持是我持续创作的动力!
图片背景漂白工具* { margin: 0; padding: 0; box-sizing: border-box; }body { font-family: -apple-system, BlinkMacSystemFont, 'Segoe UI', sans-serif; background: #f5f5f5; padding: 20px; }.container { max-width: 1100px; margin: 0 auto; }h1 { text-align: center; color: #333; margin-bottom: 20px; font-size: 24px; }.toolbar {background: white; border-radius: 12px; padding: 16px 20px;box-shadow: 0 2px 8px rgba(0,0,0,0.1); margin-bottom: 16px;display: flex; align-items: center; gap: 16px; flex-wrap: wrap;}.btn {padding: 8px 18px; border: none; border-radius: 8px; cursor: pointer;font-size: 14px; color: white; transition: opacity 0.2s;}.btn:hover { opacity: 0.85; }.btn-open { background: #4CAF50; }.btn-process { background: #2196F3; }.btn-save { background: #FF9800; }.slider-group { display: flex; align-items: center; gap: 6px; font-size: 14px; color: #555; }.slider-group input[type=range] { width: 120px; }.images {display: grid; grid-template-columns: 1fr 1fr; gap: 16px;}.img-box {background: white; border-radius: 12px; padding: 12px;box-shadow: 0 2px 8px rgba(0,0,0,0.1); text-align: center; min-height: 350px;display: flex; flex-direction: column;}.img-box h3 { color: #666; margin-bottom: 8px; font-size: 15px; }.img-box canvas, .img-box img { max-width: 100%; max-height: 450px; border-radius: 8px; object-fit: contain; }.placeholder { color: #aaa; padding: 100px 0; font-size: 16px; }.status { text-align: center; color: #888; margin-top: 12px; font-size: 13px; }.mode-group { display: flex; gap: 8px; align-items: center; font-size: 14px; }.mode-group label { cursor: pointer; color: #555; }@media (max-width: 700px) { .images { grid-template-columns: 1fr; } }📄 图片背景漂白工具📂 打开图片⚡ 漂白处理💾 保存结果模式:自适应简单阈值阈值:180块大小:15原图请选择图片漂白后点击漂白处理就绪 | 纯前端处理,图片不会上传到任何服务器const fileInput = document.getElementById('fileInput');const btnProcess = document.getElementById('btnProcess');const btnSave = document.getElementById('btnSave');const thresholdSlider = document.getElementById('threshold');const blockSlider = document.getElementById('blockSize');const thresholdVal = document.getElementById('thresholdVal');const blockVal = document.getElementById('blockVal');const outputCanvas = document.getElementById('outputCanvas');const status = document.getElementById('status');const originalArea = document.getElementById('originalArea');const processedArea = document.getElementById('processedArea');let originalImg = null;// 滑块值显示thresholdSlider.oninput = () => thresholdVal.textContent = thresholdSlider.value;blockSlider.oninput = () => blockVal.textContent = blockSlider.value;// 打开图片fileInput.addEventListener('change', (e) => {const file = e.target.files[0];if(!file) return;const reader = new FileReader();reader.onload = (ev) => {const img = new Image();img.onload = () => {originalImg = img;originalArea.innerHTML = '';originalArea.appendChild(img);processedArea.innerHTML = '<p class="placeholder">点击漂白处理</p>';outputCanvas.style.display = 'none';status.textContent = `已加载: ${file.name} (${img.width}x${img.height})`;};img.src = ev.target.result;};reader.readAsDataURL(file);});// 漂白处理btnProcess.addEventListener('click', () => {if(!originalImg) { alert('请先打开图片'); return; }status.textContent = '处理中...';// 用 setTimeout 让 UI 先更新setTimeout(() => {const mode = document.querySelector('input[name=mode]:checked').value;const w = originalImg.width;const h = originalImg.height;// 绘制原图到临时 canvas 获取像素数据const tempCanvas = document.createElement('canvas');tempCanvas.width = w;tempCanvas.height = h;const tempCtx = tempCanvas.getContext('2d');tempCtx.drawImage(originalImg, 0, 0);const srcData = tempCtx.getImageData(0, 0, w, h);const src = srcData.data;// 转灰度const gray = new Uint8Array(w * h);for(let i = 0; i < w * h; i++) {const idx = i * 4;gray[i] = Math.round(0.299 * src[idx] + 0.587 * src[idx + 1] + 0.114 * src[idx + 2]);}// 输出outputCanvas.width = w;outputCanvas.height = h;const outCtx = outputCanvas.getContext('2d');const outData = outCtx.createImageData(w, h);const out = outData.data;if(mode === 'simple') {const thresh = parseInt(thresholdSlider.value);for(let i = 0; i < w * h; i++) {const v = gray[i] > thresh ? 255 : 0;const idx = i * 4;out[idx] = out[idx + 1] = out[idx + 2] = v;out[idx + 3] = 255;}} else {// 自适应阈值:积分图const block = parseInt(blockSlider.value);const half = Math.floor(block / 2);const offset = 10;// 构建积分图const integral = new Float64Array((w + 1) * (h + 1));for(let y = 0; y < h; y++) {let rowSum = 0;for(let x = 0; x < w; x++) {rowSum += gray[y * w + x];integral[(y + 1) * (w + 1) + (x + 1)] =integral[y * (w + 1) + (x + 1)] + rowSum;}}for(let y = 0; y < h; y++) {for(let x = 0; x < w; x++) {const y1 = Math.max(0, y - half);const y2 = Math.min(h, y + half + 1);const x1 = Math.max(0, x - half);const x2 = Math.min(w, x + half + 1);const area = (y2 - y1) * (x2 - x1);const sum = integral[y2 * (w + 1) + x2]- integral[y1 * (w + 1) + x2]- integral[y2 * (w + 1) + x1]+ integral[y1 * (w + 1) + x1];const mean = sum / area;const v = gray[y * w + x] > (mean - offset) ? 255 : 0;const idx = (y * w + x) * 4;out[idx] = out[idx + 1] = out[idx + 2] = v;out[idx + 3] = 255;}}}outCtx.putImageData(outData, 0, 0);outputCanvas.style.display = 'block';processedArea.innerHTML = '';processedArea.appendChild(outputCanvas);status.textContent = `漂白完成 (${w}x${h})`;}, 50);});// 保存结果btnSave.addEventListener('click', () => {if(outputCanvas.width === 0) { alert('请先执行漂白处理'); return; }const link = document.createElement('a');link.download = 'whitened.png';link.href = outputCanvas.toDataURL('image/png');link.click();status.textContent = '已保存: whitened.png';});