夜雨聆风
夜雨聆风写在前面的话
为什么我们用kali安装openclaw?因为我们后续是要做渗透测试智能体。
1. 什么是 OpenClaw
OpenClaw 是一个多渠道 AI 智能体 Gateway 网关,可以在任何操作系统上运行,支持 WhatsApp、Telegram、Discord、iMessage、Signal、Slack、Google Chat 等多种聊天平台。
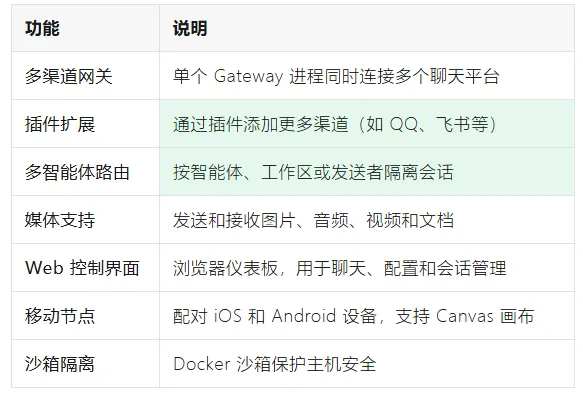
核心功能
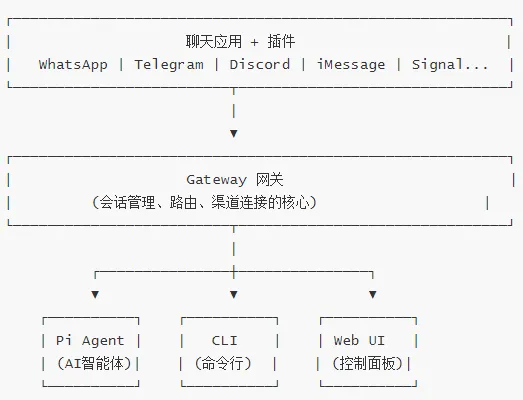
工作原理
2. 系统要求
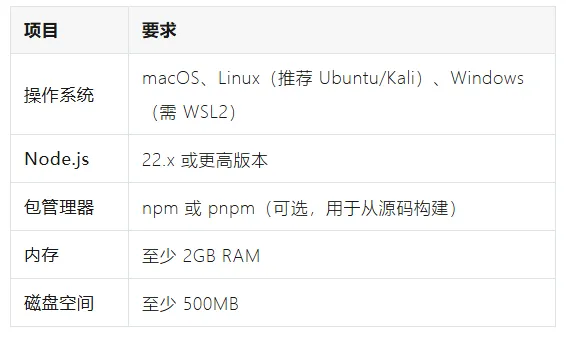
最低要求
Kali Linux 特别说明
Kali Linux 基于 Debian,完全支持 OpenClaw。以下命令均已针对 Kali 测试通过。
https://cdimage.kali.org/#7z下载地址https://www.7-zip.org/download.html
kali基本配置
#1、换源bash <(curl -sSL https://linuxmirrors.cn/main.sh)#2、更新apt update
kali安装中文语言包
1. 更新系统源
sudo apt update2. 安装中文语言包
#安装中文语言支持sudo apt install locales locales-all -y#安装中文字体sudo apt install fonts-wqy-zenhei fonts-wqy-microhei -ysudo apt install ttf-wqy-zenhei xfonts-wqy -y
3. 配置系统语言
#使用命令行#生成中文localesudo locale-gen zh_CN.UTF-8#设置系统默认语言sudo dpkg-reconfigure locales
4.安装中文输入法
安装中文输入法(推荐fcitx)
sudoapt install fcitx5 fcitx5-chinese-addons \fcitx5-frontend-gtk2 fcitx5-frontend-gtk3 fcitx5-frontend-gtk4 \fcitx5-frontend-qt5 fcitx5-frontend-qt6 \fcitx5-config-qt im-config -y
设置默认框架
im-config -n fcitx5配置环境变量(系统级,最可靠)
echo'GTK_IM_MODULE=fcitx' | sudo tee /etc/environmentecho'QT_IM_MODULE=fcitx' | sudo tee-a /etc/environmentecho'XMODIFIERS=@im=fcitx' | sudo tee-a /etc/environment
同时配置用户级(备用)
echo'export GTK_IM_MODULE=fcitx' >> ~/.bashrcecho'export QT_IM_MODULE=fcitx' >> ~/.bashrcecho'export XMODIFIERS=@im=fcitx' >> ~/.bashrc
重启系统(必须)
sudo reboot3. 安装步骤
3.1 方法一:使用安装脚本(推荐)
这是最简单的安装方式,安装脚本会自动处理 Node.js 的检测和安装:
#下载并运行安装脚本curl-fsSL https://openclaw.ai/install.sh | bash#安装完成后,重新加载 shell 配置:source ~/.zshrc #如果使用zsh或source ~/.bashrc #如果使用 bash
3.2 方法二:使用 npm 全局安装
如果你已经安装了 Node.js 22+:
安装 Node.js 22(如果尚未安装)
#使用 nvm 安装(推荐)curl -o- https://raw.githubusercontent.com/nvm-sh/nvm/v0.40.1/install.sh | bashsource ~/.zshrcnvm install 22nvm use 22#安装 OpenClawnpm install -g openclaw@latest
npm安装失败的解决方法
1、上网科学配置socks5代理vim /etc/proxychains4.conf2、换国内源设置为淘宝镜像npm config set registry https://registry.npmmirror.com恢复官方源npm config set registry https://registry.npmjs.org/验证配置npm config get registry
| 镜像源 | 地址 |
|---|---|
| 淘宝镜像 | https://registry.npmmirror.com |
| 腾讯云镜像 | https://mirrors.cloud.tencent.com/npm/ |
| 华为云镜像 | https://mirrors.huaweicloud.com/repository/npm/ |
| 中科院镜像 | https://registry.npmmirror.com |
3.3 验证安装
#检查版本openclaw --version#查看帮助openclaw help
预期输出类似:
🦞 OpenClaw 中文版 2026.3.7 — Half butler, half debugger, full crustacean.4. 初始配置
4.1 运行新手引导向导
OpenClaw 提供交互式引导向导,帮助你完成初始配置:
openclaw onboard --install-daemon向导会引导你完成:
选择 Gateway 模式:本地或远程
配置认证:
OAuth 登录(推荐)
API 密钥(如 Anthropic、OpenAI 等)
选择渠道:WhatsApp、Telegram、Discord 等
安装守护进程:设置为系统服务
4.2 配置认证(AI 模型)
OpenClaw 需要连接 AI 模型才能响应消息。支持多种认证方式:
方式一:OAuth 登录(推荐用于 OpenAI Codex)
#在向导中选择 OAuth,会自动打开浏览器进行授权方式二:API 密钥
Anthropic (Claude):
export ANTHROPIC_API_KEY="sk-ant-..."OpenAI:
export OPENAI_API_KEY="sk-..."Z.AI (GLM):
export ZAI_API_KEY="your-zai-api-key"Moonshot (Kimi):
export KIMI_API_KEY="sk-..."4.3 配置文件位置
OpenClaw 的主配置文件位于:
~/.openclaw/openclaw.json配置文件使用JSON5格式,支持注释和尾逗号。
4.4 最小配置示例
{// 智能体默认设置agents: {defaults: {workspace: "~/.openclaw/workspace",model: {primary: "anthropic/claude-sonnet-4-5-20250929"}}},// 渠道配置channels: {telegram: {enabled: true,botToken: "你的机器人Token",dmPolicy: "pairing"}}}
5. 启动 Gateway 网关
5.1 检查状态
#检查 Gateway 状态openclaw gateway status3健康检查openclaw health
5.2 启动 Gateway
前台运行(用于调试):
openclaw gateway --port18789--verbose后台服务(推荐):
#如果向导已安装守护进程:#启动服务openclaw gateway start#停止服务openclaw gateway stop#重启服务openclaw gateway restart
5.3 访问 Web 控制界面
Gateway 启动后,打开浏览器访问:
http://127.0.0.1:18789/或使用命令自动打开:
openclaw dashboard6. 连接聊天渠道
6.1 QQ 设置
步骤 1:创建 QQ 机器人
https://q.qq.com/qqbot/openclaw/login.html步骤 2:配置 OpenClaw
6.2 飞书 设置
步骤 1:openclaw安装飞书插件
#安装飞书插件openclaw plugins enable feishu3查看插件安装列表openclaw plugins list#重启网关openclaw gateway restart
步骤 2:登录飞书
https://open.feishu.cn/app步骤 3:配置插件
openclaw channels add导入权限
{"scopes": {"tenant": ["aily:file:read","aily:file:write","application:application.app_message_stats.overview:readonly","application:application:self_manage","application:bot.menu:write","cardkit:card:read","cardkit:card:write","contact:user.employee_id:readonly","corehr:file:download","event:ip_list","im:chat.access_event.bot_p2p_chat:read","im:chat.members:bot_access","im:message","im:message.group_at_msg:readonly","im:message.p2p_msg:readonly","im:message:readonly","im:message:send_as_bot","im:resource"],"user": ["aily:file:read", "aily:file:write", "im:chat.access_event.bot_p2p_chat:read"]}}
7. 基本使用
7.1 发送消息
连接成功后,直接在 QQ/飞书中向机器人发送消息即可。
常用聊天命令:
| 命令 | 说明 |
|---|---|
/status | 查看状态 |
/reset | 重置会话 |
/new | 开始新对话 |
/model | 切换模型 |
/help | 查看帮助 |
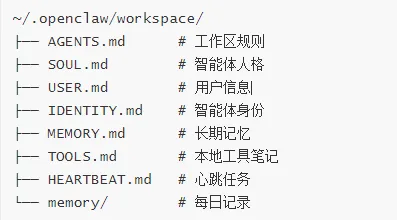
7.2 工作区概念
OpenClaw 使用工作区来管理文件和记忆:
8. 附录:常用命令速查
Gateway 管理
openclaw gateway status | 检查 Gateway 状态 |
openclaw gateway start | 启动后台服务 |
openclaw gateway stop | 停止服务 |
openclaw gateway restart | 重启服务 |
openclaw gateway --port 18789 | 前台运行 |
openclaw dashboard | 打开 Web 控制界面 |
配置管理
| 命令 | 说明 |
|---|---|
openclaw config get | 获取当前配置 |
openclaw config set <key> <value> | 设置配置项 |
openclaw config validate | 验证配置 |
openclaw configure | 交互式配置向导 |
系统诊断
| 命令 | 说明 |
|---|---|
openclaw doctor | 运行诊断 |
openclaw health | 健康检查 |
openclaw status | 显示状态 |
openclaw logs --follow | 实时查看日志 |
openclaw security audit | 安全审计 |
更多资源
官方文档:https://docs.openclaw.ai中文镜像:https://openclaw.qt.coolGitHub:https://github.com/openclaw/openclaw社区:https://discord.com/invite/clawdSkills 市场:https://clawhub.com