 夜雨聆风
夜雨聆风
SmartFlow Agent 从0到1 · 第8期/共14期 前两期我们用 MockLLM 跑通了 Agent。这期把 MockLLM 的设计讲透——规则引擎、双模式切换、调试技巧。然后门口放一把钥匙:接入真实 LLM。
本期目标
学完这篇,你能做到:
理解 MockLLM 的内部工作原理(规则匹配引擎)
用
--real参数一键切换到真实 LLM掌握打印执行轨迹的调试方法
不用 API Key 也能完整演示 Agent 功能
本期产出:双模式运行入口 + 完整调试工具链
一、MockLLM 的设计原理
先看一个核心矛盾:开发 Agent 需要反复调试,但每调一次就调一次 API 是要花钱的。
MockLLM 就是为了解决这个矛盾而生的。它"扮演"LLM 的角色,通过规则匹配决定什么时候调用工具。
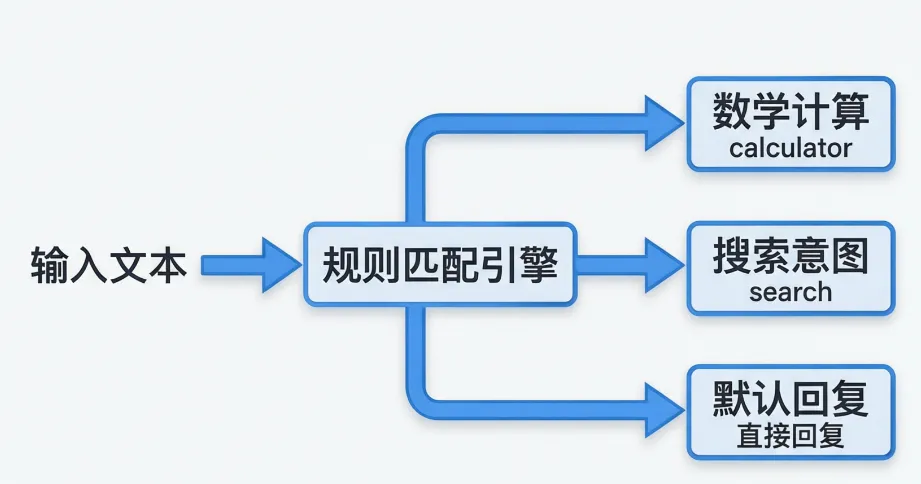
规则匹配引擎
class MockLLMClient(LLMClient):"""模拟 LLM —— 基于规则匹配,模拟 function calling 行为。"""def __init__(self):self._turn_count = 0def chat(self, messages, tools=None):self._turn_count += 1last_user_msg = self._get_last_user_message(messages)last_tool_role = self._has_tool_result(messages)# 规则1: 已有工具返回结果 → 假装看完结果后回复if last_tool_role:return {"content": f"根据工具返回的结果,我了解了。","tool_calls": []}# 规则2: 包含数学关键词 → 模拟调用计算器if any(kw in last_user_msg for kw in ["计算", "算", "+", "-", "*", "/", "×", "÷"]):return {"content": "我需要使用计算器工具来计算。","tool_calls": [{"name": "calculator", "arguments": '{"expression":"' + last_user_msg + '"}']}# 规则3: 包含搜索关键词 → 模拟调用搜索if any(kw in last_user_msg for kw in ["搜索", "查一下", "什么是", "介绍", "who is"]):return {"content": "我需要搜索相关信息。","tool_calls": [{"name": "search", "arguments": '{"query":"' + last_user_msg + '"}']}# 规则4: 默认 → 直接回复return {"content": f"你说了: {last_user_msg[:60]}", "tool_calls": []}
三个核心规则
规则 | 触发条件 | 行为 | 模拟的目的 |
|---|---|---|---|
工具结果已存在 | 消息列表最后一条 role=tool | 假装看完结果,直接回复 | 模拟 LLM "观察→推理→回复"的过程 |
数学意图 | 消息含"计算/算/+-*/" | 调用 calculator 工具 | 模拟 LLM 识别并调用计算工具 |
搜索意图 | 消息含"搜索/查一下/什么是" | 调用 search 工具 | 模拟 LLM 识别并调用搜索工具 |
默认回复 | 以上都不匹配 | 直接回复文本 | 模拟 LLM 闲聊场景 |
关键的"两次对话"机制
MockLLM 模拟一轮 ReAct 循环至少需要两次 chat() 调用:
第1次 chat():用户: "帮我计算 3.14 * 2"MockLLM: {"tool_calls": [calculator]}→ Agent 执行 calculator → 结果写回记忆第2次 chat():用户: "帮我计算 3.14 * 2"工具: "计算结果: 3.14 * 2 = 6.28" ← 上轮的工具结果MockLLM: {"content": "根据结果...我了解了", "tool_calls": []}→ Agent 将 content 回复给用户
第一次 chat,MockLLM"认为"需要调用工具。第二次 chat,MockLLM"看到"工具结果已经在了,于是直接回复。
这就是对真实 LLM 行为的模拟——真实 LLM 也是"先决定调工具,看到结果后再决定回复"。
二、双模式运行
怎么在模拟模式和真实模式之间切换?答案就在 main.py 的入口处:
import sysfrom llm_client import MockLLMClientfrom real_llm import RealLLMClientdef create_agent(use_real_llm=False):if use_real_llm:from dotenv import load_dotenvimport osload_dotenv()llm = RealLLMClient(api_key=os.getenv("LLM_API_KEY"),base_url=os.getenv("LLM_BASE_URL"),model=os.getenv("LLM_MODEL", "gpt-4o-mini"))print(" [模式] 真实 LLM API")else:llm = MockLLMClient()print(" [模式] MockLLM 模拟运行")perception = Perception()memory = MemoryManager()executor = Executor()registry = ToolRegistry()registry.register(CalculatorTool())executor.set_registry(registry)return Agent(llm=llm, perception=perception,memory=memory, executor=executor)def main():use_real = "--real" in sys.argvagent = create_agent(use_real)print("=" * 50)print(" SmartFlow Agent 已启动")print(" 输入 exit 退出")print("=" * 50)while True:user_input = input("\n>> ")if user_input.lower() in ("exit", "quit", "q"):breakreply = agent.run(user_input)print(f"\nAgent: {reply}")print_trace(agent.steps)
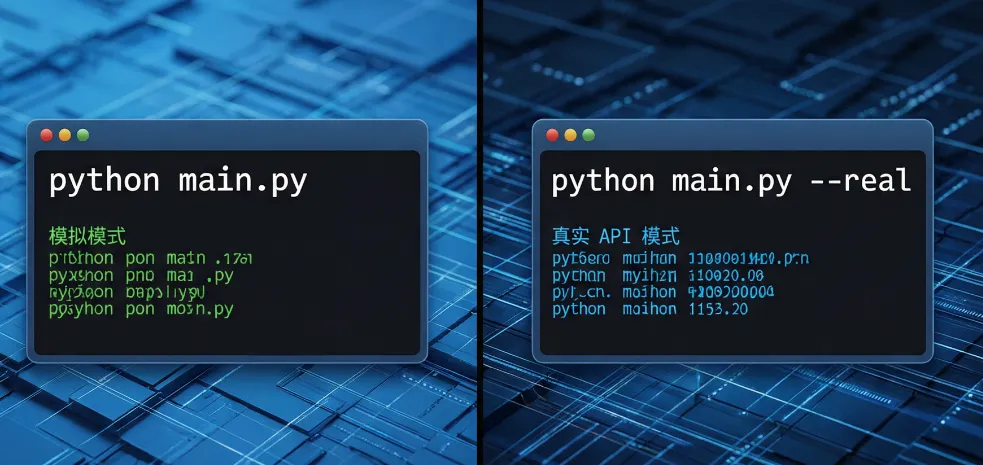
用法:
# 模拟模式(默认,无需 API Key)python main.py# 真实模式(需要配置 .env)python main.py --real
三、调试工具链
Agent 和普通程序最大的区别是:它不是确定性程序。 同样的输入可能走不同的路径。所以调试 Agent 的核心手段就是"看清楚每步发生了什么"。
轨迹打印
def print_trace(steps):"""格式化打印执行轨迹。"""if not steps:returnprint(f"\n── 执行轨迹 ({len(steps)} 步) ──")for s in steps:icon = {"perceive": "📥","reason": "🧠","tool_decision": "🤔","tool_call": "🔧","tool_result": "📊"}.get(s.action, "➡")print(f" {icon} [{s.step}] ", end="")if s.action == "tool_call":print(f"{s.content}")print(f" 参数: {json.dumps(s.tool_args, ensure_ascii=False)[:80]}")elif s.action == "tool_result":print(f"{s.content[:80]}")else:print(f"{s.content[:80]}")
完整 prompt 检查
有时候需要看发送给 LLM 的完整消息列表:
def debug_prompt(agent):"""打印发送给 LLM 的完整 prompt。"""messages = agent._memory.short_term.get_messages()print("\n── 完整 Prompt ──")for msg in messages:role = msg["role"].upper()content = msg["content"][:200]print(f"\n[{role}]")print(f" {content}")
常见问题快速诊断表
现象 | 原因 | 解法 |
|---|---|---|
Agent 不调用工具 | description 不够清晰或规则不匹配 | 检查 MockLLM 规则关键词或工具描述 |
Agent 循环调用同一工具 | 工具结果未正确记入记忆 | 检查 |
Agent 回答与工具结果矛盾 | 上下文窗口截断 | 增大短期记忆条数限制 |
Agent 陷入死循环 | 缺少终止条件 | 检查 |
四、完整对话演示
启动模拟模式,看看完整的对话效果:
python main.py>> 你好Agent: 你说了: 你好── 执行轨迹 (1 步) ──📥 [0] perceive: 感知输入: 你好 (意图: chat)🧠 [1] reason: 你说了: 你好>> 帮我计算 3.14 * 2Agent: 根据工具返回的结果,我了解了。── 执行轨迹 (4 步) ──📥 [0] perceive: 感知输入: 帮我计算 3.14 * 2 (意图: command)🧠 [1] reason: 我需要使用计算器工具来计算。🔧 [2] tool_call: 调用工具: calculator参数: {"expression": "帮我计算 3.14 * 2"}📊 [3] tool_result: 工具返回: 计算结果: 3.14 * 2 = 6.28🧠 [4] reason: 根据工具返回的结果,我了解了。>> 什么是 ReActAgent: 根据工具返回的结果,我了解了。── 执行轨迹 (4 步) ──📥 [0] perceive: 感知输入: 什么是 ReAct (意图: question)🧠 [1] reason: 我需要搜索相关信息。🔧 [2] tool_call: 调用工具: search参数: {"query": "什么是 ReAct"}📊 [3] tool_result: 工具返回: [模拟搜索] 搜索关键词: 什么是 ReAct
五、真实 LLM 接入(可选)
MockLLM 跑通了?是时候试试真实 LLM 了。只需三步:
第一步:配置 .env
确保你的 .env 文件里有这些内容(第4期已创建):
LLM_API_KEY=你的API-KEYLLM_BASE_URL=https://api.openai.com/v1LLM_MODEL=gpt-4o-mini
如果你用智谱 GLM:
LLM_API_KEY=你的智谱API-KEYLLM_BASE_URL=https://open.bigmodel.cn/api/paas/v4LLM_MODEL=glm-4-flash
第二步:安装依赖
pip install openai python-dotenv第三步:运行
python main.py --real试试同样的输入,感受真实 LLM 和 MockLLM 的差别。你会发现:
MockLLM 快如闪电(毫秒级),真实 LLM 需要几秒(网络延迟 + 推理时间)
MockLLM 只匹配关键词,真实 LLM 理解语义
MockLLM 免费,真实 LLM 按 token 计费
六、单元测试:让 MockLLM 为你所用
MockLLM 最大的价值不在演示,在测试。
# tests/test_agent.pyfrom agent.core import Agentfrom agent.perception import Perceptionfrom agent.executor import Executorfrom tools.base import ToolRegistryfrom tools.calculator import CalculatorToolfrom llm_client import MockLLMClientdef create_test_agent():"""创建一个专用于测试的 Agent(全模拟)。"""llm = MockLLMClient()perception = Perception()executor = Executor()registry = ToolRegistry()registry.register(CalculatorTool())executor.set_registry(registry)# Memory 用最简单的from agent.memory import MemoryManagermemory = MemoryManager()return Agent(llm=llm, perception=perception,memory=memory, executor=executor,max_iter=5)def test_agent_responds_to_greeting():agent = create_test_agent()reply = agent.run("你好")assert "你说了" in replydef test_agent_calls_calculator():agent = create_test_agent()reply = agent.run("帮我计算 3.14 * 2")assert "calculator" in str(agent.steps) or "工具返回" in replydef test_agent_max_iter_respected():agent = create_test_agent()reply = agent.run("x" * 1000) # 超长输入,触发默认回复assert len(reply) > 0pytest tests/ -v
七、本期文件清单
ai-agent-guide/├── main.py ← 更新:双模式入口(--real 参数)├── llm_client.py ← 更新:MockLLMClient 完整版 + 文档├── real_llm.py ★ 新增:RealLLMClient 真实 LLM 客户端├── agent/│ ├── core.py ← 完整 ReAct 循环│ ├── perception.py ← 完整感知模块│ ├── memory.py ← 桩代码│ └── executor.py ← 完整执行模块├── tools/│ ├── base.py│ └── calculator.py└── tests/└── test_agent.py ★ 新增:测试用例
避坑提醒
1. RealLLM 先测简单输入
第一次接真实 LLM 时,先试"你好"这种简单输入,确认 API 连通,再试工具调用。
2. MockLLM 和真实 LLM 行为有差异
MockLLM 用关键词匹配,很"机械"。真实 LLM 会理解语义、做多步推理。所以 MockLLM 跑通不等于真实 LLM 没问题——但反过来,MockLLM 跑不通,真实 LLM 一定不行。
3. 测试时用小模型
开发测试阶段,用 gpt-4o-mini 或 glm-4-flash 这种小模型,速度快、成本低。
本期产出总检查
[x] MockLLM 规则匹配引擎(4条规则)
[x] 双模式运行(
--real参数切换)[x] 轨迹打印调试工具
[x] 完整对话演示(3种场景)
[x] 真实 LLM 接入指南
[x] 测试用例
下期预告
从第9期开始进入全新的阶段——工具扩展。我们要实现真正可用的 CalculatorTool,深入讲解 Tool 基类的设计哲学、参数校验、安全求值。
SmartFlow Agent 系列 · 第8期/共14期
阶段三 · 核心引擎,全部完成。
回顾一下这8期的路程:第1期理解概念 → 第2-3期做规划 → 第4-5期搭骨架 → 第6-7期写引擎 → 第8期双模式运行。
从第9期开始,进入工具扩展阶段。Agent 的能力边界将大幅拓宽。