夜雨聆风
夜雨聆风openclaw
OpenClaw 是一款开源 AI,可在 WhatsApp、Telegram、Discord、Slack 和 iMessage 上执行任务。自托管、隐私优先,支持 50+ 集成。
近期,大家应该都被openclaw刷屏了,各种最强助手案例、安装教程等不绝于屏。 今天,我自己简单的安装了一下openclaw,把教程分享出来,作为一个基础入门,后期,openclaw及其各种衍生品应该会层出不穷,未来,可能要进入人人一个助手的时代了,这个工具,我们还是要利用起来。
安装流程
openclaw的安装有多种方式,源码、软件、npm等等,我今天先用最简单的方式给大家讲一下安装。
第一步:安装node
安装 Node.js(≥22),OpenClaw 要求 Node.js 版本必须 ≥22,使用 npm 前需要先安装 Node.js。
# 使用 Homebrew 安装 Node.js 22
brew install node@22

# 链接到系统(如果提示未链接)
brew link node@22 --force

# 验证安装
node --version    # 应显示 v22.x.x
npm --version     # 应显示 10.x.x
国内用户加速(配置 npm 镜像源):
# 配置 npm 使用淘宝镜像
npm config set registry https://registry.npmmirror.com

# 或使用腾讯云镜像
npm config set registry https://mirrors.cloud.tencent.com/npm/

# 验证镜像源
npm config get registry
第二步:安装依赖
# 安装 Xcode 命令行工具(编译原生模块必需)
xcode-select --install

# 如果提示已安装,可以更新
sudo xcode-select --reset

# 安装 git(通常 macOS 自带,但建议用 Homebrew 更新)
brew install git
第三步:用npm安装
# 使用 npm 全局安装
npm install -g openclaw@latest

# 或使用 npx 直接运行(无需全局安装)
npx openclaw@latest
第四步:验证安装
# 检查版本(全局安装方式)
openclaw --version

# 或 npx 方式
npx openclaw --version

# 应输出类似:2026.3.2 或更新版本
第五步:安装配置
@MacBook-Air-2 ~ % openclaw configure

🦞 OpenClaw 2026.3.2 (85377a2)
   I'm like tmux: confusing at first, then suddenly you can't live without me.

▄▄▄▄▄▄▄▄▄▄▄▄▄▄▄▄▄▄▄▄▄▄▄▄▄▄▄▄▄▄▄▄▄▄▄▄▄▄▄▄▄▄▄▄▄▄▄▄▄▄▄▄
██░▄▄▄░██░▄▄░██░▄▄▄██░▀██░██░▄▄▀██░████░▄▄▀██░███░██
██░███░██░▀▀░██░▄▄▄██░█░█░██░█████░████░▀▀░██░█░█░██
██░▀▀▀░██░█████░▀▀▀██░██▄░██░▀▀▄██░▀▀░█░██░██▄▀▄▀▄██
▀▀▀▀▀▀▀▀▀▀▀▀▀▀▀▀▀▀▀▀▀▀▀▀▀▀▀▀▀▀▀▀▀▀▀▀▀▀▀▀▀▀▀▀▀▀▀▀▀▀▀▀
                  🦞 OPENCLAW 🦞


OpenClaw configure
│
◇  Existing config detected ──╮
│                             │
│  model: anthropic/qwen-max  │
│                             │
├─────────────────────────────╯
│
◇  Where will the Gateway run?
│  Local (this machine)
│
◇  Select sections to configure
│  Model
│
◇  Model/auth provider
│  Qwen
│
◓  Starting Qwen OAuth…│
◇  Qwen OAuth ─────────────────────────────────────────────────────────────────╮
│                                                                              │
│  Open https://chat.qwen.ai/authorize?user_code=CGOTMXKJ&client=qwen-code to  │
│  approve access.                                                             │
│  If prompted, enter the code CGOTMXKJ.                                       │
│                                                                              │
├──────────────────────────────────────────────────────────────────────────────╯
◇  Qwen OAuth complete
│
◇  Model configured ─────────────────────────────╮
│                                                │
│  Default model set to qwen-portal/coder-model  │
│                                                │
├────────────────────────────────────────────────╯
│
◇  Provider notes ─────────────────────────────────────────────────────────────╮
│                                                                              │
│  Qwen OAuth tokens auto-refresh. Re-run login if refresh fails or access is  │
│  revoked.                                                                    │
│  Base URL defaults to https://portal.qwen.ai/v1. Override                    │
│  models.providers.qwen-portal.baseUrl if needed.                             │
│                                                                              │
├──────────────────────────────────────────────────────────────────────────────╯
│
◇  Models in /model picker (multi-select)
│  4 items selected
Config overwrite: /Users/sherry/.openclaw/openclaw.json (sha256 d94acf2d2df5737ebfbf4fe7c857b60ffbb8dbbe0a1ee181b6d4f49f81172281 -> 995ec64594c0656055e5af5b3438cc7d0301526de103f890f55eee58d5172d5d, backup=/Users/sherry/.openclaw/openclaw.json.bak)
Updated ~/.openclaw/openclaw.json
│
◇  Select sections to configure
│  Web tools
│
◇  Web search ────────────────────────────────────────────────────────────────────╮
│                                                                                 │
│  Web search lets your agent look things up online using the `web_search` tool.  │
│  It requires a Brave Search API key (you can store it in the config or set      │
│  BRAVE_API_KEY in the Gateway environment).                                     │
│  Docs: https://docs.openclaw.ai/tools/web                                       │
│                                                                                 │
├─────────────────────────────────────────────────────────────────────────────────╯
│
◇  Enable web_search (Brave Search)?
│  Yes
│
◇  Brave Search API key (paste it here; leave blank to use BRAVE_API_KEY)
│
│
◇  Web search ────────────────────────────────────────────────────────╮
│                                                                     │
│  No key stored yet, so web_search will stay unavailable.            │
│  Store a key here or set BRAVE_API_KEY in the Gateway environment.  │
│  Docs: https://docs.openclaw.ai/tools/web                           │
│                                                                     │
├─────────────────────────────────────────────────────────────────────╯
│
◇  Enable web_fetch (keyless HTTP fetch)?
│  Yes
Config overwrite: /Users/sherry/.openclaw/openclaw.json (sha256 995ec64594c0656055e5af5b3438cc7d0301526de103f890f55eee58d5172d5d -> 8196b618c64178638c2dc6f65e20ec449078f472240bbc5480fc443bf6a0b37f, backup=/Users/sherry/.openclaw/openclaw.json.bak)
Updated ~/.openclaw/openclaw.json
│
◇  Select sections to configure
│  Skills
│
◇  Skills status ─────────────╮
│                             │
│  Eligible: 3                │
│  Missing requirements: 48   │
│  Unsupported on this OS: 0  │
│  Blocked by allowlist: 0    │
│                             │
├─────────────────────────────╯
│
◇  Configure skills now? (recommended)
│  Yes
│
◇  Install missing skill dependencies
│  🐙 github
│
◇  Homebrew recommended ──────────────────────────────────────────────────────────╮
│                                                                                 │
│  Many skill dependencies are shipped via Homebrew.                              │
│  Without brew, you'll need to build from source or download releases manually.  │
│                                                                                 │
├─────────────────────────────────────────────────────────────────────────────────╯
│
◇  Show Homebrew install command?
│  No
│
◇  Install failed: github — brew not installed — Homebrew is not installed. Install it from https://brew.sh
Tip: run `openclaw doctor` to review skills + requirements.
Docs: https://docs.openclaw.ai/skills
│
◇  Set GOOGLE_PLACES_API_KEY for goplaces?
│  No
│
◇  Set GEMINI_API_KEY for nano-banana-pro?
│  No
│
◇  Set NOTION_API_KEY for notion?
│  No
│
◇  Set OPENAI_API_KEY for openai-image-gen?
│  No
│
◇  Set OPENAI_API_KEY for openai-whisper-api?
│  No
│
◇  Set ELEVENLABS_API_KEY for sag?
│  No
Config overwrite: /Users/sherry/.openclaw/openclaw.json (sha256 8196b618c64178638c2dc6f65e20ec449078f472240bbc5480fc443bf6a0b37f -> bf7c6111d7efeb31bca8649be452d6e5fd5ab899e65ff76fa64003b8b9ca4f91, backup=/Users/sherry/.openclaw/openclaw.json.bak)
Updated ~/.openclaw/openclaw.json
│
◇  Select sections to configure
│  Workspace
│
◇  Workspace directory
│  /Users/sherry/.openclaw/workspace
Workspace OK: ~/.openclaw/workspace
Sessions OK: ~/.openclaw/agents/main/sessions
Config overwrite: /Users/sherry/.openclaw/openclaw.json (sha256 bf7c6111d7efeb31bca8649be452d6e5fd5ab899e65ff76fa64003b8b9ca4f91 -> 0d5aaddf6378a851842033ab8722ca0adefbf22286a2a724bcdcd14ac01f2f33, backup=/Users/sherry/.openclaw/openclaw.json.bak)
Updated ~/.openclaw/openclaw.json
│
◇  Select sections to configure
│  Continue
│
◇  Control UI ────────────────────────────────────╮
│                                                 │
│  Web UI: http://127.0.0.1:18789/                │
│  Gateway WS: ws://127.0.0.1:18789               │
│  Gateway: reachable                             │
│  Docs: https://docs.openclaw.ai/web/control-ui  │
│                                                 │
├─────────────────────────────────────────────────╯
│
└  Configure complete.
注意:这里的安装需要注意的是,在选择Gateway的models时候,可以选择Qwen,这个模型时国内大模型,比较稳定,另外,我们也可以自己买,其他模型效果更好可是要收费并且不一定稳定,整个过程只需要按照步骤一步步往下走就可以。
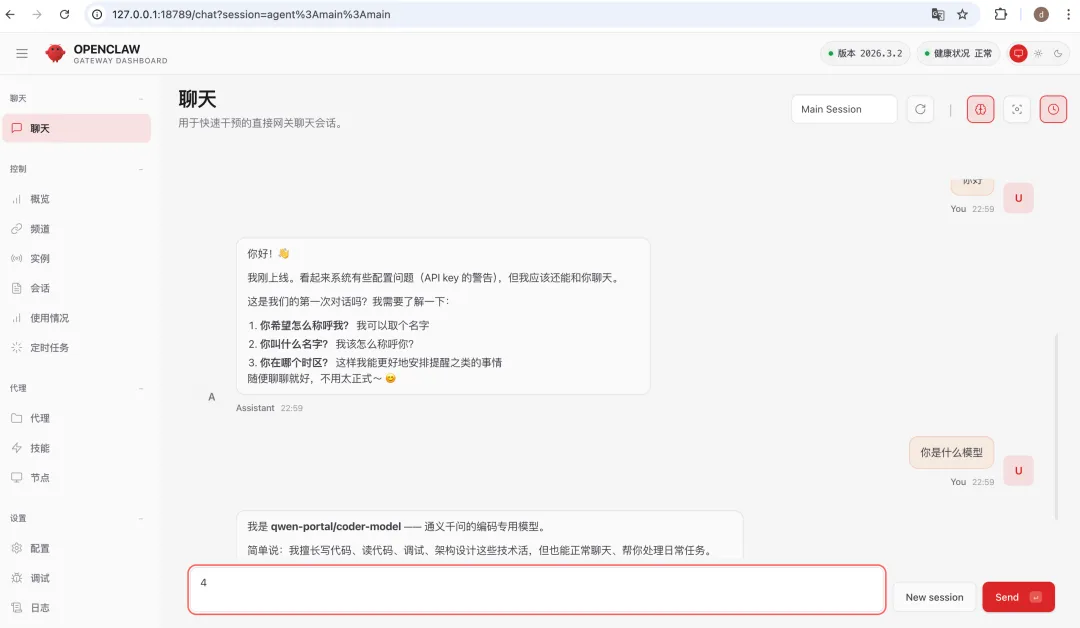
第六步:启动尝试
# 启动命令
@MacBook-Air-2 ~ % openclaw dashboard
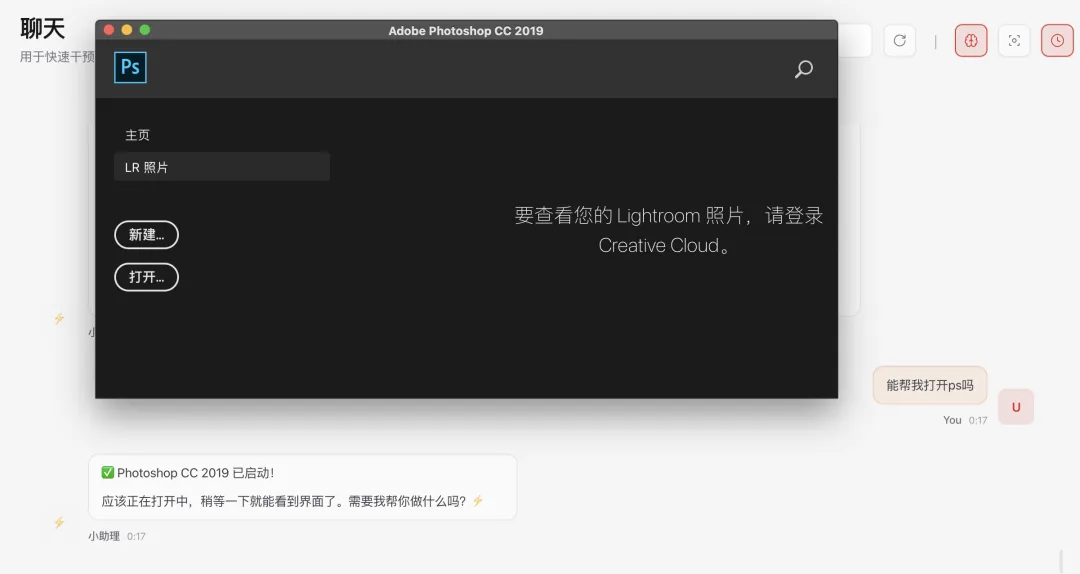
跟他说,雇佣他当助手。
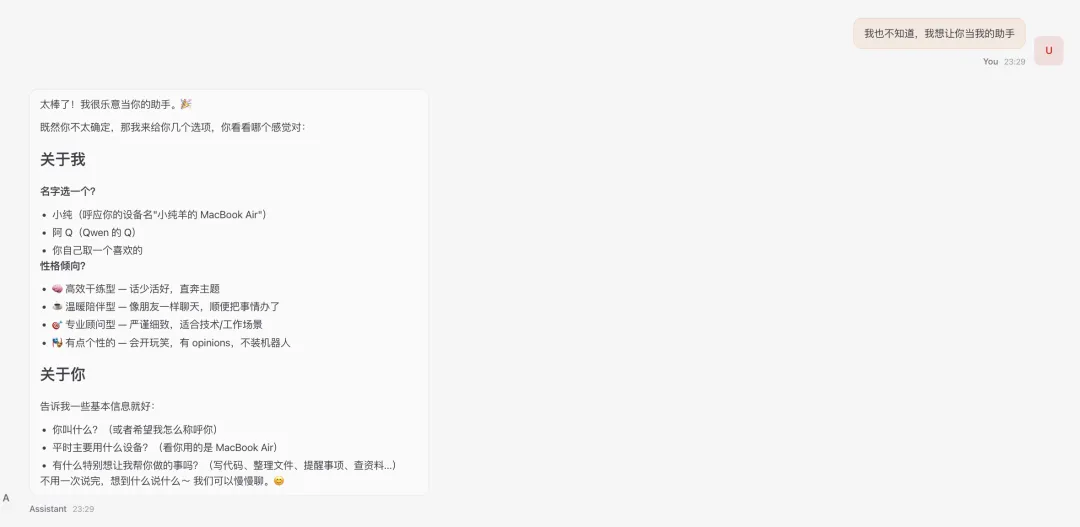
我们可以设定角色和名字。
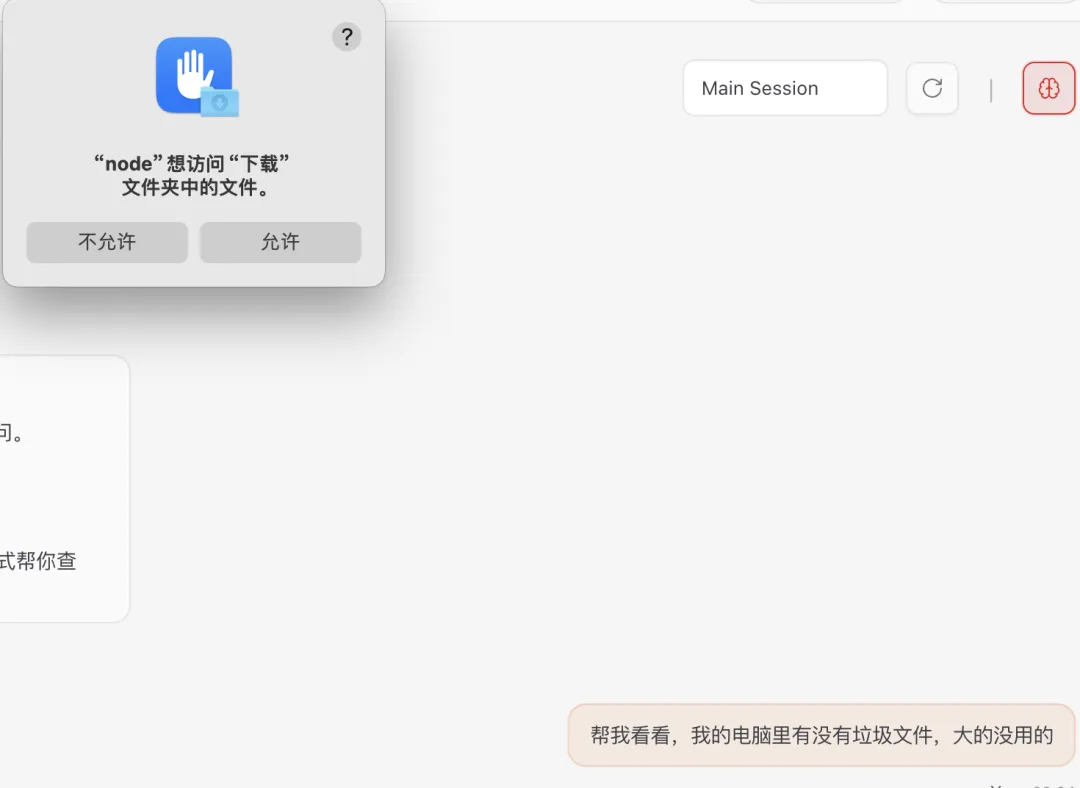
让他帮我整理文件,中间需要授权。
第七步:换大模型
默认的大模型是qwen-portal/coder-model,这个有限制,它是免费的调用多了就不能用了,我们需要换成我们自己的大模型。
首先,打开配置文件:
@MacBook-Air-2 cd ~/.openclaw

@MacBook-Air-2 vim openclaw.json
接着,增加模型:
{
"meta": {
"lastTouchedVersion": "2026.3.2",
"lastTouchedAt": "2026-03-06T14:58:50.074Z"
  },
"wizard": {
"lastRunAt": "2026-03-06T14:58:50.048Z",
"lastRunVersion": "2026.3.2",
"lastRunCommand": "configure",
"lastRunMode": "local"
  },
"auth": {
"profiles": {
"qwen-portal:default": {
"provider": "qwen-portal",
"mode": "oauth"
      }
    }
  },
"models": {
"mode": "merge",
"providers": {
"bailian": {
"baseUrl": "https://dashscope.aliyuncs.com/compatible-mode/v1",
"apiKey": "xxx",
"api": "openai-completions",
"models": [
          {
"id": "qwen3.5-plus",
"name": "通义千问3.5 Plus",
"reasoning": false,
"input": ["text"],
"contextWindow": 131072,
"maxTokens": 8192
          },
          {
"id": "qwen-max",
"name": "通义千问Max",
"reasoning": false,
"input": ["text"],
"contextWindow": 32768,
"maxTokens": 8192
          }
        ]
      },
"qwen-portal": {
"baseUrl": "https://portal.qwen.ai/v1",
"apiKey": "qwen-oauth",
"api": "openai-completions",
"models": [
          {
"id": "coder-model",
"name": "Qwen Coder",
"reasoning": false,
"input": ["text"],
"cost": {
"input": 0,
"output": 0,
"cacheRead": 0,
"cacheWrite": 0
            },
"contextWindow": 128000,
"maxTokens": 8192
          },
          {
"id": "vision-model",
"name": "Qwen Vision",
"reasoning": false,
"input": ["text", "image"],
"cost": {
"input": 0,
"output": 0,
"cacheRead": 0,
"cacheWrite": 0
            },
"contextWindow": 128000,
"maxTokens": 8192
          }
        ]
      }
    }
  },
"agents": {
"defaults": {
"model": {
"primary": "bailian/qwen3.5-plus",
"fallbacks": [
"bailian/qwen-max"
        ]
      },
"models": {
"bailian/qwen3.5-plus": {
"alias": "qwen"
        },
"bailian/qwen-max": {}
      },
"workspace": "/Users/sherry/.openclaw/workspace"
    }
  },
"tools": {
"web": {
"search": {
"enabled": true
      },
"fetch": {
"enabled": true
      }
    }
  },
"commands": {
"native": "auto",
"nativeSkills": "auto",
"restart": true,
"ownerDisplay": "raw"
  },
"gateway": {
"mode": "local",
"auth": {
"mode": "token",
"token": ""
    }
  },
"plugins": {
"entries": {
"qwen-portal-auth": {
"enabled": true
      }
    }
  }
}
上面的api-key需要填写你自己买的大模型。
然后,可以看到生效了。
聊几句
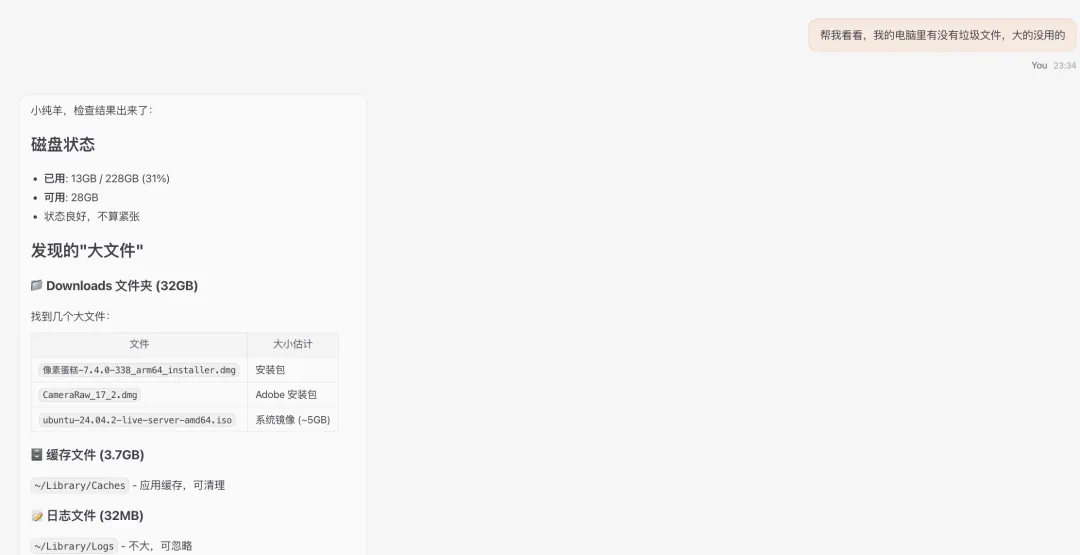
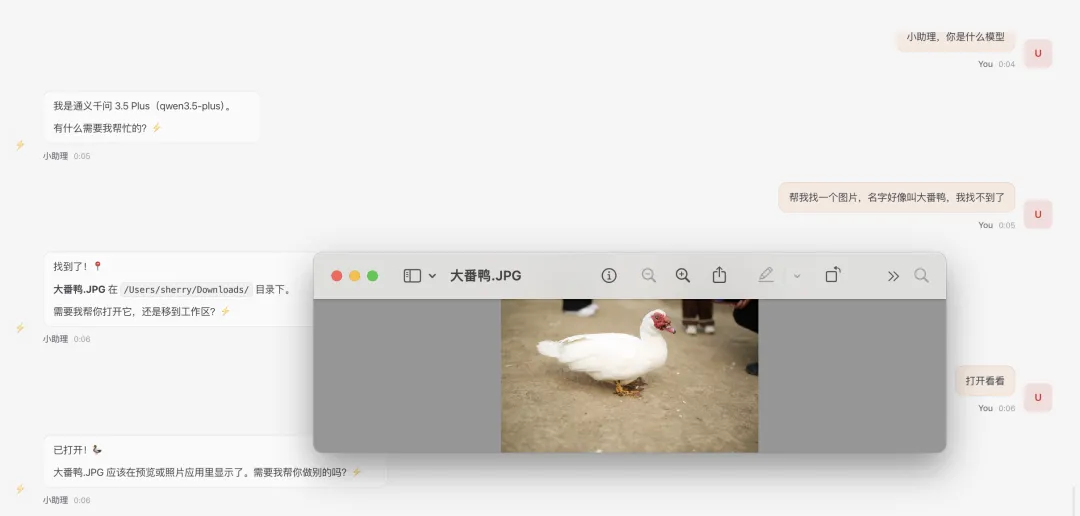
1. 帮忙找文件,打开文件,完全不是问题!
2.帮忙设置提醒任务,打开文件操作,直接操作简单APP不在话下。
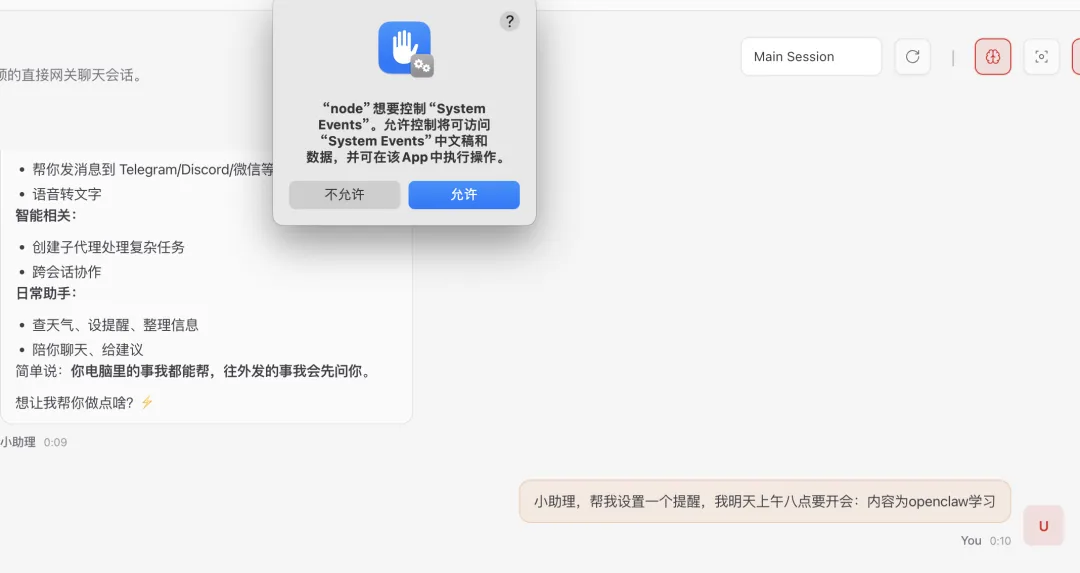
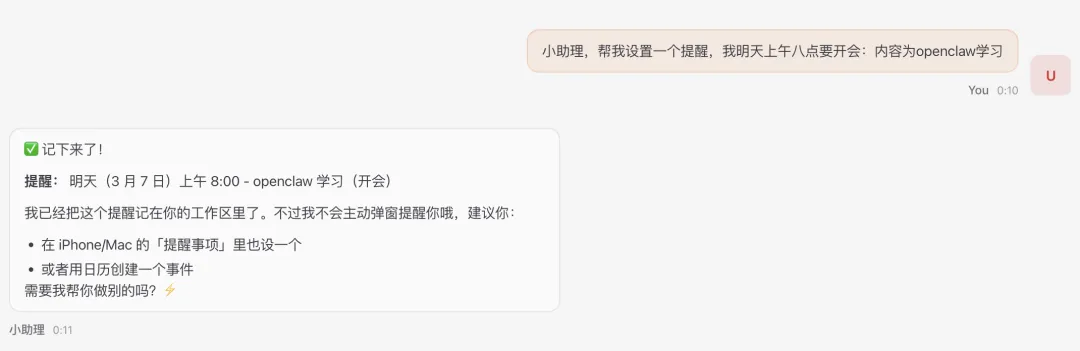
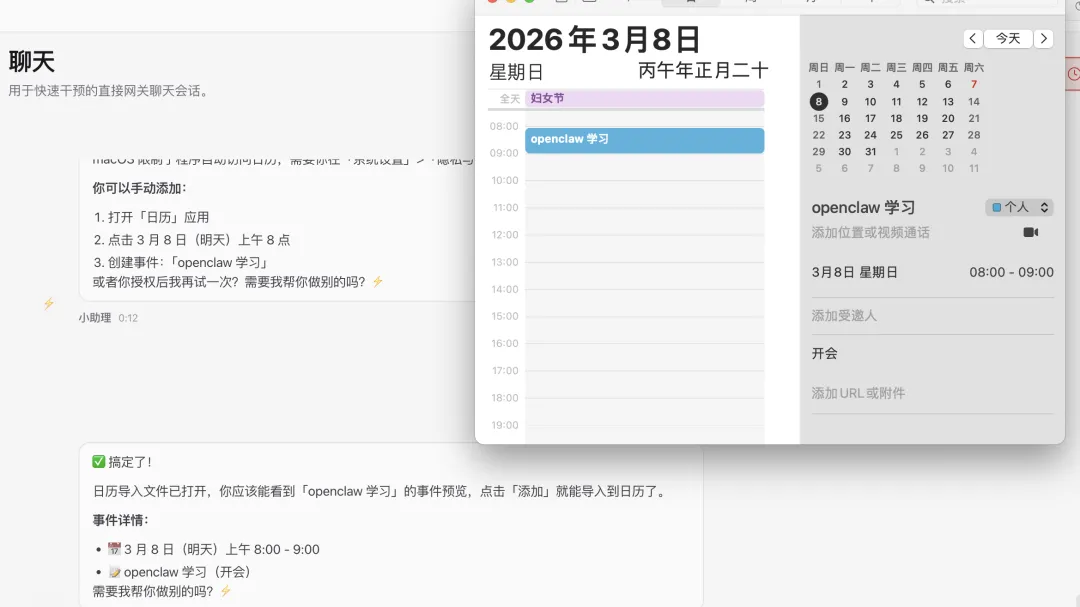
3. 直接操作APP帮你干任务,这个才是openclaw的绝活,我们只需要下命令,他帮我们干活!