 夜雨聆风
夜雨聆风


VScode让 AI 编程助手在远程服务器飞起来:在VScode中创建SSH 端口转发完全指南
让 AI 编程助手在远程服务器飞起来:SSH 端口转发完全指南
场景痛点:你的计算资源在远程 Linux 服务器上,本地 Windows 通过 VS Code Remote-SSH 连接开发。装好了 Copilot、Claude Code、Codex,却发现它们全部离线——因为服务器没有外网,或者代理不通。
本文目标:一条线搞定「本地 Clash 代理 → SSH 隧道 → 远程服务器 → AI 编程助手联网」,让你的 Copilot / Claude Code / Codex 在远程环境畅通无阻。
一、先看全局:网络架构一览
整个方案的核心思想是 SSH 远程端口转发(Remote Port Forwarding)——把本地代理的端口,通过 SSH 隧道”映射”到远程服务器上。
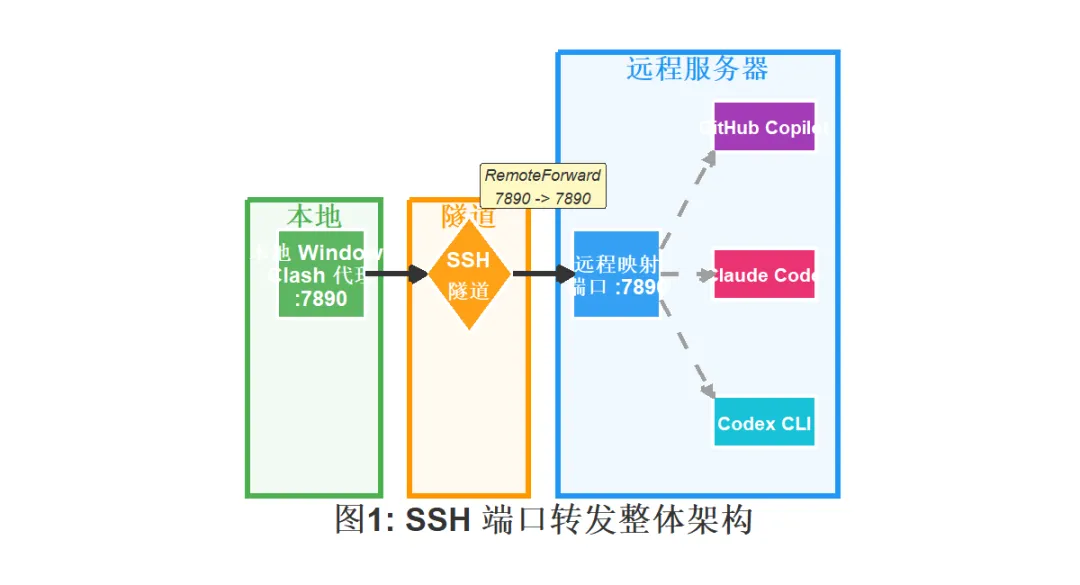
数据流向一句话总结:
AI 助手请求 → 远程
127.0.0.1:7890→ SSH 隧道(加密)→ 本地 Clash127.0.0.1:7890→ 互联网
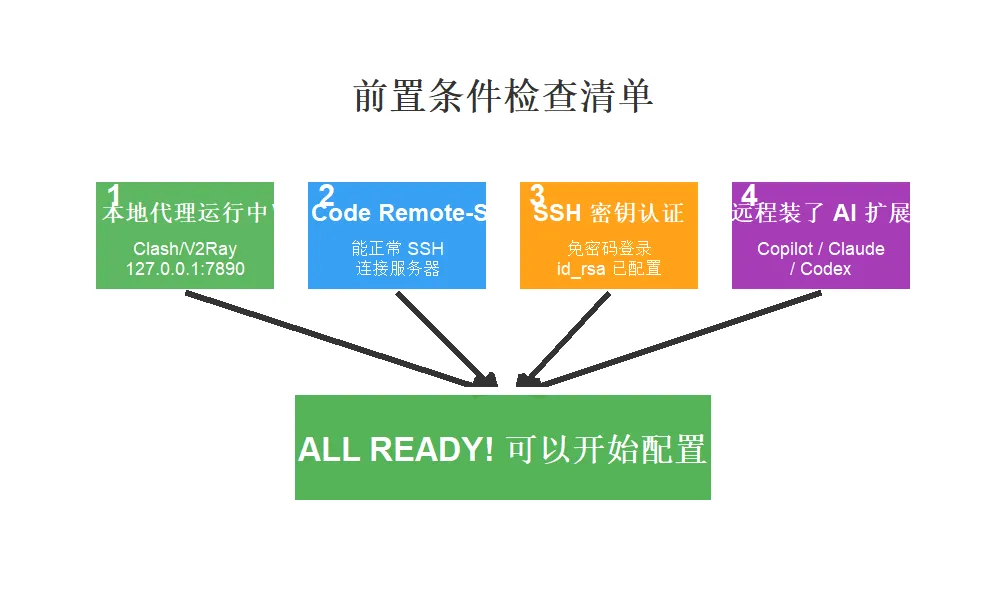
二、前置条件
在开始之前,确认你已经具备以下条件:
|
|
|
|
|---|---|---|
|
|
|
127.0.0.1:7890 |
|
|
|
|
|
|
|
id_rsa) |
|
|
|
|
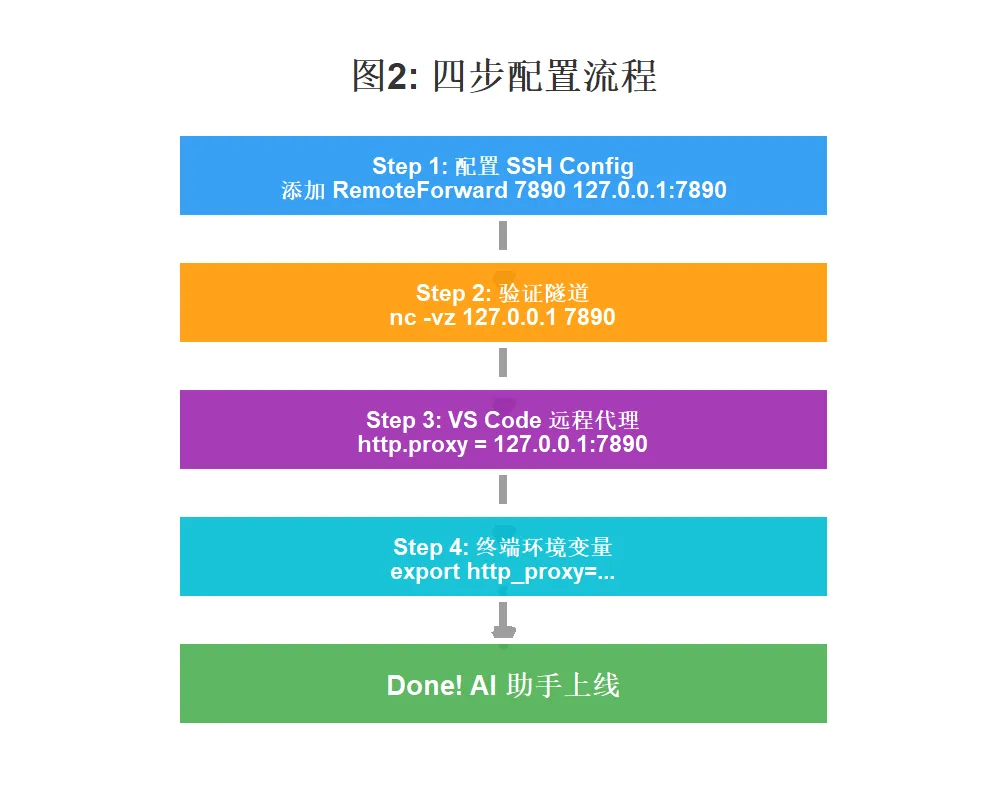
三、Step 1:配置 SSH Config
编辑本地的 SSH 配置文件,路径为:
-
1
C:\Users\<你的用户名>\.ssh\config添加以下内容(根据你的实际情况修改 IP、用户名、密钥路径):
-
1 -
2 -
3 -
4 -
5 -
6 -
7 -
8 -
9 -
10 -
11 -
12 -
13 -
14
Host dev-server4HostName 10.20.37.247# 远程服务器 IPUser niecl # 登录用户名Port 22# SSH 端口IdentityFile "C:\Users\nieca\.ssh\id_rsa"# 密钥路径# ---- 连接稳定性设置 ----ServerAliveInterval 20# 每 20 秒发心跳包ServerAliveCountMax 6# 6 次无响应才断开TCPKeepAlive yes# 启用 TCP 保活ConnectTimeout 20# 连接超时 20 秒# ---- 核心配置:远程端口转发 ----RemoteForward 7890127.0.0.1:7890
关键参数解释:
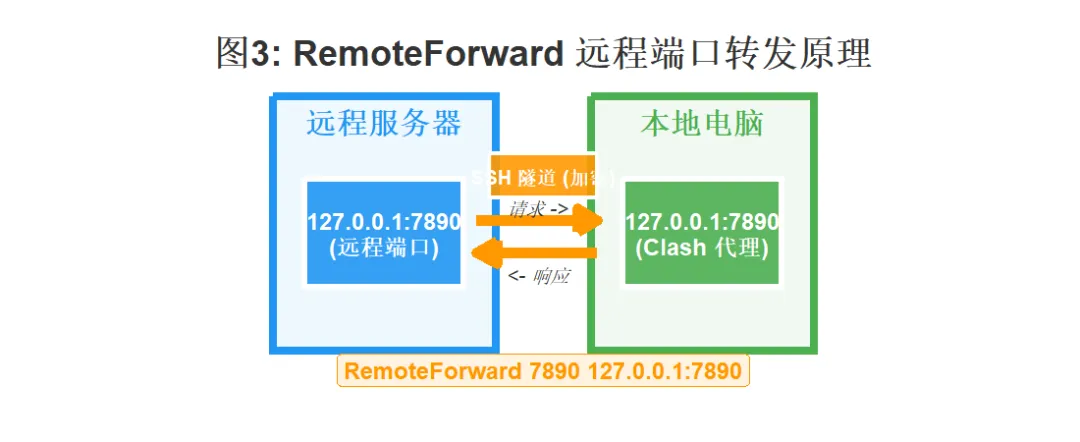
💡 小贴士:
RemoteForward的意思是”把远程服务器上的某个端口,转发到本地”。这样远程服务器上访问127.0.0.1:7890,实际上就是在访问你本地电脑的 Clash。
四、Step 2:验证 SSH 隧道是否打通
通过 VS Code Remote-SSH 连接到远程服务器后,打开远程终端,执行以下命令:
-
1 -
2 -
3 -
4 -
5 -
6 -
7 -
8
# 1. 检查远程 7890 端口是否在监听ss -tnlp | grep 7890# 2. 测试端口连通性nc -vz 127.0.0.1 7890# 3. 终极验证:通过代理访问外网curl -x http://127.0.0.1:7890 https://api.openai.com -v
期望输出:
-
1 -
2
$ nc -vz 127.0.0.17890Connection to 127.0.0.17890 port [tcp/*] succeeded! ✅

五、Step 3:让 VS Code 远程窗口的 AI 扩展走代理
SSH 隧道通了,但 VS Code 远程窗口里的 Copilot 等扩展不会自动使用终端里的代理,需要单独配置。
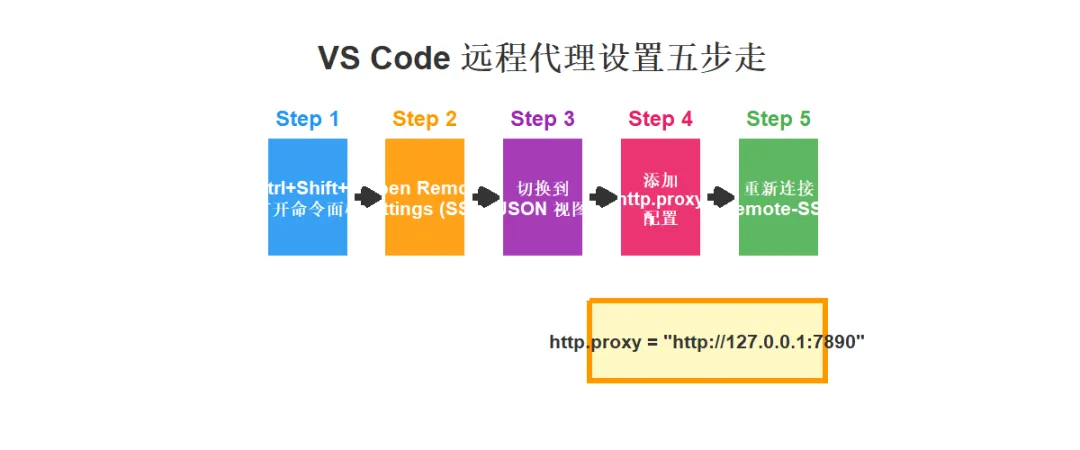
操作步骤
-
在 VS Code 远程窗口中,按 Ctrl+Shift+P 打开命令面板 -
输入并选择:Preferences: Open Remote Settings (SSH: dev-server4) -
切换到 JSON 编辑视图,添加以下配置:
-
1 -
2 -
3 -
4 -
5 -
6
{// 让远端 VS Code 及扩展走 HTTP 代理(经过 SSH 隧道到本地 Clash)"http.proxy":"http://127.0.0.1:7890","http.proxySupport":"on","https.proxyStrictSSL":false}
-
保存后重新连接远程服务器(关闭远程窗口,重新用 Remote-SSH 连接)
⚠️ 注意:这里配置的是远程服务器上的 VS Code 设置,不是本地设置。如果打开的是本地 settings.json,那就配错了!
六、Step 4:配置远端终端的全局代理(CLI 场景)
如果你还需要在远程终端里直接使用 Claude Code、Codex CLI,或者 Python 脚本调用 OpenAI API,需要设置环境变量:
临时生效(当前终端会话)
-
1 -
2 -
3 -
4
export http_proxy=http://127.0.0.1:7890export https_proxy=http://127.0.0.1:7890export HTTP_PROXY=$http_proxyexport HTTPS_PROXY=$https_proxy
永久生效(写入 Shell 配置文件)
-
1 -
2 -
3 -
4 -
5 -
6 -
7
# Bash 用户 → ~/.bashrc# Zsh 用户 → ~/.zshrcecho'export http_proxy=http://127.0.0.1:7890' >> ~/.bashrcecho'export https_proxy=http://127.0.0.1:7890' >> ~/.bashrcecho'export HTTP_PROXY=$http_proxy' >> ~/.bashrcecho'export HTTPS_PROXY=$https_proxy' >> ~/.bashrcsource ~/.bashrc
验证
-
1 -
2
curl https://api.openai.com -v# 如果返回 HTTP 响应(而不是连接超时),说明代理配置成功 ✅
七、进阶:让 SSH 隧道自动保持(不断线)
SSH 隧道有时会意外断开。这里提供 Windows PowerShell 自动重连脚本,后台静默运行,断线自动重连。
创建 keep-tunnel.ps1 脚本
将以下内容保存为 keep-tunnel.ps1(放在任意目录):
-
1 -
2 -
3 -
4 -
5 -
6 -
7 -
8 -
9 -
10 -
11 -
12 -
13 -
14 -
15 -
16 -
17 -
18 -
19 -
20 -
21 -
22 -
23 -
24
param([string]$HostAlias = "dev-server4",[string]$RemoteBind = "127.0.0.1:7898",[string]$LocalTarget = "127.0.0.1:7897",[int]$RetrySeconds = 5)$log = Join-Path$PSScriptRoot"keep-tunnel.log"while ($true) {$time = Get-Date-Format"yyyy-MM-dd HH:mm:ss"Add-Content$log"[$time] starting ssh tunnel..."ssh -N-R"$RemoteBind`:$LocalTarget" `-o"ServerAliveInterval=30" `-o"ServerAliveCountMax=3" `-o"ExitOnForwardFailure=yes" `$HostAlias$code = $LASTEXITCODE$time = Get-Date-Format"yyyy-MM-dd HH:mm:ss"Add-Content$log"[$time] ssh exited (code=$code), retry in $RetrySeconds s"Start-Sleep-Seconds$RetrySeconds}
后台启动(隐藏窗口)
-
1 -
2 -
3 -
4 -
5 -
6 -
7 -
8
# 方式一:使用脚本文件Start-Process powershell.exe `-WindowStyleHidden `-ArgumentList"-NoProfile -ExecutionPolicy Bypass -File `"$PWD\keep-tunnel.ps1`""# 方式二:一行命令直接启动Start-Process powershell.exe -WindowStyleHidden `-ArgumentList'-NoProfile -Command "ssh -N -o ServerAliveInterval=30 -o ServerAliveCountMax=3 -R 127.0.0.1:7899:127.0.0.1:7890 dev-server4"'
检查隧道是否在运行
-
1 -
2 -
3
Get-CimInstance Win32_Process |Where-Object { $_.Name -eq'ssh.exe'-and$_.CommandLine -match'7890' } |Select-Object ProcessId, CommandLine
停止隧道
-
1 -
2 -
3
Get-CimInstance Win32_Process |Where-Object { $_.Name -eq"powershell.exe"-and$_.CommandLine -match"keep-tunnel.ps1" } |ForEach-Object { Stop-Process-Id$_.ProcessId -Force }
八、完整配置检查清单
配置完成后,按此清单逐项检查:

|
|
|
|
|---|---|---|
|
|
|
|
|
|
nc -vz 127.0.0.1 7890
|
|
|
|
|
|
|
|
curl https://api.openai.com
|
|
|
|
|
|
九、常见问题排查
Q1:Copilot 一直显示”脱机”
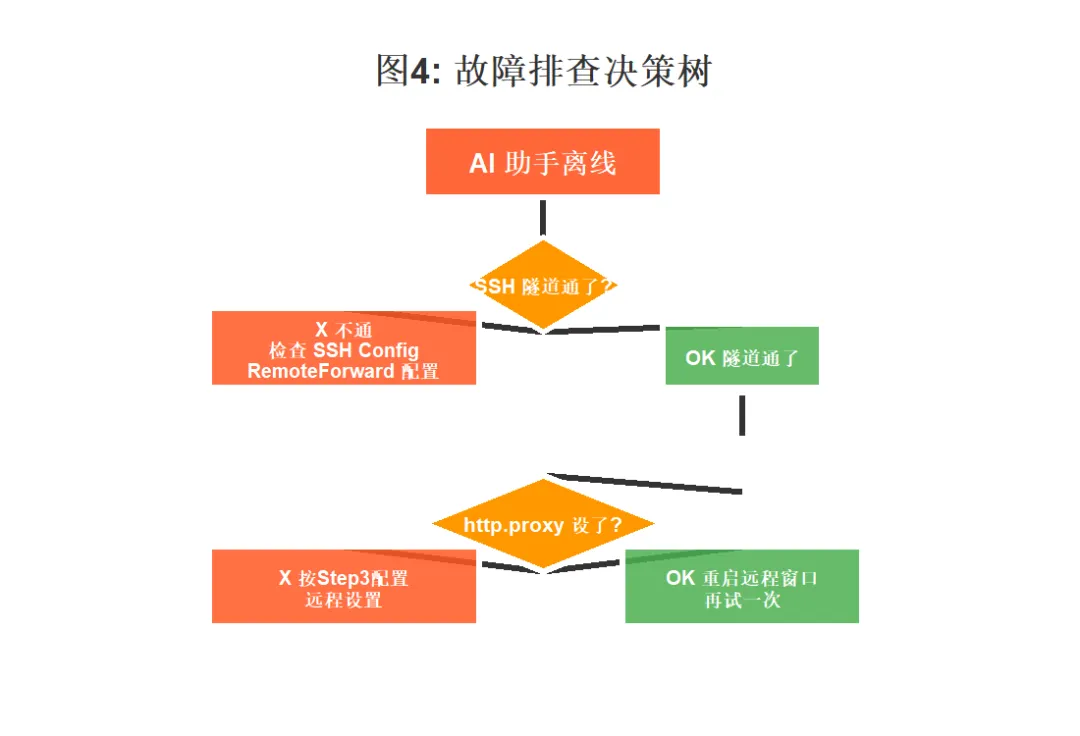
Q2:隧道频繁断线
-
确认 SSH Config 中 ServerAliveInterval 和 ServerAliveCountMax 已设置 -
使用本文提供的 keep-tunnel.ps1 自动重连脚本 -
检查本地网络稳定性
Q3:Claude Code / Codex CLI 无法联网
-
确认远程终端已 export http_proxy=http://127.0.0.1:7890 -
确认是通过 VS Code Remote 终端打开的(环境变量才会传递) -
用 curl -x http://127.0.0.1:7890 https://api.openai.com 测试
Q4:端口被占用
-
1 -
2 -
3 -
4 -
5
# 查看谁在占用 7890 端口ss -tnlp | grep 7890# 如果是旧的 SSH 转发占用,杀掉后重连kill <PID>
十、网络数据流全景图
把所有步骤串起来,一张图看懂数据是怎么走的:

十一、总结
|
|
|
|---|---|
| 适用场景 |
|
| 核心原理 |
|
| 配置步骤 |
|
| 稳定性保障 |
|
| 覆盖工具 |
|
一句话配置速查
-
1 -
2 -
3 -
4 -
5 -
6 -
7 -
8 -
9 -
10
# SSH Config 一行核心RemoteForward 7890 127.0.0.1:7890# VS Code 远程设置三行"http.proxy": "http://127.0.0.1:7890""http.proxySupport": "on"# 终端环境变量两行export http_proxy=http://127.0.0.1:7890export https_proxy=http://127.0.0.1:7890
📌 作者注:本文方案已在 Windows 11 + VS Code 1.98 + Ubuntu 22.04 服务器环境实测通过。如果你的环境有差异,欢迎在评论区交流。
🔗 相关资源:
VS Code Remote-SSH 官方文档[https://code.visualstudio.com/docs/remote/ssh] SSH 端口转发详解[https://www.ssh.com/academy/ssh/tunneling/example]