 夜雨聆风
夜雨聆风前置阅读:第 1 篇 — Plugin SDK 入门 | 第 8 篇 — 运行时 API
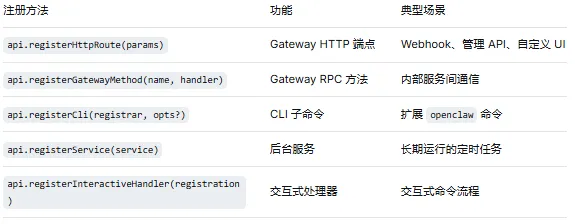
本篇讲解 OpenClaw 的基础设施扩展能力:HTTP 路由、Gateway RPC 方法、CLI 子命令和后台服务。这些能力让插件不仅能响应 Agent 的请求,还能暴露 HTTP API、扩展命令行界面、在后台持续运行任务。
01
—
基础设施注册一览
—
HTTP 路由
基本用法
api.registerHttpRoute 让插件在 OpenClaw Gateway 上注册自定义 HTTP 端点。Gateway 是 OpenClaw 的核心进程(通过 openclaw gateway start 启动),它本身就是一个 HTTP 服务器。通过 registerHttpRoute,你可以在这个服务器上添加自己的路由:
api.registerHttpRoute({method: "GET",path: "/my-plugin/status",handler: async (request, response) => {response.json({status: "ok",plugin: api.id,uptime: process.uptime(),});},});
注册后,通过 Gateway 的 HTTP 端口访问(默认端口见 openclaw gateway start 的输出):
GET http://localhost:3000/my-plugin/status路径约定
路径应该以插件的 ID 或功能名称为前缀,避免与其他插件冲突:
// 推荐:使用插件 ID 作为路径前缀api.registerHttpRoute({path: "/my-plugin/...",});// 不推荐:使用通用路径(可能冲突)api.registerHttpRoute({path: "/status", // 可能与系统路由冲突});
请求与响应
api.registerHttpRoute({method: "POST",path: "/my-plugin/webhook",handler: async (request, response) => {// 读取请求体const body = request.body; // 已解析的 JSONconst headers = request.headers;const query = request.query; // 查询参数// 处理逻辑const result = await processWebhook(body);// 返回响应response.json({ success: true, data: result });},});
实用场景
场景 1:Webhook 接收器
api.registerHttpRoute({method: "POST",path: "/github-webhook",handler: async (request, response) => {// 验证签名const signature = request.headers["x-hub-signature-256"];if (!verifySignature(request.rawBody, signature)) {response.status(401).json({ error: "Invalid signature" });return;}// 处理 GitHub 事件const event = request.headers["x-github-event"];const payload = request.body;if (event === "pull_request") {// 触发代码审查流程await triggerCodeReview(payload);}response.json({ received: true });},});
场景 2:管理 API
api.registerHttpRoute({method: "GET",path: "/my-plugin/config",handler: async (request, response) => {// 返回插件当前配置(脱敏后)const config = { ...api.pluginConfig };if(config.apiKey) config.apiKey = "***";response.json(config);},});api.registerHttpRoute({method: "PUT",path: "/my-plugin/config",handler: async (request, response) => {// 更新插件配置const newConfig = request.body;// 验证并应用新配置await updatePluginConfig(newConfig);response.json({ success: true });},});
03
—
Gateway RPC 方法
api.registerGatewayMethod 注册内部 RPC(Remote Procedure Call)远程过程调用方法。你可能好奇:既然有了 HTTP 路由,为什么还需要 RPC?
区别在于:HTTP 路由是给外部系统访问OpenClaw的,而 RPC 方法是给 OpenClaw 内部使用的——走 Gateway 的内部通信协议,不直接暴露为 HTTP 端点。如果你只是需要插件之间互相调用,用 RPC 方法更合适。
##服务端api.registerGatewayMethod("my-plugin:analyze", async (params) => {const { text, options } = params;// 执行分析逻辑const result = await analyzeText(text, options);return {score: result.score,insights: result.insights,processedAt: new Date().toISOString(),};});##OpenClaw内部其它方法-客户端// 在另一个插件中(调用方)const result = await gateway.call("my-plugin:analyze", {text: "Hello world",options: { language: "en" }});console.log(result.score); // 输出: 0.95
注意:
调用方并没有
import那个analyze函数。调用方不知道这个函数运行在哪个进程、哪台机器上。
调用方只是通过一个字符串标识符
"my-plugin:analyze"和参数对象来发起调用。
Gateway 在幕后做了这些事:
将参数
{ text: "...", options: {...} }序列化(比如 JSON 或 Protobuf)。通过网络(或进程间通信)将请求发送到注册了
my-plugin:analyze的那个插件实例。等待响应,反序列化结果,再返回给调用方。
HTTP 路由 vs RPC 方法
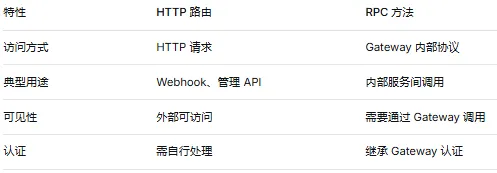
选择原则:需要被外部系统访问的用 HTTP 路由;仅供 OpenClaw 内部使用的用 RPC 方法。
04
—
CLI 子命令
api.registerCli 允许插件扩展 OpenClaw 的命令行界面。注册后,用户可以在终端中直接调用你定义的子命令,就像使用 git 的子命令一样。api.registerCli((cli) => {cli.command("my-command").description("My plugin command description").option("--input <file>", "Input file path").option("--output <file>", "Output file path").option("--verbose", "Verbose output", { default: false }).action(async (args) => {const { input, output, verbose } = args;console.log(`Processing ${input}...`);const result = await processFile(input);if (output) {await writeFile(output, JSON.stringify(result, null, 2));console.log(`Output written to ${output}`);} else {console.log(JSON.stringify(result, null, 2));}});},{// 可选配置name: "my-plugin", // 命令命名空间});
注册后,用户可以通过以下方式调用:
openclaw my-command --input data.json --output result.json --verboseCLI 注册选项
api.registerCli(registrar, {name: "my-plugin", // 命令命名空间(可选)hidden: false, // 是否在帮助中隐藏(默认 false)description: "My plugin CLI commands", // 分组描述(可选)});
实用场景
api.registerCli((cli) => {// 子命令 1:导出数据cli.command("export").description("Export plugin data").option("--format <format>", "Output format (json|csv)", { default: "json" }).option("--since <date>", "Export data since date").action(async (args) => {const data = await exportData(args.format, args.since);process.stdout.write(data);});// 子命令 2:导入数据cli.command("import").description("Import data into plugin").option("--file <path>", "File to import").option("--dry-run", "Preview changes without applying").action(async (args) => {const result = await importData(args.file, args.dryRun);console.log(`Imported ${result.count} records`);});// 子命令 3:状态检查cli.command("status").description("Check plugin health").action(async () => {const health = await checkHealth();console.log(`Status: ${health.ok ? "healthy" : "unhealthy"}`);if (health.details) {for (const [key, value] of Object.entries(health.details)) {console.log(` ${key}: ${value}`);}}});}, { name: "my-plugin" });
05
—
后台服务
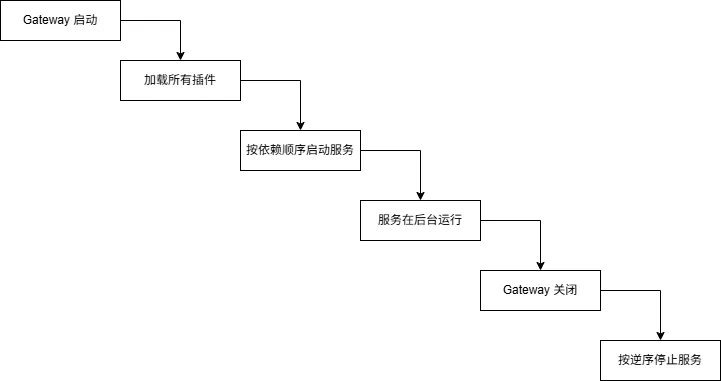
api.registerService 注册在后台持续运行的服务。与钩子(事件触发)不同,后台服务是「主动运行」的——它有自己的生命周期,在 Gateway 启动时开始运行,在 Gateway 关闭时停止。适合定时任务、长连接监听等场景。api.registerService({name: "my-sync-service",description: "Periodically sync data with external source",async start(context) {// 启动服务context.logger.info("Sync service starting");// 设置定时任务const interval = setInterval(async () => {try {await syncData();context.logger.debug("Sync completed");} catch (error) {context.logger.error("Sync failed", { error: String(error) });}}, 60000); // 每分钟同步一次// 保存引用以便停止时清理return { interval };},async stop(context, state) {// 停止服务if (state?.interval) {clearInterval(state.interval);}context.logger.info("Sync service stopped");},});
服务生命周期
服务特点
后台运行:服务在 Gateway 进程内运行,不影响请求处理
生命周期管理:
start在 Gateway 启动时调用,stop在关闭时调用状态保存:
start的返回值会传递给stop,用于清理资源日志:通过
context.logger记录日志,自动带服务名称前缀
06
—
交互式处理器
api.registerInteractiveHandler 注册交互式的命令处理流程。与 CLI 子命令(一次执行完毕)不同,交互式处理器适合需要多轮用户输入的场景——比如安装向导、初始配置等。api.registerInteractiveHandler({id: "setup-wizard",name: "Setup Wizard",description: "Interactive setup for the plugin",async handler(context) {// 步骤 1:询问 API 端点const endpoint = await context.prompt("Enter API endpoint URL:");// 步骤 2:询问认证方式const authMethod = await context.select("Choose auth method:", [{ label: "API Key", value: "api-key" },{ label: "OAuth", value: "oauth" },{ label: "None", value: "none" },]);// 步骤 3:根据选择收集信息if (authMethod === "api-key") {const apiKey = await context.prompt("Enter API key:", {sensitive: true,});// 保存配置}// 完成context.success("Setup complete!");},});
07
—
综合示例:监控插件
import { definePluginEntry } from "openclaw/plugin-sdk/plugin-entry";export default definePluginEntry({id: "monitor-plugin",name: "Monitor Plugin",version: "1.0.0",register(api) {const metrics: Array<{ timestamp: number; value: number; label: string }> = [];// HTTP API:获取指标api.registerHttpRoute({method: "GET",path: "/monitor/metrics",handler: async (_req, res) => {res.json({count: metrics.length,metrics: metrics.slice(-100), // 最近 100 条});},});// HTTP API:手动上报api.registerHttpRoute({method: "POST",path: "/monitor/report",handler: async (req, res) => {const { value, label } = req.body;metrics.push({timestamp: Date.now(),value,label: label ?? "unnamed",});res.json({ recorded: true });},});// 后台服务:定期收集系统指标api.registerService({name: "metrics-collector",async start(context) {const interval = setInterval(() => {const memUsage = process.memoryUsage();metrics.push({timestamp: Date.now(),value: memUsage.heapUsed,label: "heap_used",});}, 30000); // 每 30 秒return { interval };},async stop(_context, state) {if (state?.interval) clearInterval(state.interval);},});// CLI:查看实时指标api.registerCli((cli) => {cli.command("metrics").description("View recent metrics").option("--last <n>", "Number of entries to show", { default: 10 }).action(async (args) => {const entries = metrics.slice(-Number(args.last));console.log("Timestamp\t\tValue\t\tLabel");for (const entry of entries) {const time = new Date(entry.timestamp).toISOString();console.log(`${time}\t${entry.value}\t${entry.label}`);}});cli.command("metrics-reset").description("Clear all metrics").action(async () => {metrics.length = 0;console.log("Metrics cleared");});}, { name: "monitor" });},});
08
—
小结
本篇覆盖了 OpenClaw 的基础设施扩展能力:
HTTP 路由:为 Gateway 添加自定义端点
RPC 方法:内部服务间通信
CLI 子命令:扩展命令行界面
后台服务:长期运行的定时任务
交互式处理器:多轮用户输入流程
这些能力让插件从单纯的「能力提供方」升级为「完整的服务组件」——可以接收外部请求、暴露管理接口、在后台持续运行。
下一篇:技能(Skills)— 用 Markdown 驾驭 Agent 行为。我们将学习如何通过 Markdown 格式的技能文件精确引导 Agent 的行为。
