夜雨聆风
夜雨聆风 关注我,掌握前端最新动态
关注后回复H,领取前端大礼包
前言
Next.js 作为最受欢迎的 React 框架之一,一直在不断演进。从最初的 Pages Router 到现在的 App Router,Next.js 带来了全新的开发体验。
App Router 是 Next.js 13+ 引入的全新路由系统,它原生支持 React Server Components,让数据获取变得前所未有的简单。
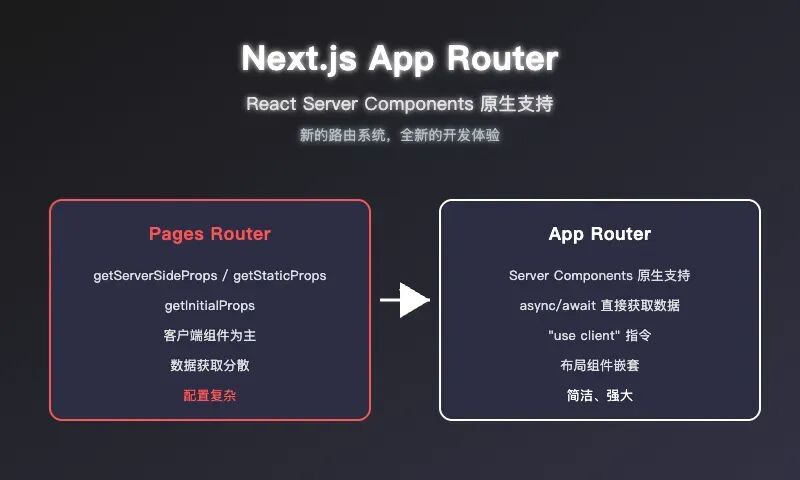
在 App Router 中,默认所有组件都是 Server Components,你可以直接在组件中使用 async/await 获取数据,无需额外的 getServerSideProps 或 getStaticProps。
在这篇文章中,我将带你深入了解 Next.js App Router 的核心概念、使用方法以及最佳实践。
一、为什么需要 App Router
1.1 Pages Router 的痛点
让我们回顾一下 Pages Router 的数据获取方式:
// pages/posts/[id].tsximport { GetServerSideProps } from 'next';interface PostPageProps { post: Post;}export default function PostPage({ post }: PostPageProps) { return <h1>{post.title}</h1>;}export const getServerSideProps: GetServerSideProps<PostPageProps> = async ({ params }) => { const res = await fetch(`https://api.example.com/posts/${params.id}`); const post = await res.json(); return { props: { post } };};这种方式有什么问题?
代码分散:数据获取逻辑和组件逻辑分离 类型重复:需要定义 Props接口和getServerSideProps返回类型学习成本高:需要理解 getServerSideProps、getStaticProps、getInitialProps等不同的数据获取方式客户端组件为主:默认是客户端组件,需要额外配置才能实现服务端渲染
1.2 App Router 的解决方案
使用 App Router,我们可以这样写:
// app/posts/[id]/page.tsxasync function PostPage({ params }: { params: { id: string } }) { const res = await fetch(`https://api.example.com/posts/${params.id}`); const post = await res.json(); return <h1>{post.title}</h1>;}export default PostPage;看到区别了吗?App Router 让数据获取变得非常简单:
直接在组件中获取数据:使用 async/await直接获取数据代码集中:数据获取和组件渲染在一起 Server Components 默认:默认是 Server Components,不需要额外配置 类型推断:自动推断类型,不需要手动定义
二、核心概念
2.1 项目结构
App Router 使用文件系统来定义路由,项目结构如下:
app/├── layout.tsx → 根布局(所有页面共享)├── page.tsx → 根页面(/)├── loading.tsx → 加载状态├── error.tsx → 错误处理├── not-found.tsx → 404 页面├── posts/│ ├── layout.tsx → posts 布局│ ├── page.tsx → /posts│ ├── [id]/│ │ ├── page.tsx → /posts/123│ │ └── loading.tsx → posts/[id] 加载状态│ └── new/│ └── page.tsx → /posts/new└── about/ └── page.tsx → /about2.2 Server Components vs Client Components
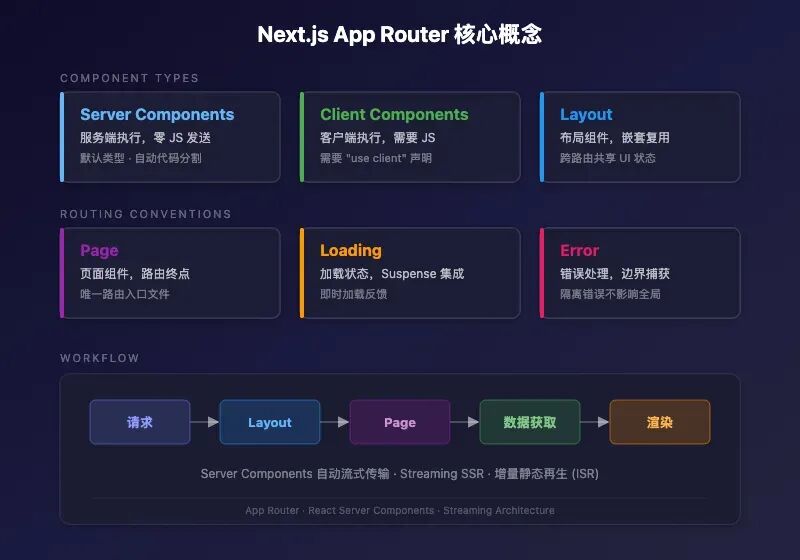
App Router 的核心概念是 Server Components 和 Client Components 的区分:
Server Components(默认):
在服务端执行 可以直接访问数据库和文件系统 不需要发送 JavaScript 到客户端 不能使用 Hooks(useState、useEffect 等) 不能访问浏览器 API(window、document 等)
Client Components:
在客户端执行 需要发送 JavaScript 到客户端 可以使用 Hooks 和浏览器 API 需要添加 "use client"指令
// Server Component(默认)async function BlogPage() { const posts = await db.posts.findMany(); return <PostList posts={posts} />;}export default BlogPage;// Client Component(需要 "use client")"use client";import { useState } from 'react';function Counter() { const [count, setCount] = useState(0); return <button onClick={() => setCount(c => c + 1)}>{count}</button>;}export default Counter;2.3 Layout 组件
Layout 组件用于定义页面布局,它会包裹所有子页面:
// app/layout.tsxexport default function RootLayout({ children,}: { children: React.ReactNode;}) { return ( <html lang="en"> <head> <title>My App</title> </head> <body> <nav> <a href="/">Home</a> <a href="/posts">Posts</a> <a href="/about">About</a> </nav> <main>{children}</main> </body> </html> );}Layout 组件的特点:
可以嵌套 共享的布局只渲染一次 支持数据获取
2.4 Page 组件
Page 组件是路由的终点,定义了页面的内容:
// app/posts/page.tsxasync function PostsPage() { const posts = await fetch('https://api.example.com/posts').then(res => res.json()); return ( <div> <h1>Posts</h1> <ul> {posts.map(post => ( <li key={post.id}>{post.title}</li> ))} </ul> </div> );}export default PostsPage;三、App Router 核心功能
3.1 数据获取
在 App Router 中,数据获取非常简单,直接在组件中使用 async/await:
async function Page() { // 直接获取数据 const posts = await fetch('https://api.example.com/posts').then(res => res.json()); // 可以并行获取多个数据 const [users, comments] = await Promise.all([ fetch('https://api.example.com/users').then(res => res.json()), fetch('https://api.example.com/comments').then(res => res.json()) ]); return ( <div> <h1>Posts: {posts.length}</h1> <h2>Users: {users.length}</h2> <h3>Comments: {comments.length}</h3> </div> );}3.2 动态路由
动态路由使用 [param] 命名约定:
// app/posts/[id]/page.tsxasync function PostPage({ params }: { params: { id: string } }) { const post = await fetch(`https://api.example.com/posts/${params.id}`).then(res => res.json()); return ( <div> <h1>{post.title}</h1> <p>{post.content}</p> </div> );}export default PostPage;3.3 搜索参数
使用 searchParams 获取 URL 查询参数:
async function SearchPage({ searchParams }: { searchParams: { q?: string } }) { const query = searchParams.q || ''; const results = await fetch(`https://api.example.com/search?q=${query}`).then(res => res.json()); return ( <div> <input defaultValue={query} /> <ul> {results.map(result => ( <li key={result.id}>{result.title}</li> ))} </ul> </div> );}3.4 Loading 组件
Loading 组件用于显示加载状态:
// app/posts/loading.tsxexport default function Loading() { return ( <div className="loading"> <div className="spinner"></div> <p>Loading posts...</p> </div> );}当访问 /posts 时,在数据获取完成之前,会显示 Loading 组件。
3.5 Error 组件
Error 组件用于处理错误:
// app/posts/error.tsx'use client'; // Error 组件必须是 Client Componentexport default function Error({ error, reset }: { error: Error; reset: () => void;}) { return ( <div className="error"> <h2>Something went wrong!</h2> <p>{error.message}</p> <button onClick={() => reset()}>Try again</button> </div> );}3.6 NotFound 组件
NotFound 组件用于处理 404 页面:
// app/not-found.tsxexport default function NotFound() { return ( <div> <h1>404 - Page Not Found</h1> <p>The page you're looking for doesn't exist.</p> <a href="/">Go back home</a> </div> );}四、高级特性
4.1 路由组
路由组允许你组织路由而不影响 URL 路径:
app/├── (home)/│ ├── page.tsx → /│ └── about.tsx → /about├── (dashboard)/│ ├── layout.tsx → 只对 dashboard 路由生效│ ├── page.tsx → /dashboard│ └── settings.tsx → /dashboard/settings└── layout.tsx → 根布局路由组的特点:
使用括号 ()包裹目录名目录名不会出现在 URL 中 可以为不同的路由组定义不同的布局
4.2 并行路由
并行路由允许你同时渲染多个页面:
app/├── @main/│ ├── page.tsx│ └── posts/│ └── page.tsx├── @sidebar/│ ├── page.tsx│ └── posts/│ └── page.tsx└── layout.tsx在布局中使用插槽渲染:
// app/layout.tsxexport default function Layout({ children, main, sidebar,}: { children: React.ReactNode; main: React.ReactNode; sidebar: React.ReactNode;}) { return ( <div className="layout"> <div className="main">{main}</div> <div className="sidebar">{sidebar}</div> </div> );}4.3 拦截路由
拦截路由允许你在导航到特定路由时显示覆盖层:
app/├── login/│ └── page.tsx├── @modal/│ └── login/│ └── page.tsx└── layout.tsx当用户导航到 /login 时,@modal/login/page.tsx 会在主内容之上显示。
4.4 服务端 Actions
服务端 Actions 允许你在服务端执行表单提交:
// app/posts/new/page.tsxasync function createPost(formData: FormData) { 'use server'; // 标记为服务端 Action const title = formData.get('title') as string; const content = formData.get('content') as string; await db.post.create({ data: { title, content } });}export default function NewPostPage() { return ( <form action={createPost}> <input name="title" /> <textarea name="content" /> <button type="submit">Create</button> </form> );}五、时序图:App Router 请求处理流程
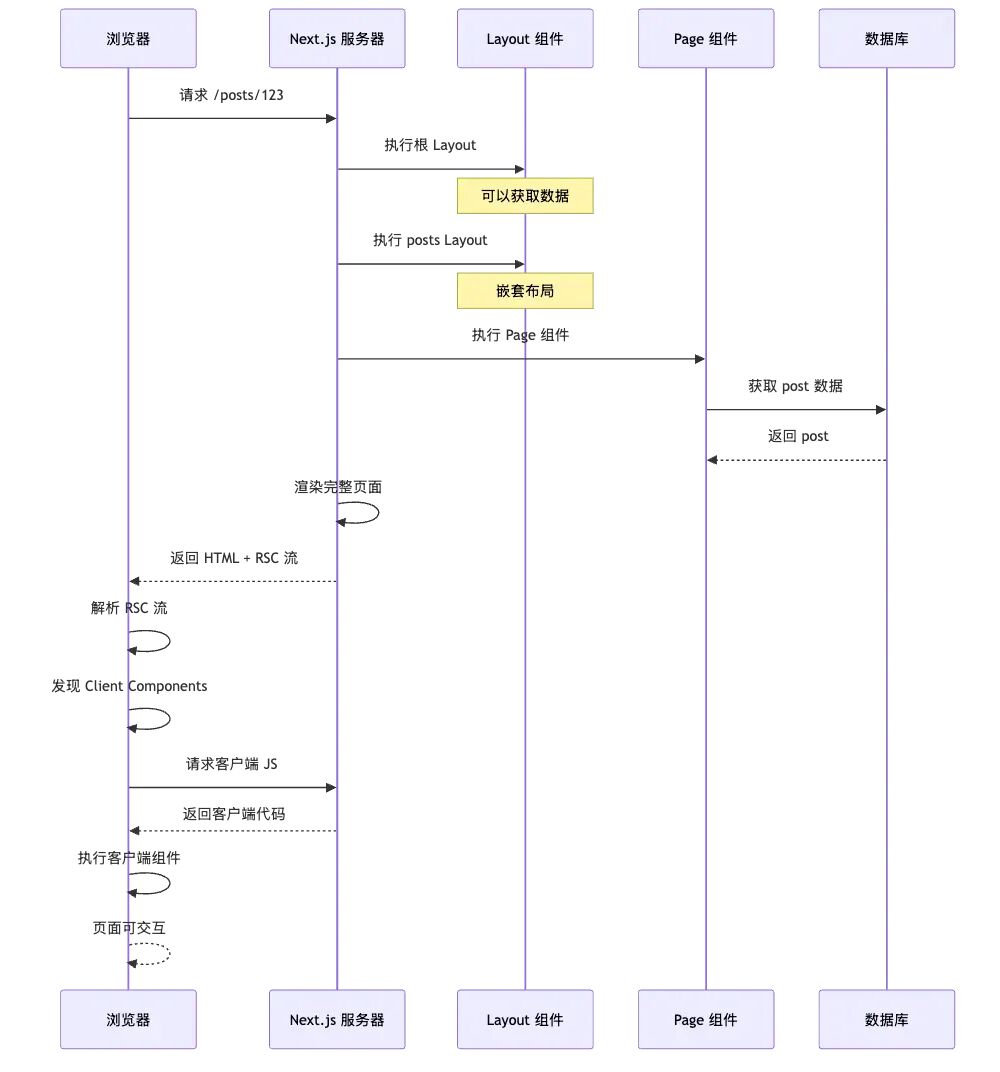
让我们通过一个时序图来理解 App Router 的完整请求处理流程:
六、实际案例:构建博客应用
让我们来看一个实际的案例,展示如何使用 App Router 构建一个博客应用。
6.1 项目结构
app/├── layout.tsx├── page.tsx├── loading.tsx├── error.tsx├── not-found.tsx├── posts/│ ├── layout.tsx│ ├── page.tsx│ ├── [id]/│ │ ├── page.tsx│ │ ├── loading.tsx│ │ └── error.tsx│ └── new/│ └── page.tsx└── components/ ├── PostCard.tsx └── CommentSection.tsx6.2 根布局
// app/layout.tsximport type { Metadata } from 'next';export const metadata: Metadata = { title: 'My Blog', description: 'A Next.js blog using App Router',};export default function RootLayout({ children,}: { children: React.ReactNode;}) { return ( <html lang="en"> <body> <header> <h1><a href="/">My Blog</a></h1> <nav> <a href="/">Home</a> <a href="/posts">Posts</a> </nav> </header> <main>{children}</main> </body> </html> );}6.3 首页
// app/page.tsximport Link from 'next/link';async function getRecentPosts() { const res = await fetch('https://api.example.com/posts?limit=5'); return res.json();}export default async function HomePage() { const posts = await getRecentPosts(); return ( <div className="home"> <h2>Recent Posts</h2> <div className="post-list"> {posts.map(post => ( <article key={post.id} className="post-card"> <h3><Link href={`/posts/${post.id}`}>{post.title}</Link></h3> <p>{post.excerpt}</p> </article> ))} </div> <Link href="/posts">View all posts</Link> </div> );}6.4 文章列表
// app/posts/page.tsximport Link from 'next/link';async function getAllPosts() { const res = await fetch('https://api.example.com/posts'); return res.json();}export default async function PostsPage() { const posts = await getAllPosts(); return ( <div className="posts"> <h1>All Posts</h1> <div className="post-list"> {posts.map(post => ( <article key={post.id} className="post-card"> <h2><Link href={`/posts/${post.id}`}>{post.title}</Link></h2> <p>{post.excerpt}</p> <p className="meta">By {post.author} on {post.date}</p> </article> ))} </div> </div> );}6.5 文章详情
// app/posts/[id]/page.tsximport Link from 'next/link';import CommentSection from '@/components/CommentSection';async function getPost(id: string) { const res = await fetch(`https://api.example.com/posts/${id}`); if (!res.ok) { throw new Error('Post not found'); } return res.json();}async function getComments(postId: string) { const res = await fetch(`https://api.example.com/comments?postId=${postId}`); return res.json();}export default async function PostPage({ params }: { params: { id: string } }) { const post = await getPost(params.id); const comments = await getComments(params.id); return ( <div className="post"> <h1>{post.title}</h1> <p className="meta">By {post.author} on {post.date}</p> <div className="content">{post.content}</div> <CommentSection comments={comments} postId={params.id} /> <Link href="/posts">Back to posts</Link> </div> );}6.6 加载状态
// app/posts/[id]/loading.tsxexport default function Loading() { return ( <div className="loading"> <div className="spinner"></div> <p>Loading post...</p> </div> );}6.7 客户端组件
// app/components/CommentSection.tsx'use client';import { useState } from 'react';interface CommentSectionProps { comments: Comment[]; postId: string;}export default function CommentSection({ comments, postId }: CommentSectionProps) { const [newComment, setNewComment] = useState(''); const [localComments, setLocalComments] = useState(comments); async function handleSubmit(e: React.FormEvent) { e.preventDefault(); if (!newComment.trim()) return; const res = await fetch(`https://api.example.com/comments`, { method: 'POST', headers: { 'Content-Type': 'application/json' }, body: JSON.stringify({ postId, text: newComment }) }); const comment = await res.json(); setLocalComments([comment, ...localComments]); setNewComment(''); } return ( <div className="comments"> <h3>Comments ({localComments.length})</h3> <ul> {localComments.map(comment => ( <li key={comment.id}>{comment.text}</li> ))} </ul> <form onSubmit={handleSubmit}> <input type="text" value={newComment} onChange={(e) => setNewComment(e.target.value)} placeholder="Add a comment..." /> <button type="submit">Submit</button> </form> </div> );}6.8 代码分析
这个应用展示了 App Router 的几个核心特性:
Server Components:默认使用 Server Components 获取数据 async/await:直接在组件中获取数据 Layout 组件:共享布局 Loading 组件:加载状态 Client Components:使用 "use client"指令
七、最佳实践
7.1 组件选择
默认使用 Server Components 只有在需要 Hooks 或浏览器 API 时才使用 Client Components 将交互逻辑封装为独立的 Client Components
7.2 数据获取
在 Server Components 中获取数据 使用 Promise.all并行获取多个数据避免在 Client Components 中获取数据(除非必要)
7.3 布局设计
使用根布局定义全局样式和导航 使用嵌套布局定义特定路由的布局 使用路由组组织相关路由
7.4 错误处理
使用 error.tsx处理路由级别的错误使用 not-found.tsx处理 404 页面在数据获取中使用 try-catch
7.5 性能优化
使用增量静态生成:对静态页面使用 generateStaticParams()使用缓存:对 API 请求使用 cache: 'force-cache'使用 Suspense:对慢速数据请求使用 Suspense 优化图片:使用 next/image组件
八、常见问题与解答
Q1:App Router 和 Pages Router 可以混用吗?
A:可以。Next.js 支持同时使用 App Router 和 Pages Router,但建议新项目使用 App Router。
Q2:什么时候应该使用 Client Components?
A:当你需要:
使用 Hooks(useState、useEffect 等) 使用浏览器 API(window、document 等) 添加交互逻辑(点击事件、表单提交等)
Q3:App Router 支持 TypeScript 吗?
A:是的,App Router 完全支持 TypeScript,并且提供了很好的类型推断。
Q4:如何从 Pages Router 迁移到 App Router?
A:迁移步骤:
创建 app/目录创建根布局 app/layout.tsx逐步将页面迁移到 app/目录将 getServerSideProps/getStaticProps转换为组件内的数据获取
Q5:App Router 的部署方式有哪些?
A:App Router 支持所有 Next.js 支持的部署方式:
Vercel(官方推荐) Netlify AWS Amplify Docker
九、总结
Next.js App Router 是 React 全栈开发的新范式,它带来了以下核心价值:
Server Components 原生支持:默认是 Server Components,数据获取更简单 async/await 直接获取数据:不需要额外的 getServerSideProps文件系统路由:简单直观的路由定义 强大的布局系统:嵌套布局、路由组、并行路由 更好的性能:零 JS 发送的 Server Components
学习路径建议:
先掌握基本概念:Layout、Page、Server Components、Client Components 学习数据获取和动态路由 学习高级特性:路由组、并行路由、拦截路由 尝试构建实际应用
现在就开始尝试 App Router 吧,体验 React 全栈开发的新范式!
 关注我,掌握前端最新动态
关注后回复H,领取前端大礼包
 点个赞或爱心支持我吧