ARTICLE · 1173767
别再让 AI 对着屏幕乱点:下一代 Computer Agent 应该直接调用软件能力
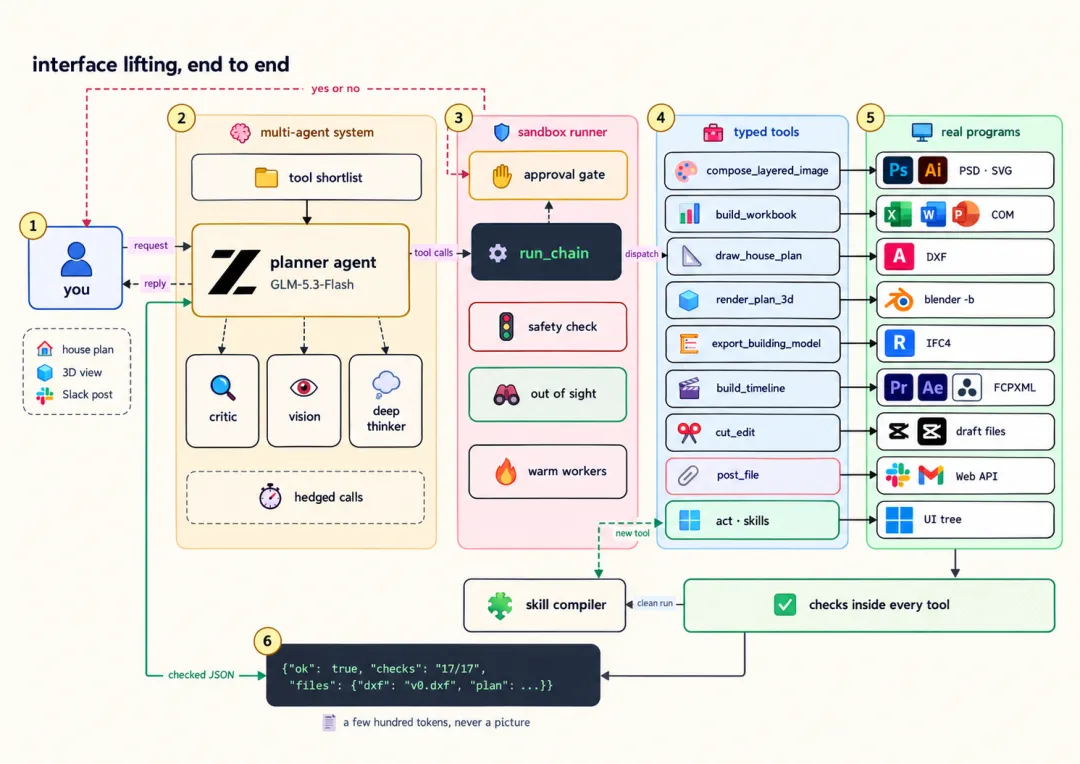
下面是我们将逐个组件构建的架构:
一个 multi-agent system:planner agent 编写 tool calls 和完整 chains,旁边有 critic、vision agent 和 deep thinker,并通过 shortlist 只把相关 tools 放入每次 prompt。
一个 sandbox runner:tool calls 在审批门之后运行,任何 outward 操作都需要批准,每个 UI action 都经过 safety classifier;程序以 headless、off screen 的方式运行,并保持 warm。
一个 typed tool registry:普通 Python 函数变成 tools,每个 tool 都有模型可读的 schema、implementation、verifier 和 effect。
Native interfaces before pixels:每个 tool 都通过程序自己的文件、命令行、COM interface 或 API 驱动程序,accessibility tree 放在最后。
以文本形式返回经过检查的结果:每个 tool 衡量自己生成的内容,并返回几百个 token 的 JSON。
一个 skill compiler:成功运行过一次的任务会变成一个新 tool,模型之后可以调用它。
一个 ledger 和一项 ablation study:每个任务都会与 screen agent 对比衡量,每个设计选择都有成本。
读完本文后,我们的 Agent 能用 2 次模型调用在 4.4 秒内绘制一张 AutoCAD 住宅平面图,能从一句话串联 AutoCAD、Blender 和 Slack,并且能把一个学会的桌面任务变成一个新 tool,以 56 到 64 毫秒重放。
所有代码都在我的 GitHub 仓库中:https://github.com/FareedKhan-dev/ai-pc
代码库组织如下。
agent/├── toolkit/ # the tool layer: registry, results, the agent loop and chains├── apps/ # tools for single programs: Photoshop, Premiere, After Effects, Revit ...├── office/ # spreadsheet, slide and document tools, rendered through COM├── cad/ # drafting tools and the house-plan search├── three/ # 3D tools on Blender in background mode├── video/ # timeline and edit tools for CapCut and JianYing├── hub/ # messaging tools for Slack, Gmail and other work apps└── desktop/ # window tools on the accessibility tree, and learned skills分析一个 Screen Agent
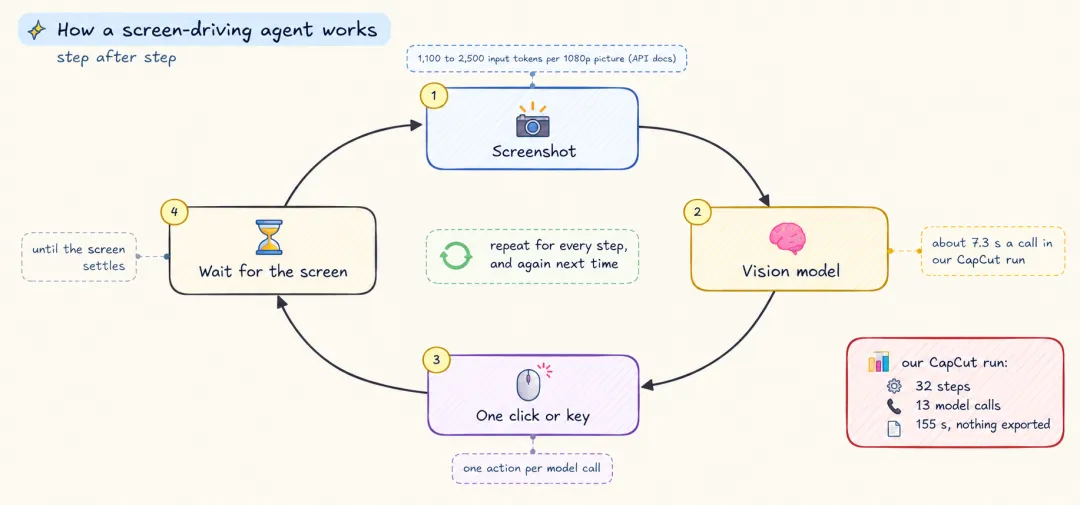
在构建任何新东西之前,我想先看看 screen agent 的时间都花在哪里。10 月 1 日,我给自己的早期 screen agent 一个小任务:打开 CapCut,把一个视频添加到新项目里,给它加任意免费滤镜,然后导出。它走了 32 步、调用模型 13 次,155 秒后放弃,没有导出任何东西。
我像处理任何慢系统一样处理它:先测量,找原因,提出假设,构建修复方案,再重新测量。Agent 的 32 个步骤都围绕同一个小循环运转。
因为 Agent 会记录每一步,我们可以把这 155 秒拆成几个桶。
#### OUTPUT ####13 model calls 95.4 s 61.5%acting, and waiting for CapCut 37.1 s 23.9%waiting for the screen to settle 7.7 s 5.0%reading the window 4.8 s 3.1%finding click targets 3.8 s 2.5%other 6.2 s 4.0%input tokens: 29,900 to 41,600模型调用占了整次运行的 61.5%,这些调用背后的截图为一个最终失败的任务消耗了 30,000 到 42,000 个 input tokens。
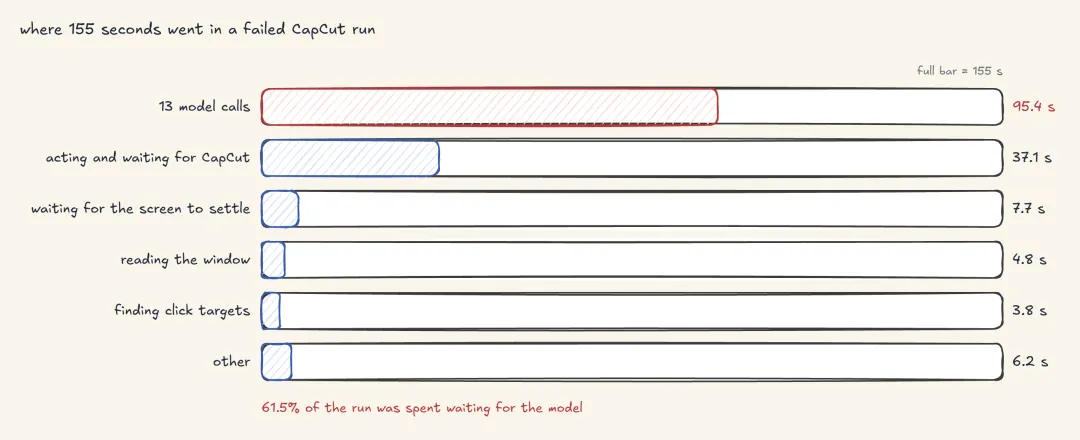

这些调用很慢,平均 7.3 秒;而我现在使用的模型在同类调用上只需 1.6 到 2.7 秒。不过,更快的模型只会缩小这个总和中的一项,步骤数仍然不变。
为了公平比较运行结果,我们维护一个 ledger,每个任务一行,从这次失败运行开始。
# speed_ledger.py: model calls, tool calls, actions on a visible window, input tokens, seconds, checksledger = Ledger()ledger.add("CapCut filter, screen agent", 13, 0, 32, "30k-42k", "155 s", "failed")ledger.show()#### OUTPUT ####task model tools UI tokens seconds checksCapCut filter, screen agent 13 0 32 30k-42k 155 s failedScreen Loop 的六项成本
单次运行说明不了太多,所以我把我们的结果与研究人员在其他基于截图工作的 Agent 上测得的数据放在一起。六项成本在这些研究中反复出现。
每个动作都要等待新计划。 在 OSWorld-Human 中,一个强 Agent 的 planning 和 reflection 占用了 76% 到 96% 的时间,而最好的 Agent 所用步骤数是必要步骤数的 2.7 到 4.3 倍。
每次调用都携带一张图片。 一张 1080p 截图需要 1,100 到 2,500 个 input tokens;在 ScreenSpot-Pro 中,需要点击的目标只占其中 0.07%。
每个动作都要等待程序。 图片无法说明程序何时完成加载,所以 Agent 会 sleep,然后再看一次。在我们的运行中,这花了 44.8 秒。
Agent 借用了你的屏幕。 它一次只运行一个任务,而你只能等待;当 OSWorld 作者缩小窗口时,成功率从 50.79% 跌到 15.04%。
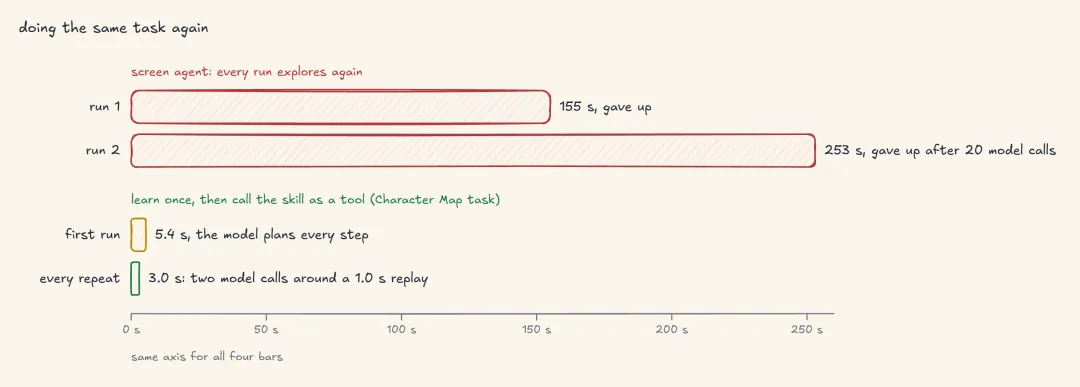
什么都不会被记住。 每次运行都会重新探索程序。我们的第二次 CapCut 尝试比第一次更糟,20 次模型调用,253 秒。
错误暴露得太晚。 在长任务中错误会不断累积,因为截图无法证明一个总数是正确的。在 OSWorld 2.0 的 1.6 小时工作流上,最佳 Agent 只完成了 20.6%。
Screen agent 正在快速进步:在 OSWorld-Verified 上,当前最佳模型已经能完成 86% 到 90% 的短桌面任务。不过,更好的模型只会缩小前两项成本。另外四项来自 interface,而这正是我们的 Agent 要改变的部分。每项成本都指向我们的 tools 必须具备的一种属性。
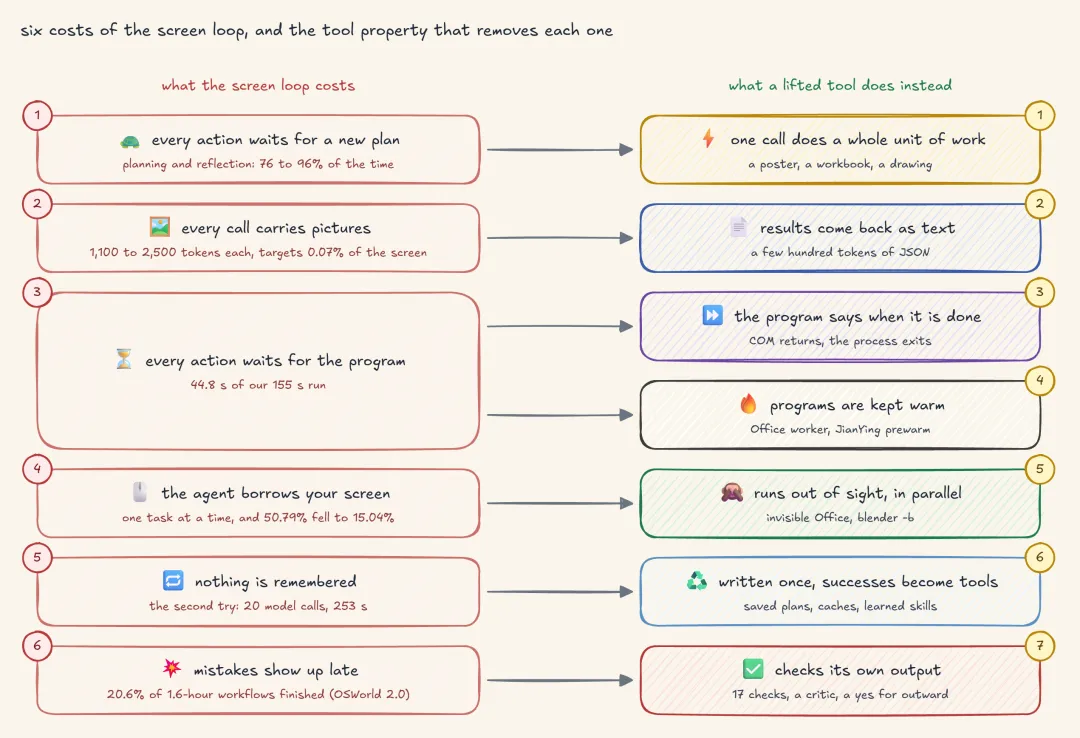
设计 Tool Layer
这些成本大多可以追溯到一个设计决策:模型通过屏幕接触计算机。Interface lifting 用模型可直接调用的 typed functions 替代屏幕。
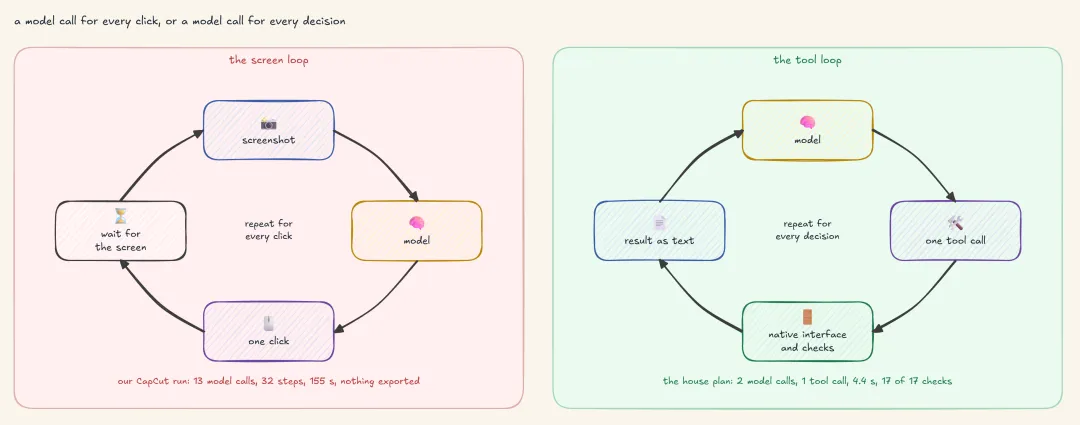
四个可测试预测
假设是:瓶颈在 interface,而不是模型。如果这是真的,那么在同一模型、同类工作的 ledger 中应该看到四件事。
每个任务的模型调用从几十次降到少数几次,因为一次 tool call 会完成一个完整工作单元。
每个任务的 input tokens 下降一个数量级,因为结果会以几百个 token 的文本返回。
错误会在制造错误的步骤暴露,因为每个 tool 在返回前都会检查自己的输出。
用户保留屏幕,因为 tools 在不可见处运行。
五种 native interfaces
大多数程序都有比屏幕更好的 interface。我们的 tools 按以下优先级使用五类 interface。
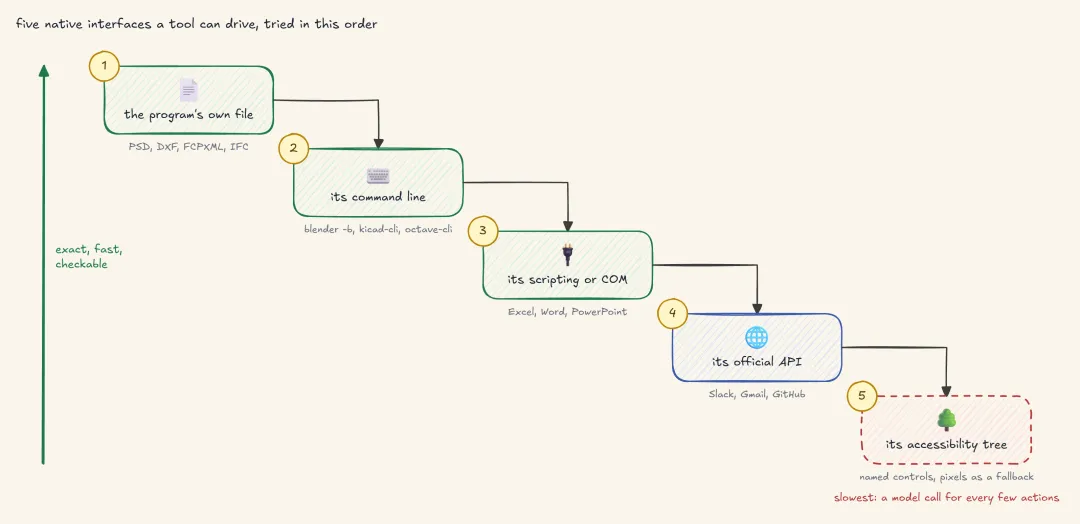
程序自己的文件:Photoshop 的 PSD、AutoCAD 的 DXF 或 FCPXML timeline,打开后就像人做的一样。
它的命令行:
blender -b可以无窗口渲染。它的 scripting 或 COM interface:Excel 会重新计算我们写入的 workbook,并返回计算值。
它的官方 API:Slack 接收上传并返回文件 id。
它的 accessibility tree:任意窗口的命名控件,像素只作为 fallback。
前四种给出的结果可以被 tool 精确检查,因为 tool 知道自己写了什么。代价是前期工作,因为需要有人编写每个 tool 及其检查。ScreenSpot-Pro 的 23 个程序中,有 15 个存在前四种 interface 之一。
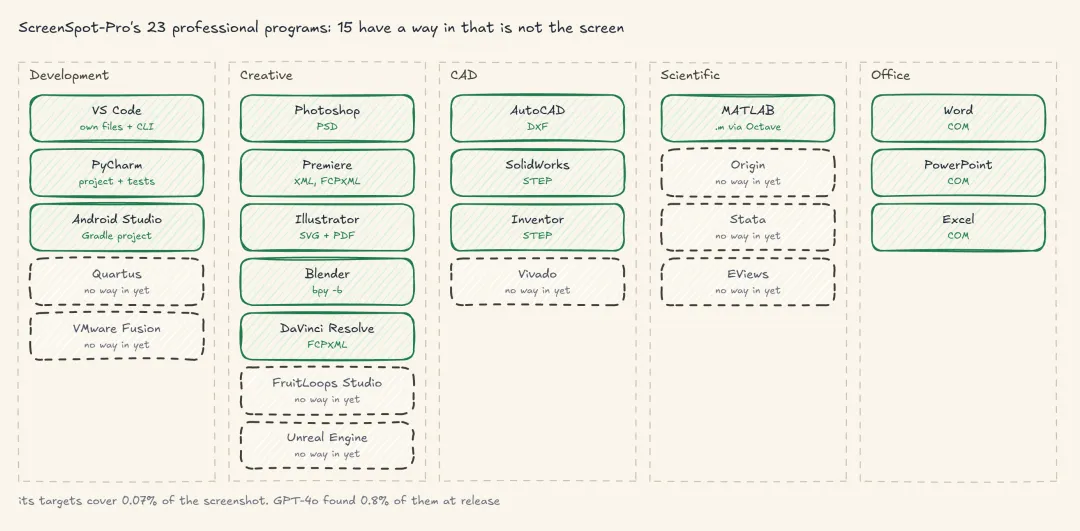
当 CoAct-1 允许 Agent 在点击旁边编写代码时,平均任务降到 10.15 步,“相比领先 GUI Agent 的 15 步”。OSWorld-Verified leaderboard 的第一名也混合了代码和点击。
Tool contract
我们 Agent 中的每个 tool 都保持相同的四部分 contract,而模型只会读取第一部分。
一个 schema:名称、docstring 和 typed arguments。
一个 implementation:通过程序 native interface 驱动程序的代码。
一个 verifier:对输出的检查,随结果一起返回。
一个 effect:
local表示停留在 PC 上的工作,outward表示任何会被其他人看到的东西,它会等待人的确认。
一个 decorator 会从函数本身读取 schema。每个 tool 只编写一次,就是普通 Python。
# toolkit/registry.py: what the model sees of the computer, and what runs when it callsimport inspectimport typingTOOLS = {}JSON_TYPES = {str: "string", int: "integer", float: "number", bool: "boolean", list: "array", dict: "object"}def tool(effect="local"): """Register a function as a tool. Its name, docstring and type hints become the schema the model reads.""" def register(fn): hints, params = typing.get_type_hints(fn), inspect.signature(fn).parameters props = {n: {"type": JSON_TYPES[typing.get_origin(hints[n]) or hints[n]]} for n in params} TOOLS[fn.__name__] = { "fn": fn, "effect": effect, # "outward" tools wait for a yes "schema": {"name": fn.__name__, "description": inspect.getdoc(fn), # the docstring is the tool's manual "parameters": {"type": "object", "properties": props, "required": [n for n, p in params.items() if p.default is p.empty]}}, } return fn return register每个 tool 也返回同一种 shape,这就是模型能看到的全部结果。
# toolkit/result.py: the only thing a tool sends back to the modeldef result(summary, files=None, checks=(), **extra): checks = [[name, bool(passed)] for name, passed in checks] return {"ok": all(passed for _, passed in checks), "summary": summary, "files": {k: str(v) for k, v in (files or {}).items()}, "checks": checks, **extra}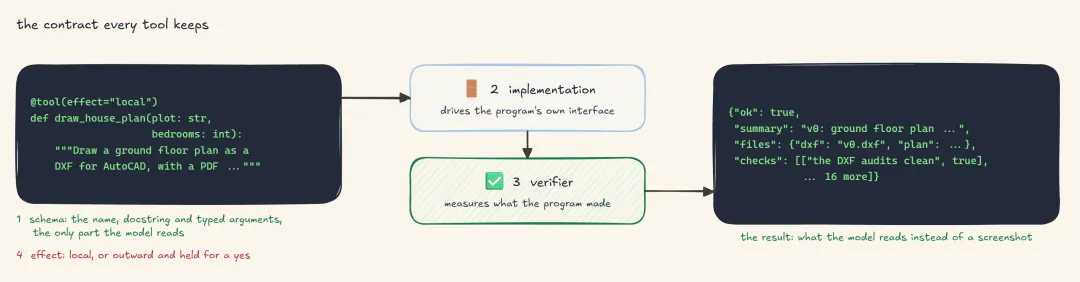
项目设置
我们会把 Agent 构建成一个面向 Windows 11 的 Python package,它安装的所有内容都留在项目文件夹内。
uv init --python 3.12 agent && cd agent # one project folder for everythinguv add openai pywin32 comtypes psutil pillow numpy ezdxf ifcopenshellopenai 只是 client。任何 OpenAI-compatible provider 或本地模型都可以工作,本文中的每次模型调用都运行在 GLM-5.3-Flash 上。
Agent runtime
模型读取请求和 tool schemas,然后要么回答,要么请求 tool calls。Runner 执行每次调用,把任何 outward 操作拦住等待确认,并以文本形式把结果发回。
# toolkit/loop.py: the model decides, tools act, results come back as textimport jsondef run_agent(request, model, tools, row, max_turns=8): messages = [{"role": "system", "content": SYSTEM}, {"role": "user", "content": request}] schemas = [{"type": "function", "function": t["schema"]} for t in tools.values()] for _ in range(max_turns): reply = model.chat(messages, tools=schemas) # one model call row.model_calls += 1 if not reply.tool_calls: return reply.content # the model has its answer messages.append(reply.message) for call in reply.tool_calls: t = tools[call.name] if t["effect"] == "outward" and not approved(call): out = {"ok": True, "pending": preview(call)} # anything others will see waits for a yes else: out = t["fn"](**call.args) # the program does the work, out of sight row.tool_calls += 1 messages.append({"role": "tool", "tool_call_id": call.id, "content": json.dumps(out)}) return "stopped after too many turns"Runner 会为每次 model call 和 tool call 打印一行,这使下面每段输出都成为一条 trace。在任何 tool 存在之前,我们把一个商店老板可能在 Eid 前发给设计师的请求发给它。
request = "photoshop file 1080x1080: background shop.jpg; logo logo.png top-left; title 'Eid Sale' white; subtitle '20% off' yellow"print(run_agent(request, model, TOOLS, row)) # TOOLS is still empty#### OUTPUT ####model 1.1 s in 412 tok -> replyI cannot make a Photoshop file yet: none of my tools writes PSD files. I can list the layers this poster needs.total 1.1 s, 1 model call, 0 tool calls模型理解了请求,但还没有可以执行动作的 tool。我们构建的第一个 tool 正是这个请求需要的。
Layer Compositor
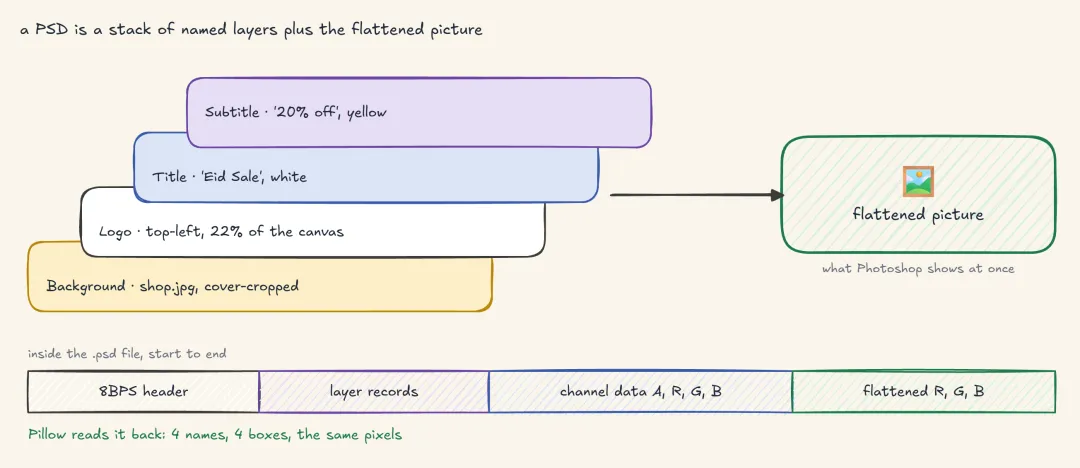
收到 Eid Sale 请求的设计师会返回一个 PSD,而 PSD 的意义在于海报的每个部分仍然是客户可以移动的命名图层。
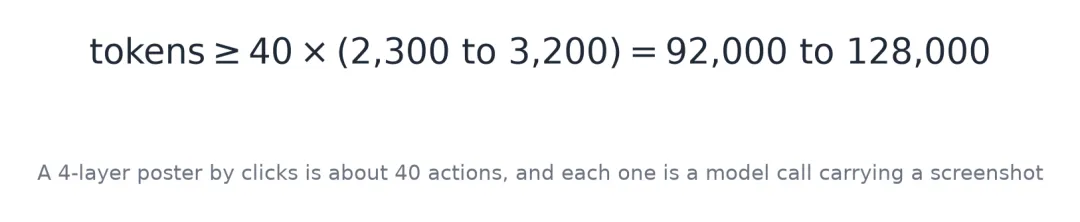
如果基于截图来做,这大约需要 40 个动作:新建文档对话框、放置照片和 logo、两个文本图层、两种颜色、四个位置、四个图层名和保存对话框。Photoshop 属于 ScreenSpot-Pro 的 creative category,其中目标非常小。每个动作都是一次携带截图的模型调用,而且这 40 次都必须正确。
由于 PSD 格式是公开文档化的,我们可以把 layered composition 本身暴露为一个 tool。模型填充 arguments,docstring 就是它关于这个 tool 了解的全部内容。
# apps/photoshop.py@tool()def compose_layered_image(size: list, layers: list, name: str = "poster") -> dict: """Make a layered PSD that opens in Photoshop, GIMP, Photopea and Affinity with every layer movable. size: [width, height] in pixels. layers: bottom first, each {"name", "kind": "image" or "text", "file" or "text", "at": "fill", "top-left", "center" ..., "color": a name or #rrggbb}. Returns the PSD, a PNG preview and checks read back from the saved file.""" placed = [place_layer(spec, size) for spec in layers] # pictures fitted, text set in the poster font path = OUT / "psd" / f"{slug(name)}.psd" flat = write_psd(path, size, placed) # the file, written byte by byte below return result(f"PSD with {len(placed)} layers ({', '.join(n for n, _, _ in placed)}), {size[0]}x{size[1]}: {path}", files={"psd": path, "preview": save_preview(flat, path)}, checks=check(path, placed, flat))place_layer 会把每个描述变成图片和位置,write_psd 会写入文件:header、每个 layer 的 record、每个 layer 的 raw pixels,以及 Photoshop 在读取任何 layer 前显示的 flattened picture。
# apps/photoshop.py (continued)def write_psd(path, size, layers): """layers: [(name, RGBA image, (left, top))], bottom first. Writes an 8-bit RGB PSD with the flattened picture.""" w, h = size canvas = Image.new("RGBA", size, (255, 255, 255, 255)) # stacked as we go, for the flattened picture records, channel_data = b"", b"" for name, im, (left, top) in layers: im = im.convert("RGBA") canvas.alpha_composite(im, (max(0, left), max(0, top)), (max(0, -left), max(0, -top))) lw, lh = im.size r, g, b, a = im.split() chans = [(-1, a), (0, r), (1, g), (2, b)] # channel -1 is the layer's transparency rec = struct.pack(">iiiiH", top, left, top + lh, left + lw, 4) # the layer's box and its 4 channels for cid, _ in chans: rec += struct.pack(">hI", cid, 2 + lw * lh) # each channel: a 2-byte header + raw pixels extra = struct.pack(">I", 0) + struct.pack(">I", 0) + _pascal(name) + _unicode_block(name) # the name, twice records += rec + b"8BIMnorm" + bytes([255, 0, 0, 0]) + struct.pack(">I", len(extra)) + extra # normal blend channel_data += b"".join(struct.pack(">H", 0) + ch.tobytes() for _, ch in chans) # 0 = raw pixels info = struct.pack(">h", len(layers)) + records + channel_data info += b"\0" * (len(info) % 2) # this section has to end on an even length lmi = struct.pack(">I", len(info)) + info + struct.pack(">I", 0) # layer info, then an empty global mask flat = canvas.convert("RGB") data = b"8BPS" + struct.pack(">H6sHIIHH", 1, b"\0" * 6, 3, h, w, 8, 3) # version 1, 3 channels, 8 bits, RGB data += struct.pack(">II", 0, 0) + struct.pack(">I", len(lmi)) + lmi # no colour table, no resources data += struct.pack(">H", 0) + b"".join(c.tobytes() for c in flat.split()) # the flattened picture, plane by plane Path(path).write_bytes(data) return flat这两个 helper 会把每个 layer 的名称保存为短 Pascal string,并再次保存在标记为 luni 的 Unicode block 中,Photoshop 正是从那里读取名称。
Verifier check 会再次用 Pillow 的 PSD reader 打开已保存文件,而这个 reader 对我们的 writer 一无所知。它会比较每个 layer 的名称和 box,然后逐像素比较 flattened picture。
导入模块会注册 tool。现在我们再次发送同一个请求。
from apps import photoshop # registers compose_layered_imageprint(run_agent(request, model, TOOLS, row))#### OUTPUT ####model 1.4 s in 1,384 tok -> compose_layered_image(size=[1080, 1080], name="Eid Sale", layers=[ {"name": "Background", "kind": "image", "file": "shop.jpg", "at": "fill"}, {"name": "Logo", "kind": "image", "file": "logo.png", "at": "top-left"}, {"name": "Title", "kind": "text", "text": "Eid Sale", "color": "white"}, {"name": "Subtitle", "kind": "text", "text": "20% off", "color": "yellow"}])tool 0.6 s <- ok, 2/2 checks, out\psd\Eid_Sale.psdmodel 0.9 s in 1,731 tok -> replyPSD with 4 layers (Background, Logo, Title, Subtitle), 1080x1080: out\psd\Eid_Sale.psd (and a PNG preview).Opens in Photoshop, GIMP, Photopea and Affinity with every layer movable. Checked: Pillow reads every layer byname, in its place; the flattened picture is the layers stacked.total 2.9 s, 2 model calls, 1 tool call, 0 screenshots, 3,115 input tokens模型只做了一个决策,即整张海报;tool 在背后完成了相当于 40 个动作的工作。2 次模型调用和约 3,100 个 input tokens 替代了约 40 次调用和 92,000 以上的 tokens。
ledger.add("layered image, Eid Sale poster", 2, 1, 0, "3,115", "2.9 s", "2/2")Workbook Engine
下一个请求对模型要求更高:“在 Excel 中为 8 名学生制作成绩表,包含总分、等级和班级汇总”。有人必须虚构学生并决定列结构;如果用截图操作,这张表远超一百个动作。Microsoft 的 UFO2 论文说,长 GUI 序列,“例如在 Excel 中迭代选择和格式化单元格”,“通常可以折叠为一次 API call”。
我们的 spreadsheet tool 将整个 workbook design 作为一个参数。模型在写这个参数时完成全部思考,docstring 会让它避开模型容易出错的部分:cell addresses。
# office/tools.py@tool()def build_workbook(plan: dict) -> dict: """Build an Excel workbook with live formulas, recalculated by Excel itself, and its PDF. plan: {"title", "sheets": [{"name", "kind": "table" or "summary", ...}]}. NEVER write cell addresses (A1, C2:C9) or formulas with them. Computed columns name other columns in brackets: "[Qty] * [Price]", "ROUND([Obtained] / [Total] * 100, 1)". Totals, metrics and groups are declared, and code writes every formula, so they stay live when the client edits the data.""" path, expected = write_book(plan) # formulas from the plan, and what Python says they equal excel = run_com_job("excel", path, read=expected) # Excel recalculates, then reads back those cells return result(f"Made {path.name} and its PDF {path.with_suffix('.pdf').name}.", files={"xlsx": path, "pdf": path.with_suffix(".pdf")}, checks=check_book(excel, expected))2026 年 10 月 5 日我运行它时,GLM-5.3-Flash 把下面这个表格 sheet 放进了 plan 参数,这里做了截断。第二个 sheet 声明四个汇总指标和两个带图表的分组。
{"name": "Marks", "kind": "table", "columns": ["Roll No", "Student Name", "Maths", "Science", "English", "History", {"name": "Total", "formula": "[Maths] + [Science] + [English] + [History]"}, {"name": "Percentage", "type": "percent", "formula": "ROUND([Total] / 400 * 100, 1)"}, {"name": "Grade", "formula": "IF([Percentage] >= 90, \"A+\", IF([Percentage] >= 75, \"A\", ...))"}], "rows": [[1, "Aarav Sharma", 88, 92, 79, 85, null, null, null], "... 7 more students"], "total": {"Maths": "average", "Science": "average", "English": "average", "History": "average", "Total": "sum"}}写这个参数是任务中最慢的模型调用。模型延迟也有长尾:10 月 1 日,DeepSeek-V4.1-Flash 的中位响应时间跳到 39.8 秒,而它通常是 2 到 3.5 秒。因此每次模型调用都有一个等待时间 hedge_s,超过后会发送一个相同的备份请求,先返回者胜出。按每百万 input/output tokens 0.15 和 0.50 美元计算,偶尔的备份是廉价保险。
在 tool 内部,write_book 会把方括号中的列名转换成单元格引用,另一个函数 py_value 用 ast 模块在 Python 中计算同样的表达式。Python 能算出的每个数字,Excel 都必须给出一致结果。
#### OUTPUT ####Total G2 =C2+D2+E2+F2Percentage H2 =ROUND(G2/400*100,1)Grade I2 =IF(H2>=90,"A+",IF(H2>=75,"A",IF(H2>=60,"B",IF(H2>=50,"C",IF(H2>=40,"D","F")))))expected by Python, 19 cells: on Marks, subject averages 71.75, 73.5, 74.25, 74.25 and total 2350; on Summary,highest 362, lowest 215, the same 4 averages, and student totals 344, 319, 264, 362, 223, 335, 215, 288然后 Excel 执行数学计算。COM job 会打开一个新的、不可见的、属于我们的 Excel,重新计算,扫描每个 used cell 中的 error codes,读取我们有期望值的 cells,并打印 PDF。
# office/_com.pydef _excel(job, app): # app = DispatchEx("Excel.Application"), Visible = False wb = app.Workbooks.Open(job["src"], UpdateLinks=0, ReadOnly=not job.get("save")) app.CalculateFull() # Excel itself computes every formula code wrote errors = [(ws.Name, v) for ws in wb.Worksheets for row in ws.UsedRange.Value for v in row if isinstance(v, int) and v in XL_ERRORS] # #DIV/0!, #REF!, #NAME? come back as error codes values = {f"{r['sheet']}!{r['cell']}": wb.Worksheets(r["sheet"]).Range(r["cell"]).Value for r in job["read"]} charts = sum(int(ws.ChartObjects().Count) for ws in wb.Worksheets) wb.ExportAsFixedFormat(0, job["pdf"]) # and the PDF a person will open return {"errors": errors, "values": values, "charts": charts}DispatchEx 总是启动一个新实例,绝不会使用你已经打开的 Excel;job 在用 CREATE_NO_WINDOW 启动的子进程中运行。当 CalculateFull 返回时,Excel 已经完成计算,verifier 会把 Excel 计算出的每个值与 Python 的值比较。

#### OUTPUT ####model 8.6 s in 2,284 tok -> build_workbook(plan={"title": "Class Marks Sheet", "sheets": [Marks, Summary]})tool 9.2 s <- ok, 2/2 checks, class-marks-sheet.xlsx, class-marks-sheet.pdf pass global Excel recalculated 2 sheet(s): no errors, 2 chart(s) pass values all 19 totals and summaries Excel computed equal the numbers computed heremodel 1.1 s in 4,631 tok -> replyMade class-marks-sheet.xlsx and its PDF class-marks-sheet.pdf. Ask for changes, or 'undo'.total 18.9 s, 2 model calls, 1 tool call, 0 screenshots, 6,915 input tokens大部分时间都是真实工作:模型写 plan 用了 8.6 秒,tool 驱动 Excel 用了 9.2 秒。
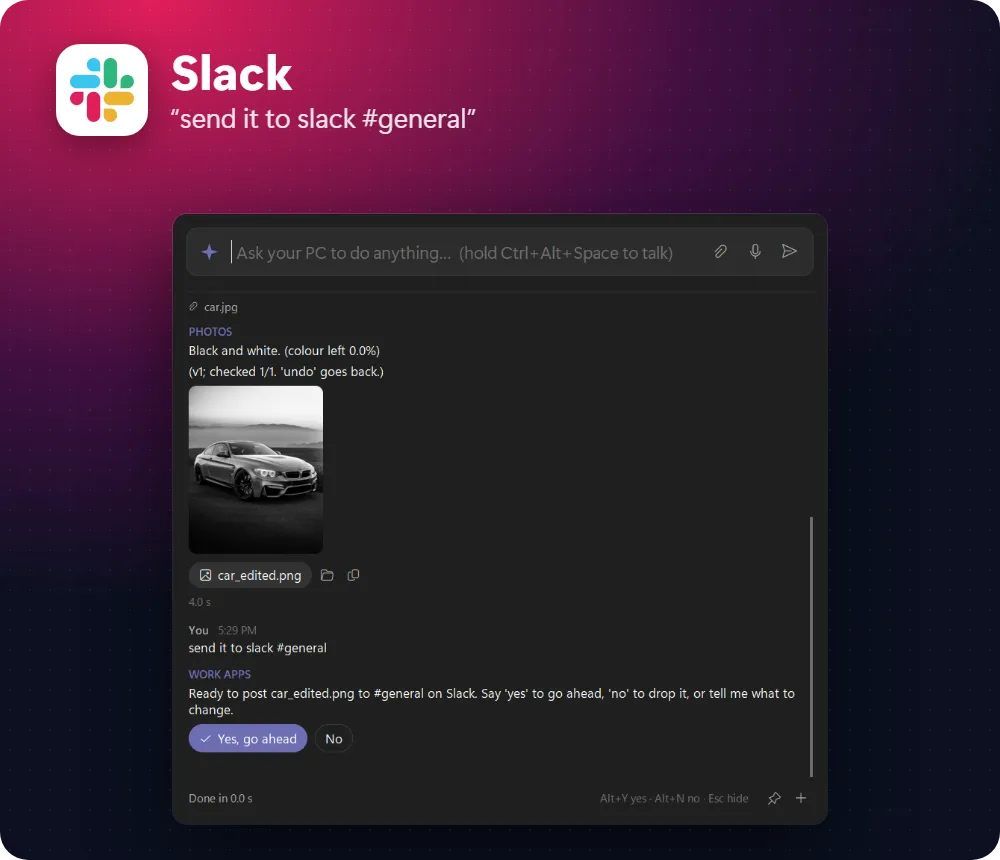
我还在 Agent 前面放了一个小 command bar,用 Ctrl+Alt+Space 打开,本文截图来自这里。

ledger.add("spreadsheet, marks sheet", 2, 1, 0, "6,915", "18.9 s", "19/19")ledger.add("slides, 10-slide deck", 3, 1, 0, "8,240", "22 s", "11/11")Deck 会经过一个 build_deck tool,它接收完整 outline。PowerPoint 随后报告每个文本框占用多少空间。Overflow 会以“slide 6: text runs out of its box (Body: 212 pt of text in 180 pt)”的形式出现,并在任何人看到之前被修复。一个 10 页 slide deck 用 3 次模型调用花了 22 秒,通过 11/11 slide checks,成本为 0.0018 美元。一个 5 页 Word report 大约花 45 秒,每次写 6 个 section。
Warm worker pool
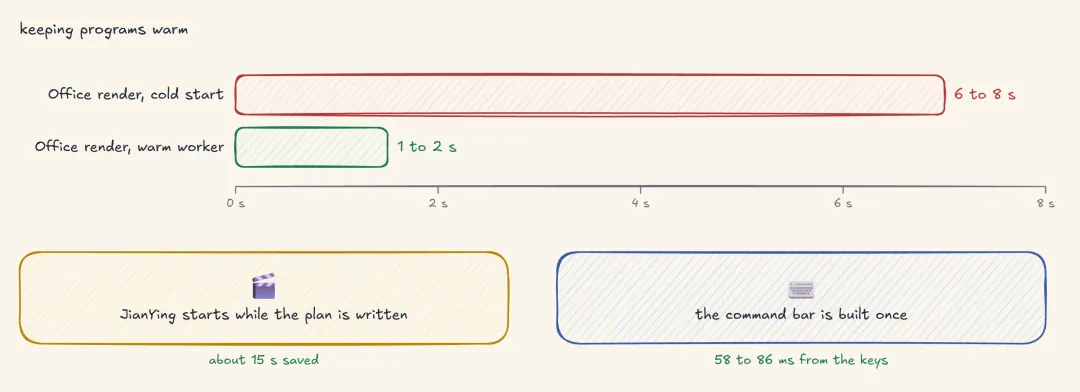
一次性 render 大约要 6 到 8 秒,主要耗在 Office 启动和退出上。因此 tools 共享一个 worker,让 Word、PowerPoint 和 Excel 保持打开,并逐行接收 JSON job。有了它,render 会降到约 1 到 2 秒。如果某个 job hang 住,worker 只会杀掉它自己启动的 Office 进程,绝不会杀掉你自己打开的 Word 窗口。
Floor Plan Solver
住宅设计师经常收到这种请求:“一栋 10 marla、3 间卧室的房子”。Marla 是土地面积单位,通常为 225 平方英尺,因此这是 35 x 65 英尺的地块。在 AutoCAD 中绘制它需要几百条命令:墙、门扇、窗、尺寸、房间名和标题栏,全部按比例。
Drafting tool 从不打开 AutoCAD。它会写入 DXF,即 AutoCAD 读取的绘图格式,单位为英寸以确保 AutoCAD 得到正确比例;并用 headless Chrome 按真实比例打印 PDF。模型只需读取 brief 并填充两个 arguments,因为 tool 接受人们口头说出的 plot sizes。
# cad/tools.pyPLOTS = {3: (20, 34), 5: (25, 45), 7: (30, 52), 10: (35, 65), 20: (50, 90)} # marla -> feet wide x deep, 12 sizes in all@tool()def draw_house_plan(plot: str, bedrooms: int, storeys: int = 1) -> dict: """Draw a ground floor plan as a DXF for AutoCAD, with a PDF at true scale. plot: '10 marla', '1 kanal' or '35 x 65 ft'. A layout search places the rooms, doors and sheet scale, and the plan is checked before it is returned. The saved plan file can be passed to the 3D and building-model tools.""" w, d = plot_size(plot) # '10 marla' -> 35 x 65 ft, from the table above lay = plan({"plot": [w, d], "bedrooms": bedrooms, "storeys": storeys}) # the search, below return draw(lay) # DXF, PDF, the plan file and 17 checksdraw_house_plan 内部的搜索会从临路一侧向后按 band 布置房间:前部是 car porch 和 drawing room,中部是 kitchen、TV lounge 和 stairs,然后是 passage,最后是带 attached baths 的 bedrooms。
每个 candidate 都会因为房间偏离目标面积、房间像走廊、需要采光但没有外墙、应该相连的房间之间缺门而被加 penalty points。任何从入口无法走到的房间会扣 40 分。
Tool 会保留在 2.5 秒内找到的最佳 candidate,然后选择 sheet scale:1:125,因为在 1:100 下 plan 需要 258 mm,而 A3 只有 231。
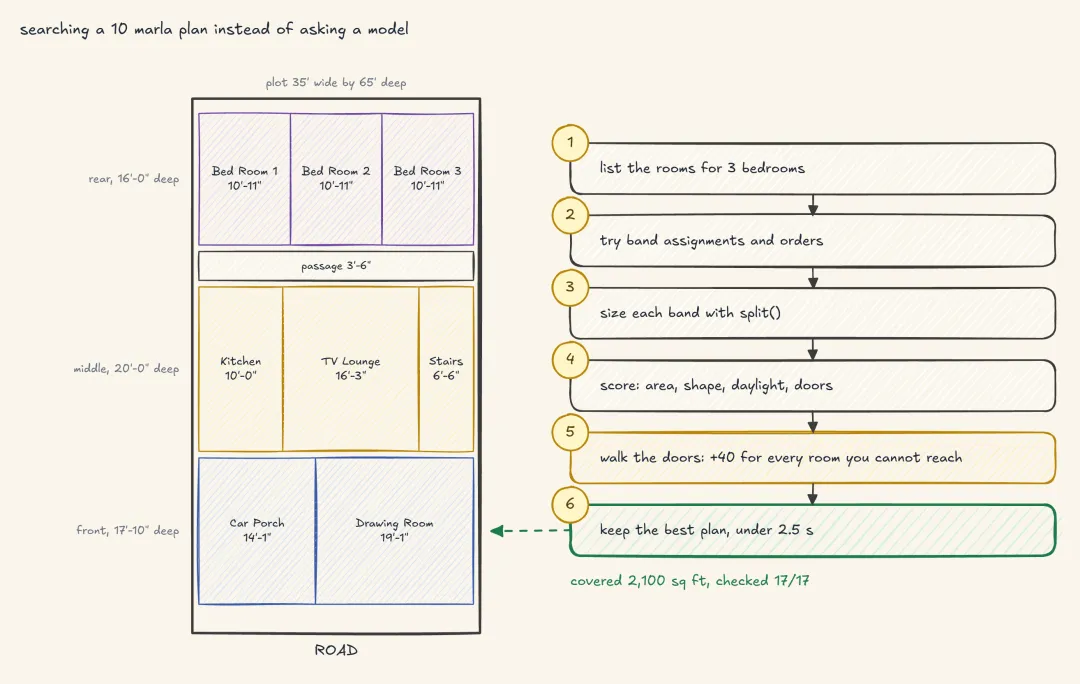
Agent 用三步完成了整个任务。
#### OUTPUT ####model 1.3 s in 1,402 tok -> draw_house_plan(plot="10 marla", bedrooms=3)tool 2.1 s <- ok, 17/17 checks, v0.dxf, v0.pdf, v0.png, v0.plan.jsonmodel 1.0 s in 1,866 tok -> replyv0: ground floor plan for a 35' x 65' plot (10.1 marla), 1:125 on A3. Covered 2,100 sq ft. Rooms: Drawing Room19'-1" x 17'-10"; ... Bed Room 3 10'-11" x 16'-0"; 3 attached bath(s). Notes: KITCHEN has no outside wall: give ita skylight or a ventilator and an exhaust fan; ... Files: v0.dxf (AutoCAD), v0.pdf, v0.png. (checked 17/17)total 4.4 s, 2 model calls, 1 tool call, 0 screenshots, 3,268 input tokens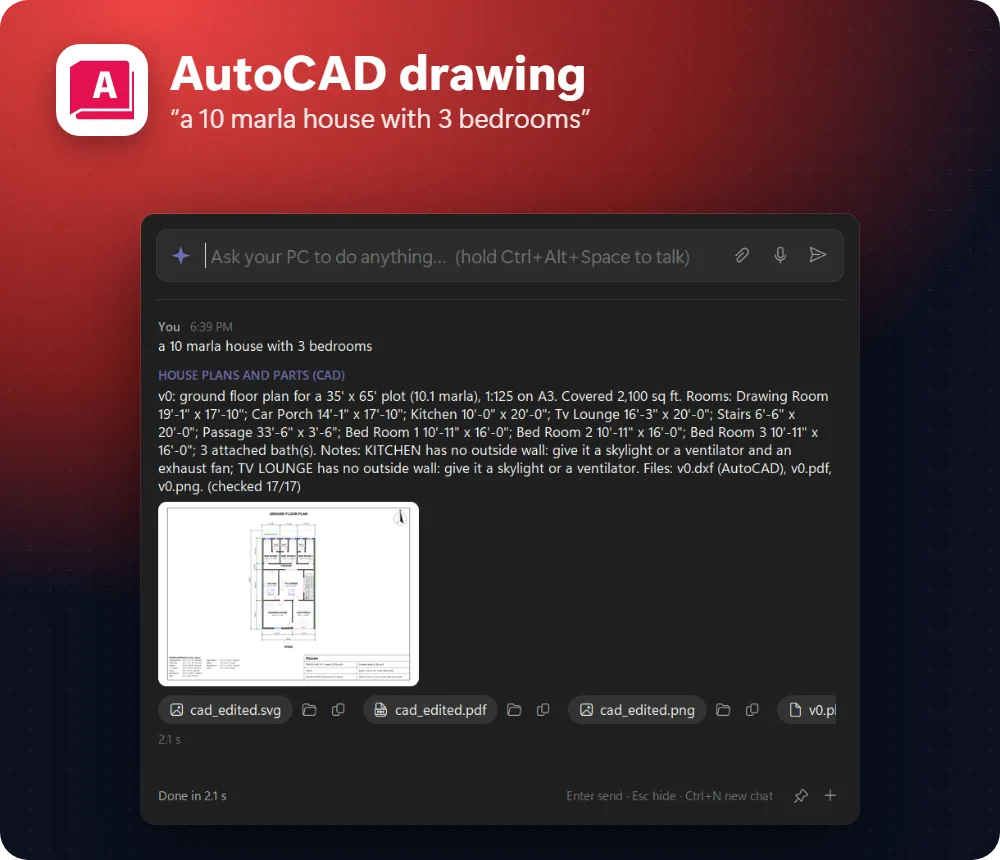
由于搜索无法让 kitchen 或 lounge 拥有外墙,结果会说明施工方应在那里增加什么。它的“(checked 17/17)”覆盖六条 plan 规则、九项已保存 DXF 的 read-backs,以及两项 printed sheet 检查。
作为结果的 Refusals
像“make the kitchen bigger”这样的请求会调用第二个 tool:resize_room。它会尝试把 kitchen 放大一英尺,然后放大六英寸,每次都以 1.5 秒预算重新运行整个搜索,并且只有当所有 plan rules 仍然通过时才保留版本。如果没有版本通过,它会拒绝并返回原因。
#### OUTPUT ####> make the kitchen bigger (a 5 marla plot)model -> resize_room(room="kitchen", by_ft=1)tool <- refused: in width, Bed Room 1 would lose its door; in depth, the rooms around it are already at their smallestThe kitchen can't get bigger on this plot: in width, Bed Room 1 would lose its door; in depth, the rooms aroundit are already at their smallest. The plan stays as it is.> scale 1:100 (the 10 marla plan)model -> set_sheet(scale="1:100")tool <- refused: at 1:100 the plan needs 167 x 258 mm and A3 has room for 390 x 231Couldn't draw that: at 1:100 the plan needs 167 x 258 mm and A3 has room for 390 x 231; 1:125 fits A3, or askfor a bigger sheet.模型可以原样传达 refusal,也可以尝试它指出的选项,例如 A3 上的 1:125。我们是在一个早期版本被要求把 kitchen 放大 2 英寸却让 Bed Room 1 失去门之后,添加了 door rule。
ledger.add("drafting, 10 marla house plan", 2, 1, 0, "3,268", "4.4 s", "17/17")Headless 3D 与 BIM Export
搜索在另一次运行中可能产生稍有不同的平面图。因此 drafting tool 也会把精确 layout 保存为 v0.plan.json 并返回其路径。3D 和 building-model tools 将这个路径作为参数,这让模型能把文件从一个程序传给下一个程序。
3D tool 通过命令行以 background mode 启动 Blender,没有窗口。
# three/blender.py@tool()def render_plan_3d(plan_file: str) -> dict: """Build a saved house plan as a 3D model in Blender and render a 3D floor plan and a front view, out of sight.""" spec = save_spec(house_spec(load_plan(plan_file))) # boxes in inches, walls cut around openings cmd = [str(exe()), "-b", "--factory-startup", "--python-exit-code", "1", # no window, no user settings, fail on errors "-P", str(BL / "house_scene.py"), "--", str(spec), str(OUT_JSON)] # our scene script reads the spec p = subprocess.Popen(cmd, stdout=subprocess.PIPE, stderr=subprocess.STDOUT, creationflags=NO_WINDOW) for raw in iter(p.stdout.readline, b""): if m := re.match(rb"PROGRESS (\d+)", raw): # the script reports its own progress progress(int(m.group(1))) return result_from(OUT_JSON) # the renders and 15 checks, read from the filehouse_spec 会把 plan 转换成以英寸为单位的 boxes,墙体围绕每扇门窗切割。Blender 用 EEVEE 渲染两个视图,并为每个视图输出 silhouette mask,让 checks 判断房屋是否被裁切。进程退出时,render 已完成,tool 会从 result file 读取图片和 checks。
#### OUTPUT ####pass 3D: every room on the ground floor has its floor 9 of 9pass 3D: glass in every ground-floor windowpass 3D: the ground-floor stairs reach the next floor 11.0 ftpass 3D: the front door is in... 11 more checks on the model and the two picturesChecked: 15 of 15 passed.Files: v0_plan3d.png, v0_front.pngRevit 通过 IFC4 获取同一个 plan,IFC4 是 building models 的开放格式;对应的 export_building_model tool 基于 ifcopenshell 构建。它的三项检查会重新打开文件并统计元素,在地块上把每面墙和 slab 构建为 solid geometry,并运行 IFC schema validator。
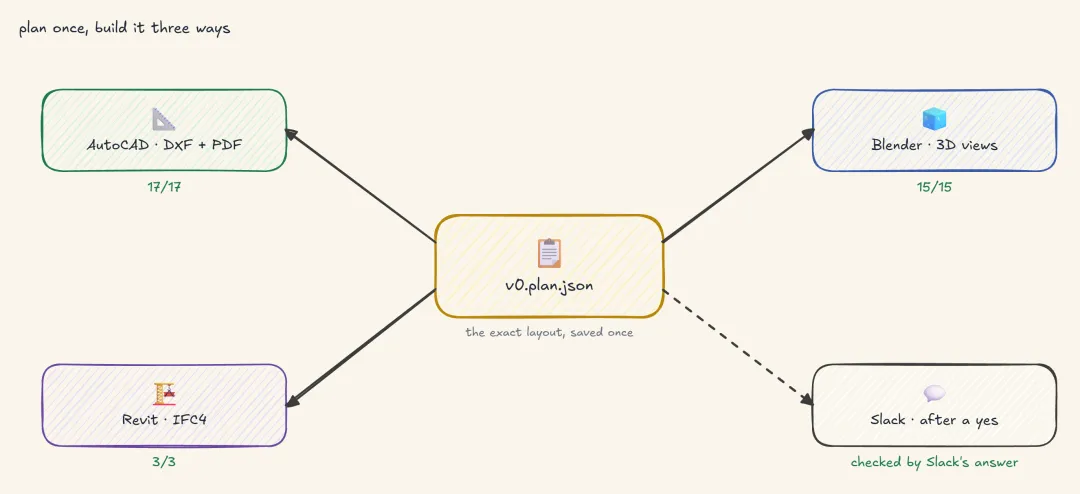
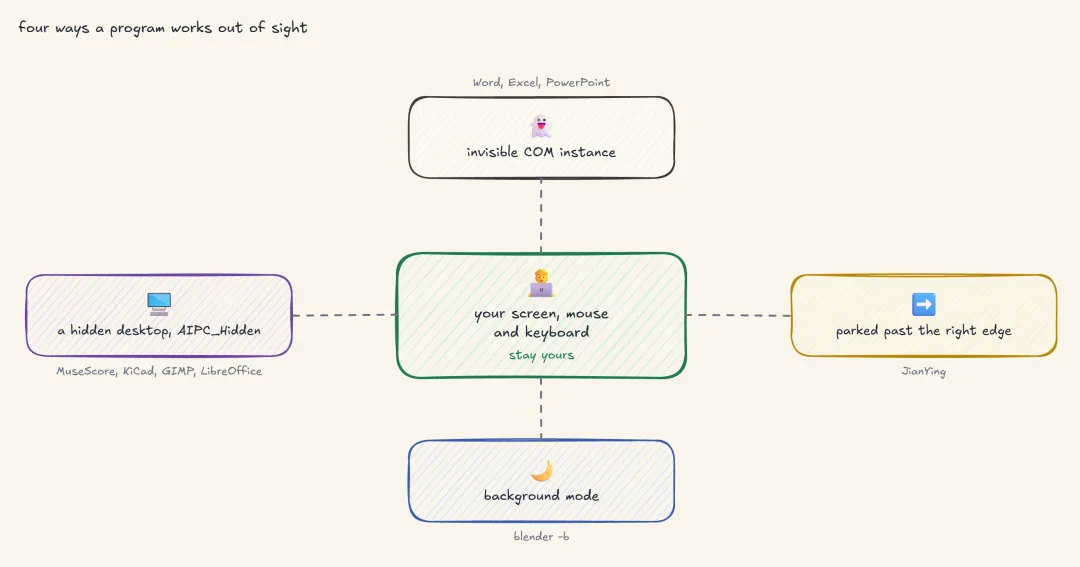
这些程序都不会出现在你的屏幕上,你可以在 Agent 运行时继续工作。Office 作为 invisible instance 运行,Blender 以 background mode 运行,JianYing 停在所有显示器右边缘之外。像 MuseScore 这类即使命令行启动也会打开窗口的程序,会运行在第二个从未显示的 Windows desktop 上。
ledger.add("3D views of the plan", 2, 1, 0, "3,410", "33.8 s", "15/15")ledger.add("building model, IFC4", 2, 1, 0, "3,190", "4.6 s", "3/3")跨程序编排
到目前为止,每个请求只需要一个程序。这个请求需要三个:“a 10 marla house with 3 bedrooms, then show the plan in 3d in blender and send it to slack #team”。在任何程序运行前,会出现两个问题。
Schema shortlisting
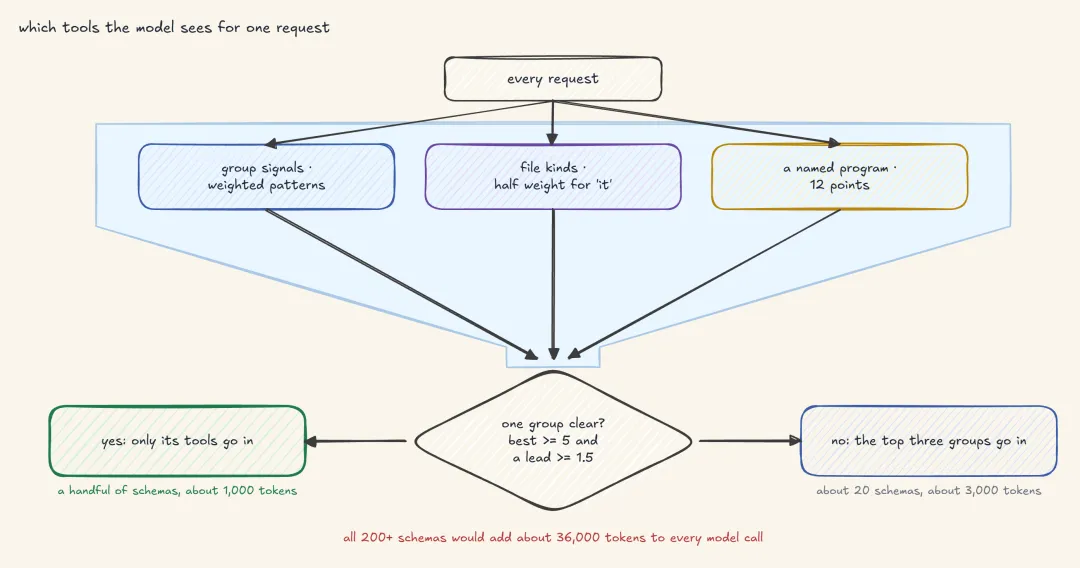
第一个问题是大小。我们的 Agent 有 200 多个 tools,每个 schema 约 180 tokens。把它们全部发送会给每次模型调用增加 36,000 tokens,而且模型从长列表中选择会更差,所以一个 scorer 会决定哪些 tool groups 进入 prompt。
# toolkit/shortlist.pySIGNALS = { "hub": [(r"\bslack\b|\b(?:ms |microsoft )?teams\b|\btrello\b|\bnotion\b|\bjira\b", 10), (r"(?:^|\s)#[a-z][\w-]*", 6)], "cad": [(r"\bhouse plan\b|\bfloor plan\b|\bmarla\b|\bkanal\b|\bbedrooms?\b|\bautocad\b|\bdxf\b", 7)], "three": [(r"\b3d\b|\bthree[- ]d\b|\bblender\b", 10), (r"\brender(?:ing)?\b|\bmock-?ups?\b|\bturntable\b", 7)], # ... 13 groups in all}def score(message, files=(), named=None): s = {} for group, sigs in SIGNALS.items(): hits = sorted((w for pat, w in sigs if re.search(pat, message, re.I)), reverse=True) if hits: s[group] = hits[0] + 0.5 * (len(hits) - 1) # the strongest signal, plus a little for each extra one for k in {kind_of(f) for f in files}: for group, w in KIND_GROUPS.get(k, {}).items(): s[group] = s.get(group, 0) + w # an attached picture pulls toward the photo tools if named: # the message names a program we have tools for s["apps"] = max(s.get("apps", 0), 12) return s当某个 group 得分至少 5,且领先第二名 1.5 时,选择是明确的,只有它的 tools 会进入 prompt。否则前三个 groups 会进入 prompt,模型会在更多 tools 中选择。

#### OUTPUT ####'a 10 marla house with 3 bedrooms, then show the plan in 3d in blender and send it to slack #team' hub 10.5 three 10.0 cad 7.0 -> not clear: 3 groups, 19 tools, 3,240 schema tokens'photoshop file 1080x1080: ...' with shop.jpg and logo.png apps 12.0 (photoshop) photo 7.0 sound 7.0 -> clear: 6 tools, 972 schema tokens'make it pop' in a new chat no group scores -> 3 general tools, and the model asks what 'it' is命名一个程序值 12 分,足以让“background”和“subtitle”无法把 Photoshop 请求拉偏。我们的句子确实需要三个 groups,三个都会进入 prompt,总共约 3,200 tokens,而不是 36,000。
一次调用完成 Chain planning
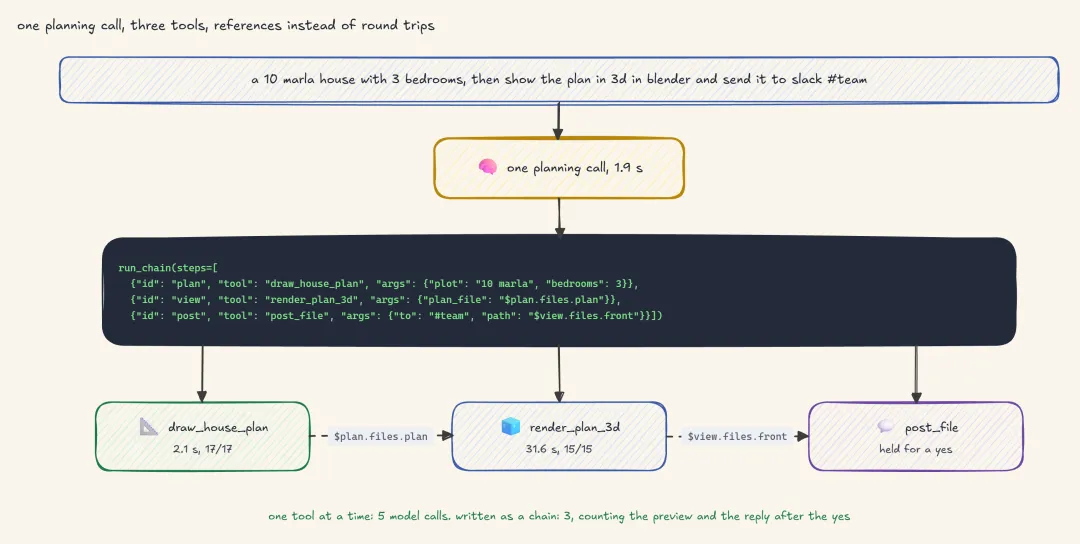
第二个问题是往返。若一次只调用一个 tool,三个依赖 tool 需要每个 tool 前一次模型调用,最后再一次回复。可是模型在读句子时已经知道完整 chain。另一个 tool run_chain 让它在一次调用中写下这个 chain,列表中后面的调用可以引用前面调用的输出。
# toolkit/chain.py: one model call plans several dependent tool calls@tool()def run_chain(steps: list) -> dict: """Run tool calls in order. steps: [{"id", "tool", "args"}]. An argument written "$id.files.kind" is replaced by that file from an earlier step's result. The chain stops at the first failed check, and an outward step waits for a yes.""" done = {} for s in steps: args = {k: resolve(v, done) for k, v in s["args"].items()} # "$plan.files.plan" -> the real path t = TOOLS[s["tool"]] if t["effect"] == "outward" and not approved(s): return {"ok": True, "pending": preview(s["tool"], args), "done": done} # hold it, report what ran done[s["id"]] = out = t["fn"](**args) if not out["ok"]: return {"ok": False, "failed": s["id"], "done": done} # stop where the problem is return {"ok": True, "done": done}
整句话只需要一次 planning call。
#### OUTPUT ####> a 10 marla house with 3 bedrooms, then show the plan in 3d in blender and send it to slack #teammodel 1.9 s in 3,672 tok -> run_chain(steps=[ {"id": "plan", "tool": "draw_house_plan", "args": {"plot": "10 marla", "bedrooms": 3}}, {"id": "view", "tool": "render_plan_3d", "args": {"plan_file": "$plan.files.plan"}}, {"id": "post", "tool": "post_file", "args": {"service": "slack", "to": "#team", "path": "$view.files.front"}}])tool 2.1 s <- plan: ok, 17/17 checkstool 31.6 s <- view: ok, 15/15 checks, v0_plan3d.png, v0_front.pngtool 0.0 s <- post: held for a yesmodel 0.9 s in 4,355 tok -> reply[Work apps] Ready to post v0_front.png to #team on Slack. Say 'yes' to go ahead, 'no' to drop it, or tell me what to change.模型只写了一次 chain,references 把 plan file 和 render 从一个程序传到下一个程序。只有 Slack post 停了下来,被 gate 拦住。
Approval Gate
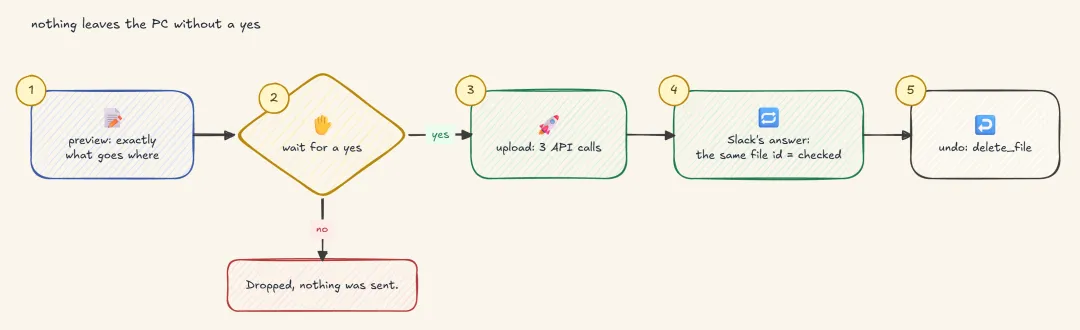
发布到 Slack 是第一个其他人会看到的步骤。它的 tool 被注册为 outward,runner 在没有 yes 的情况下绝不会调用 outward tool。
# hub/tools.py@tool(effect="outward")def post_file(service: str, to: str, path: str) -> dict: """Post a file to a channel or a person on a work app (slack, teams). Others will see it, so it waits for a yes.""" out = SERVICES[service].upload(to, path) # each service keeps its own API client return result(f"Uploaded {Path(path).name} to {to}" + (" (checked)" if out["verified"] else ""), files={"link": out["link"]}, checks=[("the service names the file we sent", out["verified"])], undo=out["undo"])Preview 由被 held 的 call 本身构建,会准确显示什么东西要发到哪里。确认 yes 之后,上传由 Slack Web API 的三次调用完成:upload URL、bytes 和 share。只有当 Slack 的回答命名了它为我们的上传发出的 file id 时,检查才通过。
#### OUTPUT ####> yestool 1.4 s <- post: ok, 1/1 checksmodel 0.8 s in 4,618 tok -> reply[Work apps] Uploaded v0_front.png to #team (checked). <link to the file>total 38.7 s of work, 3 model calls, 3 tool calls, 0 screenshots, 12,645 input tokens, 33/33 checks如果逐个调用 tool,同一句话需要五次模型调用:每个 tool 前一次、显示 preview 一次、yes 之后一次。Chain 只需要三次。
错误上传可以用 undo 删除,但错误邮件无法撤回。因此 email tool 只会创建 Gmail draft,而发送 draft 需要第二次 yes。
ledger.add("chain: house, 3D view, Slack post", 3, 3, 0, "12,645", "38.7 s", "33/33")Frame-Accurate Video Pipeline
Video editor 是 screen agent 最难处理的程序之一。Timeline 很密集,每次拖拽都必须落在正确帧上,而结果只有导出后才会出现。它们也恰好拥有一些最好的 native interfaces。
帧网格上的 Timeline files
Premiere Pro、DaVinci Resolve 和 Final Cut Pro 都能导入 timeline files,而文件可以把每个 cut 精确放到某一帧。Timeline tool 接收 clips、in/out points 和 music,并从一个 plan 写出四种格式,帧率会 snap 到标准值,所有时间都是整数帧。
# apps/premiere.py@tool()def build_timeline(name: str, clips: list, music: str = "", fps: float = 30) -> dict: """Write one timeline for Premiere Pro (XML), DaVinci Resolve and Final Cut Pro (FCPXML), any editor (EDL) and OTIO. clips: [{"file", "in": seconds, "out": seconds}] in order. Every time is snapped to the frame grid.""" fps = snap_fps(fps) # 29.97 stays 30000/1001, never a drifting float tl = layout(clips, music, fps) # every cut in whole frames files = {fmt: write(fmt, tl, name) for fmt in ("premiere", "fcpxml", "edl", "otio")} return result(summary(tl, files), files=files, checks=[read_back(fmt, f, tl) for fmt, f in files.items()])下面是 tool 为 integration test 中的请求写出的内容。
#### OUTPUT ####> premiere timeline: clip1.mp4 1-4, clip2.mp4; music song.mp3; called 'Shop promo'model -> build_timeline(name="Shop promo", clips=[{"file": "clip1.mp4", "in": 1, "out": 4}, {"file": "clip2.mp4"}], music="song.mp3")timeline 3 s of clip1 + 8 s of clip2 = 330 frames at 30 fps, 1280x720FCPXML clip1 offset="0s" start="1s" duration="3s" clip2 offset="3s" start="0s" duration="8s" music offset="1s" duration="11s" lane="-1" audioRole="music"EDL 001 AX V C 00:00:01:00 00:00:04:00 00:00:00:00 00:00:03:00Checked: Premiere XML: every clip, ending at the sequence's length; FCPXML: every clip, every time on the framegrid; EDL: one event per clip; OTIO: the video track's length is the sequence's.每项检查都会读回自己的文件。FCPXML 检查会把每个时间除以 frame duration,除非结果是整数,否则失败。
After Effects 有一个 make_title_animation tool。它把 title 写成 Lottie animation,即 After Effects 通过 Bodymovin 导出的 JSON 格式,同时写成一个构建相同 composition 的 ExtendScript .jsx。Headless Chrome 会播放 Lottie,检查 title 在第一帧缺失、最后一帧出现。
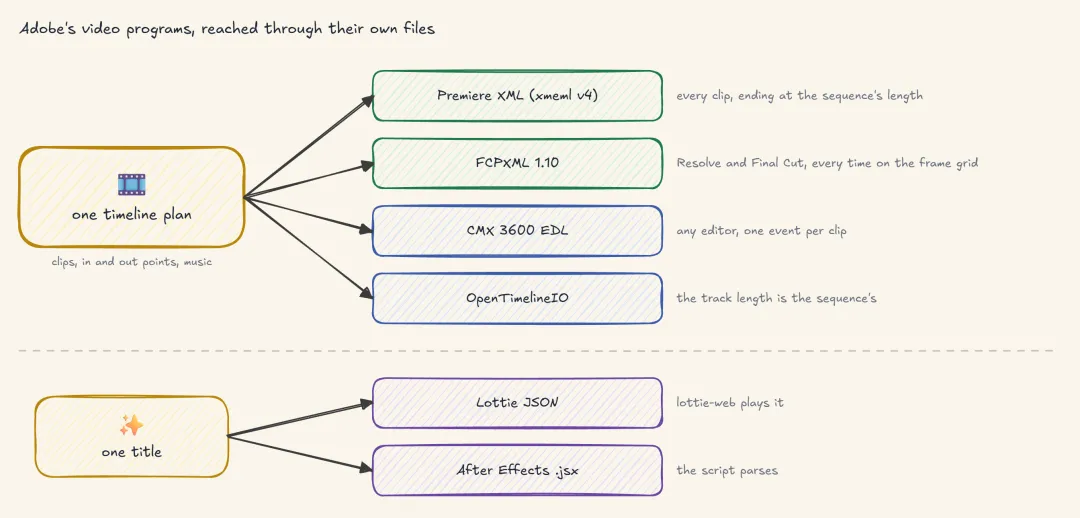
ledger.add("timeline, 2 clips in 4 formats", 2, 1, 0, "2,530", "3.3 s", "4/4")ledger.add("title animation, Lottie + .jsx", 2, 1, 0, "2,380", "6.1 s", "3/3")一次 design call 完成整个 edit
CapCut,也就是我们的 screen agent 失败的程序,其实也有 native interface:它的项目是 draft files,tool 可以直接写入项目列表。只有导出需要屏幕。为此,edit tool 使用 CapCut 的中国版 JianYing 5.9,并把窗口停在所有显示器右边缘之外。
模型在这里使用两个 tools。analyze_clips 返回每个 clip 的内容和 beat grid,cut_edit 接收完整 edit 作为参数。cut_edit 的描述以一条规则开头。
# video/director.py: the rule at the top of cut_edit's descriptionDESIGN_SYSTEM = """You are a senior short-form and YouTube editor. You DESIGN the edit; code then cuts it on the beat andwrites every keyframe, so you choose and never compute. Output ONE JSON object: ..."""这个 design 来自我的离线视频测试:一个 140 BPM grid 上的 hype edit,带 speed ramp、green-screen shot、freeze-frame ending,以及在 drop 时砸入的 title。
{ "style": "hype", "canvas": "9:16", "music": {"generate": "hype", "bpm": 140}, "shots": [ {"id": "a", "section": "intro", "file": "mixkit_4832.mp4", "beats": 4}, {"id": "b", "section": "drop", "file": "mixkit_47518.mp4", "beats": 6, "speed": "velocity"}, {"id": "c", "section": "drop", "file": "mixkit_28287.mp4", "beats": 2, "chroma": "auto"}, {"id": "d", "section": "outro", "file": "mixkit_28287.mp4", "beats": 4, "speed": "freeze", "chroma": "auto"} ], "recipes": [{"use": "kinetic_title", "text": "BOSS MODE", "at": "drop"}]}代码会把“velocity”转换成三点 speed ramp,把每个 shot 转换成完整 beats,把 title 转换成 keyframes。更复杂的 edit 意味着更长的 argument,而模型调用次数保持不变。
一次 render 大约要 30 秒。在付出这笔成本之前,cut_edit 会让 critic 审查 plan。大约十七条规则检查会先运行,例如“前 1.5 秒没有任何事情发生(no hook)”。随后一次模型 review 最多提出六个 patch operations,且只有 weighted rule score 没有变差的 patch 才会保留。
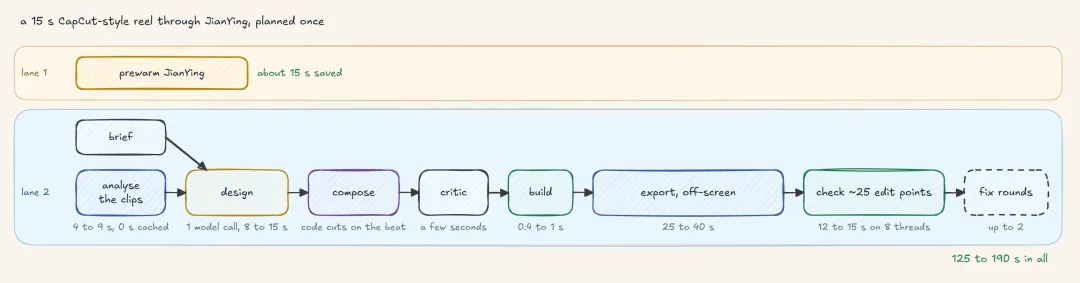
其余部分并行且在不可见处运行。JianYing 会在模型写 design 时启动,节省约 15 秒。导出后,edit points 会在 8 个线程上检查。下面是基于该 design 构建的 15 秒 reel 的一次运行。
#### OUTPUT ####model 1.6 s in 1,520 tok -> analyze_clips(files=[3 clips]) (starting JianYing in the background)tool 7.4 s <- analysed 3 file(s), 0 from cache, 31 candidates, a 140 BPM grid (generated)model 11.6 s in 5,412 tok -> cut_edit(design={hype, 4 shots, BOSS MODE at the drop}) (1,385 tokens out)tool <- composed hype: 7 shots, drop at 6.9 s, 9 recipe edits + 2 hand-placed critic 2.6 s: score 7/10, 1 check(s) flagged; applied 1: s3: beats 2 -> 4 built agent_boss_101512: 15.1 s, 9 tracks, 64 operations in 610 ms exported agent_boss_101512 in 31.4 s verified 24 edit points in 13.2 s: 24 pass, 0 warn, 0 fail asked vs delivered: a hype reel from these 3 clips = met, BOSS MODE at the drop = metmodel 1.0 s in 7,180 tok -> reply在我的运行中,这样的 reel 约 100 秒、0.008 美元,通过 24/24 edit points。一个十种 genre 的一分钟视频批处理平均每条视频约 3.3 分钟、0.009 美元,其中 57 个 asks 被满足,21 个部分满足,没有 missed。
ledger.add("video edit, 15 s reel", "4 + vision", 2, 0, "21,400", "about 100 s", "24/24")四次模型调用分别是 analysis request、design、critic 和 reply。Vision calls 会在导出后查看每个 clip 和每个 effect。
Accessibility Tree Driver
有些程序没有文件格式、命令行或 API。不过,大多数 Windows 程序会通过 UI Automation 描述自己的窗口,即一个包含 roles、names 和 actions 的 control tree,模型可以把它当作文本读取。我们把这棵 tree 暴露为 tools:observe_window 读取它,act 在命名控件上最多执行六个 actions。
# desktop/uia.py: what observe_window reads, in one cross-process call of about 50 to 100 msdef snapshot(hwnd, max_elements=300): arr = IUIA.ElementFromHandle(hwnd).FindAllBuildCache(4, _COND_VISIBLE, _CR) # ONE call fetches every visible control els = [] for i in range(min(arr.Length, max_elements * 4)): # their properties are already cached on our side el = arr.GetElement(i) name, aid = el.CachedName or "", el.CachedAutomationId or "" ops = [op for op, prop in (("invoke", P_INVOKE), ("toggle", P_TOGGLE), ("value", P_VALUE)) if el.GetCachedPropertyValue(prop)] if name or aid: els.append(El(f"e{len(els) + 1}", ROLES.get(el.CachedControlType, "Custom"), name, aid, tuple(ops))) return els模型先为 Calculator、再为 CapCut 读取这棵 tree 作为文本。
#### OUTPUT ####APP: calculatorapp.exe (pid 4242) | window "Calculator" | richness: rich (26 interactable of 31 elements)e3 Text "Display is 0" [CalculatorResults]e13 Button "Seven" [num7Button] {invoke}e28 Button "Equals" [equalButton] {invoke}... (23 more)APP: capcut.exe (pid 9120) | window "CapCut" | richness: EMPTY (0 interactable of 3 elements)NOTE: the UI tree is thin; for anything not listed use ground_click with a plain-words target (a screenshot may be attached).Calculator 按名称交出每个按钮。由于 CapCut 绘制自己的控件,UI Automation 在那里只能看到一个空窗口,这就是旧 Agent 必须基于截图工作的原因。
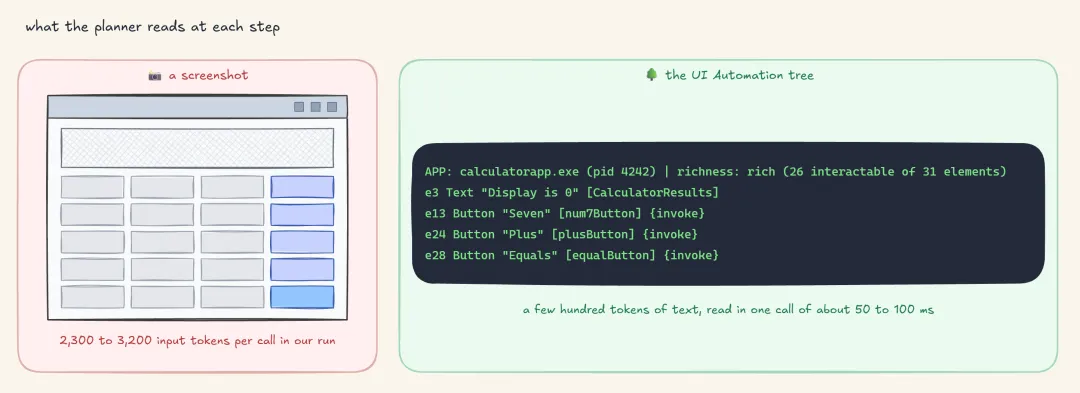
Tool 描述要求选择最便宜的可靠路径,所以模型会在一个 action 中输入整个表达式,而不是按六个按钮。完成后,它必须引用能证明答案的 on-screen text。
{"tool": "act", "args": {"actions": [{"op": "type", "text": "25*4"}, {"op": "key", "keys": ["enter"], "expect": {"text_contains": "100"}}]}}还有一些习惯能让它保持快速。
程序自己的 shortcuts。 CapCut 附带约 80 个 editor shortcuts 的数据文件,例如
importMedia=Ctrl+I,模型被告知它们“精确且即时,因此优先于点击”。只在需要时使用像素。
ground_clicktool 会在 tree 少于 6 个命名、可执行控件时才提供,它会在截图中找到目标。没有固定 sleeps。
act会等到窗口发生变化并稳定下来,通常在 250 ms 内。后台 deep thinker。 一个更慢的模型会在后台线程中规划困难任务,而快速 planner 从显而易见的步骤开始。
以 tree 作为眼睛,一个新的 Calculator 任务用了 3 次模型调用、2 次 tool calls 和 3.6 秒。当 vision fallback 运行时,一个小型 click model 会找到位置:在我的测试中,Vocaela-2–500M 找到了 30 个 CapCut 目标中的 29 个。
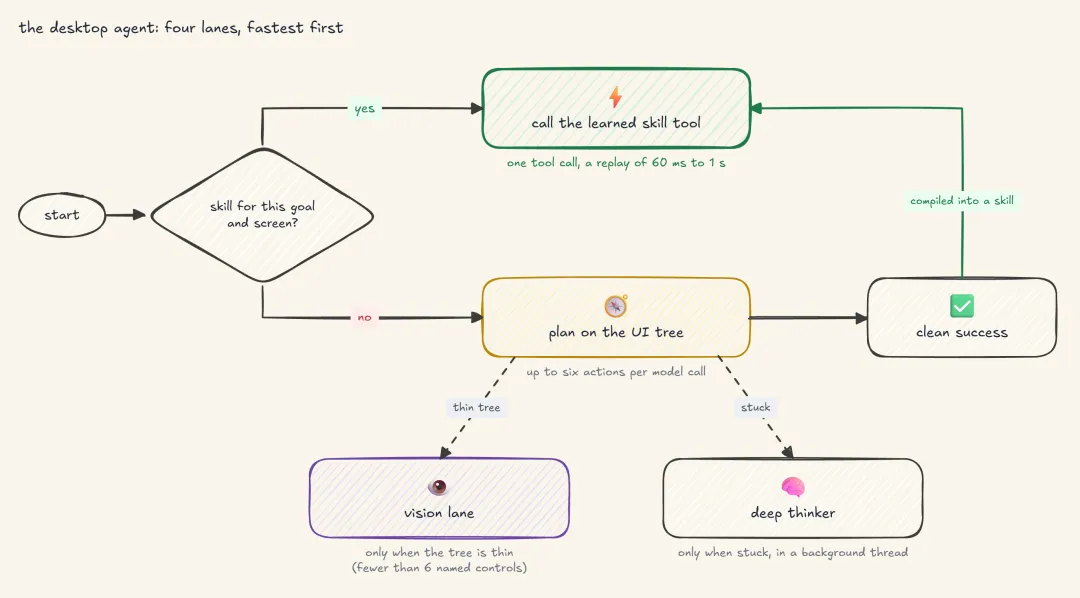
每个 action 还会经过用代码编写的 safety check,因为屏幕上的文本可能携带攻击者的指令。如果一个假 banner 命令模型按下“Delete all files”,classifier 仍会把这次点击评为高风险,无人值守运行会拒绝。
#### OUTPUT ####invoke "Seven" low runskey alt+f4 medium hotkey alt+f4 may close or delete something: needs a yesinvoke "Delete all files" high 'Delete all files deleteAllButton' looks irreversible or costly: needs a yestype into a password field block refusing to type into a password fieldkey win+r block system hotkey win+r is not allowedledger.add("window, new Calculator task", 3, 2, 2, "4,720", "3.6 s", "read back")Skill compiler
这仍然留下第五项成本:screen agent 每次运行都会重新探索程序。我们的 Agent 会把一次干净运行编译成一个 skill,使用命名每个 control 而不是其 pixels 的 locators,并把值转换成 typed placeholders。这个 skill 会注册为一个新 tool,从此该任务只需要模型一次调用。Skill 只会在今天的窗口看起来像它学习时的窗口时运行,连续失败两次会把它关闭。

这是从一次成功运行“calculate 12 + 30”编译出的 skill,注册为 tool,然后被调用。
#### OUTPUT ####compiled calculate-a-b-29da8f intent 'calculate {a} + {b}' params a, b (num, num)steps [{"op": "type", "text": "{{a}}+{{b}}"}, {"op": "key", "keys": ["enter"]}]final read CalculatorResults (it showed "Display is 42")tool calculate_a_plus_b(a: number, b: number)> calculate 25 + 4model 1.2 s in 1,318 tok -> calculate_a_plus_b(a=25, b=4)tool 0.05 s <- ok, read back "Display is 29"model 0.8 s in 1,402 tok -> reply25 + 4 = 29, read from Calculator's display.total 2.1 s, 2 model calls, 1 tool call, 2,720 input tokens'calculate twelve + thirty' -> no match: the placeholders only accept numbers, so the model plans it on the tree一个六次按键的 Calculator skill 会在 56 到 64 毫秒内重放,一个 5.4 秒学会的 Character Map 任务会在 1.0 秒内重放,包括 app start。OSExpert 发现了同一个杠杆:computer-use agents 比人类专家慢 5 到 50 倍,而从探索中学习 skills 可以弥合约 80% 的差距。
ledger.add("window, learned skill as a tool", 2, 1, 2, "2,720", "2.1 s", "read back")与 Baseline 的评估
现在我们打印完整 ledger,共十三行,并用它检查四个预测。
ledger.show()#### OUTPUT ####task model tools UI tokens seconds checksCapCut filter, screen agent 13 0 32 30k-42k 155 s failedlayered image, Eid Sale poster 2 1 0 3,115 2.9 s 2/2spreadsheet, marks sheet 2 1 0 6,915 18.9 s 19/19slides, 10-slide deck 3 1 0 8,240 22 s 11/11drafting, 10 marla house plan 2 1 0 3,268 4.4 s 17/173D views of the plan 2 1 0 3,410 33.8 s 15/15building model, IFC4 2 1 0 3,190 4.6 s 3/3chain: house, 3D view, Slack post 3 3 0 12,645 38.7 s 33/33timeline, 2 clips in 4 formats 2 1 0 2,530 3.3 s 4/4title animation, Lottie + .jsx 2 1 0 2,380 6.1 s 3/3video edit, 15 s reel 4 + vision 2 0 21,400 about 100 s 24/24window, new Calculator task 3 2 2 4,720 3.6 s read backwindow, learned skill as a tool 2 1 2 2,720 2.1 s read back模型调用从一次失败运行的 13 次,降到了每个任务 2 或 3 次。 Video edit 更多,因为它的创意决策需要模型做两次。
多数行的 input tokens 降低了 7 到 15 倍,约 2,400 到 4,700,对比 30,000 到 42,000。这个预测只部分成立:spreadsheet 和 deck 的 plan 较长,只降低了 4 到 5 倍;video edit 则是有意查看图片。
每一行都带有来自 tool 内部的 checks,并且全部通过。失败的 check 会在导致问题的步骤停止 chain。
只有两个 window 行触碰了 visible program,而且它们是通过 accessibility tree 完成的。
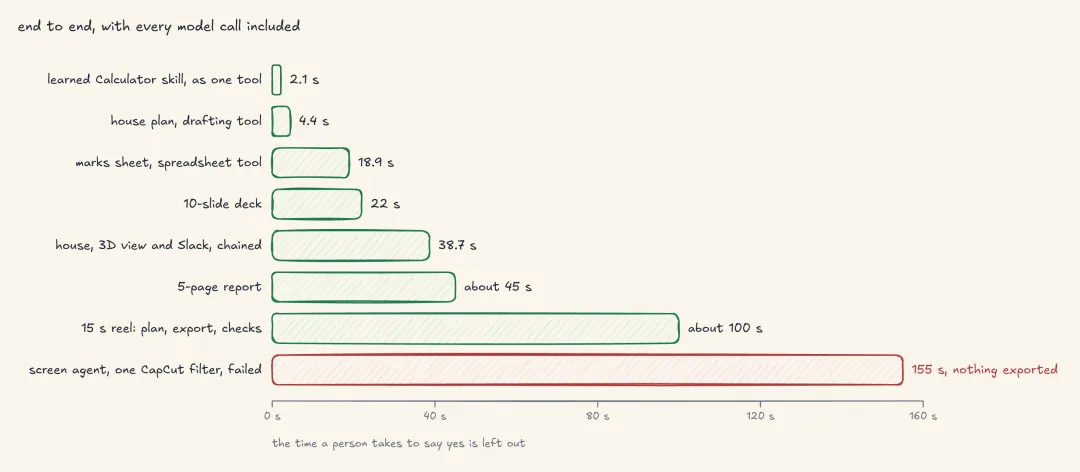
# ablate.py: the cost of removing each design choice, from unit costs measured in this postshot, result_json = (1100, 2500), 260 # tokens: one 1080p screenshot, the drafting tool's resultschema, tools, shortlist = 180, 200, 19 # tokens per schema, tools in the agent, tools in the chain's promptprint(f"results as pictures +{shot[0] - result_json:,} to {shot[1] - result_json:,} tokens per result")print(f"every schema in the prompt +{schema * (tools - shortlist):,} tokens per model call")print(f"one round trip per tool +{(3 + 1) - 2} model calls for the three-tool sentence")print(f"a cold Office per render +{6 - 2} to {8 - 1} s per render")为了看清设计中的哪一部分在发挥作用,我一次移除一个选择,并用前文测得的单位成本为每次移除定价。
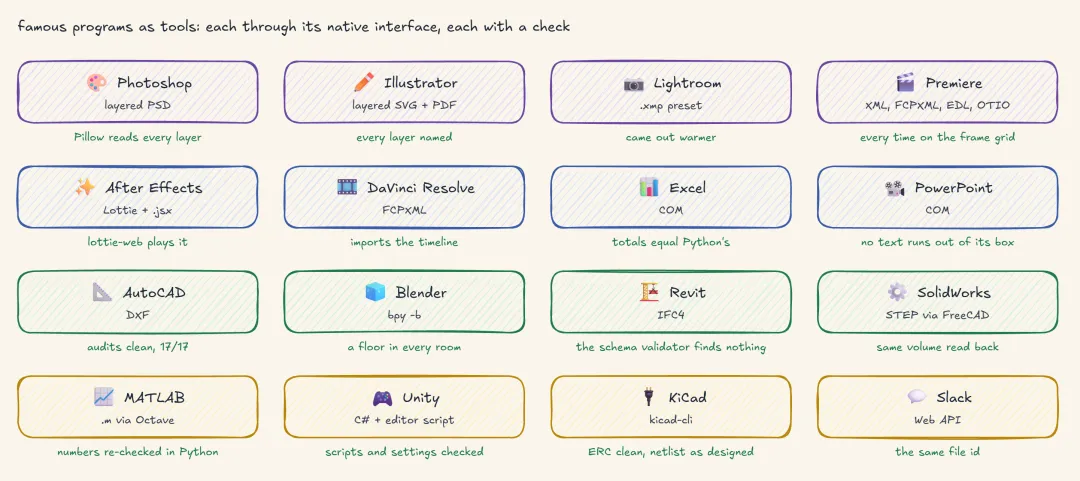
除了 ledger 之外,同样的模式还覆盖了更多程序。Illustrator 获得 layered SVG 和 print PDF,Lightroom 获得 .xmp preset 并在被修改的照片上检查,SolidWorks 获得 FreeCAD headless 构建的 STEP files,MATLAB scripts 在 GNU Octave 中运行,并用 Python 重新检查每个 printed number。我的测试套件真实运行 40 多个这样的程序,通过 180/180。
#### OUTPUT ####results as pictures +840 to 2,240 tokens per resultevery schema in the prompt +32,580 tokens per model callone round trip per tool +2 model calls for the three-tool sentencea cold Office per render +4 to 7 s per renderShortlist 节省的 tokens 最多,text results 次之。Chain 只节省两次调用,但每次都是用户等待的 1 到 2 秒。Verifier 没出现在输出中,因为移除它不花时间或 tokens。没有它,一个让 Bed Room 1 失去门的 plan 会毫无警告地发出。
已知限制
每个功能都有前期工作成本。 因为每个 tool 都需要 implementation 和 checks,所以 Agent 覆盖约一百个程序和服务,而不是 Windows 上的每个程序。
模型仍可能选错 tool 或错误 arguments。 Shortlist 可能把正确 tool 排除在外,而 tool 只能拒绝它的 checks 能看到的问题。
Checks 证明数字,不证明意义。 记录的 marks-sheet plan 有两个 check 未捕获的疏漏:“Students Passed”把 grade F 也算进去了;Percentage 被输入为 percent,因此 86 显示为 8600.0%。
Vision 是薄弱 fallback。 只有图标的按钮仍然很难定位。
模型调用仍然消耗秒级时间。 每次需要 1 到 3 秒,部分原因是网络距离,所以包含很多决策的任务仍会受模型约束。
Budgets 和 platform。 Desktop run 会在 30 steps、14 model calls 或 180 seconds 时停止,而且一切只在 Windows 上运行。
可迁移的设计规则
我的 CapCut Agent 很慢,是因为它被给予的 interface 很慢;更快的模型只会缩小六项成本中的两项。修复方式是 interface lifting:把每个程序的功能作为 typed tools 提供给模型,并通过程序已经拥有的 interface 执行。
如果今天从头开始构建另一个 Agent,我会保留这个 Agent 的三个习惯:在使用截图前先寻找每个程序自己的 interface,把每个功能包装成会检查自身输出的 typed tool,并在任何其他人会看到的东西发出前等人确认。
完整代码:https://github.com/FareedKhan-dev/ai-pc