ARTICLE · 1114875
告别单体AI缺陷!LangGraph分层自愈多智能体实战搭建

来源:DeepHub IMBA 本文约13000字,建议阅读15+分钟 本文介绍了基于LangGraph搭建分层自愈多智能体系统的完整实战方案。
编排专业化 AI 子智能体:按角色分配思考级别、隔离工具沙箱,并用循环反馈构建更可靠的 Python 智能体系统
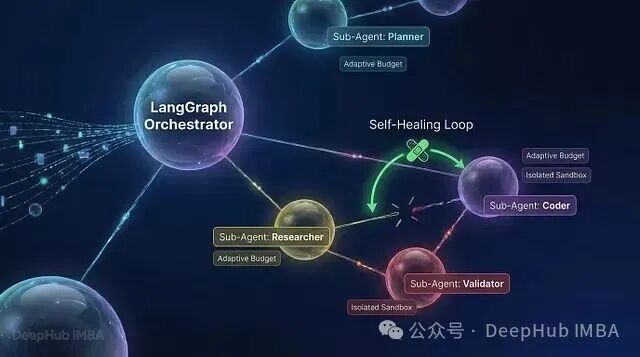
如今的现代软件开发工作流里,AI 几乎已经出现在每一层:自动生成代码、复杂数据分析、多步推理,都很常见。
把所有能力都塞进一个单体 AI 智能体,一个 LLM 同时面对几十种工具和大量指令时,很容易受到上下文污染,甚至混淆工具签名,幻觉和错误率随之升高。指令一旦执行不稳,最终输出质量也会跟着下降。
本文用 LangGraph 在 Python 中搭建一个模块化、分层式的多智能体状态机,示例是一支自愈式多智能体软件工程团队,角色包括架构师、开发者、子进程 Pytest 沙箱、调试器和审查器;同一种架构模式也适用于其他 AI 工程工作流。
思路是:复杂任务拆给不同的专业化子智能体,各角色只拿到与职责相匹配的推理量和工具权限,任务放进受控沙箱执行,再用持续反馈把测试结果送回系统。这样智能体可以在交付之前自行测试、发现问题并修复,最终输出经过验证的结果。
架构概览
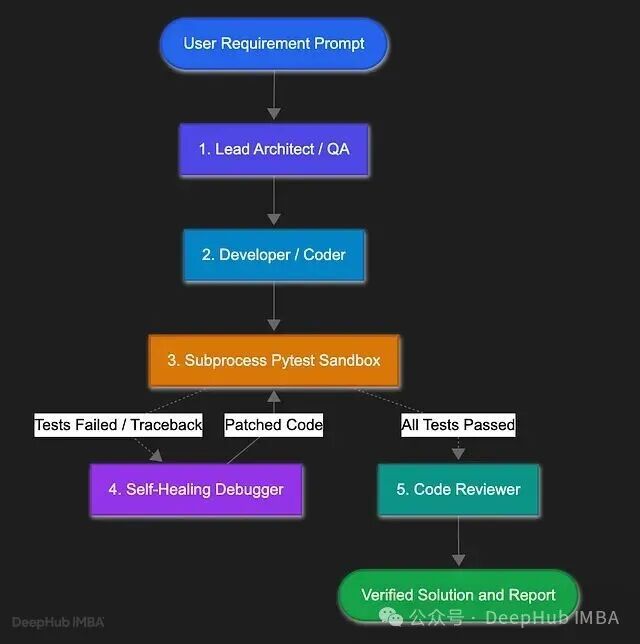
这套系统主要依赖两条设计原则。
异构模型分层与自适应思考级别:角色复杂度不同,没必要统一使用同一个模型,也不需要给每个角色相同的计算预算。
架构师(gemini-pro-latest,high 思考级别):承担推理强度最高的工作,包括界定问题边界、预判竞态条件,以及设计严格的 pytest 测试套件。
开发者(gemini-3.7-flash,medium 思考级别):按照架构师给出的明确规格生成代码,在推理能力和吞吐量之间取平衡。
测试运行器:确定性的 Python 子进程,本地执行 pytest。一次测试大约需要 15 毫秒,不消耗任何 LLM API Token。
调试器(gemini-3.7-flash,high 思考级别):把更多推理资源留给因果根因分析,从原始堆栈跟踪定位真正出错的代码。
审查器(gemini-flash-lite-latest,low 思考级别):处理代码风格检查、最终执行摘要这类相对直接的任务,使用轻量推理即可。
严格限制子智能体的工具作用域(最小权限原则):每个角色只拿到完成本职工作所需的输入和工具,不开放无关的终端或文件系统权限。开发者智能体不能执行任意终端命令;测试运行器只负责真正运行测试并返回结果,不让 LLM 猜测或生成测试结论。角色边界清楚之后,模型更容易把注意力放在当前任务上,也能减少工具混淆和幻觉。
LangGraph 核心概念
如果刚接触 LangGraph,可以把它看成一块共享白板。每个团队成员,也就是子智能体,只处理自己的任务,再把结果写回同一个共享空间;后续角色拿到的是团队已经积累下来的上下文。LangGraph 在这里扮演编排器(orchestrator),负责控制执行顺序,并在节点之间传递状态。
状态(TypedDict):共享白板。图中的所有智能体都读写同一个 Python 字典 AgentTeamState。用户 Prompt、技术规格、单元测试、当前代码草稿、测试结果和调试迭代次数都放在这里。
节点(Nodes):团队成员(子智能体)。每个 LangGraph 节点本质上是一个 Python 函数:接收当前状态,完成一项明确任务,例如调用 LLM 或运行测试,再返回需要写回共享状态的更新。
边(Edges):工作流逻辑。边负责决定接下来执行哪个节点。
直接边(Direct Edges):定义固定转移。架构师结束后一定进入开发者,就是一次直接职责交接。
条件边(Conditional Edges):根据当前状态决定路径。测试运行器结束后,全部测试通过就进入审查器;只要有测试失败,就转到调试器。
编译后的图(Compiled Graph):节点和边注册到 StateGraph 后,图会被编译成可执行对象。之后既可以直接运行,也可以在工作流推进时持续读取流式事件。
设置项目
创建项目目录,并在其中建立虚拟环境:
mkdir langgraph-self-healing-teamcd langgraph-self-healing-teampython3 -m venv .venvsource .venv/bin/activate
新建 requirements.txt,写入项目依赖:
langgraph>=0.2.20langchain-google-genai>=2.0.0langchain-openai>=1.6.0langchain-core>=0.3.0pydantic>=2.7.0pytest>=8.0.0rich>=13.7.0python-dotenv>=1.0.1
安装依赖:
pip install -r requirements.txt这些包各自承担不同职责:
langgraph:负责多智能体工作流的状态管理、节点交接和循环反馈。
langchain-google-genai:接入 Google Gemini 模型,并支持配置思考级别。
langchain-openai:提供可选的 OpenRouter 或 OpenAI 接口。如果不想只使用 Gemini,可以切换到 GPT 5.6、Deepseek v4 Pro 等模型。
pytest:本地子进程沙箱里的测试运行器,执行生成的测试套件并返回真实结果。
rich:负责终端日志、表格、代码的排版、颜色和语法高亮,便于观察智能体工作流与调试过程。
python-dotenv:从 .env 文件加载 API Key 和模型配置。
在项目根目录创建 .env,保存 API 凭据和模型配置:
# API KeyGEMINI_API_KEY="your_api_key_here"# OPENROUTER_API_KEY=""# OPENAI_API_KEY=""# 模型分层选择与自适应思考级别(low、medium、high)ARCHITECT_MODEL="gemini-pro-latest"ARCHITECT_THINKING_LEVEL="high"CODER_MODEL="gemini-3.7-flash"CODER_THINKING_LEVEL="medium"DEBUGGER_MODEL="gemini-3.7-flash"DEBUGGER_THINKING_LEVEL="high"REVIEWER_MODEL="gemini-flash-lite-latest"REVIEWER_THINKING_LEVEL="low"# 自愈式重试循环的最大次数MAX_DEBUG_ITERATIONS=3
环境就绪后开始搭建应用。
第 1 步:定义共享白板状态(src/state.py)
先定义智能体之间传递的数据 Schema。创建 src 目录,并在其中新建 state.py。
Pydantic 的 TestResult 模型用来表示沙箱执行 pytest 后的结构化结果:
from typing import TypedDict, List, Dict, Any, Optionalfrom pydantic import BaseModel, Fieldclass TestResult(BaseModel):passed: bool = Field(description="Whether all tests in the test suite passed")exit_code: int = Field(description="Exit code of the pytest execution process")output: str = Field(description="Captured stdout and stderr from pytest")passed_count: int = Field(default=0, description="Number of passed tests")failed_count: int = Field(default=0, description="Number of failed tests")error_summary: Optional[str] = Field(default=None, description="Concise error traceback summary")
一次测试运行里真正需要保留下来的信息都在 TestResult 中:测试套件是否通过、进程退出码、通过和失败的测试数量,以及原始输出。error_summary 只截取堆栈跟踪中与错误直接相关的部分,后面调试器会依赖它定位失败原因。
主状态 AgentTeamState 使用 Python 的 TypedDict 定义。它会贯穿整条 LangGraph 工作流;每个节点读取自己关心的字段,完成任务后再把更新写回去。
class AgentTeamState(TypedDict):"""The shared whiteboard state passed between all nodes in the LangGraph team."""user_request: strspecs: strtests: strcode: strtest_results: Dict[str, Any]iteration: intmax_iterations: intdebug_history: List[str]review_summary: strstatus: str
各字段的职责如下:
user_request:保存用户最初提交的问题,确保所有角色都能看到原始意图。
specs 和 tests:由架构师生成。开发者根据规格实现方案,测试运行器执行对应测试。
code:当前版本的 Python 实现。最初由开发者写入,测试失败后可能由调试器替换。
test_results:沙箱返回的结构化结果。工作流据此决定进入审查器还是回到调试器。
iteration 和 max_iterations:记录自愈循环次数并设置上限,避免调试器无限重试,例如最多尝试 3 次。
debug_history:保存每轮调试识别出的根因和修复动作,留下代码演进记录。
review_summary:代码通过验证后,保存审查器输出的最终报告。
status:记录工作流当前阶段,例如生成代码、运行测试、调试或等待审查。
第 2 步:处理模型分层与自适应思考级别(src/config.py)
这一层需要一个统一的 LLM 工厂,根据子智能体角色选择模型,并配置自适应推理级别(low、medium、high)。
创建 src/config.py,先写默认配置:
import osfrom typing import Dict, Any, Optionalfrom dotenv import load_dotenvfrom langchain_core.language_models.chat_models import BaseChatModelfrom langchain_google_genai import ChatGoogleGenerativeAIfrom langchain_openai import ChatOpenAIload_dotenv()# 角色配置与自适应思考级别DEFAULT_CONFIG: Dict[str, Dict[str, Any]] = {"architect": {"model": os.getenv("ARCHITECT_MODEL", "gemini-pro-latest"),"thinking_level": os.getenv("ARCHITECT_THINKING_LEVEL", "high"),"temperature": 0.2,},"coder": {"model": os.getenv("CODER_MODEL", "gemini-3.7-flash"),"thinking_level": os.getenv("CODER_THINKING_LEVEL", "medium"),"temperature": 0.2,},"debugger": {"model": os.getenv("DEBUGGER_MODEL", "gemini-3.7-flash"),"thinking_level": os.getenv("DEBUGGER_THINKING_LEVEL", "high"),"temperature": 0.1,},"reviewer": {"model": os.getenv("REVIEWER_MODEL", "gemini-flash-lite-latest"),"thinking_level": os.getenv("REVIEWER_THINKING_LEVEL", "low"),"temperature": 0.2,},}MAX_DEBUG_ITERATIONS = int(os.getenv("MAX_DEBUG_ITERATIONS", "3"))
配置的核心是按任务难度分配推理预算,而不是让所有角色使用同一档能力。这样既保留关键环节的推理质量,也能控制速度与成本。
architect 和 debugger 使用 high。系统设计和错误堆栈诊断都要做较深的多步推理。
coder 使用 medium。它主要执行架构师已经确定的方案,需要的是稳定、较快的代码生成。
reviewer 使用 low。这个角色只在整体结果已经确定后生成执行摘要,没有必要继续投入高推理预算。
同一个文件中再实现 get_llm():
def get_llm(role: str,model_override: Optional[str] = None,thinking_level_override: Optional[str] = None,) -> BaseChatModel:"""Unified LLM Factory. Returns an initialized LangChain ChatModel configuredspecifically for the sub-agent role with adaptive thinking levels."""role_conf = DEFAULT_CONFIG.get(role, DEFAULT_CONFIG["coder"])model_name = model_override or role_conf["model"]thinking_level = thinking_level_override or role_conf["thinking_level"]temp = role_conf["temperature"]openrouter_key = os.getenv("OPENROUTER_API_KEY")openai_key = os.getenv("OPENAI_API_KEY")gemini_key = os.getenv("GEMINI_API_KEY") or os.getenv("GOOGLE_API_KEY")# 1. OpenRouter Provider(处理 deepseek/deepseek-r1:free 之类的开放模型)if openrouter_key and ("/" in model_name or not gemini_key):return ChatOpenAI(model=model_name,api_key=openrouter_key,base_url="https://openrouter.ai/api/v1",temperature=temp,)# 2. Google Gemini Providerif "gemini" in model_name.lower() or gemini_key:kwargs: Dict[str, Any] = {"model": model_name,"temperature": temp,}if gemini_key:kwargs["google_api_key"] = gemini_keyif thinking_level and thinking_level.lower() in ["low", "medium", "high"]:kwargs["thinking_level"] = thinking_level.lower()return ChatGoogleGenerativeAI(**kwargs)# 3. 直接使用 OpenAI Provider 作为回退方案if openai_key:return ChatOpenAI(model=model_name,api_key=openai_key,temperature=temp,)return ChatGoogleGenerativeAI(model=model_name, temperature=temp)
thinking_level(low、medium、high)会直接给 ChatGoogleGenerativeAI,各角色的推理投入可以独立控制;返回值统一实现 LangChain的 BaseChatModel,所以图节点不必关心模型提供商,统一调用 .invoke() 即可。
第 3 步:确定性的 Pytest 沙箱(src/sandbox.py)
AI 智能体架构里一个常见误区,是让 LLM 自己判断刚生成的代码是否正确。即便代码里藏着 Bug,模型也可能很自信地预测测试能够通过;就算它指出了一些问题,也没有客观执行结果可以证明判断可靠。
更稳妥的办法是直接让代码运行。这里新增一个本地执行节点,把生成的实现和测试写到临时目录,再在隔离的 Python 子进程里执行 pytest。返回的是实际测试结果,可以直接写回工作流,而不是模型对代码正确性的主观判断。
在 src 下创建 sandbox.py。辅助函数 _extract_error_summary() 负责从原始 pytest 输出里截取最有价值的失败信息,避免把整段日志都塞给调试器:
import osimport reimport sysimport tempfileimport subprocessfrom typing import Dict, Anydef _extract_error_summary(pytest_output: str) -> str:"""Extracts the most relevant failure section (FAILURES / ERRORS traceback)from the raw pytest output to provide dense, actionable signal to the Debugger."""if "=== FAILURES ===" in pytest_output:failures_part = pytest_output.split("=== FAILURES ===")[-1]if "=== short test summary info ===" in failures_part:failures_part = failures_part.split("=== short test summary info ===")[0]return failures_part.strip()if "=== ERRORS ===" in pytest_output:return pytest_output.split("=== ERRORS ===")[-1].strip()# 回退到最后 25 行lines = pytest_output.splitlines()return "\n".join(lines[-25:])
它会去掉终端颜色代码和测试头部样板,只留下准确的断言失败信息(assert result == expected)与堆栈跟踪。调试器拿到的上下文更紧凑,Token 不会浪费在无关日志上。
同一个文件里继续实现主沙箱函数 run_tests_in_sandbox():
def run_tests_in_sandbox(code: str, tests: str, timeout_seconds: int = 15) -> Dict[str, Any]:"""Executes unit tests against the generated code in an isolated temporary directory.Runs locally in a Python subprocess with zero LLM API calls ($0.00 / 0 tokens)."""with tempfile.TemporaryDirectory() as temp_dir:code_file = os.path.join(temp_dir, "solution.py")test_file = os.path.join(temp_dir, "test_solution.py")# 把解决方案代码和测试文件写入临时目录with open(code_file, "w", encoding="utf-8") as f:f.write(code)with open(test_file, "w", encoding="utf-8") as f:f.write(tests)# 使用当前 Python 解释器构建执行命令python_exec = sys.executablecmd = [python_exec, "-m", "pytest", "-v", "test_solution.py"]try:result = subprocess.run(cmd,cwd=temp_dir,capture_output=True,text=True,timeout=timeout_seconds,)output = (result.stdout + "\n" + result.stderr).strip()exit_code = result.returncodeexcept subprocess.TimeoutExpired as e:output = f"Execution Timed Out after {timeout_seconds} seconds! Possible infinite loop.\n" + (e.stdout or "")exit_code = -1passed = (exit_code == 0)passed_count = 0failed_count = 0passed_match = re.search(r"(\d+)\s+passed", output)if passed_match:passed_count = int(passed_match.group(1))failed_match = re.search(r"(\d+)\s+failed", output)if failed_match:failed_count = int(failed_match.group(1))elif not passed and exit_code != 0:failed_count = 1error_summary = Noneif not passed:error_summary = _extract_error_summary(output)return {"passed": passed,"exit_code": exit_code,"output": output,"passed_count": passed_count,"failed_count": failed_count,"error_summary": error_summary,}
这段逻辑把代码验证变成了确定性执行,而不是让 LLM 给自己的实现打分。几个细节直接决定了沙箱是否可靠:
tempfile.TemporaryDirectory():每轮测试都创建独立临时工作区,代码和测试写入其中,运行结束自动清理。
timeout=15:给测试执行加硬性上限。生成代码一旦进入无限循环或耗时过长,子进程会被终止,不会拖住整个智能体工作流。
exit_code == 0:直接使用 pytest 的退出码判断通过与失败。0 代表测试套件成功结束,任何非零值都说明需要把结果和堆栈跟踪送给调试器。
结构化测试结果:除了原始输出,函数还提取通过数、失败数,并生成 error_summary。这些字段写回共享状态后,图可以据此决定继续前进还是进入自愈循环。
第 4 步:为每个专业智能体编写系统 Prompt(src/prompts.py)
多智能体系统里的系统 Prompt 不能无限扩张。每个角色需要知道自己的职责、边界和输出格式,但不该背负其他角色的指令;作用域越清楚,越不容易在执行时互相干扰。
在 src 目录创建 prompts.py,定义四个专业角色的系统 Prompt:
ARCHITECT_SYSTEM_PROMPT = """You are the Lead Software Architect and Quality Assurance Principal.Your role is to analyze the user's software engineering requirements and design:1. Architectural Specification: Detailed function/class signatures, data structures, and edge-case requirements.2. Comprehensive Pytest Suite: A rigorous set of unit tests in `pytest` format.IMPORTANT TEST RULES:- The tests MUST import from `solution` (e.g. `from solution import ClassName, function_name`).- Include test cases for standard happy paths AND tricky edge cases (e.g., empty inputs, boundary limits, invalid types, concurrency/ordering if applicable).- Write self-contained tests without external network dependencies.Provide your response in two distinct markdown sections:### SPECIFICATIONS<detailed specifications and API contracts>### TESTS```python<complete pytest code>```"""CODER_SYSTEM_PROMPT = """You are a Senior Python Developer.Your role is to write clean, idiomatic, and robust Python code that implements the provided Architecture Specifications and passes 100% of the Pytest Suite.RULES:- Implement ONLY the implementation code (do NOT include tests in your output).- Use proper typing, error handling, and docstrings.- Output ONLY the executable Python code inside a ```python ``` code block. Do not include extraneous conversational text."""DEBUGGER_SYSTEM_PROMPT = """You are an Expert Debugger and Causal Root-Cause Analyst.A Python solution was executed against its test suite in an isolated sandbox and FAILED.Your job:1. Carefully inspect the failing Pytest Traceback and Error Summary.2. Cross-reference the traceback with the provided Implementation Code and Test Suite.3. Identify the EXACT root cause (e.g., off-by-one error, incorrect data structure, missing edge-case branch).4. Provide a 2-3 sentence diagnosis explaining the bug.5. Provide the COMPLETE, corrected Python implementation code.Output format:### DIAGNOSIS<2-3 sentence root-cause diagnosis>### PATCHED_CODE```python<complete corrected python code>```"""REVIEWER_SYSTEM_PROMPT = """You are a Principal Code Reviewer.The multi-agent engineering team has completed the code and passed all unit tests.Your job is to provide a concise, high-level code quality summary:- Verify correctness and adherence to original user requirements.- Note any key algorithmic strengths or future optimization ideas.- Keep the summary under 150 words."""
这里把输出结构和职责边界写得很死。ARCHITECT_SYSTEM_PROMPT 要求固定输出 ### SPECIFICATIONS 与 ### TESTS,解析器就能稳定拆开架构说明和可执行测试代码。Coder 只写实现、不碰测试;Debugger 给出 2 句简短诊断后,还必须返回完整修复代码。每个子智能体只处理自己那一段工作,职责重叠越少,幻觉越容易控制。
第 5 步:构建子智能体节点(src/nodes.py)
接下来进入执行层,开始定义节点函数。
LangGraph 节点就是普通 Python 函数。函数接收共享的 AgentTeamState,完成一次明确操作,例如调用 LLM、执行测试,再把需要修改的字段返回。LangGraph 把这些结果合并回状态,后面的节点自然能看到最新上下文。
在 src 目录新建 nodes.py,按角色逐个加入节点。
1、用于提取代码和拆分规格的辅助解析器
LLM 的输出格式并不总是完全服从 Prompt。即使已经要求只返回代码,模型仍可能加 Markdown 围栏(python ... ),也可能多写一两句介绍。两个小工具函数就够了:把不同响应格式统一成字符串,再把代码块和架构师的两类输出稳定拆出来。
在 src/nodes.py 中加入 import 与辅助函数:
import refrom typing import Dict, Any, Listfrom langchain_core.messages import SystemMessage, HumanMessagefrom src.state import AgentTeamStatefrom src.config import get_llmfrom src.sandbox import run_tests_in_sandboxfrom src.prompts import (ARCHITECT_SYSTEM_PROMPT,CODER_SYSTEM_PROMPT,DEBUGGER_SYSTEM_PROMPT,REVIEWER_SYSTEM_PROMPT,)def _get_text(content: Any) -> str:"""Extracts a clean string from either a standard string or list-of-dict content blocksreturned by modern LangChain message objects."""if isinstance(content, str):return contentif isinstance(content, list):parts = []for item in content:if isinstance(item, str):parts.append(item)elif isinstance(item, dict) and "text" in item:parts.append(str(item["text"]))return "\n".join(parts).strip()return str(content).strip()def _extract_code(text: Any) -> str:"""Extracts executable Python code from markdown backticks using regex.If no backticks are found, falls back to returning the cleaned raw text."""clean_text = _get_text(text)match = re.search(r"```(?:python)?\s*\n(.*?)\n```", clean_text, re.DOTALL)if match:return match.group(1).strip()return clean_text.strip()def _parse_architect_output(raw_content: Any) -> tuple[str, str]:"""Splits the Architect's raw output into its two distinct deliverables:the architectural specification text and the pytest test suite."""text = _get_text(raw_content)specs = texttests = ""if "### TESTS" in text:parts = text.split("### TESTS")specs = parts[0].replace("### SPECIFICATIONS", "").strip()tests = _extract_code(parts[1])elif "```python" in text:tests = _extract_code(text)specs = text.split("```python")[0].strip()return specs, tests
三个函数分别解决不同问题:
_get_text():模型提供商和 LangChain Wrapper 可能返回普通字符串,也可能返回 [{"type": "text", "text": "..."}] 一类结构化内容。它把这些形式统一整理成普通 Python 字符串,后续逻辑不再关心底层响应类型。
_extract_code():用带 re.DOTALL 的正则 r"```(?:python)?\s*\n(.*?)\n```" 提取多行 Python 代码,开头围栏是否带 python 都能识别;没有代码块时就返回清理后的原始文本。
_parse_architect_output():架构师以 ### TESTS 分隔输出,标记前的内容写入 specs,后面的代码抽取到 tests。自然语言规格和真正要执行的测试代码从这里开始分开保存。
2、子智能体 1:首席架构师节点(architect_node)
首席架构师是工作流入口,采用测试驱动开发(Test-Driven Development,TDD)思路。它不会先写实现,而是先读用户需求,确定数据结构和类接口,再设计完整的 pytest 套件。正常路径和重要边界场景都要覆盖,开发者后面只需要按这份契约实现。
把 architect_node() 加入 src/nodes.py:
def architect_node(state: AgentTeamState) -> Dict[str, Any]:"""Sub-Agent 1: Lead Architect (High Reasoning Tier).Analyzes user requirements, designs architectural specifications,and authors an exhaustive Pytest suite covering happy paths and edge cases."""llm = get_llm("architect")messages = [SystemMessage(content=ARCHITECT_SYSTEM_PROMPT),HumanMessage(content=f"Requirements:\n{state['user_request']}"),]response = llm.invoke(messages)specs, tests = _parse_architect_output(str(response.content))return {"specs": specs,"tests": tests,"status": "specs_ready",}
get_llm("architect") 会初始化 high 思考级别的 gemini-pro-latest。架构师要理解需求、制定方案,还要预判线程安全、空集合、边界条件等问题,因果规划比单纯写代码更重。消息层则很简单:ARCHITECT_SYSTEM_PROMPT 作为 SystemMessage,用户原始 Prompt state['user_request'] 作为 HumanMessage。节点结束时返回 specs、tests 和 status = "specs_ready",LangGraph 再把这几个字段并入 AgentTeamState。
3、子智能体 2:开发者节点(developer_node)
规格和测试生成后,开发者接手实现。它的任务是写出符合 Python 惯用写法的代码,落实架构规格,并满足架构师准备的全部测试。
在 src/nodes.py 中加入 developer_node():
def developer_node(state: AgentTeamState) -> Dict[str, Any]:"""Sub-Agent 2: Developer / Coder (Fast Workhorse Tier).Synthesizes the Python implementation code grounded in the specificationsand the explicit assertions of the Pytest suite."""llm = get_llm("coder")prompt = f"""Requirements:{state['user_request']}Architect Specifications:{state['specs']}Pytest Suite:```python{state['tests']}```Write the complete Python implementation code to satisfy all tests."""messages = [SystemMessage(content=CODER_SYSTEM_PROMPT),HumanMessage(content=prompt),]response = llm.invoke(messages)code = _extract_code(response.content)return {"code": code,"status": "code_generated",}
开发者节点调用 get_llm("coder"),使用 medium 思考级别的 gemini-3.7-flash。架构师已经给出了 API 蓝图和测试断言,开发阶段不用重新做一遍系统设计,重点转成速度和代码准确性,medium 足够,也能省下 Token 和成本。
这里还有一个很实际的约束:state['tests'] 直接进入 Developer Prompt。模型能看到准确断言,也就能明确方法名、参数类型和返回值。生成结果经过 _extract_code() 清理后,节点返回 {"code": code, "status": "code_generated"}。
4、子智能体 3:确定性测试沙箱节点(test_runner_node)
测试沙箱是整套系统里很关键的一层。它不问 LLM“代码看起来对不对”,而是直接在隔离子进程里跑 pytest。整个测试过程发生在本地,不调用 LLM API,通常约 15 毫秒就能完成。
在 src/nodes.py 中加入 test_runner_node():
def test_runner_node(state: AgentTeamState) -> Dict[str, Any]:"""Sub-Agent 3: Deterministic Test Sandbox ($0.00 / 0 Tokens).Executes tests against the code in an isolated temporary subprocess sandbox.Returns structured pass/fail metrics and concise error tracebacks upon failure."""test_results = run_tests_in_sandbox(code=state["code"],tests=state["tests"],timeout_seconds=15,)new_status = "tests_passed" if test_results["passed"] else "tests_failed"return {"test_results": test_results,"status": new_status,}
节点把 state["code"] 和 state["tests"] 传给 run_tests_in_sandbox(),所以这一阶段 Token 消耗为零。test_results["passed"] == True,也就是 exit_code == 0 时,状态写成 "tests_passed";否则写成 "tests_failed"。返回的 test_results 还带有执行输出、通过数、失败数和堆栈摘要,第 6 步的条件边会直接读取这些数据。
5、子智能体 4:自愈式调试器节点(debugger_node)
沙箱一旦报错,控制流就转到调试器。这里不做泛泛的代码审阅,而是把失败代码、测试断言和真实 pytest 堆栈放在一起,追到具体根因,再给出针对性的修复。
在 src/nodes.py 中加入 debugger_node():
def debugger_node(state: AgentTeamState) -> Dict[str, Any]:"""Sub-Agent 4: Debugger & Fixer (High Reasoning Tier).Performs causal root-cause analysis on execution tracebacks and stack traces.Applies surgical code patches and logs the diagnosis to the debug history."""llm = get_llm("debugger")test_results = state.get("test_results", {})error_summary = test_results.get("error_summary", test_results.get("output", "Unknown error"))current_iteration = state.get("iteration", 0) + 1prompt = f"""The implementation failed its unit tests in the execution sandbox.Current Implementation Code:```python{state['code']}```Pytest Suite:```python{state['tests']}```Execution Error Traceback:{error_summary}Please analyze the root cause of the failure and output the corrected Python code."""messages = [SystemMessage(content=DEBUGGER_SYSTEM_PROMPT),HumanMessage(content=prompt),]response = llm.invoke(messages)response_text = str(response.content)# 提取诊断摘要和修复后的代码块diagnosis = "Debugger applied code patch based on traceback."if "### DIAGNOSIS" in response_text and "### PATCHED_CODE" in response_text:diag_part = response_text.split("### PATCHED_CODE")[0]diagnosis = diag_part.replace("### DIAGNOSIS", "").strip()patched_code = _extract_code(response_text)# 把诊断结果追加到审计记录history = list(state.get("debug_history", []))history.append(f"Iteration {current_iteration}: {diagnosis}")return {"code": patched_code,"iteration": current_iteration,"debug_history": history,"status": "code_patched",}
get_llm("debugger") 给 gemini-3.7-flash 分配 high 思考级别。堆栈诊断要沿执行路径追变量状态、边界场景和错误位置,比普通代码生成更依赖推理。这里选 gemini-3.7-flash 是为了兼顾速度和分析能力;如果 1~2 轮仍修不好,也可以把这一层换成 Pro 模型,甚至设计中途切换模型的流程。
模型拿到的是精简后的 error_summary,例如 AssertionError: assert False == True, where False = allow_request('user_1'),而不是整份日志。每次经过调试器,current_iteration = state.get("iteration", 0) + 1 都会把重试计数加 1;模型给出的 2 句诊断写入 debug_history,patched_code 替换 state['code'],节点返回 status = "code_patched"。
6、子智能体 5:代码审查器节点(reviewer_node)
全部测试通过,或者重试次数达到上限后,工作流进入审查器。它负责最后一次质量检查,确认整体代码质量和 Docstring 是否清楚,并把最终结果整理成简短摘要交给用户。
在 src/nodes.py 中加入 reviewer_node():
def reviewer_node(state: AgentTeamState) -> Dict[str, Any]:"""Sub-Agent 5: Code Reviewer (Fast Mode Tier).Validates code quality, verifies requirement adherence,and produces the final executive deliverable summary."""llm = get_llm("reviewer")test_results = state.get("test_results", {})prompt = f"""Requirements:{state['user_request']}Final Implementation Code:```python{state['code']}```Test Results:Passed: {test_results.get('passed', False)} ({test_results.get('passed_count', 0)} passed, {test_results.get('failed_count', 0)} failed)Iterations Taken: {state.get('iteration', 0)}Debug History: {state.get('debug_history', [])}Provide a concise, professional code quality review and verification summary."""messages = [SystemMessage(content=REVIEWER_SYSTEM_PROMPT),HumanMessage(content=prompt),]response = llm.invoke(messages)return {"review_summary": _get_text(response.content),"status": "completed",}
审查节点调用 get_llm("reviewer"),使用 low 思考级别的 gemini-flash-lite-latest。代码已经经过测试,这一层主要做结果整理,没有继续投入高推理预算的必要。Prompt 会带上最终实现、沙箱通过/失败指标、调试总次数和完整 debug_history;节点最终返回 {"review_summary": _get_text(response.content), "status": "completed"}。
第 6 步:条件路由逻辑(src/edges.py)
节点负责做事,边负责决定工作流往哪里走。条件边(Conditional Edge)会读取节点返回的状态字典,再用一个字符串指出下一个执行节点。
在 src 目录创建 edges.py,加入路由函数:
from typing import Literalfrom src.state import AgentTeamStatedef route_after_test_runner(state: AgentTeamState) -> Literal["reviewer", "debugger"]:"""Conditional edge router evaluated immediately after `test_runner` completes.Decides whether to trigger the self-healing Debugger loop or proceed to Reviewer."""test_results = state.get("test_results", {})passed = test_results.get("passed", False)iteration = state.get("iteration", 0)max_iterations = state.get("max_iterations", 3)# 1. 正常路径:100% 的单元测试通过 -> 直接进入审查if passed:return "reviewer"# 2. 自愈循环:测试失败且仍在重试预算内 -> 触发调试器if iteration < max_iterations:return "debugger"# 3. 安全回退:超过最大重试次数 -> 带警告退出循环并进入审查器return "reviewer"
判断逻辑有三种结果:
正常路径(passed == True):第一次就通过全部测试,直接进入审查器,不再浪费调试时间和 Token。
自愈路径(passed == False 且 iteration < max_iterations):测试失败,但重试预算还没用完,代码进入调试器继续修复。
达到最大重试次数(iteration >= max_iterations):3 次调试机会耗尽后仍然失败,就停止循环并进入审查器。这个硬上限可以避免图被矛盾需求、含糊需求等问题永久卡住。
第 7 步:组装 StateGraph(src/graph.py)
节点和路由逻辑都准备好了,接下来把它们接成完整的 StateGraph。固定职责交接用直接边,测试后的分支用条件边,调试结果再回到测试节点,整个自愈循环就形成了。
在 src 目录创建 graph.py:
from langgraph.graph import StateGraph, ENDfrom src.state import AgentTeamStatefrom src.nodes import (architect_node,developer_node,test_runner_node,debugger_node,reviewer_node,)from src.edges import route_after_test_runnerdef build_self_healing_graph() -> StateGraph:"""Assembles the Multi-Agent Self-Healing Engineering Team into a LangGraph StateGraph.Configures node registrations, linear handoffs, cyclic feedback edges, and conditional routing."""# 1. 使用共享白板状态 Schema 初始化 StateGraphworkflow = StateGraph(AgentTeamState)# 2. 注册子智能体节点(把节点名称映射到 Python 可调用函数)workflow.add_node("architect", architect_node)workflow.add_node("developer", developer_node)workflow.add_node("test_runner", test_runner_node)workflow.add_node("debugger", debugger_node)workflow.add_node("reviewer", reviewer_node)# 3. 定义图的入口点workflow.set_entry_point("architect")# 4. 添加确定性的直接交接边workflow.add_edge("architect", "developer")workflow.add_edge("developer", "test_runner")# 5. 添加循环式自愈反馈边workflow.add_edge("debugger", "test_runner")# 6. 为沙箱测试评估添加条件路由边workflow.add_conditional_edges("test_runner",route_after_test_runner,{"debugger": "debugger","reviewer": "reviewer",},)# 7. 添加终止边workflow.add_edge("reviewer", END)# 8. 把图编译成可执行状态机return workflow.compile()
图的结构如下:
StateGraph(AgentTeamState):以 AgentTeamState Schema 创建有状态图。工作流每往前走一步,节点看到的都是同一份共享状态。
workflow.add_node(name, func):把 Python 函数注册成节点。设计测试、生成代码、执行测试、调试失败,各自对应一个职责。
workflow.set_entry_point("architect"):把 architect 定为入口。无论调用还是流式运行,只要传入初始状态,就从这里开始。
workflow.add_edge("architect", "developer") 和 workflow.add_edge("developer", "test_runner"):建立最前面的线性流程。架构师产出规格和测试,开发者据此写代码,随后交给测试运行器。
workflow.add_edge("debugger", "test_runner"):自愈循环的关键边。调试器修改代码后,不直接进入审查,而是回到测试运行器重新验证。
workflow.add_conditional_edges("test_runner", route_after_test_runner, ...):测试结束后调用 route_after_test_runner(state)。返回 debugger 就继续修复,返回 reviewer 就进入最终审查。
workflow.add_edge("reviewer", END):审查器完成质量检查和摘要后进入 END,图执行结束。
workflow.compile():把图定义编译成可运行对象,并在执行前验证工作流结构。
第 8 步:交互式终端 UI 与流式运行器(src/main.py)
最后补上 CLI 入口,用 rich 把各子智能体的进度实时显示在终端面板中。
在 src 目录新建 main.py,先定义 Banner 和配置表:
import osimport sysimport argparseimport timeimport warnings# 抑制 SDK 库内部警告warnings.filterwarnings("ignore")# 确保项目根目录位于 sys.path 中sys.path.insert(0, os.path.abspath(os.path.join(os.path.dirname(__file__), "..")))from rich.console import Consolefrom rich.panel import Panelfrom rich.table import Tablefrom rich.syntax import Syntaxfrom src.config import DEFAULT_CONFIG, MAX_DEBUG_ITERATIONSfrom src.graph import build_self_healing_graphfrom src.state import AgentTeamStateconsole = Console()def print_banner():console.print(Panel.fit("[bold cyan]LangGraph Self-Healing Multi-Agent Engineering Team[/bold cyan]\n""[dim]Heterogeneous Model Tiering | Sub-Agent Tool Scoping | Autonomous Pytest Sandbox[/dim]",border_style="cyan",))def print_config_table():table = Table(title="Multi-Agent Team Configuration and Model Tiers", border_style="dim")table.add_column("Sub-Agent Role", style="bold yellow")table.add_column("Assigned Model", style="cyan")table.add_column("Thinking Level", style="green")table.add_column("Primary Responsibility", style="white")table.add_row("Architect",DEFAULT_CONFIG["architect"]["model"],str(DEFAULT_CONFIG["architect"]["thinking_level"]).upper(),"Specifications and Pytest Edge-Case Suite",)table.add_row("Developer",DEFAULT_CONFIG["coder"]["model"],str(DEFAULT_CONFIG["coder"]["thinking_level"]).upper(),"Fast Code Synthesis from Specification",)table.add_row("Test Runner","Deterministic Python ($0.00 / 0 Tokens)","N/A","Subprocess Pytest Sandbox Execution",)table.add_row("Debugger",DEFAULT_CONFIG["debugger"]["model"],str(DEFAULT_CONFIG["debugger"]["thinking_level"]).upper(),"Causal Traceback Analysis and Patching",)table.add_row("Reviewer",DEFAULT_CONFIG["reviewer"]["model"],str(DEFAULT_CONFIG["reviewer"]["thinking_level"]).upper(),"Code Verification and Executive Summary",)console.print(table)console.print()
这部分代码只负责终端输出样式。接着加入 run_agent_pipeline():
def run_agent_pipeline(user_request: str):print_banner()print_config_table()console.print(Panel(f"[bold white]User Request:[/bold white]\n{user_request}", border_style="blue"))initial_state: AgentTeamState = {"user_request": user_request,"specs": "","tests": "","code": "","test_results": {},"iteration": 0,"max_iterations": MAX_DEBUG_ITERATIONS,"debug_history": [],"review_summary": "","status": "starting",}graph = build_self_healing_graph()start_time = time.time()current_state = initial_stateconsole.print("[bold green]Starting LangGraph Multi-Agent Workflow...[/bold green]\n")# 逐节点流式执行图for event in graph.stream(initial_state):for node_name, node_output in event.items():current_state.update(node_output)if node_name == "architect":console.print(Panel(f"[bold yellow][1/5] Architect Completed Specifications & Tests[/bold yellow]\n\n"f"[bold]Specifications:[/bold]\n{current_state['specs'][:300]}...\n\n"f"[bold]Generated Pytest Suite:[/bold]\n[dim]({len(current_state['tests'].splitlines())} lines of test code designed)[/dim]",border_style="yellow",))elif node_name == "developer":console.print(Panel(f"[bold cyan][2/5] Developer Completed Initial Implementation[/bold cyan]\n"f"[dim]Synthesized {len(current_state['code'].splitlines())} lines of Python code.[/dim]",border_style="cyan",))elif node_name == "test_runner":results = current_state["test_results"]if results.get("passed", False):console.print(Panel(f"[bold green][3/5] Test Runner Sandbox: PASSED[/bold green]\n"f"[green]All {results.get('passed_count', 0)} unit tests passed cleanly in subprocess sandbox.[/green]",border_style="green",))else:console.print(Panel(f"[bold red][3/5] Test Runner Sandbox: TESTS FAILED[/bold red]\n"f"[red]{results.get('failed_count', 0)} failed, {results.get('passed_count', 0)} passed.[/red]\n\n"f"[bold white]Traceback Snippet:[/bold white]\n[dim red]{results.get('error_summary', '')[:400]}[/dim red]",border_style="red",))elif node_name == "debugger":history = current_state.get("debug_history", [])latest_diag = history[-1] if history else "Patch applied."console.print(Panel(f"[bold magenta][4/5] Self-Healing Debugger (Iteration {current_state.get('iteration', 1)})[/bold magenta]\n"f"[magenta]{latest_diag}[/magenta]\n\n"f"[dim]Re-routing patched code to Test Runner Sandbox...[/dim]",border_style="magenta",))elif node_name == "reviewer":console.print(Panel(f"[bold white][5/5] Reviewer Final Report[/bold white]\n"f"{current_state.get('review_summary', '')}",border_style="white",))elapsed = round(time.time() - start_time, 2)# 显示最终交付物console.print("\n" + "=" * 80)console.print(f"[bold green]Pipeline Completed in {elapsed}s[/bold green]\n")console.print("[bold cyan]Final Verified Implementation (solution.py):[/bold cyan]")syntax_code = Syntax(current_state["code"], "python", theme="monokai", line_numbers=True)console.print(syntax_code)console.print("\n[bold yellow]Comprehensive Pytest Suite (test_solution.py):[/bold yellow]")syntax_tests = Syntax(current_state["tests"], "python", theme="monokai", line_numbers=True)console.print(syntax_tests)# 汇总指标表summary_table = Table(title="Execution Summary Metrics", border_style="cyan")summary_table.add_column("Metric", style="bold")summary_table.add_column("Value", style="green")summary_table.add_row("Total Elapsed Time", f"{elapsed} seconds")summary_table.add_row("Self-Healing Iterations", str(current_state.get("iteration", 0)))summary_table.add_row("Pytest Pass Status", "Passed (100%)" if current_state["test_results"].get("passed") else "Failed")summary_table.add_row("Unit Tests Passed", str(current_state["test_results"].get("passed_count", 0)))console.print(summary_table)
run_agent_pipeline() 把前面的各层真正串起来。函数先初始化共享 AgentTeamState,再构建自愈式 LangGraph,并逐节点流式执行。
每个节点结束时,当前状态都会更新,Rich 面板也会同步显示对应阶段的信息:架构师生成的规格与测试、开发者实现、测试运行结果、调试迭代,以及审查器最终报告。工作流结束后,终端还会打印经过验证的实现、生成的 pytest 测试套件,以及总运行时间、调试次数和测试结果等汇总指标。
最后加入 CLI 参数解析器:
def main():parser = argparse.ArgumentParser(description="LangGraph Self-Healing Multi-Agent Engineering Team")parser.add_argument("--prompt",type=str,default="Build an in-memory Sliding Window Rate Limiter class in Python with thread safety, per-user limits, and a clean method `allow_request(user_id: str) -> bool`.",help="Software engineering prompt for the multi-agent team",)args = parser.parse_args()run_agent_pipeline(args.prompt)if __name__ == "__main__":main()
测试与演示
架构搭好后,用一个有一定复杂度的算法工程问题跑完整流程。终端执行:
python src/main.py --prompt "Build an in-memory Sliding Window Rate Limiter class in Python with thread safety, per-user limits, and a method allow_request(user_id: str) -> bool."这次运行会依次经历下面几个阶段:
[1/5] 首席架构师:分析限流器需求,生成多线程 pytest 测试套件,覆盖时间戳清理、滑动窗口阈值约束和并发多线程请求。
[2/5] 开发者:使用 collections.deque 和 threading.Lock 生成初始 SlidingWindowRateLimiter 类。
[3/5] 测试运行器沙箱(迭代 0):执行 pytest。并发压力测试失败,因为时间戳清理发生在临界锁区之外,形成竞态条件,多个线程因此超过允许的请求数量。
[4/5] 自愈式调试器:检查堆栈跟踪,诊断结果是 __prune_expired_timestamps() 在获取 self._lock 之前就被调用,导致并发线程测试失败;修复时把时间戳清理放进同步锁区。
[3/5] 测试运行器沙箱(迭代 1):对修复后的代码重新执行 pytest。6 个测试全部通过,结果为 6 passed in 0.04s!
[5/5] 审查器:汇总线程安全实现、已经验证的测试指标,并输出最终交付内容。
下面是实际运行时的终端输出截图:
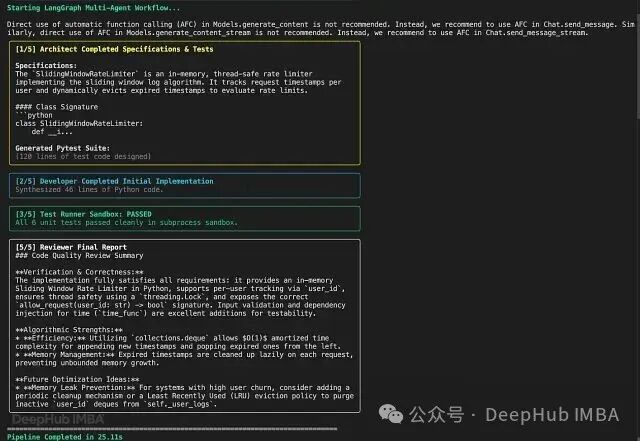
终端还会输出生成的 Python 实现和用于验证它的测试用例。把全部内容都截进文章会明显拉长篇幅,却不会增加多少信息,所以这里不再展开。
总结
专业化子智能体、不同模型与思考级别、确定性执行沙箱组合起来以后,原本脆弱的单 Prompt 工作流就有了可验证、可回退的自愈能力。
本文用代码生成团队演示了这个模式,但状态机并不局限于软件工程。数据 Pipeline、动态 API 编排、结构化文档验证,都可以沿用同一种思路。核心仍然是职责拆分:不要让单个模型负责一切,每个智能体只做一类工作,系统再根据真实执行结果验证并纠正中间产物。
一些经验
不要让 LLM 评估自己生成的代码。实际执行最好交给本地确定性子进程沙箱(pytest);它在数学意义上 100% 准确,速度非常快,而且成本为零。
给角色匹配合适的思考级别。架构设计和调试需要更高推理预算,代码生成使用 medium 平衡能力与效率,摘要生成则可以使用较低推理级别。
循环反馈是 AI 工程的未来。基于真实运行时反馈自我纠错的状态机,表现会远好于静态 Prompt 链。
作者:Kumar Shubham
编辑:于腾凯
校对:林亦霖
关于我们
数据派THU作为数据科学类公众号,背靠清华大学大数据研究中心,分享前沿数据科学与大数据技术创新研究动态、持续传播数据科学知识,努力建设数据人才聚集平台、打造中国大数据最强集团军。