夜雨聆风
夜雨聆风前言
很多企业私有化部署 OpenWebUI 后,不想用内置向量库,想对接自己开发的 RAG 检索服务,但又忌讳修改 UI 底层源码、担心升级后失效。本文给一套无侵入、纯管道 + 函数插件的落地方案,无需改动 OpenWebUI 一行源码,同时实现两大核心能力:
1、对话时自动调用自研 RAG 知识库检索上下文; 2、内置大文件上传面板,直接对接自研 RAG 文件分片上传接口。
一、前置环境准备
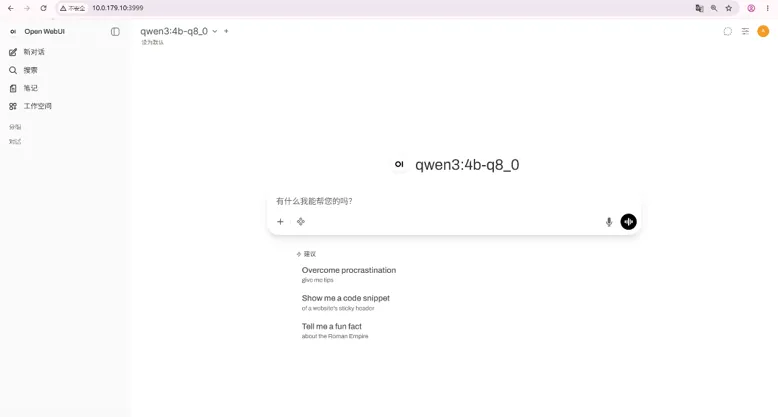
1、本地私有化 OpenWebUI
已完成服务器私有化部署,可正常访问、管理员账号登录、模型可正常调用。
2、自研 RAG 完整 API 服务
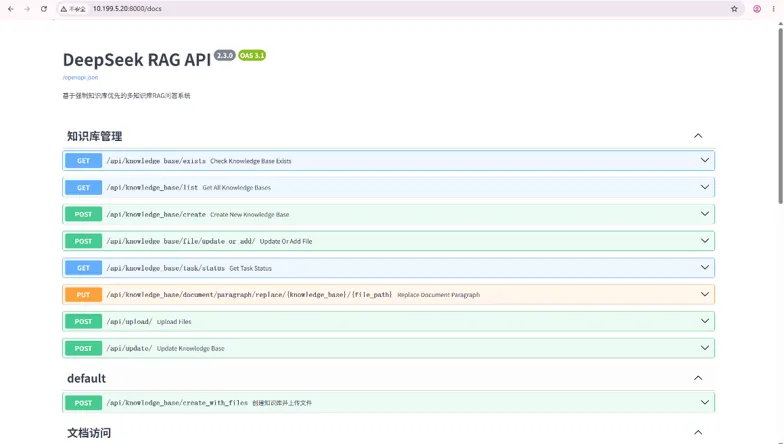
自有 RAG 后台,提供全套知识库接口:创建库、文件上传、文档管理、检索、任务状态查询等标准 REST 接口。
二、核心方案:Pipelines 管道打通 RAG 检索链路
步骤 1:拉取官方 Pipelines 管道项目
Pipelines 是 OpenWebUI 官方扩展插件体系,用来自定义对话前置 、后置逻辑,RAG 检索逻辑全部放在管道里实现。
步骤 2:改造 Langgraph 流式推理服务
使用langgraph_example.py封装大模型推理 + RAG 联动逻辑,解决三大痛点:
(1)后台 nohup 运行,无需交互式输入密钥; (2)异步流式输出,区分「思考过程 + 正式回答」双数据流; (3)字符缓冲分片推送,避免细碎卡顿,兼容 Nginx 流式输出。
关键改造点:
(1)加载 .env环境变量,后台运行无交互;(2)增加 30 字符缓冲阈值,批量推送流数据; (3)标准 SSE 返回格式,兼容 OpenWebUI 流式渲染; (4)单独输出 reasoning_content思考字段,界面区分思维链与回答。
langgraph_example.py:""" title: Langgraph stream integration author: bartonzzx author_url: https://github.com/bartonzzx git_url: description: Integrate langgraph with open webui pipeline required_open_webui_version: 0.4.3 requirements: none version: 0.4.3 licence: MIT """ import os import sys import json from dotenv import load_dotenv from typing import Annotated, Literal from typing_extensions import TypedDict from fastapi import FastAPI from fastapi.responses import StreamingResponse from langgraph.graph import StateGraph, START, END from langgraph.graph.message import add_messages from langchain_openai import ChatOpenAI from langgraph.config import get_stream_writer # ========== 修复1:移除getpass,加载.env环境变量,兼容后台nohup ========== # 加载同目录.env文件,无交互式输入 load_dotenv() def _set_env(var: str): # 后台运行禁用交互式输入,缺失环境变量直接抛出明确异常 if not os.environ.get(var): raise RuntimeError(f"环境变量 {var} 未配置,请在当前目录.env文件中填写") # 读取密钥,不会触发终端输入 _set_env("OPENAI_API_KEY") ''' Define Langgraph ''' # 新增:全局缓冲阈值,30字符批量输出 BUFFER_THRESHOLD = 30 def generate_custom_stream(type: Literal["think","normal"], buffer_obj, content: str): # 写入缓冲区,不再直接推送 buffer_obj["buf"] += content # 达到阈值才输出 if len(buffer_obj["buf"]) >= BUFFER_THRESHOLD: custom_stream_writer = get_stream_writer() custom_stream_writer({type: buffer_obj["buf"]}) buffer_obj["buf"] = "" class State(TypedDict): messages: Annotated[list, add_messages] llm = ChatOpenAI( model="qwen3.6-27b", temperature=0.1, base_url='http://10.199.5.10:8003/v1', api_key=os.getenv("OPENAI_API_KEY", "dummy_key") # 从环境变量读取,兜底默认 ) # ========== 修复2:同步llm.invoke阻塞问题,改为异步astream实时输出 + 字符缓冲 ========== async def chatbot(state: State): # 初始化缓冲区 think_buf = {"buf": ""} normal_buf = {"buf": ""} # 异步分步输出思考内容,不阻塞主流 async for chunk in llm.astream(["Please reasoning:"] + state["messages"]): generate_custom_stream("think", think_buf, chunk.content) # 思考流剩余缓存强制输出 if think_buf["buf"]: custom_stream_writer = get_stream_writer() custom_stream_writer({"think": think_buf["buf"]}) async for chunk in llm.astream(state["messages"]): generate_custom_stream("normal", normal_buf, chunk.content) # 回答流剩余缓存强制输出 if normal_buf["buf"]: custom_stream_writer = get_stream_writer() custom_stream_writer({"normal": normal_buf["buf"]}) return {"messages": [normal_buf["buf"]]} # Define graph graph_builder = StateGraph(State) # Define nodes graph_builder.add_node("chatbot", chatbot) graph_builder.add_edge("chatbot", END) # Define edges graph_builder.add_edge(START, "chatbot") # Compile graph graph = graph_builder.compile() ''' Define api processing ''' app = FastAPI( title="Langgraph API", description="Langgraph API", ) @app.get("/test") async def test(): return {"message": "Hello World"} @app.post("/stream") async def stream(inputs: State): async def event_stream(): try: stream_start_msg = { 'choices': [ { 'delta': {}, 'finish_reason': None } ] } yield f"data: {json.dumps(stream_start_msg)}\n\n" #接口层二次缓冲兜底,防止极端细碎分片 think_buffer = "" normal_buffer = "" # Processing langgraph stream response withblock support async for event in graph.astream(input=inputs, stream_mode="custom"): print(f"stream event: {event}") think_content = event.get("think", None) normal_content = event.get("normal", None) # 分段推送思考流 if think_content: think_buffer += think_content # 攒够字符一次性输出 if len(think_buffer) >= BUFFER_THRESHOLD: think_msg = { 'choices': [ { 'delta': { 'reasoning_content': think_buffer, }, 'finish_reason': None } ] } yield f"data: {json.dumps(think_msg)}\n\n" think_buffer = "" # 分段推送回答流 if normal_content: normal_buffer += normal_content if len(normal_buffer) >= BUFFER_THRESHOLD: normal_msg = { 'choices': [ { 'delta': { 'content': normal_buffer, }, 'finish_reason': None } ] } yield f"data: {json.dumps(normal_msg)}\n\n" normal_buffer = "" #循环结束,输出缓冲区剩余所有文字 if think_buffer: think_msg = { 'choices': [ { 'delta': { 'reasoning_content': think_buffer, }, 'finish_reason': None } ] } yield f"data: {json.dumps(think_msg)}\n\n" if normal_buffer: normal_msg = { 'choices': [ { 'delta': { 'content': normal_buffer, }, 'finish_reason': None } ] } yield f"data: {json.dumps(normal_msg)}\n\n" # End of the stream stream_end_msg = { 'choices': [ { 'delta': {}, 'finish_reason': 'stop' } ] } yield f"data: {json.dumps(stream_end_msg)}\n\n" yield f"data: [DONE]\n\n" # 兼容OpenAI标准SSE结束标记 except Exception as e: print(f"Stream error: {e}", file=sys.stderr) error_msg = { "error": {"message": str(e), "code": 500} } yield f"data: {json.dumps(error_msg)}\n\n" return StreamingResponse( event_stream(), media_type="text/event-stream", headers={ "Cache-Control": "no-cache", "Connection": "keep-alive", "X-Accel-Buffering": "no" # 关闭nginx缓冲,流式实时输出 } ) if __name__ == "__main__": import uvicorn # 固定监听0.0.0.0:8863,移除--reload避免多进程IO崩溃 uvicorn.run(app, host="0.0.0.0", port=8863) |
启动服务命令:nohup pythonlanggraph_example.py> langgraph_server.log2>&1 &步骤 3:自定义 RAG 管道脚本 rag_custom_pipeline.py
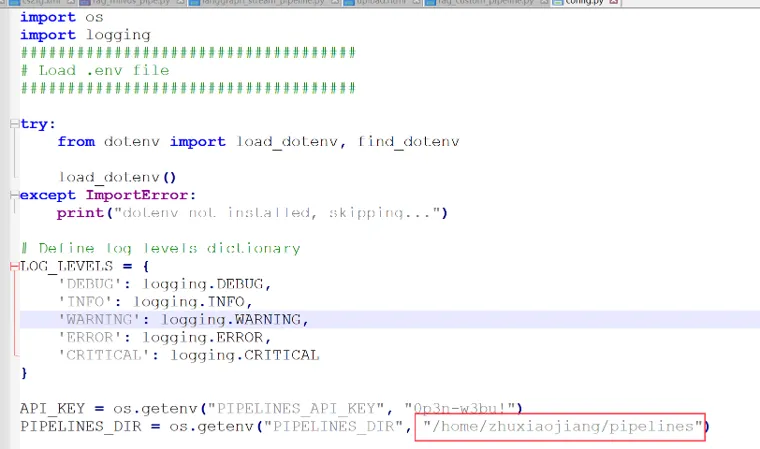
1、在 pipelines 根目录新建 rag_custom_pipeline.py,定义 Pipeline 类,负责转发对话请求到 Langgraph 服务、调用自研 RAG 检索接口拼接上下文;2、修改 config.py配置管道目录路径,指向本地 pipelines 项目文件夹:
步骤 4:启动 Pipelines 管道服务nohup uvicorn main:app --host 0.0.0.0 --port 9099 > pipeline.log 2>&1 &
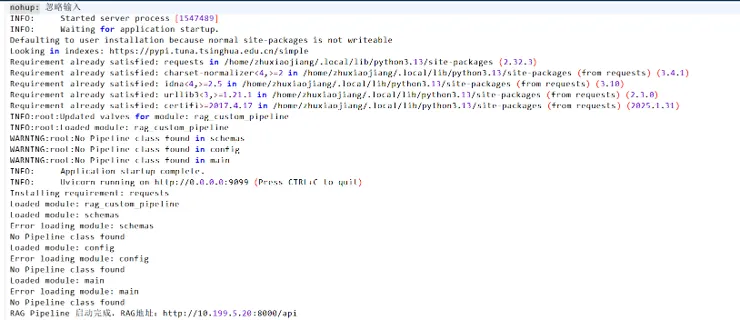
Pipelines启动成功后,自动加载Pipelines/Pipelines/下的所有模块:
步骤5:使用管理员账户进入OpenWebUI,进入管理员面板,配置Pipelines服务: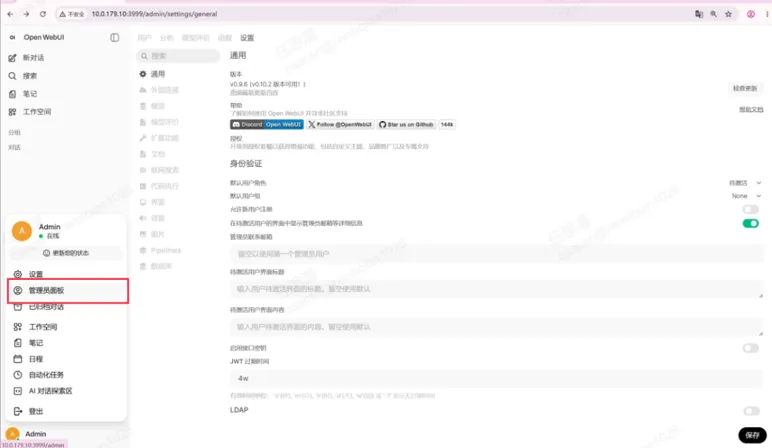
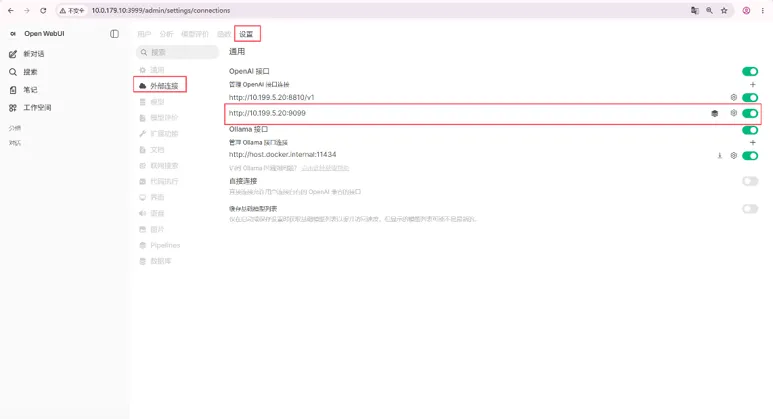
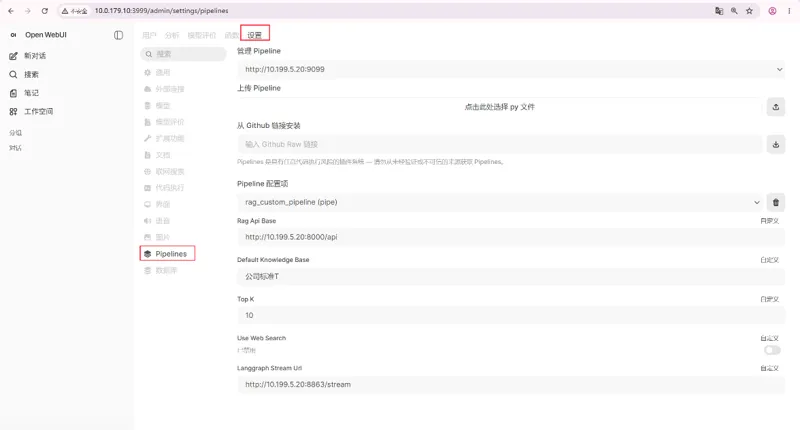
回到新对话页面,顶部下拉选择,则可选择添加的自定义知识库模型进行会话检索:
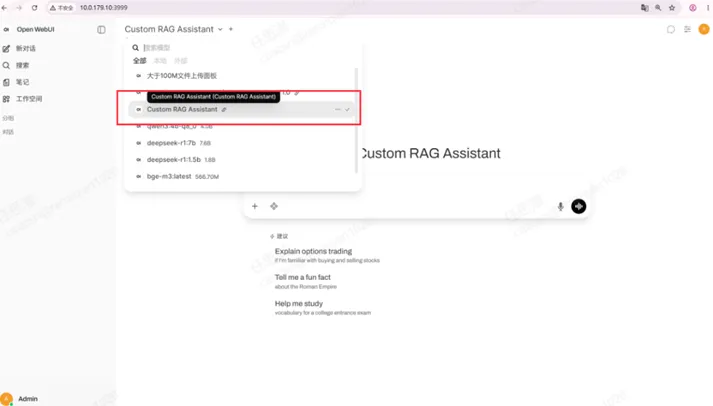
步骤6:接入自定义知识库知识上传接口(最小化接入,不需要修改OpenWebUI任何源码):使用管理员账户,进入OpenWebUI管理员面板,选择函数,新建函数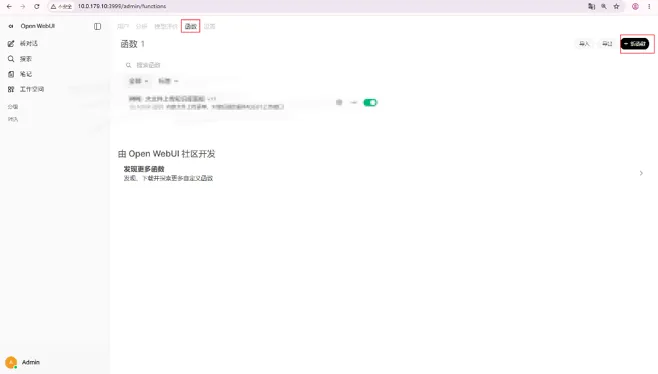
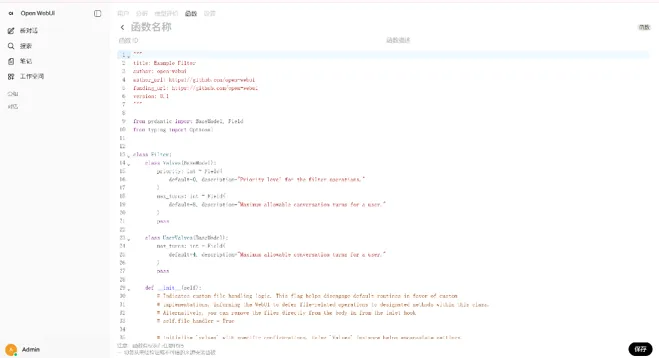
粘贴以下方法:
"""
title:大文件上传知识库面板
author: Custom
version: 1.1
description: 异步上传带进度条,上传中显示文字提示,上传完成展示后端返回结果
"""
from pydantic import BaseModel
from typing import Optional, Generator
class Pipe:
class Valves(BaseModel):
pass
def __init__(self):
self.valves = self.Valves()
def pipes(self):
return [{"id": "kb-file-upload-progress", "name": "大于100M文件上传面板"}]
def pipe(
self, body: dict, __user__: Optional[dict] = None
) -> Generator[str, None, None]:
html_page = """
<!DOCTYPE html>
<html lang="zh-CN">
<head>
<meta charset="UTF-8">
<meta name="viewport" content="width=device-width, initial-scale=1.0">
<title>大文件上传</title>
<style>
body {
background: #111827;
color: #f3f4f6;
padding: 24px;
font-family: system-ui, -apple-system, sans-serif;
}
h2 {
margin-bottom: 20px;
color: #e5e7eb;
}
input[type="file"] {
color: #fff;
padding: 8px 0;
}
button {
padding: 8px 20px;
font-size: 15px;
cursor: pointer;
margin-right: 10px;
}
.upload-btn {
background: #1677ff;
color: #fff;
border: none;
border-radius: 4px;
}
.upload-btn:hover {
background: #4096ff;
}
.upload-btn:disabled {
background: #8cb8ff;
cursor: not-allowed;
}
.clear-btn {
background: #f5f5f5;
color: #333;
border: 1px solid #ccc;
border-radius: 4px;
}
.clear-btn:hover {
background: #e8e8e8;
}
.progress-wrap {
width: 100%;
height: 12px;
background: #27272a;
border-radius: 6px;
margin: 16px 0;
overflow: hidden;
display: none;
}
.progress-bar {
height: 100%;
width: 0%;
background: #1677ff;
transition: width 0.1s linear;
}
.result-box {
margin-top: 16px;
padding: 12px;
border-radius: 6px;
white-space: pre-wrap;
display: none;
}
.success {
background: #163b2e;
border: 1px solid #22c55e;
color: #4ade80;
}
.error {
background: #3b1c1c;
border: 1px solid #ef4444;
color: #f87171;
}
</style>
</head>
<body>
<h2>大文件上传 - 公司标准T知识库</h2>
<input type="file" name="files" id="fileInput" multiple>
<br><br>
<button id="submitBtn" class="upload-btn">上传并构建知识库</button>
<button type="button" class="clear-btn" onclick="clearFiles()">清空已选文件</button>
<div class="progress-wrap" id="progressWrap">
<div class="progress-bar" id="progressBar"></div>
</div>
<div id="progressText"></div>
<div class="result-box" id="resultBox"></div>
<script>
const fileInput = document.getElementById('fileInput');
const submitBtn = document.getElementById('submitBtn');
const progressWrap = document.getElementById('progressWrap');
const progressBar = document.getElementById('progressBar');
const progressText = document.getElementById('progressText');
const resultBox = document.getElementById('resultBox');
const uploadUrl = "http://10.199.5.20:8000/api/upload/?knowledge_base=公司标准T";
function clearFiles() {
fileInput.value = '';
progressWrap.style.display = 'none';
progressText.textContent = '';
progressBar.style.width = '0%';
resultBox.style.display = 'none';
}
function showResult(text, isSuccess) {
resultBox.textContent = text;
resultBox.className = `result-box ${isSuccess ? 'success' : 'error'}`;
resultBox.style.display = 'block';
}
submitBtn.addEventListener('click', async () => {
const files = fileInput.files;
if (!files.length) {
showResult("请先选择需要上传的文件", false);
return;
}
submitBtn.disabled = true;
progressWrap.style.display = 'block';
progressBar.style.width = '0%';
// 上传开始显示固定提示文字
progressText.textContent = "正在上传中,请稍等......";
resultBox.style.display = 'none';
const formData = new FormData();
for (let file of files) {
formData.append("files", file);
}
const xhr = new XMLHttpRequest();
xhr.open("POST", uploadUrl);
xhr.upload.addEventListener("progress", (e) => {
if (e.lengthComputable) {
const percent = Math.round((e.loaded / e.total) * 100);
progressBar.style.width = `${percent}%`;
// 不再更新百分比文字,保持固定提示
}
});
xhr.onload = () => {
submitBtn.disabled = false;
// 上传完成清空上传提示文字
progressText.textContent = "";
if (xhr.status >= 200 && xhr.status < 300) {
let resText = "";
try {
const resJson = JSON.parse(xhr.responseText);
resText = `✅上传完成!接口返回:\n${JSON.stringify(resJson, null, 2)}`;
} catch (err) {
resText = `✅上传完成!原始返回:\n${xhr.responseText}`;
}
showResult(resText, true);
} else {
showResult(`❌上传失败,状态码:${xhr.status}\n响应内容:${xhr.responseText}`, false);
}
};
xhr.onerror = () => {
submitBtn.disabled = false;
progressText.textContent = "";
showResult("❌网络请求失败,请检查接口地址或后端CORS跨域配置", false);
};
xhr.send(formData);
});
</script>
</body>
</html>
"""
yield "```html\n" + html_page + "\n```"
点击保存
回到函数界面,启用添加函数功能:
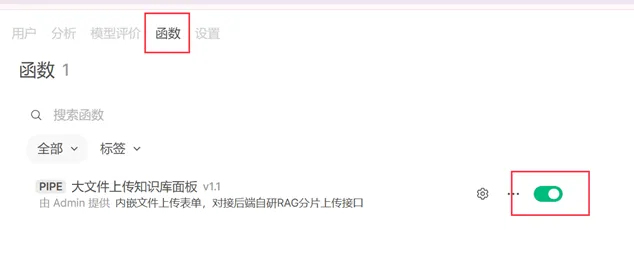
回到对话页面,出现:

对话框随意输入然后点击发送,则会弹出文件上传面板页面: