ARTICLE · 1055707
保姆级学习开发安卓手机软件实战(三)--ViewModel + Flow

C# 你添加 NuGet 引用,一步直接安装。
而 Gradle 现在的版本目录 (version catalog) 分成两步:
✅ toml(libs.versions.toml):只是登记清单
登记好库的名字、坐标、版本,只做注册,并不会真正引入到项目。 相当于:把一堆 dll 信息写进通讯录,还没引用。
✅ build.gradle.kts 里写 implementation(libs.xxx):才是真正添加引用
告诉 Gradle:这个模块需要这个库,去 Maven 下载 aar,编译打包时加入,才等同 C# 真正 Add Reference
👉 一句话:
libs.versions.toml= 维护一份统一的依赖清单(通讯录);implementation才是真正 “启用这个引用”。
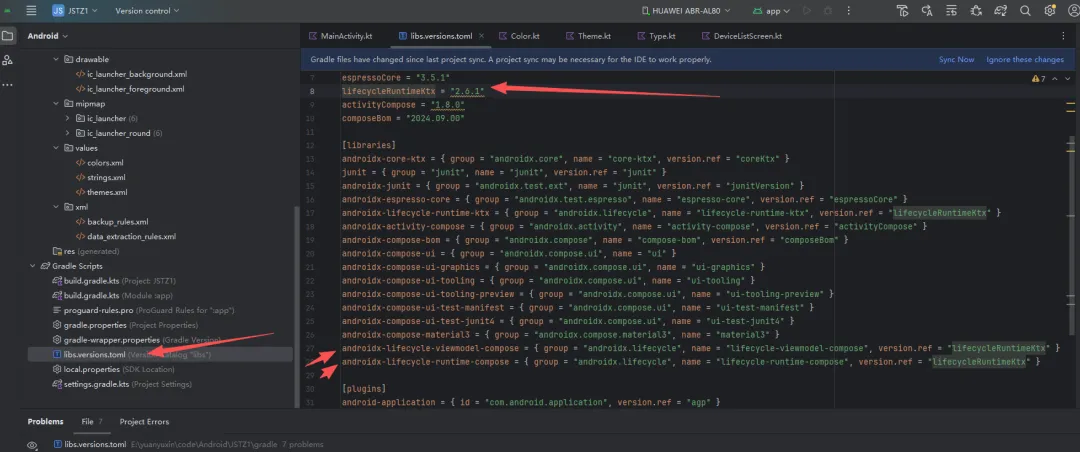
修改 libs.versions.toml
androidx-lifecycle-viewmodel-compose = { group = "androidx.lifecycle", name = "lifecycle-viewmodel-compose", version.ref = "lifecycleRuntimeKtx" }androidx-lifecycle-runtime-compose = { group = "androidx.lifecycle", name = "lifecycle-runtime-compose", version.ref = "lifecycleRuntimeKtx" }
修改app/build.gradle.kts
implementation(libs.androidx.lifecycle.viewmodel.compose)implementation(libs.androidx.lifecycle.runtime.compose)
implementation(...) ← Gradle 语法,意思是"我代码里要用这个库,请帮我下载"
添加之后,记得sync now:
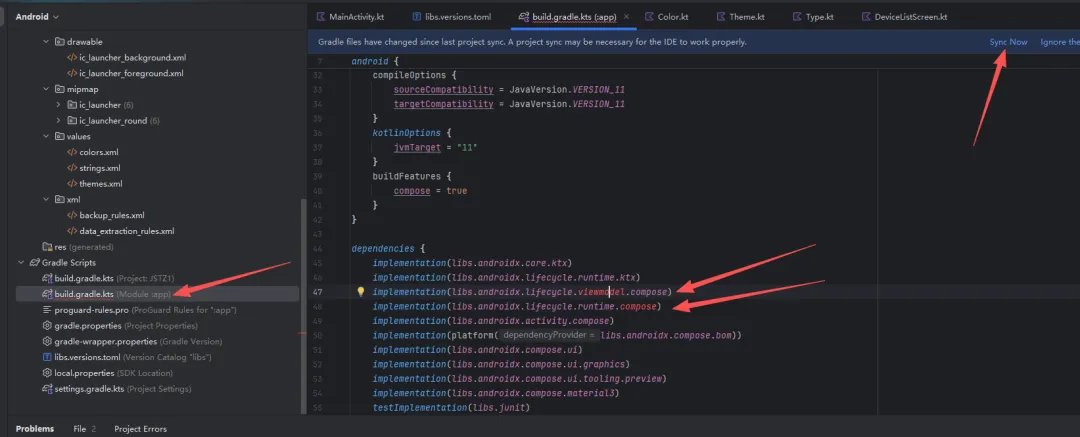
等下载完毕,上面图中报的红色错误就会消失。
二、新建类文件,把UI(DeviceListView)要显示的数据打包成一个对象
这里我们新增一个类文件,专门给 DeviceListView.kt 这个页面用:
一个页面一套 ViewModel,是 Compose 推荐的单页面单 ViewModel规范 页面打开 → 创建 ViewModel;页面退出 → ViewModel 销毁 别的页面不要直接拿这个 ViewModel 实例,避免状态混乱
类比 C#:相当于页面专属的后台服务类
怎么建:右键 screen 文件夹 → New → Kotlin Class →选 File → 命名 DeviceListViewModel。
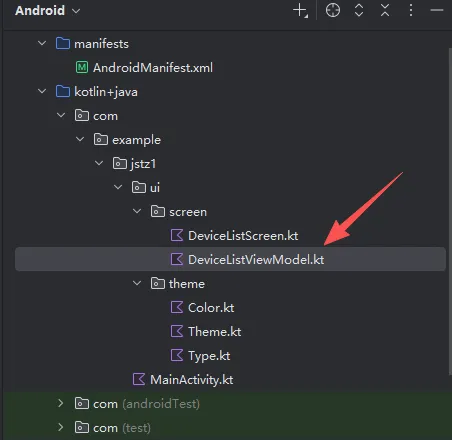
2 个新 import(都是 ViewModel 在 Compose 里用的工具。):
import androidx.lifecycle.compose.collectAsStateWithLifecycleimport androidx.lifecycle.viewmodel.compose.viewModel
创建数据类:
data class DeviceListUiState(val devices: List<String> = emptyList(),// 先用 String 占位,后面会换成 Device 模型val isLoading: Boolean = false,val errorMessage: String? = null)
后续 Composable 里只要 val state by ... 一个变量,就能拿到设备列表、加载状态、错误信息等。
类的继承:
classDeviceListViewModel : ViewModel(){}
在上面的类中添加双层状态:
private val _uiState = MutableStateFlow(DeviceListUiState()) // 内部可写val uiState: StateFlow<DeviceListUiState> = _uiState.asStateFlow() // 外部只读
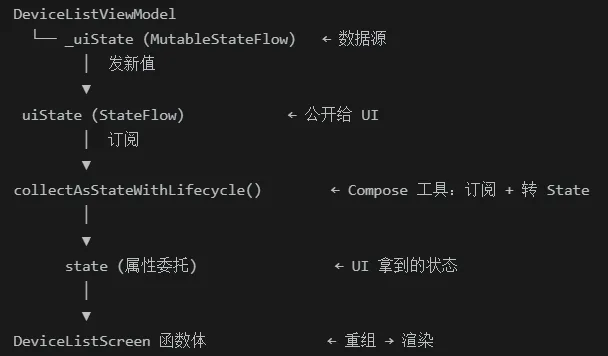
StateFlow是一种"流",会主动推送新值给所有订阅者(类似微信公众号:作者发文章,所有订阅的人手机都弹出通知)
MutableStateFlow vs StateFlow:前者能改,后者只能读。_uiState 是可变版本,外面包装一层.asStateFlow() 变只读(用 asStateFlow() 锁住,外面改不了)。
继续在上面的类中添加初始化模块:
init {loadMockDevices()}
init {} 是 Kotlin 的"构造时执行" —— 这个 VM 一被创建,就自动调用 loadMockDevices()。
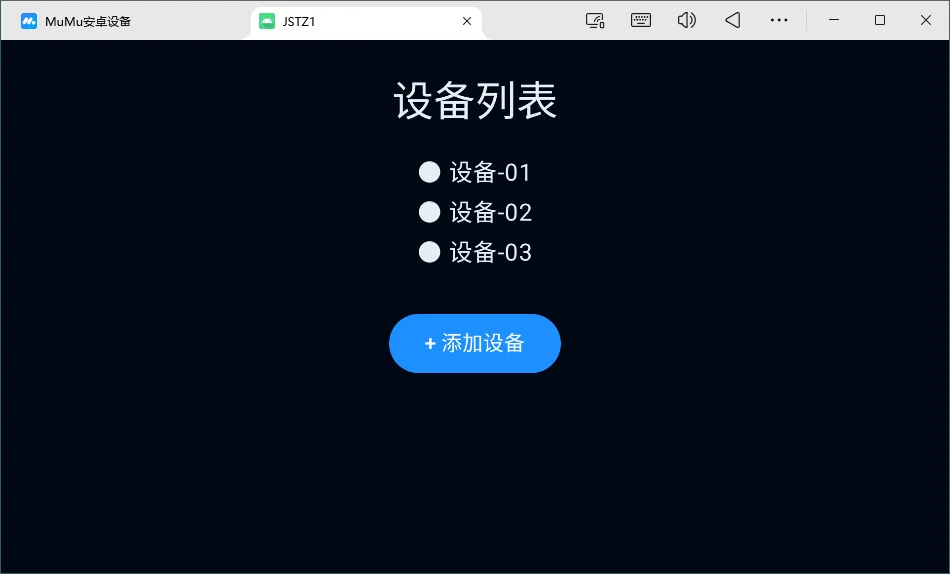
实现效果:UI 一打开就要看到数据,所以 VM 创建时立刻去拿,不用等 UI 触发按钮。
loadMockDevices()数据方法:
private funloadMockDevices() {_uiState.value = _uiState.value.copy(devices = listOf("设备-01", "设备-02", "设备-03"))}
这里的功能是模拟加载3个设备,后续会实际获取。
总的代码如下:
package com.example.jstz1.ui.screenimport androidx.lifecycle.ViewModelimport kotlinx.coroutines.flow.MutableStateFlowimport kotlinx.coroutines.flow.StateFlowimport kotlinx.coroutines.flow.asStateFlow/*** 设备列表页面的 UI 状态(一个数据类)** 现在只装"设备列表 + 加载态 + 错误信息"三件套* 后面会扩展:* - 多设备(含 IP / 端口 / 在线状态)* - 选中设备 ID* - 搜索关键字*/data class DeviceListUiState(val devices: List<String> = emptyList(), // 先用 String 占位,后面会换成 Device 模型val isLoading: Boolean = false,val errorMessage: String? = null)/*** DeviceListViewModel —— 设备列表页面的"数据大脑"** 为什么用 ViewModel(不是写在 Composable 里的 remember):* 1. 横竖屏切换时 Activity 重建,但 VM 不死 → 列表不丢* 2. 未来从 Repository / Netty 拉数据时,UI 层不用改* 3. 多页面共享数据时,只注入同一个 VM 即可*/class DeviceListViewModel : ViewModel() {/** 内部可变状态(用 MutableStateFlow,可以发"新值"出去) */private val _uiState = MutableStateFlow(DeviceListUiState())/** 外部只读状态(用 asStateFlow() 锁住,外面改不了) */val uiState: StateFlow<DeviceListUiState> = _uiState.asStateFlow()init {// VM 一创建就加载 mock 数据// 未来这里改成:viewModelScope.launch { repository.fetchDevices() }loadMockDevices()}/*** 模拟加载 3 个设备* 后面会被 Repository / Netty 替代,本方法删除*/private funloadMockDevices() {_uiState.value = _uiState.value.copy(devices = listOf("设备-01", "设备-02", "设备-03"))}}
三、修改UI文件,绑定VM
DeviceListScreen.kt首先也是新增2 个 import:
import androidx.lifecycle.compose.collectAsStateWithLifecycleimport androidx.lifecycle.viewmodel.compose.viewModel
函数签名加 vm 参数:
vm: DeviceListViewModel = viewModel() // 默认从 Activity 拿 VM这个逻辑是找当前 Activity 的 VM 存储,找叫 DeviceListViewModel::class 的 VM:有了就复用,没有就 new 一个新的。旋转屏幕时 Activity 重建 → VM 存储还在 → 找到旧的 → 复用(所以数据不丢)
= viewModel() 是默认值,意味着你调用 DeviceListScreen() 不传 vm 参数时,它自动从 Activity 拿。
把 Flow 转成 State
val state by vm.uiState.collectAsStateWithLifecycle()vm.uiState:VM 暴露的 StateFlow(前面讲的双层包装的"只读流") .collectAsStateWithLifecycle():订阅这个流,每当流发新值,就触发 Composable 重组(重新执行一遍函数体,刷新界面) by ... .collectAsStateWithLifecycle():Kotlin 的属性委托,让 state 这个变量自动跟着流的值变 val state by:原本写法是 val state = flow.collect...() 返回 State<T>,要用 state.value 才能取真实值;用 by 后,state 直接就是 T(这里是 DeviceListUiState),少打 .value collectAsStateWithLifecycle 跟 collectAsState 的区别: collectAsState:app 不在前台也继续订阅(费电) collectAsStateWithLifecycle:app 退到后台 →暂停订阅;回到前台 → 恢复订阅(省电,推荐)
if (state.devices.isEmpty()) {Text("还没有设备")} else {state.devices.forEach { name -> Text("● $name") }}
Preview 函数手动 new VM
DeviceListScreen(vm = DeviceListViewModel())package com.example.jstz1.ui.screenimport androidx.compose.foundation.layout.*import androidx.compose.material3.Buttonimport androidx.compose.material3.MaterialThemeimport androidx.compose.material3.Surfaceimport androidx.compose.material3.Textimport androidx.compose.runtime.Composableimport androidx.compose.runtime.getValueimport androidx.compose.ui.Alignmentimport androidx.compose.ui.Modifierimport androidx.compose.ui.tooling.preview.Previewimport androidx.compose.ui.unit.dpimport androidx.lifecycle.compose.collectAsStateWithLifecycleimport androidx.lifecycle.viewmodel.compose.viewModel/*** 设备列表页面 —— 已接入 ViewModel** 数据流:* DeviceListViewModel.uiState (StateFlow)* → collectAsStateWithLifecycle() [生命周期感知]* → Composable 自动重组*/@ComposablefunDeviceListScreen(modifier: Modifier = Modifier,vm: DeviceListViewModel = viewModel() // 默认从 Activity 拿 VM,无需手动传) {// 把 Flow 转成 State;生命周期暂停时不收集,省电val state by vm.uiState.collectAsStateWithLifecycle()Surface(modifier = modifier.fillMaxSize(),color = MaterialTheme.colorScheme.background) {Column(modifier = Modifier.fillMaxSize().padding(24.dp),horizontalAlignment = Alignment.CenterHorizontally,verticalArrangement = Arrangement.Top) {Text(text = "设备列表",style = MaterialTheme.typography.headlineMedium,color = MaterialTheme.colorScheme.onBackground)Spacer(modifier = Modifier.height(16.dp))if (state.devices.isEmpty()) {Text(text = "还没有设备",style = MaterialTheme.typography.bodyMedium,color = MaterialTheme.colorScheme.onSurfaceVariant)} else {// 显示设备列表(先用 Text,后面会改成 Card)state.devices.forEach { name ->Text(text = "● $name",style = MaterialTheme.typography.bodyLarge,color = MaterialTheme.colorScheme.onBackground,modifier = Modifier.padding(vertical = 4.dp))}}Spacer(modifier = Modifier.height(24.dp))Button(onClick = { /* TODO: 跳转添加设备页面 */ }) {Text("+ 添加设备")}}}}/*** AS 编辑器右上角的预览窗口用的,* 不会出现在 app 里,不影响运行** 注意:Preview 没有 Android 的 ViewModel 存储,* 所以手动 new 一个 VM 喂进去,避免 viewModel() 报错*/@Preview(showBackground = true, widthDp = 1280, heightDp = 800)@ComposablefunDeviceListScreenPreview() {MaterialTheme {DeviceListScreen(vm = DeviceListViewModel())}}