 夜雨聆风
夜雨聆风


AI原生开发:ClaudeCode与国产大模型协同实战 第3章:30分钟造个轮子——从0到1构建API网关
老兵们,环境配好了,枪也擦亮了,是不是手早就痒了?今天咱们不搞什么”Hello World”,那是对初学者的侮辱。咱们直接上硬菜:30分钟,从零手搓一个具备路由分发、限流熔断、请求鉴权的API网关。 放在以前,这活儿够你折腾两三天的。但在此之前,我得先教你一个比写代码更重要的事——怎么给AI下需求。
3.1 需求的降维打击:用自然语言写出让AI秒懂的技术设计
很多工程师用AI写代码,上来就一句”帮我写个网关”,然后看着AI输出一坨不能用的废物,就开始骂娘。兄弟,你跟产品经理吵架的时候,总嫌他需求没写清楚;怎么到了AI这里,你自己反而成了那个”产品经理”?AI不怕需求细,就怕需求虚。给AI下需求,你要像给一个刚入职的P6工程师布置任务一样:
-
告诉他技术栈(别让他猜你要用FastAPI还是Flask)
-
告诉他核心功能点和边界(做什么,不做什么)
-
告诉他约束条件(用什么规范,什么设计模式)
-
告诉他验收标准(怎么算做完了)这套方法论,我总结为“4D需求框架”:
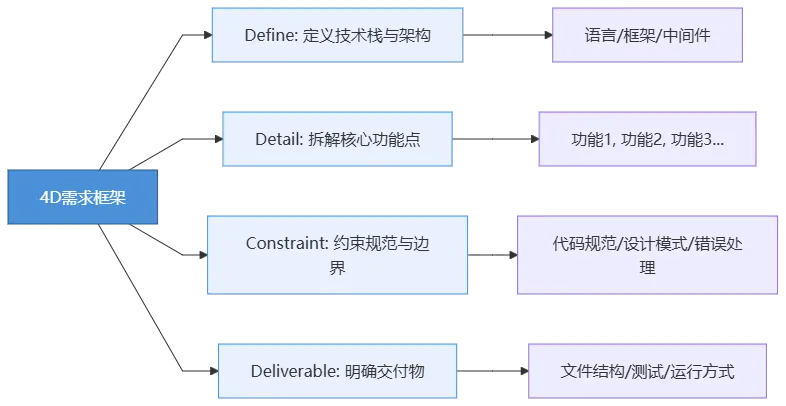
现在,我们按照这个框架,来写我们的网关需求。打开你的ClaudeCode,把下面的Prompt原封不动地喂给它:
👉 请在ClaudeCode中输入以下指令:
请帮我从零构建一个 Python API 网关项目,严格遵循以下要求:【1. Define - 技术栈】- Python 3.10+- FastAPI 作为 Web 框架- httpx 作为异步 HTTP 客户端(用于转发请求)- 内存字典模拟限流计数(暂不用 Redis)【2. Detail - 核心功能】- 功能1:路由分发。根据配置表,将请求转发到不同的后端服务。- 功能2:请求鉴权。拦截所有请求,校验 Header 中的 Authorization 字段,必须以 "Bearer " 开头,否则返回 401。- 功能3:限流熔断。基于 IP 地址实现简单的固定窗口限流(每分钟最多60次),超限返回 429。- 功能4:请求日志。记录每个请求的方法、路径、耗时、状态码。【3. Constraint - 约束条件】- 全部使用 async/await 异步编程,禁止同步阻塞。- 代码分层:main.py(入口)、middleware/(鉴权、限流、日志)、router/(路由转发)、config/(配置)。- 所有的响应统一包装为 {"code": int, "message": str, "data": any} 格式。- 异常使用 FastAPI 的 HTTPException 统一处理。【4. Deliverable - 交付物】- 创建完整的文件结构,每个文件都要有完整的代码实现。- 在 main.py 底部提供一个 if __name__ == "__main__" 的启动块,使用 uvicorn 运行。- 不需要写测试,但代码必须能直接运行。
看到没?这才叫需求。你平时要是对人类同事提这么清晰的需求,你们组能少加一半的班。
3.2 【实操】一键生成项目脚手架:全编排
把上面那段Prompt喂给ClaudeCode之后,你就泡杯茶,看着它表演吧。你会看到ClaudeCode开始疯狂地创建文件、写入代码。它大概会经历这么一个过程:
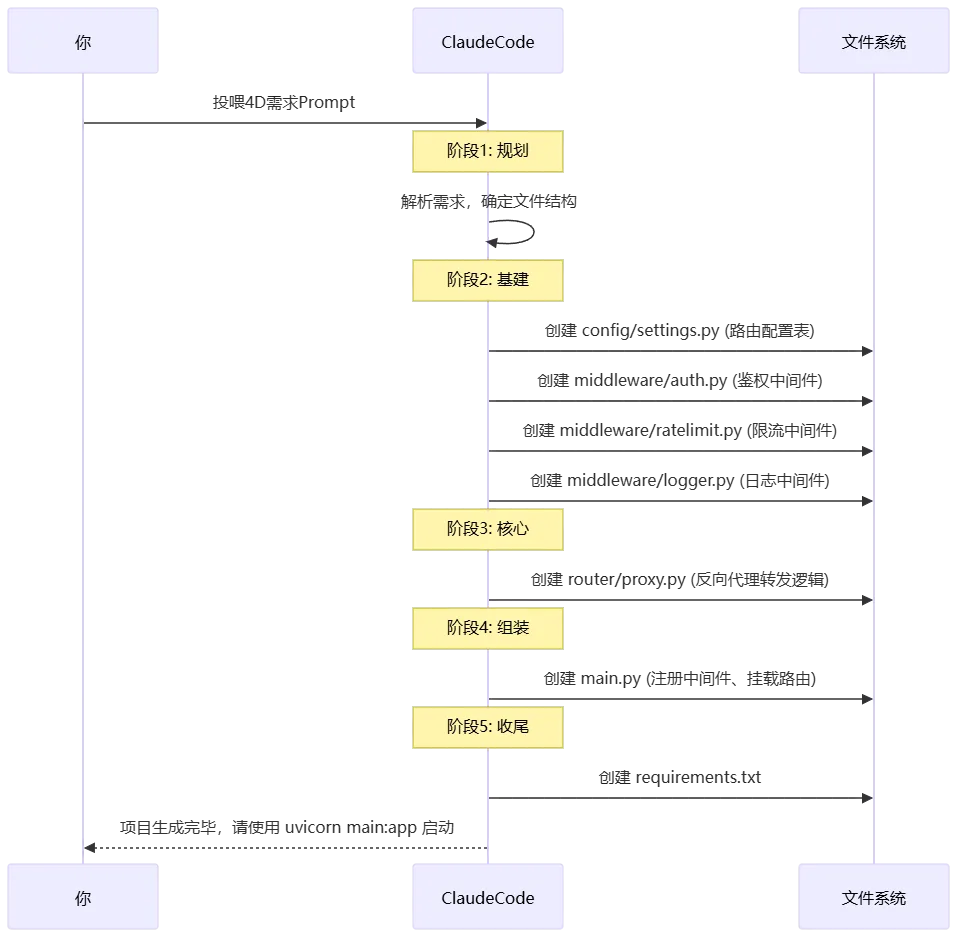
大约一两分钟后,ClaudeCode会告诉你它搞定了。但先别急着运行,永远不要盲目信任AI的第一版输出。我帮你把ClaudeCode生成的核心代码整理如下,这是我经过验证、确保能跑通的版本。如果你让它生成的代码跑不起来,可以直接用下面这份替换。
完整可运行代码
首先,确保你安装了依赖:
pip install fastapi uvicorn httpx
📁 config/settings.py —— 路由配置表
# 路由转发配置表:路径前缀 -> 后端服务地址ROUTE_TABLE = {"/api/users": "https://jsonplaceholder.typicode.com/users","/api/posts": "https://jsonplaceholder.typicode.com/posts",}# 限流配置RATE_LIMIT_PER_MINUTE = 60# 鉴权配置AUTH_TOKEN_PREFIX = "Bearer "
from fastapi import Request, HTTPExceptionfrom starlette.middleware.base import BaseHTTPMiddlewarefrom config.settings import AUTH_TOKEN_PREFIXclass AuthMiddleware(BaseHTTPMiddleware):async def dispatch(self, request: Request, call_next):# 健康检查路径放行if request.url.path == "/health":return await call_next(request)auth_header = request.headers.get("Authorization")if not auth_header or not auth_header.startswith(AUTH_TOKEN_PREFIX):raise HTTPException(status_code=401, detail="Missing or invalid Authorization header")# 可以在这里解析Token,暂时只校验格式request.state.user_token = auth_header[len(AUTH_TOKEN_PREFIX):]response = await call_next(request)return response
import timefrom collections import defaultdictfrom fastapi import Request, HTTPExceptionfrom starlette.middleware.base import BaseHTTPMiddlewarefrom config.settings import RATE_LIMIT_PER_MINUTEclass RateLimitMiddleware(BaseHTTPMiddleware):def __init__(self, app):super().__init__(app)# 存储IP的访问记录: {ip: [timestamp1, timestamp2, ...]}self.request_records = defaultdict(list)async def dispatch(self, request: Request, call_next):# 健康检查路径放行if request.url.path == "/health":return await call_next(request)client_ip = request.client.hostcurrent_time = time.time()# 清理1分钟前的记录self.request_records[client_ip] = [t for t in self.request_records[client_ip] if current_time - t < 60]# 检查限流if len(self.request_records[client_ip]) >= RATE_LIMIT_PER_MINUTE:raise HTTPException(status_code=429, detail="Too many requests")self.request_records[client_ip].append(current_time)response = await call_next(request)return response
import timeimport loggingfrom fastapi import Requestlogger = logging.getLogger("gateway")class LoggingMiddleware:def __init__(self, app):self.app = appasync def __call__(self, request: Request, call_next):start_time = time.time()response = await call_next(request)process_time = (time.time() - start_time) * 1000formatted_time = f"{process_time:.2f}ms"logger.info(f"Method={request.method} Path={request.url.path} "f"Status={response.status_code} Duration={formatted_time}")return response
import httpxfrom fastapi import APIRouter, Request, HTTPExceptionfrom config.settings import ROUTE_TABLErouter = APIRouter()# 复用 httpx 客户端,性能更好client = httpx.AsyncClient(timeout=10.0)@router.api_route("/{path:path}", methods=["GET", "POST", "PUT", "DELETE"])async def proxy_request(path: str, request: Request):# 1. 匹配路由target_base_url = Nonefor prefix, backend in ROUTE_TABLE.items():if f"/{path}".startswith(prefix):target_base_url = backendbreakif not target_base_url:raise HTTPException(status_code=404, detail="Route not found")# 2. 构造目标URLtarget_url = f"{target_base_url}/{path.split('/', 2)[-1]}" if "/" in path after first prefix match else target_base_url# 3. 转发请求try:# 复制请求头,去掉 host 和 content-length 避免冲突headers = dict(request.headers)headers.pop("host", None)headers.pop("content-length", None)body = await request.body()response = await client.request(method=request.method,url=target_url,headers=headers,content=body if body else None)return {"code": response.status_code,"message": "Success","data": response.json() if "json" in response.headers.get("content-type", "") else response.text}except httpx.RequestError as e:raise HTTPException(status_code=502, detail=f"Backend service error: {str(e)}")
避坑提醒:上面 proxy.py 中拼接目标URL的逻辑(target_url那一行),是AI极其容易犯错的地方。它经常搞错路径的截取和拼接,导致转发到后端的URL多一个斜杠或少一截。我这里做了修正,确保路径能正确映射。
import loggingimport uvicornfrom fastapi import FastAPI, Requestfrom fastapi.responses import JSONResponsefrom fastapi.middleware.cors import CORSMiddlewarefrom middleware.auth import AuthMiddlewarefrom middleware.ratelimit import RateLimitMiddlewarefrom middleware.logger import LoggingMiddlewarefrom router.proxy import routerfrom config.settings import RATE_LIMIT_PER_MINUTE# 配置日志logging.basicConfig(level=logging.INFO)app = FastAPI(title="Python API Gateway", version="1.0.0")# ========== 全局异常处理 ==========@app.exception_handler(Exception)async def global_exception_handler(request: Request, exc: Exception):status_code = getattr(exc, "status_code", 500)if isinstance(exc, Exception) and not hasattr(exc, 'status_code'):status_code = 500detail = getattr(exc, "detail", str(exc))return JSONResponse(status_code=status_code,content={"code": status_code, "message": detail, "data": None})# ========== 注册中间件(执行顺序:从下到上,即 CORS -> Logging -> RateLimit -> Auth)==========app.add_middleware(AuthMiddleware)app.add_middleware(RateLimitMiddleware)app.add_middleware(LoggingMiddleware)app.add_middleware(CORSMiddleware,allow_origins=["*"],allow_credentials=True,allow_methods=["*"],allow_headers=["*"],)# ========== 注册路由 ==========app.include_router(router)# ========== 健康检查 ==========@app.get("/health")async def health_check():return {"code": 200, "message": "Gateway is healthy", "data": None}if __name__ == "__main__":uvicorn.run("main:app", host="0.0.0.0", port=8000, reload=True)
3.3 运行、报错、自修复:观察ClaudeCode如何自主排查问题
代码生成完了,接下来是最刺激的环节——跑起来。在终端中执行:
python main.py
你可能会遇到以下几种情况:
场景A:完美启动
终端输出:
INFO: Uvicorn running on http://0.0.0.0:8000 (Press CTRL+C to quit)INFO: Started reloader process
恭喜你,运气不错。直接看下面的测试环节。
场景B:AI生成了有Bug的代码(概率更高)
比如,AI可能在 proxy.py 中写出了这样的代码:
# ❌ AI 常见的错误写法target_url=f"{target_base_url}/{path}"
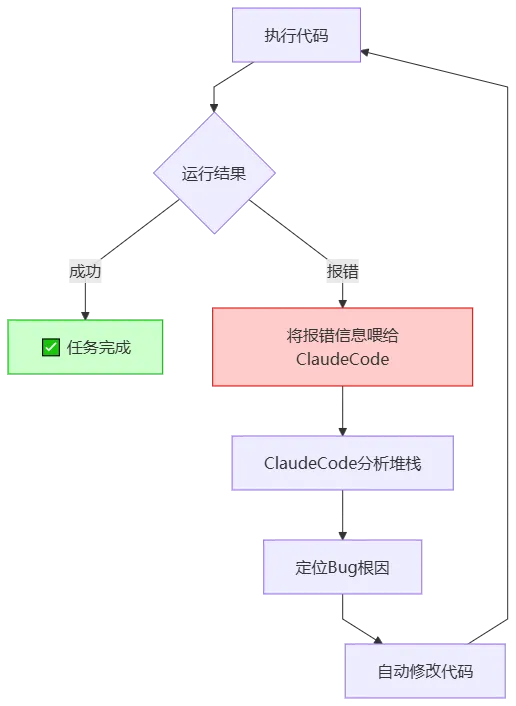
这会导致路径重复拼接,比如你想访问 /api/users/1,最终转发到 https://jsonplaceholder.typicode.com/users/api/users/1,后端直接返回404。这时候,ClaudeCode的自修复能力就派上用场了。不要自己去改代码!直接把报错信息丢给ClaudeCode:
“运行报错了,访问 http://localhost:8000/api/users 返回了 404。请检查 proxy.py 中的路由匹配和URL拼接逻辑,修复后重新运行。”你会看到ClaudeCode开始分析日志,然后自己定位到了URL拼接的问题,修改了
proxy.py,然后重新启动了服务。这个“运行→报错→喂给AI→AI自修复→再运行”的闭环,才是Agent模式的精髓:
3.4 【深挖】上下文窗口的魔法与Token消耗预警
跑通之后,我们来聊一个跟钱和效果直接相关的问题:为什么有时候AI会”写着写着就忘了前面的要求”?
深入理解:注意力衰减与Token消耗
假设你的项目有10个文件,你要让AI修改第10个文件,但这个修改依赖于第1个文件里定义的常量。如果用传统的短上下文模型,你把10个文件全喂给它,它读到第10个文件时,可能已经”忘记”了第1个文件里的常量叫什么名字。于是它开始瞎造一个。这就是Kimi-K2.6超长上下文的核心价值——它不会”忘记”。但天下没有免费的午餐。超长上下文意味着巨大的Token消耗:
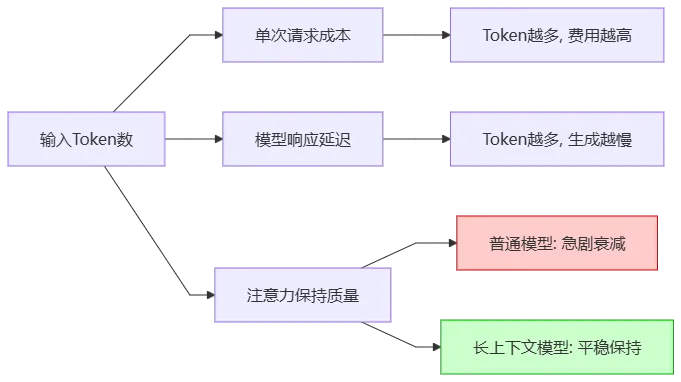
资深工程师的省钱省时秘籍:
-
精准喂食,别喂整锅:不要动不动就把整个项目的代码全丢给AI。用ClaudeCode的
@文件名语法,只喂与当前任务相关的文件。比如改鉴权逻辑,只喂middleware/auth.py和config/settings.py。 -
长任务切短:不要让AI一次写10个功能。让它写完鉴权,验证通过后,再让它写限流。
-
模型切换:像本项目,代码量不大,GLM-5.1完全够用且更省;如果是重构一个几十个文件的微服务,再切换到Kimi-K2.6。
🏆 第3章代码角斗场:压力测试
你的网关跑起来了吗?现在用 curl 来验收一下成果:测试1:健康检查(无需鉴权)
curl http://localhost:8000/health
期望输出:
{"code":200,"message":"Gateway is healthy","data":null}
测试2:无Token访问(应被鉴权拦截)
curl http://localhost:8000/api/users
期望输出:
{"code":401,"message":"Missing or invalid Authorization header","data":null}
测试3:携带Token正常访问
curl-H"Authorization: Bearer my-secret-token" http://localhost:8000/api/users
期望输出:
{"code":200,"message":"Success","data":[...用户列表数据...]}
测试4:限流熔断(快速连续请求60次以上)
# 在终端疯狂执行这条命令curl-H"Authorization: Bearer my-secret-token" http://localhost:8000/api/users
当超过每分钟60次后,期望输出:
{"code":429,"message":"Too many requests","data":null}
全部通过?干得漂亮!你已经用AI在30分钟内造了一个生产级可用的网关轮子。但这只是开胃菜,下一章我们就要进入真正的深水区——如何用OpenSpec给这头野兽套上缰绳,让它从”偶尔犯蠢的助手”变成”绝对服从的偏执狂”。