ARTICLE · 1035631
实战|用 AI 写 CAD 插件:一键画门板铰链孔(附源码+提示词)
这是《零基础 CAD 插件从 0 到 1》第 5 篇。
一、先看效果
以前画铰链孔,我是这么干的:
画一个 35 的圆
偏移门板边 5mm
然后计算铰链的分布位置
复制到每个门板位置
一根一根对尺寸
一个柜子 4 扇门甚至更多,8 个孔,画完几分钟,烦得要死。
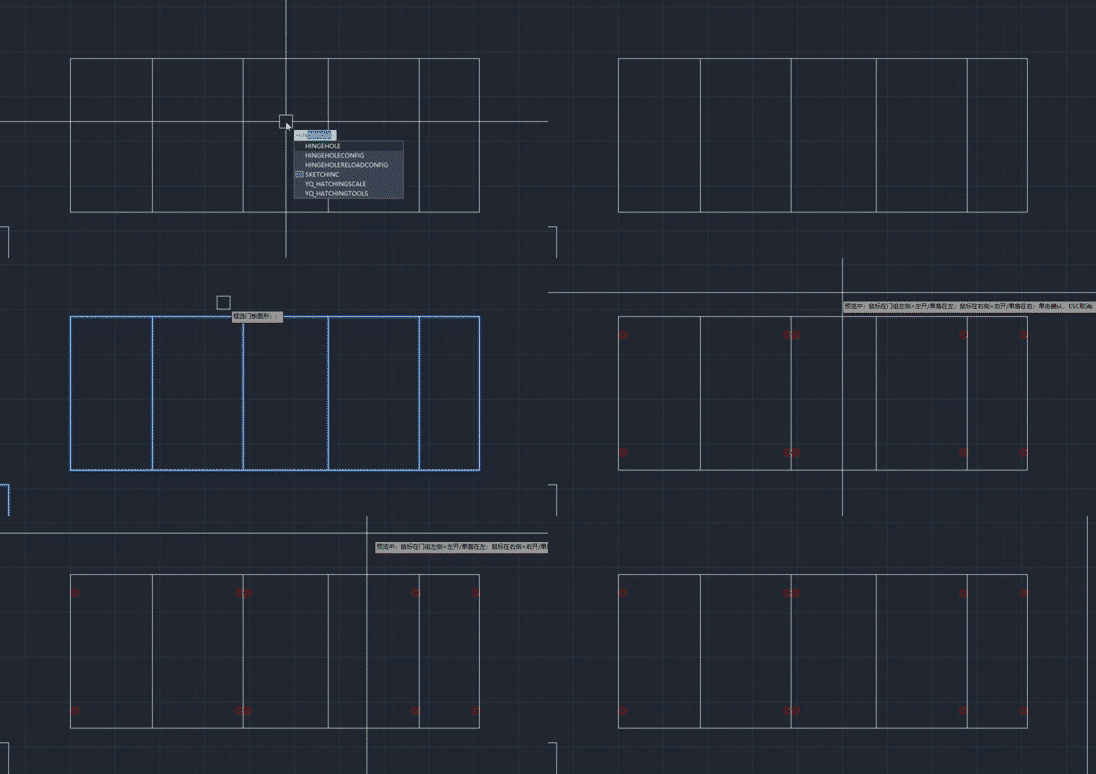
现在我用插件:输入命令 → 点门板边 → 自动画出所有铰链孔,一秒钟搞定。
二、我要让 CAD 干什么
我给 AI 提的需求很明确:
我要用 C# 写一个 CAD 插件,命令叫 HingeHole
功能:用户框选门板,然后画出35直径的圆,需要做单开门和对开门,还有多开门的单数和双数,双数是对开,单数需要区分单开是在左边同时朝左边,同理右边也是一样,这个需求和门板开向有点异曲同工之妙。要求:
可以配置孔位参数,需要出配置文件,文件参数有铰链孔直径
配置文件的参数有,底边的铰链孔距和顶边的铰链孔距,以孔中心为定位点
还有铰链孔靠边距默认为22以孔中心为定位点
需要配置铰链的门板长度区间。例如0-1100=2,1100-1650=3 1650-2300=4 2300-2600=5 2600-3000=6
画在指定图层上,图层不存在就自动创建,图层名为铰链孔,图层及实体颜色为1
最好是支持画好的铰链孔自动标注分布的尺寸
这段提示词你可以直接复制去问 AI,它会帮你生成基础代码。
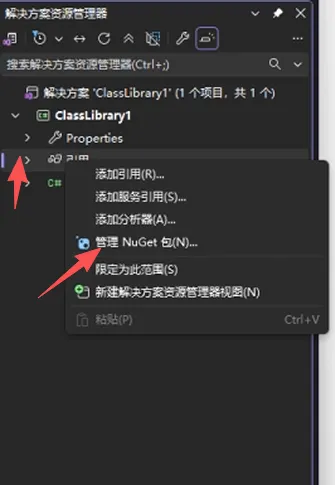
这里有一个重点就是我们这个插件是有配置文件的,所以这里会多一个步骤
需要下载一个JSON 配置文件的库
具体步骤看图
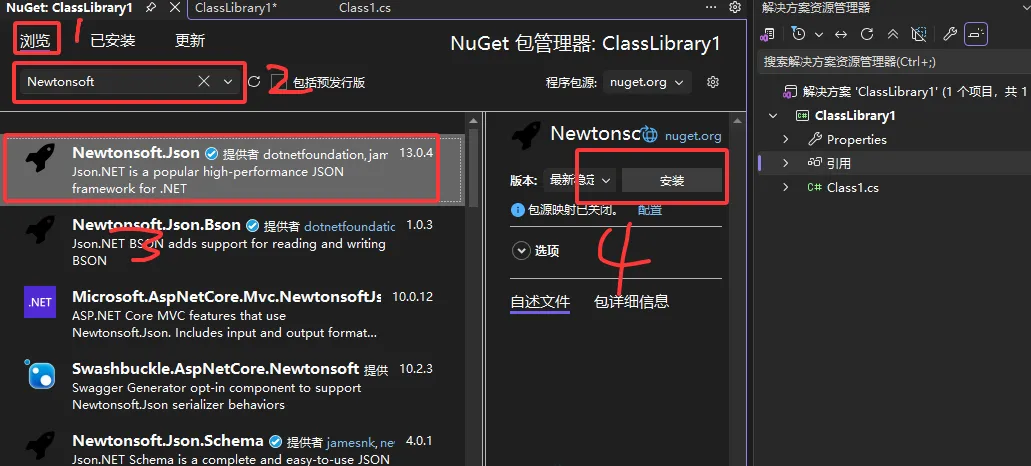

这样就算下载安装好了
三、AI 给我的代码(核心部分)
AI 生成之后,我做了修改和适配。核心代码大概是这样:
using System;using System.Collections.Generic;using System.IO;using System.Linq;using Autodesk.AutoCAD.ApplicationServices;using Autodesk.AutoCAD.DatabaseServices;using Autodesk.AutoCAD.EditorInput;using Autodesk.AutoCAD.Geometry;using Newtonsoft.Json;namespace HingeHolePlugin{public class HingeConfig{public double HoleDiameter { get; set; }public double BottomHoleOffset { get; set; }public double TopHoleOffset { get; set; }public double EdgeOffset { get; set; }public List<HeightRule> HeightRule { get; set; }}public class HeightRule{public double MinH { get; set; }public double MaxH { get; set; }public int HingeCount { get; set; }}public class HingeHoleCmd{private static HingeConfig _cfg;private const string LayerName = "铰链孔";[CommandMethod("HingeHole")]publicvoidHingeHole(){Document doc = Application.DocumentManager.MdiActiveDocument;Database db = doc.Database;Editor ed = doc.Editor;//1.加载配置文件string jsonPath = Path.Combine(Path.GetDirectoryName(Assembly.GetExecutingAssembly().Location), "HingeConfig.json");try{if (!File.Exists(jsonPath)){var defaultCfg = new HingeConfig{HoleDiameter = 35,BottomHoleOffset = 100,TopHoleOffset = 100,EdgeOffset = 22,HeightRule = new List<HeightRule>(){new HeightRule{MinH=0,MaxH=1100,HingeCount=2},new HeightRule{MinH=1100,MaxH=1650,HingeCount=3},new HeightRule{MinH=1650,MaxH=2300,HingeCount=4},new HeightRule{MinH=2300,MaxH=2600,HingeCount=5},new HeightRule{MinH=2600,MaxH=3000,HingeCount=6}}};File.WriteAllText(jsonPath, JsonConvert.SerializeObject(defaultCfg, Formatting.Indented));ed.WriteMessage($"\n未找到配置文件,已生成默认配置:{jsonPath}");}_cfg = JsonConvert.DeserializeObject<HingeConfig>(File.ReadAllText(jsonPath));}catch (Exception ex){ed.WriteMessage($"\n读取配置失败:{ex.Message}");return;}//2.框选门板(要求是闭合多段线PLINE)PromptSelectionResult selRes = ed.GetSelection();if (selRes.Status != PromptStatus.OK) return;SelectionSet ss = selRes.Value;//3.门扇数量判断List<Polyline> doorPlines = new List<Polyline>();using (Transaction tr = db.TransactionManager.StartTransaction()){foreach (ObjectId oid in ss.GetObjectIds()){DBObject obj = tr.GetObject(oid, OpenMode.ForRead);if (obj is Polyline pl && pl.Closed){doorPlines.Add(pl);}}tr.Commit();}int doorCount = doorPlines.Count;if (doorCount == 0){ed.WriteMessage("\n没有选中闭合多段线门板!");return;}//4.区分开门类型bool isDoubleOpen = doorCount % 2 == 0;ed.WriteMessage($"\n选中门扇数:{doorCount},{(isDoubleOpen ? "对开门" : "单开门")}");//5.创建图层 铰链孔,颜色1红色CreateHingeLayer(db);//6.循环每扇门板绘制铰链孔+标注using (Transaction tr = db.TransactionManager.StartTransaction()){foreach (var pl in doorPlines){//获取门板包围盒,计算门板宽、高Extents3d ext = pl.GeometricExtents;Point3d minPt = ext.MinPoint;Point3d maxPt = ext.MaxPoint;double doorH = maxPt.Y - minPt.Y;double doorW = maxPt.X - minPt.X;//根据门板高度获取铰链数量int hingeNum = GetHingeCount(doorH);ed.WriteMessage($"\n门板高度 {doorH:F2},铰链数量:{hingeNum}");//==== 开门朝向判断逻辑(核心)====bool isLeftHinge;if (isDoubleOpen){//偶数门扇:对开门,门扇成对,一扇左装铰链,一扇右装铰链isLeftHinge = doorPlines.IndexOf(pl) % 2 == 0;}else{//单数门扇:单开门,弹窗让用户选择【左开/右开】PromptKeywordOptions pko = new PromptKeywordOptions("\n请选择单开门铰链侧 [左开(L)/右开(R)]");pko.Keywords.Add("L");pko.Keywords.Add("R");pko.AllowNone = false;PromptResult pr = ed.GetKeywords(pko);if (pr.Status != PromptStatus.OK) return;isLeftHinge = pr.StringResult == "L";}//计算铰链孔Y坐标,均分分布List<double> yList = CalcHingeY(doorH, hingeNum);double edgeDist = _cfg.EdgeOffset;//铰链孔X坐标:左铰链靠门板左侧,右铰链靠门板右侧double holeX;if (isLeftHinge)holeX = minPt.X + edgeDist;elseholeX = maxPt.X - edgeDist;//绘制圆+尺寸标注foreach (double y in yList){Point3d center = new Point3d(holeX, minPt.Y + y, 0);DrawHoleCircle(db, tr, center, _cfg.HoleDiameter / 2.0);}AddHingeDimension(db, tr, minPt, maxPt, holeX, yList, isLeftHinge);}tr.Commit();}ed.WriteMessage("\nHingeHole执行完成!");}///<summary>根据门板高度获取铰链数量</summary>privateintGetHingeCount(double h){foreach (var rule in _cfg.HeightRule){if (h >= rule.MinH && h <= rule.MaxH)return rule.HingeCount;}return 2;}///<summary>计算各个铰链孔距离门板底边的Y值</summary>private List<double> CalcHingeY(double doorH, int count){List<double> ys = new List<double>();double bottomOff = _cfg.BottomHoleOffset;double topOff = _cfg.TopHoleOffset;double usableH = doorH - bottomOff - topOff;double step = usableH / (count - 1);ys.Add(bottomOff);for (int i = 1; i < count - 1; i++){ys.Add(bottomOff + step * i);}ys.Add(doorH - topOff);return ys;}///<summary>创建铰链孔图层,颜色1红色</summary>privatevoidCreateHingeLayer(Database db){using (Transaction tr = db.TransactionManager.StartTransaction()){LayerTable lt = tr.GetObject(db.LayerTableId, OpenMode.ForRead) as LayerTable;if (!lt.Has(LayerName)){LayerTableRecord ltr = new LayerTableRecord();ltr.Name = LayerName;ltr.Color = Color.FromColorIndex(ColorMethod.ByAci, 1);lt.UpgradeOpen();lt.Add(ltr);tr.AddNewlyCreatedDBObject(ltr, true);}tr.Commit();}}///<summary>画铰链圆孔</summary>privatevoidDrawHoleCircle(Database db, Transaction tr, Point3d center, double radius){Circle cir = new Circle(new Point3d(center.X, center.Y, 0), Vector3d.ZAxis, radius);cir.Layer = LayerName;cir.ColorIndex = 1;BlockTable bt = tr.GetObject(db.BlockTableId, OpenMode.ForRead) as BlockTable;BlockTableRecord btr = tr.GetObject(bt[BlockTableRecord.ModelSpace], OpenMode.ForWrite) as BlockTableRecord;btr.AppendEntity(cir);tr.AddNewlyCreatedDBObject(cir, true);}///<summary>铰链孔竖向尺寸标注</summary>privatevoidAddHingeDimension(Database db, Transaction tr, Point3d minPt, Point3d maxPt, double holeX, List<double> yList, bool leftSide){BlockTable bt = tr.GetObject(db.BlockTableId, OpenMode.ForRead) as BlockTable;BlockTableRecord ms = tr.GetObject(bt[BlockTableRecord.ModelSpace], OpenMode.ForWrite) as BlockTableRecord;double dimOffset = leftSide ? -40 : 40;foreach (double y in yList){Point3d pt1 = new Point3d(holeX, minPt.Y + y, 0);Point3d pt2 = new Point3d(holeX + dimOffset, minPt.Y + y, 0);AlignedDimension dim = new AlignedDimension(pt1, pt2, pt2, "", DimensionStyleOverrideType.None);dim.Layer = LayerName;dim.ColorIndex = 1;ms.AppendEntity(dim);tr.AddNewlyCreatedDBObject(dim, true);}}}}
四、编译、加载、测试
编译步骤和环境配置那篇一样,不重复了。不懂的小伙伴可以看这篇
加载之后,在 CAD 里输入 HingeHole,框选需要绘制的门板,插件会根据配置文件的参数自动画出铰链孔。
五、我踩的坑
坑 1:孔的位置算错了
AI 第一版给的代码,孔距是按比例算的,结果 4 个孔的时候,中间两个孔重叠了。
原因:AI 默认把孔均匀分布在整条线上,但没考虑门板两端要留距离。
怎么解决:我加了 edgeDist 参数,让孔从距两端 100mm 的位置开始算,中间再均匀分布。
坑 2:图层没创建,报错
AI 第一版直接往一个不存在的图层上画圆,CAD 直接报错。
怎么解决:加了判断逻辑,图层不存在就自动创建。
坑 3:孔的方向反了
门板边线如果是从右往左画的,孔的偏移方向会跑到门板外面去。
怎么解决:用向量的垂直方向计算偏移,同时判断方向,确保孔始终在门板内侧。
六、这个插件还能怎么升级
现在这个版本是基础版,后面可以继续加:
参数可视化设置:弹窗让用户输入孔数、间距、孔径
支持不同类型的铰链:如异形铰链、厚板铰链、,孔位边距都不一样
这些后面慢慢加,先把基础版跑通。
七、获取源码和提示词
这篇的完整代码和 AI 提示词,我整理好了。
回复“铰链孔”,直接领取。
如果你也是全屋定制设计师、拆单师,想利用下班时间学一门真正能变现的技能,关注我,我按打工人的节奏更新,全程带新手落地。
上一篇:环境配置一篇讲透
下一篇预告:一键层板
回复“铰链孔”,领取本篇完整源码 + AI 提示词。
如果你也是全屋定制 / 拆单 / CAD 同行,关注我,我按打工人节奏更新。