 夜雨聆风
夜雨聆风


一种新HTML页面转换成 PDF 技术方案
编辑:前端妹 | 来源:稀土掘金技术社区
版权申明:内容来源网络,版权归原创者所有。除非无法确认,我们都会标明作者及出处,如有侵权烦请告知,我们会立即删除并表示歉意。谢谢!
背景
本文将深入讲解如何使用 snapdom 和 jsPDF 实现高质量的 HTML 转 PDF 功能,并通过一个完整的消息列表导出案例,带你掌握这套方案的核心技术。
❞
为什么 HTML 转 PDF 如此重要?
在现代 Web 应用中,「HTML 转 PDF」 是一个非常常见的需求场景:
-
「客服系统」:导出聊天记录用于存档或投诉处理 -
「电商平台」:生成订单详情、发票等 PDF 文档 -
「报表系统」:将可视化图表和数据导出为 PDF 报告 -
「在线文档」:支持用户将网页内容离线保存 -
「合同签署」:生成合同 PDF 用于电子签名
然而,实现一个「高质量」的 HTML 转 PDF 功能并不简单。我们面临以下挑战:
|
|
|
|---|---|
| 「样式还原」 |
|
| 「分页处理」 |
|
| 「清晰度」 |
|
| 「性能」 |
|
| 「兼容性」 |
|
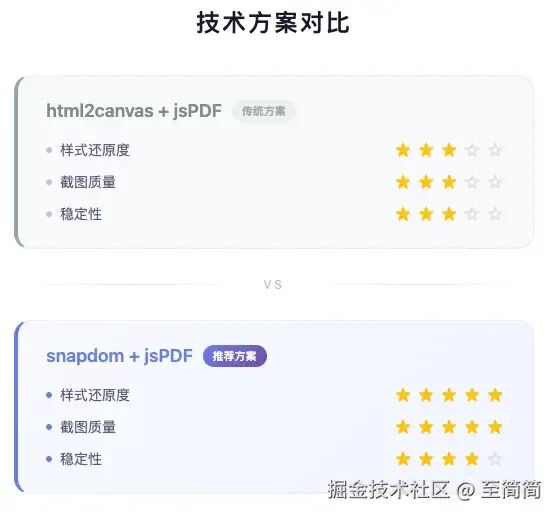
传统的 html2canvas + jsPDF 方案虽然能用,但在「样式还原度」和「截图质量」上存在明显不足。
今天笔者介绍一套新解决方案:「snapdom + jsPDF」。
snapdom 和 jsPDF 基础理论知识
snapdom 是什么?
SnapDOM 是一个现代化的 DOM 截图库,它的核心特点是:
DOM Element → Canvas/PNG/SVG核心优势
-
「高保真截图」:完美还原 CSS 样式,包括 flexbox、grid、渐变、阴影等 -
「多种输出格式」:支持 Canvas、PNG、SVG 等多种格式 -
「高清缩放」:通过 scale参数实现 2x/3x 高清截图 -
「体积小巧」:压缩后仅 ~20KB
基础用法
ounter(lineounter(lineounter(lineounter(lineounter(lineounter(lineounter(lineounter(lineounter(lineounter(lineounter(lineounter(lineounter(lineounter(lineounter(lineimport { snapdom } from '@zumer/snapdom';// 获取 DOM 元素const element = document.querySelector('.my-element');// 截图const capture = await snapdom(element, {scale: 2, // 2倍清晰度quality: 0.95 // PNG 质量});// 输出方式const canvas = await capture.toCanvas(); // Canvas 元素const imgEl = await capture.toPng(); // <img> 元素,src 为 data URLconst svgStr = await capture.toSvg(); // SVG 字符串
关键参数说明
|
|
|
|
|
|---|---|---|---|
scale |
|
|
|
quality |
|
|
|
更多详细内容请看https://snapdom.dev/官方文档
jsPDF 是什么?
jsPDF 是最流行的 JavaScript PDF 生成库,支持在浏览器端直接创建 PDF 文件。
核心特点
-
「纯前端方案」:无需服务端,浏览器直接生成 -
「功能丰富」:支持文本、图片、表格、链接等 -
「多种尺寸」:A4、Letter 等标准纸张格式 -
「插件生态」:支持 AutoTable 等扩展插件
基础用法
ounter(lineounter(lineounter(lineounter(lineounter(lineounter(lineounter(lineounter(lineounter(lineounter(lineounter(lineounter(lineounter(lineounter(lineounter(lineounter(lineounter(lineounter(lineounter(lineounter(lineounter(lineounter(lineounter(lineounter(lineounter(lineimport { jsPDF } from 'jspdf';// 创建 PDF 实例const pdf = new jsPDF({orientation: 'portrait', // 纵向unit: 'mm', // 单位:毫米format: 'a4', // A4 纸张compress: true // 启用压缩});// 添加图片pdf.addImage(imageDataUrl, // Base64 图片数据'PNG', // 图片格式10, // X 坐标(mm)10, // Y 坐标(mm)190, // 宽度(mm)100 // 高度(mm));// 添加新页面pdf.addPage();// 保存文件pdf.save('output.pdf');
A4 尺寸常量
ounter(lineounter(lineounter(lineounter(lineounter(lineounter(lineounter(lineounter(lineounter(lineounter(line// A4 标准尺寸(单位:mm)const A4_WIDTH_MM = 210;const A4_HEIGHT_MM = 297;// 页面边距const MARGIN_MM = 10;// 可用内容区域const CONTENT_WIDTH_MM = 190; // 210 - 10*2const CONTENT_HEIGHT_MM = 277; // 297 - 10*2
snapdom + jsPDF 组合的优势
案例讲述
笔者写一个IM产品中 MessageList 消息导出DEMO。接下来,我们通过一个完整的「客服消息列表导出」案例,讲解如何使用 snapdom + jsPDF 实现 HTML 转 PDF。
项目结构
src/├── components/│ ├── MessageList.tsx # 消息列表组件│ └── MessageList.css # 消息列表样式├── services/│ └── messageExportService.ts # PDF 导出服务(核心)└── App.tsx
核心流程
整个导出过程分为 「4 个步骤」:
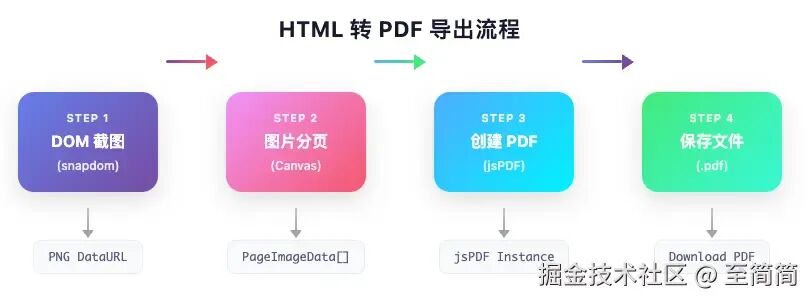
Step 1:DOM 截图(snapdom)
第一步,使用 snapdom 将整个消息列表 DOM 转换为高清 PNG 图片。
ounter(lineounter(lineounter(lineounter(lineounter(lineounter(lineounter(lineounter(lineounter(lineounter(lineounter(lineounter(lineounter(lineounter(lineounter(lineounter(lineounter(lineounter(lineounter(lineounter(lineounter(lineounter(lineounter(lineounter(lineounter(lineounter(lineounter(lineounter(lineounter(lineounter(lineounter(lineounter(lineounter(lineounter(lineounter(lineounter(lineounter(lineounter(lineounter(lineounter(lineounter(lineounter(lineounter(lineounter(lineounter(lineounter(lineounter(lineounter(lineounter(lineounter(lineounter(lineounter(lineounter(lineounter(lineounter(line// messageExportService.tsimport { snapdom } from '@zumer/snapdom';// 图片质量配置const IMAGE_QUALITY = 0.95;const IMAGE_FORMAT = 'image/png' as const;/*** 将 DOM 元素转换为图片*/export async function captureElementToImage(element: HTMLElement,quality: number = IMAGE_QUALITY): Promise<string> {console.log('开始截图...');// 保存原始样式const originalOverflow = element.style.overflow;const originalHeight = element.style.height;const originalMaxHeight = element.style.maxHeight;// 临时设置样式,确保完整截图element.style.overflow = 'visible';element.style.height = 'auto';element.style.maxHeight = 'none';try {// 核心:使用 snapdom 进行截图const capture = await snapdom(element, {scale: 2, // 2倍清晰度quality: quality});// 优先使用 toPng()const imgElement = await capture.toPng();const dataUrl = imgElement.src;// 验证数据有效性if (!dataUrl || dataUrl.length < 100) {console.log('toPng 返回无效,尝试 toCanvas...');const canvas = await capture.toCanvas();return canvas.toDataURL(IMAGE_FORMAT, quality);}console.log('截图成功,大小:', (dataUrl.length / 1024).toFixed(2), 'KB');return dataUrl;} finally {// 恢复原始样式element.style.overflow = originalOverflow;element.style.height = originalHeight;element.style.maxHeight = originalMaxHeight;}}
「关键点解析」:
-
「临时修改样式」:将 overflow、height、maxHeight临时设置为可见状态,确保截取完整内容 -
「scale: 2」:2 倍缩放提高清晰度,打印时效果更佳 -
「降级处理」: toPng()失败时自动回退到toCanvas() -
「样式恢复」:截图完成后恢复原始样式
Step 2:图片分页(Canvas)
长图片需要按照 A4 页面高度进行分割,这是最复杂的一步。
ounter(lineounter(lineounter(lineounter(lineounter(lineounter(lineounter(lineounter(lineounter(lineounter(lineounter(lineounter(lineounter(lineounter(lineounter(lineounter(lineounter(lineounter(lineounter(lineounter(lineounter(lineounter(lineounter(lineounter(lineounter(lineounter(lineounter(lineounter(lineounter(lineounter(lineounter(lineounter(lineounter(lineounter(lineounter(lineounter(lineounter(lineounter(lineounter(lineounter(lineounter(lineounter(lineounter(lineounter(lineounter(lineounter(lineounter(lineounter(lineounter(lineounter(lineounter(lineounter(lineounter(lineounter(lineounter(lineounter(lineounter(lineounter(lineounter(lineounter(lineounter(lineounter(lineounter(lineounter(lineounter(lineounter(lineounter(lineounter(lineounter(lineounter(lineounter(lineounter(lineounter(lineounter(lineounter(lineounter(lineounter(lineounter(lineounter(lineounter(lineounter(lineounter(lineounter(lineounter(lineounter(lineounter(lineounter(lineounter(lineounter(lineounter(lineounter(lineounter(lineounter(lineounter(lineounter(lineounter(lineounter(lineounter(lineounter(lineounter(line// 尺寸常量const A4_WIDTH_MM = 210;const A4_HEIGHT_MM = 297;const PDF_MARGIN_MM = 10;const PDF_CONTENT_WIDTH_MM = A4_WIDTH_MM - PDF_MARGIN_MM * 2; // 190mmconst PDF_CONTENT_HEIGHT_MM = A4_HEIGHT_MM - PDF_MARGIN_MM * 2; // 277mm// 1mm = 3.7795275590551 像素(96 DPI)const MM_TO_PX = 3.7795275590551;// 分页后的图片数据interface PageImageData {dataUrl: string;width: number;height: number;}/*** 将长图片分割成多个 A4 页面*/export async function splitImageIntoPages(imageDataUrl: string): Promise<PageImageData[]> {return new Promise((resolve, reject) => {const img = new Image();img.crossOrigin = 'anonymous';img.onload = () => {const pages: PageImageData[] = [];const originalWidth = img.width;const originalHeight = img.height;// 将 A4 内容区域转换为像素(考虑 scale=2)const pageContentHeightPx = Math.floor(PDF_CONTENT_HEIGHT_MM * MM_TO_PX * 2 // scale=2);const pageContentWidthPx = Math.floor(PDF_CONTENT_WIDTH_MM * MM_TO_PX * 2);// 计算缩放比例(图片宽度适配页面宽度)const widthScale = pageContentWidthPx / originalWidth;const scaledHeight = originalHeight * widthScale;// 计算总页数const totalPages = Math.ceil(scaledHeight / pageContentHeightPx);console.log(`原始尺寸: ${originalWidth}x${originalHeight}px`);console.log(`缩放后高度: ${scaledHeight}px, 总页数: ${totalPages}`);// 逐页裁剪for (let pageIndex = 0; pageIndex < totalPages; pageIndex++) {const startY = pageIndex * pageContentHeightPx;const endY = Math.min(startY + pageContentHeightPx, scaledHeight);const currentPageHeight = Math.floor(endY - startY);// 计算源图片对应的区域const sourceStartY = startY / widthScale;const sourceHeight = currentPageHeight / widthScale;// 创建新 Canvasconst canvas = document.createElement('canvas');const ctx = canvas.getContext('2d')!;canvas.width = pageContentWidthPx;canvas.height = currentPageHeight;// 高质量渲染ctx.imageSmoothingEnabled = true;ctx.imageSmoothingQuality = 'high';// 绘制当前页内容ctx.drawImage(img,0, sourceStartY, // 源图片起始位置originalWidth, sourceHeight, // 源图片尺寸0, 0, // 目标起始位置pageContentWidthPx, currentPageHeight // 目标尺寸);// 转换为 data URLconst pageDataUrl = canvas.toDataURL(IMAGE_FORMAT, IMAGE_QUALITY);pages.push({dataUrl: pageDataUrl,width: pageContentWidthPx,height: currentPageHeight});console.log(`第 ${pageIndex + 1}/${totalPages} 页处理完成`);}resolve(pages);};img.onerror = () => reject(new Error('图片加载失败'));img.src = imageDataUrl;});}
「分页算法图解」:
原始长图 (假设 5000px 高)┌───────────────────┐│ │ ─┐│ Page 1 │ │ 1046px (277mm × 3.78 × 2)│ │ ─┘├───────────────────┤│ │ ─┐│ Page 2 │ │ 1046px│ │ ─┘├───────────────────┤│ │ ─┐│ Page 3 │ │ 1046px│ │ ─┘├───────────────────┤│ │ ─┐│ Page 4 │ │ 1046px│ │ ─┘├───────────────────┤│ Page 5 │ ── 剩余 816px│ │└───────────────────┘
Step 3:创建 PDF(jsPDF)
将分页后的图片逐一添加到 PDF 中。
ounter(lineounter(lineounter(lineounter(lineounter(lineounter(lineounter(lineounter(lineounter(lineounter(lineounter(lineounter(lineounter(lineounter(lineounter(lineounter(lineounter(lineounter(lineounter(lineounter(lineounter(lineounter(lineounter(lineounter(lineounter(lineounter(lineounter(lineounter(lineounter(lineounter(lineounter(lineounter(lineounter(lineounter(lineounter(lineounter(lineounter(lineounter(lineounter(lineounter(lineounter(lineounter(lineounter(lineimport { jsPDF } from 'jspdf';/*** 从分页图片创建 PDF*/export function createPdfFromPages(pages: PageImageData[]): jsPDF {const pdf = new jsPDF({orientation: 'portrait',unit: 'mm',format: 'a4',compress: true // 启用压缩,减小文件体积});if (pages.length === 0) {throw new Error('没有可添加的页面');}pages.forEach((page, index) => {// 第一页直接用,后续需要 addPageif (index > 0) {pdf.addPage();}// 像素转毫米(考虑 scale=2)const scaleFactor = 2;const pageHeightMm = page.height / MM_TO_PX / scaleFactor;// 图片适配内容区域宽度const finalWidth = PDF_CONTENT_WIDTH_MM; // 190mmconst finalHeight = pageHeightMm;// 位置:左上角对齐,保留 10mm 边距const x = PDF_MARGIN_MM;const y = PDF_MARGIN_MM;console.log(`添加第 ${index + 1} 页: ${finalWidth}x${finalHeight.toFixed(2)}mm`);// 添加图片到 PDFpdf.addImage(page.dataUrl, 'PNG', x, y, finalWidth, finalHeight);});return pdf;}
Step 4:主导出函数
将以上步骤串联起来,提供统一的导出接口。
ounter(lineounter(lineounter(lineounter(lineounter(lineounter(lineounter(lineounter(lineounter(lineounter(lineounter(lineounter(lineounter(lineounter(lineounter(lineounter(lineounter(lineounter(lineounter(lineounter(lineounter(lineounter(lineounter(lineounter(lineounter(lineounter(lineounter(lineounter(lineounter(lineounter(lineounter(lineounter(lineounter(lineounter(lineounter(lineounter(lineounter(lineounter(lineounter(lineounter(lineounter(lineounter(lineounter(lineounter(lineinterface ExportConfig {targetSelector: string; // CSS 选择器filename?: string; // 文件名quality?: number; // 图片质量}/*** 主导出函数*/export async function exportMessagesToPdf(config: ExportConfig): Promise<void> {const {targetSelector,filename = 'messages.pdf',quality = IMAGE_QUALITY} = config;console.log('=== 开始导出 PDF ===');// 1. 获取目标元素const element = document.querySelector(targetSelector) as HTMLElement;if (!element) {throw new Error(`元素未找到: ${targetSelector}`);}console.log('元素尺寸:', {width: element.offsetWidth,height: element.scrollHeight});// 2. DOM 截图const imageDataUrl = await captureElementToImage(element, quality);console.log('截图完成,大小:', (imageDataUrl.length / 1024).toFixed(2), 'KB');// 3. 图片分页const pages = await splitImageIntoPages(imageDataUrl);console.log(`分页完成,共 ${pages.length} 页`);// 4. 创建 PDFconst pdf = createPdfFromPages(pages);// 5. 保存文件pdf.save(filename);console.log('=== 导出完成 ===');}
在组件中使用
ounter(lineounter(lineounter(lineounter(lineounter(lineounter(lineounter(lineounter(lineounter(lineounter(lineounter(lineounter(lineounter(lineounter(lineounter(lineounter(lineounter(lineounter(lineounter(lineounter(lineounter(lineounter(lineounter(lineounter(lineounter(lineounter(lineounter(lineounter(lineounter(lineounter(lineounter(lineounter(lineounter(lineounter(lineounter(lineounter(lineounter(lineounter(lineounter(lineounter(lineounter(lineounter(lineounter(lineounter(lineounter(lineounter(lineounter(lineounter(lineounter(lineounter(lineounter(line// MessageList.tsximport { exportMessagesToPdf } from '../services/messageExportService';const MessageList: React.FC = () => {const messageListRef = useRef<HTMLDivElement>(null);const [isExporting, setIsExporting] = useState(false);const handleExportToPdf = useCallback(async () => {setIsExporting(true);try {// 生成带时间戳的文件名const timestamp = new Date().toISOString().replace(/[:.]/g, '-');const filename = `messages-${timestamp}.pdf`;await exportMessagesToPdf({targetSelector: '.message-list-container',filename,quality: 0.95});} catch (error) {console.error('导出失败:', error);alert('导出失败,请重试');} finally {setIsExporting(false);}}, []);return (<divclassName="message-list-container"ref={messageListRef}><divclassName="message-list-header"><h2>消息记录</h2><buttonclassName="export-button"onClick={handleExportToPdf}disabled={isExporting}>{isExporting ? '导出中...' : '导出 PDF'}</button></div><divclassName="message-list">{messages.map(message => (<MessageItemkey={message.id}message={message} />))}</div></div>);};
完整效果
运行项目后,点击「导出 PDF」按钮:
-
控制台显示详细的导出日志 -
自动计算页数并分页 -
生成高清 PDF 文件并自动下载
=== 开始导出 PDF ===目标选择器: .message-list-container元素尺寸: { width: 600, height: 8500 }开始截图...截图完成,大小: 2847.65 KB分页完成,共 8 页添加第 1 页: 190x277.00mm添加第 2 页: 190x277.00mm...添加第 8 页: 190x156.32mm=== 导出完成 ===
SnapDOM VS html2canvas
为什么选择 SnapDOM 而不是更流行的 html2canvas?让我们来对比一下:
详细对比表
|
|
|
|
|---|---|---|
| 「样式还原」 |
|
|
| 「Flexbox/Grid」 |
|
|
| 「渐变背景」 |
|
|
| 「阴影效果」 |
|
|
| 「自定义字体」 |
|
|
| 「SVG 支持」 |
|
|
| 「输出格式」 |
|
|
| 「包大小」 |
|
|
| 「维护状态」 |
|
|
| 「API 设计」 |
|
|
代码对比
「html2canvas 方式:」
ounter(lineounter(lineounter(lineounter(lineounter(lineounter(lineounter(lineounter(lineounter(lineounter(lineounter(lineounter(lineounter(lineimport html2canvas from 'html2canvas';// 需要处理各种兼容性问题const canvas = await html2canvas(element, {scale: 2,useCORS: true,logging: false,allowTaint: true,foreignObjectRendering: true, // 可能不生效// 还需要处理字体、SVG 等问题...});const dataUrl = canvas.toDataURL('image/png');
「SnapDOM 方式:」
ounter(lineounter(lineounter(lineounter(lineounter(lineounter(lineounter(lineounter(lineounter(lineimport { snapdom } from '@zumer/snapdom';// 简洁的 API,无需额外配置const capture = await snapdom(element, {scale: 2,quality: 0.95});const dataUrl = (await capture.toPng()).src;
什么时候选择 html2canvas?
虽然 SnapDOM 在大多数场景下更优秀,但 html2canvas 在以下情况可能更适合:
-
「项目已在使用」:迁移成本较高 -
「简单场景」:只需截取简单文本,无复杂样式 -
「团队熟悉度」:团队对 html2canvas 更熟悉
总结
核心要点回顾
-
「SnapDOM」 提供高保真的 DOM 截图能力,通过 scale: 2实现 2 倍清晰度 -
「jsPDF」 是强大的 PDF 生成库,支持 A4 纸张、压缩等特性 -
「分页算法」 是整个方案的核心难点,需要精确计算像素与毫米的转换 -
「SnapDOM」 相比 html2canvas 在样式还原度上有明显优势
进一步优化方向
|
|
|
|---|---|
| 「Web Worker」 |
|
| 「分段截图」 |
|
| 「加载提示」 |
|
| 「PDF 压缩」 |
|
| 「页眉页脚」 |
|
-已完结-
为了跟上AI时代我干了一件事儿,我创建了一个知识星球社群:ChartGPT与副业。想带着大家一起探索ChatGPT和新的AI时代。
有很多小伙伴搞不定ChatGPT账号,于是我们决定,凡是这三天之内加入ChatPGT的小伙伴,我们直接送一个正常可用的永久ChatGPT独立账户。
不光是增长速度最快,我们的星球品质也绝对经得起考验,短短一个月时间,我们的课程团队发布了8个专栏、18个副业项目:

简单说下这个星球能给大家提供什么:
1、不断分享如何使用ChatGPT来完成各种任务,让你更高效地使用ChatGPT,以及副业思考、变现思路、创业案例、落地案例分享。
2、分享ChatGPT的使用方法、最新资讯、商业价值。
3、探讨未来关于ChatGPT的机遇,共同成长。
4、帮助大家解决ChatGPT遇到的问题。
5、提供一整年的售后服务,一起搞副业
星球福利:
1、加入星球4天后,就送ChatGPT独立账号。
2、邀请你加入ChatGPT会员交流群。
3、赠送一份完整的ChatGPT手册和66个ChatGPT副业赚钱手册。
其它福利还在筹划中… 不过,我给你大家保证,加入星球后,收获的价值会远远大于今天加入的门票费用 !
本星球第一期原价399,目前属于试运营,早鸟价169,每超过50人涨价10元,星球马上要来一波大的涨价,如果你还在犹豫,可能最后就要以更高价格加入了。。
早就是优势。建议大家尽早以便宜的价格加入!

如果感觉有帮助的话,别忘了给前端妹点个 。谢谢大家哦!!!
 前端妹拍了拍你说:
记得戳小花花哦~


喜欢本文的朋友们,欢迎点击关注订阅号前端技术精选
收看更多精彩内容
你在看吗?一起成长