 夜雨聆风
夜雨聆风


Tomcat组件管理源码详解
生命周期管理:LifeCycle
我从以下几方面,帮助你构建基于上下文的知识体系和理解为什么要理解组件的生命周期管理(LifeCycle)
-
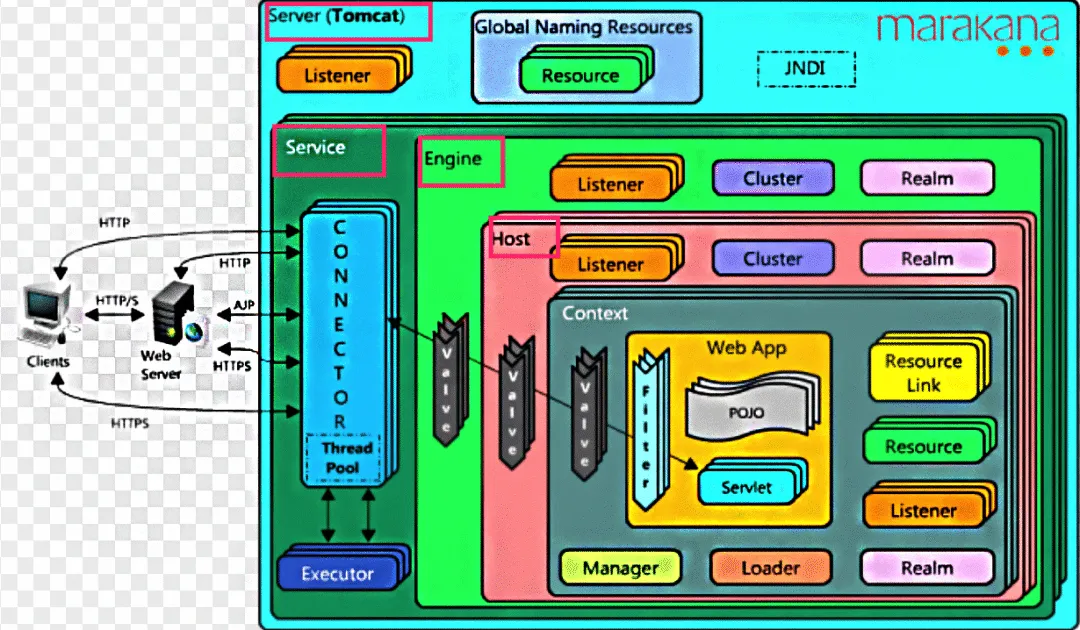
Server及其它组件
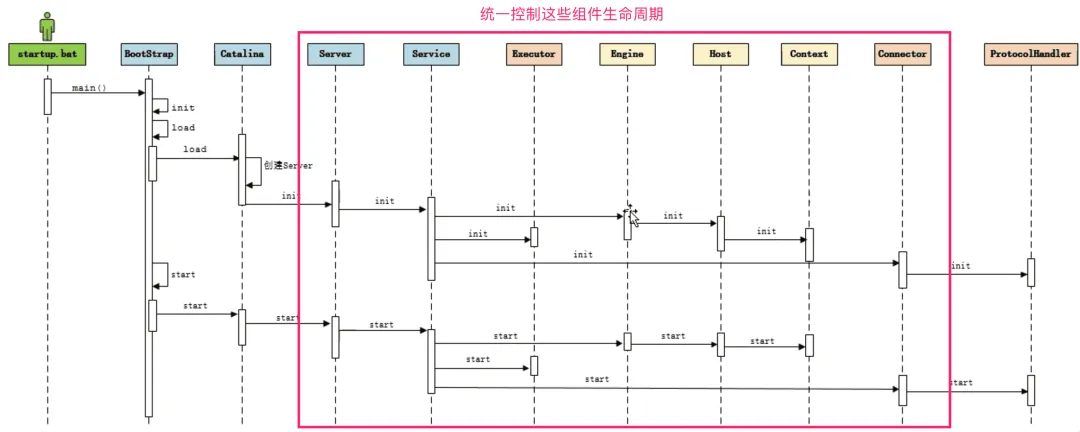
-
Server后续组件生命周期及初始化
-
Server的依赖结构
LifeCycle接口
理解Lifecycle主要有两点:第一是三类接口方法;第二是状态机。
一个标准的LifeCycle有哪些方法?
分三类去看:
publicinterfaceLifecycle{
/** 第1类:针对监听器 **/
// 添加监听器
publicvoidaddLifecycleListener(LifecycleListener listener);
// 获取所以监听器
public LifecycleListener[] findLifecycleListeners();
// 移除某个监听器
publicvoidremoveLifecycleListener(LifecycleListener listener);

/** 第2类:针对控制流程 **/
// 初始化方法
publicvoidinit()throws LifecycleException;
// 启动方法
publicvoidstart()throws LifecycleException;
// 停止方法,和start对应
publicvoidstop()throws LifecycleException;
// 销毁方法,和init对应
publicvoiddestroy()throws LifecycleException;

/** 第3类:针对状态 **/
// 获取生命周期状态
public LifecycleState getState();
// 获取字符串类型的生命周期状态
public String getStateName();
}
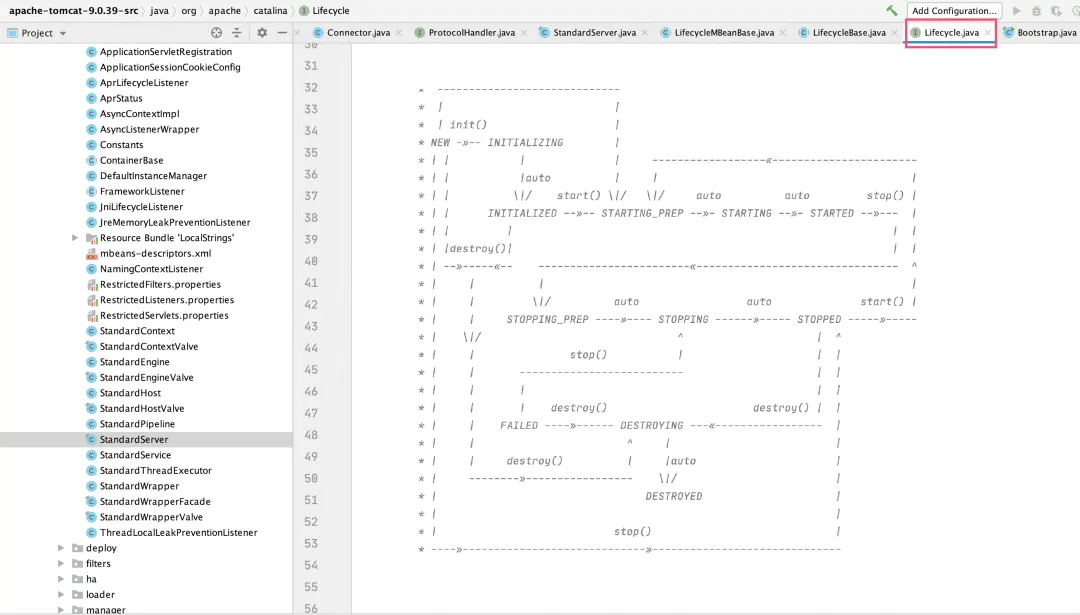
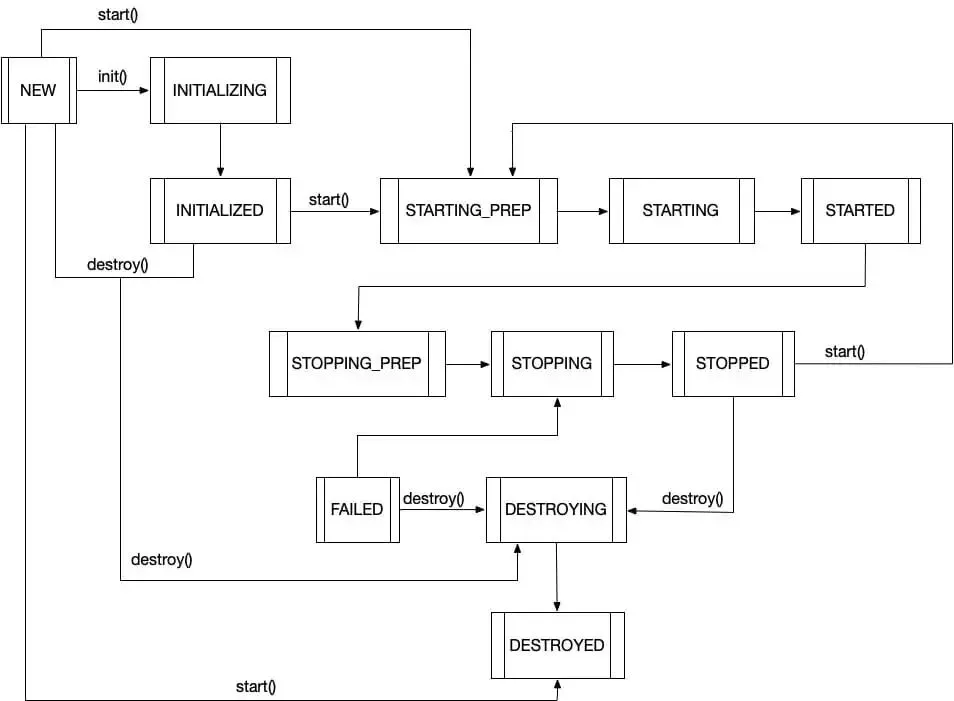
LifeCycle状态机有哪些状态?
Tomcat 给各个组件定义了一些生命周期中的状态
-
在枚举类 LifecycleState 里
publicenum LifecycleState {
    NEW(false, null),
    INITIALIZING(false, Lifecycle.BEFORE_INIT_EVENT),
    INITIALIZED(false, Lifecycle.AFTER_INIT_EVENT),
    STARTING_PREP(false, Lifecycle.BEFORE_START_EVENT),
    STARTING(true, Lifecycle.START_EVENT),
    STARTED(true, Lifecycle.AFTER_START_EVENT),
    STOPPING_PREP(true, Lifecycle.BEFORE_STOP_EVENT),
    STOPPING(false, Lifecycle.STOP_EVENT),
    STOPPED(false, Lifecycle.AFTER_STOP_EVENT),
    DESTROYING(false, Lifecycle.BEFORE_DESTROY_EVENT),
    DESTROYED(false, Lifecycle.AFTER_DESTROY_EVENT),
    FAILED(false, null);

privatefinalboolean available;
privatefinal String lifecycleEvent;

privateLifecycleState(boolean available, String lifecycleEvent){
this.available = available;
this.lifecycleEvent = lifecycleEvent;
    }
    ……
}
-
它们之间的关系是怎么样的呢?
在Lifecycle.java源码中有相关的注释:
看不太清楚的可以看下图:
LifecycleBase – LifeCycle的基本实现
LifecycleBase是Lifecycle的基本实现。
监听器相关
生命周期监听器保存在一个线程安全的CopyOnWriteArrayList中。所以add和remove都是直接调用此List的相应方法。 findLifecycleListeners返回的是一个数组,为了线程安全,所以这儿会生成一个新数组。
privatefinal List<LifecycleListener> lifecycleListeners = new CopyOnWriteArrayList<>();

@Override
publicvoidaddLifecycleListener(LifecycleListener listener){
    lifecycleListeners.add(listener);
}
@Override
public LifecycleListener[] findLifecycleListeners() {
return lifecycleListeners.toArray(new LifecycleListener[0]);
}
@Override
publicvoidremoveLifecycleListener(LifecycleListener listener){
    lifecycleListeners.remove(listener);
}
生命周期相关
-
init
@Override
publicfinalsynchronizedvoidinit()throws LifecycleException {
// 非NEW状态,不允许调用init()方法
if (!state.equals(LifecycleState.NEW)) {
        invalidTransition(Lifecycle.BEFORE_INIT_EVENT);
    }

try {
// 初始化逻辑之前,先将状态变更为`INITIALIZING`
        setStateInternal(LifecycleState.INITIALIZING, null, false);
// 初始化,该方法为一个abstract方法,需要组件自行实现
        initInternal();
// 初始化完成之后,状态变更为`INITIALIZED`
        setStateInternal(LifecycleState.INITIALIZED, null, false);
    } catch (Throwable t) {
// 初始化的过程中,可能会有异常抛出,这时需要捕获异常,并将状态变更为`FAILED`
        ExceptionUtils.handleThrowable(t);
        setStateInternal(LifecycleState.FAILED, null, false);
thrownew LifecycleException(
                sm.getString("lifecycleBase.initFail",toString()), t);
    }
}
我们再来看看invalidTransition方法,该方法直接抛出异常。
privatevoidinvalidTransition(String type)throws LifecycleException {
    String msg = sm.getString("lifecycleBase.invalidTransition", type,
            toString(), state);
thrownew LifecycleException(msg);
}
setStateInternal方法用于维护状态,同时在状态转换成功之后触发事件。为了状态的可见性,所以state声明为volatile类型的。
privatevolatile LifecycleState state = LifecycleState.NEW;。

privatesynchronizedvoidsetStateInternal(LifecycleState state,
        Object data, boolean check)throws LifecycleException {
if (log.isDebugEnabled()) {
        log.debug(sm.getString("lifecycleBase.setState", this, state));
    }

// 是否校验状态
if (check) {
// Must have been triggered by one of the abstract methods (assume
// code in this class is correct)
// null is never a valid state
// state不允许为null
if (state == null) {
            invalidTransition("null");
// Unreachable code - here to stop eclipse complaining about
// a possible NPE further down the method
return;
        }

// Any method can transition to failed
// startInternal() permits STARTING_PREP to STARTING
// stopInternal() permits STOPPING_PREP to STOPPING and FAILED to
// STOPPING
if (!(state == LifecycleState.FAILED ||
                (this.state == LifecycleState.STARTING_PREP &&
                        state == LifecycleState.STARTING) ||
                (this.state == LifecycleState.STOPPING_PREP &&
                        state == LifecycleState.STOPPING) ||
                (this.state == LifecycleState.FAILED &&
                        state == LifecycleState.STOPPING))) {
// No other transition permitted
            invalidTransition(state.name());
        }
    }

// 设置状态
this.state = state;
// 触发事件
    String lifecycleEvent = state.getLifecycleEvent();
if (lifecycleEvent != null) {
        fireLifecycleEvent(lifecycleEvent, data);
    }
}
设置完 state 的状态之后,就触发该状态的事件了,通知事件监听器
/**
 * The list of registered LifecycleListeners for event notifications.
 */
privatefinal List<LifecycleListener> lifecycleListeners = new CopyOnWriteArrayList<>();


protectedvoidfireLifecycleEvent(String type, Object data){
    LifecycleEvent event = new LifecycleEvent(this, type, data);
for (LifecycleListener listener : lifecycleListeners) {
        listener.lifecycleEvent(event);
    }
}
这里的 LifecycleListener 对象是在 Catalina 对象解析 server.xml 文件时就已经创建好并加到 lifecycleListeners 里的。这个不是特别重要就不细讲了。
-
start
@Override
publicfinalsynchronizedvoidstart()throws LifecycleException {
// `STARTING_PREP`、`STARTING`和`STARTED时,将忽略start()逻辑
if (LifecycleState.STARTING_PREP.equals(state) || LifecycleState.STARTING.equals(state) ||
            LifecycleState.STARTED.equals(state)) {

if (log.isDebugEnabled()) {
            Exception e = new LifecycleException();
            log.debug(sm.getString("lifecycleBase.alreadyStarted", toString()), e);
        } elseif (log.isInfoEnabled()) {
            log.info(sm.getString("lifecycleBase.alreadyStarted", toString()));
        }

return;
    }

// `NEW`状态时,执行init()方法
if (state.equals(LifecycleState.NEW)) {
        init();
    }

// `FAILED`状态时,执行stop()方法
elseif (state.equals(LifecycleState.FAILED)) {
        stop();
    }

// 不是`INITIALIZED`和`STOPPED`时,则说明是非法的操作
elseif (!state.equals(LifecycleState.INITIALIZED) &&
            !state.equals(LifecycleState.STOPPED)) {
        invalidTransition(Lifecycle.BEFORE_START_EVENT);
    }

try {
// start前的状态设置
        setStateInternal(LifecycleState.STARTING_PREP, null, false);
// start逻辑,抽象方法,由组件自行实现
        startInternal();
// start过程中,可能因为某些原因失败,这时需要stop操作
if (state.equals(LifecycleState.FAILED)) {
// This is a 'controlled' failure. The component put itself into the
// FAILED state so call stop() to complete the clean-up.
            stop();
        } elseif (!state.equals(LifecycleState.STARTING)) {
// Shouldn't be necessary but acts as a check that sub-classes are
// doing what they are supposed to.
            invalidTransition(Lifecycle.AFTER_START_EVENT);
        } else {
// 设置状态为STARTED
            setStateInternal(LifecycleState.STARTED, null, false);
        }
    } catch (Throwable t) {
// This is an 'uncontrolled' failure so put the component into the
// FAILED state and throw an exception.
        ExceptionUtils.handleThrowable(t);
        setStateInternal(LifecycleState.FAILED, null, false);
thrownew LifecycleException(sm.getString("lifecycleBase.startFail", toString()), t);
    }
}
-
stop
@Override
publicfinalsynchronizedvoidstop()throws LifecycleException {
// `STOPPING_PREP`、`STOPPING`和STOPPED时,将忽略stop()的执行
if (LifecycleState.STOPPING_PREP.equals(state) || LifecycleState.STOPPING.equals(state) ||
            LifecycleState.STOPPED.equals(state)) {

if (log.isDebugEnabled()) {
            Exception e = new LifecycleException();
            log.debug(sm.getString("lifecycleBase.alreadyStopped", toString()), e);
        } elseif (log.isInfoEnabled()) {
            log.info(sm.getString("lifecycleBase.alreadyStopped", toString()));
        }

return;
    }

// `NEW`状态时,直接将状态变更为`STOPPED`
if (state.equals(LifecycleState.NEW)) {
        state = LifecycleState.STOPPED;
return;
    }

// stop()的执行,必须要是`STARTED`和`FAILED`
if (!state.equals(LifecycleState.STARTED) && !state.equals(LifecycleState.FAILED)) {
        invalidTransition(Lifecycle.BEFORE_STOP_EVENT);
    }

try {
// `FAILED`时,直接触发BEFORE_STOP_EVENT事件
if (state.equals(LifecycleState.FAILED)) {
// Don't transition to STOPPING_PREP as that would briefly mark the
// component as available but do ensure the BEFORE_STOP_EVENT is
// fired
            fireLifecycleEvent(BEFORE_STOP_EVENT, null);
        } else {
// 设置状态为STOPPING_PREP
            setStateInternal(LifecycleState.STOPPING_PREP, null, false);
        }

// stop逻辑,抽象方法,组件自行实现
        stopInternal();

// Shouldn't be necessary but acts as a check that sub-classes are
// doing what they are supposed to.
if (!state.equals(LifecycleState.STOPPING) && !state.equals(LifecycleState.FAILED)) {
            invalidTransition(Lifecycle.AFTER_STOP_EVENT);
        }
// 设置状态为STOPPED
        setStateInternal(LifecycleState.STOPPED, null, false);
    } catch (Throwable t) {
        ExceptionUtils.handleThrowable(t);
        setStateInternal(LifecycleState.FAILED, null, false);
thrownew LifecycleException(sm.getString("lifecycleBase.stopFail",toString()), t);
    } finally {
if (thisinstanceof Lifecycle.SingleUse) {
// Complete stop process first
            setStateInternal(LifecycleState.STOPPED, null, false);
            destroy();
        }
    }
}
-
destory
@Override
publicfinalsynchronizedvoiddestroy()throws LifecycleException {
// `FAILED`状态时,直接触发stop()逻辑
if (LifecycleState.FAILED.equals(state)) {
try {
// Triggers clean-up
            stop();
        } catch (LifecycleException e) {
// Just log. Still want to destroy.
            log.warn(sm.getString(
"lifecycleBase.destroyStopFail", toString()), e);
        }
    }

// `DESTROYING`和`DESTROYED`时,忽略destroy的执行
if (LifecycleState.DESTROYING.equals(state) ||
            LifecycleState.DESTROYED.equals(state)) {

if (log.isDebugEnabled()) {
            Exception e = new LifecycleException();
            log.debug(sm.getString("lifecycleBase.alreadyDestroyed", toString()), e);
        } elseif (log.isInfoEnabled() && !(thisinstanceof Lifecycle.SingleUse)) {
// Rather than have every component that might need to call
// destroy() check for SingleUse, don't log an info message if
// multiple calls are made to destroy()
            log.info(sm.getString("lifecycleBase.alreadyDestroyed", toString()));
        }

return;
    }

// 非法状态判断
if (!state.equals(LifecycleState.STOPPED) &&
            !state.equals(LifecycleState.FAILED) &&
            !state.equals(LifecycleState.NEW) &&
            !state.equals(LifecycleState.INITIALIZED)) {
        invalidTransition(Lifecycle.BEFORE_DESTROY_EVENT);
    }

try {
// destroy前状态设置
        setStateInternal(LifecycleState.DESTROYING, null, false);
// 抽象方法,组件自行实现
        destroyInternal();
// destroy后状态设置
        setStateInternal(LifecycleState.DESTROYED, null, false);
    } catch (Throwable t) {
        ExceptionUtils.handleThrowable(t);
        setStateInternal(LifecycleState.FAILED, null, false);
thrownew LifecycleException(
                sm.getString("lifecycleBase.destroyFail",toString()), t);
    }
}
用了什么设计模式?
从上述源码看得出来,LifecycleBase是使用了状态机+模板模式来实现的。模板方法有下面这几个:
// 初始化方法
protectedabstractvoidinitInternal()throws LifecycleException;
// 启动方法
protectedabstractvoidstartInternal()throws LifecycleException;
// 停止方法
protectedabstractvoidstopInternal()throws LifecycleException;
// 销毁方法
protectedabstractvoiddestroyInternal()throws LifecycleException;
组件拓展管理:MX和MBean
为什么要了解JMX
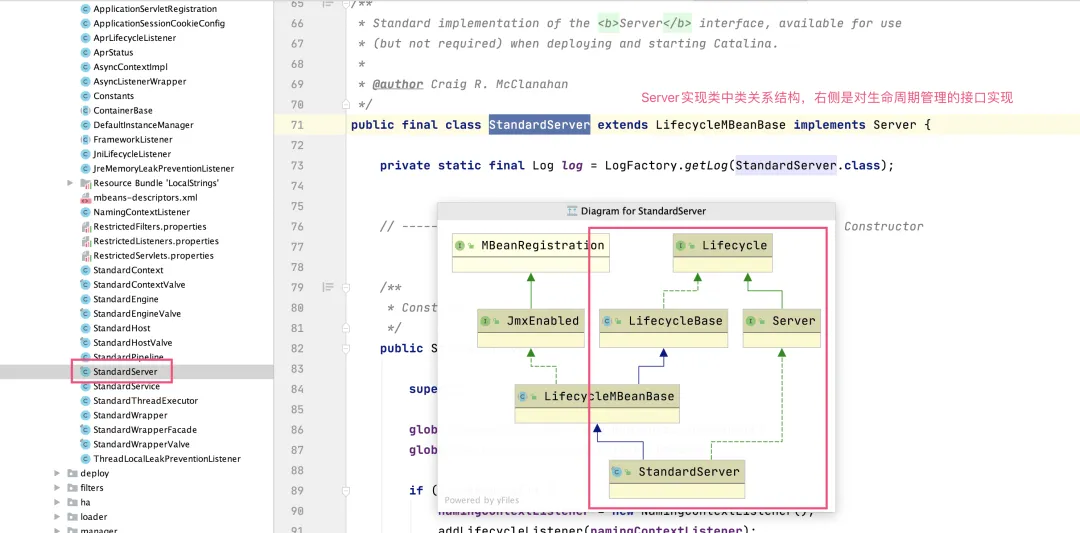
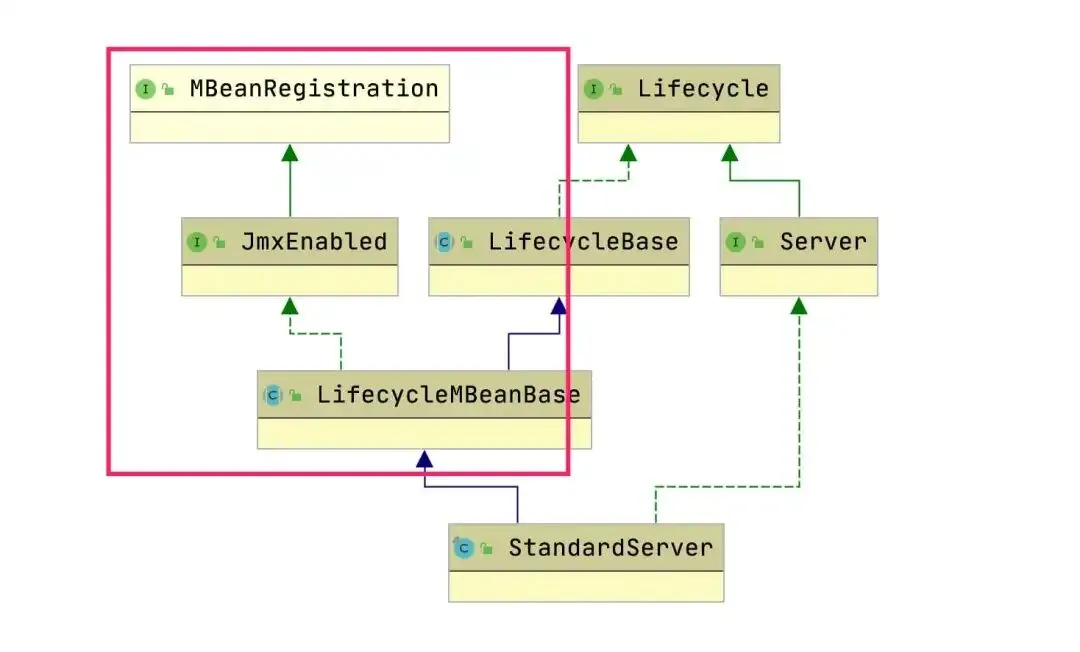
我们在上文中讲Lifecycle和相关组件时,你会发现其实还设计一块就是左侧的JMX和MBean的实现,即LifecycleMBeanBase.
什么是JMX和MBean
JMX是java1.5中引入的新特性。JMX全称为“Java Management Extension”,即Java管理扩展。
JMX(Java Management Extensions)是一个为应用程序植入管理功能的框架。JMX是一套标准的代理和服务,实际上,用户可以在任何Java应用程序中使用这些代理和服务实现管理。它使用了最简单的一类javaBean,使用有名的MBean,其内部包含了数据信息,这些信息可能是程序配置信息、模块信息、系统信息、统计信息等。MBean可以操作可读可写的属性、直接操作某些函数。
应用场景:中间件软件WebLogic的管理页面就是基于JMX开发的,而JBoss则整个系统都基于JMX构架,我们今天讲的Tomcat也是基于JMX开发而来的。
我们看下JMX的结构
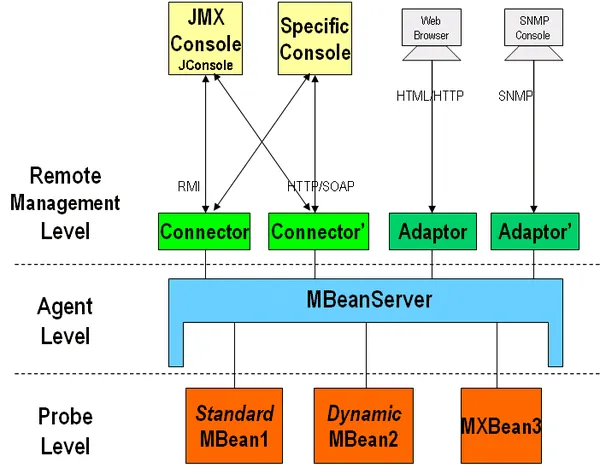
-
Probe Level 负责资源的检测(获取信息),包含MBeans,通常也叫做Instrumentation Level。MX管理构件(MBean)分为四种形式,分别是标准管理构件(Standard MBean)、动态管理构件(Dynamic MBean)、开放管理构件(Open Mbean)和模型管理构件(Model MBean)。 -
The Agent Level 或者叫做MBean Server(代理服务器),是JMX的核心,连接Mbeans和远程监控程序。 -
Remote Management Level 通过connectors和adaptors来远程操作MBean Server。
JMX使用案例
上节只是引入和相关概念,这是不够的,你依然需要一个案例来帮助你理解JMX是如何工作的。
基于JMX的监控例子
-
ServerImpl – 我们模拟的某个服务器ServerImpl状态
publicclassServerImpl{
publicfinallong startTime;
publicServerImpl(){
        startTime = System.currentTimeMillis();
    }
}
-
由于MXBean规定,标准MBean也要实现一个接口,其所有向外界公开的方法都要在该接口中声明,否则管理系统就不能从中获取信息。此外,该接口的命名有一定的规范:在标准MBean类名后加上MBean后缀。这里的标准MBean类就是ServerMonitor,所以其对应的接口就应该是ServerMonitorMBean。因此ServerMonitorMBean的实现如下
publicinterfaceServerMonitorMBean{
publiclonggetUpTime();
}
-
使用ServerMonitor类来监测ServerImpl的状态,实现如下
publicclassServerMonitorimplementsServerMonitorMBean{
privatefinal ServerImpl target;
publicServerMonitor(ServerImpl target){
this.target = target;
    }

@Override
publiclonggetUpTime(){
return System.currentTimeMillis() - target.startTime;
    }
}
-
对于管理系统来讲,这些MBean中公开的方法,最终会被JMX转换为属性(Attribute)、监听(Listener)和调用(Invoke)的概念。下面代码中Main类的manage方法就模拟了管理程序是如何获取监测到的属性,并表现监测结果。
import javax.management.MBeanServer;
import javax.management.MBeanServerFactory;
import javax.management.ObjectName;

publicclassMain{
privatestatic ObjectName objectName;
privatestatic MBeanServer mBeanServer;

publicstaticvoidmain(String[] args)throws Exception {
        init();
        manage();
    }

privatestaticvoidinit()throws Exception {
        ServerImpl serverImpl = new ServerImpl();
        ServerMonitor serverMonitor = new ServerMonitor(serverImpl);
        mBeanServer = MBeanServerFactory.createMBeanServer();
        objectName = new ObjectName("objectName:id=ServerMonitor1");

// 注册到MBeanServer
        mBeanServer.registerMBean(serverMonitor, objectName);
    }

privatestaticvoidmanage()throws Exception {
// 获取属性值
long upTime = (Long)mBeanServer.getAttribute(objectName, "UpTime");
        System.out.println(upTime);
    }
}
-
整体流程
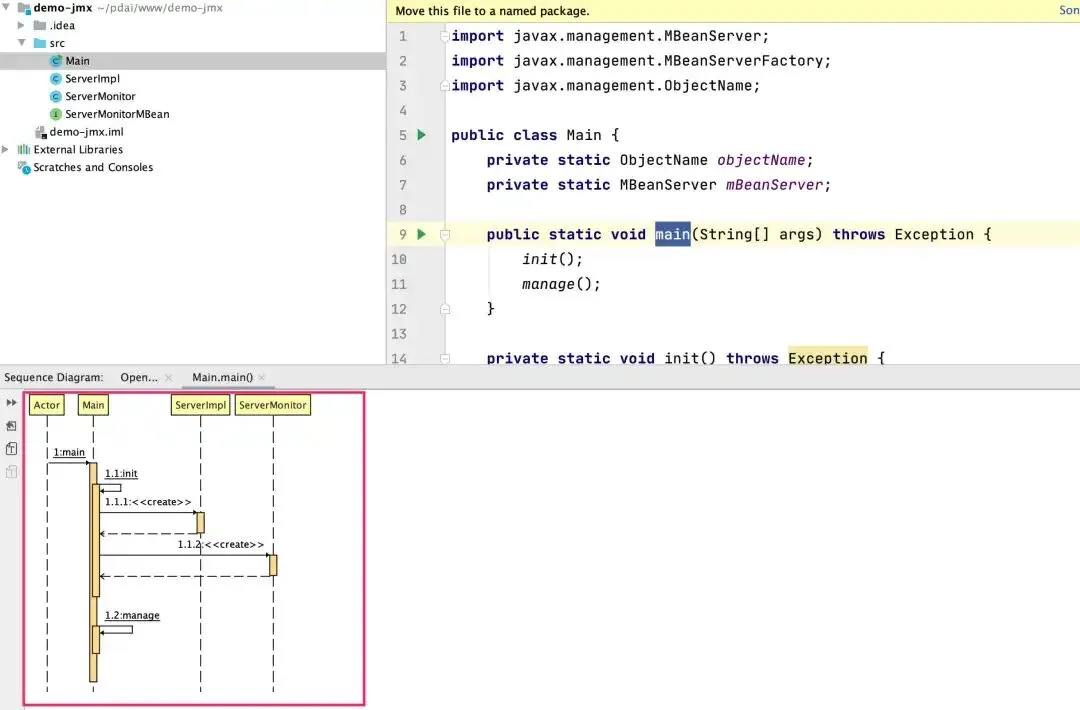
如上步骤就能让你理解常见的Jconsole是如何通过JMX获取属性,对象等监控信息的了。
基于JMX的HTMLAdapter案例
上面例子,还没有体现adapter展示,比如上述信息在HTML页面中展示出来,再看一个例子
-
我们的管理目标
publicclassControlTarget{
privatelong width;
privatelong length;

publicControlTarget( long width, long length){
this.width = width;
this.length = length;
 }

publiclonggetWidth(){
return width;
 }

publiclonggetLength(){
return length;
 }
}
-
根据标准MBean类抽象出符合规范的MBean类的接口,并修改标准MBean类实现该接口。
publicinterfaceControlImplMBean{
publiclonggetLength();
publiclonggetWidth();
publiclonggetArea();
publicdoublegetLengthWidthRatio();
}
-
根据需求,创建管理(目标程序)的类,其中包含操纵和获取(目标程序)特性的方法。这个类就是标准MBean类。
publicclassControlImplimplementsControlImplMBean{
private ControlTarget target;

publicControlImpl(ControlTarget target){
this.target = target;
 }

@Override
publiclonggetLength(){
return target.getLength();
 }

@Override
publiclonggetWidth(){
return target.getWidth();
 }

@Override
publiclonggetArea(){
return target.getLength() * target.getWidth();
 }

@Override
publicdoublegetLengthWidthRatio(){
return  target.getLength() * 1.0f / target.getWidth();
 }
}
-
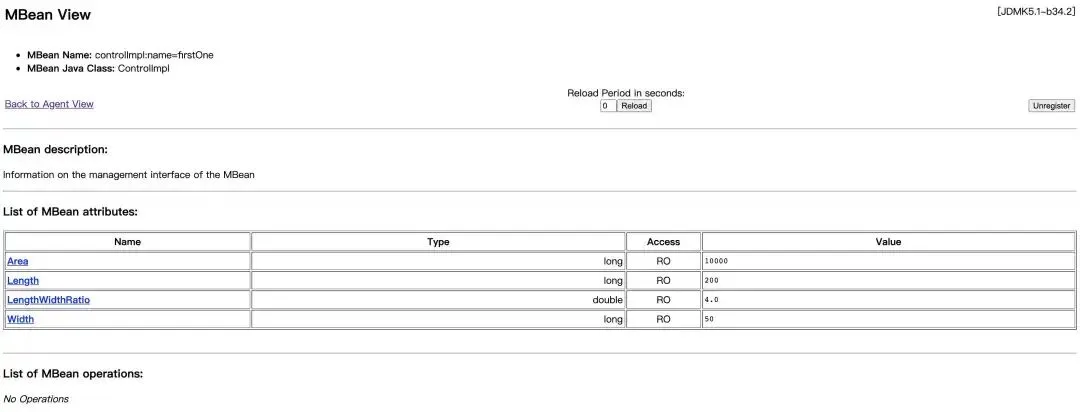
创建MBean的代理类,代理中包含创建MBeanServer、生成ObjectName、注册MBean、表现MBean
import com.sun.jdmk.comm.HtmlAdaptorServer;

import javax.management.*;

publicclassControlImplAgent{

publicstaticvoidmain(String[] args)throws MalformedObjectNameException, NullPointerException, InstanceAlreadyExistsException, MBeanRegistrationException, NotCompliantMBeanException {

// 创建MBeanServer
        MBeanServer server = MBeanServerFactory.createMBeanServer();

// 为MBean创建ObjectName
        ObjectName controlImplName = new ObjectName("controlImpl:name=firstOne");

// 注册MBean到Server中
        server.registerMBean(new ControlImpl(new ControlTarget(50, 200)), controlImplName);

// 表现MBean(一种方式)
        ObjectName adapterName = new ObjectName("ControlImpl:name=htmladapter,port=8082");
        HtmlAdaptorServer adapter = new HtmlAdaptorServer();
        server.registerMBean(adapter, adapterName);

        adapter.start();
//adapter.stop();
    }

}
-
打开相关页面
PS:相关Adapter可以通过这里下载https://download.csdn.net/download/com_ma/10379741
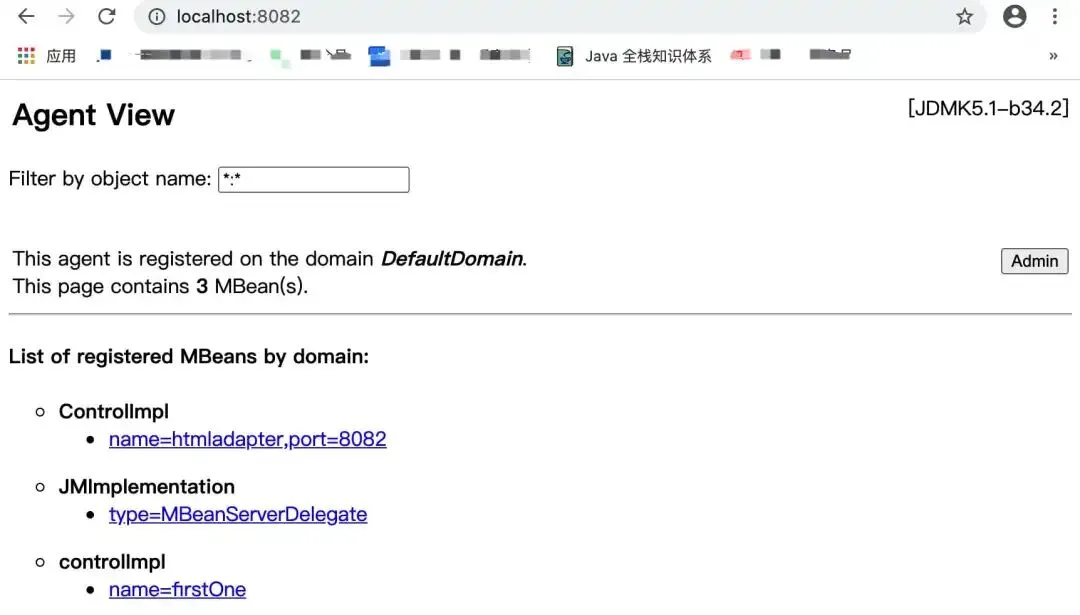
点击最后一个链接
Tomcat如何通过JMX实现组件管理
在简单理解了JMX概念和案例之后,我们便可以开始学习Tomcat基于JMX的实现了。

上述图中,我们看下相关的类的用途
-
MBeanRegistration:Java JMX框架提供的注册MBean的接口,引入此接口是为了便于使用JMX提供的管理功能; -
JmxEnabled: 此接口由组件实现,这些组件在创建时将注册到MBean服务器,在销毁时将注销这些组件。它主要是由实现生命周期的组件来实现的,但并不是专门为它们实现的。 -
LifecycleMBeanBase:Tomcat提供的对MBeanRegistration的抽象实现类,运用抽象模板模式将所有容器统一注册到JMX;
此外,ContainerBase、StandardServer、StandardService、WebappLoader、Connector、StandardContext、StandardEngine、StandardHost、StandardWrapper等容器都继承了LifecycleMBeanBase,因此这些容器都具有了同样的生命周期并可以通过JMX进行管理。
MBeanRegistration
理解MBeanRegistration主要在于:
-
两块内容:registered 和 unregistered -
两类方法:before和after
publicinterfaceMBeanRegistration{

// 在注册之前执行的方法,如果发生异常,MBean不会注册到MBean Server中
public ObjectName preRegister(MBeanServer server,
                                  ObjectName name)throws java.lang.Exception;
// 在注册之后执行的方法,比如注册失败提供报错信息
publicvoidpostRegister(Boolean registrationDone);


// 在卸载前执行的方法
publicvoidpreDeregister()throws java.lang.Exception ;
// 在执行卸载之后的方法
publicvoidpostDeregister();

 }
JmxEnabled
理解JmxEnabled:在设计上它引一个域(Domain)对注册的MBeans进行隔离,这个域类似于MBean上层的命名空间一样。
publicinterfaceJmxEnabledextendsMBeanRegistration{

// 获取MBean所属于的Domain
String getDomain();

// 设置Domain
voidsetDomain(String domain);

// 获取MBean的名字
ObjectName getObjectName();
}
LifecycleMBeanBase
这样理解LifecycleMBeanBase时,你便知道它包含两块,一个是Lifecycle的接口实现,一个是Jmx接口封装实现。
从它实现的类继承和实现关系便能看出:
publicabstractclassLifecycleMBeanBaseextendsLifecycleBase
implementsJmxEnabled{

}
JmxEnabled的接口实现
-
Domain和mBeanName相关,代码很简单,不做详解
/* Cache components of the MBean registration. */
private String domain = null;
private ObjectName oname = null;
@Deprecated
protected MBeanServer mserver = null;

/**
  * Specify the domain under which this component should be registered. Used
  * with components that cannot (easily) navigate the component hierarchy to
  * determine the correct domain to use.
  */
@Override
publicfinalvoidsetDomain(String domain){
this.domain = domain;
}


/**
  * Obtain the domain under which this component will be / has been
  * registered.
  */
@Override
publicfinal String getDomain(){
if (domain == null) {
        domain = getDomainInternal();
    }

if (domain == null) {
        domain = Globals.DEFAULT_MBEAN_DOMAIN;
    }

return domain;
}


/**
  * Method implemented by sub-classes to identify the domain in which MBeans
  * should be registered.
  *
  * @return  The name of the domain to use to register MBeans.
  */
protectedabstract String getDomainInternal();


/**
  * Obtain the name under which this component has been registered with JMX.
  */
@Override
publicfinal ObjectName getObjectName(){
return oname;
}


/**
  * Allow sub-classes to specify the key properties component of the
  * {@link ObjectName} that will be used to register this component.
  *
  * @return  The string representation of the key properties component of the
  *          desired {@link ObjectName}
  */
protectedabstract String getObjectNameKeyProperties();
-
注册和卸载的相关方法
/**
  * Utility method to enable sub-classes to easily register additional
  * components that don't implement {@link JmxEnabled} with an MBean server.
  * <br>
  * Note: This method should only be used once {@link #initInternal()} has
  * been called and before {@link #destroyInternal()} has been called.
  *
  * @param obj                       The object the register
  * @param objectNameKeyProperties   The key properties component of the
  *                                  object name to use to register the
  *                                  object
  *
  * @return  The name used to register the object
  */
protectedfinal ObjectName register(Object obj,
        String objectNameKeyProperties){

// Construct an object name with the right domain
    StringBuilder name = new StringBuilder(getDomain());
    name.append(':');
    name.append(objectNameKeyProperties);

    ObjectName on = null;

try {
        on = new ObjectName(name.toString());
        Registry.getRegistry(null, null).registerComponent(obj, on, null);
    } catch (MalformedObjectNameException e) {
        log.warn(sm.getString("lifecycleMBeanBase.registerFail", obj, name),
                e);
    } catch (Exception e) {
        log.warn(sm.getString("lifecycleMBeanBase.registerFail", obj, name),
                e);
    }

return on;
}


/**
  * Utility method to enable sub-classes to easily unregister additional
  * components that don't implement {@link JmxEnabled} with an MBean server.
  * <br>
  * Note: This method should only be used once {@link #initInternal()} has
  * been called and before {@link #destroyInternal()} has been called.
  *
  * @param objectNameKeyProperties   The key properties component of the
  *                                  object name to use to unregister the
  *                                  object
  */
protectedfinalvoidunregister(String objectNameKeyProperties){
// Construct an object name with the right domain
    StringBuilder name = new StringBuilder(getDomain());
    name.append(':');
    name.append(objectNameKeyProperties);
    Registry.getRegistry(null, null).unregisterComponent(name.toString());
}


/**
  * Utility method to enable sub-classes to easily unregister additional
  * components that don't implement {@link JmxEnabled} with an MBean server.
  * <br>
  * Note: This method should only be used once {@link #initInternal()} has
  * been called and before {@link #destroyInternal()} has been called.
  *
  * @param on    The name of the component to unregister
  */
protectedfinalvoidunregister(ObjectName on){
    Registry.getRegistry(null, null).unregisterComponent(on);
}


/**
  * Not used - NOOP.
  */
@Override
publicfinalvoidpostDeregister(){
// NOOP
}


/**
  * Not used - NOOP.
  */
@Override
publicfinalvoidpostRegister(Boolean registrationDone){
// NOOP
}


/**
  * Not used - NOOP.
  */
@Override
publicfinalvoidpreDeregister()throws Exception {
// NOOP
}


/**
  * Allows the object to be registered with an alternative
  * {@link MBeanServer} and/or {@link ObjectName}.
  */
@Override
publicfinal ObjectName preRegister(MBeanServer server, ObjectName name)
throws Exception {

this.mserver = server;
this.oname = name;
this.domain = name.getDomain().intern();

return oname;
}
LifecycleBase相关接口
这样你就知道这里抽象出的LifecycleBase如下两个方法的用意,就是为了注册和卸载MBean
/**
注册MBean
  */
@Override
protectedvoidinitInternal()throws LifecycleException {
// If oname is not null then registration has already happened via
// preRegister().
if (oname == null) {
        mserver = Registry.getRegistry(null, null).getMBeanServer();

        oname = register(this, getObjectNameKeyProperties());
    }
}


/**
  卸载MBean
  */
@Override
protectedvoiddestroyInternal()throws LifecycleException {
    unregister(oname);
}