ARTICLE · 1138926
保姆级学习开发安卓手机软件实战(七)--前台服务(ForegroundService 集成)
保姆级学习开发安卓手机软件实战(七)--前台服务(ForegroundService 集成)

今天是最后一天,虽然发广告的都发现是个坑,虽然到现在一杯奶茶钱都木有凑出来,哈哈,但是最后一天,用你发财的小手再帮忙点一点~~~三年了,我从一罐假蜂蜜里醒了过来
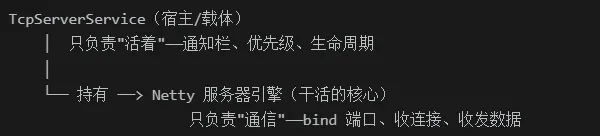
因为上节我们临时放在界面里面,存在几个问题: Activity 一重建就重跑 onCreate,还有如果app 退到后台 / 锁屏,系统随时冻结进程→ tcpServer 死 → 硬件全部掉线 。 所以我们需要实现后台常驻,这个在android里面,叫把 tcpServer 挪进前台服务(Foreground Service):代码依然跑在后台,强制要求:必须在通知栏显示一条持续可见的通知,进程优先级抬高。
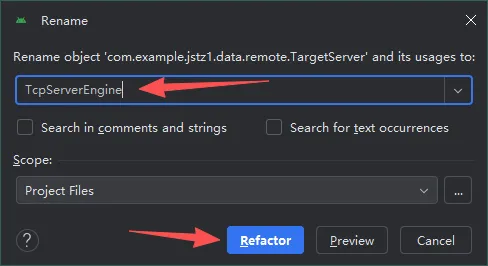
这一节我们先改名字吧,我感觉上节取的类名称不是很到位,后续如果更多文件,怕混淆,所以将TargetServer更改为TcpServerEngine。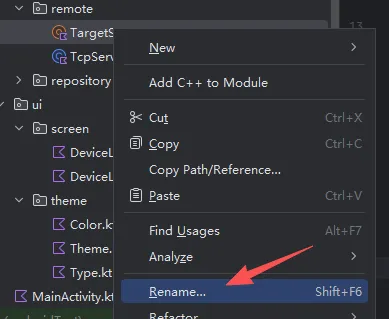
步骤 1:Manifest 加权限 + 注册 Service
声明“我要用前台服务,类型是数据同步”。 之前加 2 个权限:
<uses-permissionandroid:name="android.permission.FOREGROUND_SERVICE" /><uses-permissionandroid:name="android.permission.FOREGROUND_SERVICE_DATA_SYNC" />
<application> 里面、<activity> 标签旁边加:
<serviceandroid:name=".data.remote.ServerHostService"android:exported="false"android:foregroundServiceType="dataSync" />
说明下:
FOREGROUND_SERVICE:允许 app 启动前台服务(Android 9+ 必须) FOREGROUND_SERVICE_DATA_SYNC:Android 14+ 要求(用哪类前台服务必须白纸黑字声明,你这是数据传输→ dataSync→ 网络 TCP 上传 / 下载、数据收发、文件同步这类场景(归类:比如音乐、位置、摄像头、dataSync 数据同步)) foregroundServiceType=“dataSync”:Service侧的对应声明,和权限(上一条)对不上会直接崩 name=:告诉 Android 系统,这个 <service>标签对应的 Kotlin/Java 类是哪一个,系统启动服务时,靠这个名字反射找到你的 Service 类,实例化它。exported=“false”:别的 app 不许启动你的 Service 这一步做完,name报错是正常的,第二步会完善。 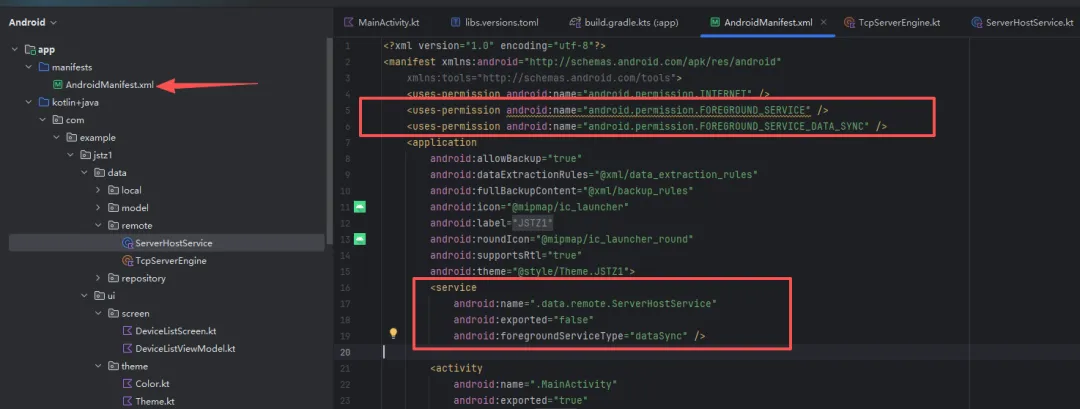
步骤 2:新建 data/remote/ServerHostService.kt
这里就是新建一个 完整的前台服务Service,生命周期里只干三件事——onCreate 建通知渠道、onStartCommand 升前台 + 启动 Server、onDestroy 停 Server。
package com.example.jstz1.data.remoteimport android.app.Notificationimport android.app.NotificationChannelimport android.app.NotificationManagerimport android.app.Serviceimport android.content.Intentimport android.os.IBinderimport androidx.core.app.NotificationCompatclass ServerHostService: Service() {companion object {// 通知 ID:startForeground 必须传一个非 0 的 IDprivate const val NOTIFICATION_ID = 1private const val CHANNEL_ID = "tcp_server"}override funonBind(intent: Intent?): IBinder? = null // 不用绑定,返回 nulloverride funonCreate() {super.onCreate()// 通知渠道:Android 8+ 发通知前必须建一次,重复建不报错val channel = NotificationChannel(CHANNEL_ID,"设备通信服务",NotificationManager.IMPORTANCE_LOW // LOW = 不响铃不弹横幅,只在通知栏挂着)getSystemService(NotificationManager::class.java).createNotificationChannel(channel)}override funonStartCommand(intent: Intent?, flags: Int, startId: Int): Int {// 关键:5 秒内必须调用 startForeground,否则系统判定违规 → 崩startForeground(NOTIFICATION_ID, buildNotification("监听端口 8000"))TargetServer.start(8000)return START_STICKY // 进程被杀后系统会尝试重启这个 Service}override funonDestroy() {TargetServer.stop() // Service 死 → Server 优雅关闭,释放端口super.onDestroy()}private funbuildNotification(text: String): Notification =NotificationCompat.Builder(this, CHANNEL_ID).setSmallIcon(android.R.drawable.stat_notify_sync) // 先用系统图标,以后换自己的.setContentTitle("JSTZ1 服务运行中").setContentText(text).setOngoing(true) // 用户划不掉,只能通过 app 停止.build()}
步骤 3:改 MainActivity —— 从“自己启动”改为“命令 Service 启动”
把 TargetServer.start(8000) 这行删掉,换成启动 Service:
import android.content.Intentimport com.example.jstz1.data.remote.ServerHostService
startForegroundService(Intent(this, ServerHostService::class.java))最后我们运行,查看状态栏: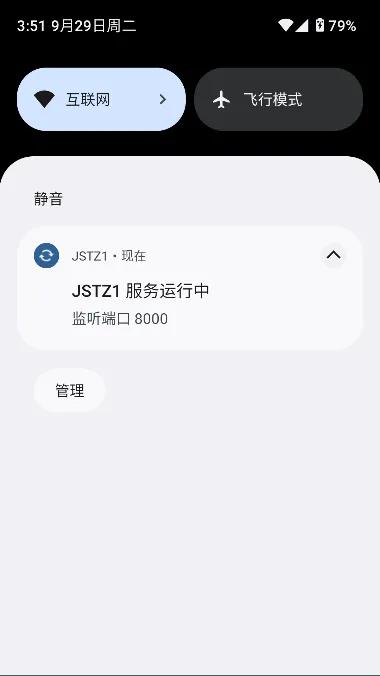 且关闭软件,消息也留存,表明一直在后台运行中,没有被关闭。
 总结一下:
总结一下: