ARTICLE · 1196028
libcxx stl源码分析-容器vector分析(1)
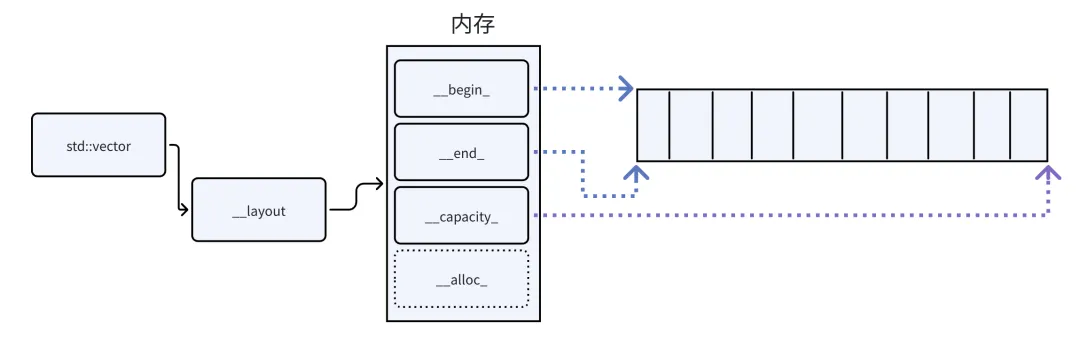
std::vector内存布局
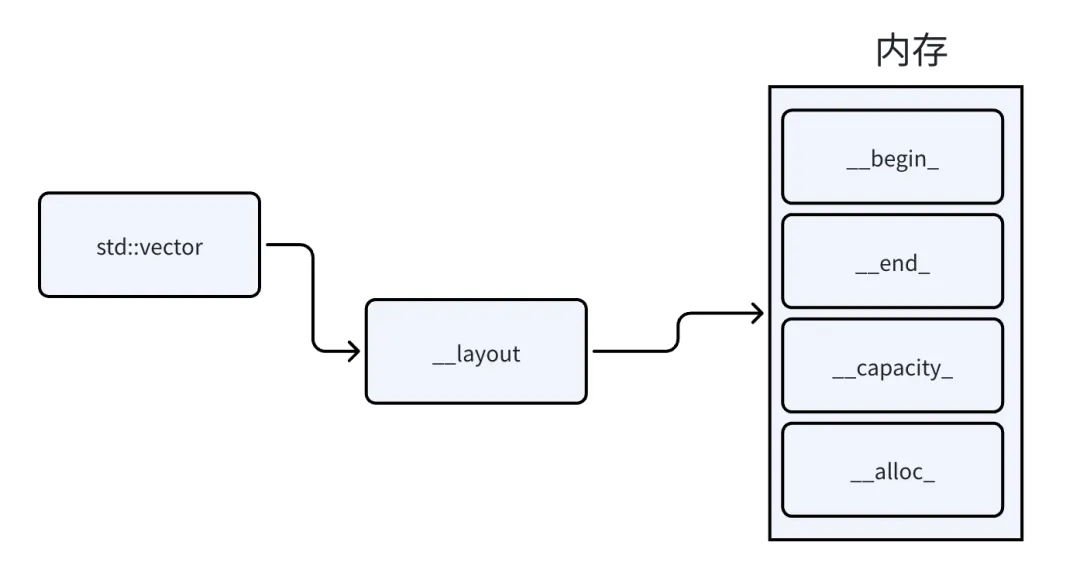
using __base_type = __vector_layout<_Tp, _Allocator>;pointer __begin_ = nullptr;#ifdef _LIBCPP_ABI_VECTOR_LAYOUT_SIZE_BASEDsize_type __size_ = 0;size_type __capacity_ = 0;_LIBCPP_NO_UNIQUE_ADDRESS allocator_type __alloc_;#elsepointer __end_ = nullptr;_LIBCPP_COMPRESSED_PAIR(pointer, __capacity_ = nullptr, allocator_type, __alloc_);#endif
基于size的内存布局 基于指针的内存布局(这是libcxx一直采用的默认标准)
它的核心作用:让空成员“不占地方”。
正常情况下,C++ 里每个对象都必须有自己独立的地址,即使是一个没有任何数据成员的“空类”,sizeof也至少是 1 字节,否则它就没法拥有一个可区分的地址了。
[[no_unique_address]]打破了这个限制。如果被标记的成员是一个空类类型(比如一个无状态的allocator),编译器就可以把它优化到不占用任何空间,效果就像它是一个空基类一样。
所以这里需要注意:如果自己定义了一个有状态的Allocator, 那么std::vector的sizeof值就不是三个指针的sizeof之和了。
std::vector的构造函数源码追踪
std::vector<int> a(10);template <class _Tp, class _Alloc = allocator<_Tp> >class vector;
explicit vector(size_type __n) {auto __guard = std::__make_exception_guard(__destroy_vector(*this));if (__n > 0) {__vallocate(__n);__construct_at_end(__n);}__guard.__complete();}
__vallocate(__n);__construct_at_end(__n);
void __vallocate(size_type __n) {// .... 这里省略一些前置检查语句if (__n > max_size())this->__throw_length_error();auto __allocation = std::__allocate_at_least(this->__layout_.__alloc(), __n);__layout_.__set_layout(__allocation.ptr, 0, __allocation.count);__annotate_new(0);}
std::__allocate_at_least __layout_.__set_layout(__allocation.ptr, 0, __allocation.count);template <class _Tp, class _Alloc>void __vector_layout<_Tp, _Alloc>::__set_layout(pointer __new_begin, size_type __new_size, size_type __new_capacity) _NOEXCEPT {__begin_ = __new_begin;__end_ = __new_begin + __new_size;__capacity_ = __new_begin + __new_capacity;}
// Default constructs __n objects starting at __layout_.__end_ptr()// throws if construction throws// Precondition: __n > 0// Precondition: size() + __n <= capacity()// Postcondition: size() == size() + __ntemplate <class _Tp, class _Allocator>void vector<_Tp, _Allocator>::__construct_at_end(size_type __n) {_ConstructTransaction __tx(*this, __n);const_pointer __new_end = __tx.__new_end_;for (pointer __pos = __tx.__pos_; __pos != __new_end; __tx.__pos_ = ++__pos) {__alloc_traits::construct(this->__layout_.__alloc(), std::__to_address(__pos));}}
struct _ConstructTransaction {explicit _ConstructTransaction(vector& __v, size_type __n): __v_(__v), __pos_(__v.__layout_.__end_ptr()), __new_end_(__pos_ + __n) {__v_.__annotate_increase(__n);}~_ConstructTransaction() {__v_.__layout_.__set_bound_using_pointer(__pos_);if (__pos_ != __new_end_) {__v_.__annotate_shrink(__new_end_ - __v_.__layout_.__begin_ptr());}}vector& __v_;pointer __pos_;const_pointer const __new_end_;_ConstructTransaction(_ConstructTransaction const&) = delete;_ConstructTransaction& operator=(_ConstructTransaction const&) = delete;};
假设vector要往尾部插入n个元素。构造过程中,如果第 k 个元素(k < n)的构造函数抛了异常,会发生什么?
前面k-1个元素已经构造好了,但它们还没被算进size。
如果不处理,vector的状态就烂了:缓冲区里躺着一半构造好的对象,__end_却没动,之后既不会析构这些对象(内存泄漏/资源泄漏),又可能被后续操作当成未初始化区域覆盖。
_ConstructTransaction就是用来自动收尾的。
__set_bound_using_pointer(__pos_):把 vector 的end设成__pos_。
if (__pos_ != __new_end_)加__annotate_shrink:__annotate_increase(__n)预留了n个位置,但如果实际没填满,就要把 sanitizer 的注解缩回到真实大小,避免 AddressSanitizer 等工具误报。
最终的构造由
__alloc_traits::construct(this->__layout_.__alloc(), std::__to_address(__pos));完成。这个函数最终会调用到如下函数
template <class _Up, class... _Args>voidconstruct(_Up* __p, _Args&&... __args){::new ((void*)__p) _Up(std::forward<_Args>(__args)...);}
这个函数在allocator模版类中,这里也不多讲解,后续会留一篇文章单独讲解allocator。
由上述源码分析可知,要想如下语句能够正常工作,class A必须要有默认构造函数。
classA;std::vector<A> a(10);
#include<cstdio>#include<vector>#include<iostream>class A {A(int a) {std::cout << "A(int)\n";}};intmain(){std::vector<A> a(5);return 0;}
In file included from /home/insights/insights.cpp:2:In file included from /usr/bin/../lib/gcc/x86_64-linux-gnu/16/../../../../include/c++/16/vector:66:/usr/bin/../lib/gcc/x86_64-linux-gnu/16/../../../../include/c++/16/bits/stl_construct.h:133:38: error: no matching constructor for initialization of 'A'133 | ::new(static_cast<void*>(__p)) _Tp(std::forward<_Args>(__args)...);| ^/usr/bin/../lib/gcc/x86_64-linux-gnu/16/../../../../include/c++/16/bits/stl_uninitialized.h:899:11: note: in instantiation of function template specialization 'std::_Construct<A>' requested here899 | std::_Construct(std::addressof(*__first));| ^/usr/bin/../lib/gcc/x86_64-linux-gnu/16/../../../../include/c++/16/bits/stl_uninitialized.h:970:2: note: in instantiation of function template specialization 'std::__uninitialized_default_n_1<false>::__uninit_default_n<A *, unsigned long>' requested here970 | __uninit_default_n(__first, __n);| ^/usr/bin/../lib/gcc/x86_64-linux-gnu/16/../../../../include/c++/16/bits/stl_uninitialized.h:1025:19: note: in instantiation of function template specialization 'std::__uninitialized_default_n<A *, unsigned long>' requested here1025 | { return std::__uninitialized_default_n(__first, __n); }| ^/usr/bin/../lib/gcc/x86_64-linux-gnu/16/../../../../include/c++/16/bits/stl_vector.h:2001:9: note: in instantiation of function template specialization 'std::__uninitialized_default_n_a<A *, unsigned long, A>' requested here2001 | std::__uninitialized_default_n_a(this->_M_impl._M_start, __n,| ^/usr/bin/../lib/gcc/x86_64-linux-gnu/16/../../../../include/c++/16/bits/stl_vector.h:578:9: note: in instantiation of member function 'std::vector<A>::_M_default_initialize' requested here578 | { _M_default_initialize(__n); }| ^/home/insights/insights.cpp:13:20: note: in instantiation of member function 'std::vector<A>::vector' requested here13 | std::vector<A> a(5);| ^/home/insights/insights.cpp:6:3: note: candidate constructor not viable: requires single argument 'a', but no arguments were provided6 | A(int a) {| ^ ~~~~~/home/insights/insights.cpp:5:7: note: candidate constructor (the implicit copy constructor) not viable: requires 1 argument, but 0 were provided5 | class A {| ^/home/insights/insights.cpp:5:7: note: candidate constructor (the implicit move constructor) not viable: requires 1 argument, but 0 were provided5 | class A {| ^1 error generated.Error while processing /home/insights/insights.cpp.
总结
std::vector<int> a{10};