 夜雨聆风
夜雨聆风【Netty系列_4】源码分析之NioEventLoopGroup&NioEventLoop的创建NioEventLoo
前言
NioEventLoopGroup和NioEventLoop是Netty中很很基础的组件,而NioEventLoop的工作机制,将是我们学习Netty的重要一步!也是最基础的一步。深入了解其机制,有利于我们在出现问题时候快速做出判断。同时也能体会其设计哲学。
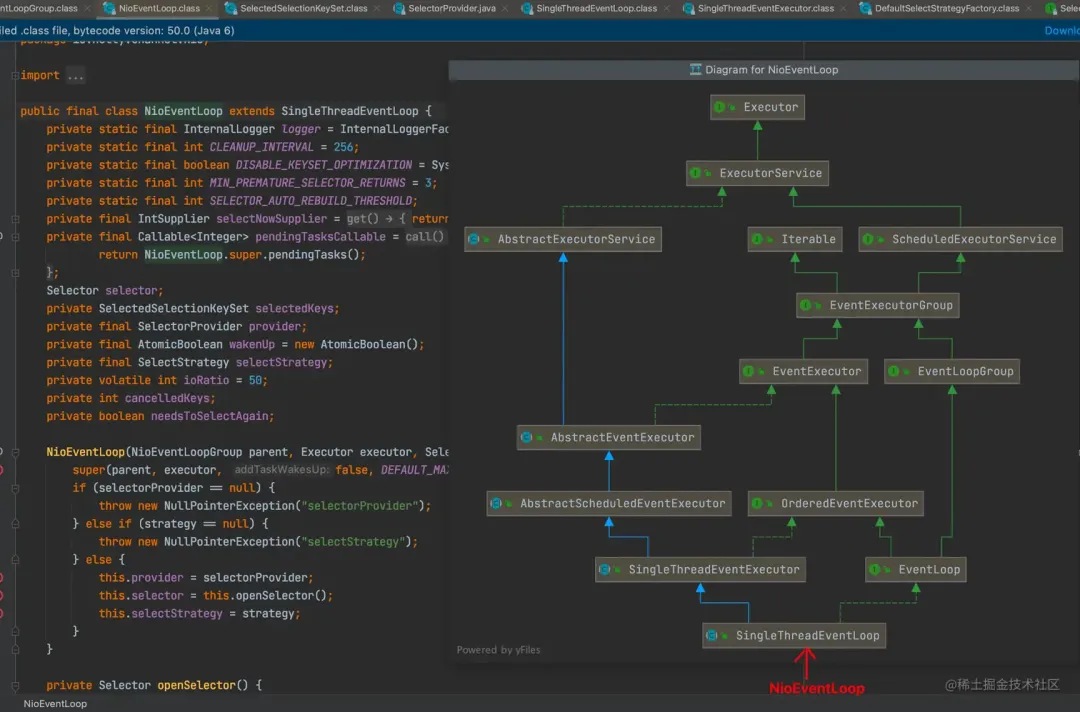
本质上NioEventLoopGroup可以简单理解为线程池 ,而NioEventLoop是线程池中的个体(他本质上也是个线程池 只不过是单线程的线程池)
NioEventLoopGroup & NioEventLoop的创建
说起NioEventLoopGroup的创建,可能大家也都不陌生了,在我们使用Netty时,是必须要写这么一段代码的,即
NioEventLoopGroup boosGroup = new NioEventLoopGroup();NioEventLoopGroup workerGroup = new NioEventLoopGroup();接下来,我们就一步一步看看是如何创建的NioEventLoopGroup和NioEventLoop的
在NioEventLoopGroup类中按顺序依次调用构造方法,如下:
public NioEventLoopGroup() { this(0);}public NioEventLoopGroup(int nThreads) { this(nThreads, (Executor)null);}public NioEventLoopGroup(int nThreads, Executor executor) { this(nThreads, executor, SelectorProvider.provider());}public NioEventLoopGroup(int nThreads, Executor executor, SelectorProvider selectorProvider) { this(nThreads, executor, selectorProvider, DefaultSelectStrategyFactory.INSTANCE);}public NioEventLoopGroup(int nThreads, Executor executor, SelectorProvider selectorProvider, SelectStrategyFactory selectStrategyFactory) { super(nThreads, executor, new Object[]{selectorProvider, selectStrategyFactory, RejectedExecutionHandlers.reject()});}可以看到在上边的几个构造中,会初始化
selector工厂,以及默认选择策略,默认线程池拒绝策略.
调用父类(MultithreadEventLoopGroup抽象类)的构造方法
protected MultithreadEventLoopGroup(int nThreads, Executor executor, Object... args) { super(nThreads == 0 ? DEFAULT_EVENT_LOOP_THREADS : nThreads, executor, args);}从这可以得知, NioEventLoopGroup默认的线程数量是cpu核数的两倍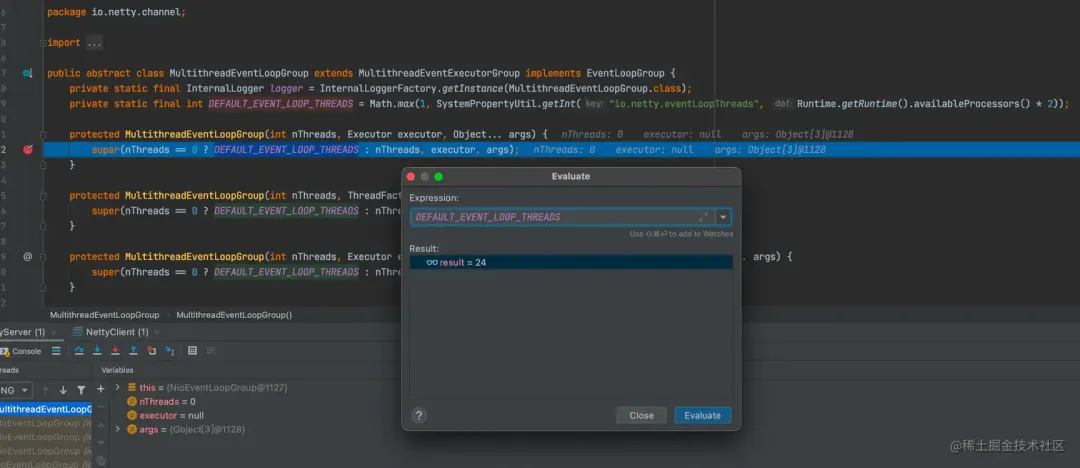
设置默认的选择策略,(用来实现从线程池中选择一个线程),暂时我们知道有这么个东西就行
protected MultithreadEventExecutorGroup(int nThreads, Executor executor, Object... args) { this(nThreads, executor, DefaultEventExecutorChooserFactory.INSTANCE, args);}接下来,就是比较重要的一个构造方法了,我们通过注释以及debug的方式,来看下这个方法干了什么
protected MultithreadEventExecutorGroup(int nThreads, Executor executor, EventExecutorChooserFactory chooserFactory, Object... args) { this.terminatedChildren = new AtomicInteger(); this.terminationFuture = new DefaultPromise(GlobalEventExecutor.INSTANCE); if (nThreads <= 0) { throw new IllegalArgumentException(String.format("nThreads: %d (expected: > 0)", nThreads)); } else { if (executor == null) { //step1: 创建线程工厂,设置线程工厂的一些基本参数 executor = new ThreadPerTaskExecutor(this.newDefaultThreadFactory()); } //创建一个cpu*2长度的线程(EventExecutor)数组 this.children = new EventExecutor[nThreads]; int j; //下面这个 for 循环将实例化 children 数组中的每一个元素 for(int i = 0; i < nThreads; ++i) { boolean success = false; boolean var18 = false; try { var18 = true; //step2: 创建NioEventLoop实例,注意此处NioEventLoop **中** 的线程实例是没有创建以及启动的 this.children[i] = this.newChild((Executor)executor, args); success = true; var18 = false; } catch (Exception var19) { throw new IllegalStateException("failed to create a child event loop", var19); } finally { //关闭资源 if (var18) { if (!success) { int j; for(j = 0; j < i; ++j) { this.children[j].shutdownGracefully(); } for(j = 0; j < i; ++j) { EventExecutor e = this.children[j]; try { while(!e.isTerminated()) { e.awaitTermination(2147483647L, TimeUnit.SECONDS); } } catch (InterruptedException var20) { Thread.currentThread().interrupt(); break; } } } } } //关闭资源 if (!success) { for(j = 0; j < i; ++j) { this.children[j].shutdownGracefully(); } for(j = 0; j < i; ++j) { EventExecutor e = this.children[j]; try { while(!e.isTerminated()) { e.awaitTermination(2147483647L, TimeUnit.SECONDS); } } catch (InterruptedException var22) { Thread.currentThread().interrupt(); break; } } } } //step3:创建成功 通过之前设置的 chooserFactory 来实例化 Chooser this.chooser = chooserFactory.newChooser(this.children); //step4:注册销毁监听器 FutureListener<Object> terminationListener = new FutureListener<Object>() { public void operationComplete(Future<Object> future) throws Exception { if (MultithreadEventExecutorGroup.this.terminatedChildren.incrementAndGet() == MultithreadEventExecutorGroup.this.children.length) { MultithreadEventExecutorGroup.this.terminationFuture.setSuccess((Object)null); } } }; EventExecutor[] arr$ = this.children; j = arr$.length; for(int i$ = 0; i$ < j; ++i$) { EventExecutor e = arr$[i$]; e.terminationFuture().addListener(terminationListener); } //step5:设置不可变集合 赋值给readonlyChildren变量 Set<EventExecutor> childrenSet = new LinkedHashSet(this.children.length); Collections.addAll(childrenSet, this.children); this.readonlyChildren = Collections.unmodifiableSet(childrenSet); }}下边我们分析一下 上边的这个方法(仅对重要步骤做分析,不重要的略过)
step1 创建线程工厂
进入该方法内部后,先进行校验,然后判断executor是否为null,这里我们debug知道当前确实是null,随后进入该if创建ThreadPerTaskExecutor实例, 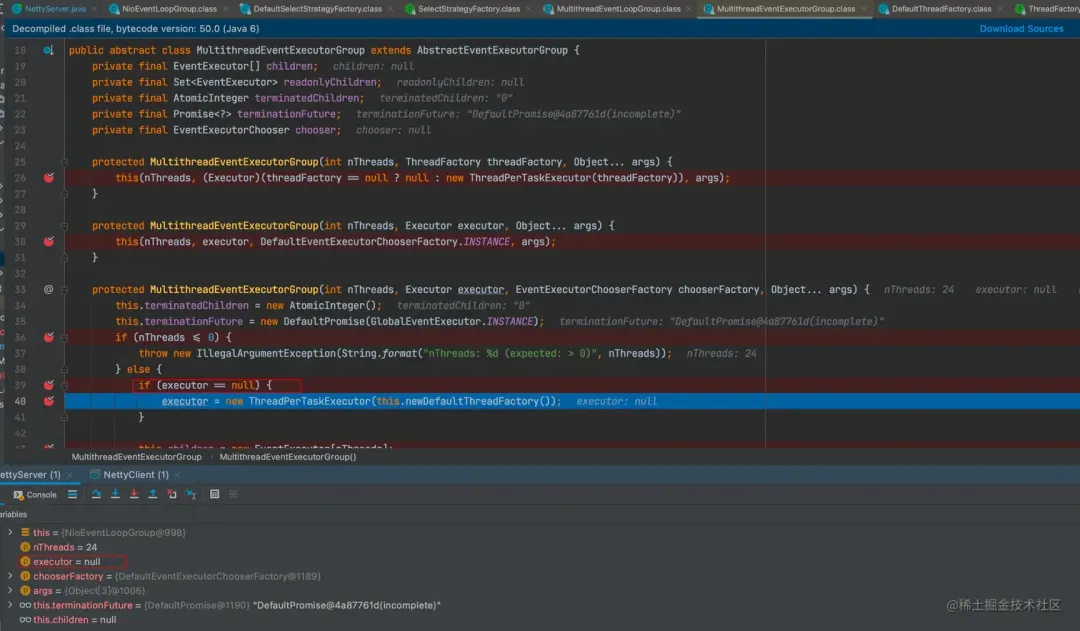
而主要工作都是在this.newDefaultThreadFactory()这一步执行的,如下: 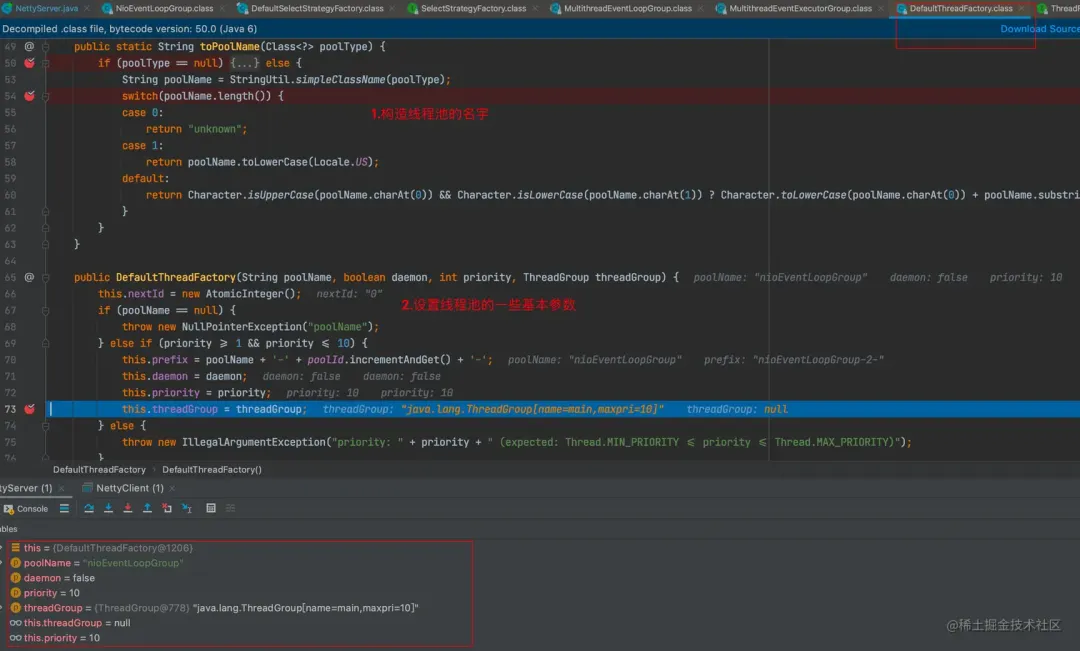 在将ThreadFactor创建完成后 传给
ThreadPerTaskExecutor类的threadFactor变量保存起来,用于后续的使用(剧透:此实例有个很重要的作用,即创建并开启NioEventLoop 中 的线程)。
step2 创建实例(NioEventLoop)
在分析创建NioEventLoop之前,我们先看下NioEventLoop的继承关系 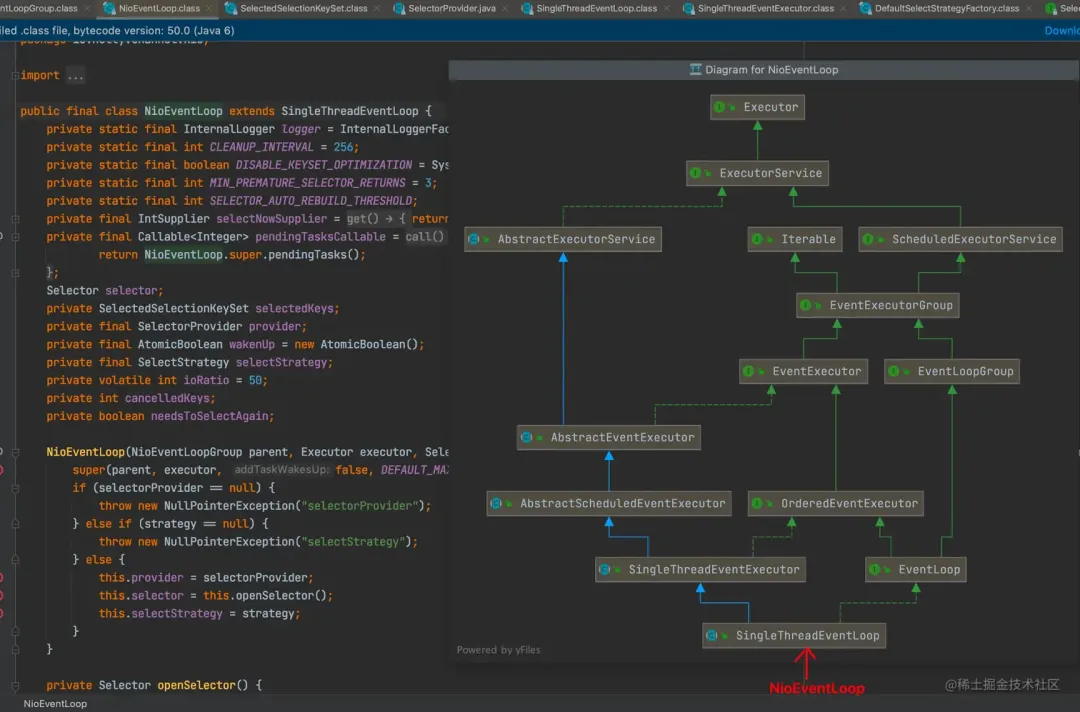
接下来我们看下是如何创建NioEventLoop实例的
NioEventLoop(NioEventLoopGroup parent, Executor executor, SelectorProvider selectorProvider, SelectStrategy strategy, RejectedExecutionHandler rejectedExecutionHandler) { //调用父类SingleThreadEventLoop 的构造 super(parent, executor, false, DEFAULT_MAX_PENDING_TASKS, rejectedExecutionHandler); if (selectorProvider == null) { throw new NullPointerException("selectorProvider"); } else if (strategy == null) { throw new NullPointerException("selectStrategy"); } else { //它由 NioEventLoopGroup 传进来,一个线程池有一个 selectorProvider,用于创建 Selector 实例 this.provider = selectorProvider; //通过反射方式创建selector选择器 从这看出,每一个NioEventLoop实例 都会有一个选择器与之对应哦! this.selector = this.openSelector(); this.selectStrategy = strategy; }}protected SingleThreadEventLoop(EventLoopGroup parent, Executor executor, boolean addTaskWakesUp, int maxPendingTasks, RejectedExecutionHandler rejectedExecutionHandler) { super(parent, executor, addTaskWakesUp, maxPendingTasks, rejectedExecutionHandler); this.tailTasks = this.newTaskQueue(maxPendingTasks);}protected SingleThreadEventExecutor(EventExecutorGroup parent, Executor executor, boolean addTaskWakesUp, int maxPendingTasks, RejectedExecutionHandler rejectedHandler) { //将之前创建的线程池实例赋值给某个NioEventLoop实例中的变量 parent(父类`AbstractEventExecutor`的属性) super(parent); this.threadLock = new Semaphore(0); this.shutdownHooks = new LinkedHashSet(); this.state = 1; this.terminationFuture = new DefaultPromise(GlobalEventExecutor.INSTANCE); this.addTaskWakesUp = addTaskWakesUp; this.maxPendingTasks = Math.max(16, maxPendingTasks); //给exector赋值 ThreadPerTaskExecutor的实例,他用来启动 NioEventLoop 中的线程,注意是NioEventLoop **中** 的线程 this.executor = (Executor)ObjectUtil.checkNotNull(executor, "executor"); //设置NioEventLoop中的任务队列 这个是很重要的一个组件,runAllTask就是从该队列中取的task。 this.taskQueue = this.newTaskQueue(this.maxPendingTasks); //taskQueue 的默认容量是 16,所以,如果 submit 的任务堆积了到了 16, //再往里面提交任务会触发 rejectedExecutionHandler 的执行策略。从这里我们得知, //其实NioEventLoop也可以算是个线程池只不过他的线程数只有一个 this.rejectedExecutionHandler = (RejectedExecutionHandler)ObjectUtil.checkNotNull(rejectedHandler, "rejectedHandler");}注意:这个知识点比较重要这里说明下
当我们要提交一个任务给NioEventLoop时候,任务就会被放到 taskQueue 中,等NioEventLoop的run方法来轮询(通过for;;)。该队列是线程安全的 LinkedBlockingQueue,默认容量为 16。
ok基本的参数初始化完成之后,我们看下NioventLoop中重要的selector是怎么创建的
DISABLE_KEYSET_OPTIMIZATION默认是false 即使用优化的方式创建selector
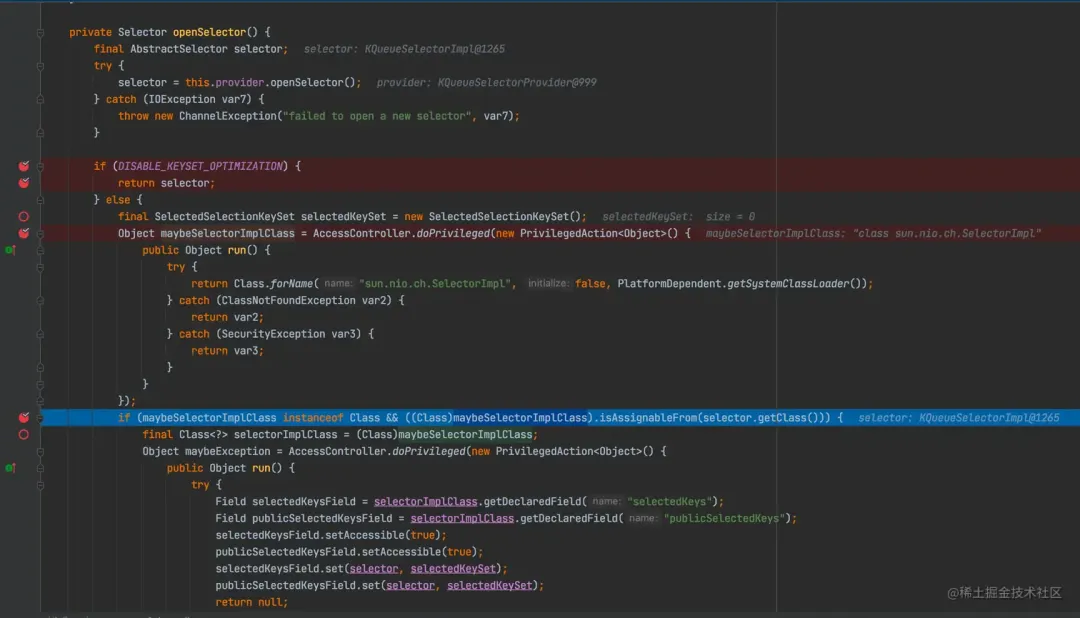
newChild方法小结:
• executor、selectStrategy 和 rejectedExecutionHandler 从 NioEventLoopGroup 中一路传到了 NioEventLoop 中
• NioEventLoop创建粗略分为两步,第一是通过父类的构造赋值以及初始化一些基本属性,比如taskQueue , rejectedExecutionHandler,executor等等,第二是通过openSelector方法创建 选择器 并赋值
• 在 Netty 中,NioEventLoopGroup 代表线程池,NioEventLoop 就是池中的个体,而在NioEventLoop中还有一个真正工作的线程 这个我们后续分析时候会说到。
• 每个 NioEventLoop 都有自己的 Selector
ok到此 NioEventLoop实例就创建成功了哦! 我们debug看下 NioEventLoop 创建完成后里边的内容
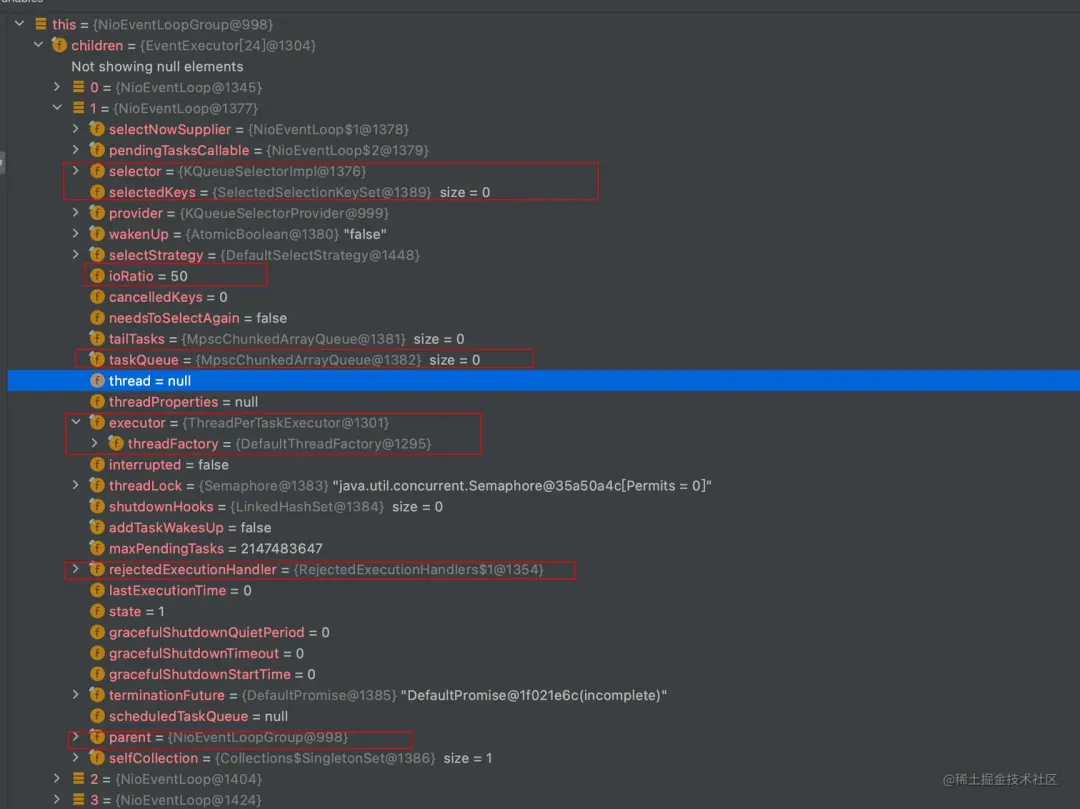
可以看到很多熟悉的面孔比如selector选择器, selectedKeys ,还有ThreadPreTaskExector ,拒绝策略,以及parent(从这里我们可以得知 其实某个NioEventLoop和NioEventLoopGroup页是父子关系 说实话这个设计多少让我有点感觉奇怪!)另外就是thread属性,图中高亮的,他是NioEventLoop中真正工作的线程,在后续的章节中我们将会重点分析NioEventLoop的工作机制!!!
剩下的不重要流程
//step3:创建成功 通过之前设置的 chooserFactory 来实例化 Chooser
//step4:注册销毁监听器
//step5:设置不可变集合 赋值给readonlyChildren变量
这几个步骤不是重点,我们暂时不做过多分析了
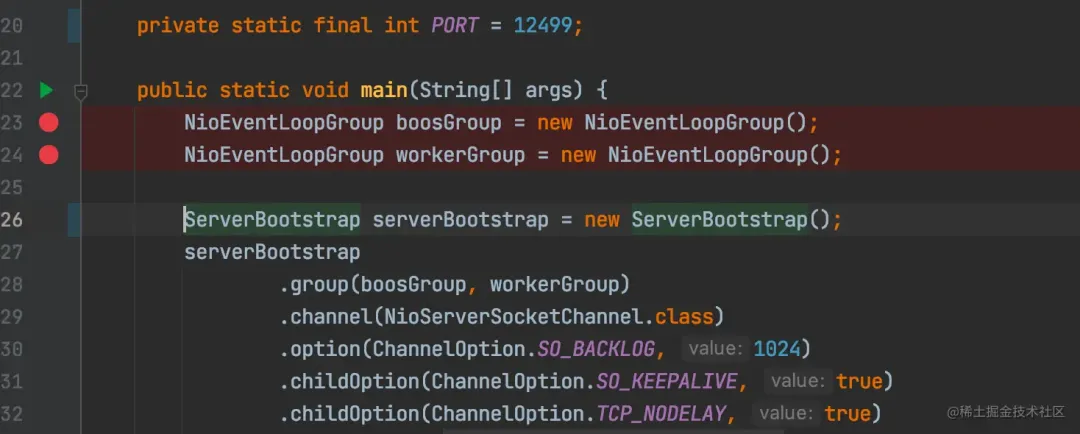
ok到此 NioEventLoopGrroup实例就创建成功了! 接下来将进行ServerBootstrap的装配工作
如下:
总结
其实对于NioEventLoopGroup和NioEventLoop的实例化是很简单的东西,但是为了为后续的NioEventLoop分析打下基础,我们还是用一篇文章来介绍他。在后续的文章中,我们将对 Netty中的重要人物:NioEventLoop 的工作机制或者说流程,做重点分析!!!