夜雨聆风
夜雨聆风


核心实战期间 2.5《RAG文档切片检索:前端AI可复用的完整代码实现》
上一篇Chroma向量库的部署,有读者在后台留言问:”文档切片到底怎么切?切多大合适?检索出来的结果为啥有时候不相关?”这些问题问到点子上了,RAG系统好不好用,一半取决于切片策略,一半取决于检索逻辑。
说实话,我刚开始做RAG时也踩过不少坑。直接把整篇文档丢进去,检索结果乱七八糟;切得太碎吧,上下文又断了,AI回答得驴唇不对马嘴。折腾了好几个版本,才算摸到点门道。
这篇文章就把AI前端开发中RAG的文档切片和检索逻辑彻底讲透,附带可直接复用的代码。前端AI项目里这套流程能直接搬过去用。
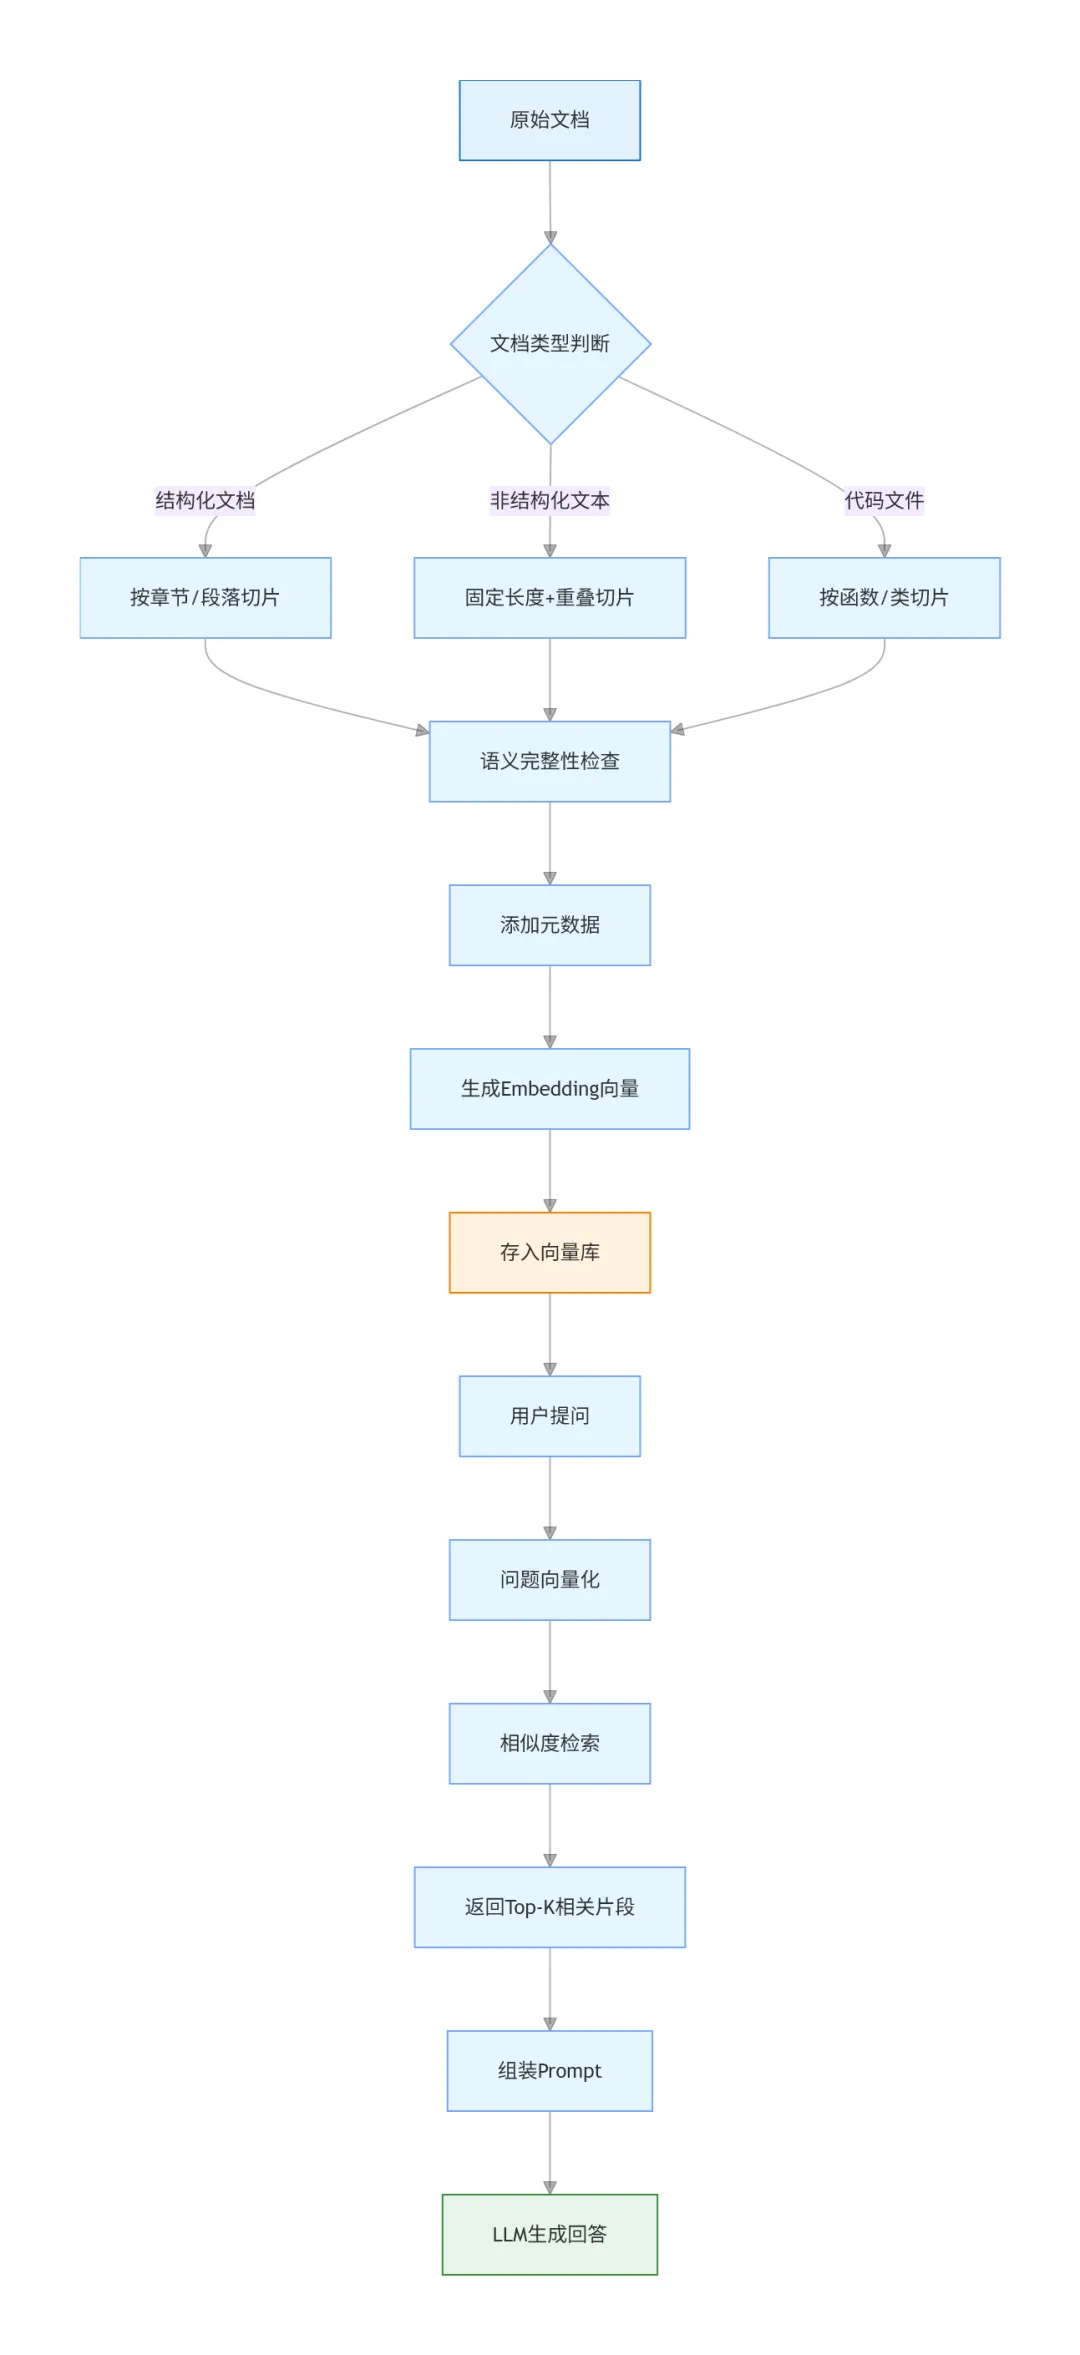
AI前端RAG系统中文档切片的核心原则
先说结论:没有万能的切片方案,只有适合你场景的方案。但有几个通用原则可以遵守。
第一,保持语义完整性。这是最重要的。切片不能从一句话中间切断,也不能把一个完整的段落拆散。理想情况下,每个chunk应该表达一个相对完整的意思。
第二,控制合理长度。太短了信息量不够,太长了会引入噪声。经验值是300-800个字符(中文)或100-300个token(英文)。具体数值要看你的embedding模型和下游任务。
第三,适当重叠。相邻的chunk之间保留一部分重叠内容,避免关键信息刚好被切在边界上。重叠比例一般10%-20%。
第四,保留元数据。每个chunk要记录来源文档、页码、章节等信息,方便后续溯源和过滤。
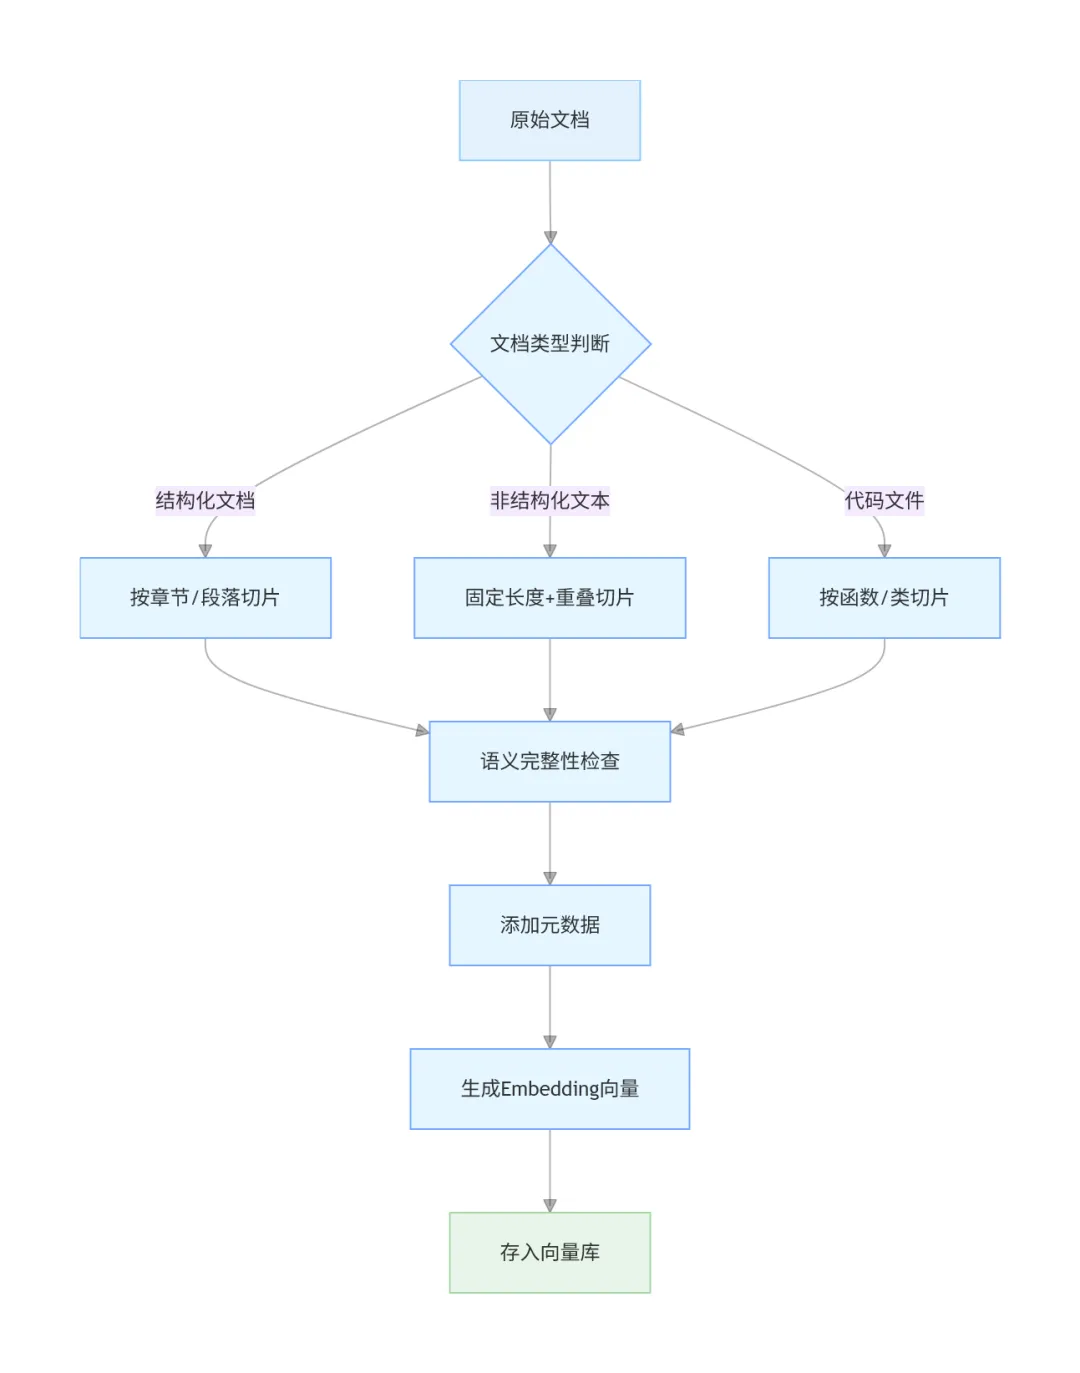
下面针对不同类型的文档,说说具体的切片策略。
前端AI工具实现智能文档切片算法
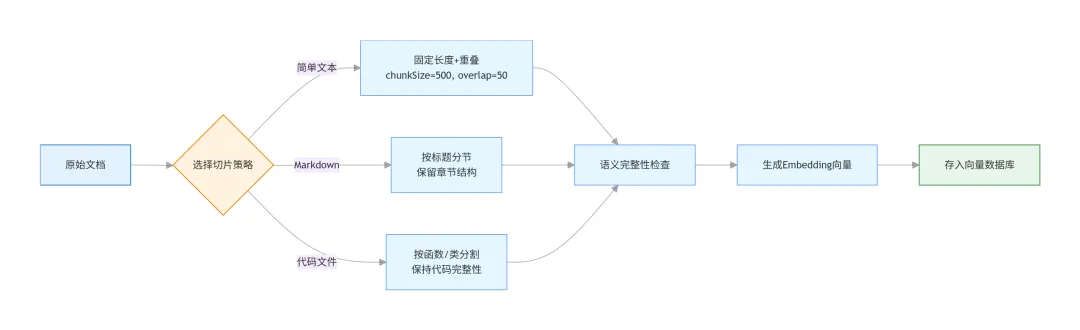
策略1:基于分隔符的简单切片
最基础的方案,适合结构清晰的文档。思路是按自然段、标题、列表项等分隔符切分。
// chunker.js - 基础文档切片器class DocumentChunker {constructor(options = {}) {this.chunkSize = options.chunkSize || 500;this.chunkOverlap = options.chunkOverlap || 50;this.separators = options.separators || ['\n\n', // 双换行(段落)'\n', // 单换行'。', // 句号';', // 分号',', // 逗号' ' // 空格];}splitText(text, metadata = {}) {if (!text || text.trim().length === 0) {return [];}const chunks = [];let startIndex = 0;while (startIndex < text.length) {let endIndex = startIndex + this.chunkSize;if (endIndex >= text.length) {endIndex = text.length;} else {endIndex = this._findSplitPoint(text, startIndex, endIndex);}const chunkText = text.slice(startIndex, endIndex).trim();if (chunkText.length > 0) {chunks.push({content: chunkText,metadata: {...metadata,chunkIndex: chunks.length,charStart: startIndex,charEnd: endIndex}});}startIndex = endIndex - this.chunkOverlap;if (startIndex < 0) startIndex = 0;}return chunks;}_findSplitPoint(text, start, end) {for (const separator of this.separators) {const lastSepIndex = text.lastIndexOf(separator, end);if (lastSepIndex > start) {return lastSepIndex + separator.length;}}return end;}}export default DocumentChunker;
使用示例:
import DocumentChunker from './chunker.js';const chunker = new DocumentChunker({chunkSize: 500,chunkOverlap: 50});const text = `人工智能是计算机科学的一个重要分支...`;const chunks = chunker.splitText(text, {source: 'ai-intro.md',category: 'technology'});console.log(chunks.length);console.log(chunks[0]);
这种方案的优点是简单直观,缺点是对复杂结构的文档处理不够精细。比如Markdown文档里的代码块、表格,可能被切成两半。
策略2:递归字符切片(推荐)
LangChain里用的就是这种方案,效果更好。核心思想是:先用粗粒度分隔符切,如果某块还是太大,再用细粒度分隔符递归切分。
// recursive-chunker.js - 递归字符切片器class RecursiveCharacterChunker {constructor(options = {}) {this.chunkSize = options.chunkSize || 500;this.chunkOverlap = options.chunkOverlap || 50;this.separators = ['\n\n', // 段落'\n', // 换行'。', // 句号'!', // 感叹号'?', // 问号';', // 分号',', // 逗号' ', // 空格'' // 字符级别(兜底)];}splitText(text, metadata = {}) {return this._splitTextRecursive(text, this.separators, metadata);}_splitTextRecursive(text, separators, metadata, startIndex = 0) {const chunks = [];if (text.length <= this.chunkSize) {if (text.trim()) {chunks.push({content: text.trim(),metadata: {...metadata,charStart: startIndex,charEnd: startIndex + text.length}});}return chunks;}const separator = separators[0];const remainingSeparators = separators.slice(1);if (separator === '') {for (let i = 0; i < text.length; i += this.chunkSize - this.chunkOverlap) {const chunk = text.slice(i, i + this.chunkSize);if (chunk.trim()) {chunks.push({content: chunk.trim(),metadata: {...metadata,charStart: startIndex + i,charEnd: startIndex + i + chunk.length}});}}return chunks;}const splits = text.split(separator);let currentChunk = '';let currentStart = startIndex;for (const split of splits) {const part = split + separator;if ((currentChunk + part).length <= this.chunkSize) {currentChunk += part;} else {if (currentChunk.trim()) {chunks.push({content: currentChunk.trim(),metadata: {...metadata,charStart: currentStart,charEnd: currentStart + currentChunk.length}});}if (part.length > this.chunkSize) {const subChunks = this._splitTextRecursive(part,remainingSeparators,metadata,currentStart + currentChunk.length);chunks.push(...subChunks);currentChunk = '';currentStart = currentStart + currentChunk.length + part.length;} else {currentChunk = part;currentStart = startIndex + text.indexOf(part, currentStart);}}}if (currentChunk.trim()) {chunks.push({content: currentChunk.trim(),metadata: {...metadata,charStart: currentStart,charEnd: currentStart + currentChunk.length}});}return chunks;}}export default RecursiveCharacterChunker;
这个方案的好处是能自适应不同结构的文本。段落长的按句子切,句子长的按词语切,总能找到一个合理的分割点。AIGC前端项目里用这个基本不会出错。
策略3:针对Markdown的特殊处理
Markdown文档有特殊的语法结构(标题、代码块、表格),需要专门处理。
// markdown-chunker.js - Markdown专用切片器class MarkdownChunker {constructor(options = {}) {this.chunkSize = options.chunkSize || 500;this.chunkOverlap = options.chunkOverlap || 50;}splitText(markdown, metadata = {}) {const chunks = [];const sections = this._parseSections(markdown);for (const section of sections) {const sectionChunks = this._splitSection(section, metadata);chunks.push(...sectionChunks);}return chunks;}_parseSections(markdown) {const lines = markdown.split('\n');const sections = [];let currentSection = { title: '', level: 0, content: [] };for (const line of lines) {const headingMatch = line.match(/^(#{1,6})\s+(.+)$/);if (headingMatch) {if (currentSection.content.length > 0) {sections.push({...currentSection,content: currentSection.content.join('\n')});}currentSection = {title: headingMatch[2],level: headingMatch[1].length,content: []};} else {currentSection.content.push(line);}}if (currentSection.content.length > 0) {sections.push({...currentSection,content: currentSection.content.join('\n')});}return sections;}_splitSection(section, baseMetadata) {const chunks = [];const header = `${'#'.repeat(section.level)}${section.title}\n\n`;if (section.content.length <= this.chunkSize) {chunks.push({content: header + section.content,metadata: {...baseMetadata,sectionTitle: section.title,sectionLevel: section.level}});return chunks;}const recursiveChunker = new RecursiveCharacterChunker({chunkSize: this.chunkSize - header.length,chunkOverlap: this.chunkOverlap});const contentChunks = recursiveChunker.splitText(section.content,{...baseMetadata,sectionTitle: section.title,sectionLevel: section.level});for (const chunk of contentChunks) {chunks.push({content: header + chunk.content,metadata: chunk.metadata});}return chunks;}}export default MarkdownChunker;
这种处理方式能保证同一个章节的内容尽量在一起,检索时也能通过sectionTitle做过滤。Vue结合AI开发的项目里,可以用这种方式处理技术文档知识库。
React AI组件实战:向量检索与重排序
切片完成后就是检索环节。最简单的做法是直接查向量相似度,但实际效果往往不够好。这里介绍两个提升检索质量的技巧。
技巧1:混合检索(关键词+向量)
纯向量检索有个问题:对于专有名词、精确匹配的场景效果不好。比如用户搜”API密钥”,向量可能召回一堆讲”密码””认证”的内容,但就是不包含”API密钥”这个词。
解决方案是结合关键词检索(BM25算法)和向量检索,加权融合结果。
// hybrid-search.js - 混合检索器class HybridSearcher {constructor(vectorStore, keywordIndex) {this.vectorStore = vectorStore;this.keywordIndex = keywordIndex;}async search(query, options = {}) {const topK = options.topK || 10;const vectorWeight = options.vectorWeight || 0.7;const keywordWeight = options.keywordWeight || 0.3;// 1. 向量检索const queryEmbedding = await this.generateEmbedding(query);const vectorResults = await this.vectorStore.query(queryEmbedding, topK * 2);// 2. 关键词检索const keywordResults = this.keywordIndex.search(query).slice(0, topK * 2);// 3. 归一化分数并融合const mergedResults = this._mergeResults(vectorResults,keywordResults,vectorWeight,keywordWeight);return mergedResults.slice(0, topK);}_mergeResults(vectorResults, keywordResults, vWeight, kWeight) {const scoreMap = new Map();for (let i = 0; i < vectorResults.ids[0].length; i++) {const id = vectorResults.ids[0][i];const distance = vectorResults.distances[0][i];const score = 1 / (1 + distance);scoreMap.set(id, {id,content: vectorResults.documents[0][i],metadata: vectorResults.metadatas[0][i],score: score * vWeight});}for (const result of keywordResults) {const existing = scoreMap.get(result.ref);if (existing) {existing.score += result.score * kWeight;} else {scoreMap.set(result.ref, {id: result.ref,content: result.content,metadata: result.metadata,score: result.score * kWeight});}}return Array.from(scoreMap.values()).sort((a, b) => b.score - a.score);}}export default HybridSearcher;
亲测下来,混合检索比纯向量检索的准确率能提升15%-20%,尤其是技术文档这种专业术语多的场景。
技巧2:LLM重排序
检索回来的结果可能有噪声,可以用大模型再做一轮精排。
// reranker.js - LLM重排序器class Reranker {constructor(llmClient) {this.llmClient = llmClient;}async rerank(query, candidates, topK = 3) {if (candidates.length <= topK) {return candidates;}const prompt = this._buildRerankPrompt(query, candidates);const response = await this.llmClient.complete(prompt);const rankedIndices = this._parseRanking(response);return rankedIndices.map(idx => candidates[idx]).filter(Boolean).slice(0, topK);}_buildRerankPrompt(query, candidates) {const candidateTexts = candidates.map((c, i) => `[${i}] ${c.content}`).join('\n\n');return `请评估以下文档片段与问题的相关性,按相关度从高到低排序。问题:${query}文档片段:${candidateTexts}请按相关度从高到低返回序号,格式如:[2, 0, 1]只返回序号列表,不要其他内容。`;}_parseRanking(llmResponse) {const match = llmResponse.match(/\[([\d,\s]+)\]/);if (match) {return match[1].split(',').map(s => parseInt(s.trim())).filter(n => !isNaN(n));}return candidates.map((_, i) => i);}}export default Reranker;
LLM重排序的效果很好,但成本高、速度慢。建议只在候选结果较多(>10条)时使用,或者作为离线优化的手段。
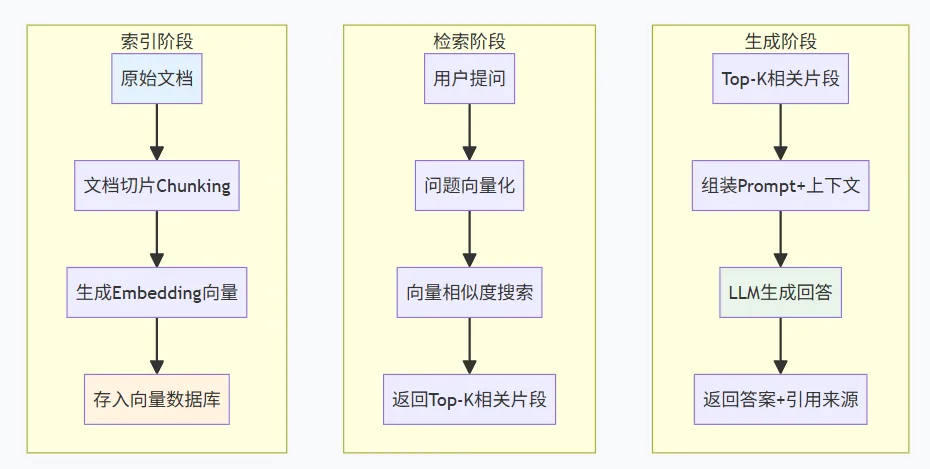
AI赋能前端开发的RAG完整流程整合
把切片、存储、检索串起来,就是一个完整的RAG管道:
// rag-pipeline.js - 完整RAG流程import RecursiveCharacterChunker from './recursive-chunker.js';import ChromaClient from './chroma-client.js';import HybridSearcher from './hybrid-search.js';class RAGPipeline {constructor(options) {this.chunker = new RecursiveCharacterChunker({chunkSize: options.chunkSize || 500,chunkOverlap: options.chunkOverlap || 50});this.chroma = new ChromaClient(options.collectionName);this.searcher = null;}async indexDocument(content, metadata = {}) {const chunks = this.chunker.splitText(content, metadata);const embeddings = await Promise.all(chunks.map(chunk => this.generateEmbedding(chunk.content)));await this.chroma.addDocuments(chunks.map(c => c.content),embeddings,chunks.map((_, i) => `${metadata.source}_${i}`),chunks.map(c => c.metadata));console.log(`索引完成:${chunks.length}个chunks`);}async query(question, options = {}) {const results = await this.searcher.search(question, {topK: options.topK || 5});const context = results.map(r => r.content).join('\n\n---\n\n');const prompt = `基于以下资料回答问题,如果资料中没有相关信息,请如实告知。参考资料:${context}问题:${question}回答:`;const answer = await this.callLLM(prompt);return {answer,sources: results.map(r => ({content: r.content,metadata: r.metadata}))};}}export default RAGPipeline;
这套代码可以直接用到前端AI工具项目里。配合前面Chroma的部署,一个完整的知识库问答系统就搭好了。
前端调用AI接口时的性能优化实践
最后说几个前端调用AI接口时的优化点,都是实际项目里总结的。
第一,异步批量索引。用户上传大文档时,不要阻塞界面。用Web Worker或后端队列异步处理,前端显示进度条。
第二,增量更新。文档修改后,不需要重新索引全部。根据元数据定位到受影响的chunks,只更新这部分。
第三,缓存embedding。同样的文本没必要重复计算向量。用LRU缓存存一下,命中率高的话能省不少时间。
第四,流式输出。LLM生成答案时用SSE或WebSocket流式返回,用户体验好很多。AI优化前端性能不只是技术问题,更是体验问题。
说实话,RAG这套东西看着复杂,拆开来看每一步都不难。关键是理解每个环节的作用,然后根据自己项目的特点做调整。别指望一套方案通吃所有场景,多试几种组合,找到最适合你的那个。
你在做RAG项目时遇到过什么问题?欢迎在评论区聊聊,咱们一起交流。
文中涉及的完整代码示例已整理成模板项目,需要的话可以在后台留言